
Stripe is an extremely flexible payment processing solution for online businesses, especially if you are a tech savvy developer. But, if you aren’t a developer, and still want to use Stripe to sell a few products online, there are simple ways to do just that. In fact, with a few snippets of code (or a simple plugin), you can add Stripe payment buttons to your website in a flash.
In this tutorial, I’m going to show you how to add Stripe payment buttons to your Divi website using Stripe Payments for WordPress Plugin (Looking for other options? Check out our list of the best WordPress Stripe plugins). I’ll even show you how to style your buttons to match your Divi layout.
Let’s get started!
- 1 Sneak Peek
- 2 Getting Started
- 3 About the Plugin
- 4 Setting up Stripe forms with the Plugin
- 5 Creating Stripe Payment Forms
- 6 Adding Stripe Payment Buttons to Your Divi Page Layout
- 7 Styling the Stripe Payment Buttons to Match the Layout
- 8 Customizing Your Payment Confirmation and Payment Failed Pages
- 9 Final Thoughts
Sneak Peek
Here is a sneak peek of the Stripe payment buttons we will create in this tutorial.

Getting Started
For this use case tutorial, you will need the following:
- The Divi Theme (installed and active)
- A Stripe Account
- The Stripe Payments for WordPress Plugin by WP Simply Pay (installed and active)
- We will also be using a the Digital Products Pricing Page Layout available for FREE within the Divi Builder
About the Plugin
Stripe Payments for WordPress by WP Simply Pay is a popular payment plugin that allows you to start collecting credit card payment with Stripe using a simple shortcode embed. You can actually create checkout forms and payment buttons manually without the use of the plugin, but since this plugin makes things easy and offers a few convenient features (like payment confirmation and payment failure pages), I thought it was more helpful in the long run. I will be using the FREE Lite version of the plugin for this tutorial. The pro version of the plugin will give you more control over the style of your forms along with support for things like custom fields, custom amounts, and subscription features.
Setting up Stripe forms with the Plugin
Once you have the plugin installed and active, navigate to Simple Pay Lite > Settings. Then under the Stripe Keys tab, you will need to enter your Stripe account API keys. For the sake of this tutorial, I will be only using the test keys, but you will need to make sure and activate your Stripe account and generate some live api keys if you want to start collecting real money.
You can find your API keys by signing into your Stripe account and clicking Developers > API keys.
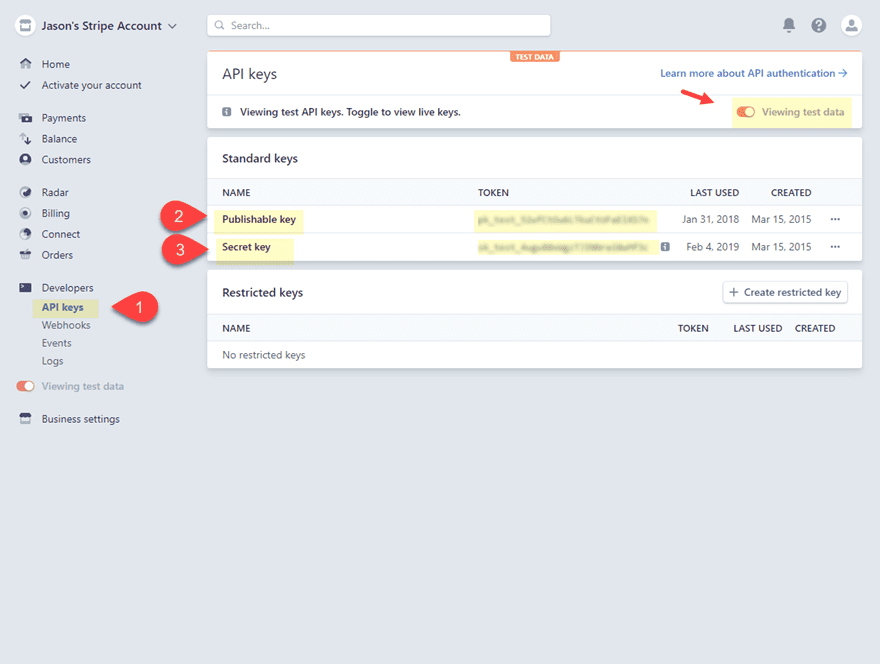
You will need to copy both the Publishable key and Secret key over to the plugin settings.
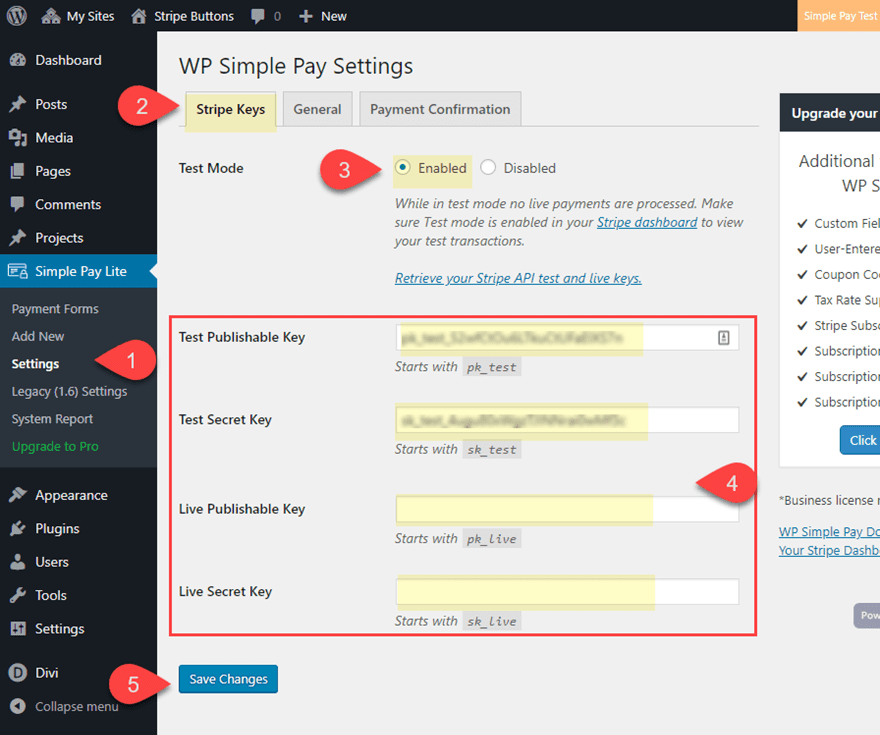
Now jump over to the general tab. There you will be able to designate a Payment Success Page and a Payment Failure Page. You will notice that the plugin has already created those pages for you. But since the page content is generated by a shortcode, you can actually add those shortcodes to any Divi module on any Divi layout to create custom versions of those pages. For now just keep those default pages in place and continue the setup.
Set the payment button style to “none (inherit from theme)”. All this does is take out the css used to style the default blue stripe button. This will make things a little bit cleaner for when we add our own custom CSS to style the button in Divi.
Then save changes.
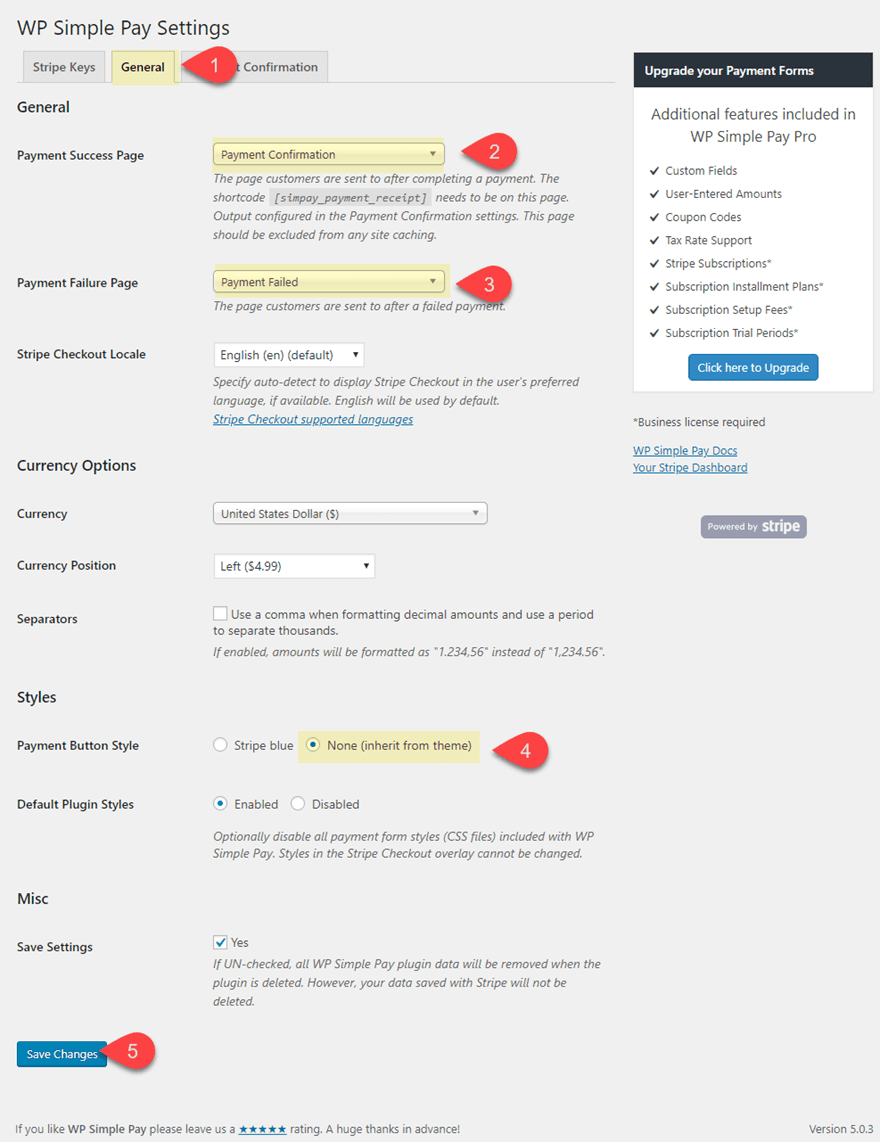
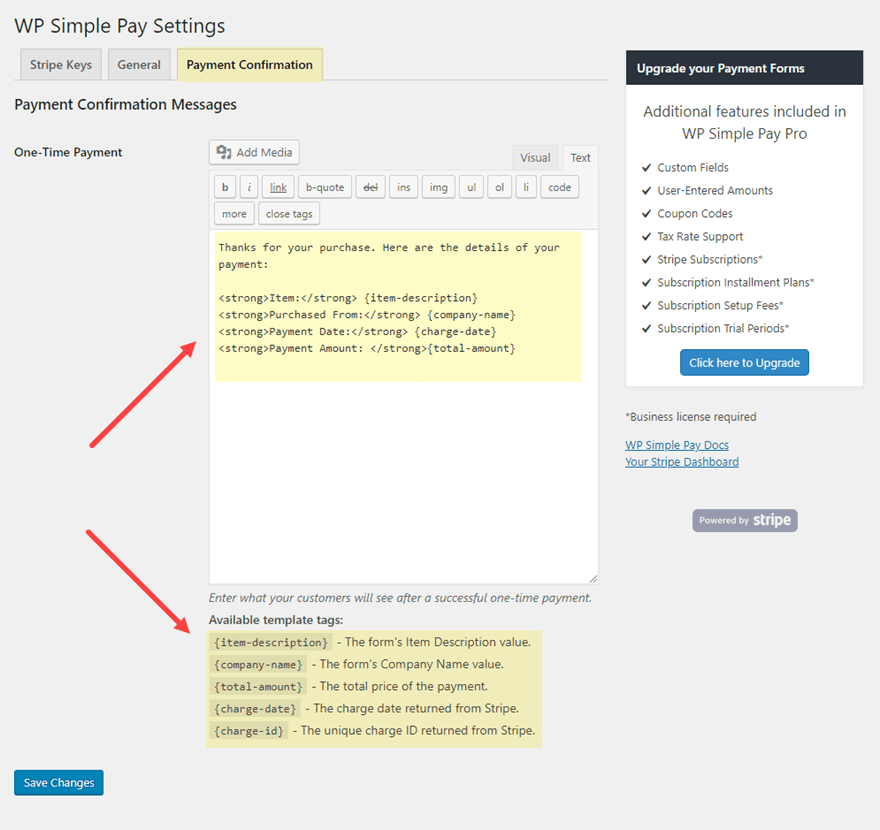
Under the payment confirmation tab, you can use the available template tags to customize the message and information that is displayed by the shortcode in your payment confirmation page. But for this tutorial, I’m just going to leave the default message.
Creating Stripe Payment Forms
The payment forms are really Stripe payment buttons that generate a popup payment form that allows users to complete a purchase without ever leaving the page. Therefore you will need to create a new payment form for each product or service you are selling. In this use case, we are going to create three payment forms for three mock products.
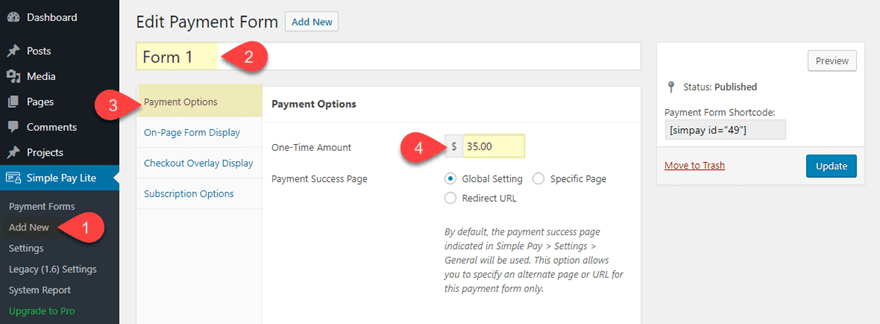
To create a new payment form, go to the WordPress Dashboard and navigate to Simple Pay Lite > Add New.
Give the Payment Form a title (this title won’t be shown on the front end).
Then under the Payment Options tab, enter a One-Time Amount.
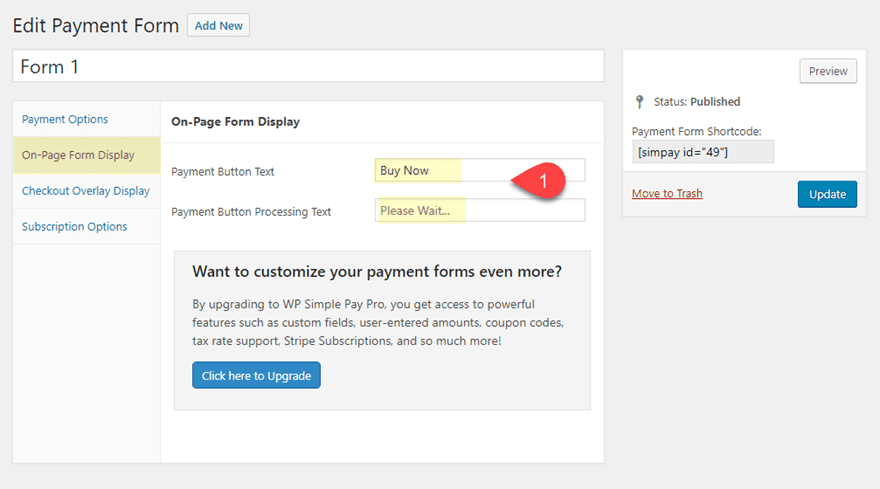
Next, click the On-Page Form Display tab and change the default Payment Button Text to “Buy Now” (or whatever you want). You can also choose the payment button processing text as well.
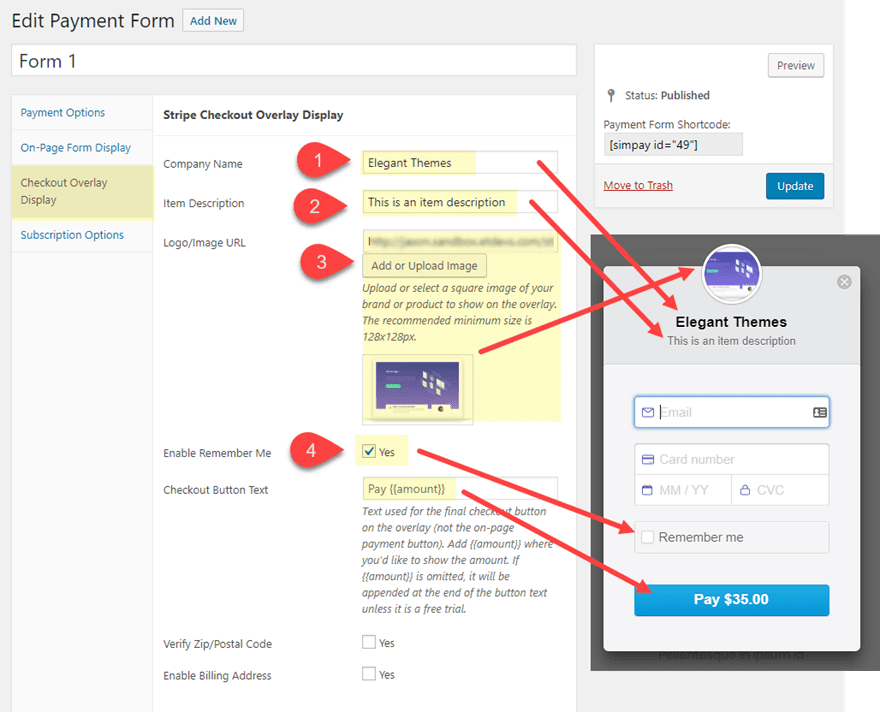
Under the Checkout Overlay Display tab, update the following:
Company Name
Item Description
Logo/Image URL
Enable Remember Me: YES
These options determine what is shown in the checkout form popup for this particular product.
Once you are done, make sure and publish/update the payment form.
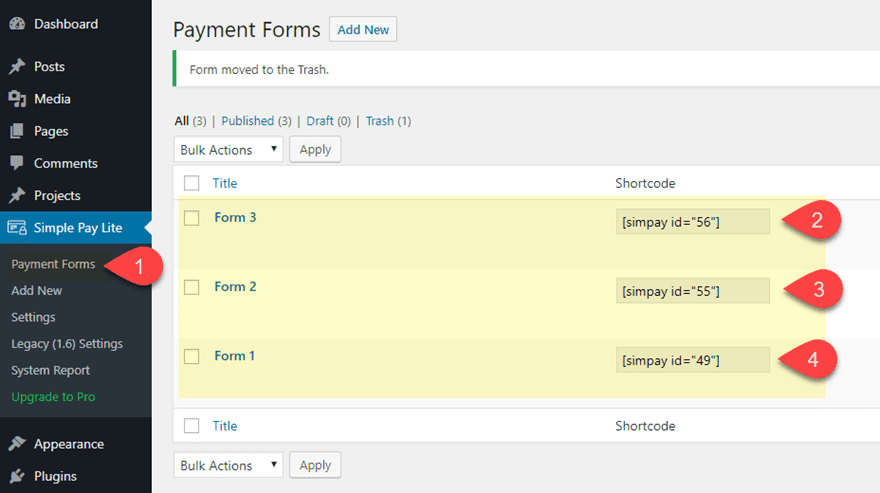
You will eventually need to copy the Payment Form Shortcode located at the top right of the Edit Payment Form page in order to paste it into your Divi page layout.
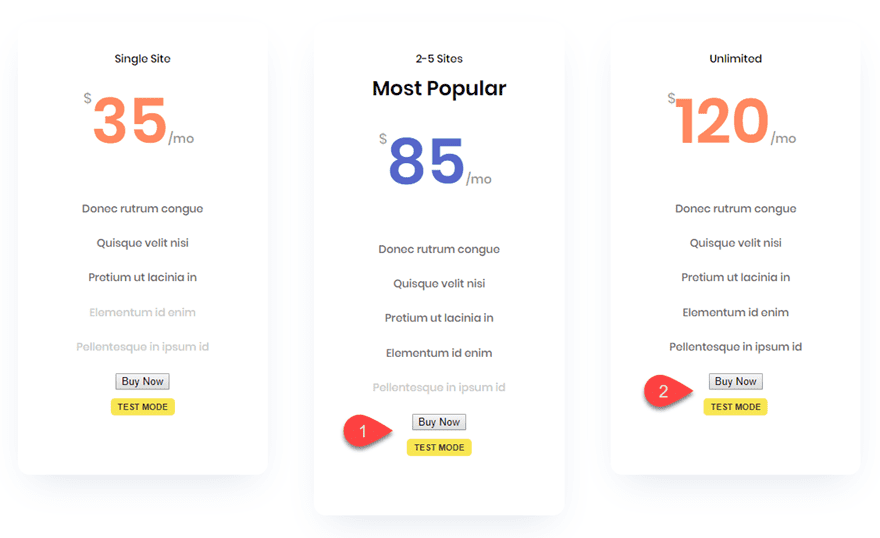
But for now, you can continue the same process to create two more payment forms each with their own item description, logo/image, and amount.
Once all your payment forms have been created, you can visit your payment forms by navigating to Simple Pay Lite > Payment Forms. There you will have easy access to the shortcodes.
With out stripe payment form shortcodes ready to go, now we need to get our Divi page layout up and running. To do this, create a new page, give your page a title, and click to use the Divi Builder.

Then select the option “Choose a Premade Layout”.
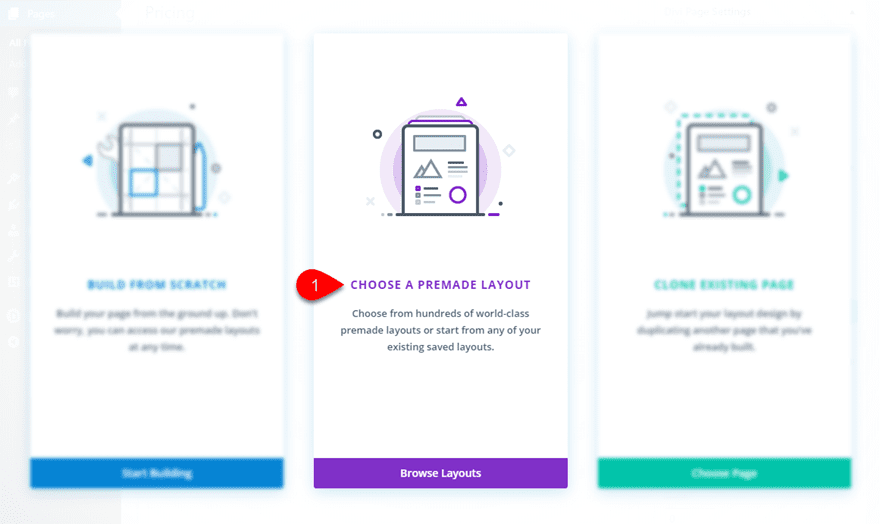
Open the Digital Product Layout pack and click to use the Digital Product Pricing page.

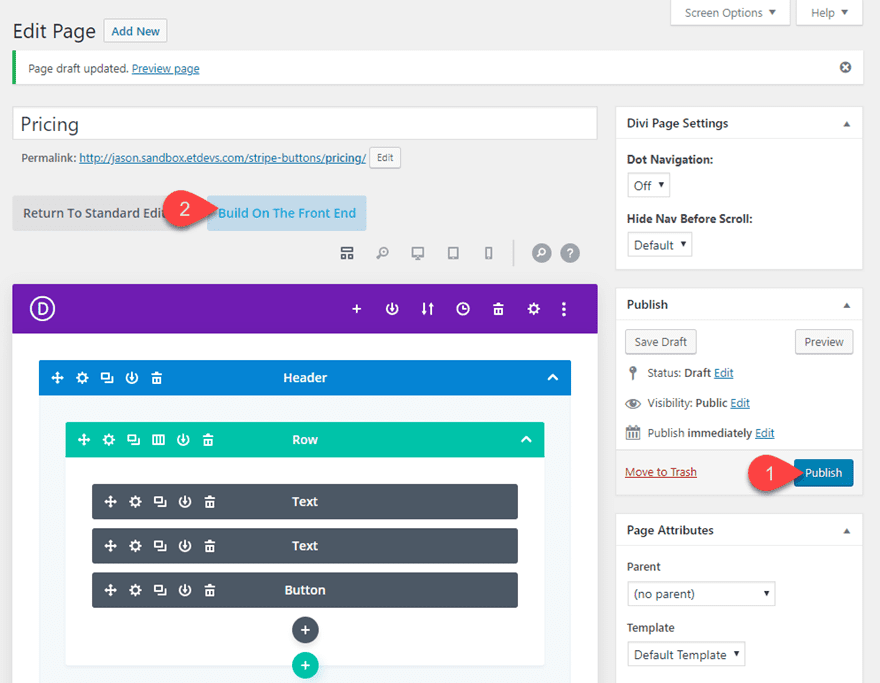
Once the layout is loaded to the page, publish the page and then click to build on the front end.
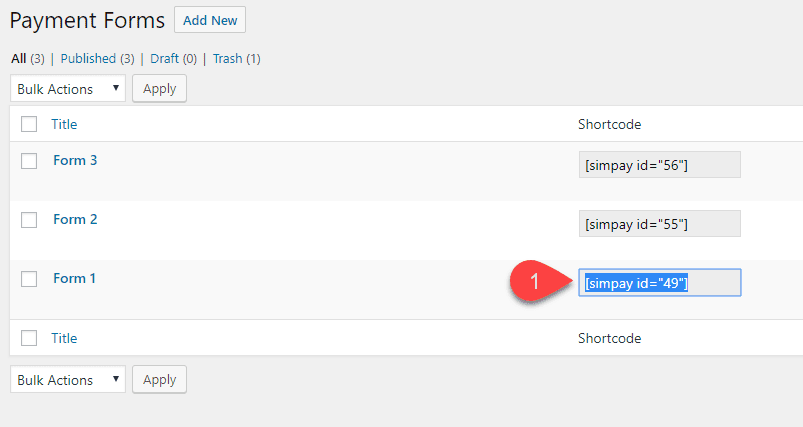
In a separate tab, go back to the payment forms page and grab the shortcode that you want to add to the pricing table.
Then go back to your pricing page layout and open the pricing table settings for one of the pricing tables in the layout.
Take out the button text (you don’t need it since the shortcode will serve as the button) and then paste the shortcode under the content in the content box.
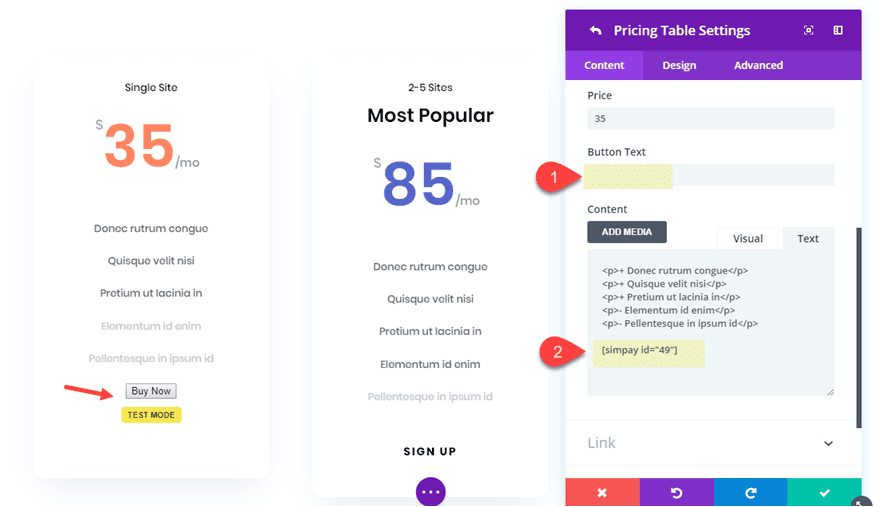
You will see an unstyled button with the text “test mode” highlighted under the button. The button in unstyled because we selected the option to use the theme styles for the button instead of the default blue button. The test mode text is simply there to remind you that you are not using a live stripe payment form. The test mode text will obviously disappear once the live API keys are used.
Next, continue the same process of copying and pasting the other two payment form shortcodes in the remaining two pricing tables.
Test out one of the buttons to make sure the payment form overlay is working properly. It should look like this…
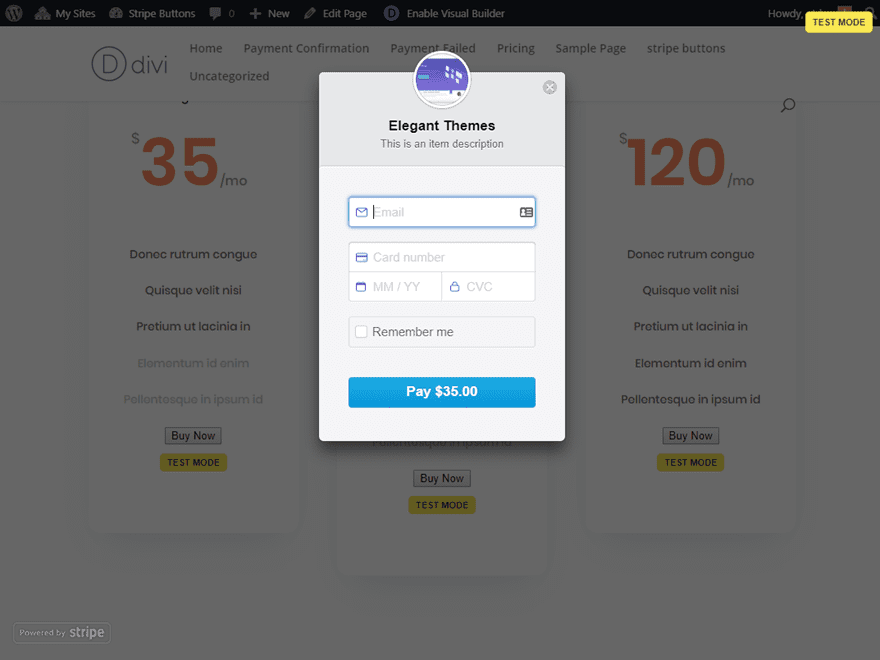
Unfortunately, this version of the plugin doesn’t allow you to customize the payment form overlay beyond the default style that you see. But the functionality is there and in many cases, you won’t need that extra styling. However, you can style those buttons!
To style the Stripe payment buttons, we are going to add some custom CSS to our page settings. First, we need to figure out what selector we are going to use to style the button. You can find this by using your browser developer tools. Right click on the Stripe button and select “Inspect”. In the html code you can see that the button has a css class “simpay-payment-btn”.
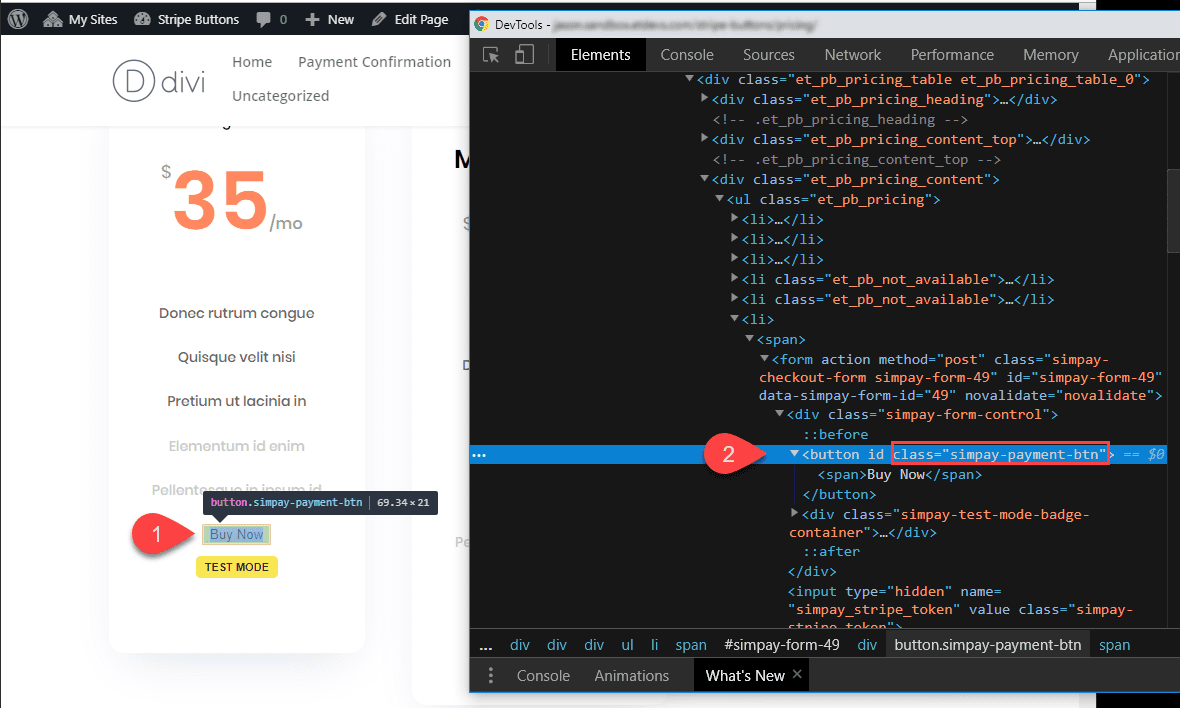
This is the selector we need to target the style of the button.
If we want to match the style of our Stripe payment buttons with the buttons used on our premade layout, we can inspect one of the Divi buttons already styled on the page to get the CSS code we need.
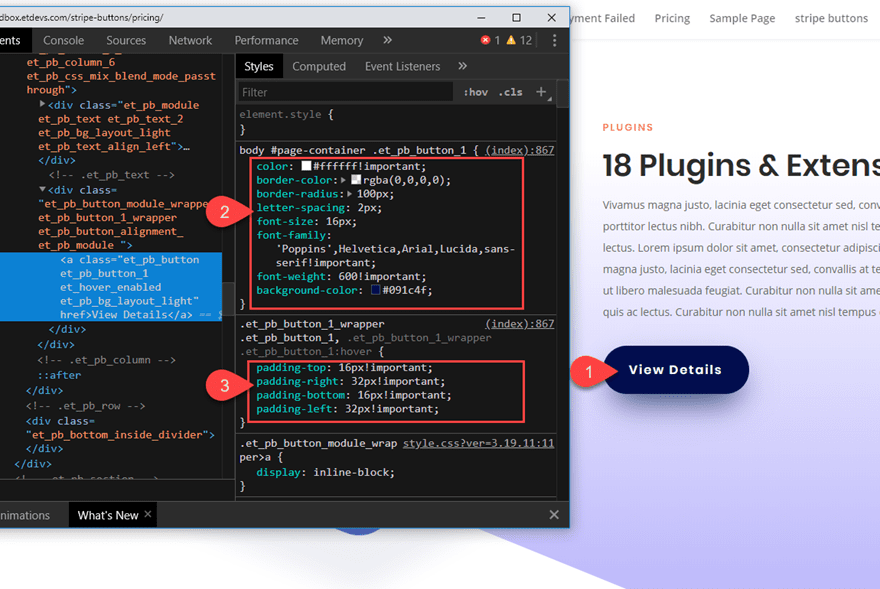
Now open the page settings and add the following Custom CSS under the Advanced tab:
.simpay-payment-btn {
    color: #ffffff!important;
    border-color: rgba(0,0,0,0);
    border-radius: 100px;
    letter-spacing: 2px;
    font-size: 16px;
    font-family: 'Poppins',Helvetica,Arial,Lucida,sans-serif!important;
    font-weight: 600!important;
    background-color: #091c4f;
    padding-top: 16px!important;
    padding-right: 32px!important;
    padding-bottom: 16px!important;
    padding-left: 32px!important;
}
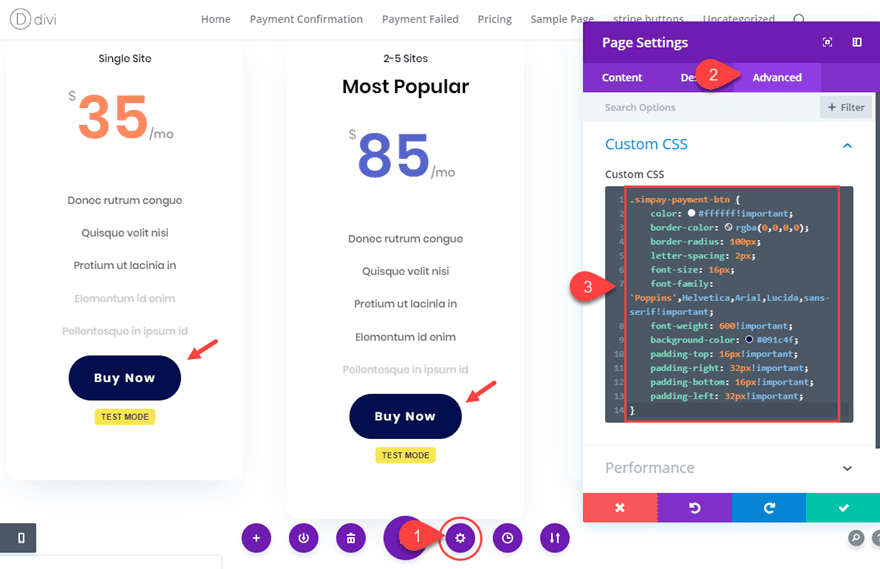
That’s it! Let’s check out the final result.
Customizing Your Payment Confirmation and Payment Failed Pages
Don’t forget that since the plugin generates your payment confirmation and payment failed page content using a shortcode, you can add that shortcode to any Divi layout and then use Divi’s built in settings to style the text how you want.
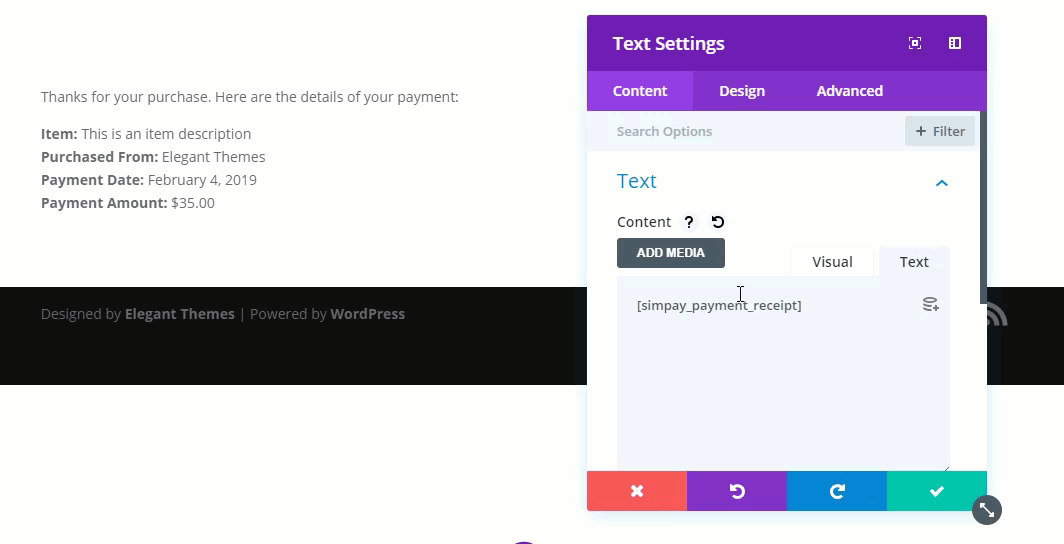
This is helpful for matching the styles of these pages with your website without having to resort to custom CSS.
Final Thoughts
Stripe can be an extremely convenient solution for collecting online payments. And, with the Simple Payments for WordPress plugin, you can get the basic Stripe Checkout functionality up and running on your Divi site in minutes. Also, if you take advantage of Divi’s premade layouts, you can add and style your Stripe payment buttons to match your layout simply by copying and pasting CSS code already created for you. The result is a fully functional and secure payment processing tool that can collect payments from visitors without them ever having to leave the page.
Feel free to explore more ways to accept Stripe payments on your WordPress website or other table plugins to create similar effects.
I hope you find this tutorial helpful and I look forward to hearing from you in the comments.
Cheers!


Very helpful tutorial, Jason. Thanks for posting it. That said, I’ve got a couple of questions that came up when I tried integrating the WP Simple Pay Pro plugin with Divi’s Pricing Tables Module.
Because the plugin creates its own payment buttons, I need to disable/hide the buttons that natively accompany each column in the module. How do I go about doing that?
Also, I originally intended to bullet the individual items in each column table, but the shortcode – that creates the button when it’s pasted under the content in the content box – takes on the content styling attributes and creates a bulleted button! Is there a way to eliminate bullets on the button while preserving those on the other individual items?
Lastly, I’d like to be able to center align the button generated by the plugin. Even though I can center align the shortcode snippet in the content box, the location of the button remains aligned to the left. How do I move the button to the center of the column?
Love it! Thank you very much!
Awesome!
Hi
Thank you for sharing good information,its to very helpful for me,it is useful for freshers.
keep updating………………………
You are quite welcome, sravani. Will do.
Great option! Unfortunately, Stripe is not available for all countries. I’m from Brazil and I was not able to use stripe. I don’t know if I’m missing something.
I guess Brazil is on the list but not available quite yet. https://stripe.com/global
Bummer!
This is a handy plugin…I use it from time to time.
I agree. Definitely takes the edge off the intitial setup and I love the payment confirmation/failure shortcodes.
This is great -so handy. A nice time saver. Thank you very much for taking the time to share.
My pleasure, Chris. Glad you liked it.
This would not be a good solution if you had multiple products, for example, skin care products that are not sold in bundles.