
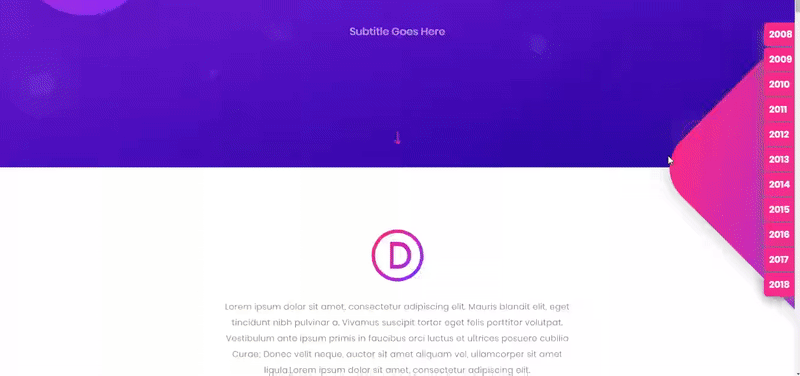
The new Timeline Layout can be downloaded for free but ONLY during Elegant Themes’ 10 Year Anniversary Sale which ENDS TODAY. It’s a slick design that’ll help you showcase the timeline of your company or any other type of timeline you want to share with your visitors. On top of the free layout, we’re going to share an interesting tutorial that’ll help your visitors navigate through this page using dot navigation.
Dot navigation is a nice extra to have on your page. Especially if you have a pretty long page you want visitors to easily navigate through. And in this tutorial, we’re going to help you take it even one step further. Instead of having just dots on the right side, you’ll be able to give all of your relevant sections a label that’ll match with the section it represents. That way, visitors can navigate to a specific year whenever they’re on this page.
Sneak Peek
Before we dive into the tutorial, let’s take a look at the exact design we’re going to create using Divi.
- Every dot in your dot navigation represents a section
- To make sure we connect each year to the right dot, we’re going to make sure that with the start of each year we have a new section
- Dot Navigation uses a list that assigns a number to each section
- The list itself doesn’t start from 1 but 0 instead, this means your first section is number ‘0’ on the list, the second is number ‘1’, etc
- You can reuse this strategy for any kind of page but you will need to modify the CSS appearance according to the length of your label and number of items you’re navigating through
Part 1: Download Elegant Themes’ Free 10 Anniversary Timeline Layout
We’re using Elegant Themes’ free 10 Anniversary Timeline Layout which you can download by going to our 10 Year Journey Page. If you’re not an Elegant Themes member yet, or if you want to upgrade/renew your account, now is the time! We’re offering a discount of 20% which is double the amount of discount you can normally get! While you’re on the 10 Year Journey Page, you’ll also be able to download the free timeline layout which was used to create this beautiful page by clicking on the download button.

Part 2: Create New Page Using the Timeline Layout
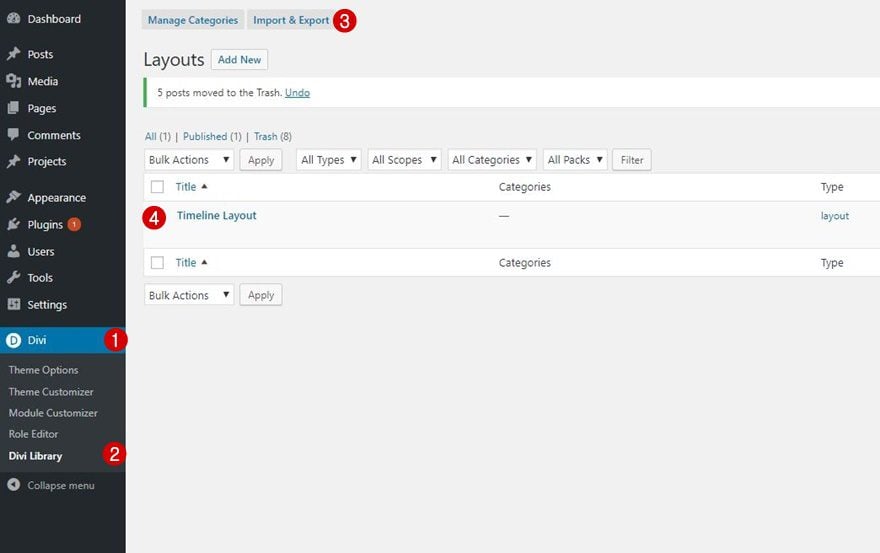
Step 1: Upload Timeline Layout to Your Divi Library
After downloading the free Timeline Layout, you’ll need to upload it to your Divi Library. To do that, go to your WordPress website > Divi > Divi Library and upload the JSON file within your zipped folder.
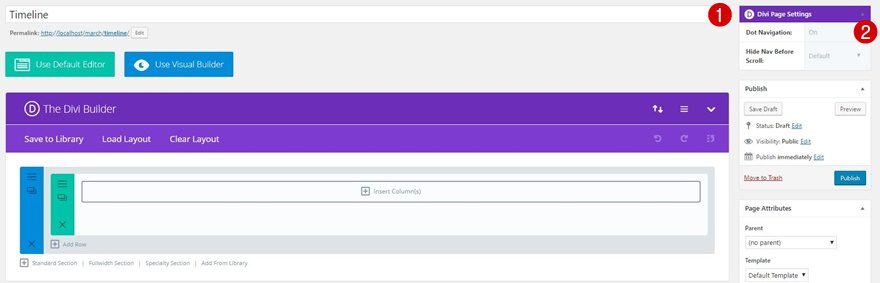
Now that you’ve added the layout to your Divi Library, it’s time to create a new page. After adding a title, make sure you enable Dot Navigation within Divi’s Page settings.
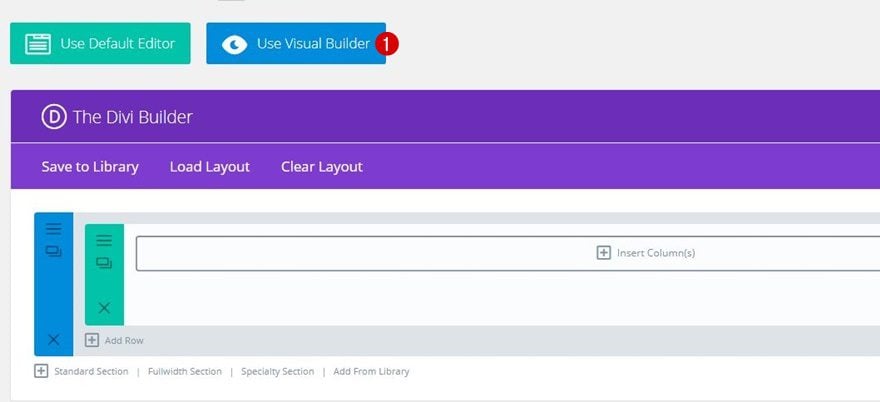
Step 3: Switch over to Visual Uploader
We can now switch over to the Visual Builder right away.
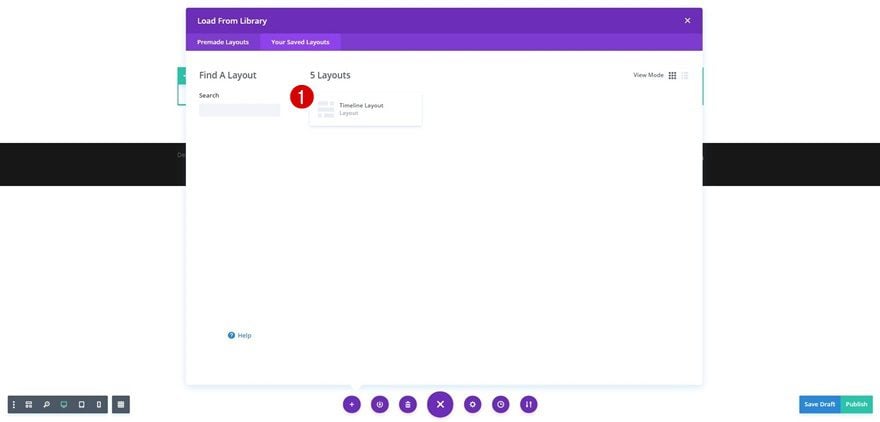
Step 4: Upload Timeline Layout
Upload the Timeline Layout by clicking on the plus icon and selecting the layout within the Your Saved Layouts tab.
Part 3: Start Each Year with a New Section
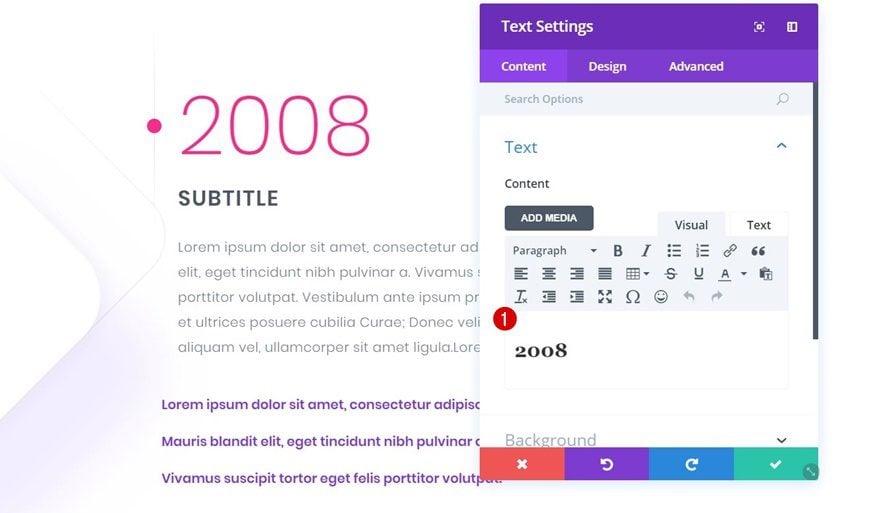
Step 1: Add Year Numbers
For the sake of knowing where to navigate to on your page, we’re going to give each one of our timeline items a year. We’re simply using Elegant Themes’ journey from 2008 to 2018. Go ahead and add these numbers in chronological order. After we’re done adding new sections, you can change these Text Modules to whichever text you want to use instead.
Step 2: Place Introduction Row in New Section
The first additional section we’ll need to create is one for the introduction. That way, the first timeline item will have its own section.

Step 3: Place 2011 in New Section
Timeline items 2010 & 2011 are by default located in the same section. Create a separate section for 2011 and place the row in it.

Part 4: Add CSS Code to Page Custom CSS
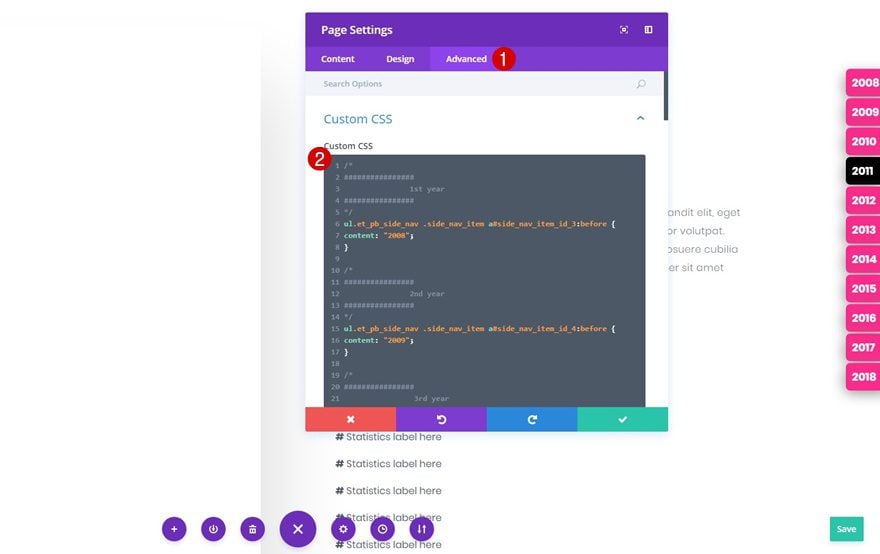
Step 1: The CSS Code
Before we add the CSS code to our page, I’m going to elaborate some parts of it that’ll help you create one for other pages as well. The entire CSS code you’ll need is the following:
/*
################
1st year
################
*/
ul.et_pb_side_nav .side_nav_item a#side_nav_item_id_3:before {
content: "2008";
}

/*
################
2nd year
################
*/
ul.et_pb_side_nav .side_nav_item a#side_nav_item_id_4:before {
content: "2009";
}

/*
################
3rd year
################
*/
ul.et_pb_side_nav .side_nav_item a#side_nav_item_id_5:before {
content: "2010";
}
/*
################
4th year
################
*/
ul.et_pb_side_nav .side_nav_item a#side_nav_item_id_6:before {
content: "2011";
}
/*
################
5th year
################
*/
ul.et_pb_side_nav .side_nav_item a#side_nav_item_id_7:before {
content: "2012";
}
/*
################
6th year
################
*/

ul.et_pb_side_nav .side_nav_item a#side_nav_item_id_8:before {
content: "2013";
}
/*
################
7th year
################
*/

ul.et_pb_side_nav .side_nav_item a#side_nav_item_id_11:before {
content: "2014";
}

/*
################
8th year
################
*/

ul.et_pb_side_nav .side_nav_item a#side_nav_item_id_14:before {
content: "2015";
}

/*
################
9th year
################
*/
ul.et_pb_side_nav .side_nav_item a#side_nav_item_id_17:before {
content: "2016";
}

/*
################
10th year
################
*/
ul.et_pb_side_nav .side_nav_item a#side_nav_item_id_18:before {
content: "2017";
}
/*
################
11th year
################
*/
ul.et_pb_side_nav .side_nav_item a#side_nav_item_id_19:before {
content: "2018";
}

/*
################
Hide irrelevant sections
################
*/
ul.et_pb_side_nav .side_nav_item a#side_nav_item_id_0,
ul.et_pb_side_nav .side_nav_item a#side_nav_item_id_1,
ul.et_pb_side_nav .side_nav_item a#side_nav_item_id_2,
ul.et_pb_side_nav .side_nav_item a#side_nav_item_id_9,
ul.et_pb_side_nav .side_nav_item a#side_nav_item_id_10,
ul.et_pb_side_nav .side_nav_item a#side_nav_item_id_12,
ul.et_pb_side_nav .side_nav_item a#side_nav_item_id_13,
ul.et_pb_side_nav .side_nav_item a#side_nav_item_id_15,
ul.et_pb_side_nav .side_nav_item a#side_nav_item_id_16,
ul.et_pb_side_nav .side_nav_item a#side_nav_item_id_20,
ul.et_pb_side_nav .side_nav_item a#side_nav_item_id_21,
ul.et_pb_side_nav .side_nav_item a#side_nav_item_id_22 {
display: none !important;
}

/*
################
Styling of list in its total
################
*/
ul.et_pb_side_nav li.side_nav_item {
margin-bottom: -19px;
line-height: 2.7;
margin-top: 5px;
}

/*
################
Styling of each item individually
################
*/
ul.et_pb_side_nav li.side_nav_item a {

-webkit-box-shadow: -4px 6px 39px -4px rgba(128,123,128,1);
-moz-box-shadow: -4px 6px 39px -4px rgba(128,123,128,1);
box-shadow: -4px 6px 39px -4px rgba(128,123,128,1);
padding-top: 10px;
padding-bottom: 10px;
font-weight: bold;
font-family: poppins;
font-size: 18px;
color: #F92C8B !important;
background-color: #F92C8B;
display: inline !important;

}

/*
################
Styling of each item individually when active
################
*/
ul.et_pb_side_nav li.side_nav_item a.active {
color: #000000 !important;
background-color: black !important;
}

/*
################
Styling of label
################
*/
ul.et_pb_side_nav li.side_nav_item a:before {
padding: 10px !important;
color: white !important;
}

/*
################
Styling of entire list
################
*/
ul.et_pb_side_nav {
width: 76px;
background: none;
top: 40%;
}
Each section has its own item in the list of Dot Navigation. This layout includes sections that are not linked to the timeline, and thus a specific year. That’s why it’s not necessary to include them within the dot navigation so we’re going to hide these items within our Dot Navigation. The code that’s provided to you in the previous step is functional for this particular layout (after going through part 2 of this post). However, if you want to use this method on a different number of sections, you will need to determine which sections on your page you want to appear. The first section on every page starts at zero. This is what the structure looks like on the Timeline layout:
- Section 0 → don’t include
- Section 1 → don’t include
- Section 2 → don’t include
- Section 3 → include
- Section 4 → include
- Section 5 → include
- Section 6 → include
- Section 7 → include
- Section 8 → include
- Section 9 → don’t include
- Section 10 → don’t include
- Section 11 → include
- Section 12 → don’t include
- Section 13 → don’t include
- Section 14 → include
- Section 15 → don’t include
- Section 16 → don’t include
- Section 17 → include
- Section 18 → include
- Section 19 → include
- Section 20 → don’t include
- Section 21 → don’t include
- Section 22 → don’t include
After you’ve decided on the sections you want to include in your dot navigation, you’ll need to determine the label for each one of them by using the following code and modifying the content to your needs:
/*
################
1st year
################
*/
ul.et_pb_side_nav .side_nav_item a#side_nav_item_id_3:before {
content: "2008";
}

/*
################
2nd year
################
*/
ul.et_pb_side_nav .side_nav_item a#side_nav_item_id_4:before {
content: "2009";
}

/*
################
3rd year
################
*/
ul.et_pb_side_nav .side_nav_item a#side_nav_item_id_5:before {
content: "2010";
}
/*
################
4th year
################
*/
ul.et_pb_side_nav .side_nav_item a#side_nav_item_id_6:before {
content: "2011";
}
/*
################
5th year
################
*/
ul.et_pb_side_nav .side_nav_item a#side_nav_item_id_7:before {
content: "2012";
}
/*
################
6th year
################
*/

ul.et_pb_side_nav .side_nav_item a#side_nav_item_id_8:before {
content: "2013";
}
/*
################
7th year
################
*/

ul.et_pb_side_nav .side_nav_item a#side_nav_item_id_11:before {
content: "2014";
}

/*
################
8th year
################
*/

ul.et_pb_side_nav .side_nav_item a#side_nav_item_id_14:before {
content: "2015";
}

/*
################
9th year
################
*/
ul.et_pb_side_nav .side_nav_item a#side_nav_item_id_17:before {
content: "2016";
}

/*
################
10th year
################
*/
ul.et_pb_side_nav .side_nav_item a#side_nav_item_id_18:before {
content: "2017";
}
/*
################
11th year
################
*/
ul.et_pb_side_nav .side_nav_item a#side_nav_item_id_19:before {
content: "2018";
}
The sections you don’t want to include in your Dot Navigation need to be hidden by using the following CSS code lines:
ul.et_pb_side_nav .side_nav_item a#side_nav_item_id_0,
ul.et_pb_side_nav .side_nav_item a#side_nav_item_id_1,
ul.et_pb_side_nav .side_nav_item a#side_nav_item_id_2,
ul.et_pb_side_nav .side_nav_item a#side_nav_item_id_9,
ul.et_pb_side_nav .side_nav_item a#side_nav_item_id_10,
ul.et_pb_side_nav .side_nav_item a#side_nav_item_id_12,
ul.et_pb_side_nav .side_nav_item a#side_nav_item_id_13,
ul.et_pb_side_nav .side_nav_item a#side_nav_item_id_15,
ul.et_pb_side_nav .side_nav_item a#side_nav_item_id_16,
ul.et_pb_side_nav .side_nav_item a#side_nav_item_id_20,
ul.et_pb_side_nav .side_nav_item a#side_nav_item_id_21,
ul.et_pb_side_nav .side_nav_item a#side_nav_item_id_22 {
display: none !important;
}
Step 5: Add Custom CSS Code to Page
Once you understand the code and modify it to your needs, you can add it to the page you’re working by clicking on the following button:

Going to the Advanced tab and placing your CSS code in the Custom CSS box.
And that’s it!
Last Chance to Get 20% OFF!
We hope that you’ve enjoyed this tutorial. Make sure you check out our 10th anniversary’s limited discount of 20%! This discount counts for new members, existing users who want to upgrade or renew and expired users! If you have any questions or suggestions, make sure you leave a comment in the comment section below!
Missed the sale? No worries, try out one of these timeline plugins for WordPress sites.


I love this, but how can I make the text for the swapped dot navigation dynamic? Meaning if I create a section, assign it a name, and have that name be used as the text anchor link?
this may seem like an ignorant question, forgive me, but how do I make the navigation bar longer to fit more type?
Boy, I really love this! As a newbie I misunderstood some of the directions, and then to top it off, I left out a comma in the CSS. But finally, I got it to work. I have several projects I am going to use it for. Thanks for posting this!
Hello Donjete,
Thank you very much for this tutorial!
Added the idea to a client’s website, they are very happy, as we are.
PLEASE DO CONTINUE!
Regards,
Igor
This is a great layout.
I implemented it directly on my site.
One question.
As I have a set of colors which I try to roll out throughout my site, I am lookingto change the coloring of the Dot next to the Year. I can’t find the Dot registered. Can you help me with this.
Great post Donjete.. another design element to be added to the arsenal.. Thanks for taking the time.. 😉
Anytime, Andrew!
Wonderful, Just what I needed!
Good to hear!
Thanks for sharing this, good stuff!
You’re welcome!
Does it work 100% in responsive mode?
It does!
Awesome post, thanks Donjete.
I’ve used a different approach for the Divi DotNav plugin for adding labels to dots and showing/hiding dots of specific sections.
It uses section IDs as dot labels and hides dots using a CSS class that needs to be assigned to those sections, dots of which you want to hide.
But, of course, that is not a pure CSS solution.
You’re welcome, Ivan! That sounds like a great approach.
Nice, though I feel it should be build into Divi to give labels to the dot navigation. That could be by using the section ID, the admin label or an entirely new field for sections.
Awesome! I personally did it for my website with JQuery but this wasn’t as good as yours.
It would be awesome for the code module to have some prefabricated javascript templates like a js calendar, a dynamic search bar, or a list of elements on ajax or even a list of well know js libraries!
Thank you again for this awesome tutoriel.
Agreed.
True, i´ll try it
10000000000% correct imo. Although this idea works it is not a perfect solution.
Nice, Will save this article as an archive. Can be used for nav items other than years.
This can, indeed, be used with other labels as well!