

Adding hover tilt effects to your web design is one of those fun and engaging ways to bring life to your Divi website. Usually this type of design requires a plugin or more advanced code (like in this tutorial). But, this process is a whole lot easier using Tilt.js (a lightweight hover tilt effect for jQuery). With Tilt.js, you can easily apply hover tilt effects to anything in minutes.
In this tutorial, we are going to show you how to add hover tilt effects to any element in Divi. Using a combination of tilt.js jQuery snippets and the Divi builder, we’ll show you how to add impressive hover tilt effects to an image, a column of modules, a row, and more. We’ll even show you how to add surprising 3d parallax effects as well.
Let’s get started!
- 1 Sneak Peek
- 2 Download the Layout for FREE
- 3 Download For Free
- 4 You have successfully subscribed. Please check your email address to confirm your subscription and get access to free weekly Divi layout packs!
- 5 What You Need to Get Started
- 6 The Basics for Using Tilt.js
- 7 How to Add Hover Tilt Effects to Any Element in Divi
- 8 Final Results
- 9 Final Thoughts
Sneak Peek
For a live demo of the functionality behind this tutorial, check out this codepen.
And here is a quick look at the design we’ll build in this tutorial.
Download the Layout for FREE
To lay your hands on the designs from this tutorial, you will first need to download it using the button below. To gain access to the download you will need to subscribe to our newsletter by using the form below. As a new subscriber, you will receive even more Divi goodness and a free Divi Layout pack every Monday! If you’re already on the list, simply enter your email address below and click download. You will not be “resubscribed” or receive extra emails.

To import the section layout to your Divi Library, navigate to the Divi Library.
Click the Import button.
In the portability popup, select the import tab and choose the download file from your computer.
Then click the import button.

Once done, the section layout will be available in the Divi Builder.
Let’s get to the tutorial, shall we?
What You Need to Get Started

To get started, you will need to do the following:
- If you haven’t yet, install and activate the Divi Theme.
- Create a new page in WordPress and use the Divi Builder to edit the page on the front end (visual builder).
- Choose the option “Build From Scratch”.
After that, you will have a blank canvas to start designing in Divi.
The Basics for Using Tilt.js
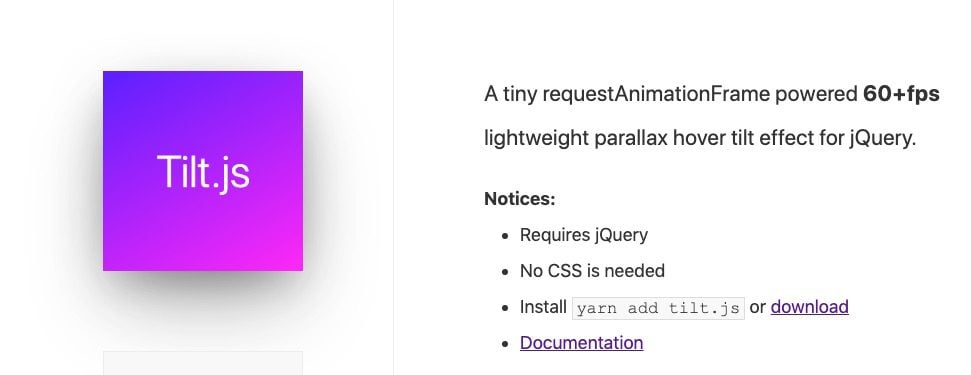
Tilt.js is a lightweight parallax hover tilt effect for jQuery. With just a couple of lines of jQuery, you can add hover tilt effects to any element on the page. It comes with up to 10 options (see the documentation) that can easily be added to control the tilt effect design and functionality including scale and a beautiful glare effect.
At the most basic level, once you access the tilt.js library, you can add a CSS class to the element you want to tilt on hover and then use a simple jQuery snippet to apply the tilt function on a jQuery object with the same class.
For example, let’s say you add a custom CSS Class to an image module named “et-js-tilt”.
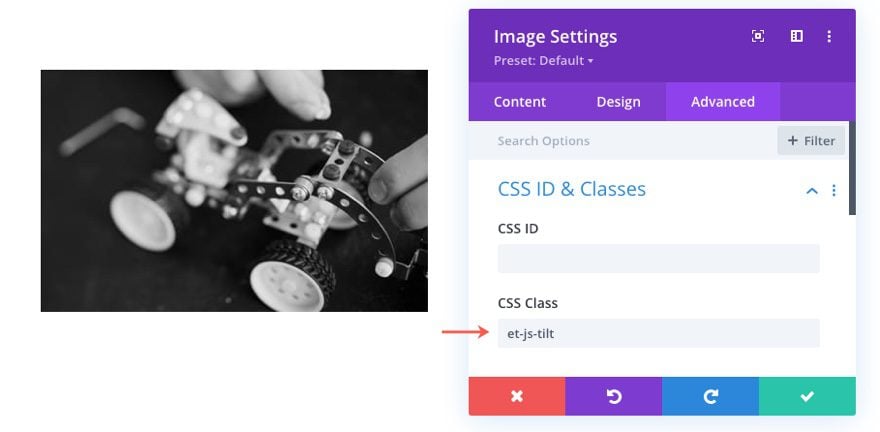
All you would need to do after that is add the following jQuery snippet to add the hover tilt effect to the image.
$(".et-js-tilt").tilt();
Then you can set additional options to the tilt effect. For example, you can add a scale and glare effect with the following code snippet.
$(".et-js-tilt").tilt({
  glare: true,
  maxGlare: 0.7,
  scale: 1.1
});
The result would be this…
For a more advanced effect, you can add transform:translateZ() to any child elements to get a 3D parallax effect. More on that later.
Now that we have a basic understanding of how to use tilt.js, let’s explore how to use it in Divi.
How to Add Hover Tilt Effects to Any Element in Divi
Adding a Tilt Hover Effect to Divi Modules
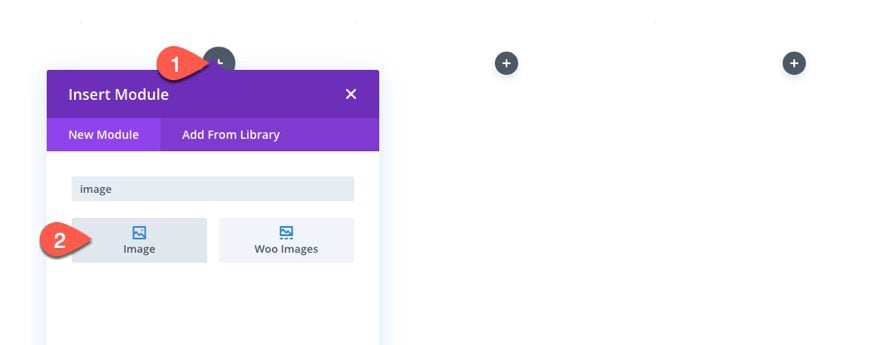
Add a three-column row to the default regular section.
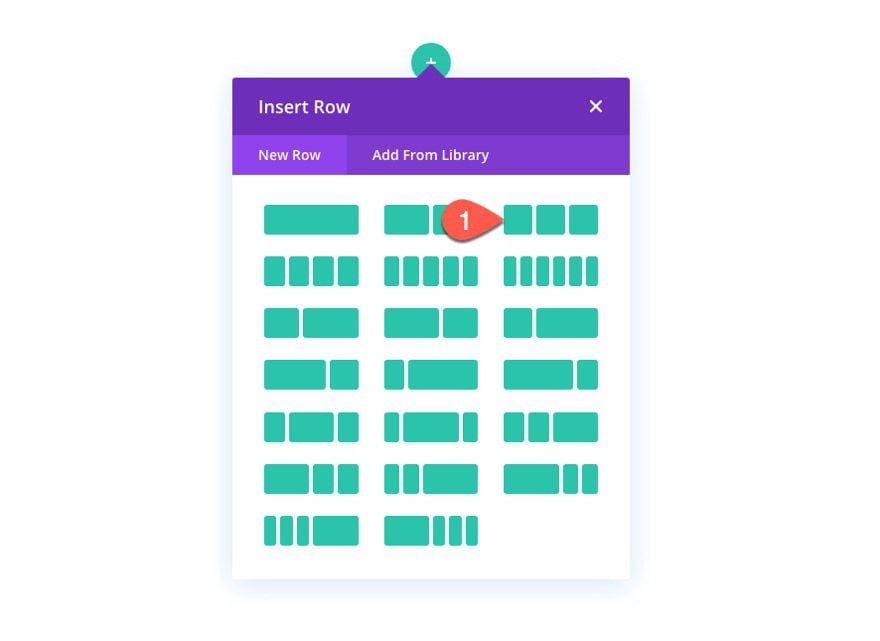
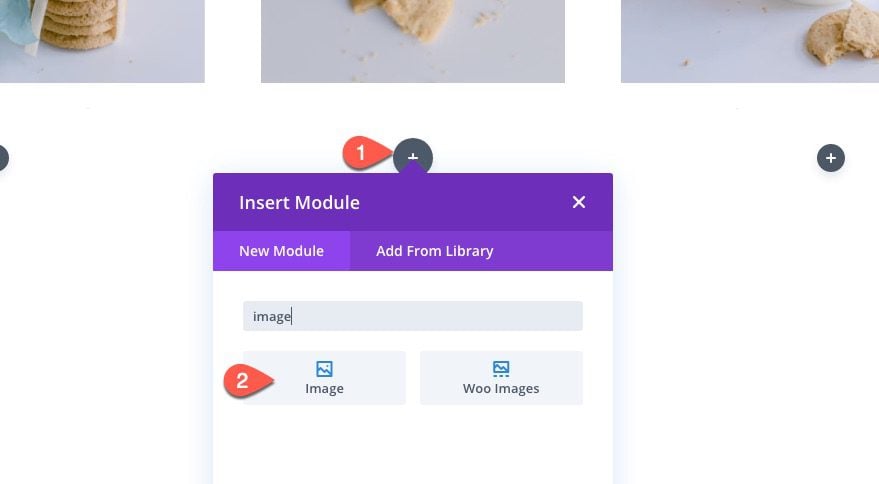
Add Image Module
In the first column, add an Image Module.
Note: You can use any module you want. It doesn’t have to be an image module.
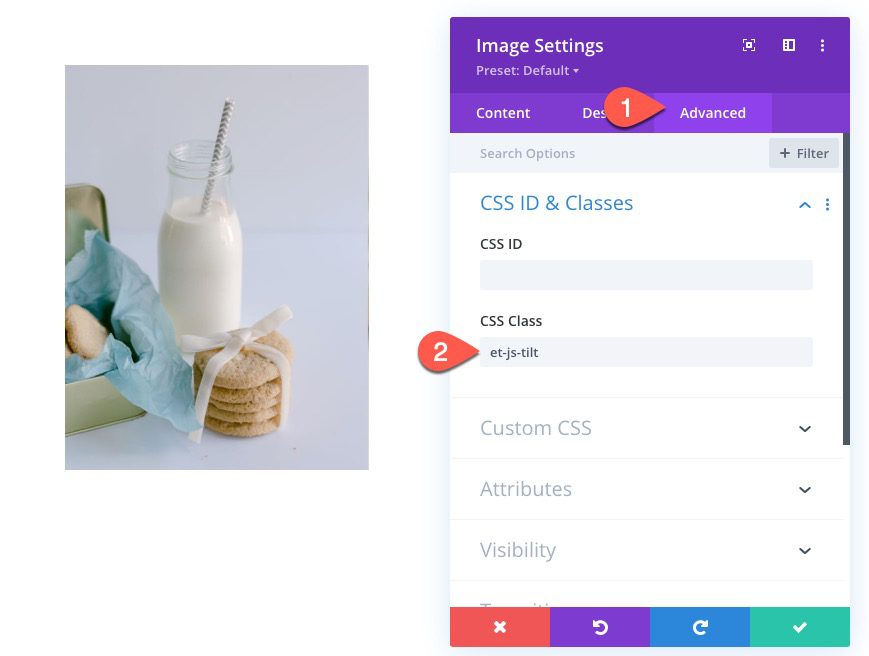
Upload an image of your choice. I’m using one from the Homemade Cookies Layout Pack.
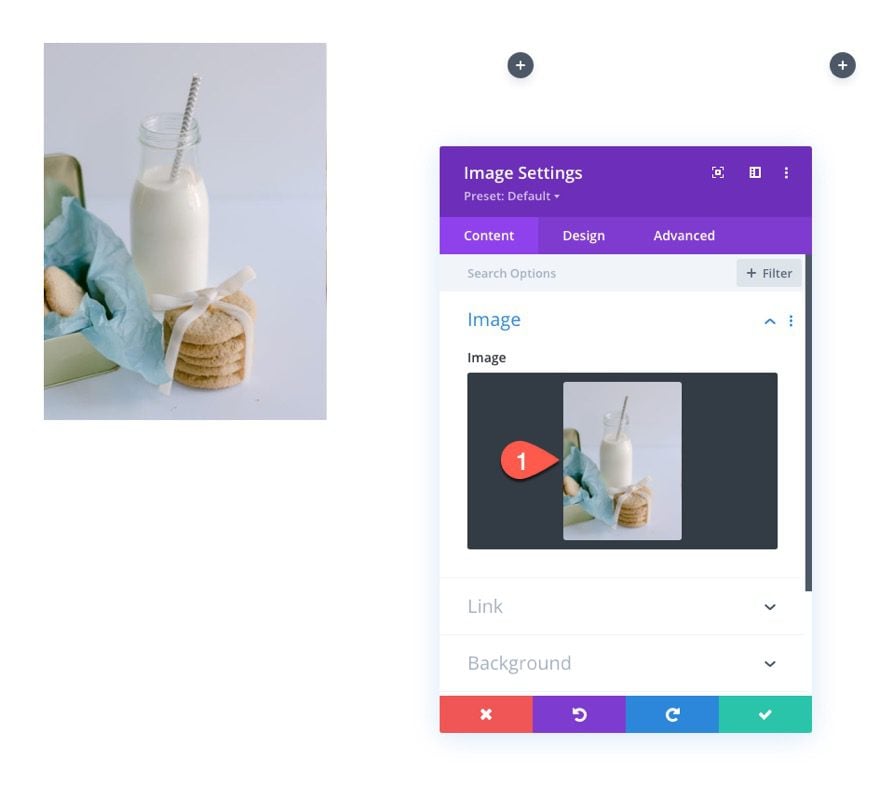
Add Image Module Class
Under the advanced tab, add the follow CSS Class:
- CSS Class: et-js-tilt
This class will be used as a selector for our tilt function later.
Copy and Paste Image Modules
Next, copy the image module and paste one into each of the remaining two columns.
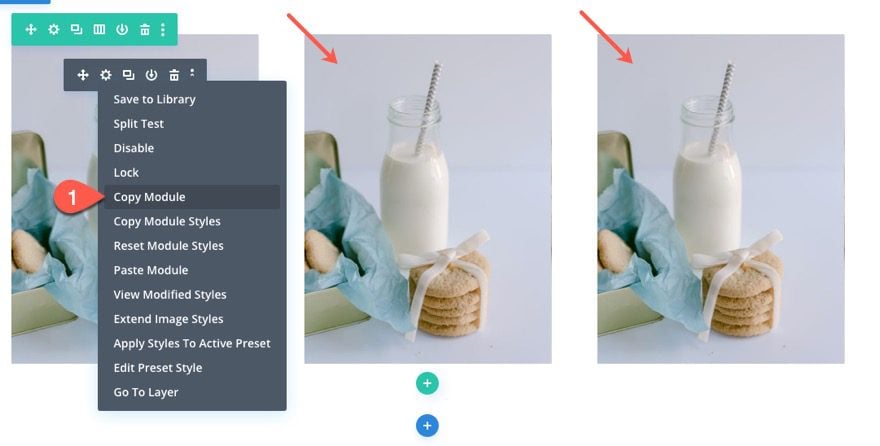
You can replace the duplicate images with new ones if you like. Just make sure that each image module has the CSS Class “et-js-tilt”.
Add the tilt.js JQuery
To add the tilt.js library and code snippet needed to tilt our images, we are going to use a code module.
First, add a new one-column row under the existing row.
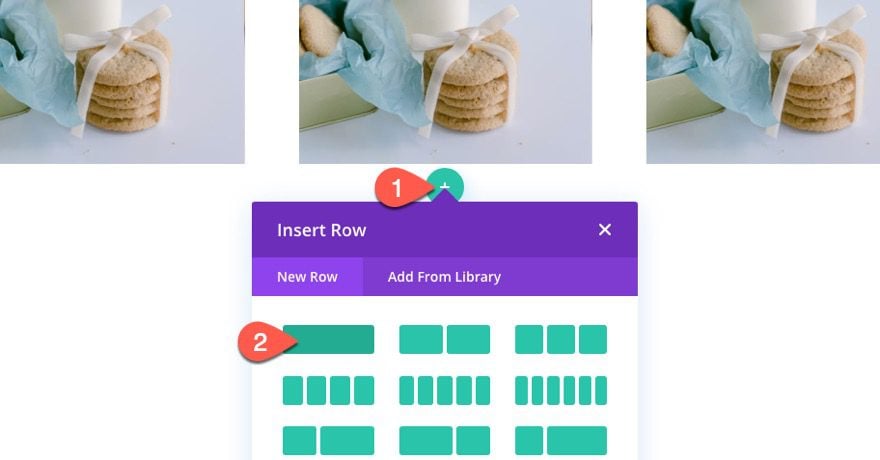
Then add a code module to the new row.
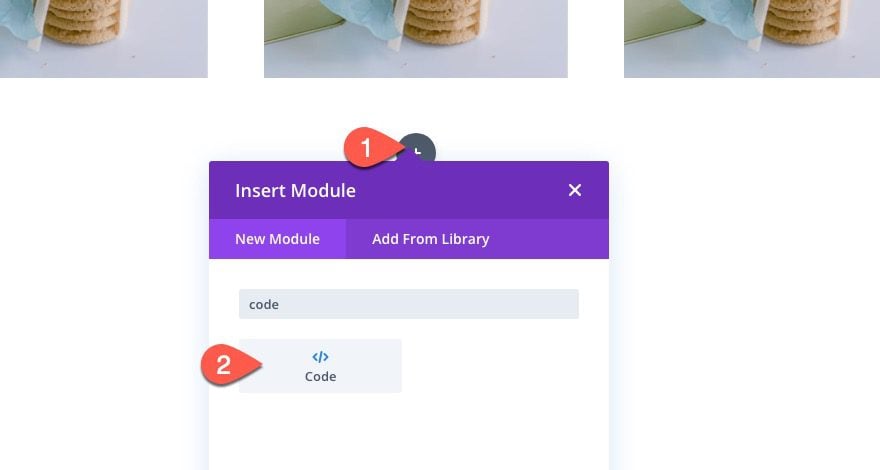
Next, we need to access the tilt.js library by adding a script that imports tilt.js from their CDN (https://cdnjs.cloudflare.com/ajax/libs/tilt.js/1.2.1/tilt.jquery.min.js). Paste the following script in the code box.
Use the following src within a script tag to import the library:
src="https://cdnjs.cloudflare.com/ajax/libs/tilt.js/1.2.1/tilt.jquery.min.js"
It should look like this:

It is important to import tilt.js before adding the code that will use it. So, after the script pointing to tilt.js, add the necessary script tags to wrap the JQuery we need to add. Then paste the following JQuery in between the script tags.
jQuery(document).ready(function ($) {
  if ($(window).width() > 980) {

    $(".et-js-tilt").tilt({
      glare: true,
      maxGlare: 0.7,
      scale: 1.1,
      perspective: 300,
    });

  }
});

Notice that the tilt() function is inside an if statement that will execute when the browser width is greater than 980px. This will make sure the effect only happens on desktop.
Here is the result.
Adding a Tilt Hover Effect to the Row
Like we mentioned earlier, you can add this hover tilt effect to any element in Divi. This includes an entire row. Plus, you can add a tilt effect to a row while keep the tilt effects for each of the modules inside the row.
Here’s how to do it.
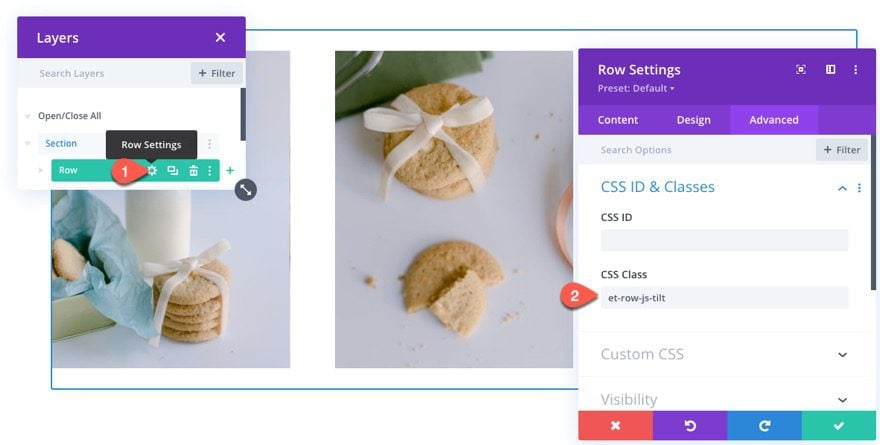
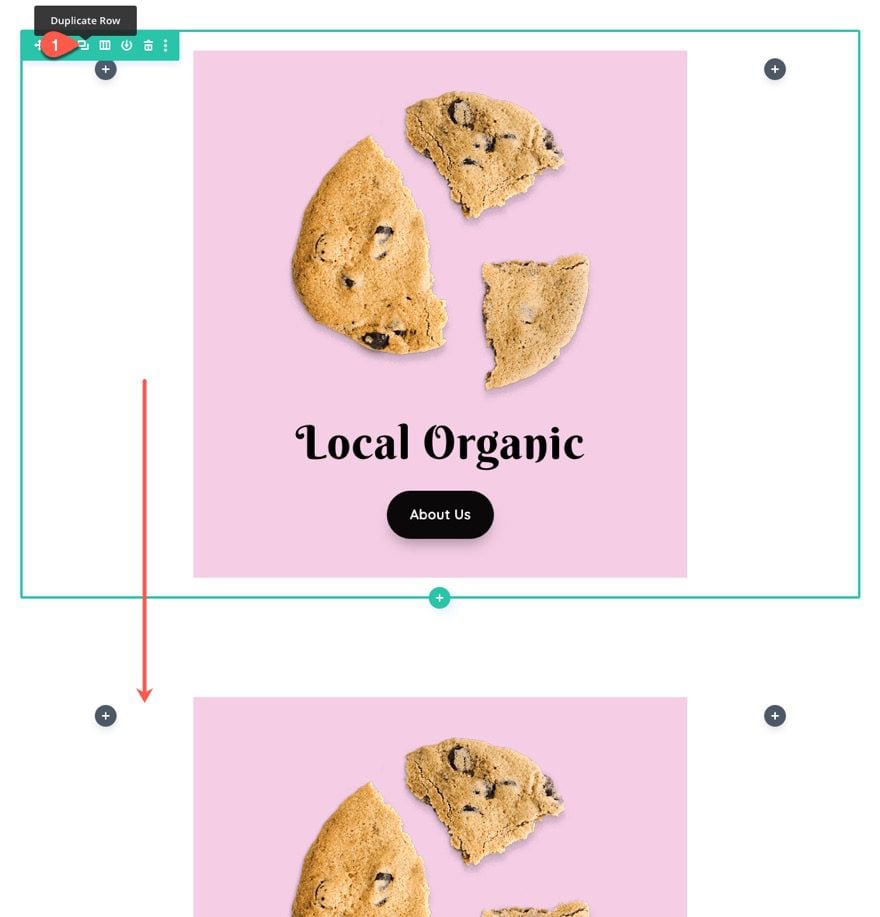
Duplicate Row and Add Unique CSS Class to Row
Duplicate the existing row of images and then open the settings of the duplicate row. Under the advanced tab, give the row a unique CSS Class as follows:
- CSS Class: et-row-js-tilt
Add jQuery
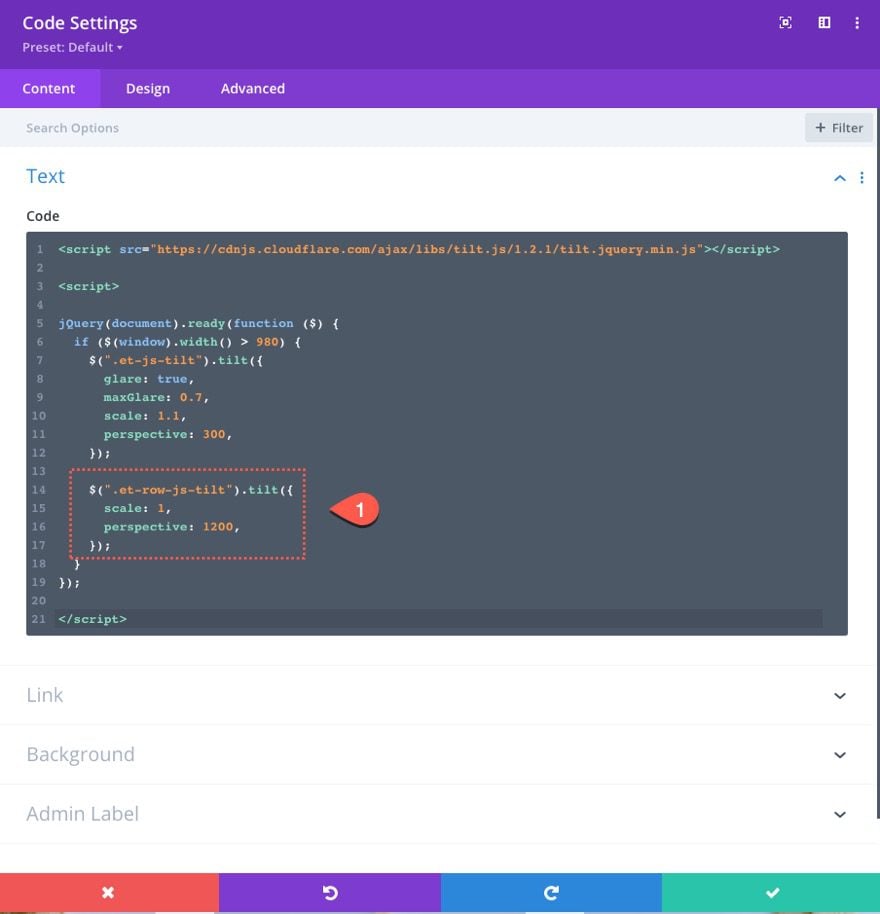
Then add the following jQuery under the previous tilt function to apply a separate tilt function to the row.
    $(".et-row-js-tilt").tilt({
      scale: 1,
      perspective: 1200,
    });
Notice that for this tilt effect, we brought the scale back to 1 and increased the perspective value so that the tilt is more subtle.
Here is the result.
Notice how the row has a tilt function that activates when hovering over the row and each of the image modules also has the same tilt effect we added earlier. This is how you can apply nested tilt effect instances.
Adding a Tilt Hover Effect to a Column with Multiple Divi Modules
In some cases, it is helpful to add a tilt effect to a column of modules. This will allow you to design multiple modules within a column with Divi and then have all of those element tilt as one unit. To give you an example of how to this, we are going to add a tilt hover effect to a column with an image module, a text module, and a button module.
Add New Row
To start, create a new one-sixth two-thirds one-sixth column row under the previous row of images.
Add Image Module
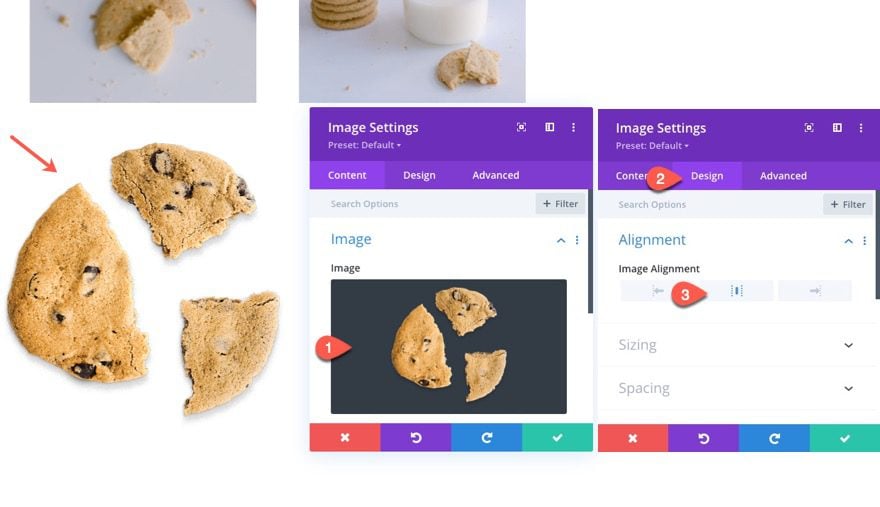
Inside column 2 (the middle column), add a new image module.
Upload an image to the module and set the image alignment to center.
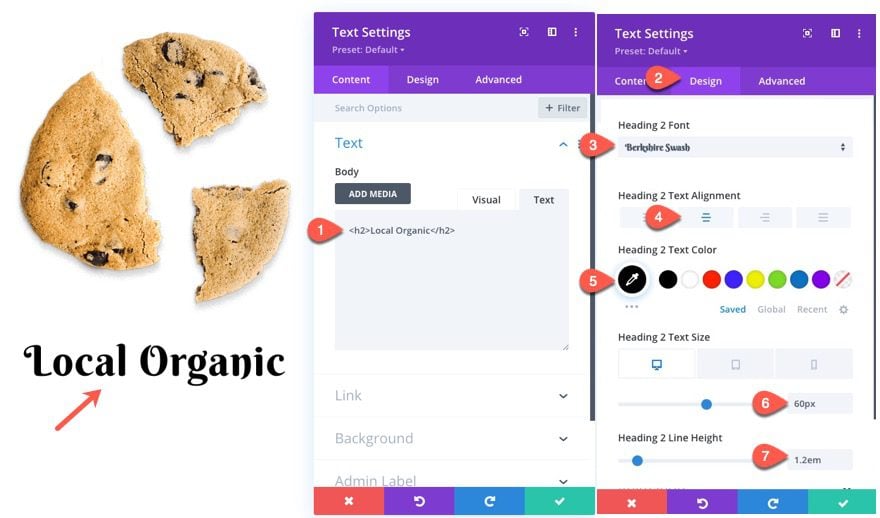
Add Text Module
Under the image module, add a text module with the following H2 heading:
<h2>Local Organic</h2>
Then update the heading 2 styles as follows:
- Heading 2 font: Berkshire Swash
- Heading 2 Text Alignment: Center
- Heading 2 Text Color: #000000
- Heading 2 Text Size: 60px (desktop), 32px (tablet), 20px (phone)
- Heading 2 Line Height: 1.2em
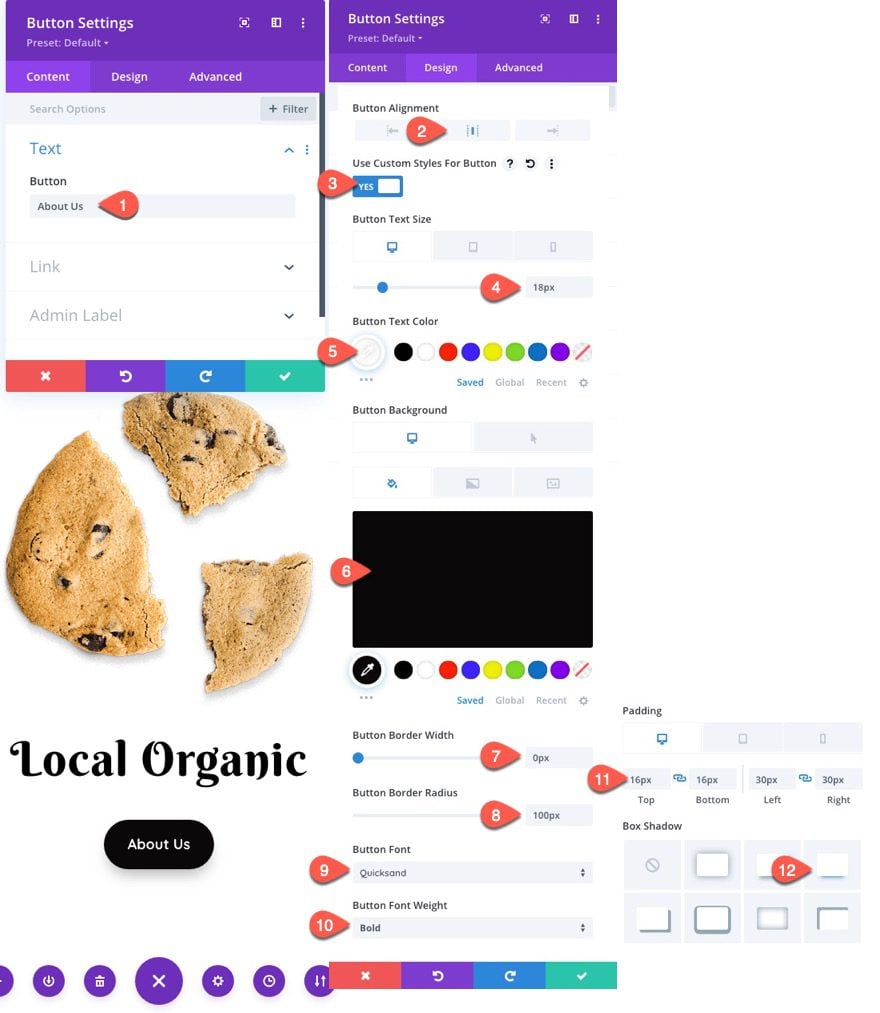
Add Button Module
Under the Text Module, add a button module.
Update the button text to read “About Us” and update the design settings as follows:
- Button Alignment: centerr
- Button Text Size: 18px
- Button Text Color: #fff
- Button Background Color: #000
- Button Border Width: 0px
- Button Border Radius: 100px
- Button Font: Quicksand
- Button Font Weight: Bold
- Padding: 16px top, 16px bottom, 30px left, 30px right
- Box Shadow: see screenshot
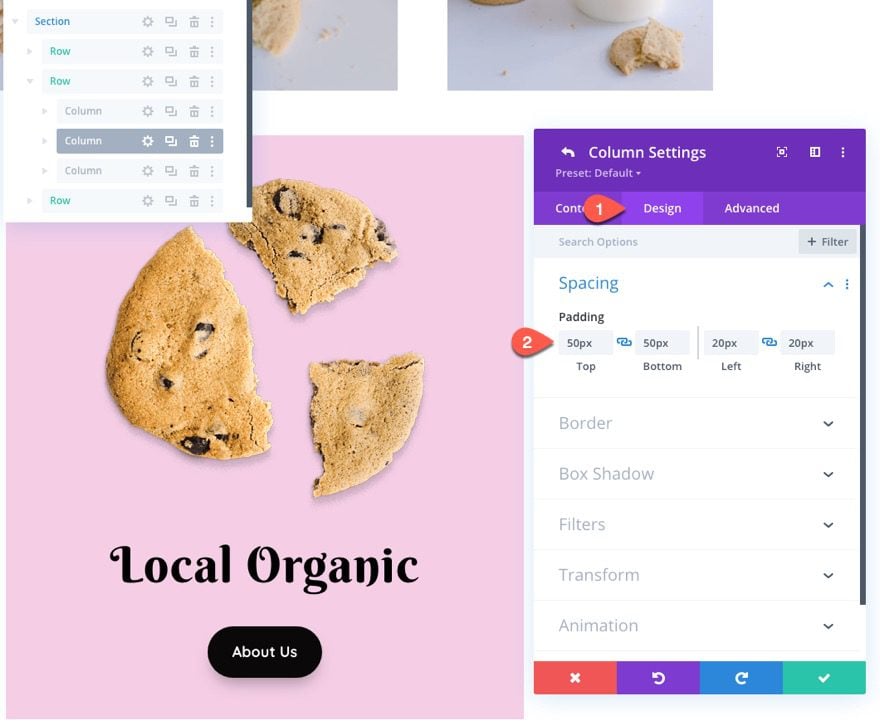
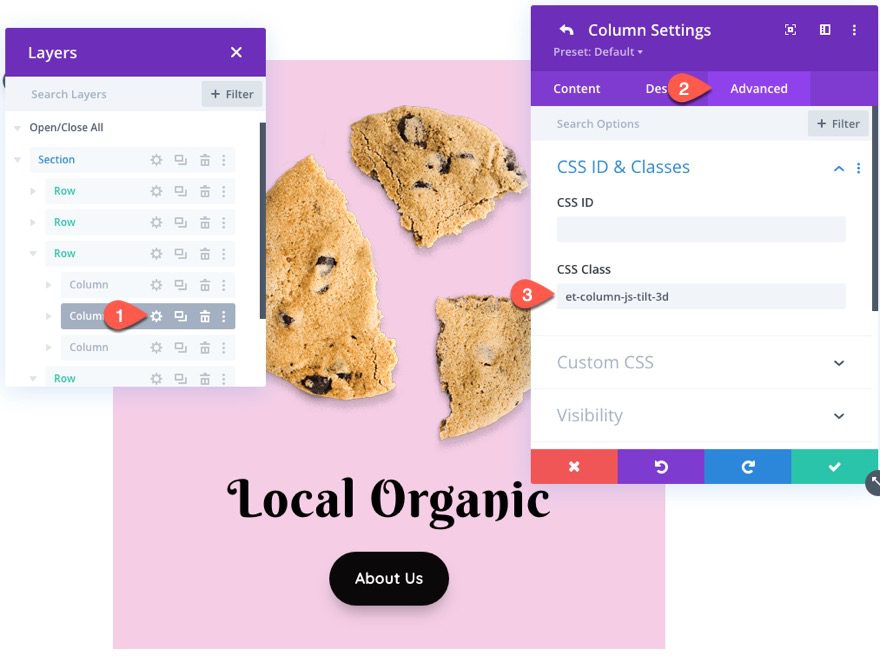
Column Settings
Once the three modules are finished, open the settings for the parent column of those modules (column 2) and update the following:
- Background Color: #f5cee6
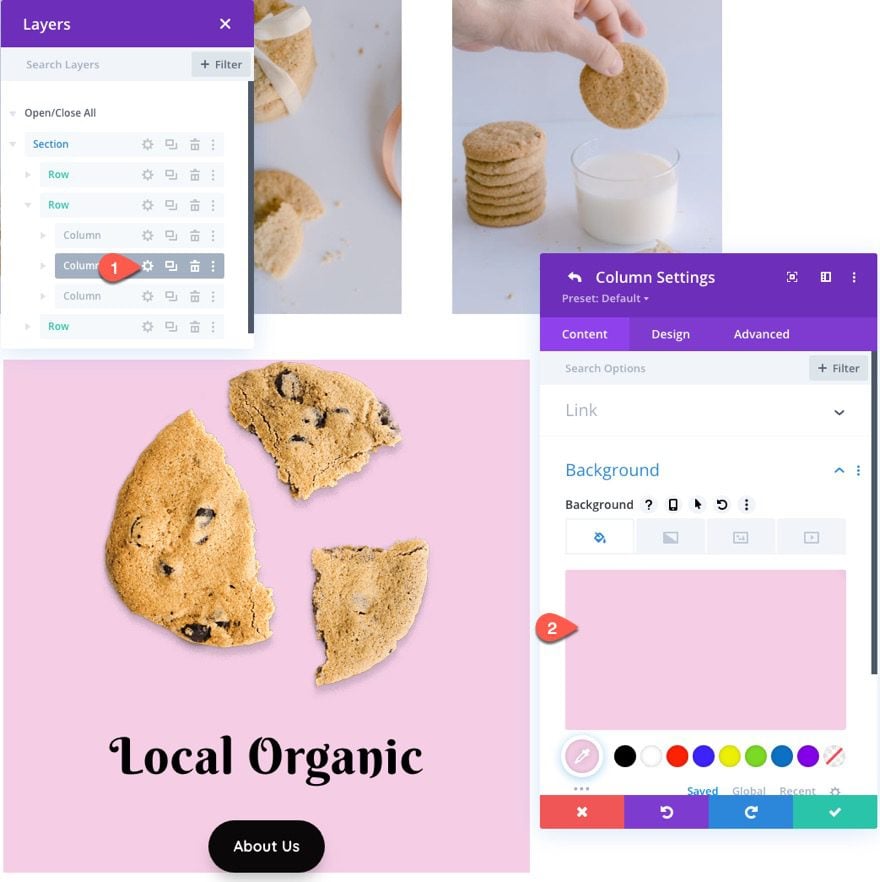
- Padding: 50px (top and bottom), 20px (left and right)
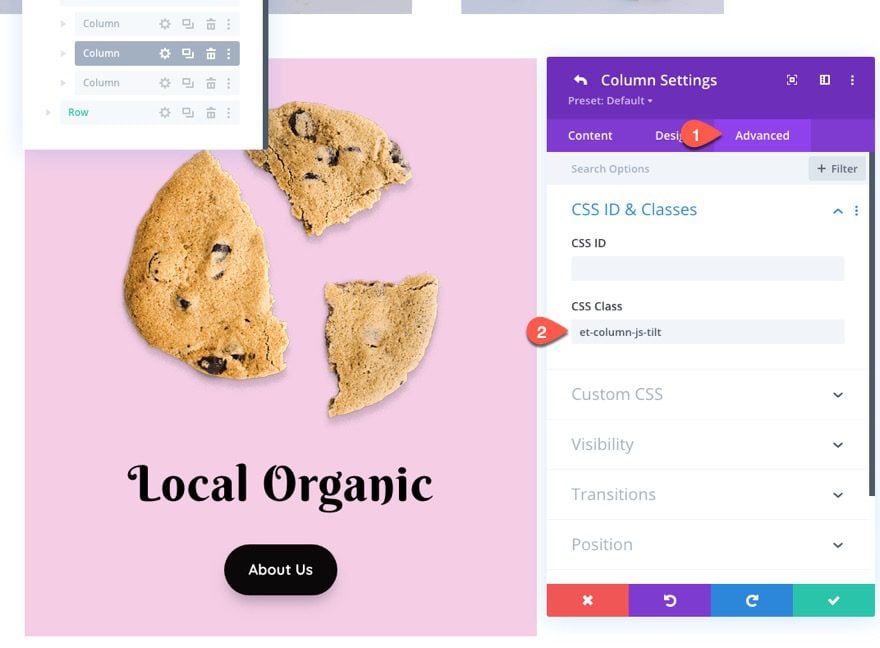
Adding the CSS Class to the Column
Under the advanced tab, add the following CSS Class:
- CSS Class: et-column-js-tilt
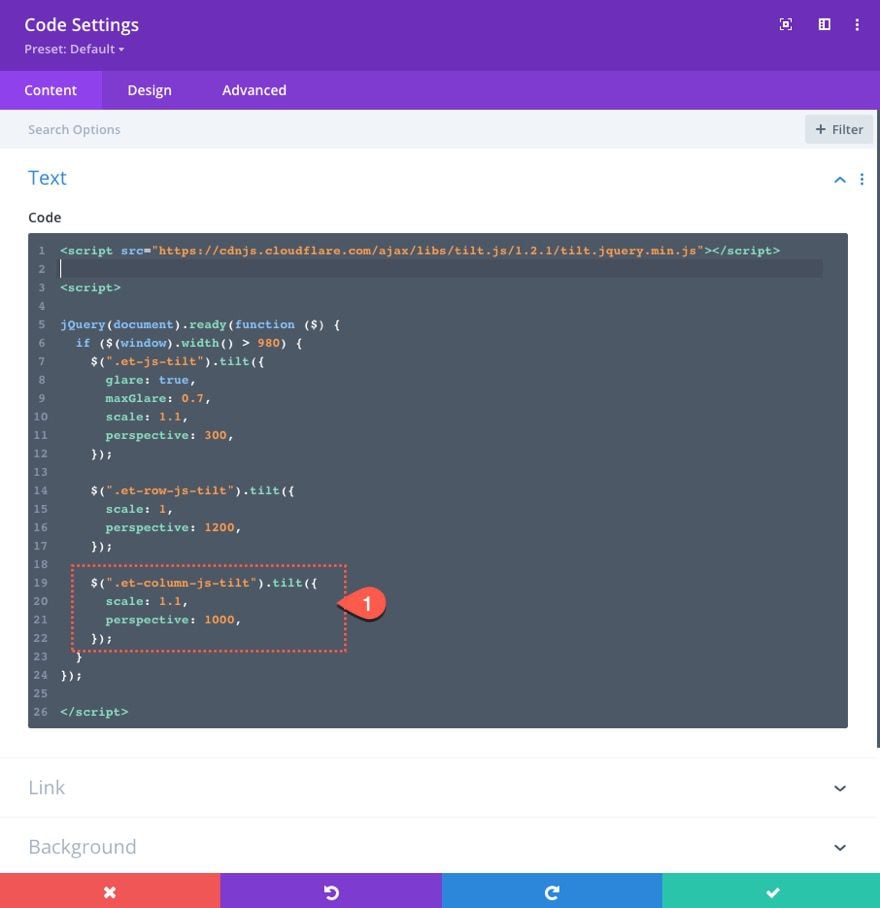
Adding the jQuery to Apply a Tilt Effect to the Column
To add the tilt effect to the column, we can add another similar snippet of jQuery that targets the column CSS Class. Paste the following snippet below the previous snippet targeting the row.
    $(".et-column-js-tilt").tilt({
      scale: 1.1,
      perspective: 1000,
    });
Here is the final result.
Adding 3D Parallax Effect to Inner Elements
For a more advanced hover tilt effect, we can add a 3D parallax effect to inner modules of the column. Using a combination ofperspective and transform:translateZ(), we can have each of the modules within the column pop out in 3d space when the hover tilt effect is active.
Here’s how to do it.
Duplicate Previous Row
First, duplicate the previous row with the tilt effect added to the middle column.
Add Unique Column Class
Then update the middle column (column 2) with a unique CSS Class as follows:
- CSS Class: et-column-js-tilt-3d
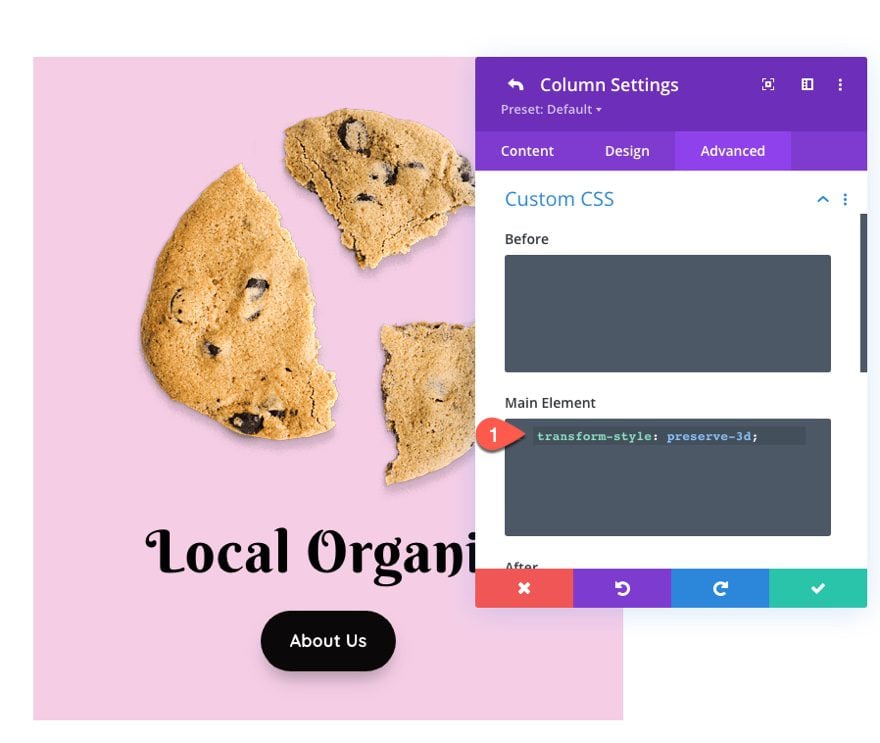
Custom CSS
To make sure the inner modules preserve the 3d effect, add the following Custom CSS to the Main Element of the Column:
transform-style: preserve-3d;
Add jQuery and CSS
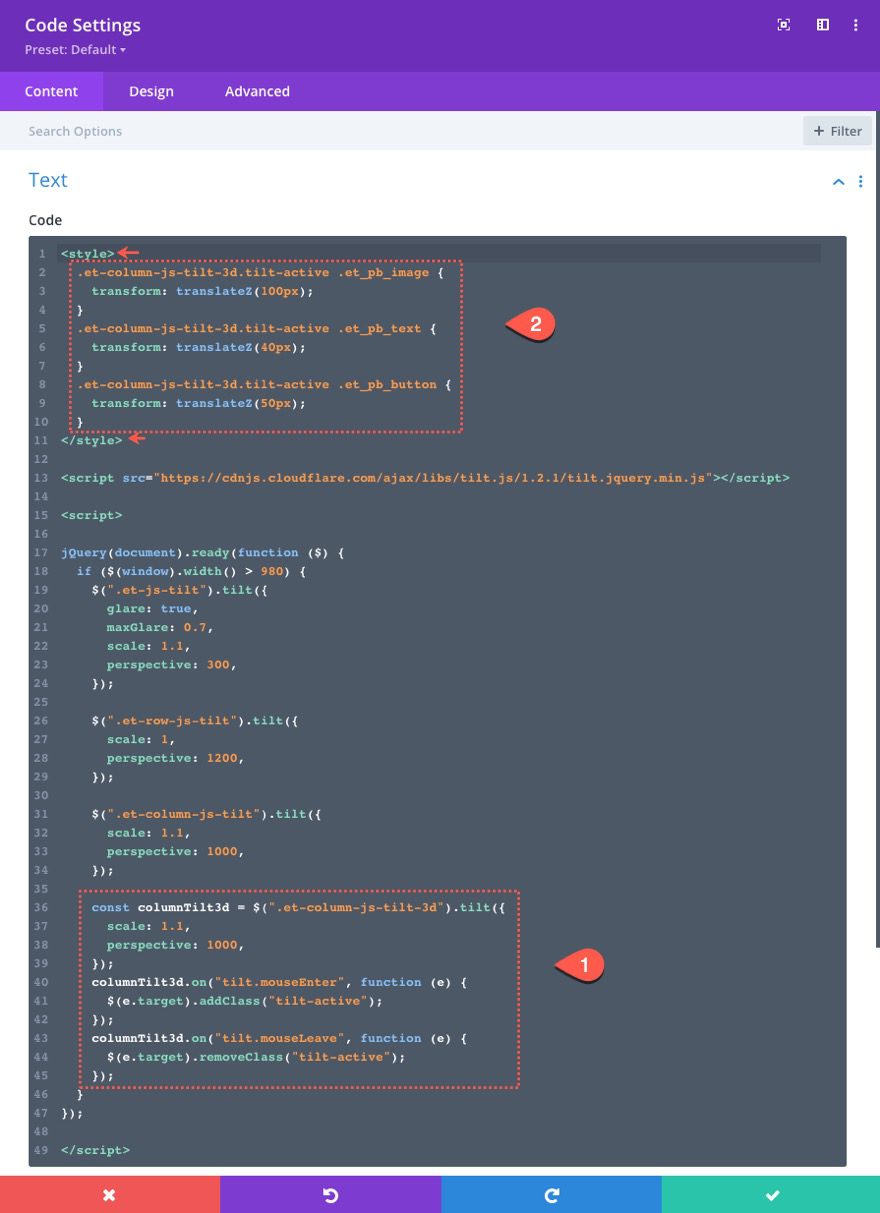
Then add a few more snippets of jQuery under the previous tilt function snippet targeting the column as follows:
    const columnTilt3d = $(".et-column-js-tilt-3d").tilt({
      scale: 1.1,
      perspective: 1000,
    });
    columnTilt3d.on("tilt.mouseEnter", function (e) {
      $(e.target).addClass("tilt-active");
    });
    columnTilt3d.on("tilt.mouseLeave", function (e) {
      $(e.target).removeClass("tilt-active");
    });
This jQuery adds another basic tilt function to the column just like the previous example. However, the code also toggles a new class (“tilt-active”) to the column whenever the tilt effect is active. We can use this new class to apply a transform: translateZ() value to each of the modules when hovering over the column. This will create the pop-out 3d parallax effect.
To do this, add the following Custom CSS to the top of the code box/content making sure to wrap the CSS in the necessary style tags.
  .et-column-js-tilt-3d.tilt-active .et_pb_image {
    transform: translateZ(100px);
  }
  .et-column-js-tilt-3d.tilt-active .et_pb_text {
    transform: translateZ(40px);
  }
  .et-column-js-tilt-3d.tilt-active .et_pb_button {
    transform: translateZ(50px);
  }
Now check out the final result. Notice how the three modules pop out in 3d space as they rotate during the tilt effect.
Final Results
Here is another look at the final results for our examples.
Final Thoughts
The hover tilt effects offered by Tilt.js really are fun to experiment with. Although I used some basic examples in this tutorial, you could easily have a field day applying these hover tilt effects to any of our premade layouts or on your own site. Enjoy!
I look forward to hearing from you in the comments.
Cheers!


Its really not working even I follow the tutorial properly. Can you explain why its not working?
It should work. I suggest that you contact the Support Team so they can check why it is not working on your site.
I cant get it to work :/
Suddenly it not work on Safari browser at all 🙁 is there some trick to fix that?
Thank you for the article.
How to make the animation start smoothly? Without that abrupt movement in the beginning.
Very cool Jason.
I have the Divi Supreme module and the option is already in it but it does not manage the box-shadows. But it’s true that it would be cool if it was native to Divi!
Thanks for your very detailed share. That’s pretty cool. But Is that make my site slower speed cause many code add in? Divi is a little heavy to get faster, in my opinion.
Try Freesoul Deactivate Plugins to set only the necessary plugin to fire on a specific page. That will reduce the number of DB inquiries and give you faster TTF.
Moreover, you may adjust the plugin firing order. It will take you a few hundred or GTMetrix runs but, eventually, you will get B ~87 ~88 for a landing page and just a bit slower for a portal.
Enjoy
The jQuery is really lightweight. Shouldn’t be an issue.
Great guide, tilt.js is a lot of fun indeed. I just found a limitation that I want to share and ask if anyone have any suggestion on how to get around it:
Adding 3D Parallax Effect to Inner Elements with perspective and transform:translateZ() does NOT work if the column use Design > Border > Rounded Corners. If Rounded Corners are not zero, the script refuses to pop out the elements in the column on the Z-axis.
Man, I just used a couple hours figuring this out, as I use rounded corners on a lot of column on my sites. Any suggestion on how I can get both rounded corners on a column AND parallax effect to the inner elements within it?
Sven,
Sorry, I should have mentioned that. The fix is to set the horizontal and vertical overflow to “visible” on any element that has a border-radius/rounded corner. Divi adds the “overflow:hidden” behind the scenes automatically whenever you add border radius.
Wow, I didn’t know all of that. Cool! I love WP but sometimes it’s hard to imagine how big sites can be run with it. Your post shows that it’s really possible
Glad to help, Joni. Thanks.
Thank you for the Tutorial!
I would like to see this function as a native option in the next Divi update 😉
That would be cool! Thanks for the suggestion, Kevin.
Good shit!
Glad you liked it!