

Divi AI agents let you build and edit websites through conversation. Available inside Divi 5, they work alongside your page in the Visual Builder and can make changes to the layout while you watch.
Paste in a screenshot of a page you like and ask for a similar layout. The agent builds with sections, rows, and modules you can open, restyle, and keep editing by hand. The new feature uses Divi-specific tools to work with the builder’s structure and settings. It also supports selected WordPress tasks outside the builder, such as managing pages, posts, and menus.
That gives you several ways to use it: creating a first draft, updating an existing page, organizing styles, or getting help with a Divi setting. In this post, we’ll connect a site and explore these workflows, along with the controls that help you guide and review the work.
- 1 Where To Find Divi AI agents
- 2 Build A Layout From A Description, A Screenshot, Or A URL
- 3 Edit An Existing Page
- 4 Work Within Divi’s Design System
- 5 How To Ask For What You Want
- 6 Give The Agent Context, Rules, Commands, And Tools
- 7 Ask It How Divi Works
- 8 Choose The Model For The Job
- 9 Divi AI agents Are Included With Divi AI
Where To Find Divi AI agents
Open a page in the Visual Builder and look at the left sidebar. Click the agent icon to open the chat panel beside your page. Before sending your first request, you’ll need to connect your account and have an available agent balance.
Access is included with Divi AI and Divi Pro, so an existing Pro subscription gives you access to Divi AI agents. Agent requests use a metered balance, which we’ll look at below.
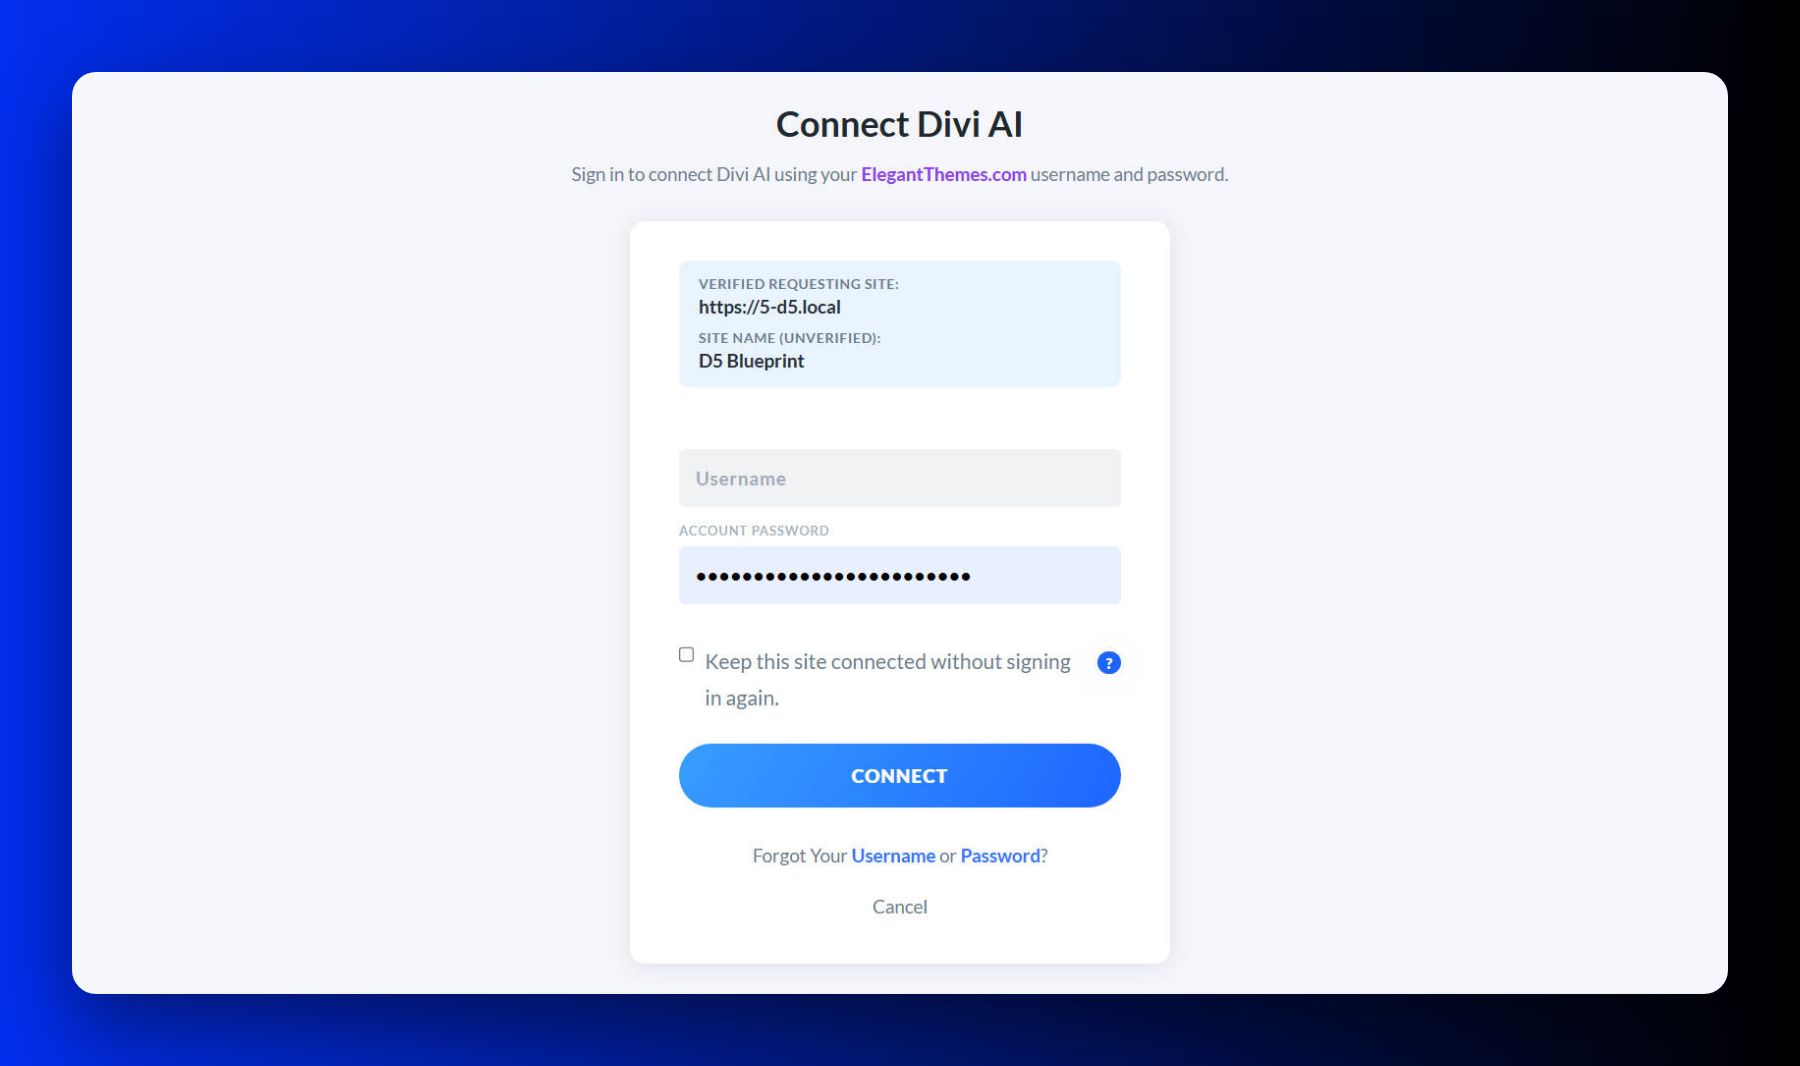
The first time you open the agent on a site, it asks you to sign in with your Elegant Themes membership account. This connects the site to your account so its requests can use your agent balance. Complete this connection on each site where you want to use the feature.
The sign-in screen displays the requesting site’s address and name, so you can check them before approving the connection. Select Keep this site connected without signing in again if you want to retain the connection for future sessions.
Before you ask it to change anything, notice the two modes. Ask mode can inspect your page, Design Variables, Presets, and Divi’s knowledge base to help you understand a setting or plan a change. Switching to Build mode allows the agent to carry out the work on your page.
In Build mode, the agent works in visible steps. As it processes the request and calls tools, you can follow the progress in the chat. The work report gives you a readable record of the actions taken, which is useful when a request involves several changes.
You can keep tasks in separate chat sessions. When you’re moving to a different job or want to start with fresh conversation context, click New Chat. This gives the next request its own conversation instead of continuing the previous thread.
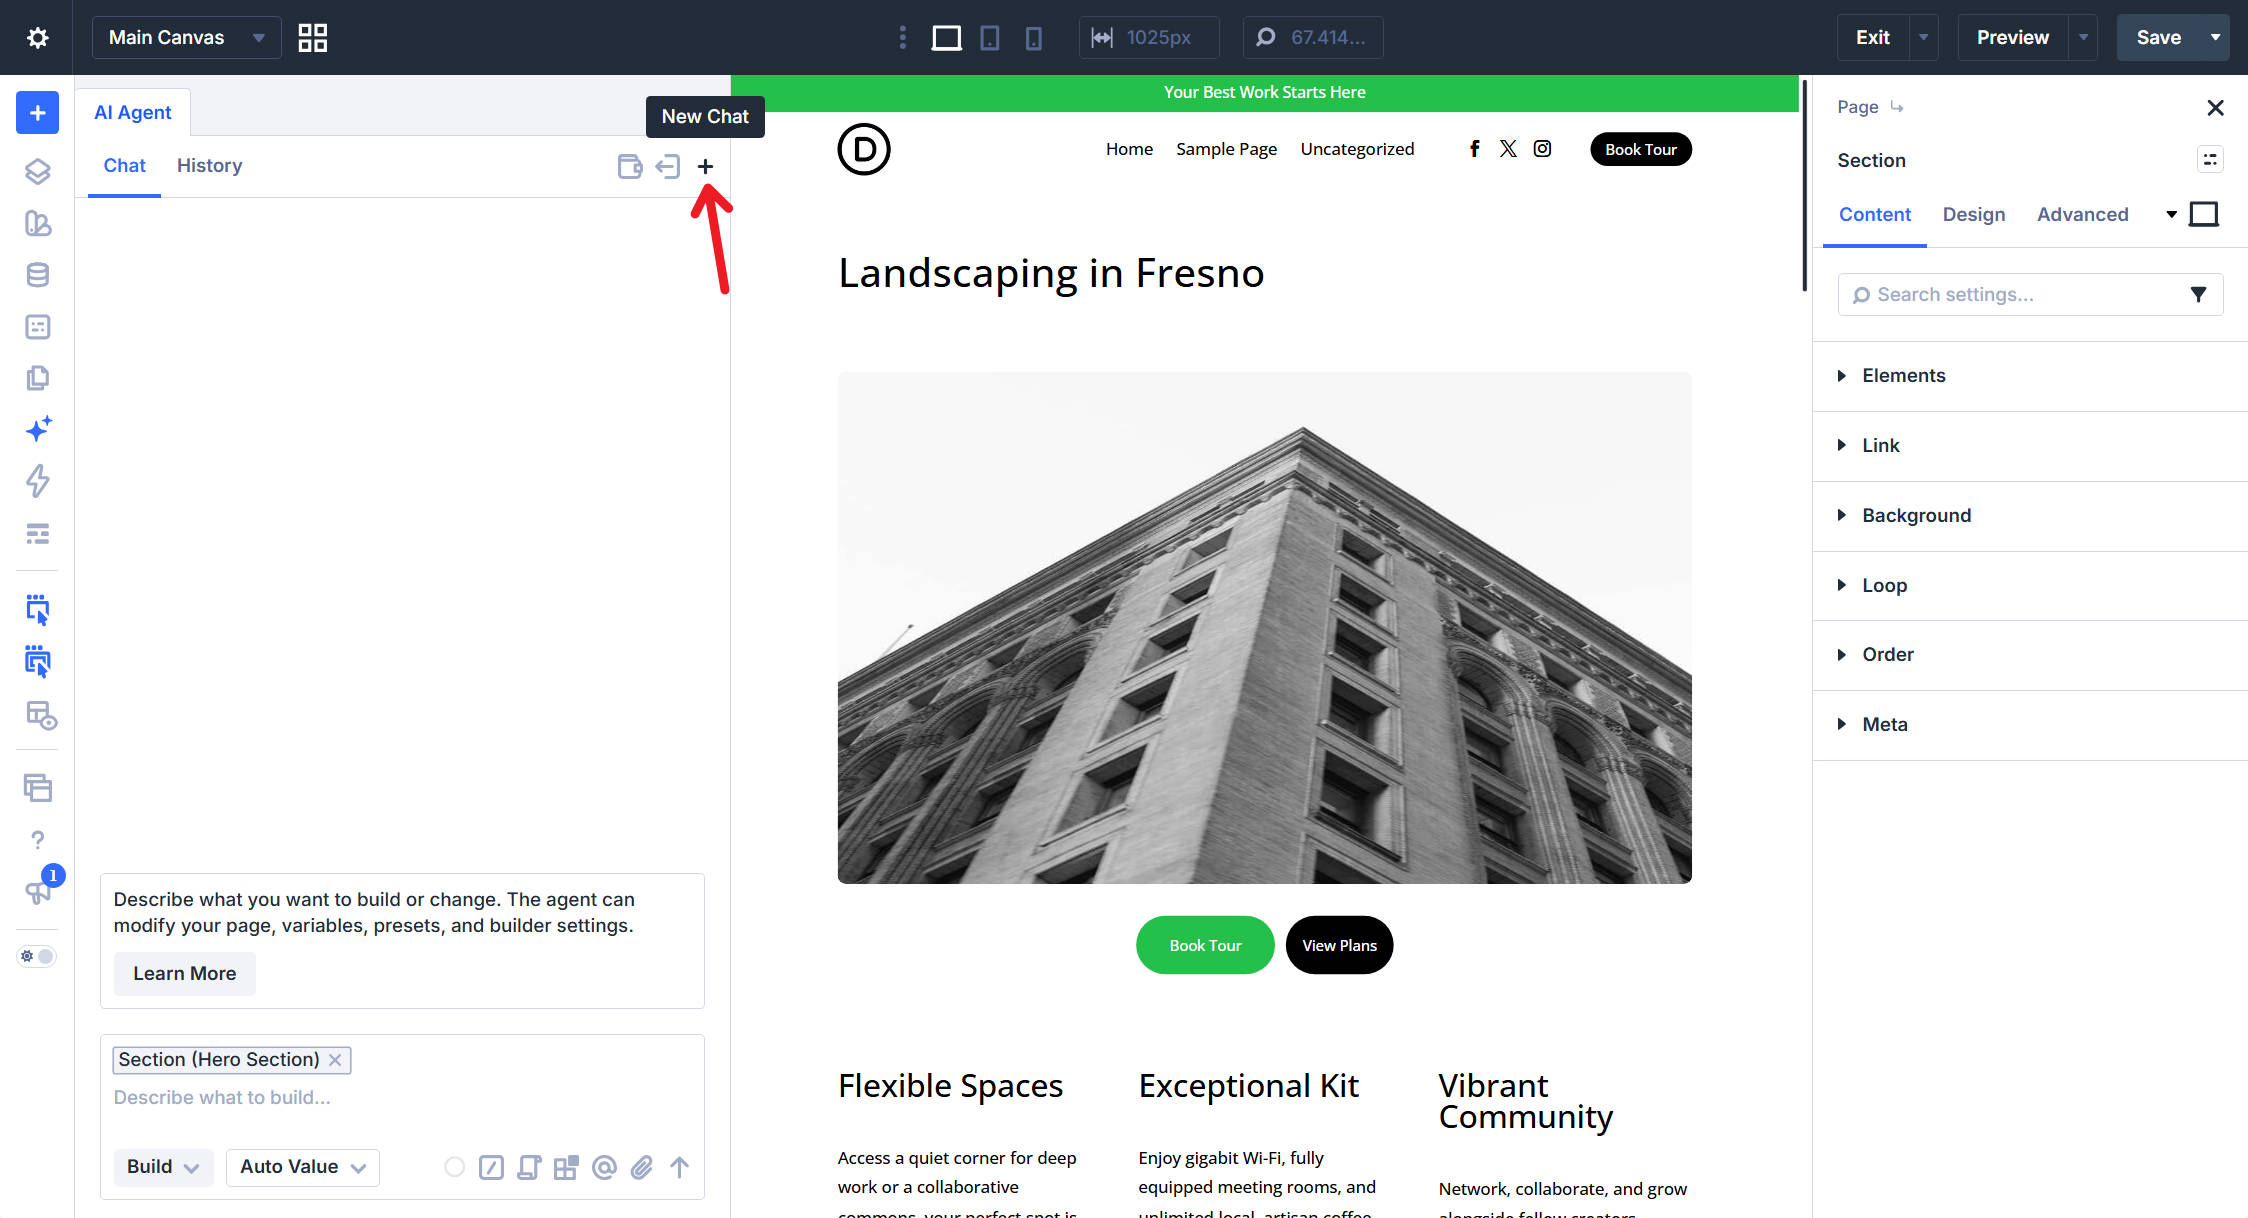
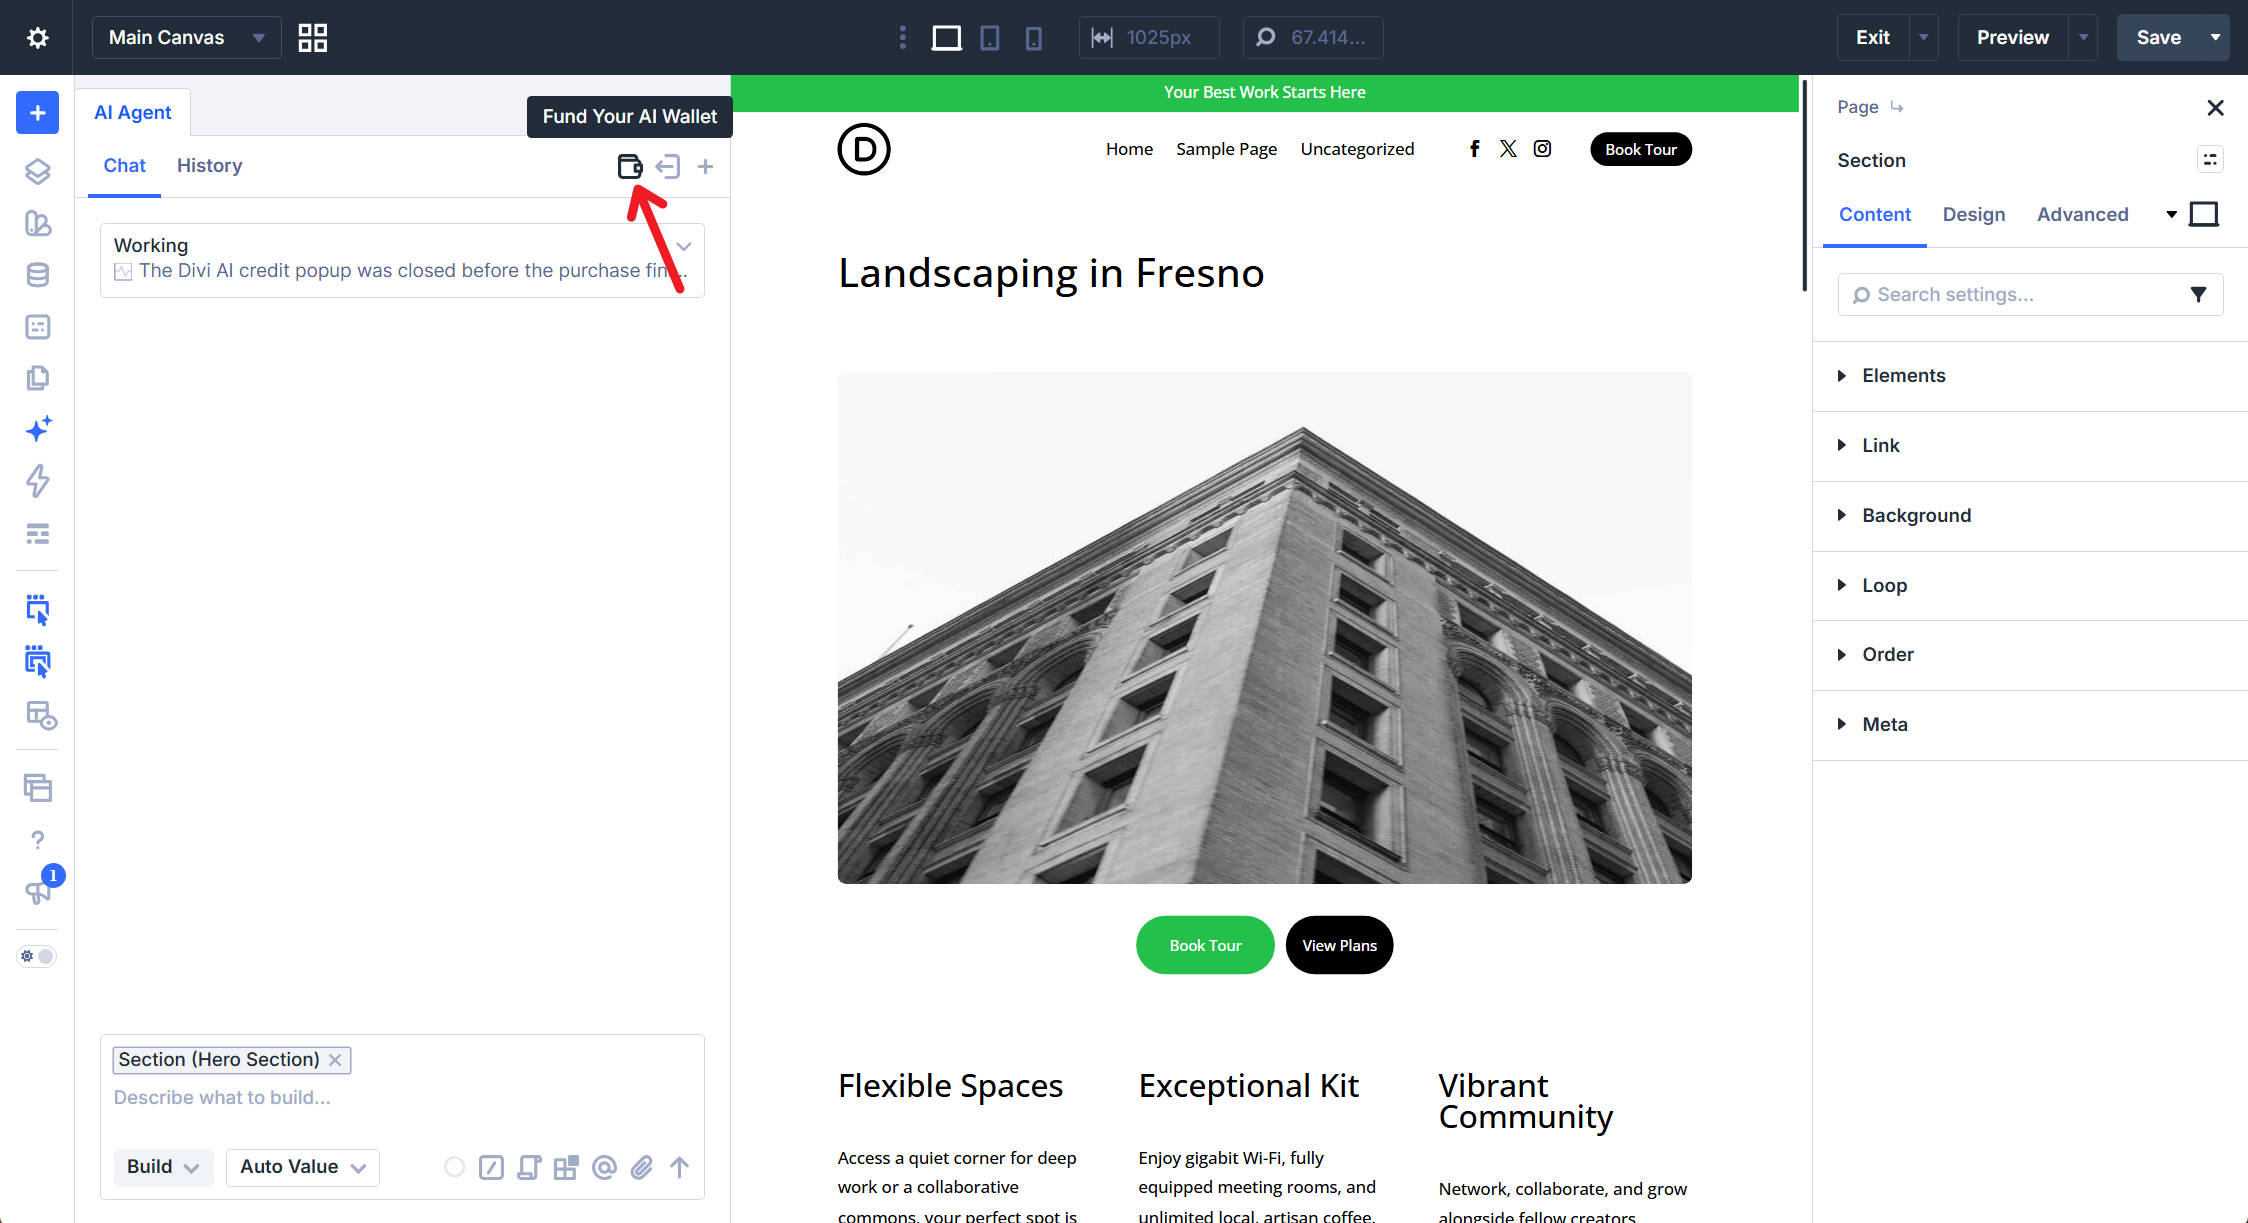
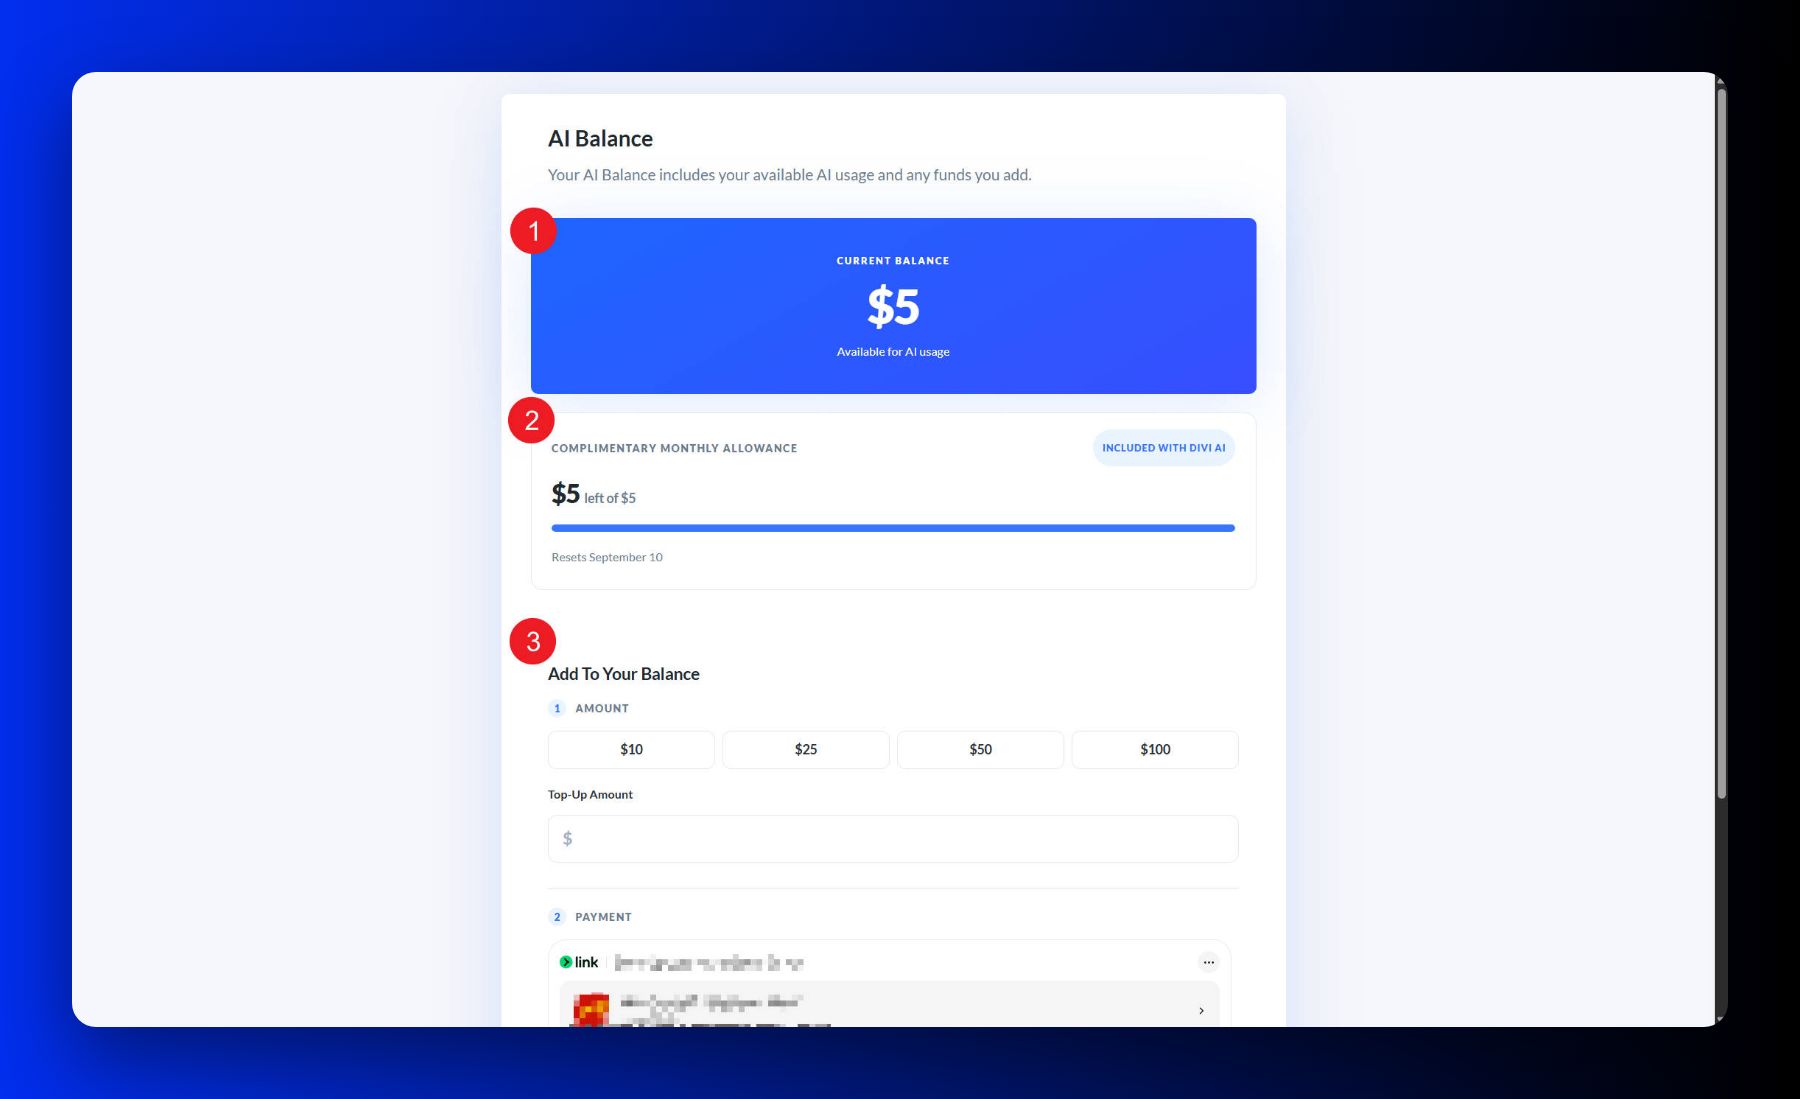
Use the Fund Your AI Wallet icon in the top-right corner of the agent panel to view your current balance and add funds.
Here, you can see your available balance and any complimentary funds from your Divi AI or Divi Pro subscription. If you need more funds, you can purchase them further down the page. This is also where you can check what’s available before starting a larger task.
With the site connected and a balance in place, you’re ready to give the agent its first instruction. Build mode reports its progress through the chat, including the steps it takes and the tools it calls. The example below shows a prompt, work report, added media, and task list.
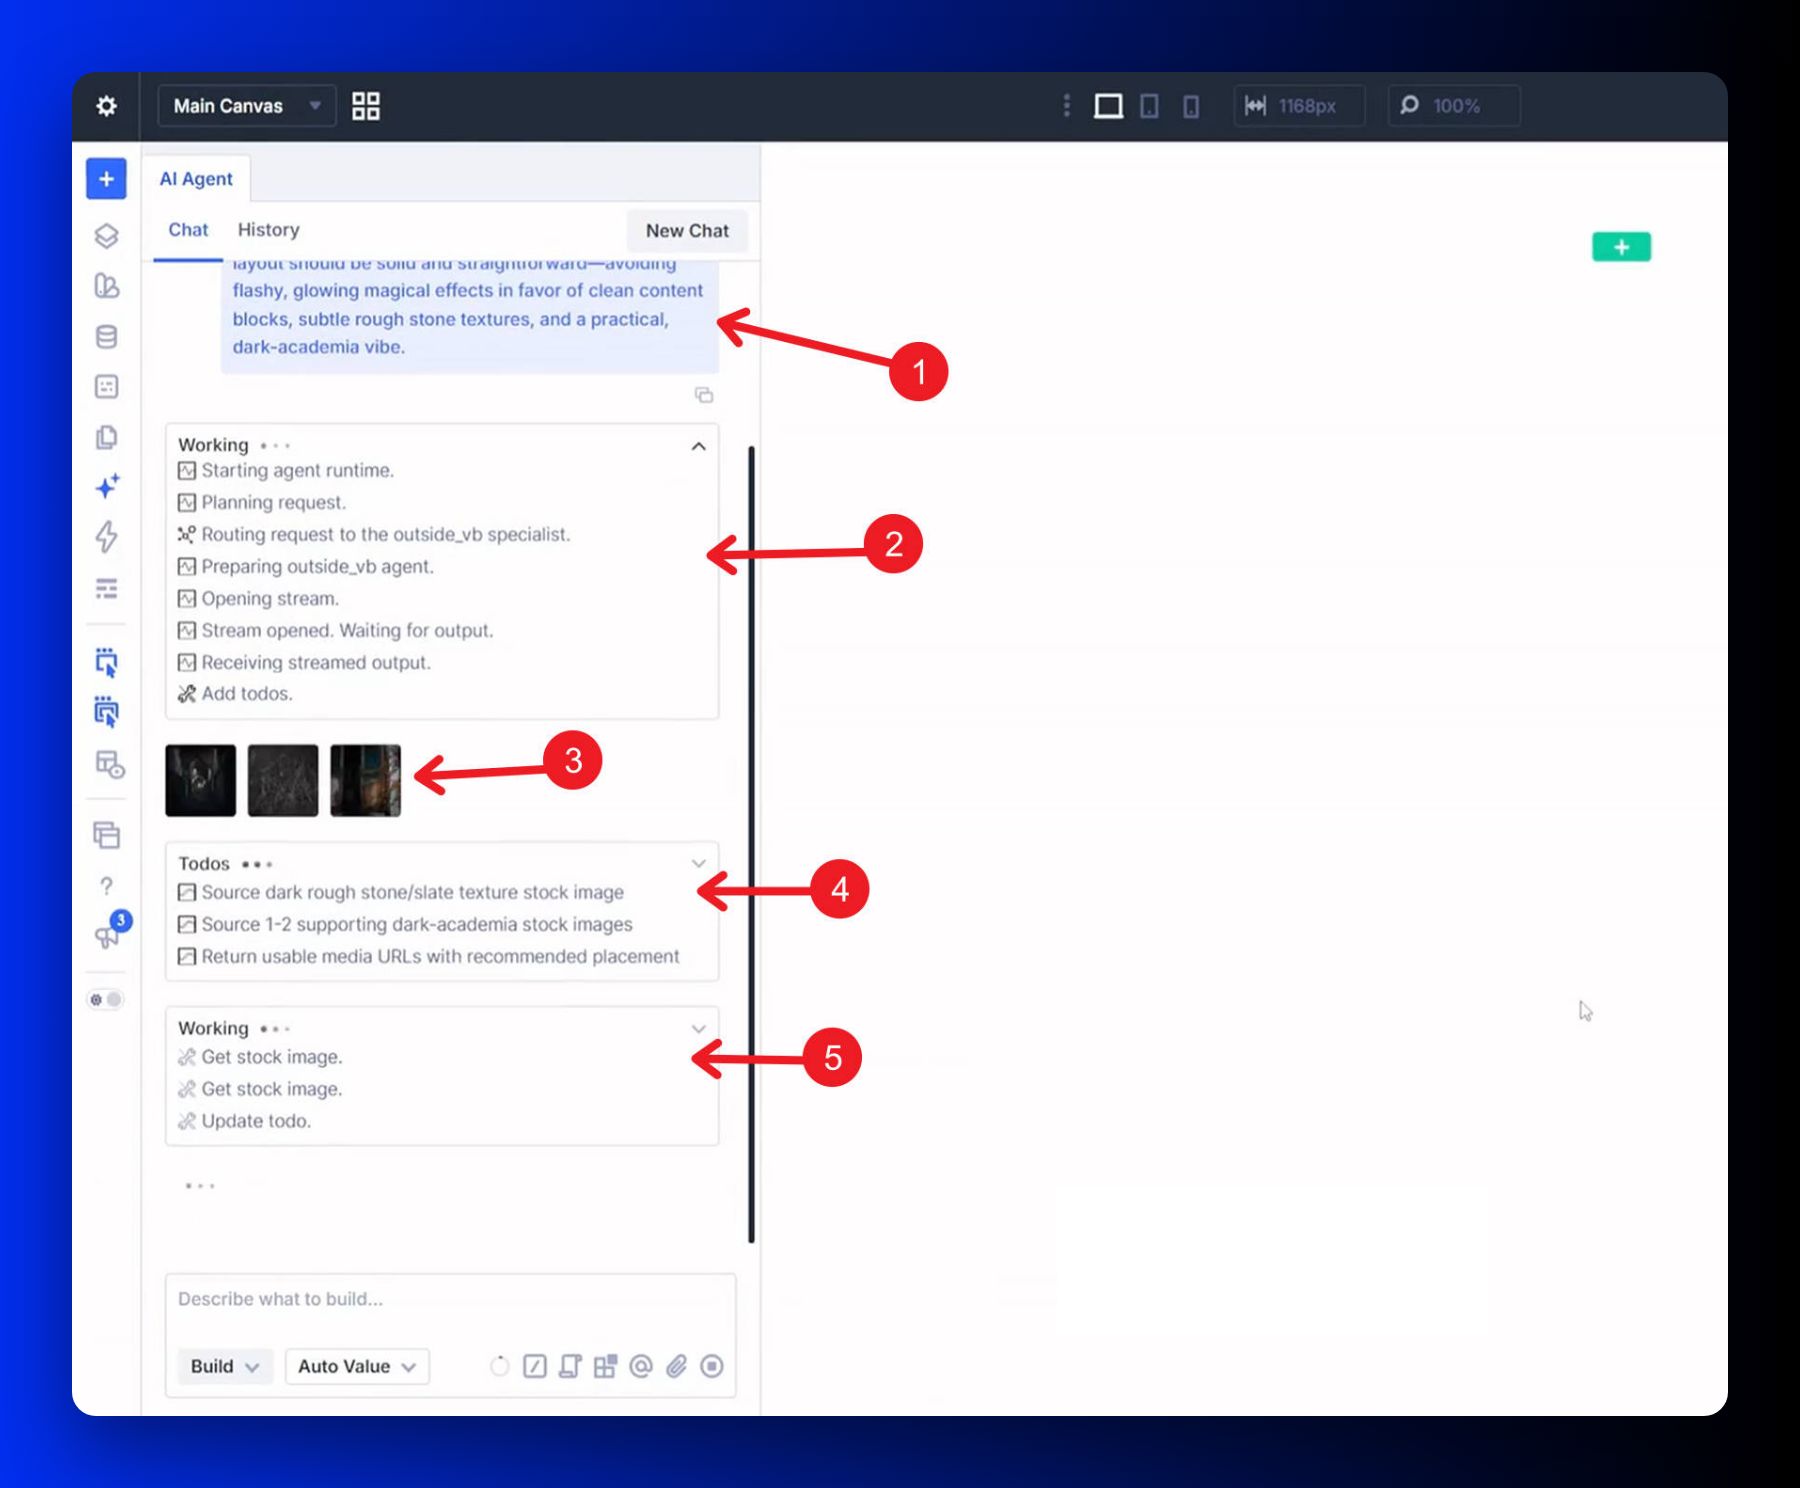
1) User Prompt, 2) Agent Work Report, 3) Media Added, 4) Agent Task List, 5) Further Progress Updates
Build A Layout From A Description, A Screenshot, Or A URL
There are four main ways to start a new layout, and each produces a Divi page you can continue editing with or without the agent. Divi AI agents work with native sections, rows, modules, and design settings, so the result remains part of your normal builder workflow. You can inspect the structure and refine individual settings after the initial layout is built.
You can start:
- From a description. Tell it what the page is for and what it should include. For example, request a pricing page with three tiers and a comparison table, or a services page for a landscaping company with a hero, four service cards, and a contact section. A specific brief gives the agent a clearer starting point.
- From a screenshot or mockup. Paste or attach the image to the chat and ask the agent to build from it. Explain whether you want to follow the overall layout, particular sections, or the visual style, and mention any content that should change.
- From a live URL. Point it at a webpage and explain what you want to use as a reference. The agent can inspect the page and work from its content and design.
- From reference images. Attach several images and ask for a layout that shares their style. Use them to communicate a direction for the colors, typography, imagery, or composition.
You can also combine these inputs. A screenshot might provide the layout, while a written brief supplies the content and brand requirements. The model you choose needs to support the types of input you provide.
Here is the screenshot route in practice. In the recorded example, one large image of a page layout, running on Auto Deep Value, produced nine sections with a reported cost of about $0.10. That figure applies to this example; costs vary with the model and task.
However you start, the canvas contains native Divi structure: sections, rows, modules, content, and styles that you can open and change in the usual settings panels. You can keep working through chat, edit the result manually, or use both approaches as you refine the page.
Edit An Existing Page
You won’t always be starting from an empty canvas. You may have a site that needs a new design direction, updated content, or a few adjustments before handoff. Divi AI agents can work with that existing layout, making them useful for ongoing work on sites you manage.
Ask the agent to redesign a hero, rearrange the modules in a section, rewrite the copy, or fix inconsistent spacing. Describe what you want to achieve and identify the area to change. You don’t need to name every setting involved, but a clear request makes the result easier to review.
One example is updating a page originally built in Divi 4 after opening it in Divi 5. If you want to convert its rows from Block to Flex, the column spacing needs attention too. Spacing previously applied through margins may need to become horizontal or vertical gaps. The following request explains both changes:
Convert all Rows with a Block Layout to have a Flex Layout. Know that Block Layouts apply a margin on the columns for spacing, whereas Flex Layouts need the spacing applied as a horizontal and sometimes vertical gap. Retain other visual spacing decisions, but make sure they work within the new flex layout paradigm.
This updates the layout structure rather than performing a complete site migration. Review the converted rows at different screen sizes to check that their alignment and spacing still work.
Referencing an element directly is often easier than describing its position. Click it on the page and add it as context so the agent has a specific target. You can also refer to a module by its content, such as the text in a heading, to help it locate the right element.
The agent can inspect the page structure, how elements are nested, and their module settings before making a change. That context helps it work with the layout already on the page.
Work Within Divi’s Design System
Presets and Design Variables help keep a Divi site consistent and maintainable. Divi AI agents can work within that system, using existing Presets and variables when you ask them to. Include those requirements in your prompt so new styling follows the site’s conventions and remains editable through Divi’s settings.
You can also work in the other direction. Point the agent at a layout built from individual values and ask it to turn repeated values into Design Variables or repeated styling into a Preset. This can include colors, fonts, gradients, images, and sizes. Ask it to list its suggestions first so you can choose which ones to apply. The example below focuses on converting static values into global Number Variables.
You don’t need to identify every inconsistency yourself before asking for help. Start in Ask mode with a prompt such as “What’s inconsistent on this page?” and review the suggestions. You can also give it more focused tasks:
- Find missing image alt text and suggest descriptions.
- Replace inconsistent colors with appropriate global colors.
- Standardize typography, spacing, and buttons.
- Review how the page behaves across breakpoints.
- Correct spelling, grammar, and capitalization.
- Review the calls to action across the page.
- Find oversized images.
- Review custom CSS that may no longer be needed.
After reviewing the suggestions, decide which changes to apply in Build mode. For shared styles, ask the agent to use the appropriate variable or Preset so the update remains manageable across the elements that use it.
How To Ask For What You Want
A few habits help you give clearer instructions and make the results easier to check:
- Be specific about the outcome. “Make this section better” leaves a lot open to interpretation. “Tighten the spacing here and make the heading the same size as the one above it” identifies both the change and its reference.
- Keep the scope manageable. A single change is easy to check. Larger requests are useful too, but include enough detail and break the work into stages when you want to review decisions along the way.
- Show it when a visual would help. Paste a screenshot or mockup when it explains the layout or style more clearly than a long description. Add a sentence about which parts of the reference matter.
- Give it constraints as well as a goal. Tell it which variables to use, which conventions to follow, and what should remain unchanged. Saved Rules can help you reuse this guidance across tasks.
- Know when to edit manually. Some adjustments are faster and cheaper to make yourself. Use the agent where it helps with the work, and use the builder controls directly when that’s the simpler option.
Review Questions And Confirmations
The agent can ask for clarification when a request is missing important details. It can also pause for approval before destructive or high-impact actions.
When it asks a follow-up question, supply the missing information before continuing. For a larger request, you can explicitly ask it to outline a plan first. This gives you a chance to check its interpretation before it begins changing the page.
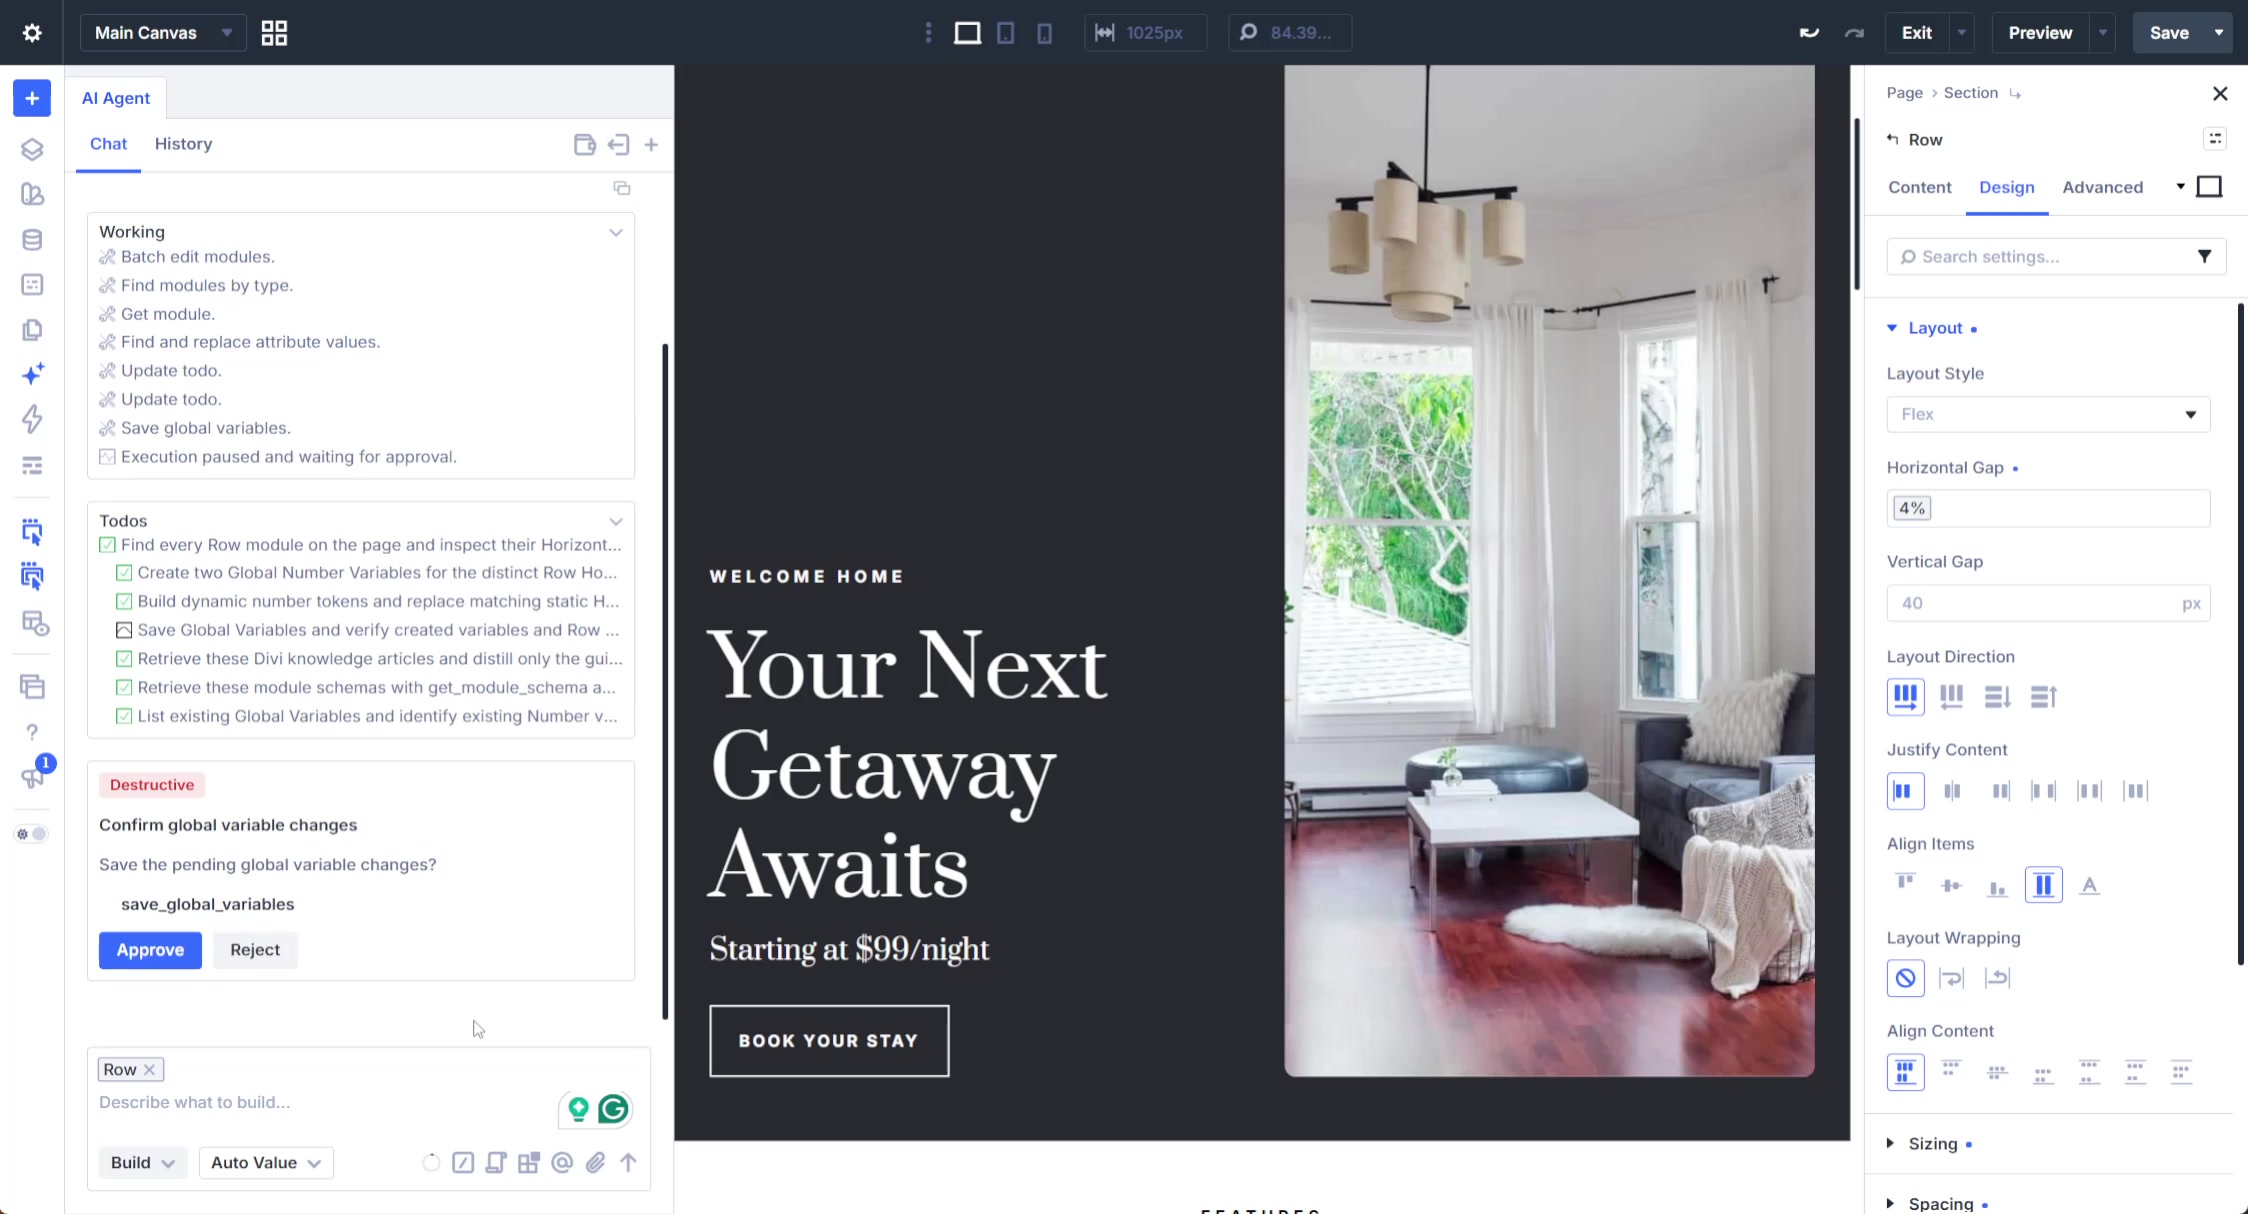
Read confirmation requests carefully when they involve deleting a template, trashing a page, removing a menu, or changing shared settings. If a menu location already has an assignment, check what will happen to that assignment before approving a replacement. In the screenshot below, the agent pauses for approval before saving changes to global variables.
If You Do Not Like The Result
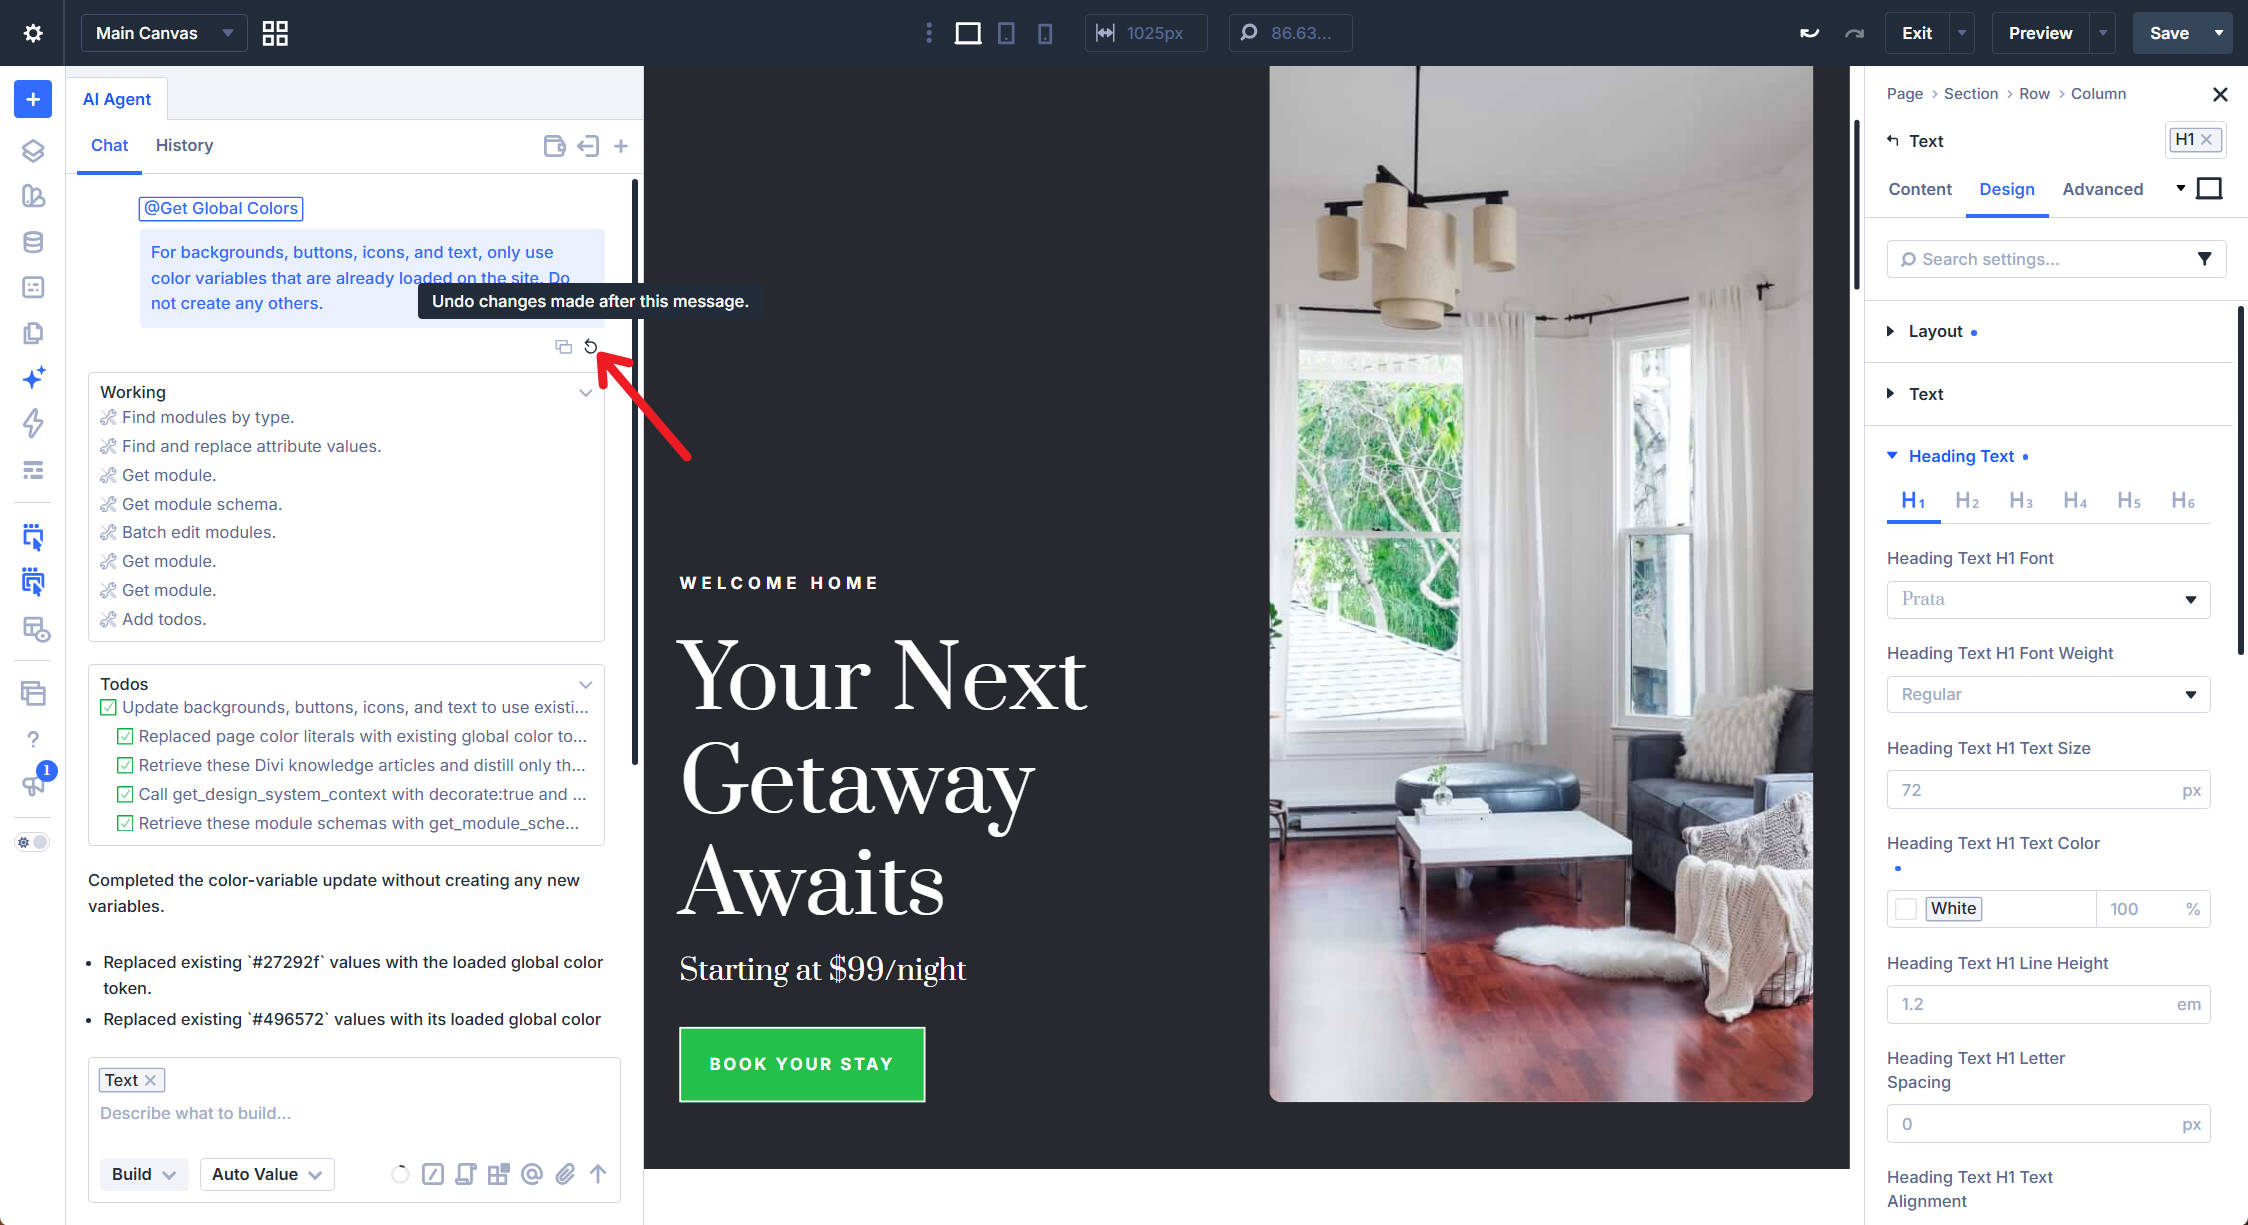
Previous messages provide a restore option for returning the page to an earlier checkpoint. Click the restore icon beside the relevant message, then review the Restore to This Point dialog before confirming. This lets you return to the layout state associated with that point in the conversation.
Restoring rewinds the page rather than selectively reversing one edit. Manual changes you made to that layout after the selected point are removed along with the agent’s subsequent changes. Check what you’ve done since that checkpoint, especially if you’ve been editing by hand alongside the agent.
Small, checkable steps make this easier to manage. If you review a single section change before moving on, you have a clearer checkpoint to return to. A restore after a larger redesign may undo considerably more work, including later adjustments you wanted to keep.
Give The Agent Context, Rules, Commands, And Tools
The chat panel includes more than a prompt field. Context supplies references, Rules save guidance, Commands let you repeat tasks, and Tools expose the actions the agent can use while working.
Add Context From Your Page
Click an element and add it to your request to show the agent exactly where to focus. You can also reference another page on your site, which is useful when you want a new section to follow a design you’ve already approved elsewhere.
Save Rules For Your Website
Rules are saved instructions that the agent can use when relevant to a task on your site. They can describe your brand voice, layout conventions, or which variables and Presets to use with particular modules. This gives recurring requirements a place outside individual chat messages.
If you find yourself typing the same guidance repeatedly, consider saving it as a Rule. For example, specify the existing variables to use for headings and backgrounds. Keep Rules up to date as the site’s design system or content requirements change.
Turn Repeated Prompts Into Commands
When you regularly run the same request, save it as a Command. You can then invoke it from the chat by typing / and choosing the saved Command, instead of writing out the instructions again.
Good candidates include the reviews you run before a page goes live: an accessibility check, a responsive layout review, a design system audit, or a final content check. Describe what to inspect and whether you want suggestions or changes. Reusing the Command helps you keep those requests consistent across pages.
Commands describe jobs you want done, while Rules guide how those jobs should be carried out. You can include the relevant Rules as context for a Command, so a repeated task follows the site’s requirements.
The Tools button opens a searchable list of actions the agent can use. Some inspect information, such as page structure, modules, or global colors. Others make changes to supported Divi settings or perform WordPress tasks outside the builder.
Selecting a tool lets you reference it in your prompt when you want to direct the agent toward a particular action. You can also see tool calls in the progress log as it works.
We’ll cover the complete list and explain each tool’s purpose in a separate post. For now, this panel gives you a useful view of the actions behind the conversation.
Ask It How Divi Works
The agent can consult Divi’s documentation and knowledge articles to help answer questions. With relevant page or site context, it can also help you investigate a specific issue, such as a Theme Builder template that isn’t applying, rather than only explaining the feature in general.
Questions to ask include:
- Should this section use Flexbox or CSS Grid?
- Should I assign Design Variables to these settings or use a Preset for the shared styling?
- Why isn’t my Theme Builder template applying to this page?
- How do the aspect ratio options behave?
Once you understand the suggested solution, you can ask the agent to apply it in Build mode. This keeps the explanation and the follow-up work in the same conversation.
Ask mode is the starting point when you want to explore settings or plan a change without editing the layout. Read the answer, ask follow-up questions, and switch to Build when you’re ready to act on it.
Choose The Model For The Job
Different AI models have different strengths, speeds, and costs, so Divi AI agents aren’t tied to a single model. Choose from hundreds of supported models or use an automatic selection option. This lets you adjust the model to the task instead of using the same one for every request.
A more capable model may suit design work and longer tasks with several dependent steps. A faster, less expensive model may be enough for straightforward proofreading. For work involving screenshots or image descriptions, choose a model that supports image input. Your choice affects usage costs, so the model selector is worth getting familiar with.
The agent can also create sub-agents to run independent work in parallel and assign a model to each. This allows separate parts of a larger task to use different models. It can be useful for dividing the work, though the total cost still depends on the models selected and the requests they process.
Divi AI agents Are Included With Divi AI
Divi AI agents come with Divi AI and are also part of Divi Pro. Your subscription can be used across the sites you build, and both plans currently include $5 in complimentary agent usage each month.
Access and usage are separate: agent requests are metered according to the model and the amount of input and output processed. You can add funds when you need more than the included allowance. Divi AI’s unlimited generation features do not make agent usage unlimited. Check the Divi AI agents page for current pricing details.
Start with one page. Open it in Ask mode, ask what’s inconsistent in a particular section, and review the response. Choose a change to apply in Build mode, then check the result on the canvas. That gives you a practical first task without handing over an entire redesign.
As you work, save useful instructions as Rules and repeated requests as Commands. You can build up a set of workflows for the tasks you do most often, from refining a page’s design to reviewing its content before publishing.






Leave A Reply