We love to interact with images online. In fact, we expect it. Pinterest, Facebook, and Instagram continue to prove this. With that in mind, it makes good sense to add an image to your website whenever possible. And, adding images in a mega menu is another great opportunity to give your users the interaction they need.
Adding images to a mega menu is a smart solution to improve the navigation of your website. Mega menus allow users to see more links all at once without the hassle of scrolling, hovering, and remembering the contents of your menu. Images also enhance the menu by grabbing their attention to further simplify the navigation process.
There are useful plugins out there that will do this for you. However, since Divi comes with a mega menu functionality already built in, it’s best to take advantage of this feature and add images to the mega menu without the use of a plugin.
Enjoy!
Implementing the Design with Divi
To get started we must first create the menu. For this example I’m creating one main parent menu item called “Mega Menu” with four sub menu items under it. Each of the four sub menu items have three sub sub menu items. Here is the breakdown for clarity:
- Mega Menu
- About Us
- Our Team
- Our Mission
- Company History
- Services
- Web Design
- Web Development
- SEO
- Our Work
- Blogs
- E-commerce
- Corporate
- Contact Us
- Support
- Directions
- Jobs
- About Us
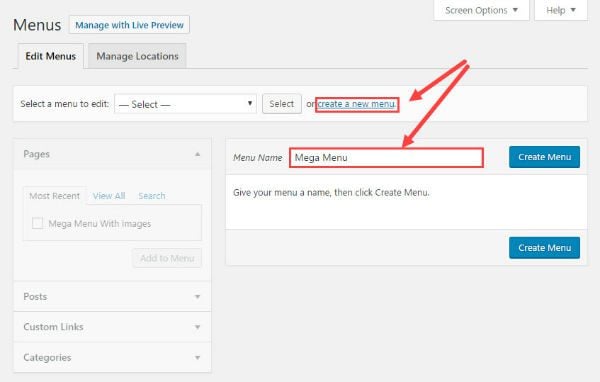
In the WordPress admin dashboard, go to Appearance → Menus. Click create a new menu and give it a name (something like “Mega Menu” should do).
Now start adding the links to the menu. I’m using custom links for this example but you can use existing pages, posts or categories if you want.
To add a custom link, click to toggle open Custom Links and add your url and Link Text. Repeat this process for all of the links.
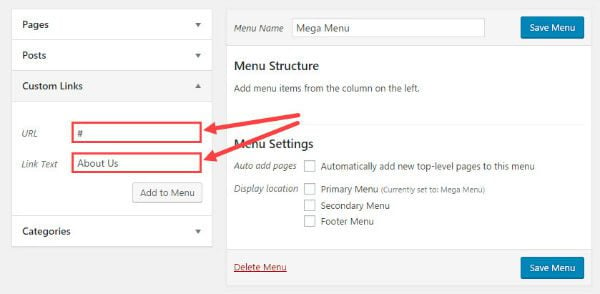
Note: For this example I’m simply adding a hashtag (#) in the url text box to serve as a mock link which will not link to anything.
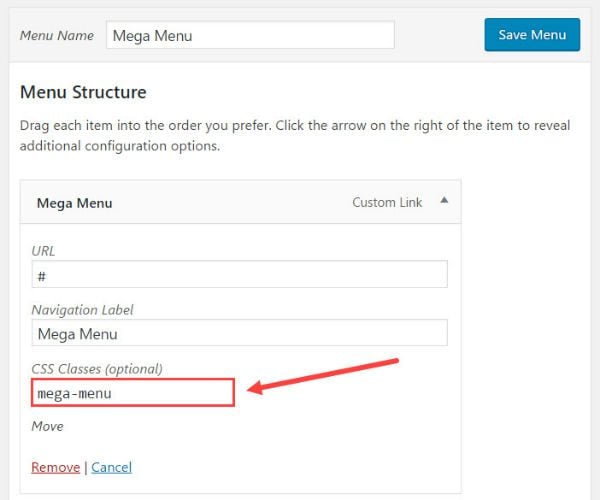
Now create one more link to serve as the mega menu link. I named it “Mega Menu” to make this clear. This is the link that will display your mega menu on hover.
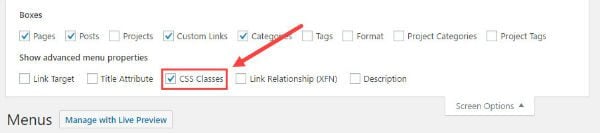
Turning your menu into a mega menu is quite simple. All you need to do is add a css class to the main Mega Menu item you just created.
To do this, click the arrow on the right of the Mega Menu item to reveal additional configuration options. Find the text box labeled CSS Classes and enter “mega-menu.”
If you don’t see the CSS Classes text box, click the Screen Options tab at the top right of Menus screen.
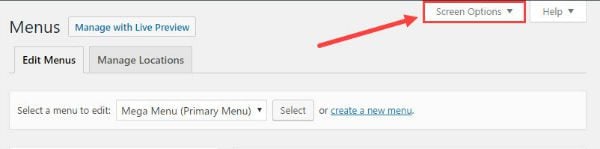
Under “Show advanced menu properties” make sure CSS Classes is checked.
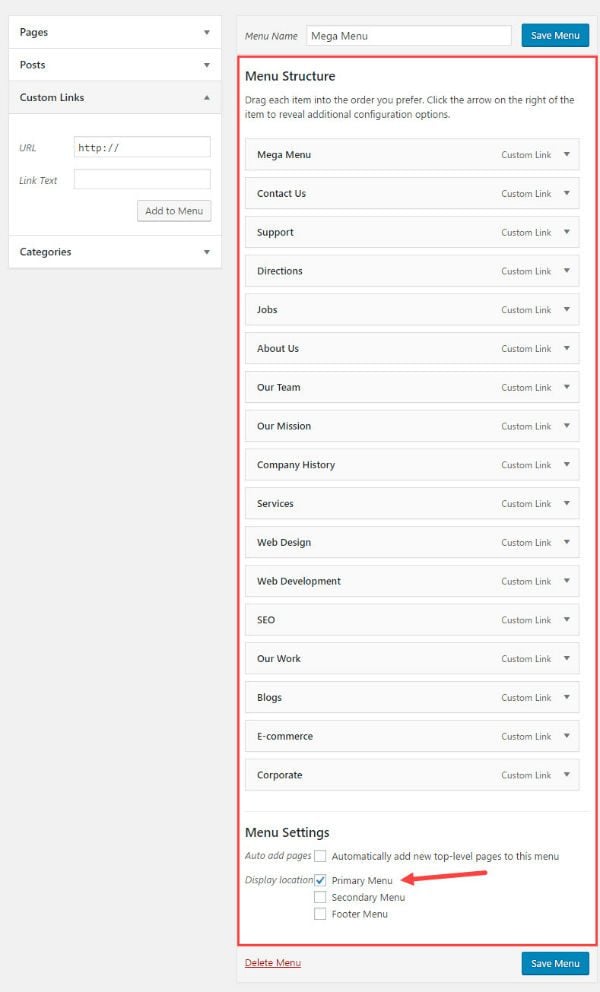
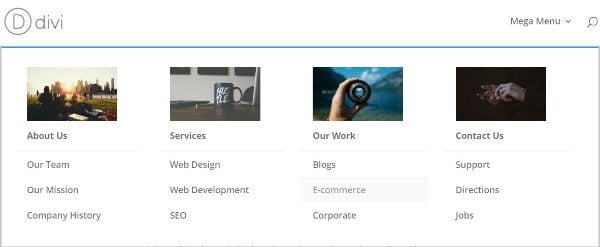
Once the links are added to the menu, scroll down to Menu Settings at the bottom of the menu screen and select Primary Menu for the display location. Your menu should now look like this.
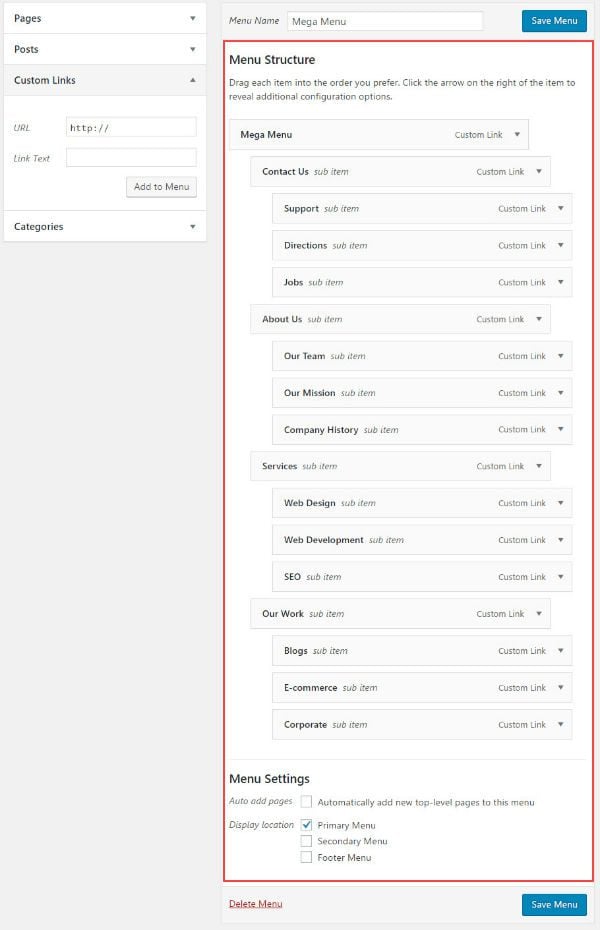
Now organize/drag the four menu items (each with three sub items of their own) to become sub items of the main parent Mega Menu link.
Now your menu should look like this:
Click Save Menu
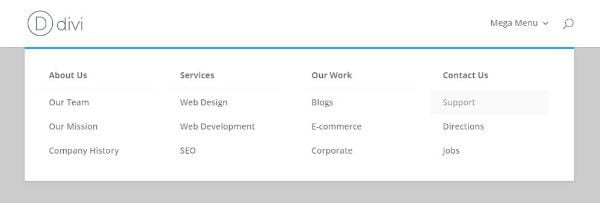
Now let’s see what the mega menu looks like so far on the live site.
Now that the menu is ready, it is time to add the images.
Start by getting four images. These images should relate to the four sub menu items (About Us, Services, Our Work, and Contact Us). I picked mine from unsplash.com.
Use a photo editor to shrink and crop each image to have a width of 500px and a height of 300px.
Add/drag them to the WordPress Media library.
Now go back to the menus page in WordPress Admin.
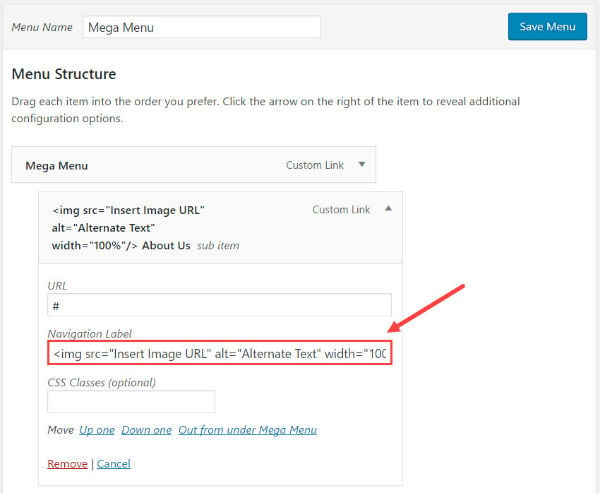
In this example the top link in my first column is “About Us”. Click the arrow on the right of the “About Us” item. In the Navigation Label box add the image you want using the html img tag directly before the text “About Us”. The image tag should look as follows:
<img src=”Insert Image URL” alt=”Alternate Text” width=”100%” />
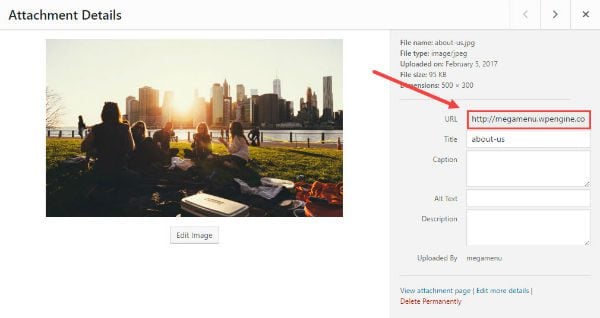
To find the url to the image, go to Media → Library. Click the image you want to add. In the Attachment Details popup screen find the url in the section to the right, highlight it, then use ctrl+c to copy it to your clipboard.
Now go back to the “About Us” menu item configuration on the menu page and replace the text “Insert Image URL” by pasting the url of your image using ctrl+v.
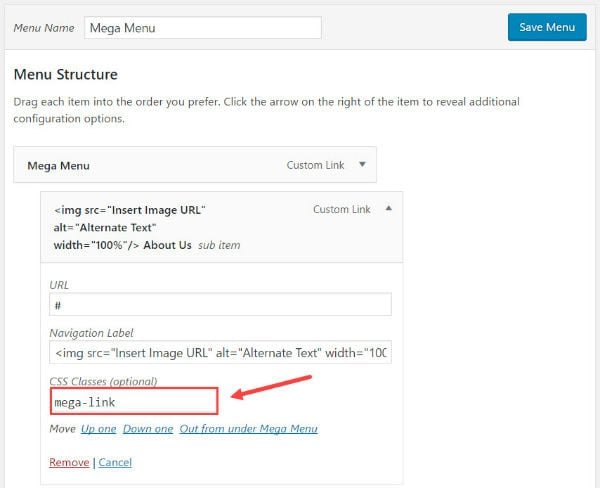
Before you leave the configuration options for the “About Us” menu item, find the CSS Classes text box and enter the class “mega-link”.
This will allow us to add some custom styling later on.
Repeat this process to add the next three images to each of the sub menu items along with the “mega-link” class. (In this example the three items left are “Services”, “Our Work”, and “Contact Us.”)
Go to your site and hover over the mega menu link. Now your mega menu should look like this:
Notice that when you hover over each of the images, the images have a fade effect along with the sub menu item directly underneath. This is because the image is part of that link, so clicking it will bring you to the associated URL.
Final Touches
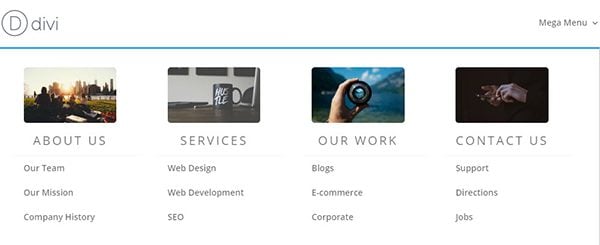
For this last step, add custom css to the menu to make the text font bigger and centered. Also, give a border radius around the image to make it look cleaner.
In WordPress Admin, go to Divi → Theme Options. Scroll down to the custom css box and enter the following css:
 .mega-link > a {
    text-align: center;
    font-size: 20px !important;
    text-transform: uppercase;
    font-weight: 400 !important;
    letter-spacing: 3px;
}

.mega-link > a img {
    margin-bottom: 8px;
    -webkit-border-radius: 5px;
    -moz-border-radius: 5px;
    border-radius: 5px;

}
Save Changes
Final Result
You’re all done!
You have a Divi mega menu with images without having to use a plugin. Take advantage of this addition for your current site or next project to improve navigation. This kind of menu works especially well for e-commerce sites that have a lot of content and require product images. Hope you find it useful.
More Divi Awesomeness Every Day
I hope you enjoyed this tutorial. We’re publishing a brand new Divi blog post every day. If you have a tutorial request be sure to leave it for us in the comments section below.
Be sure to subscribe to our email newsletter and YouTube channel so that you never miss a big announcement, useful tip, or Divi freebie!


Hi, I want to know if there is a way to reduce the width of columns of mega menu, I am currently using the theme Divi child
Thanks, still working on 2023!
Is there a way to change the background color when hover a link in the mega menu? and how can I disable the mega menu in mobile?
Hello, I want to know if there is a way to make the dropdown menu fullwidth if I’m using the vertical menu. Sorry for my bad english.
Great tutorial. Thanks. Is it possible to hide the images on a tablet/mobile device? Because it’s set to 100%, the images on a tablet and mobile are huge and take away from the usability.
Sure. Try adding this to your custom css:
@media (max-width: 980px){ .mega-menu img {display:none;} }This mega menu seems perfect for our ecommerce. Would it be possible to include an image in the drop-down menu, in the column on the right, so that it is left alone with a link to a featured product?
Thanks in advance, I’ve been trying for days and I can not get it
Hey Juan,
Sorry for the delayed response. So, you want an image in the right column without any links under it? If so just add the image code in the navigation label and don’t put any sub menu items under it. I may not be understanding you correctly though.
Is there an easy way to add a background image to the mega menu? Rather than images above each column, I would like a faded image in the back ground of all columns.
Hey John,
Sorry for the delayed response. You can try adding the following css to your custom css (this will add an image behind the first column):
.mega-menu > ul > li:nth-child(1) {
    background: url(http://myimage.jpg) no-repeat center center;
}
to target the second column you can change this:
to this…
Let me know how it goes.
Thanks
Hi – great tutorial. Quick question for a mega-menu with only 3 columns. The image for 3 columns is much to big. I edited the width property (from your code to 50%.
Image looks better size now. But the text for the mega-link a is now on the right of the image – not below. Is there a way to force the text to go below the image?
thanks in advance
I can’t seem to get this to work on a site i’m working on. I’m using it just like you have but the images are not displaying/not loading on the frontend
This technique isn’t accessible, and confuses screen readers.
Don’t use it if you have to be ARIA2 compliant.
A question for your – can I create a mega-menu for just one of my existing menu items and any hints on how I would do this
Hi Mary. I’m not sure I understand what you are asking. Can you be more clear as to what menu items you have and which ones you want to make into a mega menu?
Thanks.
I was also having trouble getting the image to show. I looked at the code with the browser developer tools and saw that there were two sets of quotation marks around everything in the image source link. I had originally copied the link from the blog post and then pasted my image link. The double quotes were not showing up in the menu but they were there on the web page. After hand typing it all in, it works fine.
Jason, Thanks for this cool post and please keep them coming!!
Thank you, this is great.
Your tutorials are always so helpful because they give a novice like me ideas about things I did not know we’re possible, or things I did not have the imagination to envision on my own. Every tutorial makes me want to test, experiment, and learn more (some people might call it “play around”).
And thanks for the way you guys interact with and respond to the comments. It always adds to the learning experience.
This is awesome stuff, Jason! Thanks for this useful tutorial, and helping support creative ways of utilizing Mega Menus.
For a question, your design actually makes me wonder if it’s possible to use a looping video instead of an image! I haven’t given this a try yet, so I wanted to ask in case you already have some insight about this, and what solutions might work. Would using videos make the load times of the menu too unmanageable?
Thanks again for your good work!
This is a good idea Mathias. Of course adding video will always increase load times so gifs may be a better option here. I haven’t tried embedding a video in the navigation label yet. I’ll keep that in mind.
Thanks for the tip!
This ist a great feature!!! Thanks to you!!!
I’m trying to make the mega menu like yours with two columns and three rows. In responsive mode they should get narrowed into two or one column to fit in in the smartphone display.
I have many elements in the submenu, so I have to put them in order.
I’ve done it with 3rd party widget, but I really have to do this with Divi.
Can you help me to organize this??
Thank you in advance 🙂
Currently the menu goes to one column on mobile devices. If you want to have them go to two columns on mobile instead of one, you can add this css:
@media (max-width: 980px){
#mobile_menu li.mega-menu > ul > li {
    width: 50%;
    float: left!important;
    margin: 0;
    padding: 0 !important;
}
}
If you want three columns on mobile change the width in the above css code to 33.3%.
That should do the trick. Let me know how it goes.
Definitely going to use this after being told my menus are too long and awkward to navigate. Putting them in ‘categories’ with a relevant image will make it so much more user-friendly. Bit concerned about how it will look on mobile devices but we will see.
In future, I’d love to see a tutorial regarding a blog post landing page (providing navigation around the blog) for those of us who have a blog within a website rather than a website that is primarily a blog.
Great idea for a tutorial. I will keep this in mind. As far as your concern for mobile, the menu items go to a one column layout by default. If you are wanting to add a two or three column option see my response to Piotr below.
Thanks.
Great option. I was trying to find a way how to do it easily.
Great ! I’l do it, definitely !!! Thank’s a lot to the divi team to share this kind of tips !
mega menu plugin help to create a menu in wordpress . insert menu short code in your templates. its work try it
Thanks Jason, great post!
Great thought looks cool, i will try once.
Wow… this is so nice. I always wanted to do this without a plugin. Thank you so much.
Can you show me the entire line of code should look like please.
Your Code:
Page Name: FOX CAMP OUT
Image URL: https://www.jemmawilson.com.au/wp-content/uploads/2017/02/Fox.jpg
Sure. So if your menu item is named “About” insert the following code inside the navigation label text box:
Thank you that worked, still doesn’t look right. I will try it again on another site as this client only wanted one image on one menu item so it would stand out more.
Pretty cool, huh! Thanks for the tips and tricks 🙂
When I paste the link in as a sample it doesn’t show up in the post.
I will try again
It’s the quotes that are messing this up. Retype each “
Make sure that you update the image src in the img tag with the image url in your media library.
This won’t work on its own:
Is that what you are referring to?
I am having the exact same issue, image not showing up, just my alt text.
Did you make sure that the image is 300 by 500? I had one of my images that was bigger and it did not show. As long as they are the correct size, they will show up if you follow the instructions correctly.
As Adam Inlay said it´s a matter of the marks you use. I copied also the code from this topic and it did not worked. Than I exchanged the marks with my ones on the keyboard and it worked… 🙂
the same here. Doesn´t work. Just a broken image link
if you copied the code from this article, change the ” marks. you will notice that the copied code has slanted ” marks. It about drove me crazy as well. Even had to ask for the help of several developers to take a look at the super basic html and css. hangin my head in shame.
Thank you that worked perfectly
Just delete the ” in image url.
Example:
Hi Willi, thanks for your solution, it works for me 🙂
Yes, I went to the library, selected the image and pasted into the section labeled insert image URL but all I get is a broken link image like it can not find the image.
I have checked the link url and it is correct
I followed the instructions but the image isn’t showing.
SAMPLE OF THE LINK
HOME
Have I missed something?
Hi
I’m able to see textes, but when I want to show images with “mega-link”. there no image on my website. Any idea.
I’v added CSS style at the end/
Did you add your image url found in your media library to replace “Insert Image URL” in the img tag?
yes
i have even tested without http:// without http://www.maisonlack.fr ….
images are one good sizes. css maga-link is ok.
i don t understand !
maxime
I want to add only one large picture above my menu. Is it possible to ad it ( size 1080 ×158px ) the same way?
As someone else mentioned, I’ve yet to use the mega menu, but this tutorial with the images is enlightening. Need to use it for some current and upcoming projects. Thanks so much!
Nice, detailed tutorial. Thank you! Any good website examples that you can share?
This is awesome 🙂
I have a Tutorial request — I was trying to add underlining to my links, but it added underlining to all the buttons on the site too 🙁
I’d love to know how to add them just to the body copy links without it appearing in the buttons.
Hey Melissa,
Please try the following CSS
a {text-decoration: underline;}
a.et_pb_button {text-decoration: none !important;}
Hope that helps.
This is brilliant, thank you so much! I was wondering exactly about this, if you guys could do one about pulling the news/posts feed into the mega menu, that would be the ultimate usage, where the featured image appeared automatically and it automatically grabbed the latest 4 posts. Not sure if possible, but doing it manually will work as well. CHEERS
Thanks for the kind words and suggestion, Vincent. I’ll pass that on to the team. There are more robust plugins which should be able to do what you are describing though. You may want to check those out.
Thank You Jason
Love it! Thank you!
I love this post, again useful and very interesting! Great work, easy explained. Thanks Jason!
Awsome!
yohoooo! i was about to use it this week !
Timing is everything right? 🙂 Glad I could help.
I haven’t used Divi’s built in mega-menu just yet, but this post makes me want to. Including images in it really adds to the overall appearance. It definitely helps that you have an equal number of links and sub-menu items though. Like you said, I can see this being most useful on an ecommerce website with clothing categories for example. Great inspiration, thanks!
Your welcome. Thanks for the input, Michael.
Coincidentally I was working on placing an icon on the main menu, this post is great! Thanks jason !!
Awesome. Great to hear!