
Sometimes, one image just isn’t enough. In some cases, two photos can create one much better composition. In this tutorial, I’ll teach you how to blend images in Photoshop. We’ll look at how to make creative compositions with textures as well as double exposure effects. You will need a Creative Cloud subscription for Adobe Photoshop and some images to work with.
In this post we will use some images from our Divi layout packs to show you three different blending techniques. With these tools under your belt, you can then create all sorts of amazing compositions in Photoshop.
Set Up The Workflow
The first thing to do is to get your workflow ready.
1. Start a new project and place two photos in the canvas.
Each image should have its own layer, name them however you like. For now, the order of the layers doesn’t matter, but later when you start seeing how things work you should try inverting the order to see how things change. For this tutorial, we place the woman below and the city above.
Next, make a copy of each image and lock the originals. In fact, this is a practice you should always do. You might go overboard with an effect and you’ll have no way of getting back to the beginning. Yes, of course, you can use Command+Z to undo, but you might also undo other effects you want to keep on another layer.
In the image below there are two images, I moved the city over a little just to show you the image of the woman underneath.
Let’s start learning how to blend images in Photoshop.

How to Blend Images in Photoshop with Opacity Options
First, let’s look at the opacity tool. This is a toggle button available for every layer in the layer panel. It activates when a layer is selected.
Definitely, the easiest way to blend images in Photoshop is with the Opacity controls. As a default, the opacity is set at 100%, meaning that the image has no transparency at all. When adjusting the opacity to blend images together, make sure you work on the top layer. Consequently, when doing your own blending experiments, try out different levels of opacity and see how different they look.
Below, you can see three different opacity levels.
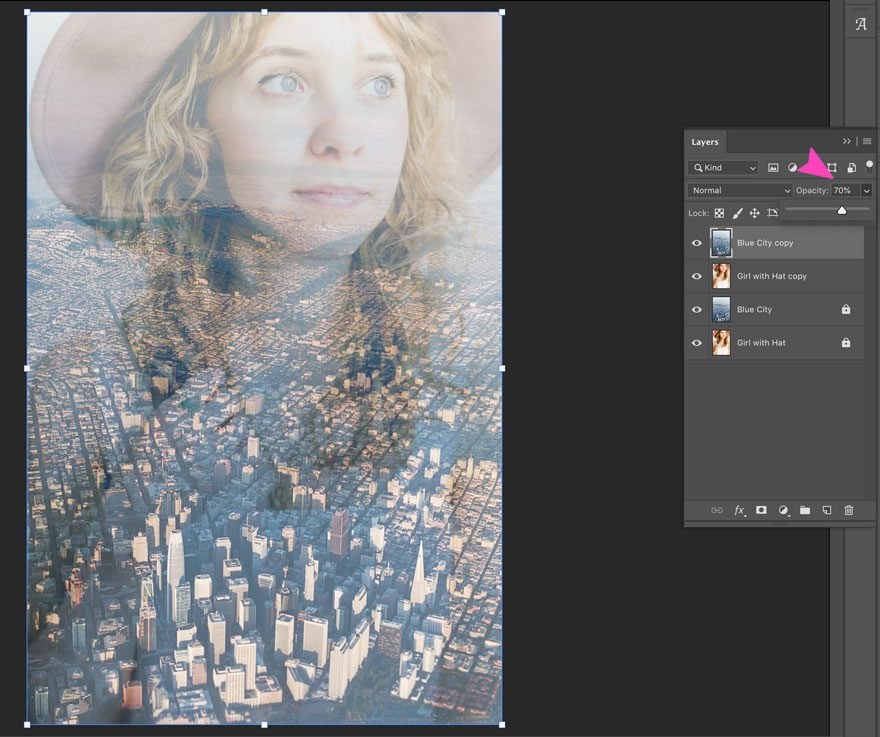
1. First, 70% Opacity
First, select the image in the top layer. Then, adjust the opacity to 70%.
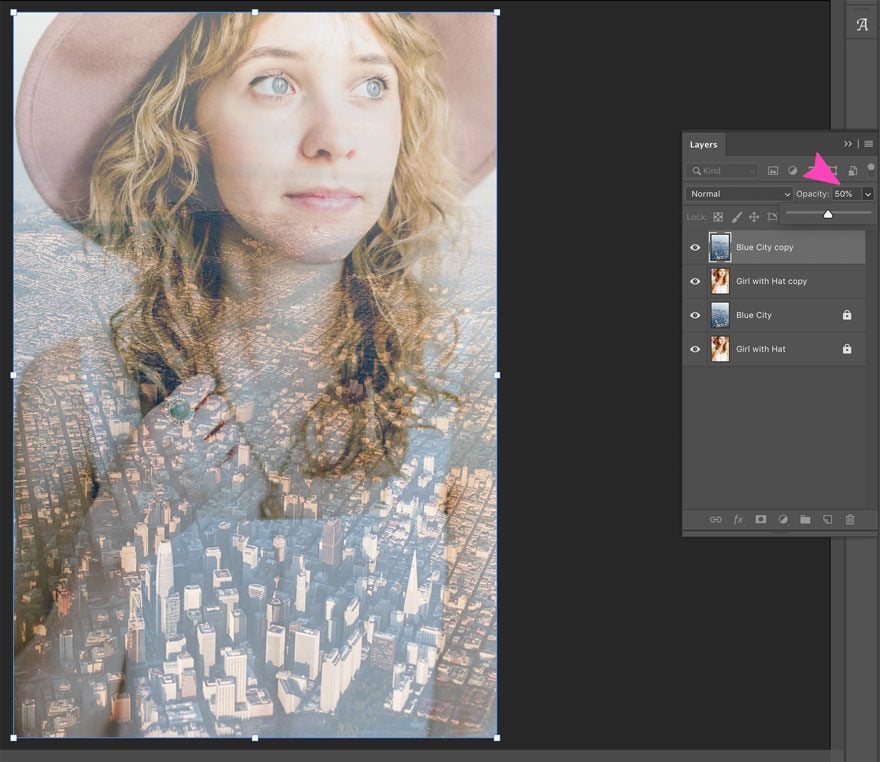
2. Then, 50% Opacity
Again, select the image in the top layer and now adjust the opacity to 50%.
3. Third, 30% Opacity
This time, select the image in the top layer and adjust the opacity to 30%.
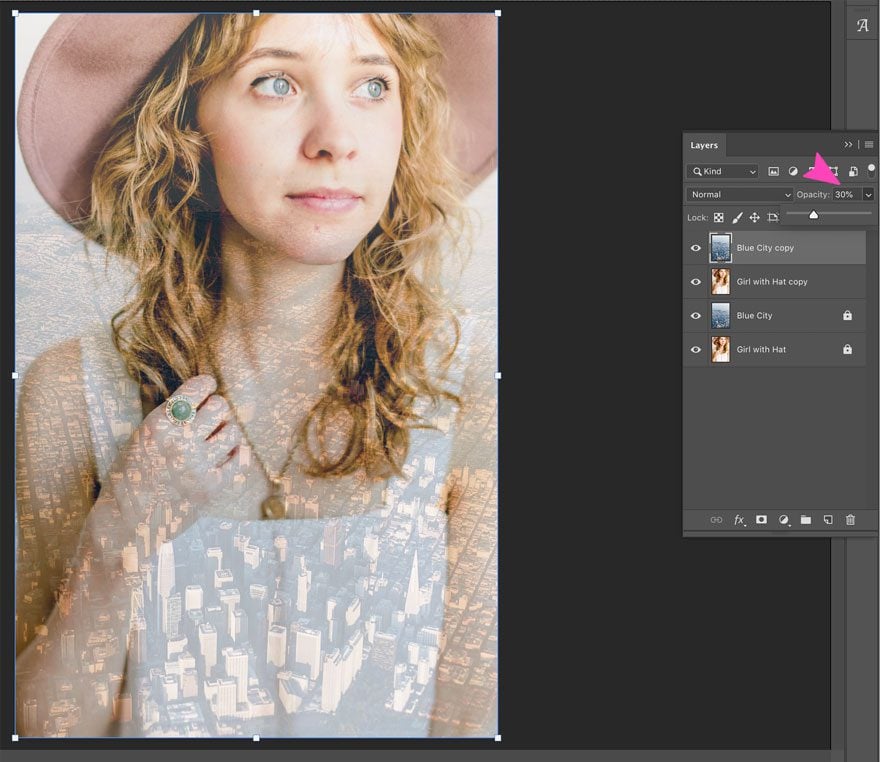
As you can see above, each percentage of opacity looks a little different. Depending on what you want to use this image for, choose the final result you like and export the image to use wherever you like.
How to Blend Images in Photoshop with Layer Blend Modes
Another practical technique to blend images in photoshop is by using the Layer Blend Modes.
To begin with, every layer has 27 options for Layer Blend Modes. The way Layer Blends work is with a numerical equation which controls how the pixels on the top layer interact with the bottom layer. For easy selection, the Blend Modes are separated into groups of what they can achieve. Consequently, all the Blend Modes inside one group create a similar overall effect but with creative differences. Additionally, all of the Blend Modes can be adjusted with the Opacity toggle for different strength or effect.
Here’s a practical list for your reference. Furthermore, every Blend Mode has a keyboard shortcut, it is Shift+Option+a letter. Thus, I have added the relevant letter to each Blend Mode in the list below.
These are the 27 Blend Modes:
Normal Blend Modes
These are the normal blend modes which technically do nothing.
The Dissolve Blend Mode though does change with the opacity controls.
- Normal N
- Dissolve I
Darken Blend Modes
The Blend Modes in this group will darken an image.
- Darken K
- Multiply M
- Color Burn B
- Linear Burn A
- Darker Color
Lighten Blend Modes
These will lighten an image.
- Lighten G
- Screen S
- Color Dodge D
- Linear Dodge (Add) W
- Lighter Color
Contrast Blend Modes
This group of Blend Modes adds contrast to an image.
- Overlay O
- Soft Light F
- Hard Light H
- Vivid Light V
- Linear Light J
- Pin Light Z
- Hard Mix L
Inversion Blend Modes
These create different effects using variations of the base and blend layers.
- Difference D
- Exclusion X
- Subtract
- Divide
Component Blend Modes
The Blend Modes in this group are visual effects bases on the primary color components.
- Hue U
- Saturation T
- Color C
- Luminosity Y
Admittedly, getting to know all the Blend Modes takes a lot of experimentation. When it comes to combining images together, the best blend mode really depends on the two images you want to blend together. For further exploration, here is a video that explains all 27 blend modes – including the 8 special ones – in detail and really easy to understand.
Special Blend Modes
Did I say 8 Special ones? Yes, there are 8 Blend Modes which can be adjusted using the Fill toggle as well as the Opacity toggle.
These are:
- Color Burn.
- Linear Burn.
- Color Dodge.
- Linear Dodge (Add)
- Vivid Light.
- Linear Light.
- Hard Mix.
- Difference.
At this opportunity, we won’t be looking at all 27 Blend Modes. In this tutorial, we’ll look at the ones that work best with our two images. Later, when you are blending your own images, try all the Blend Modes and the opacity and fill adjustments to really get a feel of what you can achieve.
How to Apply a Blend Mode to Combine Images
1. Set up the workflow as explained above, with two images.
First, as always, set up the workflow with the two images and their duplicates.
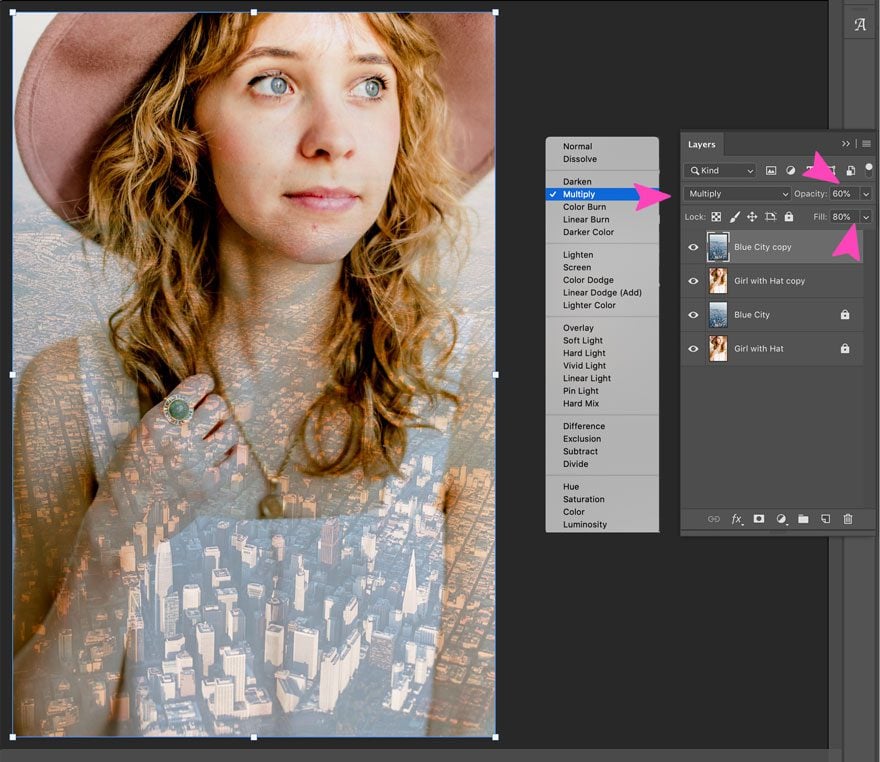
2. Apply the Multiply Blend Mode
Now, select the top layer and choose the Multiply Blend Mode from the drop-down menu. The image below has the Opacity at 60% and the Fill at 80%. As you can see, this Blend Mode maintains a nice darker city at the bottom of the composition while the woman’s face doesn’t look washed out.
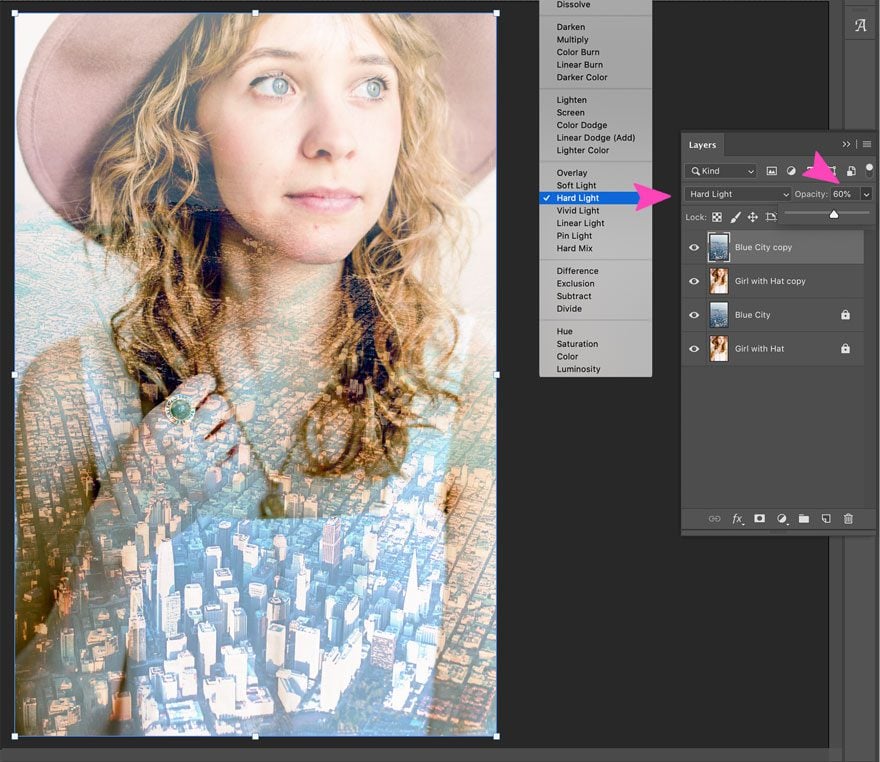
3. Apply the Hard Light Blend Mode
This time, choose the Hard Light Blend Mode in the drop-down menu. As you can see below, this Blend Mode adds contrast to the photograph of the city and the woman’s hair. The colors though, do change quite a bit and lose naturality.
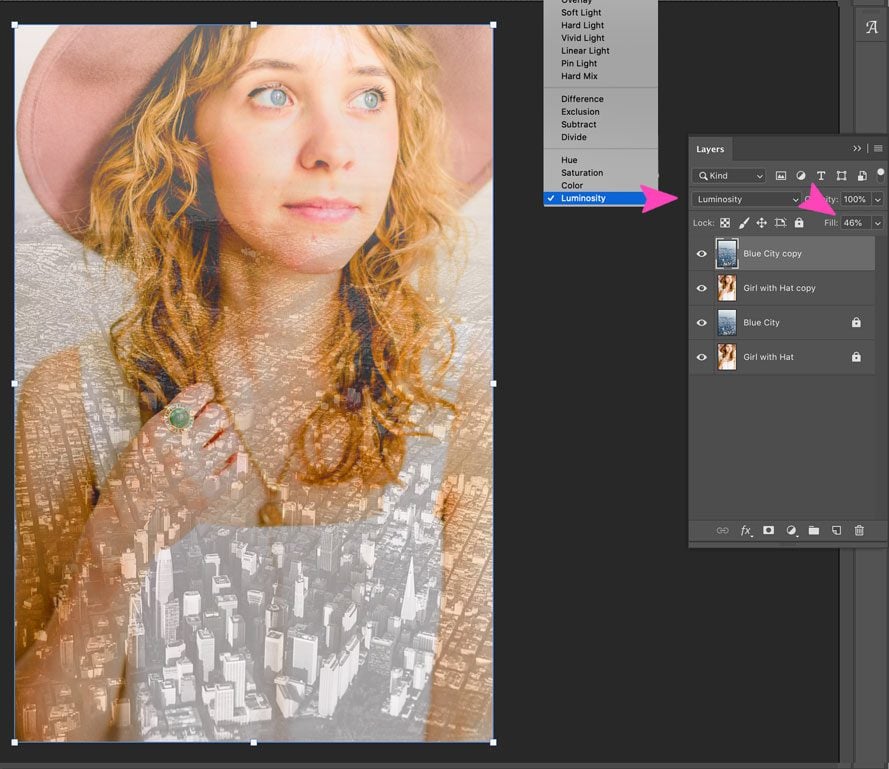
4. Apply the Luminosity Blend
Finally, select the Luminosity Layer Blend Mode. This mode gives light and vibrancy to the light parts of the top image, therefore giving the entire composition a lovely summery look and feel.
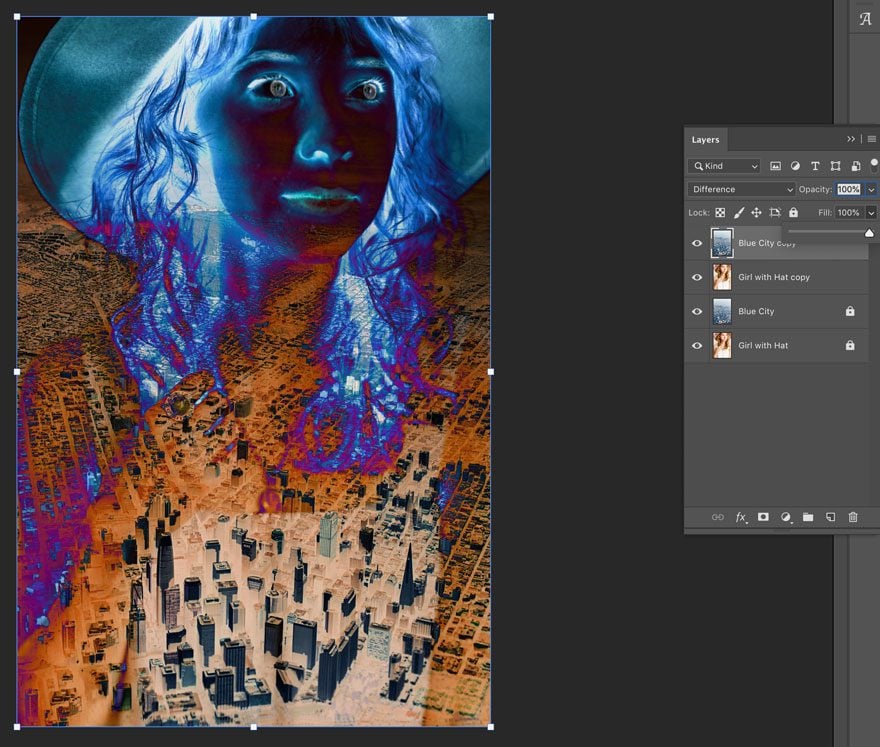
5. Don’t Go Overboard (Or do)
Knowing when you are done depends on what your desired outcome is. For example, the Layer Blend below is called Difference, it’s one of the Special 8 Layer Blends which change with the Fill toggle instead of the transparency. We Set the fill t0 100% to this over-the-top effect. This visual might be too much for the background in a website module but could work for a music festival poster.
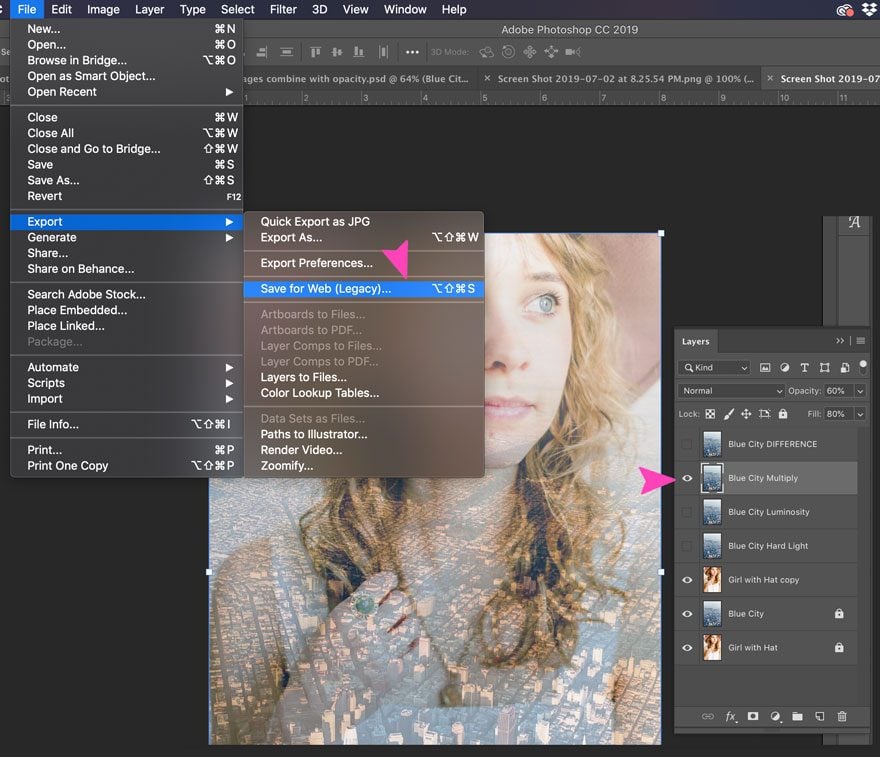
6. Finish Up and Export
For greater productivity, use a different layer for each Blend Mode. Don’t forget to always keep a copy of the original. Drag the new duplicate to the top of the list and hide all the others by clicking the eye icon. When you have chosen a Blend Mode you’d like to use, click the eye only on that one and select File > Export > Save for Web. Or use the keyboard shortcut, Option+Shift+Command+S
Layer Masks
The third and last technique we are looking at today is the use of Layer Masks.
A Layer Mask is an extra level of control for combining images. With a layer mask, you can control how much of the top layer is visible or invisible. This is achieved by using any kind of tool in black and white. The black color makes a layer become invisible and the color white makes it visible.
How to Combine Two Images With a Layer Mask
Differently to layer Blend Modes, Layer Masks will work better when you have a plan. This technique is not so much about experimenting with possibilities, but more about adjusting parameters to reach a goal. We are going to recreate the image below with two different images. Apart from the Layer Mask, we will also use gradient color. Additionally, some brush effects for the final touches.
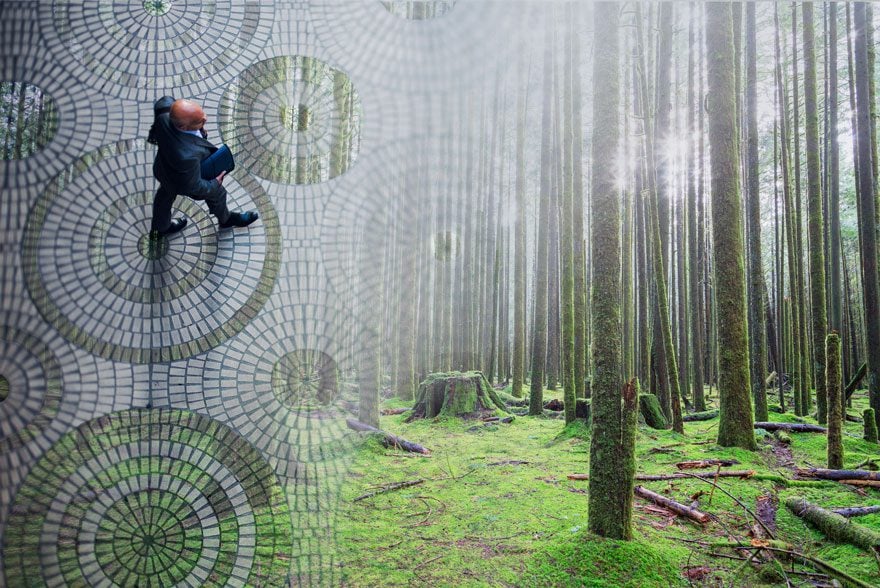
1. Open Both Images in Your Canvas.
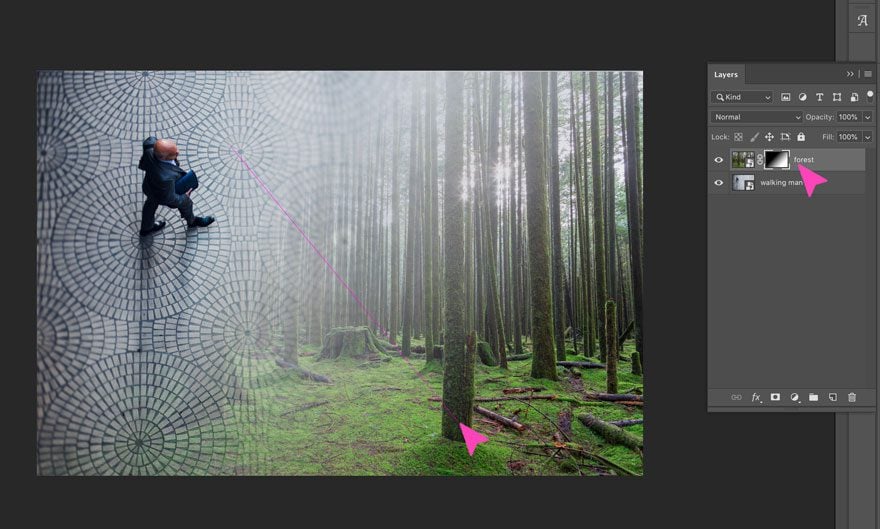
First, set up the workflow. Then, sdd two images to your canvas and give each its own layer. Place the man walking as the bottom layer and the forest on the one above.
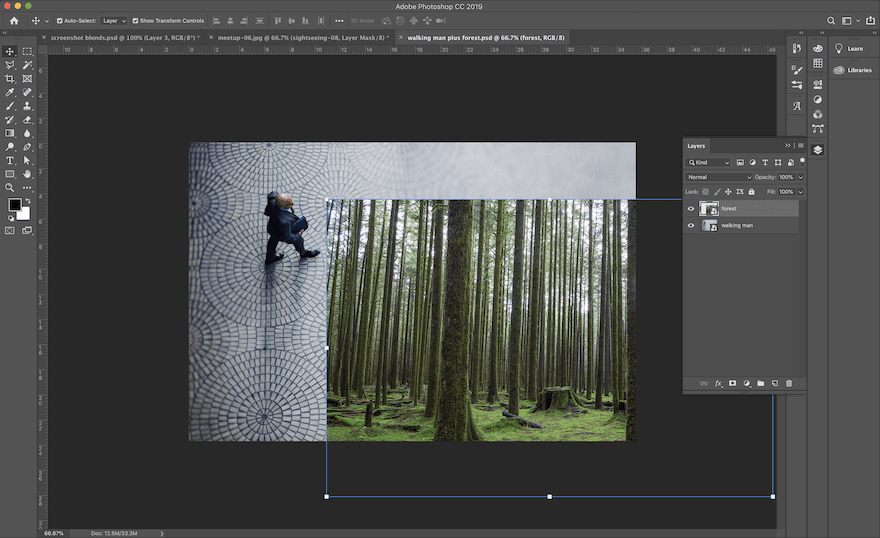
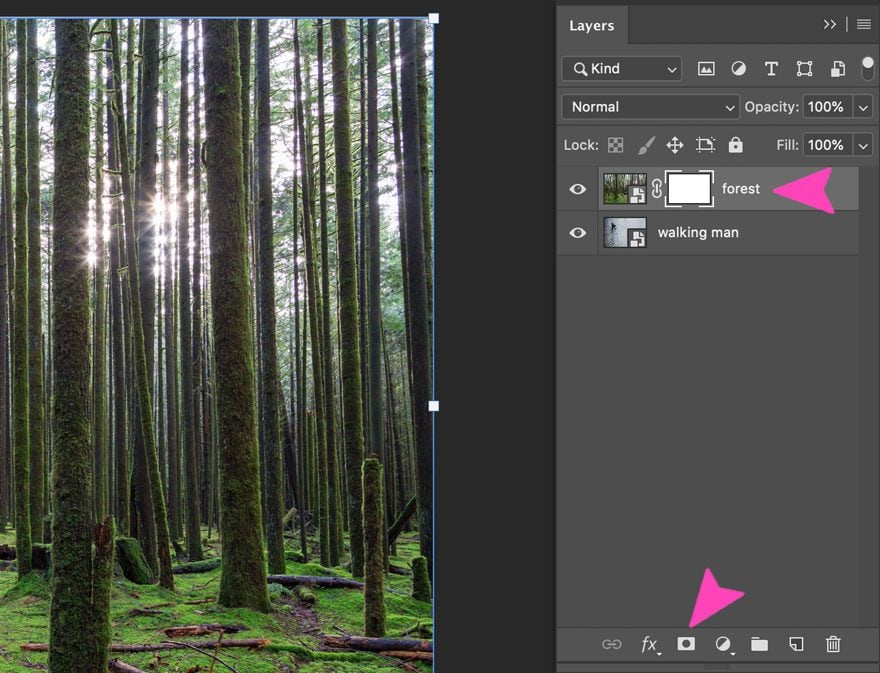
2. Add a Layer Mask to The Top Layer
Now, inside the layer panel, click on the Layer Mask icon which looks like a white rectangle and a black circle. This will add a linked white rectangle to the layer of the forest.
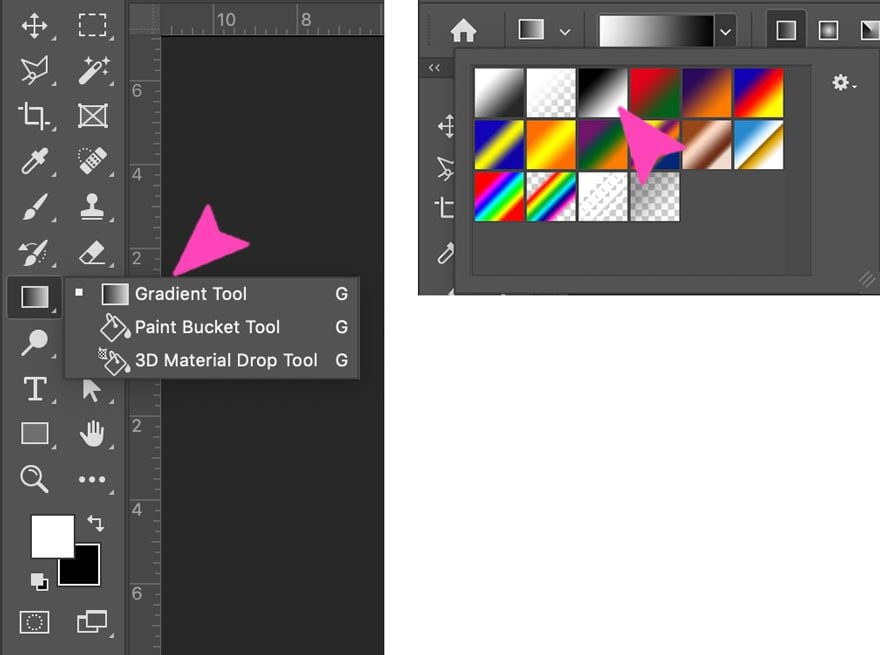
3. Select the Gradient Tool
First make sure that the Layer Mask is selected in the forest layer, then click on the tool gradient in the toolbar. In the dropdown menu in the top bar, choose the black to white gradient.
4. Apply The Gradient to The Forest Layer
Once again, make sure the Layer Mask is selected on the forest layer, then apply the gradient to the image. This is how: Click on the bottom right quadrant and drag to the top left quadrant. The beginning and end of the line where you drag the tool will make different effects with the gradient. I want to maintain some of the forest intact as well as the tiled floor, so that’s why I didn’t drag the gradient from corner to corner.
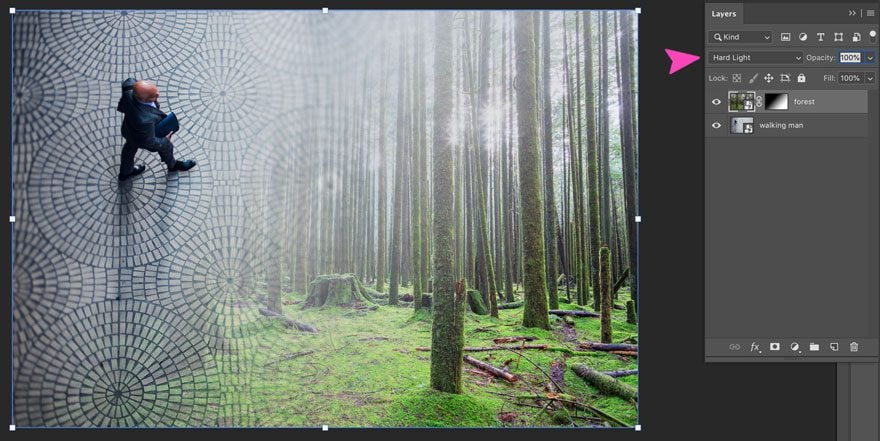
5. Apply The Hard Light Blend Mode to The Forest Layer.
Don’t forget to make sure the forest is selected – not the Layer Mask – and choose the Hard Light Blend Mode from the drop-down menu. On the other hand, you want to see another effect, then, by all means, try the other Layer Blend Modes.
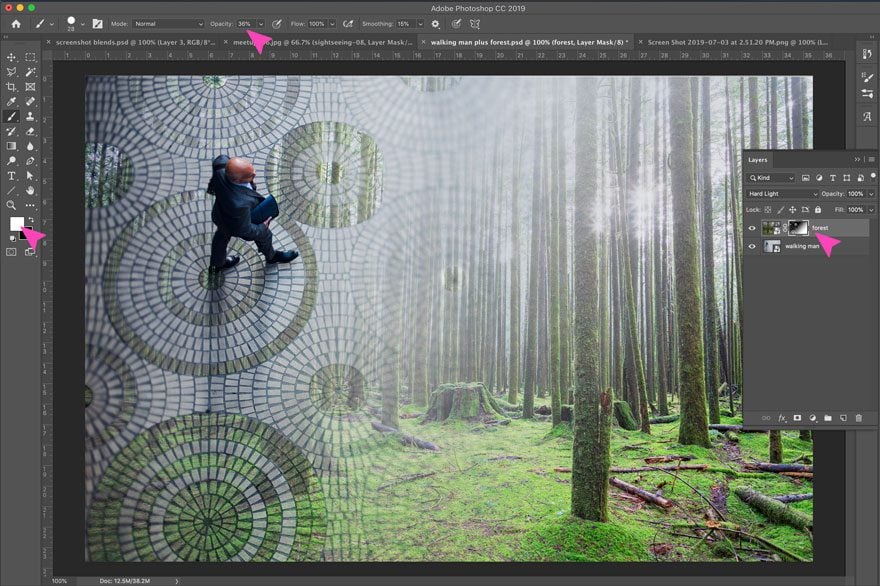
6. Add Some Creative Touches With the Brush Tool.
Now It’s time to give the image blend some personality.
With the Layer Mask selected in the forest layer, open the brush tool with white color on the foreground. Painting with white on the Layer Mask makes sections of the layer invisible.
In order to “erase” some black areas of the Layer Mask gradient, we will use different size brushes and slightly different opacities. Carefully brush over sections of the circular floor tiles to create a creative composition. If you make a mistake, simply click X to switch the black color to the foreground and brush over the error. After that, just click X again and keep going with the white color.
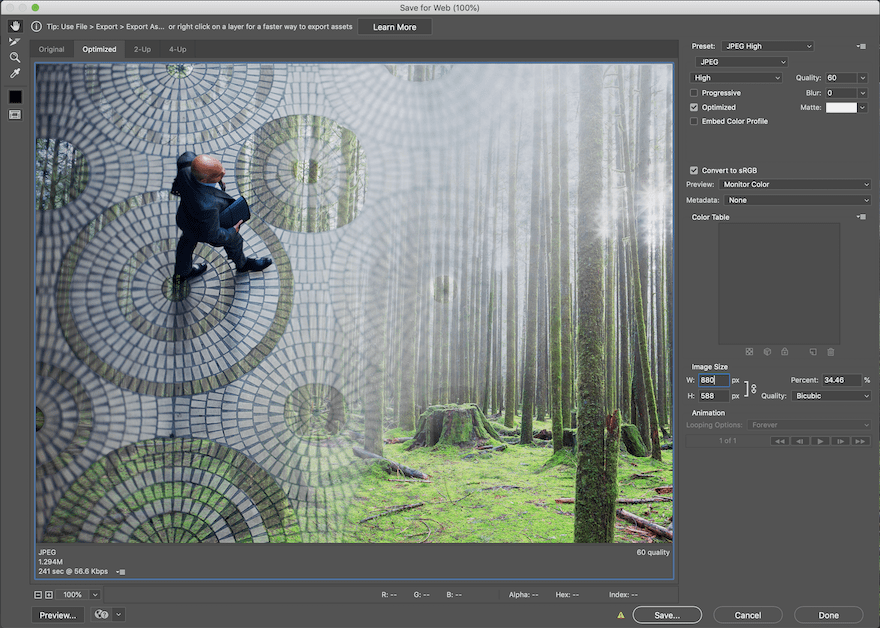
7. Save and Export
When you’re done blending your images together, press File > Export > Save for Web and insert the composite anywhere you want.
Conclusion
As you have seen above, only with these three techniques you already know how to blend images in Photoshop. Once you have more practice with these tools, you can start experimenting more and finding new ways to blend images creatively. Also, remember that the colors in the images you choose to work with, the Layer Blend modes will work in different ways. The Layer mask technique can be used with a gradient as well as with the brush tool. Effectively making the tool really useful and versatile.
Featured image via jiunn / shutterstock.com


nice infromation thanks for writing this article.
Good post. I support more tutorials of this type. That is, a software developer like me, who also has to take care of the graphic part and dominates PS at 50% … we are probably a lot. Thanks and best regards.
Thanks for sharing the useful guide. Learned a lot from the post.
well explanation
Thanks Orana. Looking forward to trying these out.
This is a great tutorial and will be put to good use. Especially the “How to Combine Two Images With a Layer Mask” one.
Thank you!