
The WordPress Editor‘s Classic Block is intended to help ease the transition between WordPress’s legacy TINYMCE editor and it’s newer block-based editor (known as Gutenberg). When the new editor was introduced into WordPress Core, all posts and pages on an updated website that had previously been created with the old editor were automatically converted into content inside the new block-based editor using the Classic block. So in a very real sense, the Classic Block is simply WordPress’s old text editor inside WordPress’s new text editor. That said, there are some key differences worth knowing and specific use cases where it’s still a good idea to use the Classic Block even if you’ve fully adopted WordPress’s block editor (and its many other blocks) for content creation.
In this article we’ll show you how to add the Classic Block to your posts or pages, we’ll cover it’s full range of settings and options, and we’ll also provide you with tips on using it effectively in the new block-based world of WordPress.
- 1 How to Add the Classic Block to your Post or Page
-
2
Classic Block Settings and Options
- 2.1 Classic Block Options
- 2.2 Classic Block Toolbar
- 2.3 Text Format
- 2.4 Bold and Italic
- 2.5 Bulleted and Numbered Lists
- 2.6 Quote
- 2.7 Alignment
- 2.8 Insert Remove Link
- 2.9 Read More Tag
- 2.10 Add Media
- 2.11 Toolbar Toggle
- 2.12 Strikethrough
- 2.13 Horizontal Line
- 2.14 Text Color
- 2.15 Paste as Text
- 2.16 Clear Formatting
- 2.17 Special Character
- 2.18 Decrease Increase Indent
- 2.19 Undo and Redo
- 2.20 Keyboard Shortcuts
- 3 Tips and Best Practices for Using the Classic Block Effectively
-
4
Frequently Asked Questions about the Classic Block
- 4.1 What is the purpose of the Classic Block?
- 4.2 Is anything removed from the Classic Editor?
- 4.3 The Classic Block does not include the Visual/Text tab. Can I still edit the HTML?
- 4.4 Where is the media button that was above the tools?
- 4.5 Can the Classic Block use shortcodes?
- 4.6 Can blocks be used within the Classic Block?
- 5 Conclusion
How to Add the Classic Block to your Post or Page
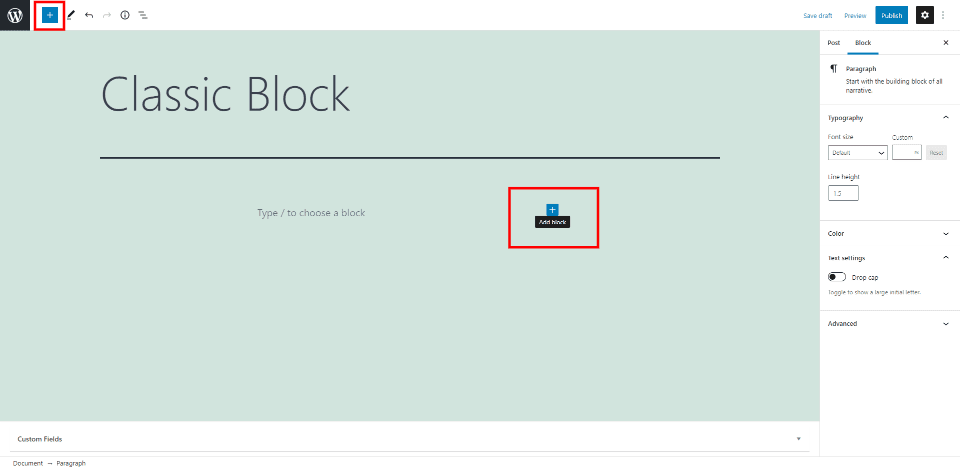
The Classic Block is added to posts and pages the same way as any block. Click on the Block Inserter icon in the top left corner or at the location where you want to place the block.

Type classic into the search field of the Block Inserter and select the Classic Block.
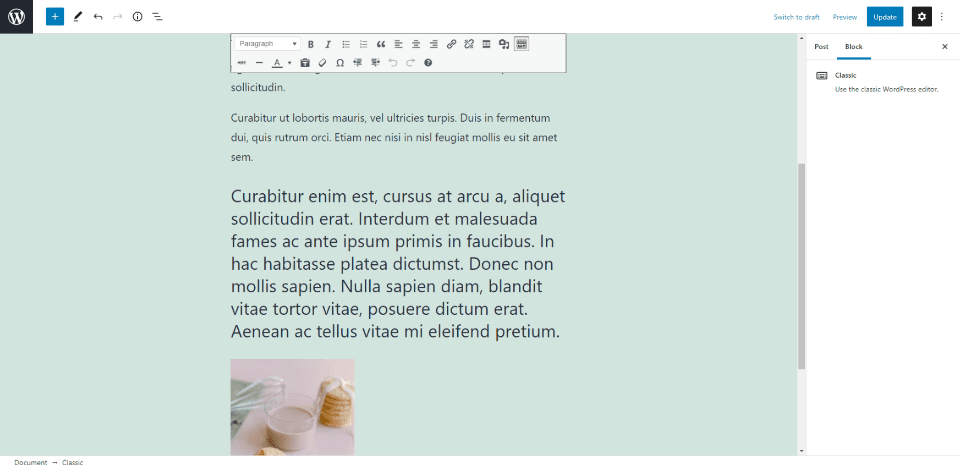
The Classic Block is added to your content.
Classic Block Settings and Options
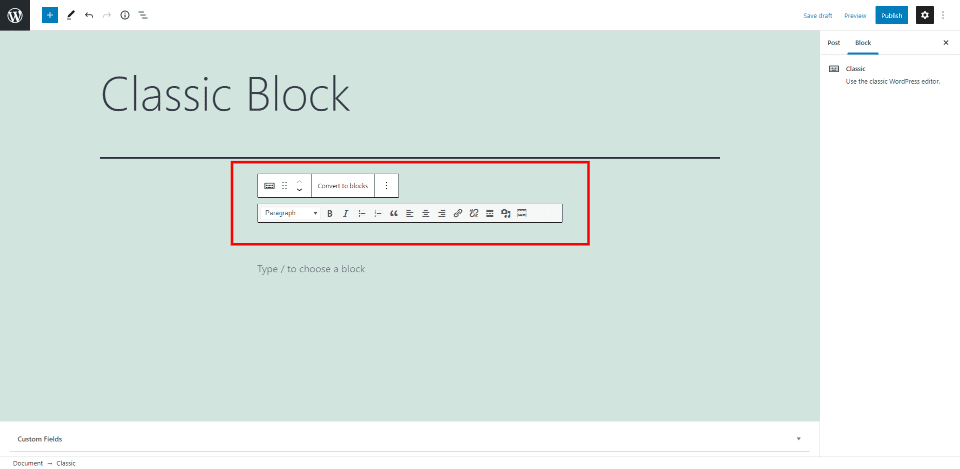
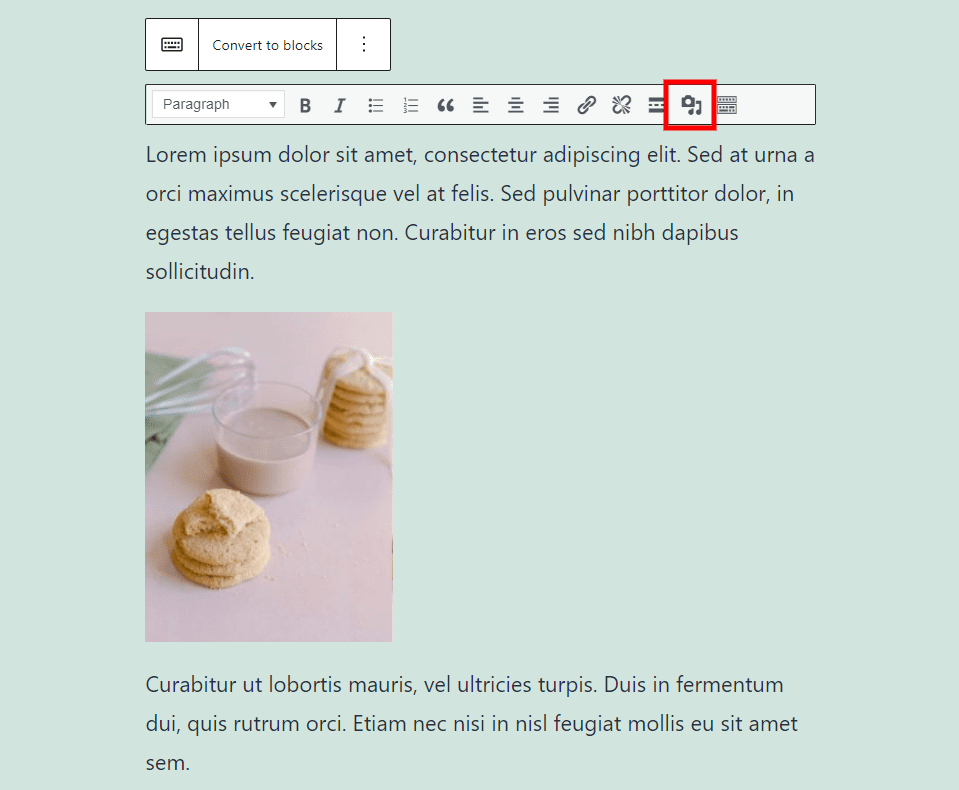
Unlike most Gutenberg blocks, the Classic Block does not include options in the editor sidebar. Instead, all the options you need are in the Classic Block toolbar itself. Click on the Classic Block to reveal its tools including the toolbar with a set of options above it. Let’s take a closer look.
Classic Block Options

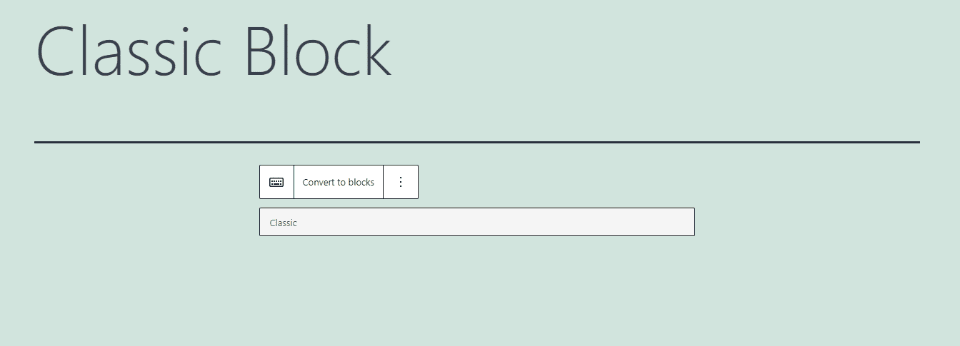
Each block has its own specific controls with options for the block. A small set of block options above the toolbar allows you to change the block type, convert to blocks, and open the options.

The first option includes the number of columns and set up a group.
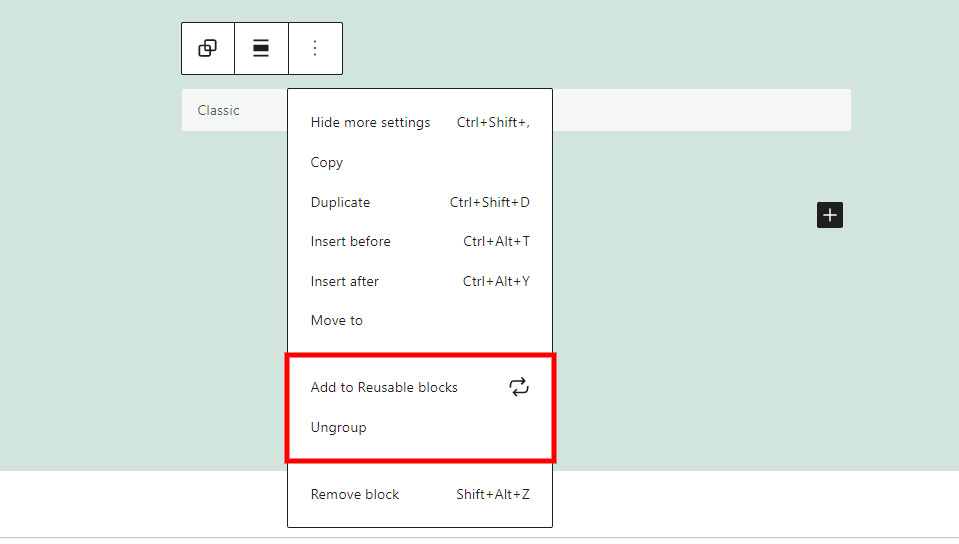
Group lets you add the block to your reusable blocks.

The next two options allow you to move the block by dragging it manually or moving it up or down by clicking the arrows.
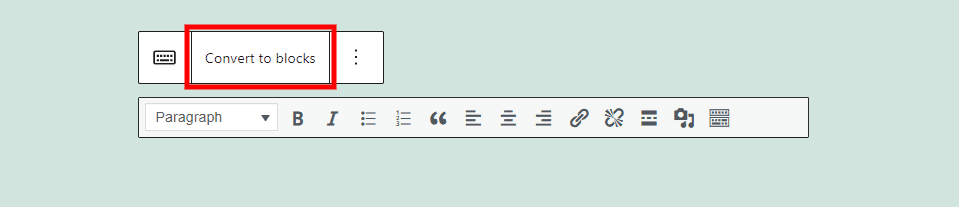
Convert to blocks converts all the content into their specific types of blocks. For example, text will be converted to Paragraph Blocks, images will be converted to Image Blocks, etc. You can’t undo this once you leave the page or post, but you can copy and paste the content into a new Classic Block if you want.

The three dots open more options allowing you to hide the settings, copy, duplicate, insert before or after, move, edit the HTML, group, or remove the block.
Classic Block Toolbar
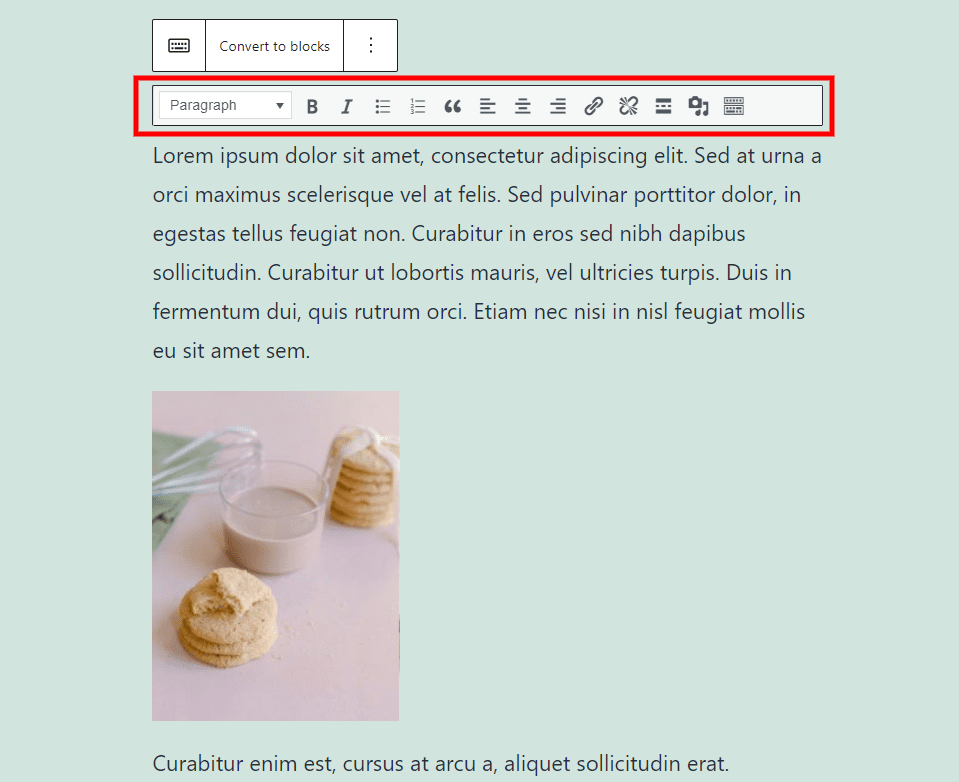
The Toolbar provides all the TinyMCE tools from the Classic Editor, allowing you to format your text, add media, and more. Permorm all content editing with this toolbar.
Text Format
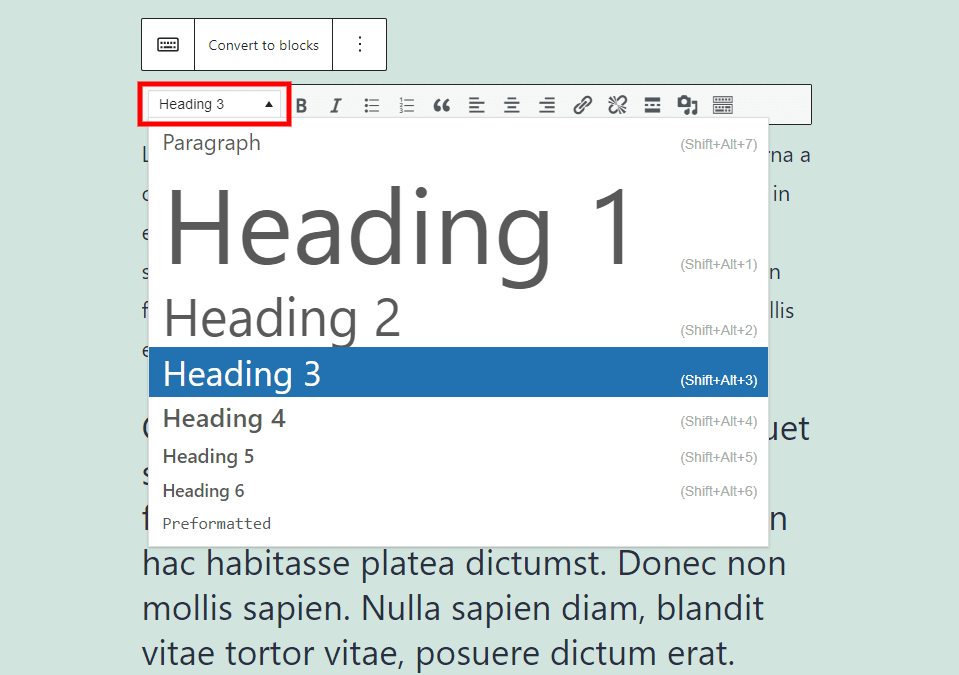
Format your highlighted text from the Text Format dropdown box. The default is Paragraph. I’ve selected a paragraph and set it to Heading 3.
Bold and Italic
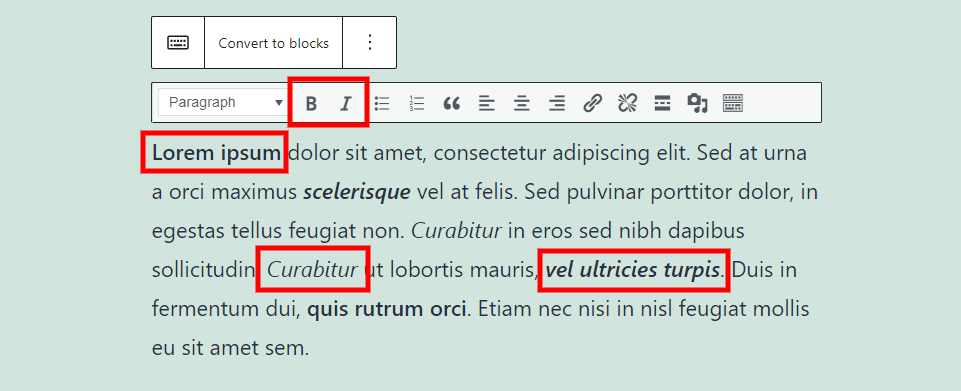
Highlight the text and click bold or Italic to format the text. Use them individually or together.
Bulleted and Numbered Lists
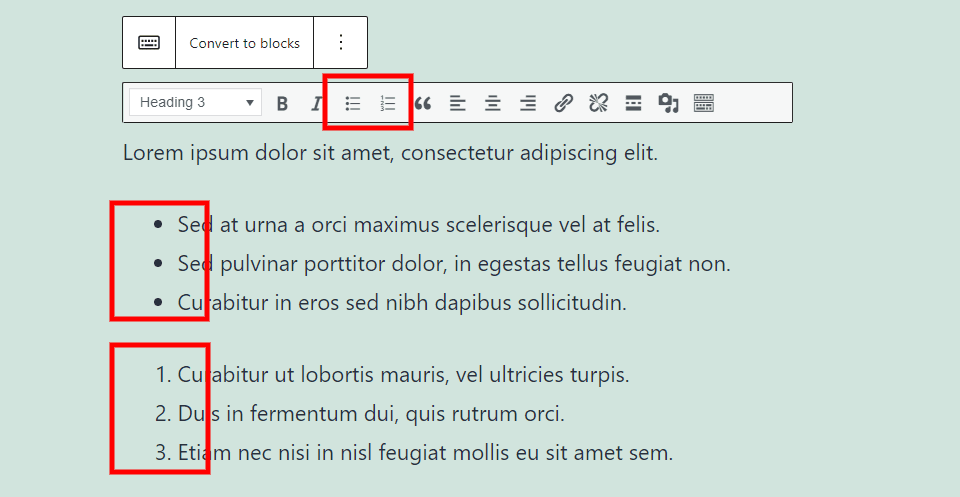
Create lists with bullets or numbers.
Quote
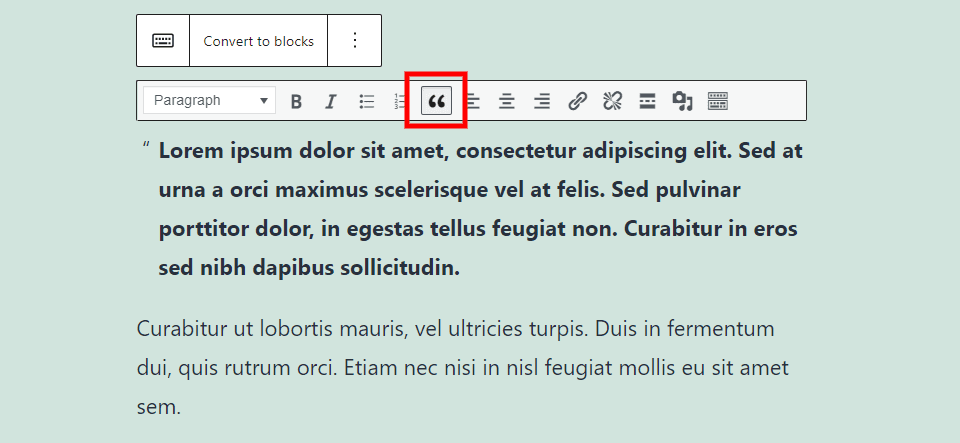
Quote controls the formatting of the paragraph where your mouse cursor is placed. The quote formatting is different from one theme to another. The Twenty Twenty-One theme indents the paragraph, adds a quotation mark, and makes the text bold.
Alignment
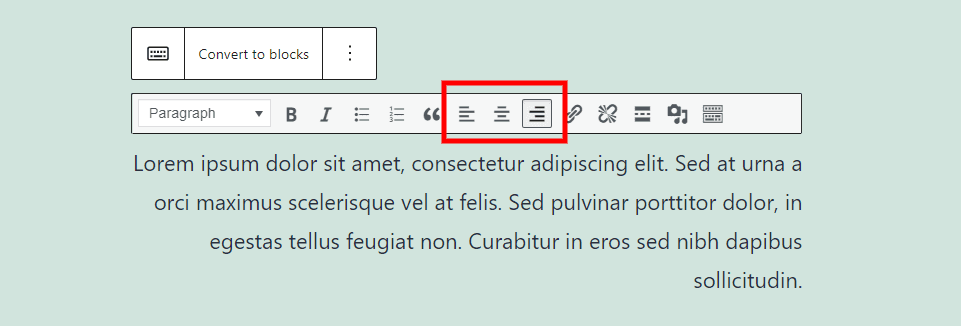
Alignment sets where the edge of the text is aligned. Choose between left, center, and right alignment. In this example, I’ve selected right alignment, so the text is aligned on the right side. Left alignment is the default setting.
Insert Remove Link
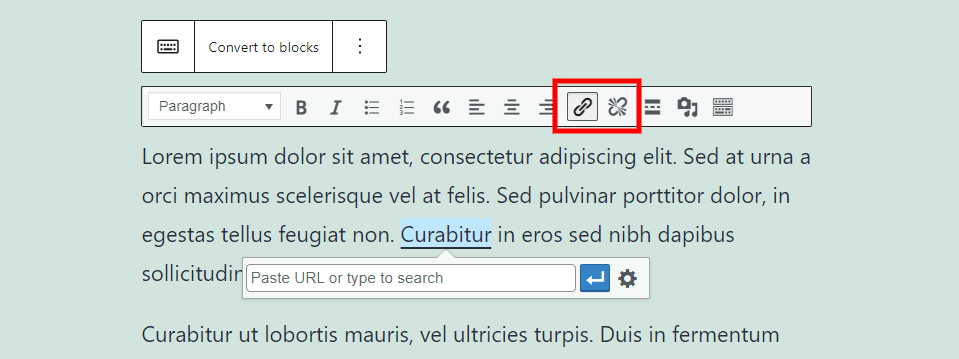
The Insert Link and Remove Link tools allow you to add, edit, or remove a link on any element. To insert a link, select the element, such as text or an image, and click the link tool you want to use. Then, search or paste in the URL. Delete a link by highlighting the text and selecting Remove Link.
Read More Tag

The Read More tag adds a break in the text where your mouse cursor is placed. This creates the breakpoint for the blog posts on the front end.
Add Media
Add Media opens the media library where you can upload or select the media to add.
Toolbar Toggle
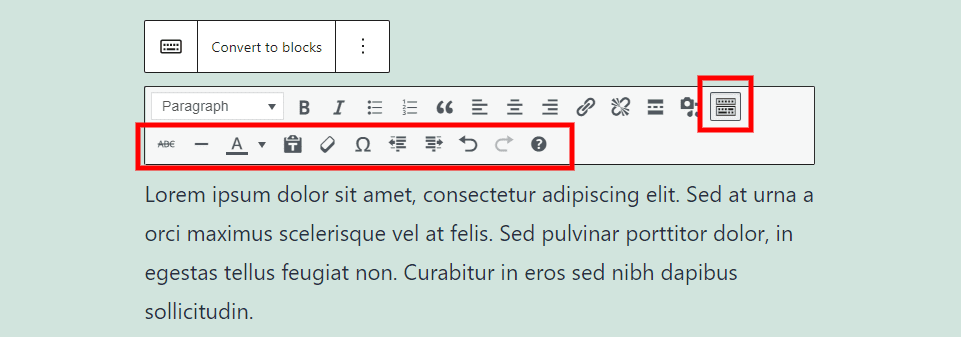
This expands the toolbar to show the next set of tools.
Strikethrough
Strikethrough adds a strike to the text that you’ve highlighted when you click the icon.
Horizontal Line
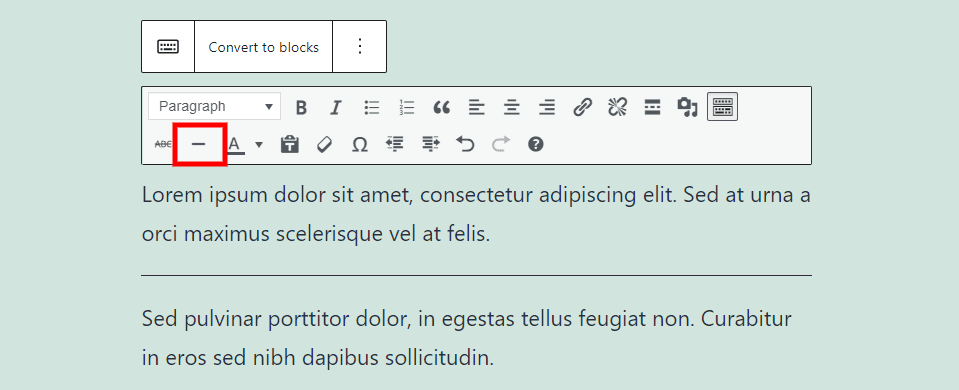
Horizontal Line adds a line across the content area. It divides the content starting at your cursor’s location and places the line under that point. In the example above, I’ve placed the cursor after the dummy word felis.
Text Color
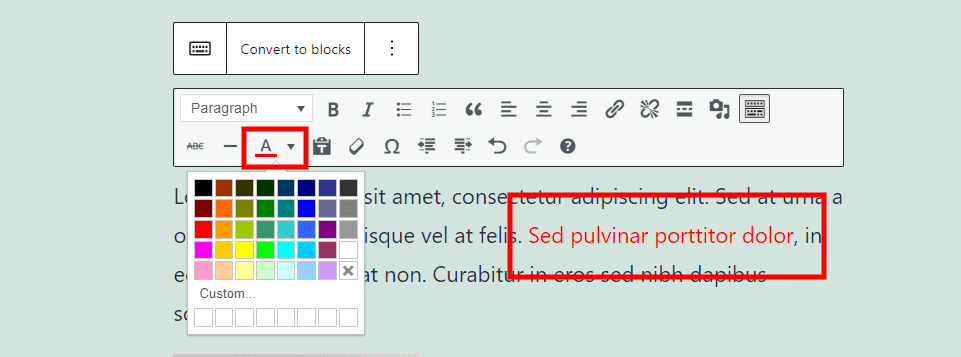
Text Color lets you choose the color of the text you’ve highlighted. The color tools lets you set up several custom colors.
Paste as Text
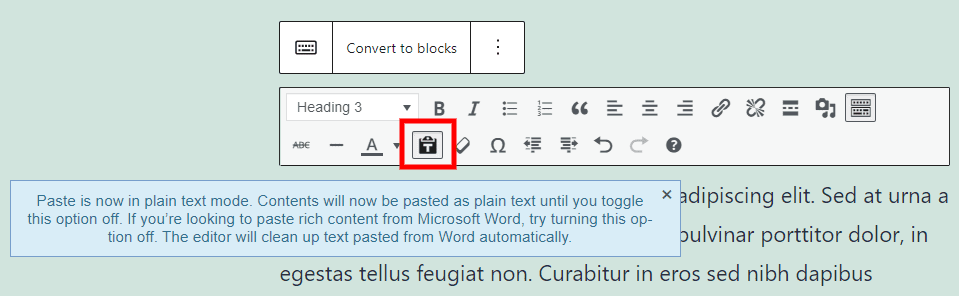
Paste as Text allows you to paste something without including its formatting. This is helpful if you’ve copied text from word processors or other websites. Toggle this on or off as needed.
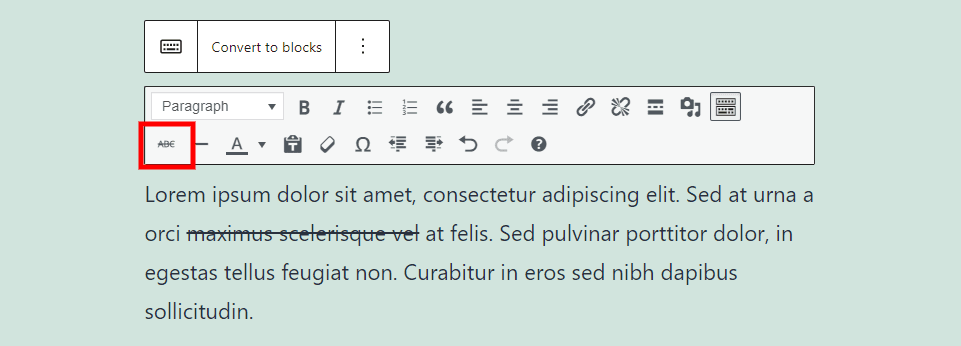
Clear Formatting
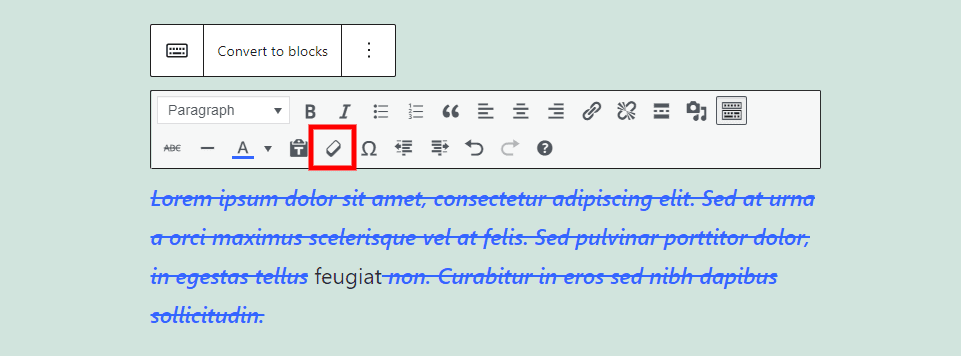
Clear Formatting removes the bold, italic, strikethrough, and color formatting of the text you’ve selected. In this example, I’ve selected one word in a paragraph and removed its formatting.
Special Character
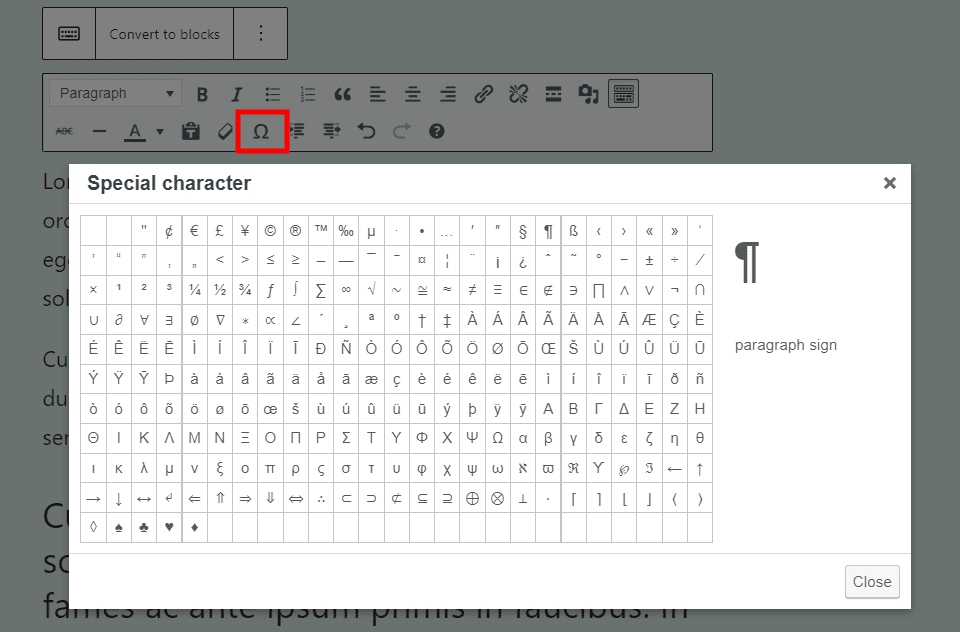
Special Character lets you add characters not found on a standard keyboard.
Decrease Increase Indent
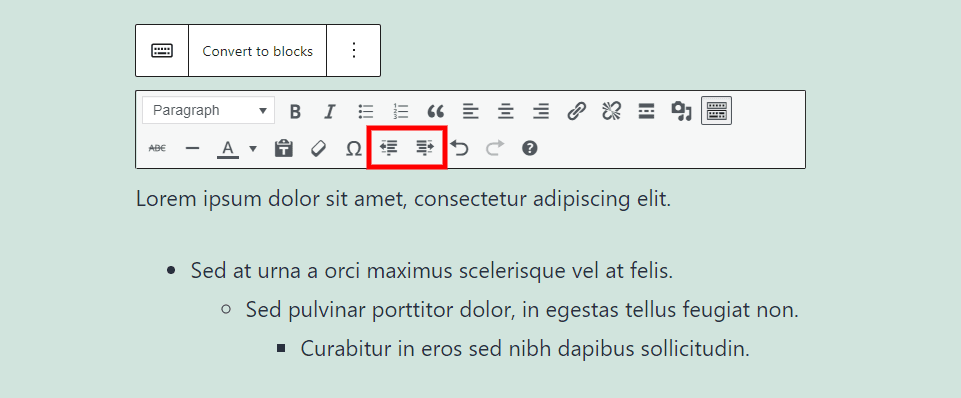
Decrease Indent and Increase Indent changes the amount of indention for bulleted and numbered lists. This creates sub-levels for the bullet points.
Undo and Redo
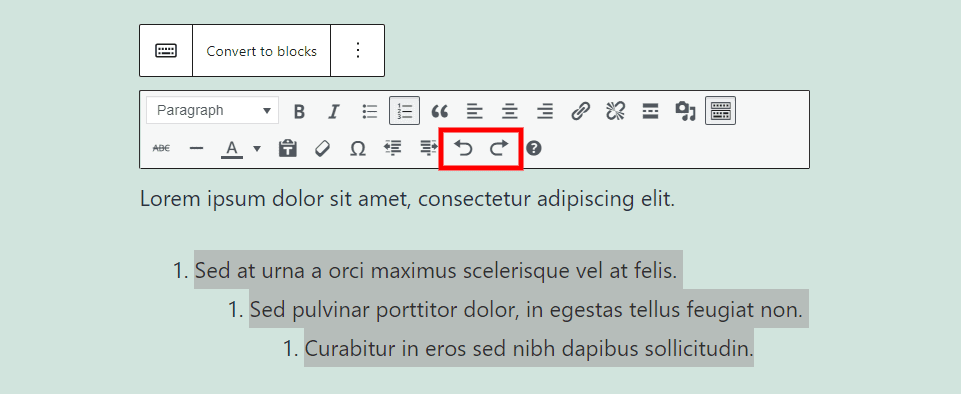
Undo reverts to the previous setting before your last edit. It highlights the change so you can see it. If you keep clicking the icon, it undoes the last setting until you’re back at the first setting. Redo adds that setting back. In this example, I undid my setting where I changed from a numbered list to a bulleted list.
Keyboard Shortcuts
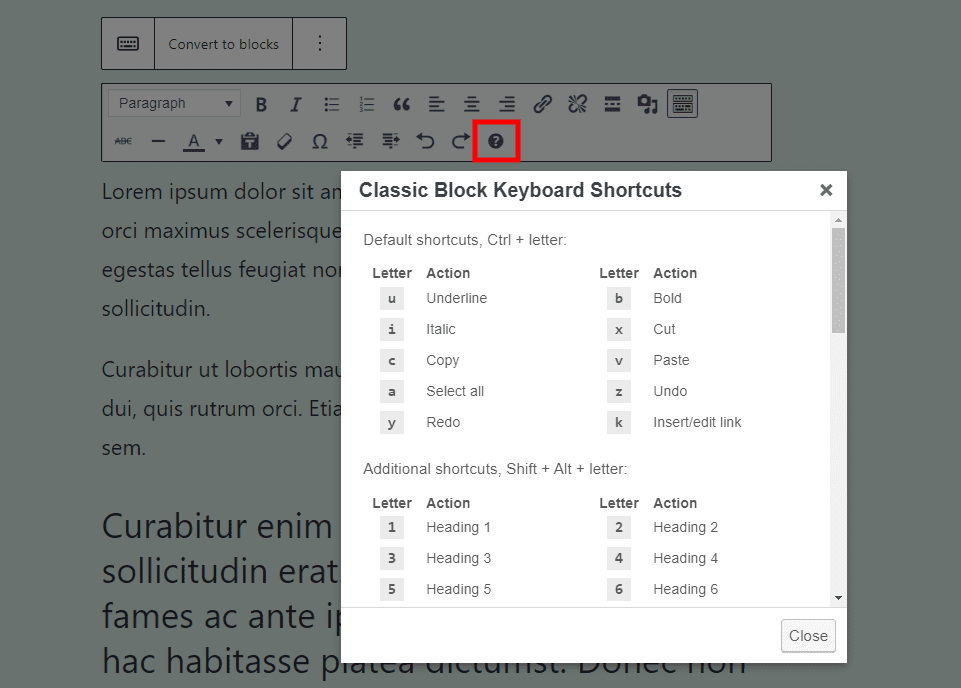
Keyboard Shortcuts provides a list of all the shortcuts to use with the Classic Block.
Tips and Best Practices for Using the Classic Block Effectively
Use the Classic Block if you’re used to the Classic Editor. This gives you the editor you want without giving up any of the benefits of the Block Editor. It also works as a bridge between the two editors. You can use the Classic Editor you’re used to while learning to use the Block Editor at the same time.
If you prefer creating your content in the Classic Editor, but want the advantages of the Block Editor, use the block and then select Convert to blocks to convert each content element to individual blocks.
Use the Classic Block if you prefer to see all the styling tools in a single location. The toolbar remains in place as you scroll, so all options are in view. Click anywhere in the block to reveal the toolbar.
Use it if you prefer to keep your content together as a single unit of content. It keeps you from having to use and manage multiple blocks.
Use multiple Classic Blocks or convert it to standard blocks to use third-party blocks within your content.
Use it for any third-party plugin that requires the Classic Editor. For example, some image gallery plugins work with the media library for creating custom galleries. These are not accessible from standard gallery or image blocks, but you can access them with the media option in the Classic Block.
Frequently Asked Questions about the Classic Block
What is the purpose of the Classic Block?
- It contains your older content that was created with the original WordPress editor.
- It provides the Classic Editor design to those who prefer it.
Is anything removed from the Classic Editor?
Some things are moved to the Block Editor. The Visual/Text tab is placed in the right sidebar. Any third-party plugins that add a button to the Classic Editor are provided as a block instead of a button. It doesn’t include Distraction-Free Writing Mode.
The Classic Block does not include the Visual/Text tab. Can I still edit the HTML?
Yes. The Text tab is now called Code Editor. It’s moved to the Options in the right sidebar under the section called Editor.
The media button has been moved from above the toolbar to the toolbar itself.
Can the Classic Block use shortcodes?
Yes. Any shortcode can be added to the content area.
Can blocks be used within the Classic Block?
No, but you can convert it to regular blocks, or use multiple Classic Blocks, and then add new blocks anywhere you want.
Conclusion
That’s our look at the Classic Block for the WordPress Block Editor. I find it to be intuitive. It’s is an excellent choice for anyone that prefers the Classic Editor or has content created with the Classic Editor.
We want to hear from you. Do you use the Classic Block? Let us know what you think about it in the comments.
Featured Image via olesia_g / shutterstock.com


I still like using the old classic editor in WordPress, It more raw.
Makes the work easy without make it over complicated with bunch of extra UI features.
Anyone like me?
Did no one think that the ability to move the toolbar would be a good idea? It often presents itself right over the text I’d like to edit. I know you can drag it to another block, but that’s not the correct solution. The ability to move the toolbar and place it where we’d like would be a major benefit.