

Adobe Lightroom is a great tool for both professionals and amateurs. While photographers are the primary users of Lightroom, it has a few benefits for web designers as well.
One of the main advantages of Lightroom is the ability to organize your entire photo library. As a web designer, you can use this to organize photos by clients.
Another benefit of Adobe Lightroom is that you can edit photos quickly and efficiently which is a major time saver when working with hundreds of photos that you need to edit in a consistent manner.
If you’re just getting started with Lightroom, learning how to use it efficiently is a great way to improve and speed up your workflow. In this article, we’ll share 18 tips and tricks for Adobe Lightroom.
-
1
18 Adobe Lightroom Tips and Tricks for Web Designers
- 1.1 1. Organize Your Workspace
- 1.2 2. Try Solo Mode
- 1.3 3. Work With Smart Previews
- 1.4 4. Compare Photos in Survey Mode
- 1.5 5. Make Use of Presets
- 1.6 6. Create Your Own Presets and Apply Them During Import
- 1.7 7. Use CAPS LOCK to Auto-Advance Photos After Adding Metadata
- 1.8 8. Quickly Reset the Sliders
- 1.9 9. Setup Watermarks
- 1.10 10. Learn Lightroom Shortcuts
- 1.11 11. Apply Settings From One Photo to Others in Your Catalog
- 1.12 12. Use Lights Out Mode to Focus
- 1.13 13. Make Use of Smart Collections
- 1.14 14. Continue Editing in Photoshop
- 1.15 15. Improve Lightroom’s Performance
- 1.16 16. Export Photos as Galleries
- 1.17 17. Synchronize Photos Between Lightroom and WordPress
- 1.18 18. Save Time By Applying Presets on Import
- 2 Master Adobe Lightroom with These Tips
18 Adobe Lightroom Tips and Tricks for Web Designers
The tips shared here are suitable for both beginners and those who are already familiar with Lightroom and will help you edit photos faster.
1. Organize Your Workspace
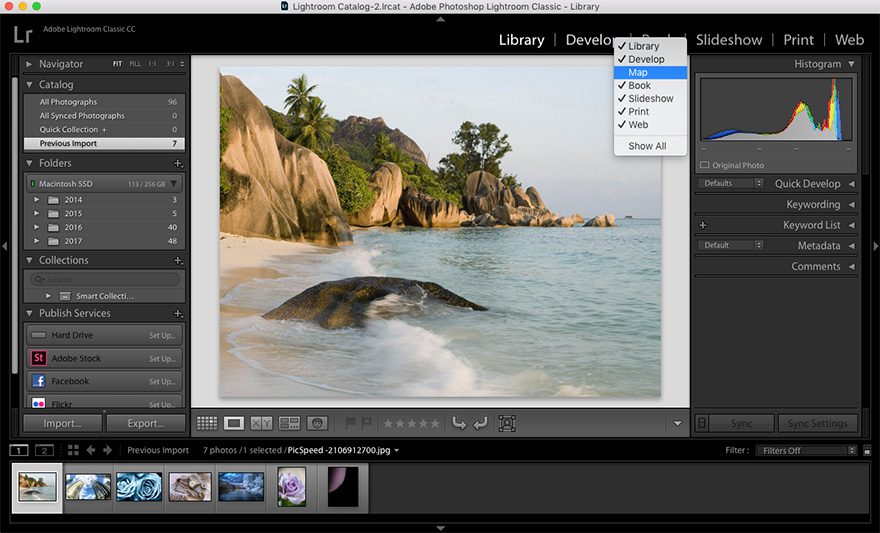
By default, Lightroom comes with several modules enabled at the top-right of the screen. The modules include Library, Develop, Book, Slideshow, Map, and others but chances are you won’t need all of them all the time. Simply right-click on any of the module names and uncheck the ones you don’t want to see. This will help you switch between the modules quickly without wasting time.
2. Try Solo Mode
The next time you’re editing photos in Develop mode, right-click on any of the open panels and select Solo mode. With Solo mode enabled, every time you open up a panel the others will close. No more scrolling through endless panels to find the one you need!
3. Work With Smart Previews
If you store the photos on an external hard drive, you’ll love the Smart Previews feature. The feature creates a smaller version of a photo and allows you to keep editing it even if you disconnect the hard drive. It also helps improve Lightroom’s performance because Smart Previews are smaller files than original photos.
To enable Smart Previews, go to Preferences > Performance. Then, check the box next to Use Smart Previews instead of Originals for image editing.
4. Compare Photos in Survey Mode
If your client handed you a large collection of similar photos for their website, the Survey Mode can help you pick the best ones. Simply highlight all of the photos and hit the N key on your keyboard. You’ll be able to compare them side by side and decide which ones are worth keeping.
5. Make Use of Presets
Lightroom presets allow you to significantly speed up your workflow by applying the same set of styles to each photo. You can find hundreds of free and paid presets online as well as create your own.
If you want to be even more efficient, consider grouping presets together based on what they do. For example, you can group several presets together that control brightness and saturation and have a different group for presets that control sharpness, lens correction, and more. To group presets together, drag and drop them onto the Presets panel.
6. Create Your Own Presets and Apply Them During Import
Speaking of presets, if you already have an established workflow, you can turn those edits into a preset of your own. All you have to do is edit a photo and then click the + icon in the Presets panel. On the window that shows up, check all the settings you want to include, name the preset, and hit the OK button. You can then right-click that preset and select Apply on Import.
7. Use CAPS LOCK to Auto-Advance Photos After Adding Metadata
Using keyboard shortcuts, you can quickly add metadata to your photos in the Library module. P and X keys will allow you to flag photos as Pick or Reject and using numbers allows you to add stars and flags for better organization. Paired with CAPS LOCK key, Lightroom will automatically advance to the next photo after you’ve flagged the current photo and added the desired metadata.
8. Quickly Reset the Sliders
If you find yourself not liking the result after you’ve worked with various sliders, you don’t have to manually move them back to zero. Double-click the slider name and it will reset to the default value. You can also hold down the ALT key to change the name of the slider into a reset link.
9. Setup Watermarks
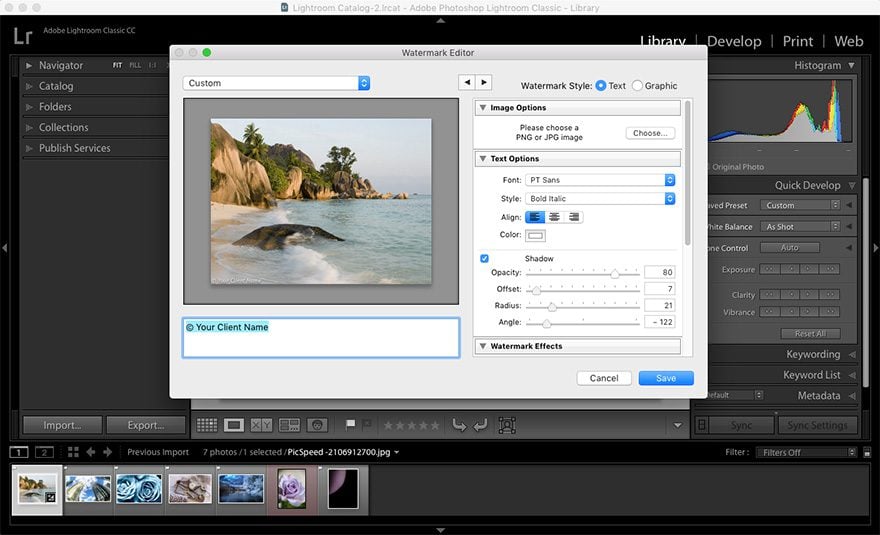
If your client wants to have their watermark on the photos, you can easily add one in Lightroom. To do this, click on Lightroom > Edit Watermarks. On the screen that loads, you’ll be able to apply an image or set a text watermark. You can also adjust the opacity and control the position of the watermark.
10. Learn Lightroom Shortcuts
Like every other Adobe application, Lightroom comes with numerous shortcuts. Learning shortcuts will save you hours of time and allow you to edit photos much faster.
Some of them we’ve already mentioned but you can find even more shortcuts for each specific module by clicking Help > Module Name Shortcuts. Alternatively, press CMD / or CTRL / on your keyboard to access them.
11. Apply Settings From One Photo to Others in Your Catalog
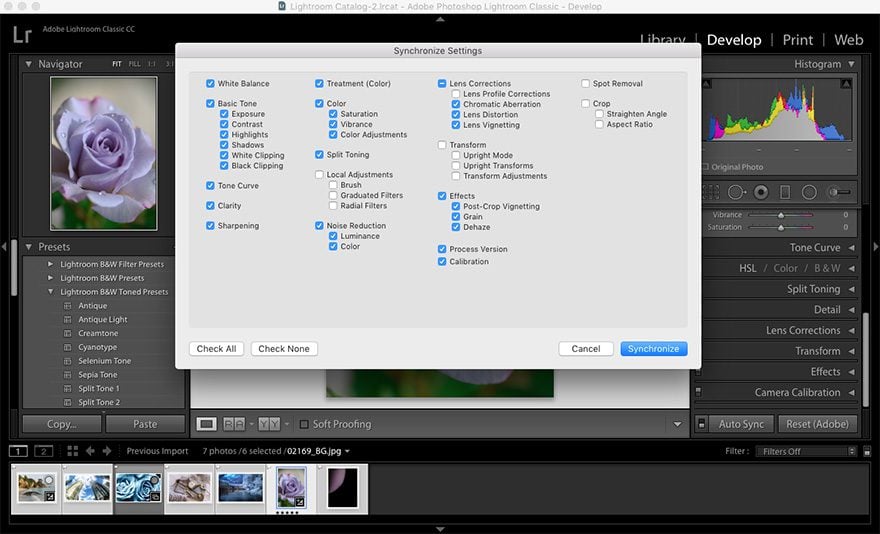
Once you’ve finished editing an image, you can apply those changes and settings even if you haven’t created a preset yet. Select your edited image and then highlight all the other images in your catalog. Click the Sync button. A window will open up where you can select specific settings that you want applied to the rest of the images. Click Synchronize and the changes will be instantly applied.
12. Use Lights Out Mode to Focus
If you want to focus on an image and make sure you’re not going too far with your edits, hit the L key on your keyboard. The rest of the screen will dim out, bringing your image into focus so you can see what you’re doing. You can even completely black out Lightroom’s screen by clicking the L key again and reset it back to normal by clicking it a third time.
13. Make Use of Smart Collections
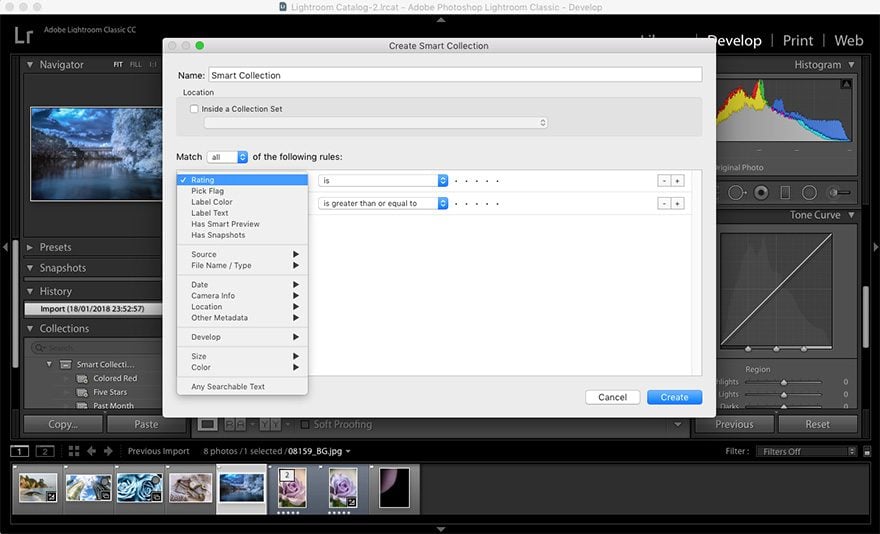
We’ve already mentioned that Lightroom offers a great way to organize your photos. You’ll see folders organized by months and years in your Collections panel, however, you can create smart collections based on your preferences.
To begin, make sure you are in the Library module and click the + key in the Collections panel. Choose Create a Smart Collection. A dialog box will appear where you can set your own rules based on rating, flags, image size, date taken, and more.
When you have defined all the rules, click Create. You can use this to organize photos by the client as well as by projects and, of course, your own personal and professional photos.
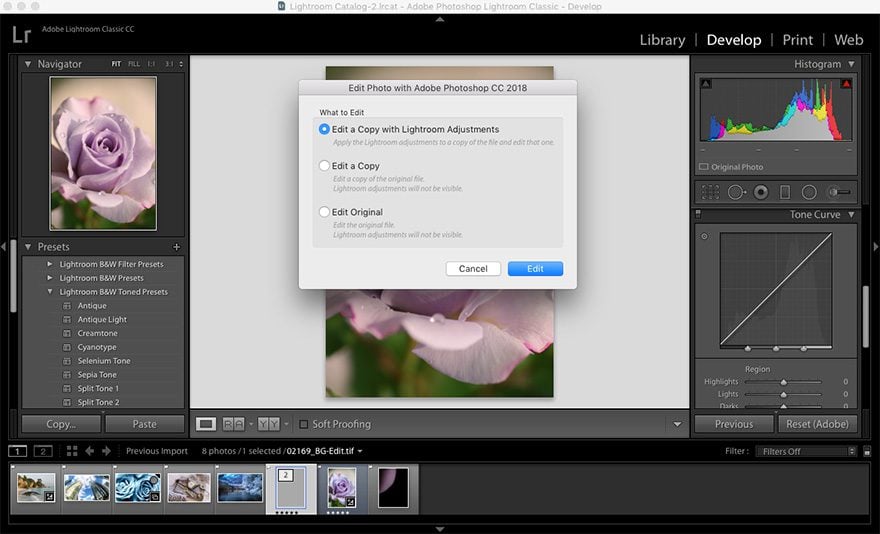
14. Continue Editing in Photoshop
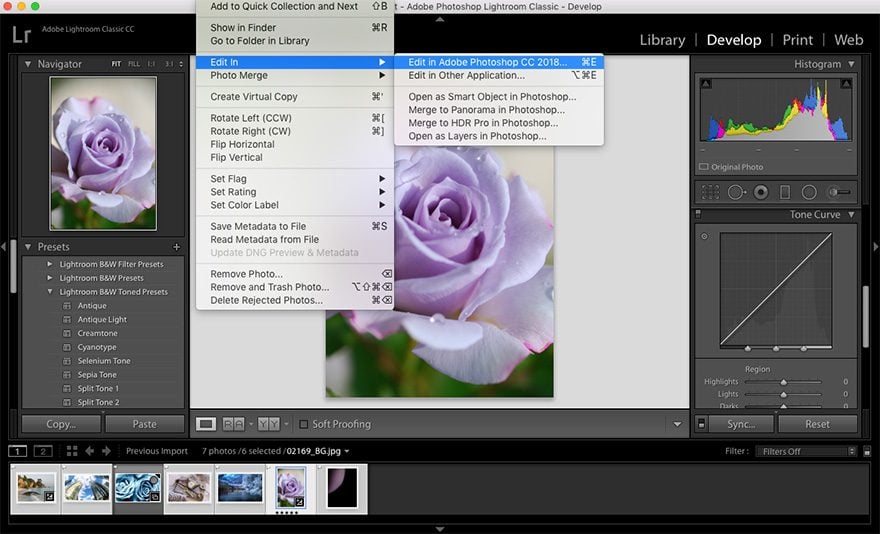
You can continue editing a photo in Photoshop if you need to apply more advanced manipulations. Click Photo > Edit in > Adobe Photoshop. You can also right-click the photo and select Edit in > Edit in Adobe Photoshop.
You can import the photo as a smart object, as layers, and more. Once you’ve selected how you want to import the photo, Lightroom will ask you if you want to edit the photo with or without changes made in Lightroom.
After you have selected the desired options, the current photo will open up in Photoshop. Make the necessary adjustments, save the changes, and they will be reflected in Lightroom.
15. Improve Lightroom’s Performance

Aside from using Smart Previews, there are a few other tweaks you can try if you find Lightroom becoming a bit sluggish. Go to Preferences > Performance and do the following:
- Uncheck Use graphics processor
- Optimize your catalog
- Increase the Camera Raw cache size to 20GB or higher
16. Export Photos as Galleries
You can export all the photos as a web gallery when you have finished modifying them. To do this, go to the Web module and choose a template. You can download additional gallery templates online if you don’t see one that you like.
On the right-hand side, you can set the copyright information as well as enter the FTP information to have the gallery automatically uploaded to your or your client’s site.
17. Synchronize Photos Between Lightroom and WordPress
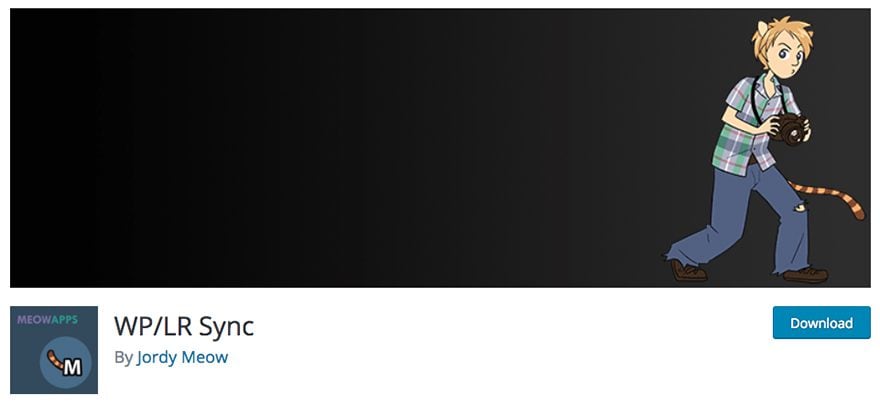
Using a plugin like WP/LR Sync, you can sync your Lightroom library, keywords, and metadata with your WordPress site. Any changes you make in Lightroom will instantly be visible on your blog and you can even link your previously imported images to Lightroom. Keep in mind, you will also need to download the corresponding Lightroom plugin.
18. Save Time By Applying Presets on Import
As our last tip, you can do a lot with your photos during the import process. Once you’ve selected all the photos you want to edit, you can rename them, specify where they should go, apply presets, and more.
Master Adobe Lightroom with These Tips
Even though Lightroom doesn’t have as many features as Photoshop, it is certainly a powerful editing application. Use the tips in this article to master Adobe Lightroom and improve your workflow.
Do you know of any Lightroom tips and tricks? Share with us in the comments below!
Article thumbnail image by Keep Calm and Vector / shutterstock.com


Many many thanks for sharing such a superclass tips with adobe lightroom. In my humble opinion, Lightroom is the essential Adobe app for android. I use it every single day; it’s in my top ten apps because it just works. I will certainly dig it and personally suggest to my friends. I’m sure they’ll be benefited from this website.
Wow, good job Dave.
Agree with you, watermarks are really important
I’ve been using LR for a while, but have defaulted back to Photoshop to save images for the web because you can preview what they will look like to make sure the size is small enough and quality good enough. LR’s export function doesn’t have this same preview capability so it’s hit and miss as to whether the export settings you’ve selected are good for the image you’re working on – I’ve had to check the exported image and then re-export with different settings. Is there some function buried in LR that I’ve missed to be able to do this more easily‽ How do you guys handle this?
Thanks so much for the article and the tip on the LR/WP Sync plugin!
“Aside from using Smart Previews, there are a few other tweaks you can try if you find Lightroom becoming a bit sluggish. Go to Preferences > Performance and do the following:
-Uncheck Use graphics processor”
That particular tip will harm performance for some users and help for others. It all depends on your monitor size and GPU.
If you have a 4K display and good graphics card, you definitely do NOT want to uncheck Use Graphics Processor in Preferences.
To know if this tip will help your Lightroom performance or harm it, you need to test by trying “Use Graphics Processor” checked and then unchecked while comparing your performance between the two.
To toggle on and off “Use Graphics Processor”, go to:
Edit > Preferences > Performance (Tab) > (Uncheck or Check) Use Graphics Processor
Lightroom is essential for photography. It’s as simple or advanced as you want it to be. I did not know about the plugin to sync to my website. Something I’ll certainly be checking out when I create a new site for my images. Thank you Brenda.
Nice!
Especially the one with Wp/LR and the metadata sync.
Thank you
A million thank you for posting this. A helpful tool for me indeed.