
Welcome to Day 34 of our Divi 100 Marathon. Keep tuning in for 100 days in a row of awesome Divi resources as we count down to the amazing release of Divi 3.0 on the final day of the series!
Simply put, the Divi Library is designed to make your life easier. If you’re not currently using it (or only using it to import the Divi 100 Layout Packs we’ve been giving away) then chances are you’re wasting precious time and energy throughout your web design process. Creating or re-creating modules, rows, sections, or even full pages that could be pre-loaded in just a few clicks–ready to use as they are or needing just a few simple edits to adapt them to your needs. That’s why in this post, I’m going to show you five ways in which the Divi Library can make your life easier as a web designer.
- 1 What is the Divi Library?
- 2 5 Ways The Divi Library Can Make Your Life Easier
- 3 1. Save Time With Custom Layouts
- 4 2. Speed Up the Design Process With Custom Modules
- 5 3. Build Websites Faster With Global Modules
- 6 4. Provide Consistent Design With Selective Settings Sync
- 7 5. Reuse Your Work By Exporting And Importing
- 8 Conclusion
- 9 Divi 100 Day 34
- 10 The Countdown To Divi 3.0
What is the Divi Library?
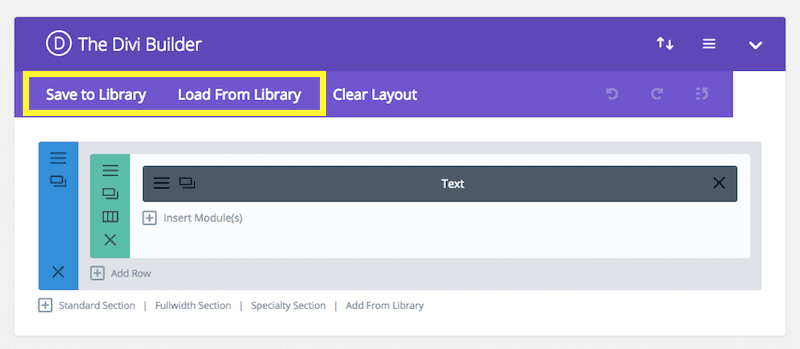
For those unfamiliar with the Divi Library, allow me to provide a brief overview: when you use the Divi Builder to create posts or pages, you are given the option of loading layouts from (or saving layouts to) the Divi Library:
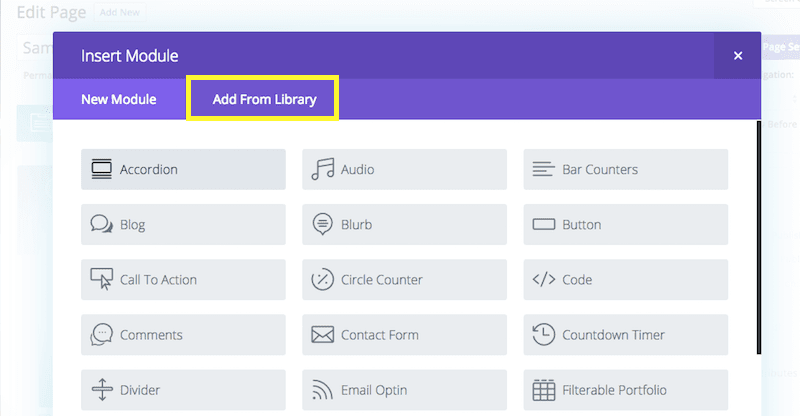
Once you have saved an item to the Library, you can access it from the window that pops up when you add a layout, section, row, or module to the page:
It’s that simple, and that powerful.
Now that you understand how the Divi Library works, let’s get into how to use it to simplify your website workflow!
5 Ways The Divi Library Can Make Your Life Easier
Subscribe To Our Youtube Channel
1. Save Time With Custom Layouts
After spending time creating a layout that works for you or customizing one of the pre-built layouts, you may want to find a way to reuse it for another page or post. The Divi Library can help you save hours of time by enabling you to create a collection of your custom layouts with your favorite combinations of sections, rows, and modules.
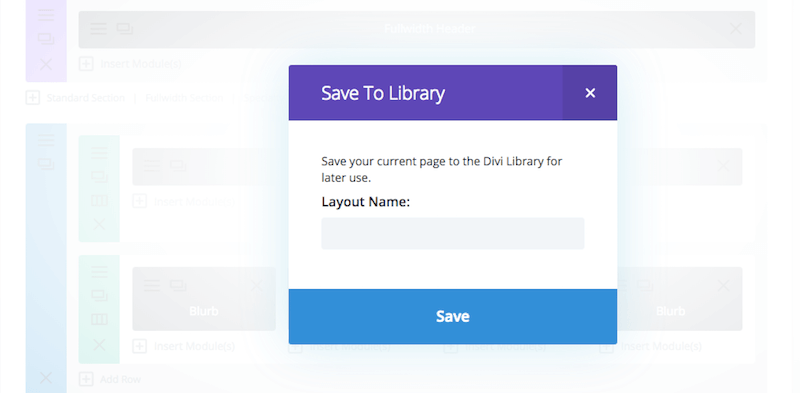
Saving a layout is easy. At any point while working on a layout, you can click the Save to Library button in the Divi Builder. This will give you a popup to enter a name for the layout:
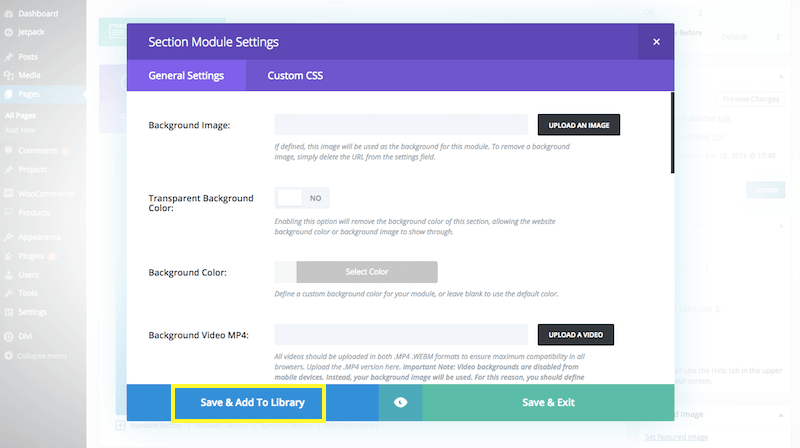
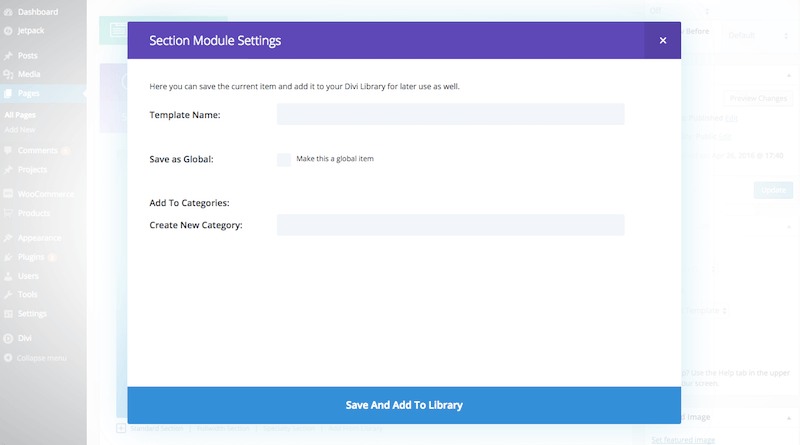
Saving any section or row with its contained modules can be done from the settings window. At the bottom left, there is a Save & Add to Library button:
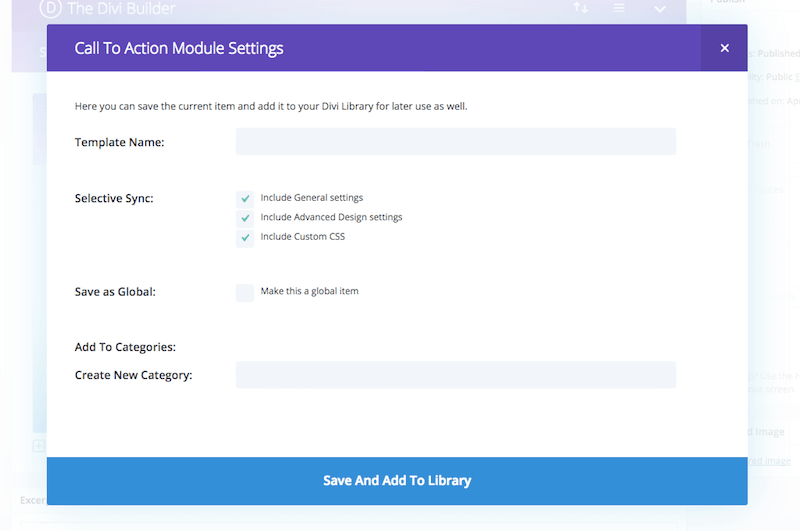
Clicking this opens a window for you to enter the name and category for the section or row:
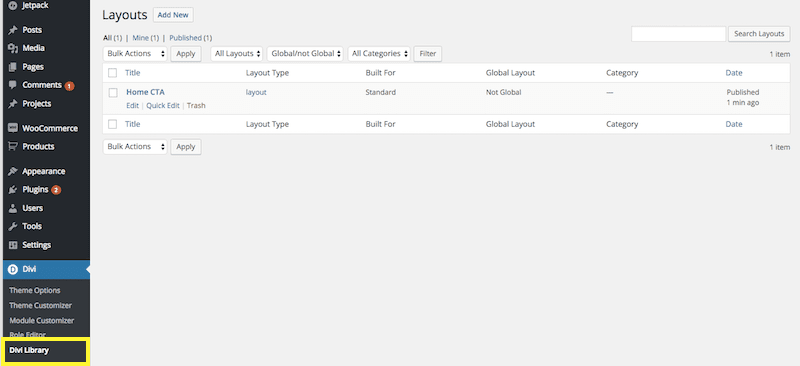
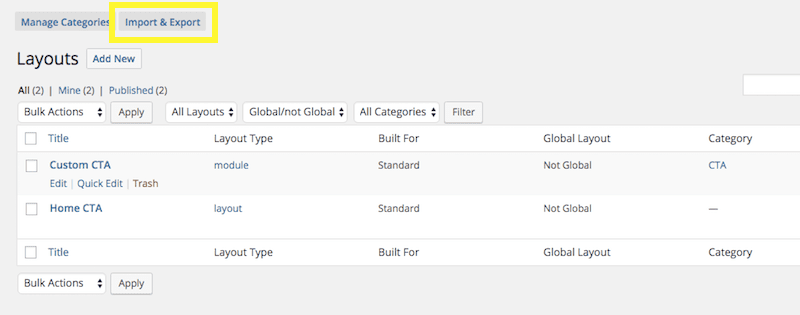
Once you’ve added items to your Divi Library, you can manage and edit them from the WordPress dashboard by going to Divi > Divi Library. The page that you will see contains a list of all your library items:
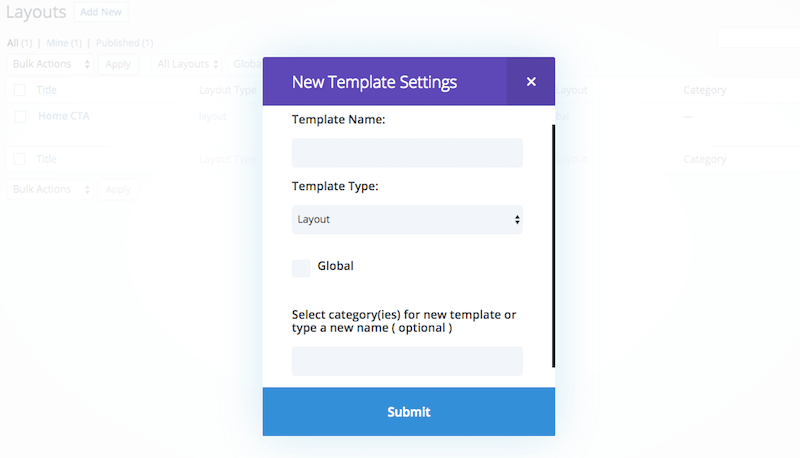
New items can be added to the Divi Library from the WordPress dashboard as well. Click the Add New button at the top of the page – this will popup a window that will collect the name, type of item (e.g. layout, section, row), settings to use, and the category:
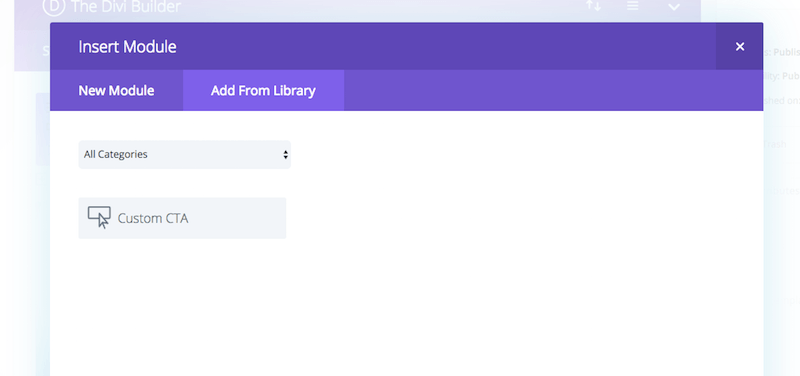
Once an item has been added to the Divi Library – whether through the Divi Builder or from the Divi Library page – it can be easily added to any post or page. While using the Divi Builder, simply click the Add From Library tab that is available when adding new layouts, sections, or rows. You will be shown the items in your library, and can click the one you want to add to your page.
2. Speed Up the Design Process With Custom Modules
Saving layouts, sections, or rows with their combination of modules is definitely a neat trick, but you might be wondering why we skipped modules. Surely you can save individual modules? Of course you can! And this is where some real time savings come in, too – you can save modules with all of your customized settings and re-use them.
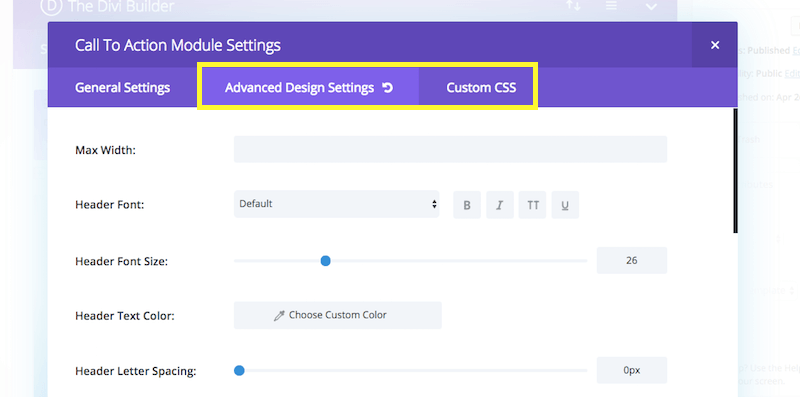
We have covered in many posts how you can create some pretty creative looks for Divi’s modules using Advanced Design Settings and Custom CSS. This is a great way to set your site apart from others using Divi. As a quick reminder, all modules (and rows for that matter) have tabs for Advanced Design Settings and Custom CSS:
From those tabs you can tweak and customize the appearance of the module until it looks just the way you imagine. Once you are satisfied, you can click the Save & Add to Library button at the bottom left of the settings window:
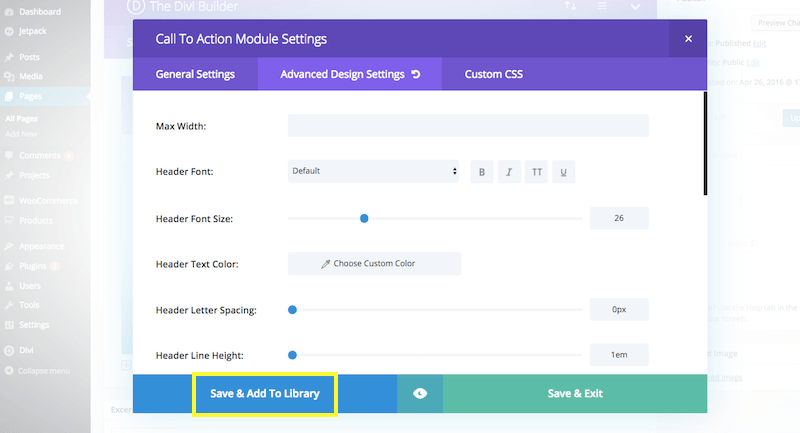
In the window that pops up, you can enter a name and a category for the module before clicking the Save & Add to Library button:
Once you have saved your customized module to the Library, you can use it elsewhere on your site, or even the same page, without having to recreate it. You can load it from the Library, with all its settings, by clicking Add From Library in the Add Module window. You will see your customized modules listed, and can click the one you wish to add to your post or page:
3. Build Websites Faster With Global Modules
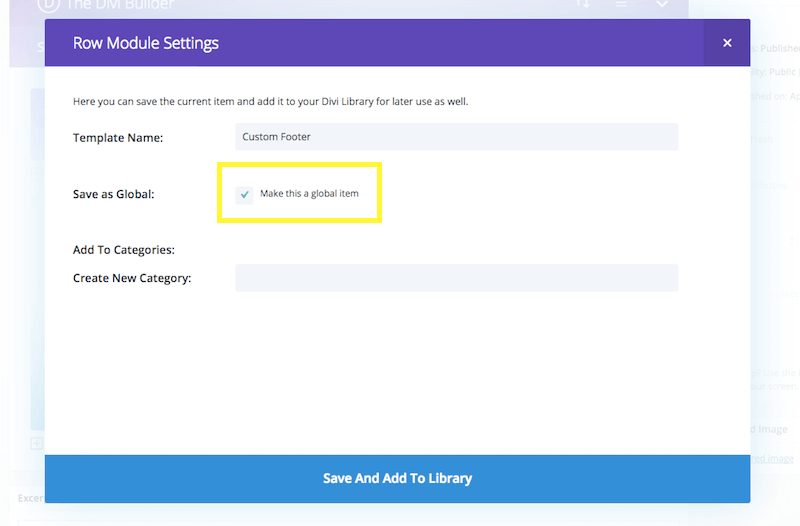
You may have noticed a little checkbox when saving your section, row, or module earlier, that said “Make this a global item.” A global item is synced and mirrored wherever it appears on your site. This means that it will be updated automatically on all pages whenever a change is made to its settings.
Now we’re moving into real time savings, as you can use Divi to create website elements that will be the same across all pages. For example, you could create a footer section that is added to all your pages. By making that section global, you won’t have to worry about forgetting to make changes to some of your pages when you need to update them.
To add a global item, just add the section, row, or module to your page as usual, and customize as needed. When you are ready, hit the Save & Add to Library button, and make sure to check the Save As Global checkbox in the settings:
Editing global items is no different to editing regular items. You click on the settings button for the section, row, or module, and make your changes. Once you click the Save & Exit button, your changes will be reflected wherever the item is used. It’s that easy!
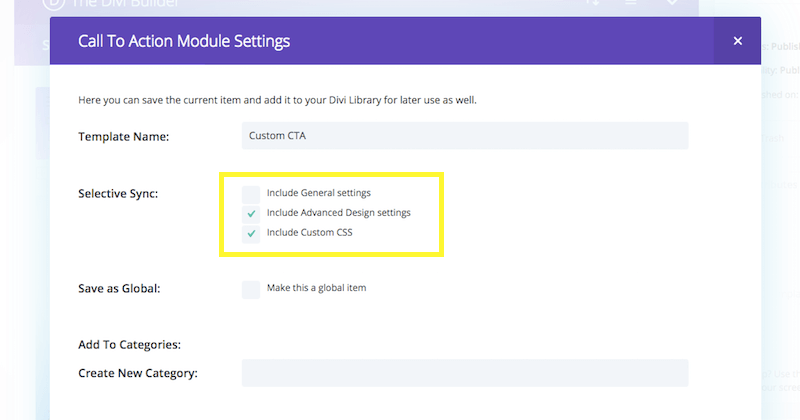
4. Provide Consistent Design With Selective Settings Sync
When you were saving your customized modules, you would have seen some other checkboxes we skipped over. There was one for each of the settings tabs: General Settings, Advanced Design Settings, and Custom CSS. The description for these tabs was “Selective Sync.”
This is an incredibly powerful feature that enables you to decide which of the settings will be saved. So, you can customize your module, but choose to only save the Advanced Design Settings with the module when you save it to the Library. This would leave you free to customize the General Settings (for example) from the defaults, instead of your customized settings.
Selective Sync is even more powerful when combined with global modules. Only the synced settings would be globally updated, leaving the other settings to be customized as needed on a per page basis.
Using Selective Sync is simple. Just check the boxes for the tabs you wish to save for the current item when you are saving it to the library as described previously. Only the settings on those tabs will be saved with the module.
5. Reuse Your Work By Exporting And Importing
Now that you have learned how to use the Divi Library to make your website design work easier, you may be wondering about reusing your work on other websites. Don’t worry – we’ve got you covered! Everything in Divi can be exported from one website and imported into another. This includes the Divi Library, so you can export and import all your customized layouts, sections, rows and modules.
To export all your library items, or a selection of them, go to the Divi > Divi Library page in your WordPress dashboard, then click the Import & Export button at the top of the screen:
Clicking this button launches the portability popup. After making sure the Export tab is selected, you will be able to enter a name for your export file. If you had selected specific items to export, you can select the checkbox to only export those items:
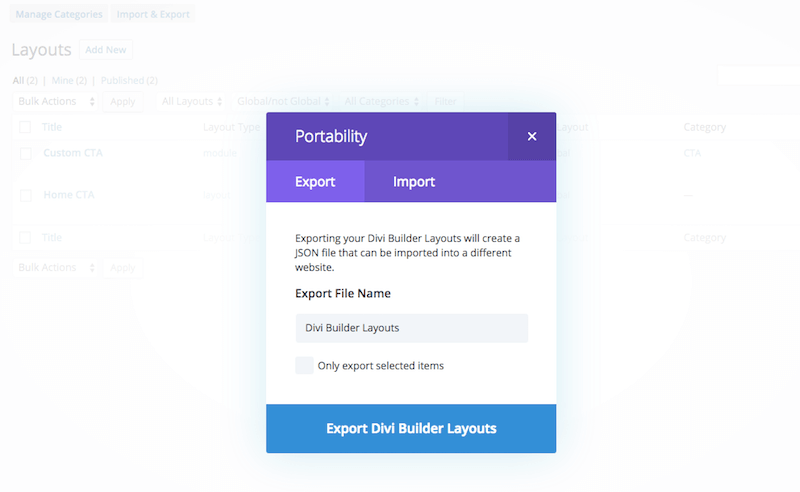
Once the export has finished, your browser will download a .JSON file containing the data about your library items.
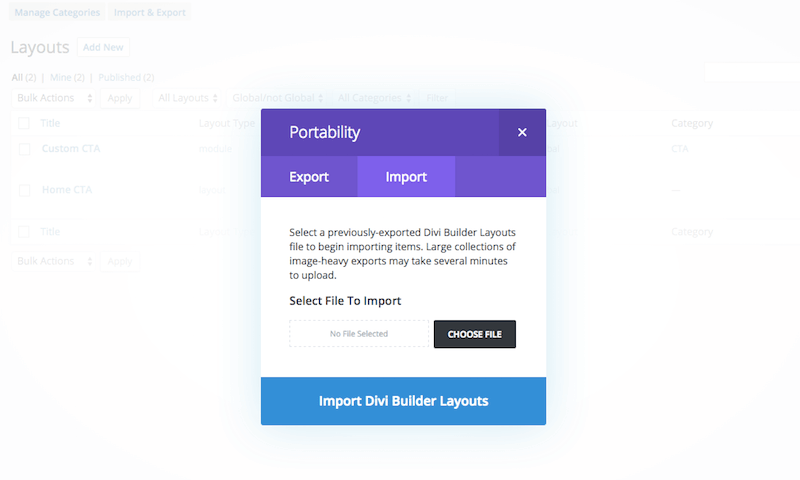
To import your library items to a new site, go to the Divi > Divi Library page as before, and click the Import & Export button. This time, click the Import tab and upload your .JSON file from your previous export. Once the import is completed, you will see your library items now added to the Divi Library page.
Conclusion
If you are using Divi to built several sites for yourself or for clients, you may want to find ways to work smarter and faster. The Divi Library is designed to help you create shortcuts for yourself that you can use to make creating websites even easier.
In this article, we’ve shown you several ways the Divi Library can be used to streamline your work and simplify your workflow. As a reminder, they were:
- Save time with Custom Layouts
- Speed up the design process with Custom Modules
- Build websites faster with Global Modules
- Provide consistent design with selective settings sync
- Reuse your work by exporting and importing
We’ve shared our tips and tricks so you can incorporate them into your workflow with your next project.
Have you fully explored the Divi Library and made use of its powerful features? Share your tips and tricks in the comments section below.
Also, be sure to subscribe to our email newsletter and YouTube channel so that you never miss a big announcement, useful tip, or Divi freebie!
Article thumbnail image by Oxy_gen / shutterstock.com
Divi 100 Day 34
The Countdown To Divi 3.0
This post is part of our Divi 100 marathon. Follow along as we post free Divi resources for 100 days in a row! This 100-day countdown will end with the game-changing release of Divi 3.0, including our brand new visual editor built from the ground up using React. Divi 3.0 will change the way you build websites with the Divi Builder forever!
Let the countdown begin.


Thank you Tom.
I find new information here.
Thanks, Erwin!
Thanks for the tips… keep them coming please! Much appreciated.
Will do, Andrea. 😉
Thanks for giving such a simple tips to make life more easier. Keep going like this.
Thanks, Rajesh. 🙂
Hi, I’ve downloaded your Free UI Kits. But when I went to Divi Library page, the Export & Import button is not there. Why is that? Hope you can point me to it. Loving Divi Builder. Thanks
Hello!
Drop us a message via one the links here – https://www.elegantthemes.com/contact/ – and we’ll take a look for you.
Nice tips Tom, Very useful for Me.
Thanks, Resep!
Great tips here, thanks. I’m loving this 100 days of Divi!!
One important thing that should be clarified about the GLOBAL library element/modules (versus just saving a module without it being global) is that if you make a change to a global element, that change will ripple across every page or post where it is used.
So if you want to use something from the library as a base to speed up the design process, but you still want to tweak things in the newly copied module, don’t use global 🙂
Thanks for the great tip, Tracey. 🙂
Thank you so much for sharing a nice tip, liked this one keep sharing Tom
Thanks for the kind words. 🙂
I paused the video many times to trace your cursor. As the narrator, you know what you are doing, but the viewers need to trace your every move – your cursor.
is there a page where all the libraries are showcased or do we need to install each library into our page first to find out what it looks like? Thanks.
Anthony, this page – http://www.elegantthemes.com/gallery/divi/documentation/divi-library/ – will likely tell you everything you need to know. If you can’t find an answer here, head on over to our forums (https://www.elegantthemes.com/forum/) to ask other users if they have a solution. 🙂
Great article! I remember the questionnaire last month where was this question about moving personal libraries across accounts and projects. Still thinking about saving the pack.
Thanks Jordan!
Hey Tom, I’ve looked everywhere for a spy cam and can’t find out how you guys at ET know what I’m thinking about! 😉
Very timely article for me, thank you.
Ha! Thanks, Hurri – we’re glad it came along at the right time for you. 🙂
What a time saver!
After spending a considerable amount of time making Sections perfect then having the ability to “keep a copy” for another time is a great feature.
Another reason why DIVI rocks!
Thanks, Chook! We aim to please. 🙂
Our helped me fantastically, it was exactly what I was needing and I did not know where to start, thank you for this article !
Thanks!
As the Blog module doesn’t has the Filterable like the Project module. I have to cloning I mean use the page layout to create pages for each categories and use Fullwidth to make it fill like filterable. Hope Divi allow filterable for Blog module as well so we don’t have to open new page every time. I curious while there are filterable for project but not for blog? Same to the blog module has grid but the default blog archive not.
Emily, it sounds like you’ve stumbled across something you’d like to see in a future update! Let us know by heading over to our Theme Suggestions forum – https://www.elegantthemes.com/forum/, and you may see it in a future Divi update. 🙂
Export tool is only available for layout. It will be very usefull to export module or row too.
Can’t stress this enough : the Divi library is such a game changer! Thank you ET for such a great tool.
Thanks for the kind words, Kaycinho. 🙂
Thanks for this info, Tom!
I’d like you to write a post on how to set the initial pages, namely the blog page and single post page.
Those are two of the most important pages when starting up a blog and I’d really like you to detail the way you setup things, at first, with a new blog using Divi.
Thanks for the suggestion, Claude! We can’t promise, but it’s definitely worth thinking about in the future. 🙂
Great explanation!
I would like to know if there is something we can use in multisite environments aswell, other than exporting & importing. For example, could I “broadcast” a change in a library item to all the network?
Thanks!
Hi Litbea.
If possible please let me know if you find out a solution for multisite enviroment. I’m also looking for something like this.
Thank you in advance.
Thanks, Litbea. 🙂
I’m afraid I don’t know if there’s a tool out there with that specific functionality. You could try posting a topic in our forums – https://www.elegantthemes.com/forum/ – another user may have needed to do the same thing.
Thank you so much for these useful tipps 🙂
No problem, Monika. 🙂
It’s a great tool, but the general settings tab contains a mix of content and design settings. For example, if you want the ‘full width header’ module to be the same en every page, you will need to use selective sync with the general tab excluded, unfortunately, that tab has a lot of design settings so you still have to change a lot on every page. That difficult to explain to customers.
As we go along, we can learn about divi — like this. If I want 2 buttons, I need to use a Header or a Full Width Header. Or you can use 1 button on the Headers. A Slider has only 1 button per page. You can keep the pic same on a 3-page slider and vary your message words (like telling a story). You get the idea.
Quick question… I’m not sure I fully understand selective sync. Will this allow me to change an existing global module and have that change reflected in all the pages I’ve used that module on that I have previously used that module? Thanks!
Hi Steve,
If you have a global module that you do not want to be exactly identical each and every time you use it, just mostly, you can use selective sync to uncheck one type of customization–general, advanced, or custom css. That way, each time you use that global module you have the ability to change the settings in your unchecked area without those changes being made to all instances in which you’ve used that global module across your website.
Hope that makes sense!
Hi Nathan,
That was similar to my question. In the video, when making a Global, he didn’t select any of the 3 checkboxes for General, Advanced, CSS.
#1 My question is then, “When I save a Global with none of those 3 checked, does it save all the 3 setting categories (Advanced, General, and CSS), and
#2. When making a Global, and if I check 1 item, say Advanced Settings, do only the Advanced Settings get saved as Global, and not the General (unchecked) and CSS (unchecked in this example? Thank you.
Thanks, Nathan!