
Pop-up optin forms are simultaneously one of the most useful and most annoying elements of web design. Without them, you can hardly grow a list of devoted customers, but first-time visitors are highly unlikely to even pay attention to them. That’s why we want to walk you through the process of using Divi’s condition options to trigger an optin form after the user visits certain pages. Not only are they more likely to convert because they have looked around your site a bit, but also because you’re not annoying them with a pop up that doesn’t pertain to them. Let’s dig in and see how we can enhance your site!
-
1
How to Trigger an Optin Form using Condition Options
- 1.1 Create a New Template
- 1.2 Copy Email Optin Module
- 1.3 Add a Custom Body Layout
- 1.4 Paste the Email Optin Section
- 1.5 Add Copy to Offer the Conditional Discount
- 1.6 Add Dynamic Page Content
- 1.7 Edit the Post Content’s Width
- 1.8 Remove Padding from Rows and Sections
- 1.9 Add an Animation
- 1.10 Optional: Set Fixed Position
- 1.11 Add Conditional Logic to the Section
- 2 Wrapping Up with the Conditional Optin Form
How to Trigger an Optin Form using Condition Options
For this particular article, we are going to use the Divi condition options to display an optin form for a discount code after the user visits two particular pages on your site. It will only appear after those conditions are met, meaning the discount is only available to specifically targeted users.
For this tutorial, we are going to be using the Divi Theme Builder to add the optin form module to the pages’ Body layout, but if you have a specific page or post you want to have an optin show after certain Page or Post visits, you can follow the exact same process for the condition options.
You can find the Divi Theme Builder in your WordPress admin dashboard under Divi – Theme Builder in the left-hand sidebar.
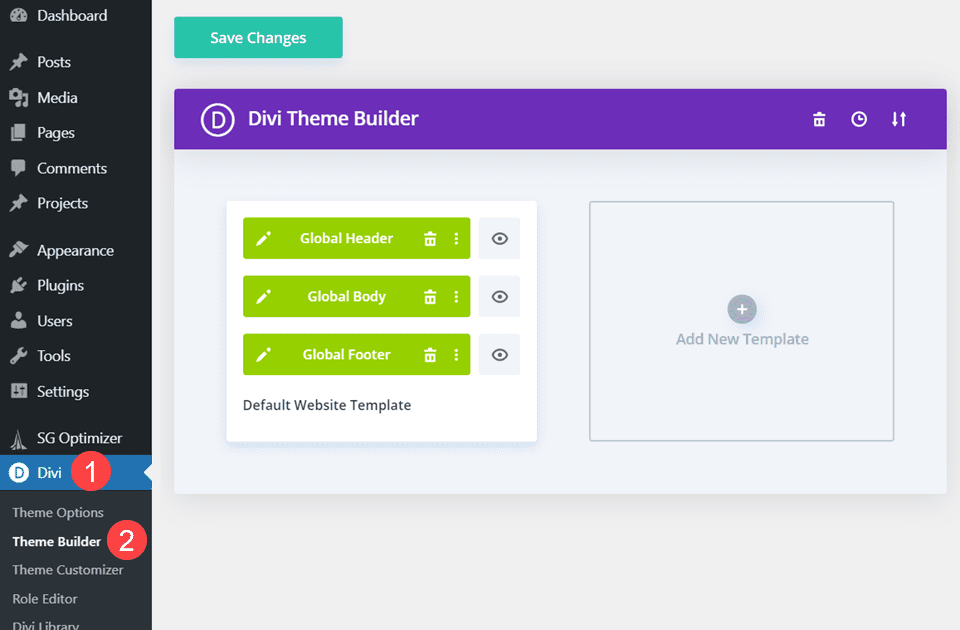
Create a New Template
Inside the Divi Theme Builder, you want to click the Add New Template button.
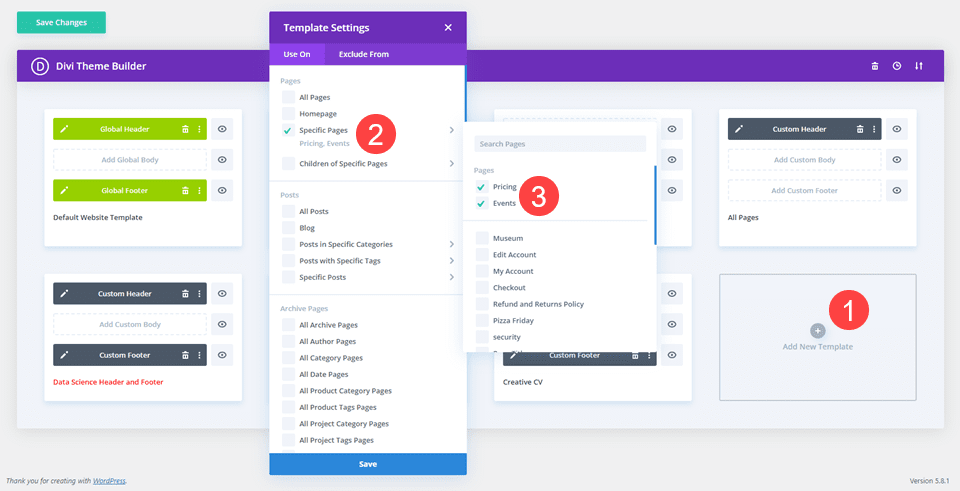
Then, select the specific pages you want the optin form to appear. Since we are going to give a discount code using the optin form module, we are going to have the layout appear only on the Events and Pricing pages.
Copy Email Optin Module
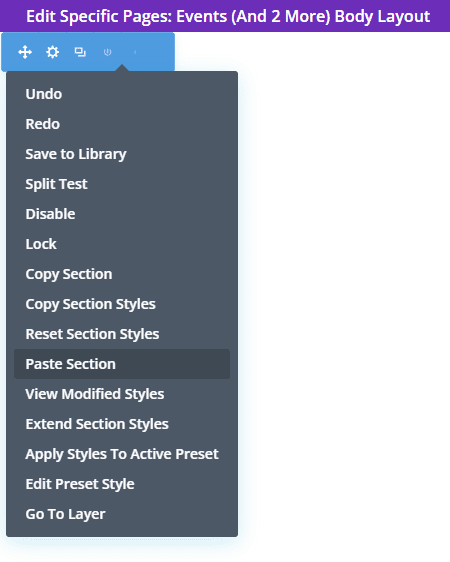
Since we’re using premade layout packs for this, go into the layout page with the email optin form already designed and implemented. Right click the containing section and select copy section from the context menu.
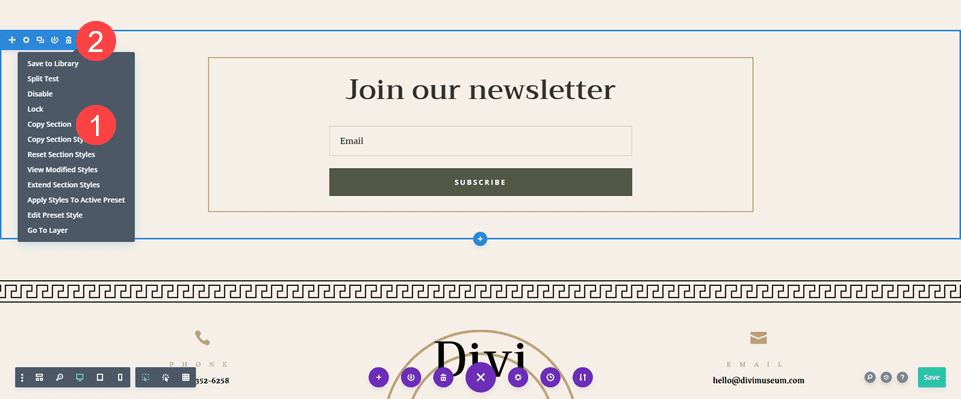
After that, delete the section from the page because you are going to have it in the Theme Builder instead.
Add a Custom Body Layout
Next navigate back to the Theme Builder to create the overall layout. You will click the Add Custom Body in that template and select Build Custom Body.
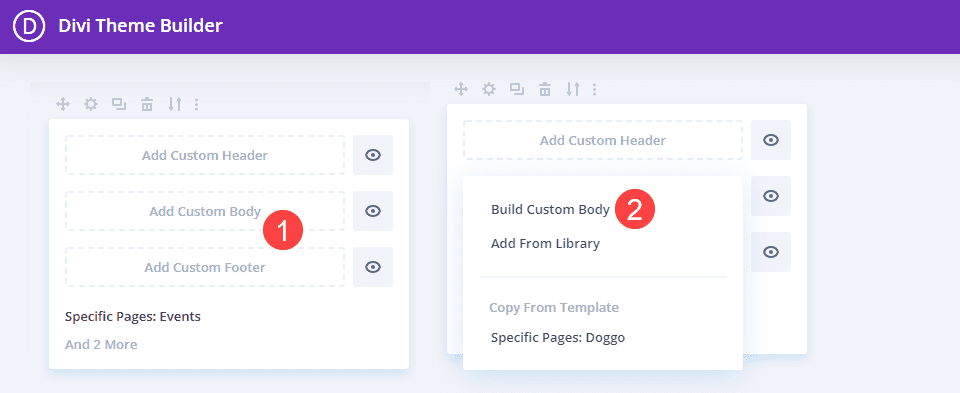
Inside that, select Start From Scratch and you should have a blank template to work with.
Paste the Email Optin Section
Inside the editor, right click and select Paste Section from the context menu.
The fully styled and designed email optin should drop right in.
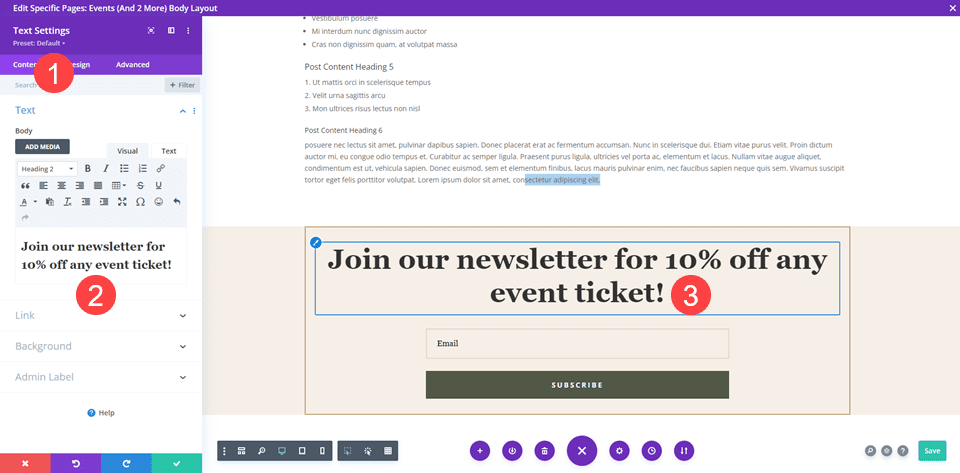
Add Copy to Offer the Conditional Discount
Next, you want to mention the discount you’re offering. For this module, we’re going to change the heading in a Text module, but you could also go into the Settings for the Optin Form and change the title text.
After that, it’s time to get to displaying the page content.
Add Dynamic Page Content
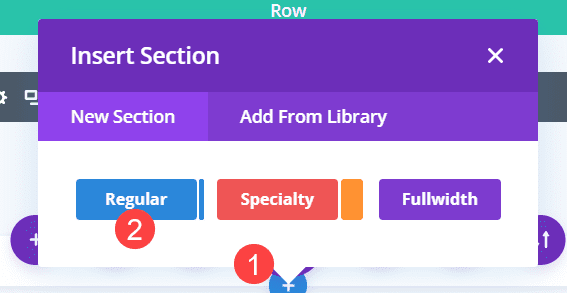
Next, if there’s not already a blank section, click add a new section by clicking the blue + icon and selecting Regular Section.
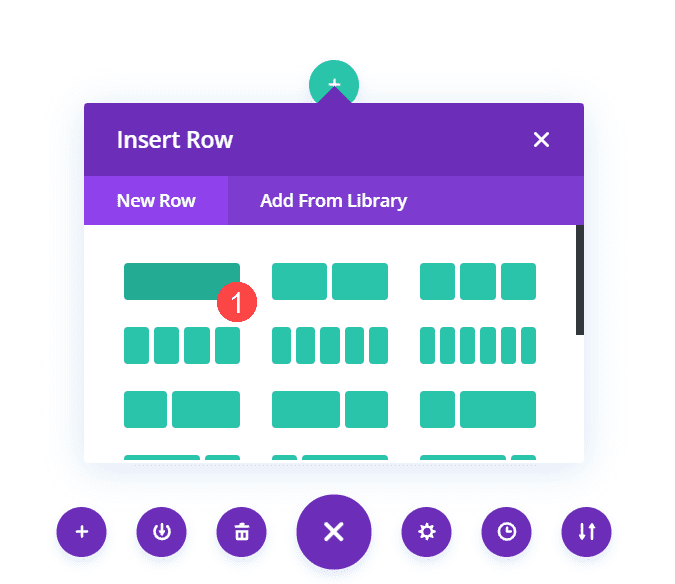
When you have the section in place, add a single column row.
Select the Post Content module from the Insert Module dropdown. This is a dynamic module that displays whatever design you have already made. In this case, the premade Museum Events and Pricing layouts will display on the front end.
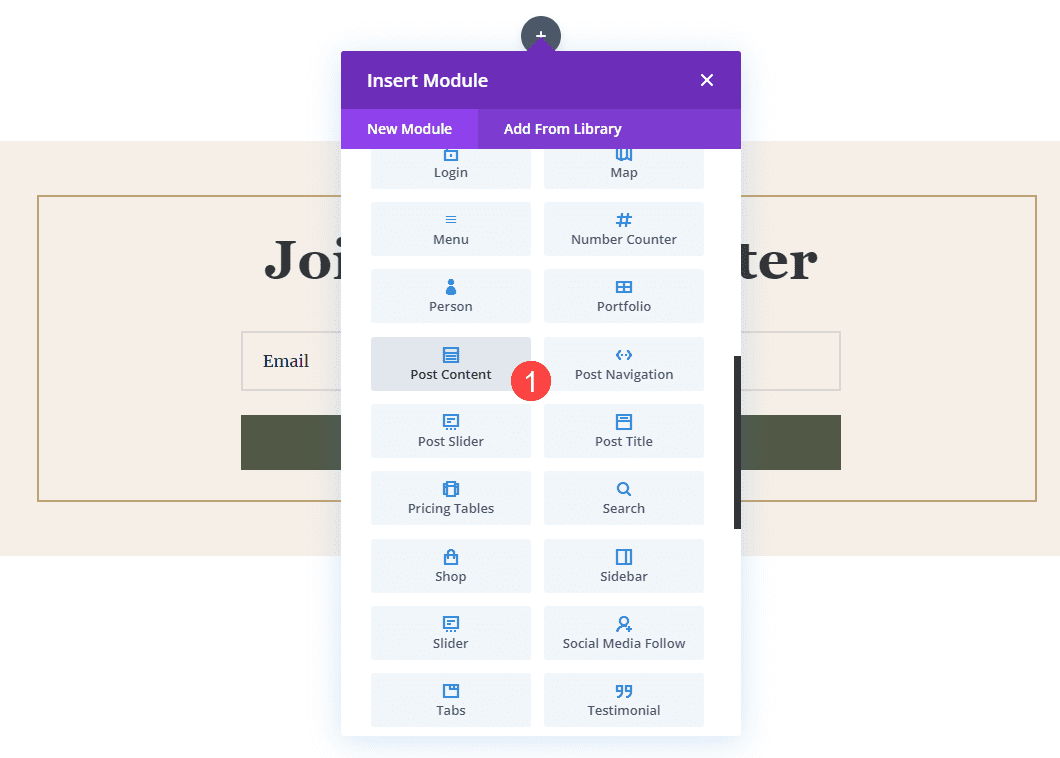
In this case, the premade Museum Events and Pricing layouts will display on the front end.
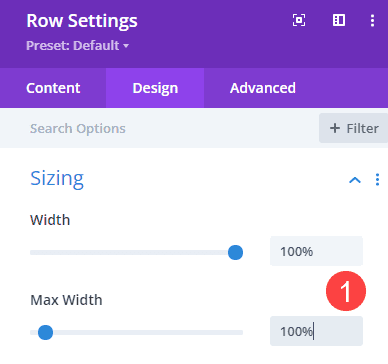
Edit the Post Content’s Width
Next, go into the row settings for the Post Content module’s containing row. Navigate to Spacing in the Design tab and set both Width and Max Width to 100%.
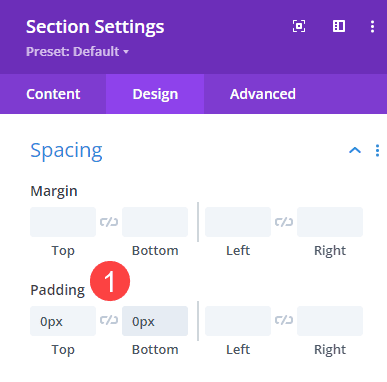
Remove Padding from Rows and Sections
Because we’re adding dynamic content to already designed pages, we want to keep it as seamless as possible. So go into the Design Settings tab for all the individual sections and rows and be sure to set Top and Bottom Padding to 0 px under the Spacing heading. Do not leave it blank, as there is default spacing set in Divi for them.
Add an Animation
Next, go into the section settings for the one containing the email optin form. Under the Design tab of the section, we are going to add an Animation. Because this section will show only for visitors who meet certain criteria, we want to draw their attention to it. We want to make sure they don’t think it’s just another part of the site. We will do so by animating the entire section to appear after a set duration.
We will chose Bounce for the Animation Style and 1000ms (1 second) for the Animation Delay. Now, this section will only appear 1 second after the visitor has arrived. You can set the delay to whatever works best for you, with each 1000ms being 1 second.

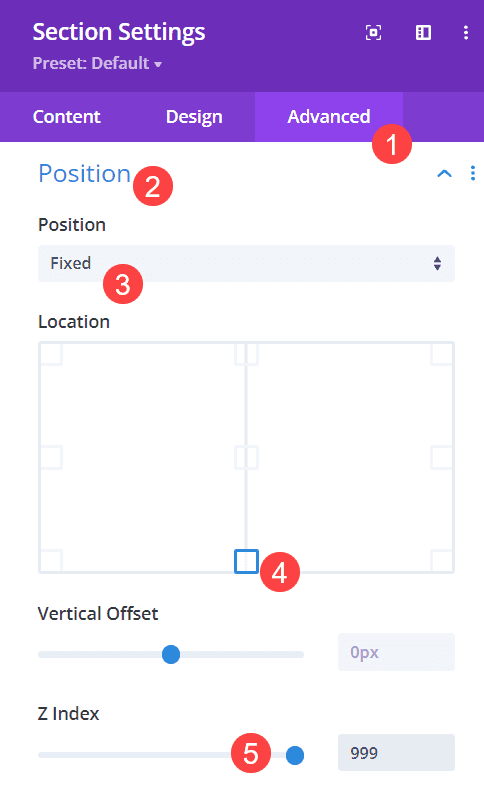
Optional: Set Fixed Position
If you want the user to see the optin immediately, rather than having to scroll to the bottom of the page, you can affix it to the bottom of the screen. Go into the Advanced tab for the section and find the Position settings. Select Fixed from the dropdown, and then click the bottom center square to position the section. Next, change the Z Index to 999 so that it’s always higher than other content on the page.
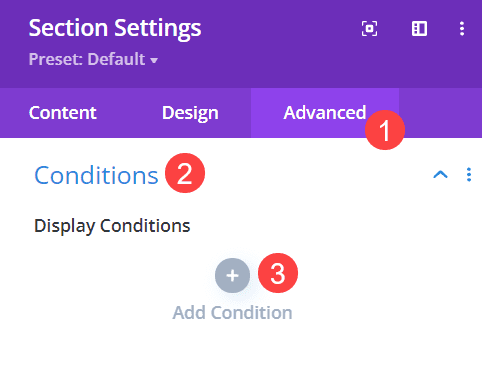
Add Conditional Logic to the Section
While you are still in the settings for the containing section, go to Advanced tab and find the Conditions options. This is how you are going to set what pages a visitor must see on your site before they get this optin form. Click the grey + icon that says Add Condition to begin.
Next, choose Page Visit under the Interaction subheading.

Then, you just need to choose the exact pages the visitor must see in order to trigger the optin form with the discount. Select the Pricing and Events pages from the list here. Because both of the pages are selected and they’re both assigned to the Theme Builder template, the user will see the optin on either page regardless of the order in which they are visited. But both must be visited in order to trigger the optin form to appear.
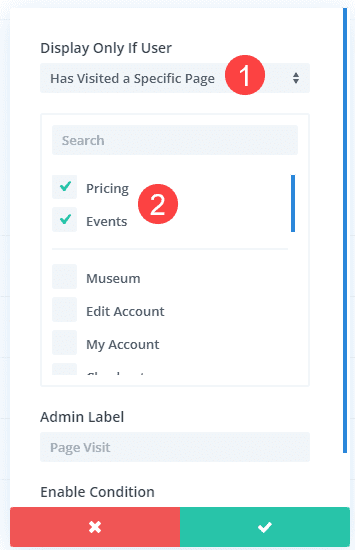
You can also do this with Post Visit, too, which is also under the Interaction subheading. It works the exact same way, but with blog posts instead of Pages.
Wrapping Up with the Conditional Optin Form
Once all of that is saved, your conditional optin form is live. Now whenever someone visits specific pages or posts on your site, you can give them special, targeted content. Being able to customize your content using these options opens up your site to having an incredible user experience. Which is one of the biggest driving factors to conversions. And now you can display the optin form to convert them as part of that experience.
How would you use the condition options to display an optin form?
Article featured image by TMvectorart / shutterstock.com


Hello,
were in Divi are the visited pages tracked of the user sessions/visits?
Or to ask it directly: Will this work with a page caching plugin (e.g. WP-Rocket) enabled?
Thanks,
Sven
The only problem with Divi is the custom CSS not flexible.
Divi should adopt same approach like Gutenberg custom CSS