
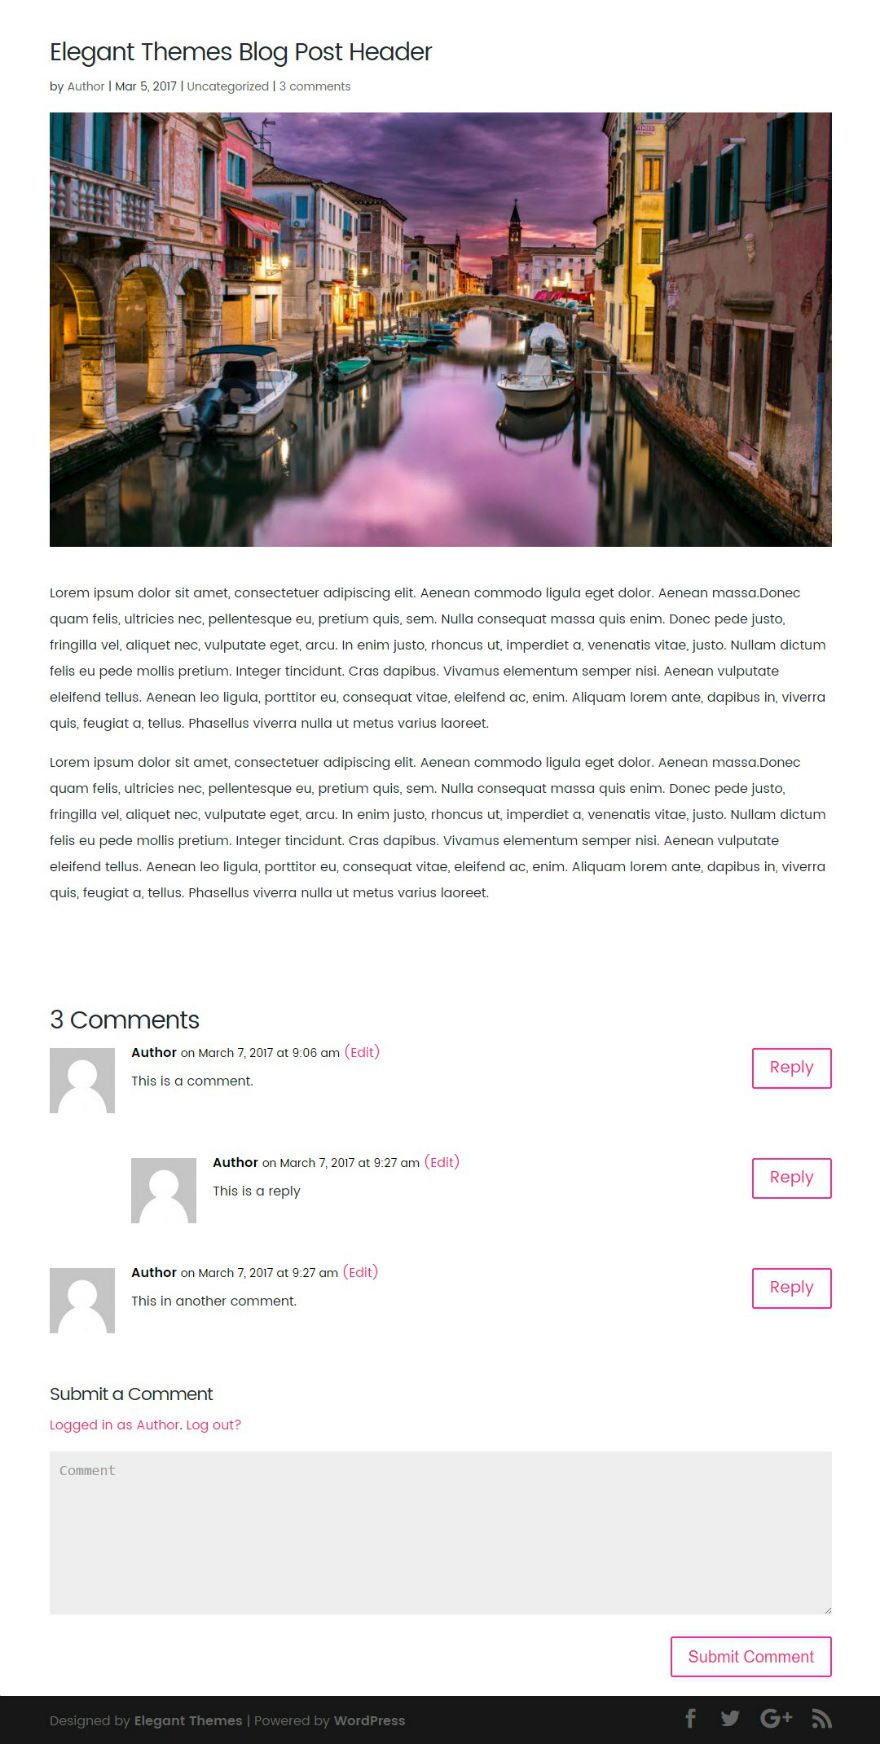
In my previous blog post, I covered how to implement the new Elegant Themes Blog design on your website. Today, I’m going to show you how to design your single blog post like the new Elegant Themes blog posts. This requires a few modifications to the default post template and some custom CSS. After you implement this new design, you will be able to use the default editor or the Divi Builder for you blog post and still keep the same new design.
Let’s get started.
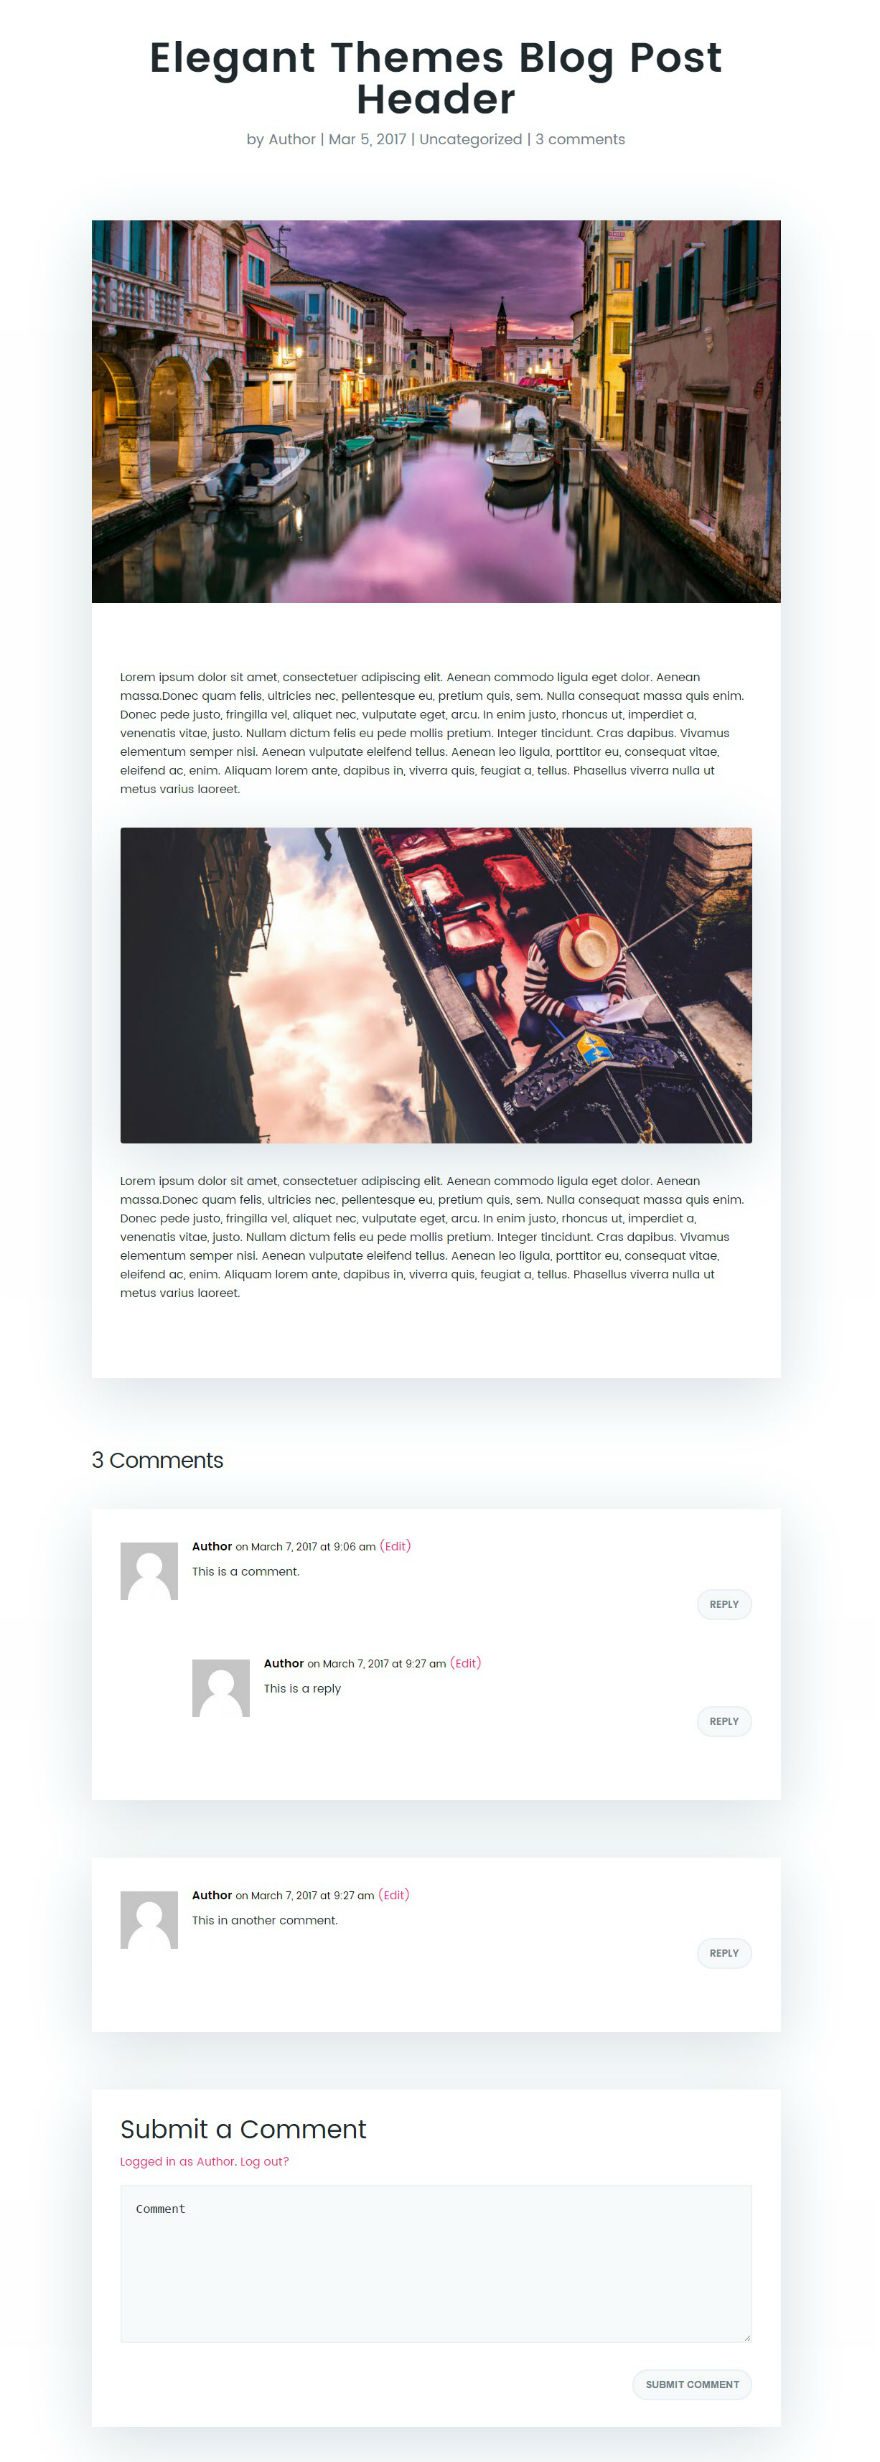
How to Style Divi’s Single Post to Match the New Elegant Themes Post Design
Subscribe To Our Youtube Channel
Implementing The Design in Divi
If you haven’t added the custom font Poppins using Google Fonts from the previous article, go ahead and do that now.
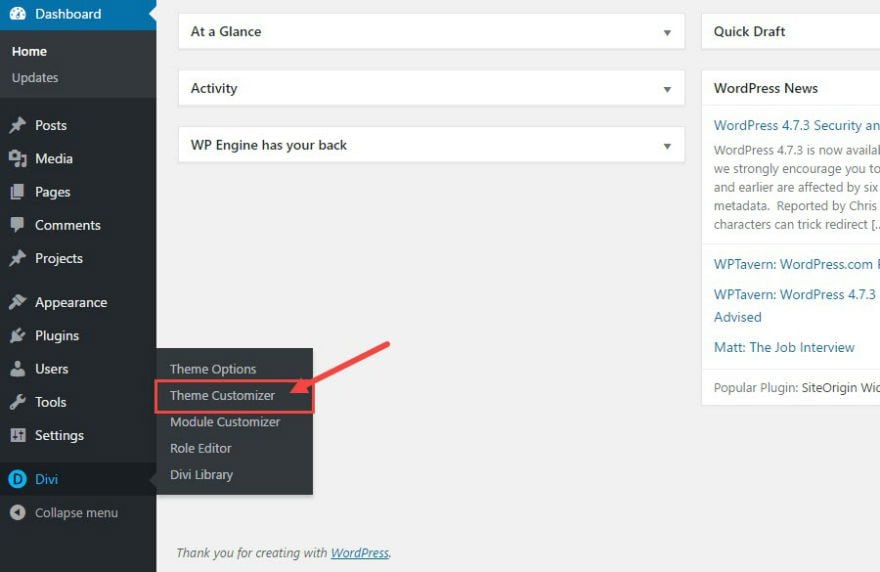
After Poppins in installed, you need to edit the default theme settings. From the WordPress Dashboard, go to Divi → Theme Customizer.
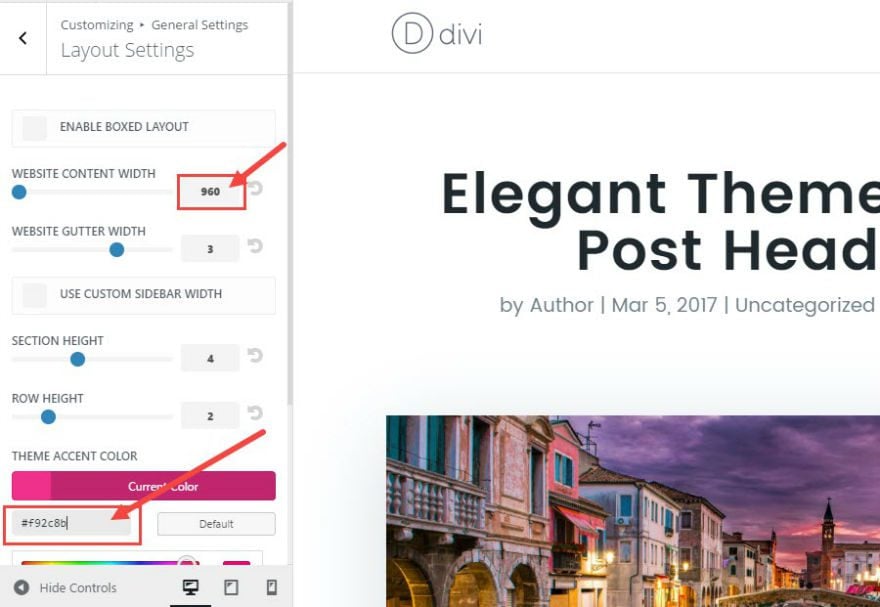
From the Theme Customizer, Select General Settings → Layout Settings and change the following:
Website Content Width: 960
Theme Accent Color: #f92c8b
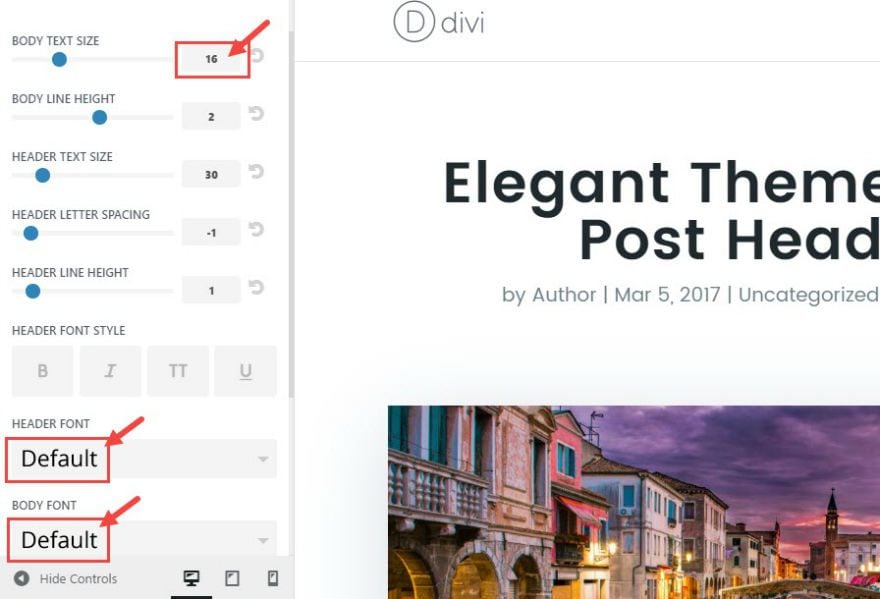
Go back to General Settings in your Theme Customizer. Select Typography and change the following settings:
Body Text Size: 16
Header Font: Default
Header Font: Default
Go back to the Theme Customizer home screen and select Blog → Post and edit the following:
Meta Text Size: 20
Header Text Size: 58
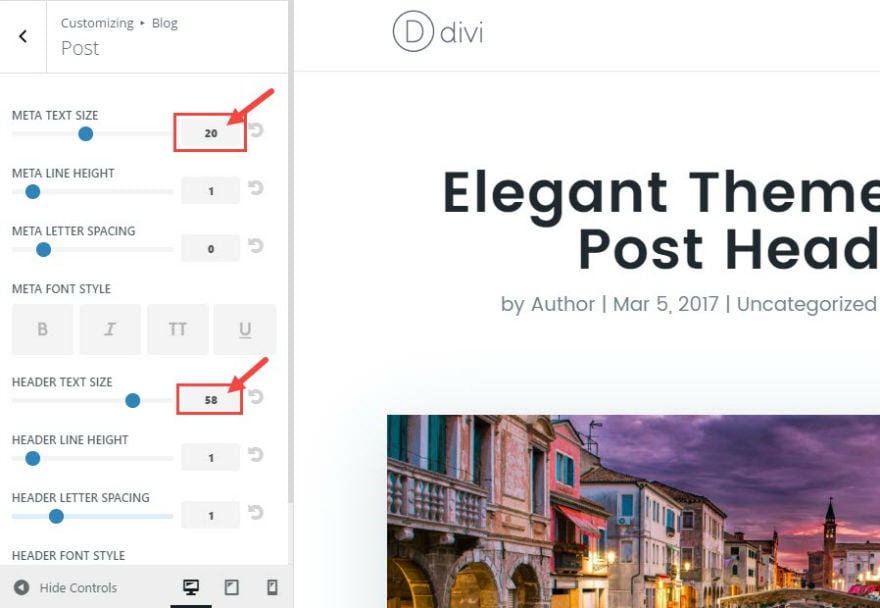
Save & Publish
Now it’s time to add a new post.
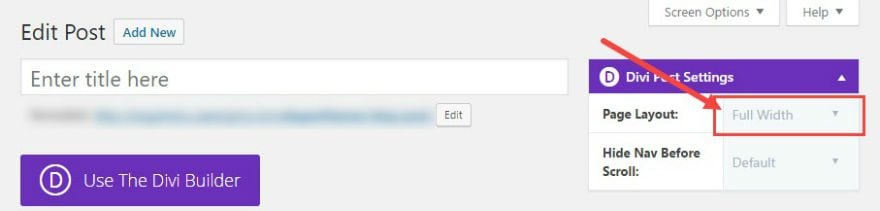
From the WordPress Dashboard, go to Posts → Add New. In the Divi Post Settings on the top right of the page, select Full Width for your page layout.
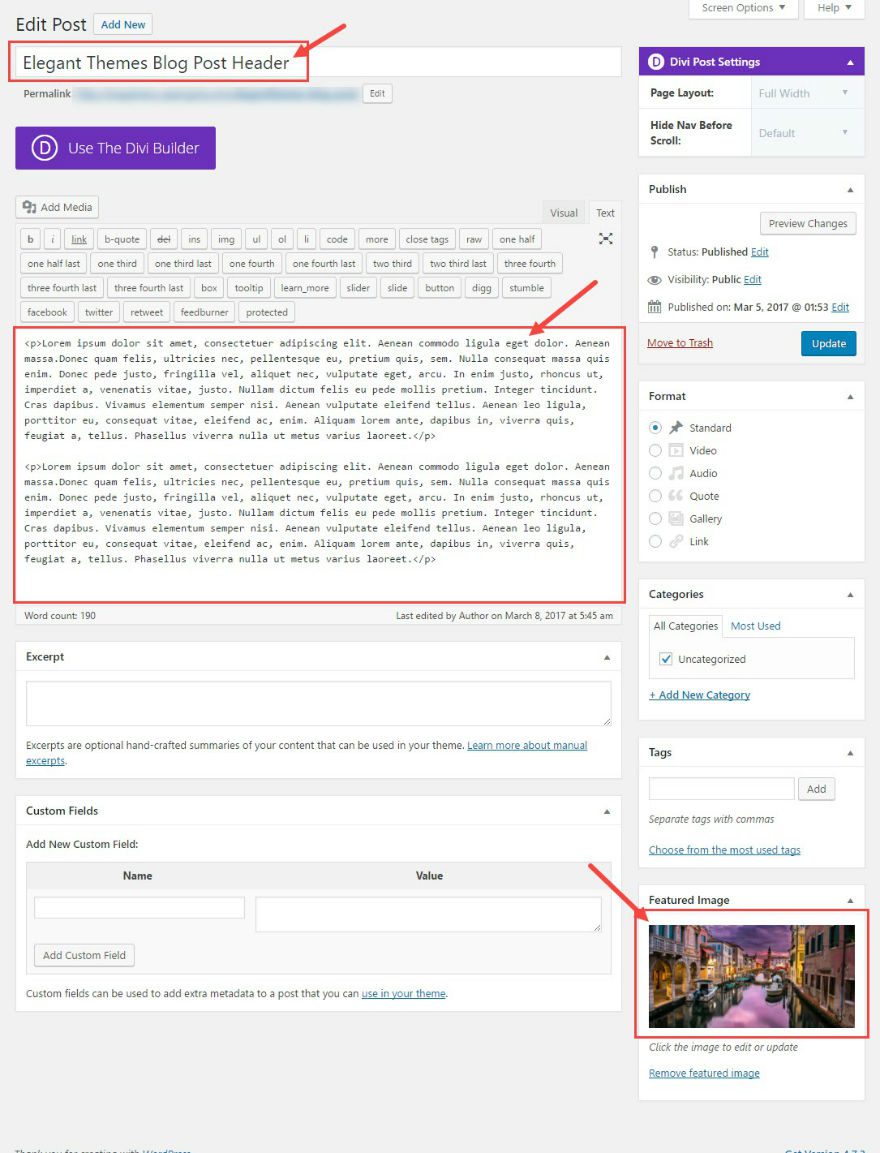
Give your post a title. Keep the default editor for now (don’t use the Divi Builder) and add your content. I’m using ‘lorem ipsum” mock content for now. Add a featured image (at least 960px in width). I’m using a mock image from unsplash.com.
Editing the Post Template
In order to get the same design that Elegant Themes has for the blog post, we need to relocate the page title, the post meta and the comment section.
Go to Divi → Theme Options and add the following scripts of code:
<script type="text/javascript">
jQuery(document).ready(function(){
jQuery( ".entry-title, .post-meta" ).insertBefore( jQuery( ".single-post article.et_pb_post" ) );
});
</script>

<script type="text/javascript">
jQuery(document).ready(function(){
jQuery( "#comment-wrap" ).insertAfter( jQuery( ".single-post article.et_pb_post" ) );
});
</script>

<script type="text/javascript">
jQuery(document).ready(function(){
jQuery( "#respond.comment-respond" ).insertAfter( jQuery( "#comment-wrap" ) );
});
</script>
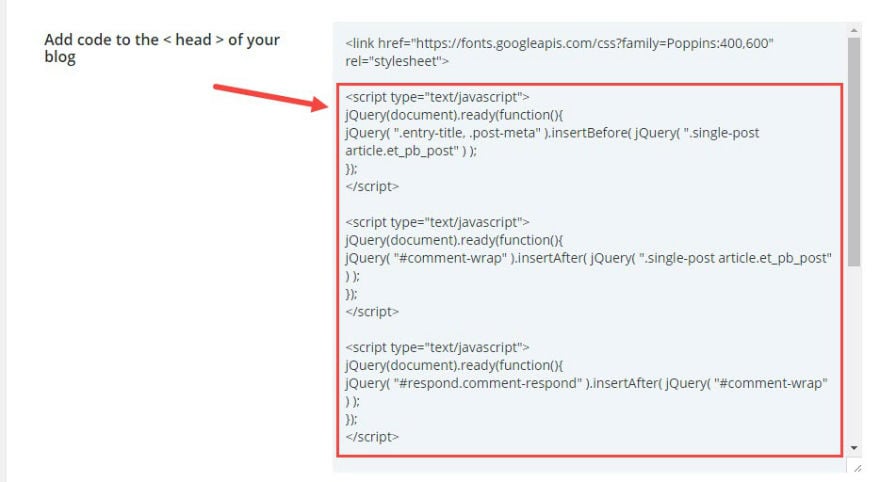
The first script puts the headline and post meta above the article tag. The next two scripts puts the comments below the article tag. This allows for styling each of these sections separately using custom CSS.
If you look at your post now, it doesn’t really look much different, but the stage is set for our CSS styling.
All that is left to do is add some custom CSS. Go to Divi → Theme Options and enter the following in the Custom CSS text box:
h1.entry-title {text-align:center;
font-size: 58px;
font-weight: 600;
letter-spacing: 1px;
color: #20292f;
padding-top: 40px;
}

.single-post #main-content {
background: #f7f9fb;
}

.post-meta {
text-align:center;
margin-bottom: 80px;

}

p.post-meta, .post-meta a {
color: #71818c !important;
font-size: 20px !important;
}

.single .et_pb_post {
margin-bottom: 27px;
box-shadow: 0px 20px 150px #d6dee4;
}

.et_pb_post .entry-content {
padding: 40px;
line-height: 26px;
}

.et_pb_post .entry-content p:first-of-type {
padding-top: 40px;
}
.et_pb_post .entry-content p {
padding-bottom: 40px;
}

.with-border {
border-radius: 4px;
box-shadow: 0px 20px 150px #d6dee4;
}

ol.commentlist > li.comment, #respond{
background-color: #fff !important;
padding: 40px !important;
box-shadow: 0px 20px 150px #d6dee4;
margin-bottom: 80px;
}

h1#comments {
margin-bottom: 40px;
}

h3#reply-title {
    font-size: 35px;
    letter-spacing: 0px;
}

.comment_area .comment-reply-link, .form-submit .et_pb_button {
font-size: 14px;
color: #71818c;
font-weight: 600;
text-transform: uppercase;
margin-top: 10px;
float: right;
display: inline-block;
padding: 8px 16px;
border-radius: 60px;
background-color: #f7f9fb;
border: 2px solid #e9eff5;
position: inherit;
float: right;
}

.form-submit .et_pb_button:hover {
padding: 8px 16px;
}

.comment-reply-link.et_pb_button:hover:after {
opacity: 0;
}

#commentform textarea {
background-color: #f7f9fb;
border: 2px solid #eff1f3;
font-size: 18px;
padding: 20px;
color: #20292f;
}

.comment-body {
padding: 0 0 0 100px;
}

@media only screen and (max-width: 768px) {
h1.entry-title {
    font-size: 48px;
}
}
If you want to use the Divi Builder for your post content, you can also add the following CSS:
.single.et_pb_pagebuilder_layout.et_full_width_page #main-content .container {
max-width: 960px;
}
.single.et_pb_pagebuilder_layout.et_full_width_page .et_post_meta_wrapper {
width: 100%;
padding-top: 0px;
}
.et_pb_pagebuilder_layout .entry-content, .et_pb_pagebuilder_layout .et_pb_post .entry-content {
padding: 0 0 0;
}
That’s it. Now you have a blog post that looks like the Elegant Themes blog post design. The full width layout, shadowing, and spacing really makes the content pop!
Final Thoughts
If you have any questions just let me know and I’ll do my best to assist you. My tutorial above was done on a relatively blank install with few plugins installed. If there is an error in a snippet above or an instruction I gave was unclear then I can help. If, on the other hand, you are having issues unique to your website you’ll need to create a support ticket so we can help you out.
I hope you enjoy the new design and I look forward to hearing from you in the comments.


so useful for me thanks ..
Hi,
Can you please fix the above mentioned issue with the divi builder?
…
Hi,
I tried all the above ways to fix the issue to get the post formatting correctly when using the Divi Builder. Nothing seems to work.
Can you tell how to use this the right way?
thanx
This is pretty awesome tutorial you got here Jason. Gonna help a lot of peeps. Keep up the good work.
If i want to use this with a 1200px wide site what do i need to change in the css?
I use the Page Builder on posts and this is what worked for me:
I put the following CSS in the style.css file in my child theme INSTEAD of Custom CSS in Divi Options:
.single.et_pb_pagebuilder_layout.et_full_width_page #main-content .container {
max-width: 960px !important;
}
.single.et_pb_pagebuilder_layout.et_full_width_page .et_post_meta_wrapper {
width: 100% !important;
max-width: 960px !important;
margin: auto !important;
padding-top: 0px !important;
}
.et_pb_pagebuilder_layout .entry-content,
.et_pb_pagebuilder_layout .et_pb_post .entry-content {
padding: 0 0 0 !important;
}
body.blog.single #et-main-area::before {
top: 200px;
}
#et-main-area::before {
content: “”;
transform: skew(0deg, -7deg);
position: absolute;
left: 0px;
right: 0px;
top: 0px;
height: 550px;
background: #FFF none repeat scroll 0% 0%;
}
I love this post, thank you!
I have just 2 questions concerning CSS of this layout:
1. How can I recreate the shadow effect under images like you did in this post?
2. How can I implement the rounded angles at the top/bottom left and right of the article section/comment sections?
Thank you very much!
Thanks, Nick. For the image shadow effect, add a class to your image called “with-border” and then add the following custom CSS:
img.with-border {
    border-radius: 4px;
    box-shadow: 0px 20px 150px #d6dee4;
}
If you want to add the border radius to the comment sections add this css
ol.commentlist > li.comment, #respond{
border-radius: 4px;
}
Hope that helps.
Thanks Jason I just applied all these on my own blog and it worked like a charm!
Hey Jason!
I followed everything step by step and I’m able to replicate all the CSS and “look and feel” on my website EXCEPT for the Title and Meta to be BEFORE the featured image. Right now, the feature image displays before my title and meta and description.
Can you please help me?
Hello, the post does not fit in the box, it occupies the entire screen. What can I do to make it look like your sample? The comments are also not in the box. It can help? Thank you!
http://www.gesforem.com/tecnico-hacienda-navarra-ope-convocatoria-2017/
The padding for the top of the entry content was also applied to the first form field on my Bloom form. This code:
.et_pb_post .entry-content p:first-of-type {
padding-top: 40px;
}
Not sure if there is a way around that?
Hi Jason,
Looks like it has some problems after the latest updates on Divi. Look at this Blog post that I was making to see the issue:
http://www.fashionistha.com/2017/03/19/swear-by-black/
Thanks
Hi Jason,
Though this link does not apply anymore because I had to revert back to the Default Right Side Bar since the code does not seem to work anymore. Requesting you to check and update this tutorial.
Thanks
Puru
Hi
I tried this tutorial with an Extra theme, unfortunately there’s no Blog section in my Customizer like in Divi :/
yeah, would have been great to know how to do that on the extra theme…
Hi, first of all Great job!
can I ask you what you use for divi blog comments layout? and how you create the great purple cta at the end of the post?
Beste Regards
Stefano
Stefano,
The comments layout is just css modifications to the default layout. As far as the purple cta, I may tackle that in a future post.
Thanks for the questions.
Hi,
Very nice post, thanks.
I made this and previous post on my page.
My bloom inline optin is slipped a little bit.
Did I something wrong?
Hi, I love this and I have implemented the previous blog page and now I would like to have my post matching, but is there a way to do it using a right column instead of full width?
Donna,
Unfortunately this works only with fullwidth. Sorry.
Did´not look like your blog 🙁
I´d do evetirhing step by step.
Sorry to hear that. If you give me some more details, maybe I can help.
Hi DIVI, can you make a video tutorial on this Article ? that would be a way easier for us.
The video is coming in the near future. Thanks for the feedback Awais!
Hi,
With the divi editor, the comments and blog goes full screen. I fix it using the code in the style.css in my child theme. And adding a !important; in this lines:
.single.et_pb_pagebuilder_layout.et_full_width_page #main-content .container {
max-width: 960px!important;
}
Thanks for that Isidro!
Hi. Can you please post the correct code you used to get posts created with Divi Builder to format the same as they do with Default Editor? Thank you very much.
Thank You!!! This is just what I was needing.
Hi. Can you please post the code you used to get the post formatting correctly when created with Divi Builder? Thank you very much.
Sure, my pleasure 🙂
Hi. Can you please post the code you used to get posts created with Divi Builder to format correctly? Thank you very much.
Still stunned by your capacities. This is the way to grow a business!
Thanks!
I have really, really tried to love the new ET design.
I can’t.
It is so far past amateur it’s shocking, especially coming from a company as awesome as ET. I would expect this from a newbie using Wix – not ET.
Sorry…..tough love….
Awesome, thanks. However when I create a post using the DIVI Builder, it makes the comments, full screen. Plus the background is full screen, meaning a large white area and a small grey border.
Not using the builder everything works fine. I did the “Builder” CSS to custom CSS.
Thanks for the tutorial Jason. Love the new look of ET. and am really enjoying all the “how to” articles.
FYI The css rule .comment_area .comment-reply-link, .form-submit .et_pb_button has float right twice.
Thanks Jules. Good catch.
Hi, how can i do the same thing but for single project layout ? (portfolio)
thanks in advance
I love this tutorial. I know zero css and the results were amazing. Have to clean up some old posts, but the overall effect is great. Thanks for sharing Jason.
Very interesting clean look and feel. I am experimenting with a variety of themes but still hesitant about applying one to a business website. However, the options for tweaking this theme look excellent. I especially like the options for altering font size as typography seems like a very important factor in determining our client’s choice to stick around or visit a competitors website. Typography is much underestimated! Keep up the good work!
Thanks Daniel. I agree with you on typography. It changes everything.
jASON
I followed on the article of how to incorporate Google Poppins, but you lost me when
You came to:
Designing the Page Header
First add a Fullwidth Section with a Fullwidth Header Module to your layout.
1. Where do you get the the Fullwith Header Module?
2. How/where do you start the process of designing the Page Header? Is it by creating a new page? Then where do you get thee Header Module I do not have it in my Divi
i am just beginning to build the new website using Divi for the first time.
This is done using the Divi builder interface.
Nice to see you’ve implemented a mobile friendly site.
I’m liking the clean look, but are sidebars still an option with this formatting? I tried doing 2 columns with yesterday’s formatting and it did not look good, so just wanted to check with this as it looks like it may not work with sidebars. Thanks.
Thanks Mike. Unfortunately this was done with a fullwidth layout in mind. It won’t work with sidebars.
I have implemented it go on my website and it looks perfect.
And I would like to ask if it is possible
Cool post! Thank you for sharing this Jason, I will be using parts of this on an upcoming project!
Great!
Really useful. Great to see you guys are sharing this info.
Great tut, Thank you.
Can you elaborate a little on the final three CSS rules for “us[ing] the Divi Builder for your post content”?
Their purpose/necessity is a little opaque from what is there.
Thank you kindly,
Emilio,
That CSS allows you to keep the same styling when using the Divi Builder for your blog post instead of the default editor.
Thanks!
The default editor works great. However, the builder just makes everything full screen with a white background. I did add the extra CSS code for the builder to the custom CSS in the theme.
Jason, great accompaniment to your post yesterday. Fantastic and thorough tutorial. I appreciate you making it!
Awesome and thank you Jason! I cannot wait to try it out.
The comment style not working on mobile view =(