
This post is part 2 of 5 in our mini series titled 5 Creative Ways to Style the Divi Post Slider Module. Stay tuned this week for all five unique examples of Divi’s Post Slider Module, with a tutorial on how to achieve each one!
One of the decisions faced when using a post slider in your website design is choosing which post elements to present to the user. Post elements to consider are the title, meta, excerpt, featured image, and post content. Complete control over individual slider elements will give you greater flexibility in your design. Today’s project demonstrates how to customize the Divi Post Slider module using CSS to display (or hide) and style very specific post elements.
Let’s get into it!
- 1 Today’s Before & After: The Divi Post Slider Module
- 2 How to Style Divi’s Post Slider Module like Brit + Co’s Post Slider
- 3 The Concept & Inspiration
- 4 Preparing the Design Elements
- 5 Implementing the Design with Divi
- 6 General Settings
- 7 Design Settings
- 8 Custom CSS
- 9 The Final Result
- 10 Tomorrow: How to Style Divi’s Post Slider Module like Tesco Living’s Post Slider
Today’s Before & After: The Divi Post Slider Module
Before
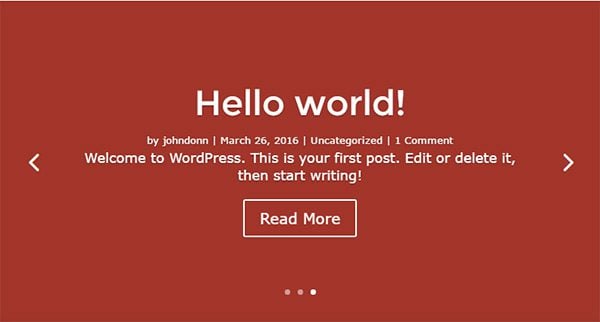
After
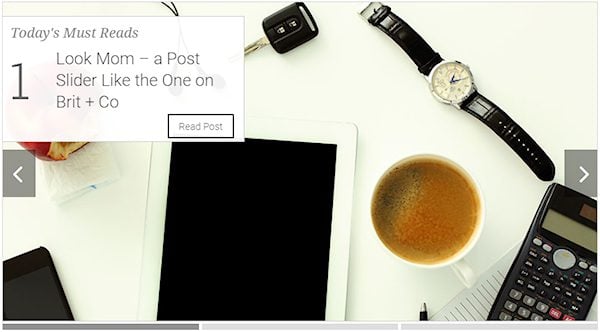
How to Style Divi’s Post Slider Module like Brit + Co’s Post Slider
Subscribe To Our Youtube Channel
The Concept & Inspiration
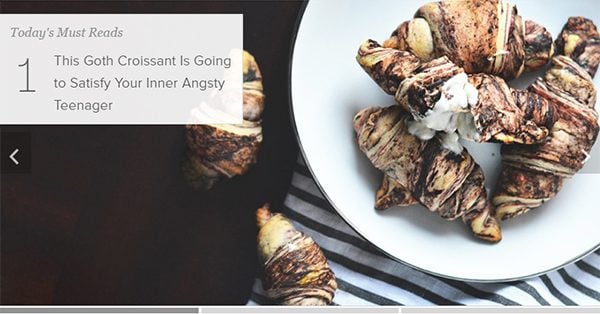
Today’s post slider inspiration comes from Brit + Co, a media and commerce company promoting creativity through inspirational content, DIY kits, and online courses. Founded in 2011 by Brit Moran, Brit + Co claims to reach over 10 million people each month through its website brit.co (note: the slider styling has since changed on the brit.co website since this post was created).
At first glance, this post slider doesn’t appear complicated, displaying a featured image as a background with the post category and title displayed on an overlay. The Brit + Co post slider is designed to present three posts each day, with a number prominently displayed to the left of each post title.
Preparing the Design Elements
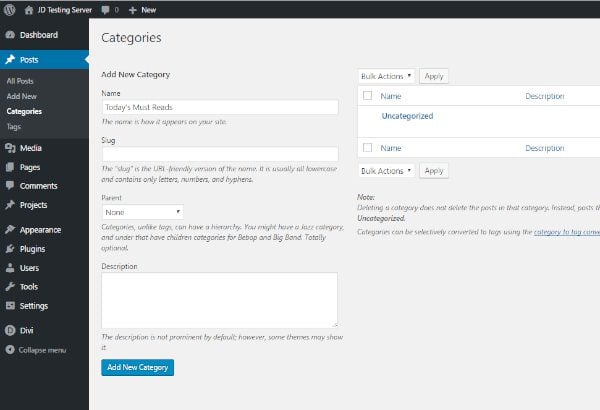
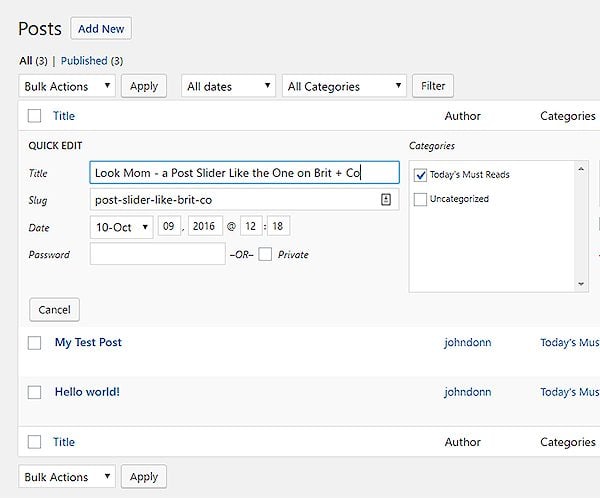
Before starting, make sure that you have three posts with featured images. You will also need to create a post category called “Today’s Must Reads” and assign your three posts to that category. To create a category from your WordPress dashboard, hover your cursor over “Posts” on the left sidebar, then click on “Categories”. Now add the new category in the “Name” input under “Add New Category” and then click the “Add New Category” button at the bottom.
Now add each of your posts to the “Today’s Must Reads” category. This can easily be done by using the WordPress “Quick Edit” function. To get there, click on “Posts” on the left sidebar then hover over the post name and click “Quick Edit”. Under “Categories”, add a check next to “Today’s Must Reads” and uncheck all other categories including “Uncategorized”.
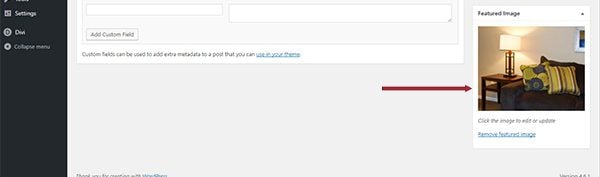
This slider is intended for posts with featured images, so if you haven’t done so, add a featured image for each of your posts. Your images should be large enough to fill the size of the post slider. I used 800px X 600px.
Before saving your post, there’s one last thing that needs to be done. You’ll notice that the post slider on Brit + Co does not show any post content or excerpt. Divi’s Post Slider module doesn’t offer us the choice of not displaying any content so I’ll use a simple work around. Under Excerpt in the center column of your post edit page, remove any text and add only a space. Now save your post by clicking “Publish” on the right sidebar.

Implementing the Design with Divi
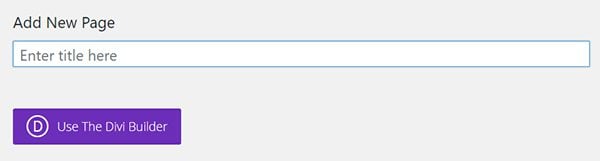
Now that your posts have been added, you can start creating your new post slider design in Divi. For the sake of this tutorial, add a new page by hovering over “New” on the top menu of your dashboard and clicking “Page”. Give your page a name and click “Use The Divi Builder”.
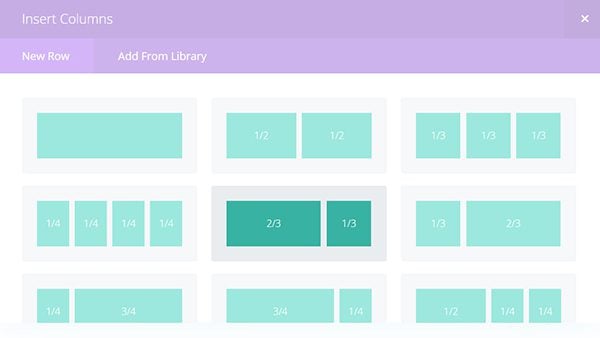
Once in the Divi builder, click on “Insert Column(s)”
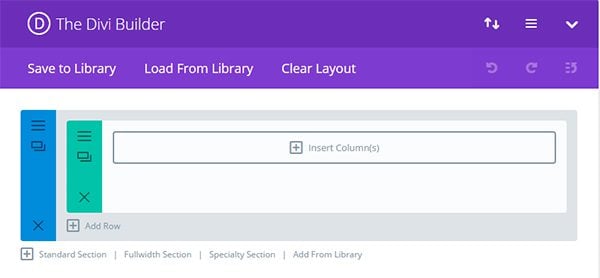
Now select the ⅔ ⅓ option.
Once your columns have been added, go to the visual builder to add and modify your Divi Post Slider module. To get there, click on “Use Visual Builder” just about the Divi Builder.
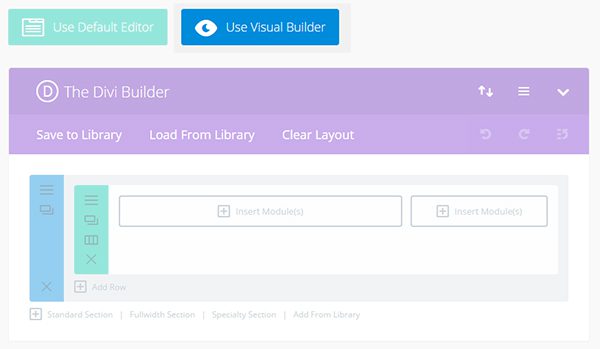
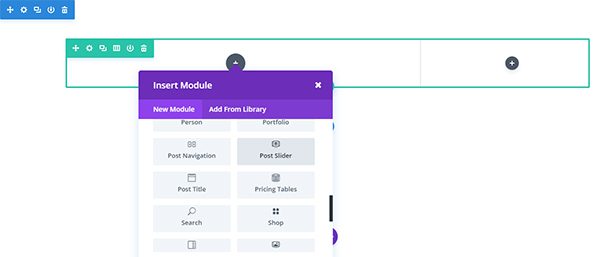
Now add a Post Slider module in the first column by clicking in the gray “Add Module” icon and selecting “Post Slider” from the available options.
General Settings
After adding the module you will be in the “General” tab of the Post Module Settings.
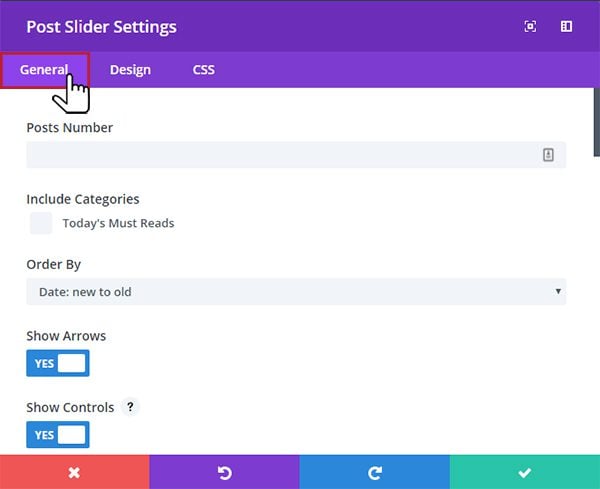
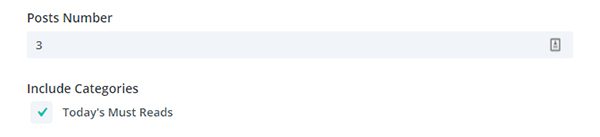
Set “Number of Posts” to 3 and select “Today’s Must Reads” under “Include Categories”.
Then scroll down to “Button Text” and change the text to “Read Post”.

Scroll down and change the “Text Color” to “Dark”.
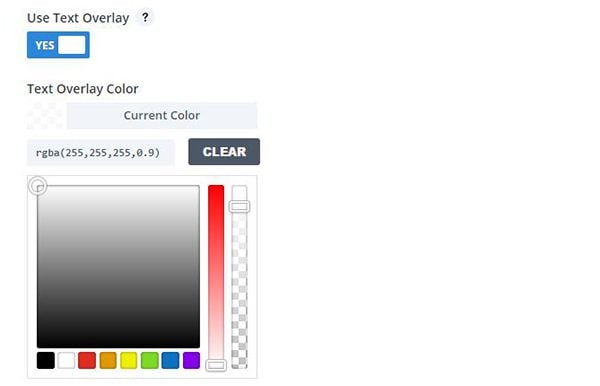
Now set “Use Text Overlay” to “Yes”, and make the “Text Overlay Color” white with 90% opacity.
Now click “Remove Inner Shadow” to change the setting to “Yes”.
Design Settings
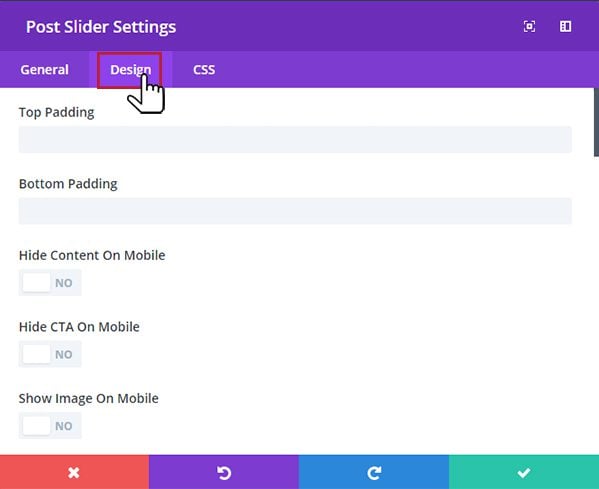
Next, move to “Design” settings by clicking the tab at the top of the “Post Slider Settings” box.
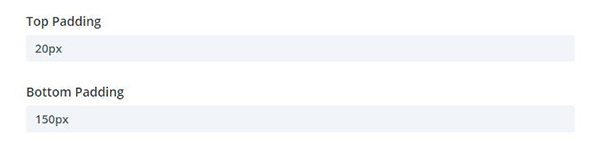
Set “Top Padding” to 20px and “Bottom Padding” to 150px.
Set “Text Overlay Border Radius” to 0px. Set “Arrows Custom Color” to #ffffff. Set “Dot Nav Custom Color” to #929292.
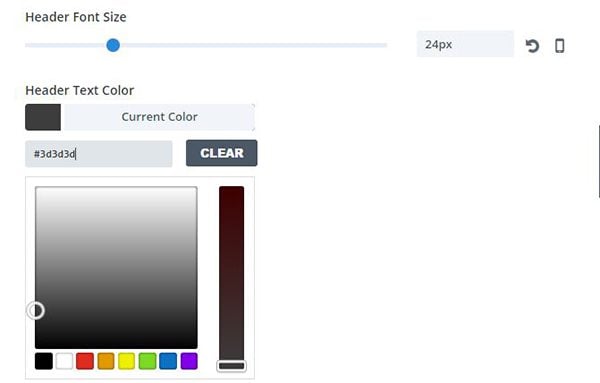
Set the “Header Font” to Roboto Light. (The Brit + Co slider uses the premium font “Proxima Nova”, but I’ll stick with free fonts for this tutorial.) Change the “Header Font Size” to 24px and the “Header Text Color” to #3d3d3d.
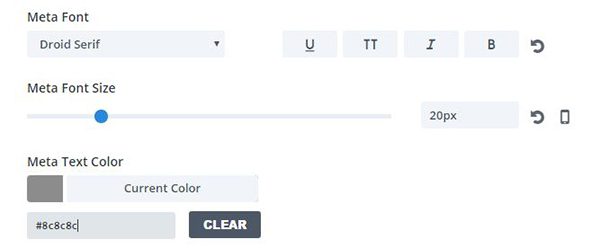
Set “Meta Font” to Droid Serif Italic, “Meta Font Size” to 20px, and “Meta Text Color” to #8c8c8c.
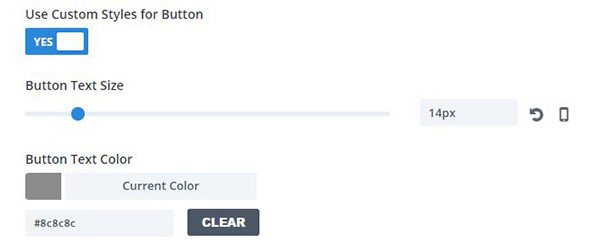
Set “Use Custom Styles for Button” to “yes”, then set the “Button Text Size” to 14px and the Button Text Color to #8c8c8c.
Custom CSS
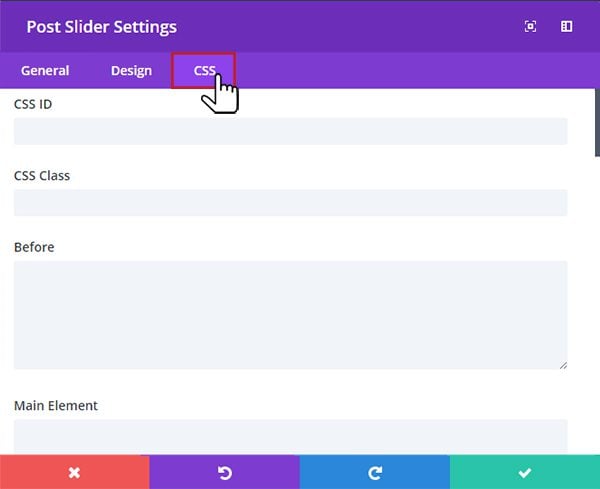
Now move to the CSS settings by clicking the “CSS” tab at the top of the Post Slider Settings” box.
Give your module an ID of brit-co-slider by adding the text to the input box under “CSS ID”. This will allow us to add styles to this specific module without affecting any other elements on the page.

Now add CSS code to the input boxes as follows:
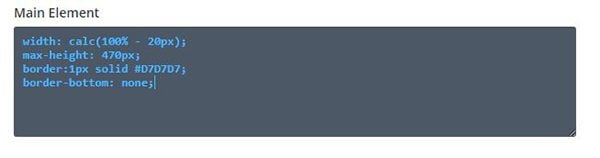
Main Element:
width: calc(100% - 20px);
max-height: 470px;
border:1px solid #D7D7D7;
border-bottom: none;
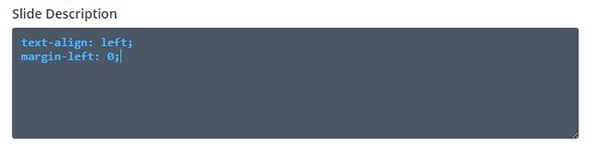
Slide Description:
text-align: left;
margin-left: 0;
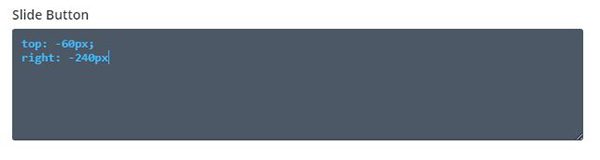
Slide Button:
top: -60px;
right: -240px
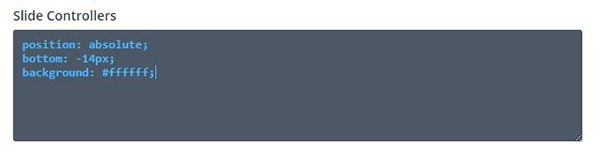
Slide Controllers:
position: absolute;
bottom: -14px;
background: #ffffff;
After adding the CSS, save your settings by clicking on the green save button with the white check mark in the lower right corner of the Module Settings box.
![]()
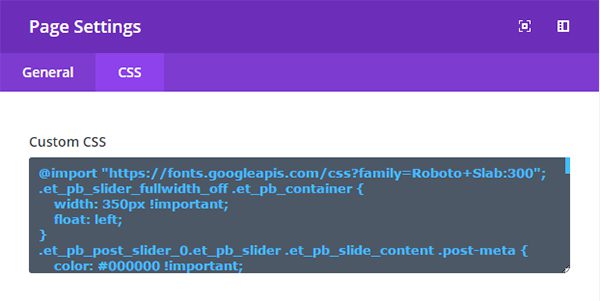
Now you’ll need to add some additional CSS code for elements that aren’t available through the module settings. Yesterday, we added this code through “Divi Theme Options”, but today we’ll add our CSS to the page settings. This is the better option for styles that require a lot of extra code and are only used on a single page. CSS placed in “Page Settings” is only injected into the page that requires it rather than every page of the blog. To get to “Page Settings”, click on the purple icon at the bottom of your screen and then click the cog-shaped page settings icon.

Now click on the CSS tab and paste the following CSS code into the “Custom Css” input area. Since there is quite a bit of code here, I included comments to clarify the purpose for each section.
/*SIZE AND POSITION TEXT AREA OF SLIDER*/
#brit-co-slider .et_pb_container {
    width: 350px !important;
    float: left;
}

/*HIDE POST META */
#brit-co-slider .et_pb_slide_content .post-meta {
    color: rgba(0, 0, 0, 0) !important;
}
#brit-co-slider .author {
    visibility: hidden;
}
/*REVEAL AND REPOSITION CATEGORY*/
#brit-co-slider .et_pb_slide_content .post-meta a {
    color: color: rgba(0, 0, 0, 1) !important;
}
#brit-co-slider p.post-meta {
    position: absolute;
    top: 5px;
    left: 15px;
}
#brit-co-slider .et_pb_slide_description {
    position: relative;
    left: -55px;
}

/*REMOVE ANIMATION FROM AND STYLE ARROWS*/
#brit-co-slider .et-pb-arrow-prev,
#brit-co-slider .et-pb-arrow-next {
    -webkit-transition: all 0 ease-in-out;
    -moz-transition: all 0 ease-in-out;
    -o-transition: all 0 ease-in-out;
    transition: all 0 ease-in-out;
}
#brit-co-slider .et_pb_slider:hover .et-pb-arrow-prev {
    left: -5px;
    opacity: 1;
}
#brit-co-slider .et_pb_slider:hover .et-pb-arrow-next {
    right: -5px;
    opacity: 1;
}
#brit-co-slider .et-pb-slider-arrows a {
    background-color: #000000;
    background-color: rgba(0, 0, 0, .4);
    padding: 10px 2px;
}

/*ADD STYLES TO CONTENT BLOCK*/
#brit-co-slider .et_pb_slide_content {
    border: 1px solid #cdcdcd;
}
#brit-co-slider .et_pb_slide_title {
    background: transparent !important;
}
#brit-co-slider h2.et_pb_slide_title {
    display: block;
    position: absolute;
    top: 35px;
    left: 50px;
    line-height: 1.3em;
}
#brit-co-slider div.et_pb_slide_content {
    min-height: 180px;
}
#brit-co-slider .et_pb_slide {
    background-size: 100%;
    background-position: top left;
}

/*CREATE AND STYLE POST NUMBERS*/
@import "https://fonts.googleapis.com/css?family=Roboto+Slab:300";
#brit-co-slider .et_pb_slides div:before {
    position: absolute;
    display: block;
    content: "";
    top: 100px;
    left: 10px;
    font-family: 'Roboto Slab', serif;
    font-size: 72px;
    opacity: 0;
    transition: opacity 2s;
}
@-webkit-keyframes fade-in {
    0% {
        opacity: 0;
        top: 120px;
    }
    100% {
        opacity: 1;
        top: 100px;
    }
}
@-moz-keyframes fade-in {
    0% {
        opacity: 0;
        top: 150px;
    }
    100% {
        opacity: 1;
        top: 100px;
    }
}
@-o-keyframes fade-in {
    0% {
        opacity: 0;
        top: 150px;
    }
    100% {
        opacity: 1;
        top: 100px;
    }
}
@keyframes fade-in {
    0% {
        opacity: 0;
        top: 150px;
    }
    100% {
        opacity: 1;
        top: 100px;
    }
}
#brit-co-slider .et_pb_slides div:nth-child(1)::before {
    content: "1";
}
#brit-co-slider .et_pb_slides div:nth-child(2)::before {
    content: "2";
}
#brit-co-slider .et_pb_slides div:nth-child(3)::before {
    content: "3";
}
#brit-co-slider .et_pb_slides .et-pb-active-slide:before {
    z-index: 3;
    -webkit-animation: fade-in 1.5s 1 cubic-bezier(.37, .34, .89, 1.08);
    -moz-animation: fade-in 1.5s 1 cubic-bezier(.37, .34, .89, 1.08);
    -o-animation: fade-in 1.5s 1 cubic-bezier(.37, .34, .89, 1.08);
    animation: fade-in 950ms 1 cubic-bezier(.37, .34, .89, 1.08);
    animation-fill-mode: forwards;
    animation-delay: 700ms;
}

/* TURN DOTS INTO BARS AND STYLE */
#brit-co-slider .et-pb-controllers a {
    width: 33%;
    height: 10px;
    margin-right: .5%;
    -webkit-border-radius: 0;
    -moz-border-radius: 0;
    border-radius: 0;
}
#brit-co-slider .et-pb-controllers a:nth-child(3) {
    margin-right: 0px;
}
#brit-co-slider .et-pb-controllers:before {
    display: block;
    content: "";
    width: 100%;
    height: 3px;
    border-top: 1px solid #d2d2d2;
}
Once you’ve added the CSS, save your page by clicking on “Save Draft” or “Publish” at the bottom right side of your screen.

The Final Result
Now exit the Visual Builder, refresh your page and you should now see a nice new look for your Divi Post Slider that looks like the one on the Brit + Co website.
Tomorrow: How to Style Divi’s Post Slider Module like Tesco Living’s Post Slider
Don’t forget! This post is just 2 of 5 in the mini series “5 Ways to Style & Use Divi’s Post Slider Module.” If you found this post helpful, be sure to come back tomorrow when we will take a look at a post slider on Tesco Living’s blog and also experiment a bit with the use of viewport width units for fluid design.
Be sure to subscribe to our email newsletter and YouTube channel so that you never miss a big announcement, useful tip, or Divi freebie!


These are awesome! I love how you are really digging deep “under the hood” and showing how Divi’s capabilities can really be exploited.
I’m looking forward to tomorrow’s post about Tesco Living’s post slider. I have an idea for a photo gallery slider with the same layout. Photo + descriptive text in that same layout. Perfect.
Great article. I love this
Definately one of the best mini series. I’m loving it.
Great article John!
Thank you for sharing these css codes en tips!
I love this blog but you guys REALLY should put a live demo of the result right in the beggining of the post.
It’s too time consuming having to find an external link in the middle of the article for something that may not even exist anymore (such as this case), just to check if the tutorial is revelant to me or not.
“These are awesome!”
Yes, but not very responsive !
We created a page, however, it looks different.
Seems some issue with the overlay..
Which overlay? If you are referring to an overlay on the featured image, I run into the same problem and realised I selected use “background overlay” in the general settings for the slider. I fixed this by setting the opacity of the overlay. You can disable it altogether.
Hi,
So I implemented this and it looks good, however, the category name does not display as in the example. Can someone direct me on how to display it.
Are these not designed for child themes? Because none of them work for me like they do for you guys.