
Every week, we provide you with new and free Divi layout packs which you can use for your next project. For one of the layout packs, we also share a use case that’ll help you take your website to the next level.
This week, as part of our ongoing Divi design initiative, we’re going to show you how to rotate section dividers to create stunning side borders with Divi’s new transform options and the Calligrapher Layout Pack. This is a great way to tweak any page design you’re working on without having to create custom illustrations using image editing software. We hope this use case tutorial inspires you to combine Divi’s section dividers and transform options to create customized and personalized web design.
Let’s get to it!
Preview
Before we dive into the tutorial, let’s take a quick look at the four different examples we’ll recreate across different screen sizes.
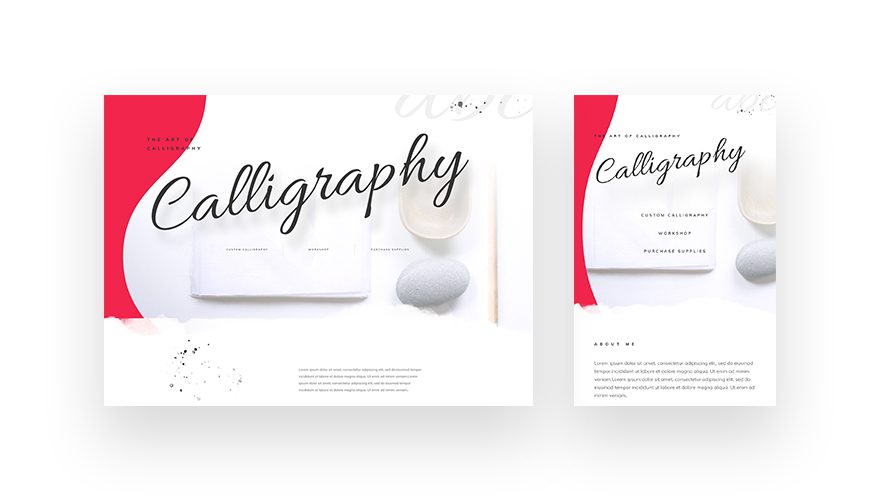
Example #1
Example #2
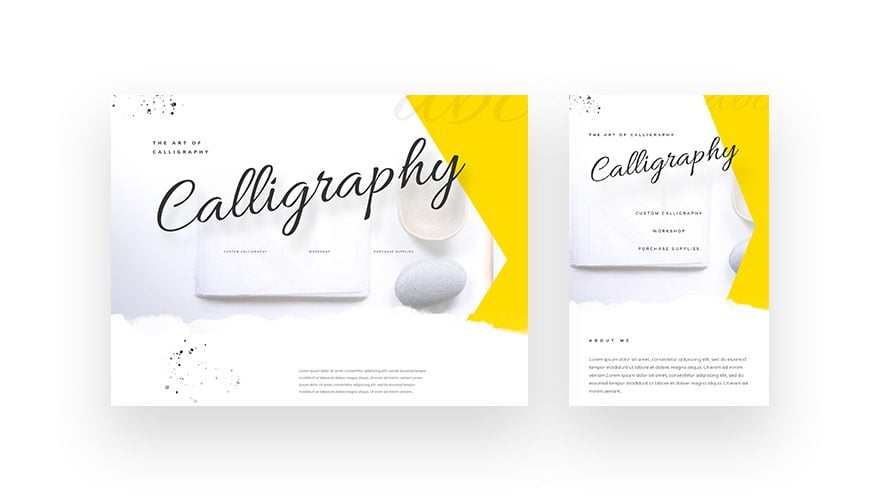
Example #3
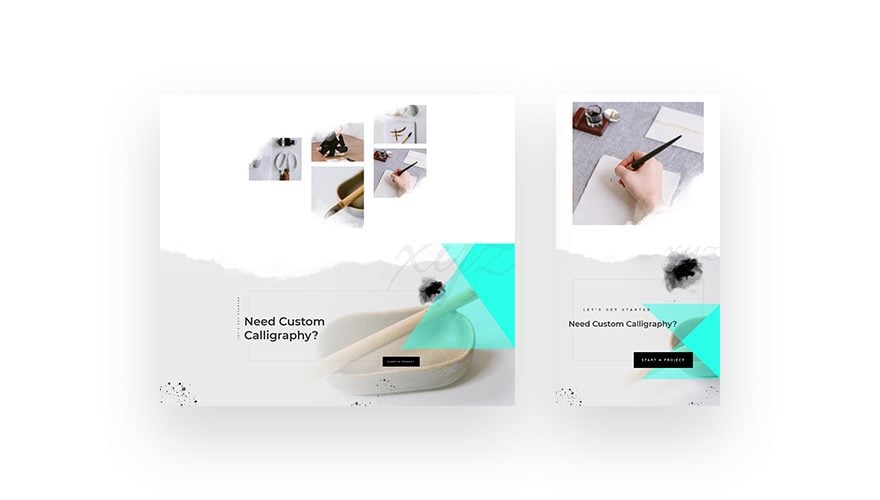
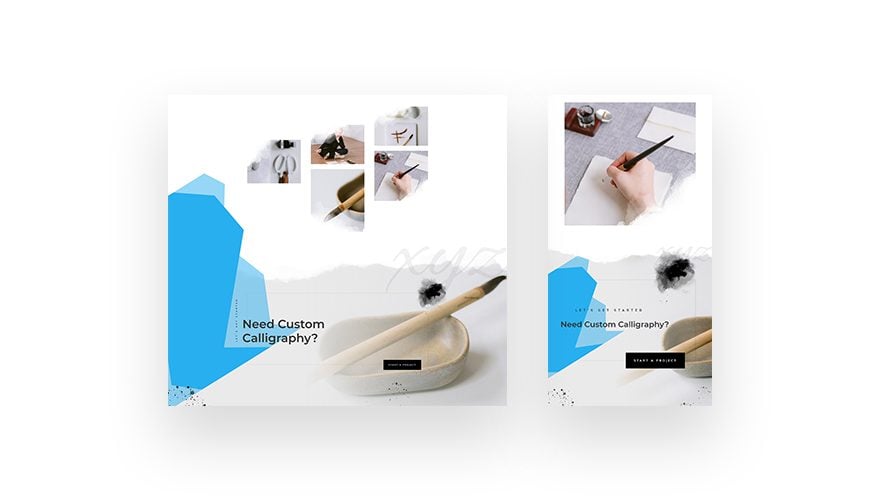
Example #4
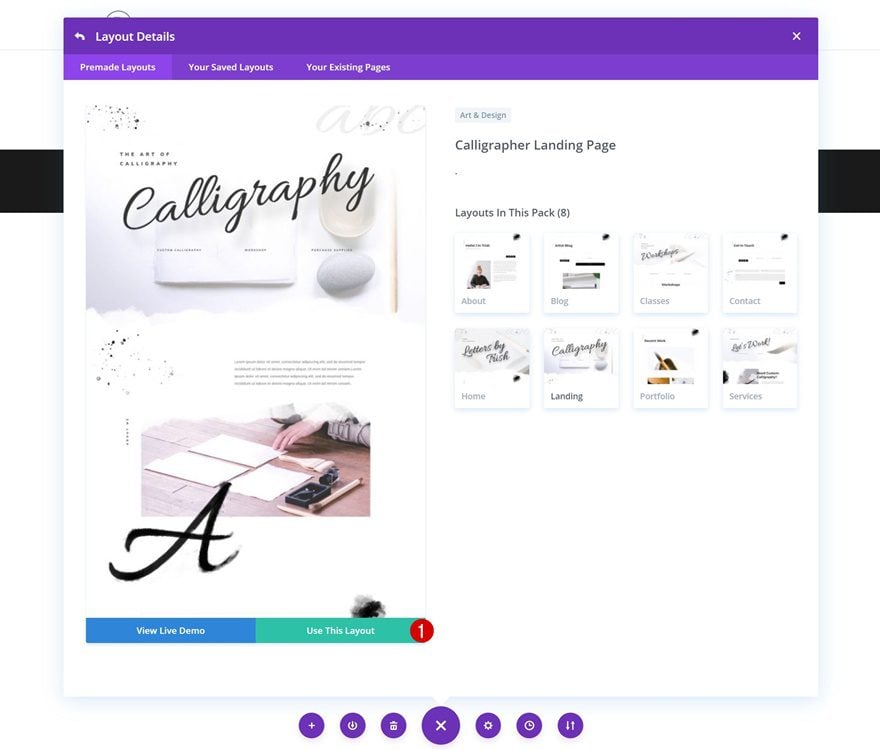
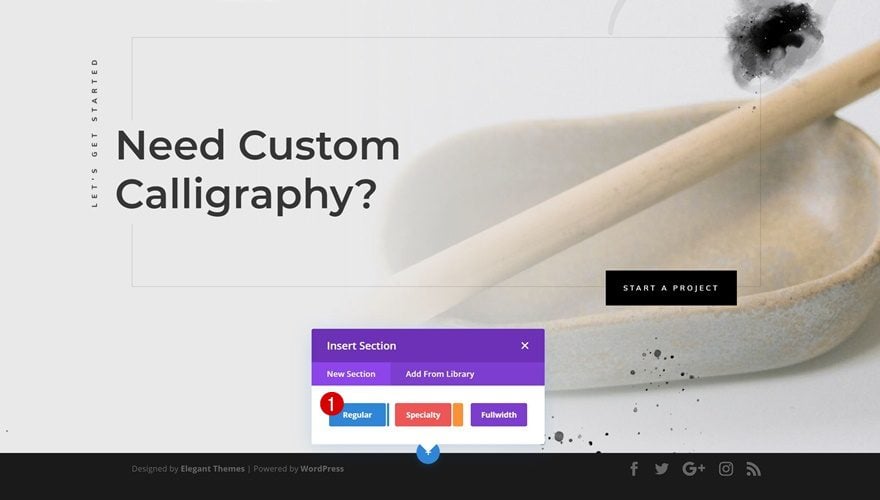
Upload Calligrapher Landing Page to New Page
We’re going to add the section divider side borders to the landing page layout of the Calligrapher Layout Pack which you can find in your premade layouts. Go ahead and create a new page on your website to get started! Although we’re using this specific layout, note that you can use this technique for any kind of website you’re working on.
Recreate Example #1
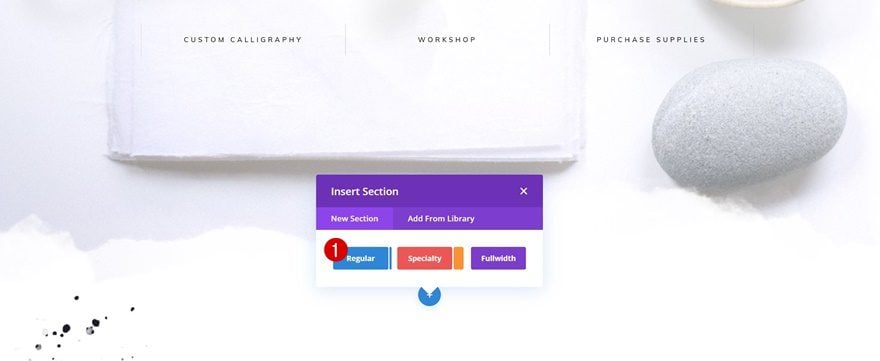
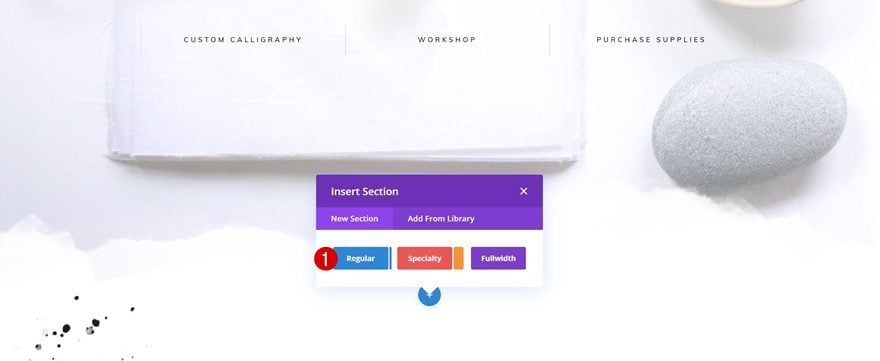
Add New Section Below Hero Section
Let’s start recreating the first effect! Add a new regular section right below the hero section on your new page. We’re using this section for its container and section dividers only. That means we won’t add any rows or modules to it. As a matter of fact, we’re going to make sure no vertical space is taken up by the section at all by removing all default padding later on this post. The only thing that’ll remain is the width of the section container and the section dividers we add.
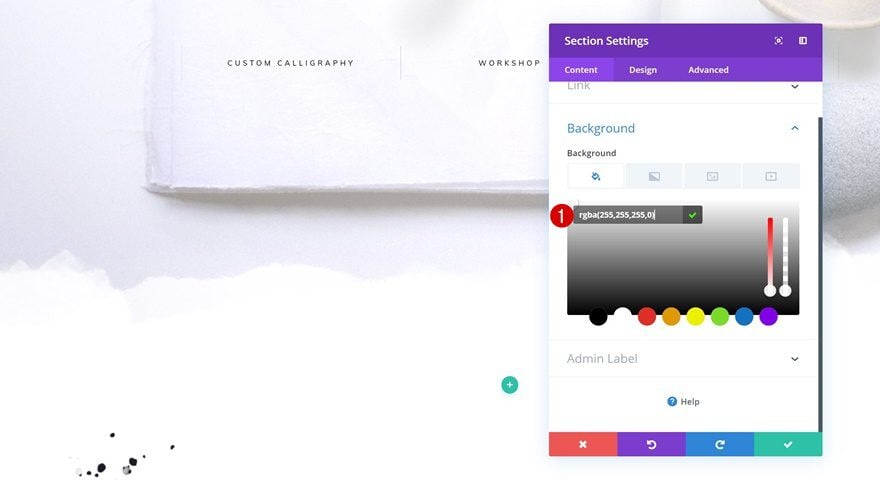
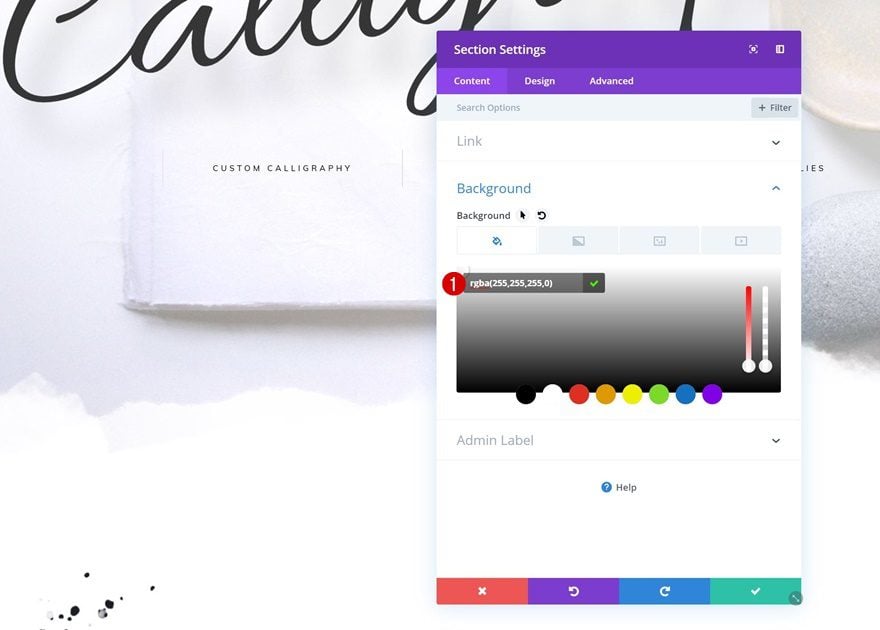
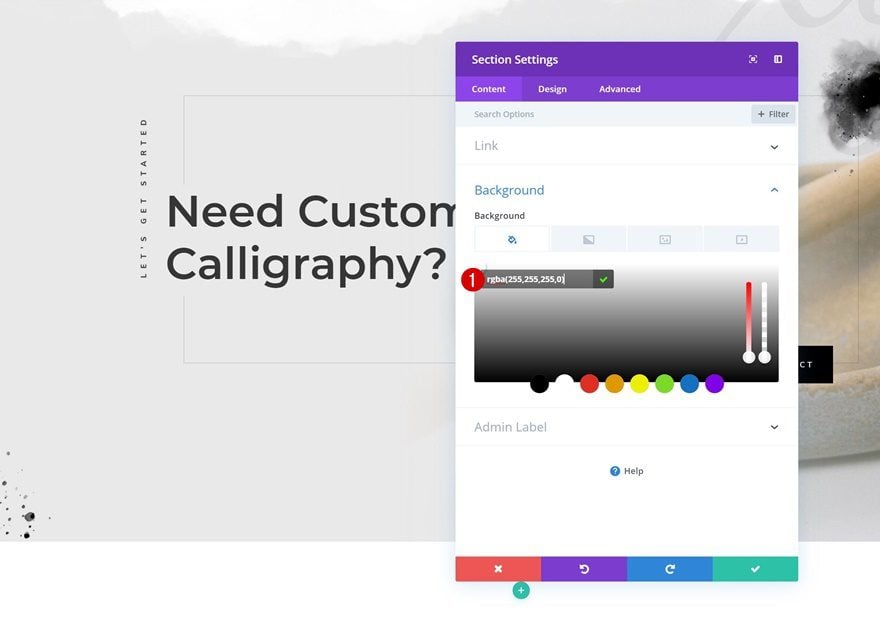
Background Color
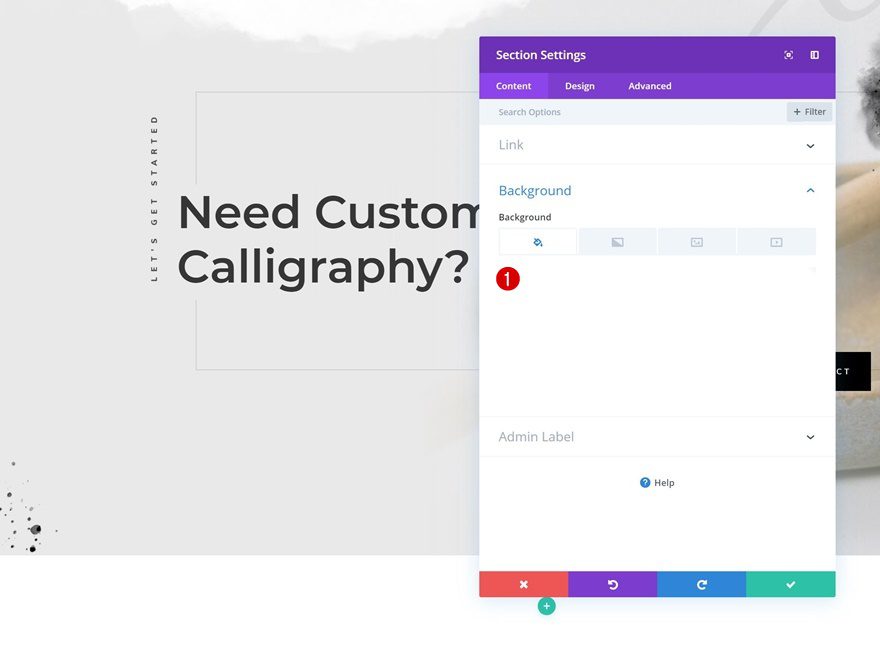
After adding the section, open the section settings and change the background into an entirely transparent color.
- Background Color: rgba(255,255,255,0)
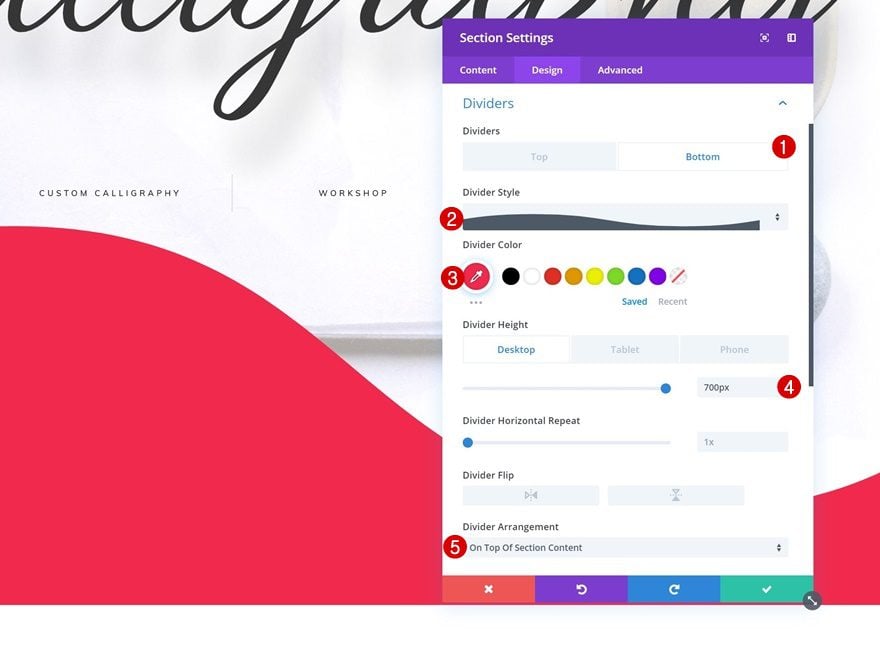
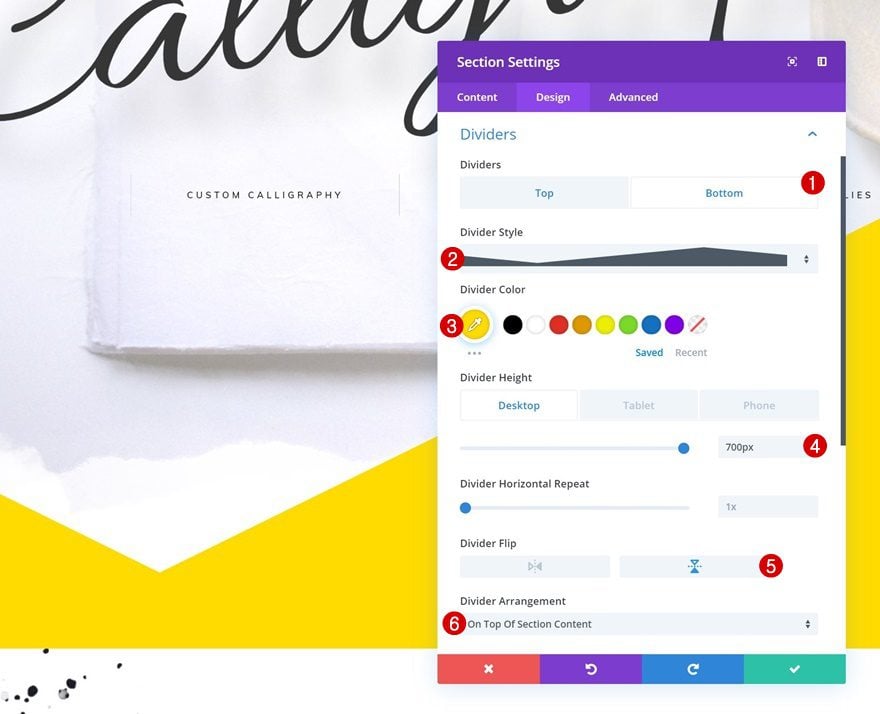
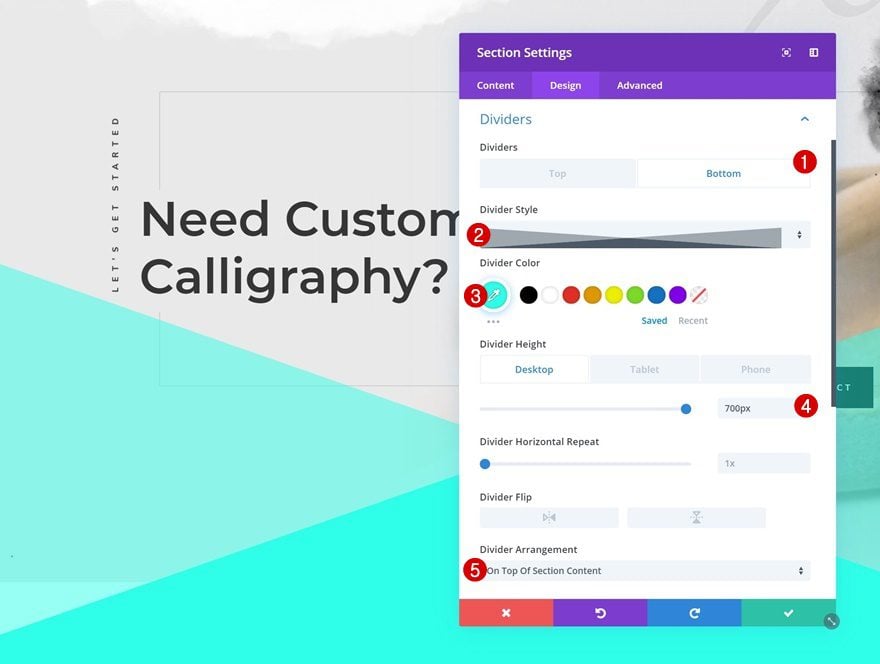
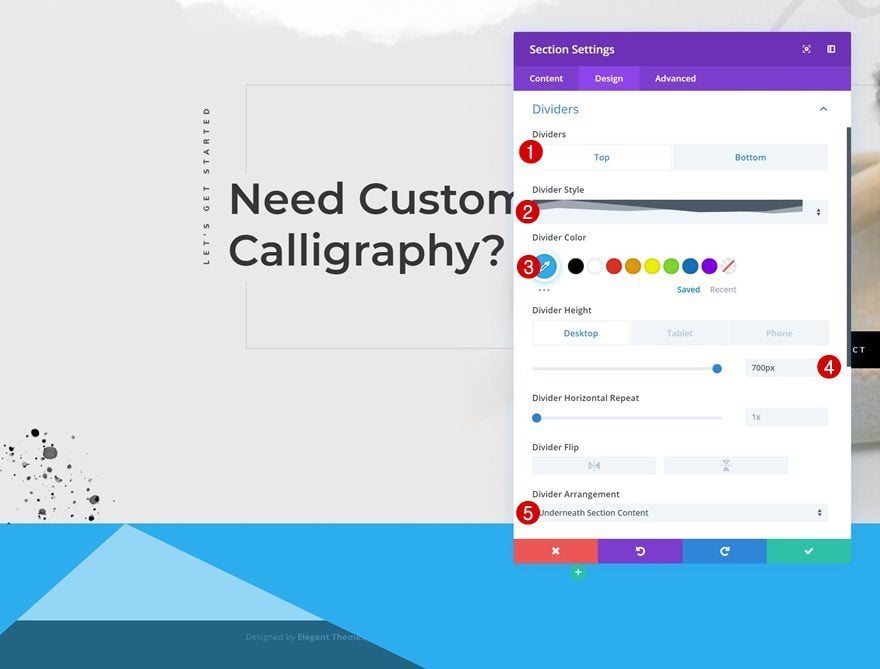
Bottom Divider
Continue by going to the design tab and adding a bottom divider to your section using the following settings:
- Divider Style: Find in List
- Divider Color: #f2264c
- Divider Height: 700px (Desktop), 300px (Tablet), 200px (Phone)
- Divider Arrangement: On Top of Section Content
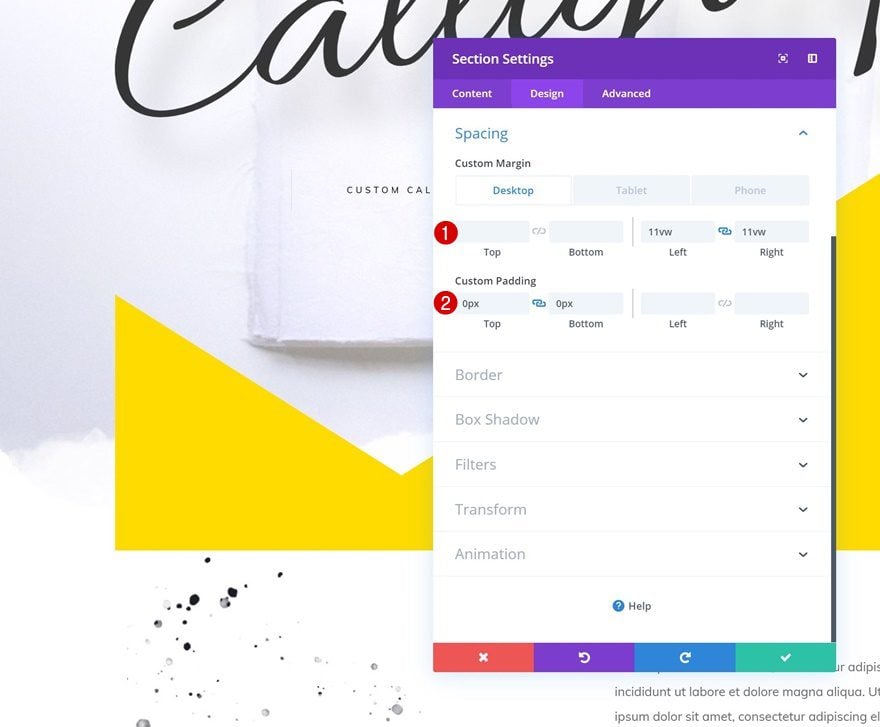
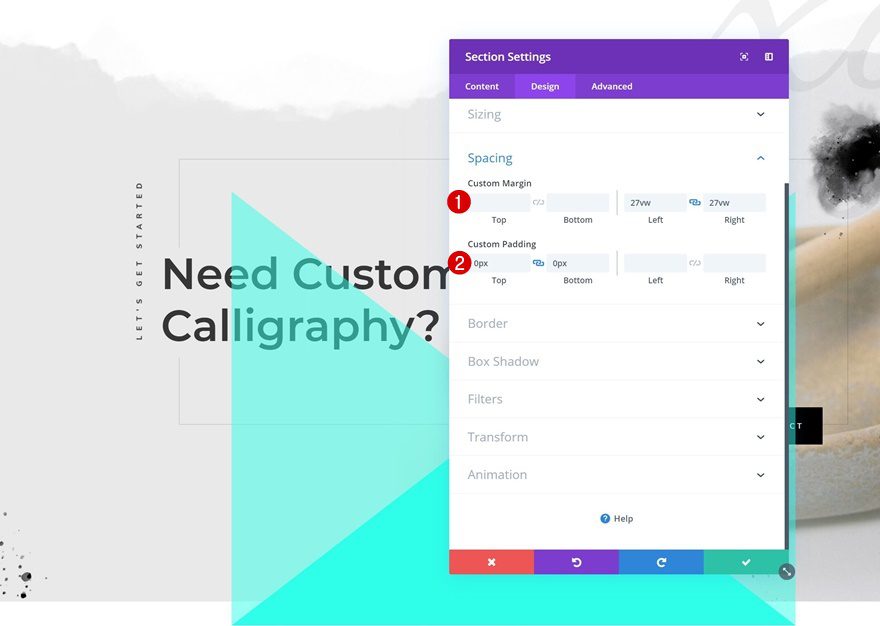
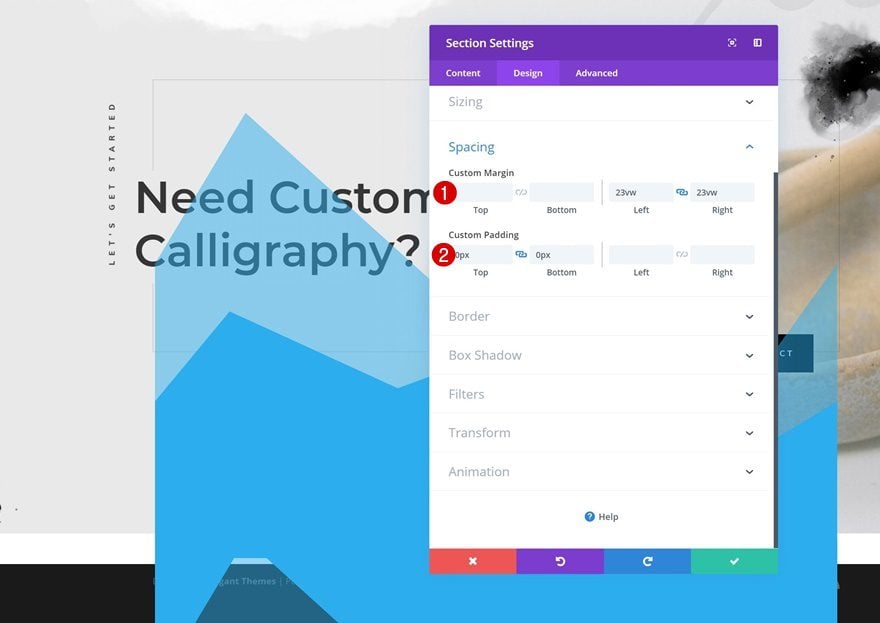
Spacing
Move on to the spacing settings. Here, we’re going to do two things. The first thing is removing all custom top and bottom padding. The second thing is shrinking the size of the section container on desktop and increasing it on mobile.
- Left Margin: 11vw (Desktop), 0vw (Tablet), -35vw (Phone)
- Right Margin: 11vw (Desktop), 0vw (Tablet), -35vw (Phone)
- Top Padding: 0px
- Bottom Padding: 0px

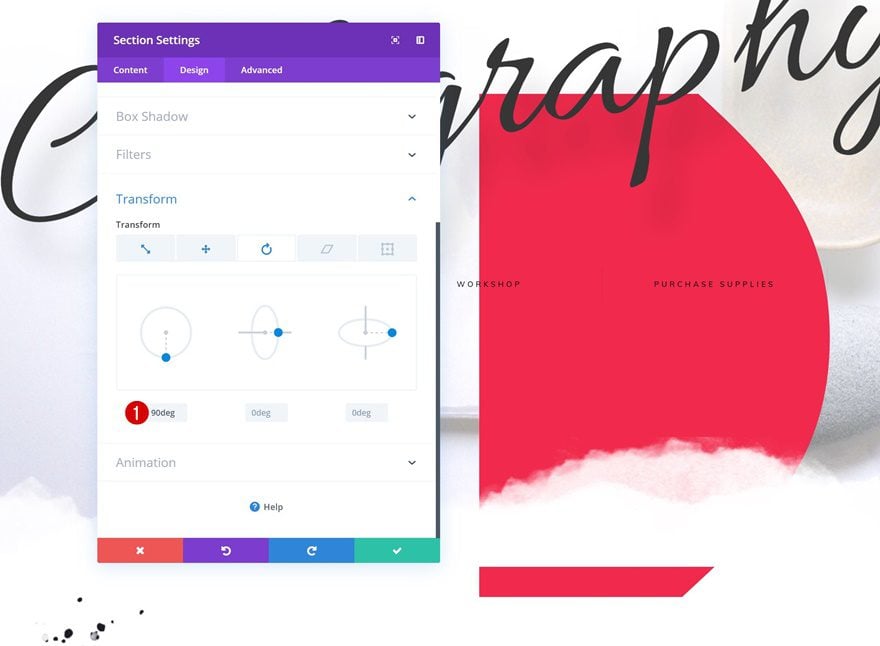
Transform Rotate
Once you’re done customizing the spacing settings, go to the transform settings and rotate the entire section. Instead of having a horizontal section divider, you will now have a vertical one.
- Left: 90deg
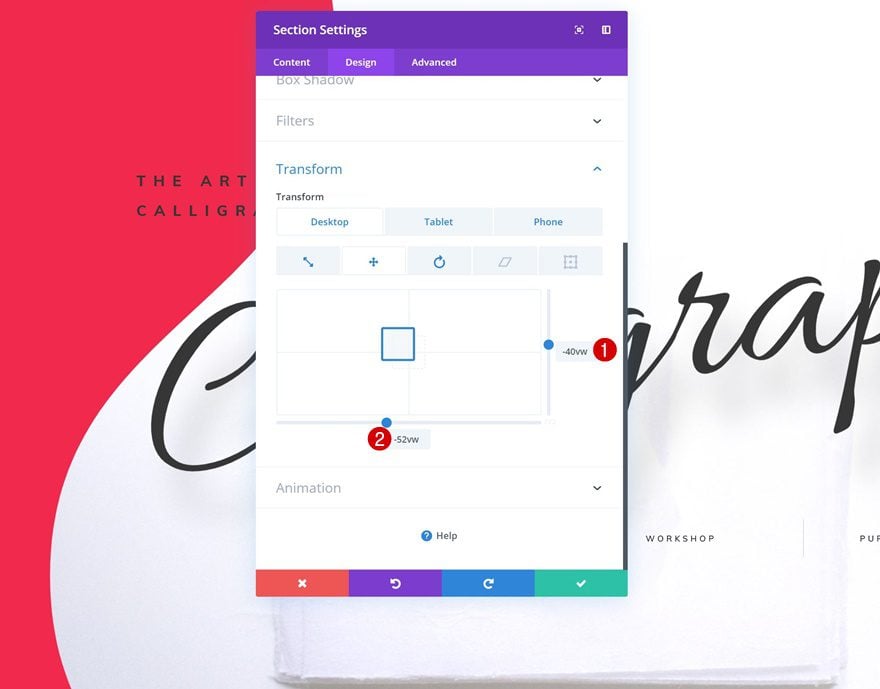
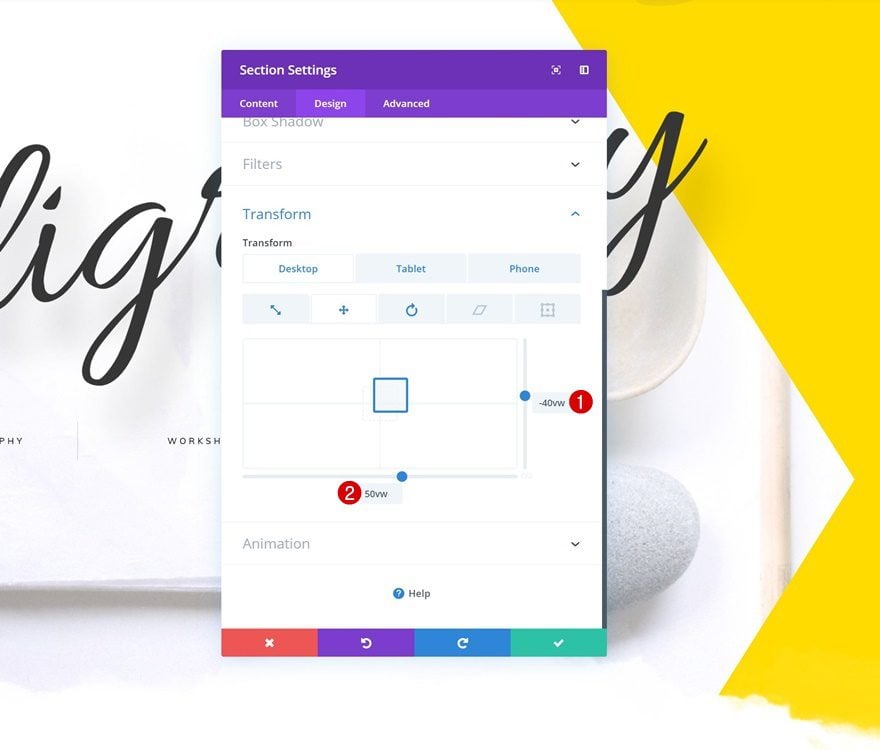
Transform Translate
After rotating the section divider, you need to reposition the section to the left side of the page. You’ll notice that we’re using the width viewport unit as well, to make sure everything remains responsive across all screen sizes.
- Right: -40vw (Desktop), -54vw (Tablet), -86vw (Phone)
- Bottom: -52vw
Recreate Example #2
Add New Section Below Hero Section
On to the second example! Again, add a new regular section right below the hero section.
Background Color
Open the section settings and change the background color into an entirely transparent color.
- Background Color: rgba(255,255,255,0)
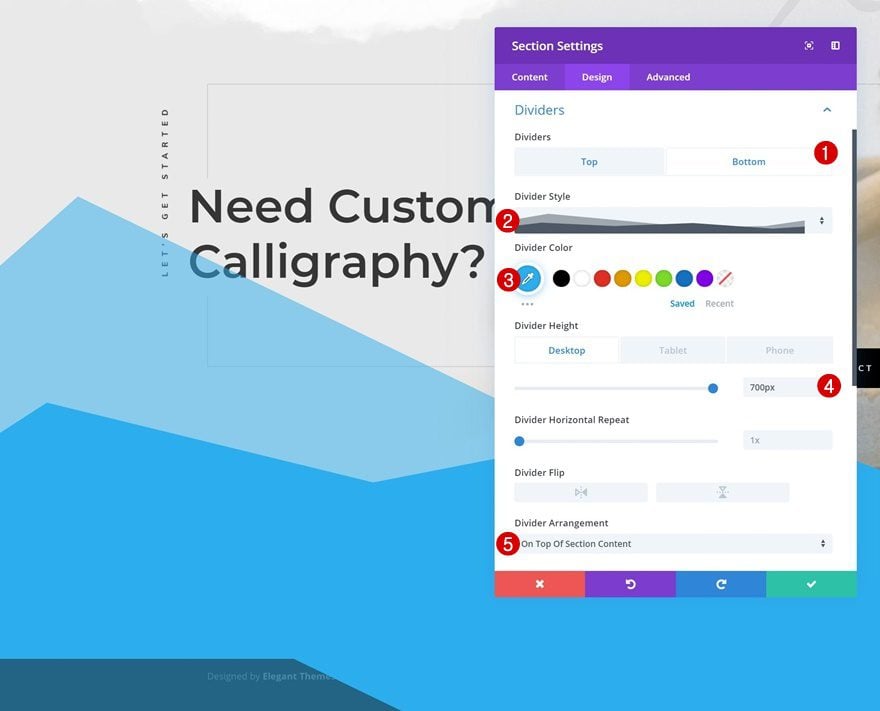
Bottom Divider
Move on to the divider settings and add a bottom divider using the following settings:
- Divider Style: Find in List
- Divider Color: #ffdc00
- Divider Height: 700px (Desktop), 300px (Tablet & Phone)
- Divider Flip: Vertical
- Divider Arrangement: On Top Of Section Section Content
Spacing
Then, go to the spacing settings and start by removing the top and bottom padding of the section. The second thing you need to do in the spacing settings is reducing the size of the section container on desktop and increasing it on mobile using custom margin values.
- Left Margin: 11vw (Desktop), 0vw (Tablet), -35vw (Phone)
- Right: 11vw (Desktop), 0vw (Tablet), -35vw (Phone)
- Top Padding: 0px
- Bottom Padding: 0px
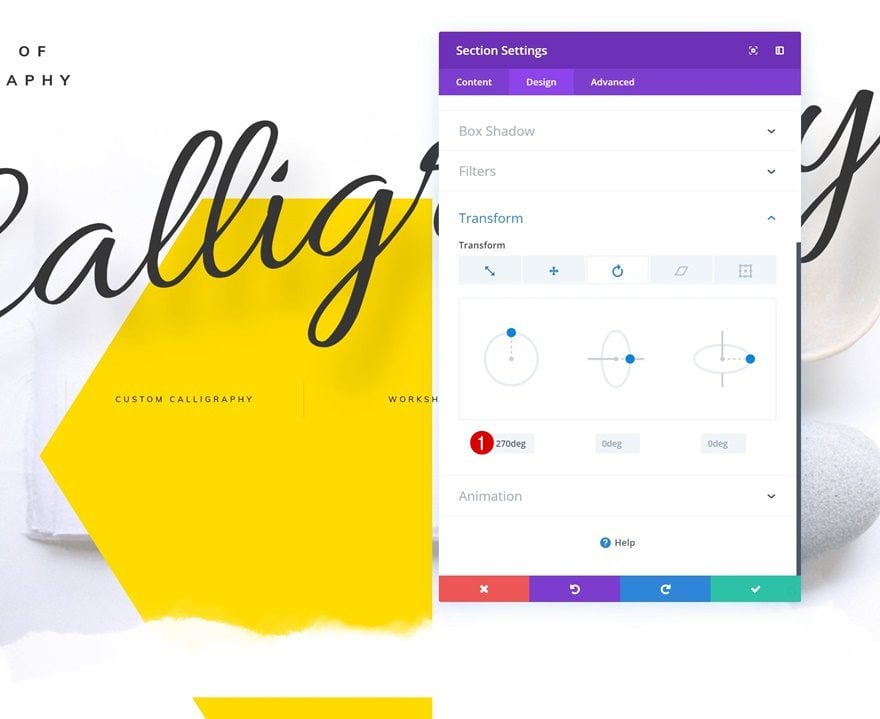
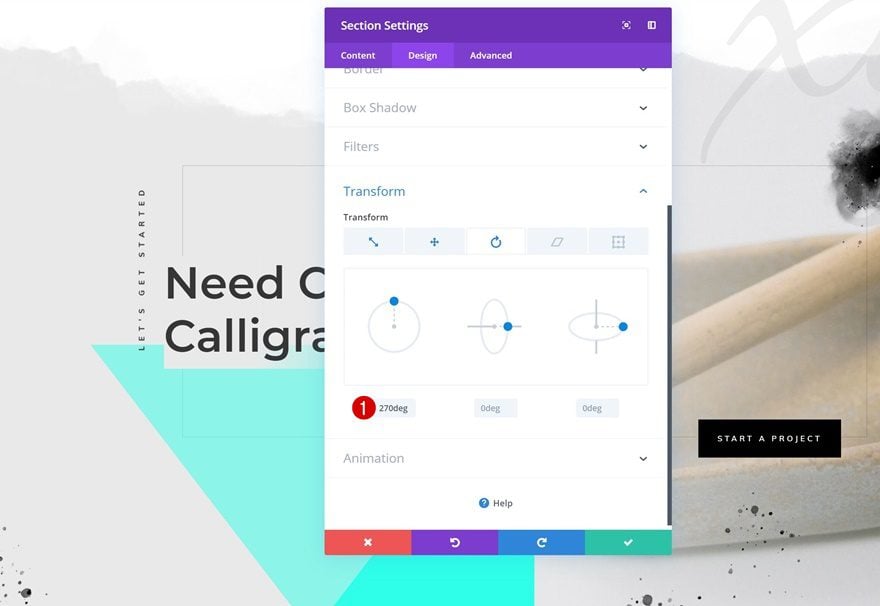
Transform Rotate
Continue by going to the transform settings and rotate the section.
- Left: 270deg
Transform Translate
Last but not least, reposition the section by adding some custom transform translate values.
- Right: -40vw (Desktop), -54vw (Tablet), -86vw (Phone)
- Bottom: 50vw
Recreate Example #3
Add New Section to Bottom of Page
On to the third example! Scroll down the page and add a new regular section to the bottom.
Background Color
Open the section settings and add an entirely transparent background color.
- Background Color: rgba(255,255,255,0)
Bottom Divider
Move on to the design tab and add a bottom divider using the following settings:
- Divider Style: Find in List
- Divider Color: #2bffe9
- Divider Height: 700px (Desktop), 300px (Tablet & Phone)
- Divider Arrangement: On Top of Section Content
Spacing
Move on to the spacing settings and add some custom margin and padding values.
- Left Margin: 27vw
- Right Margin: 27vw
- Top Padding: 0px
- Bottom Padding: 0px
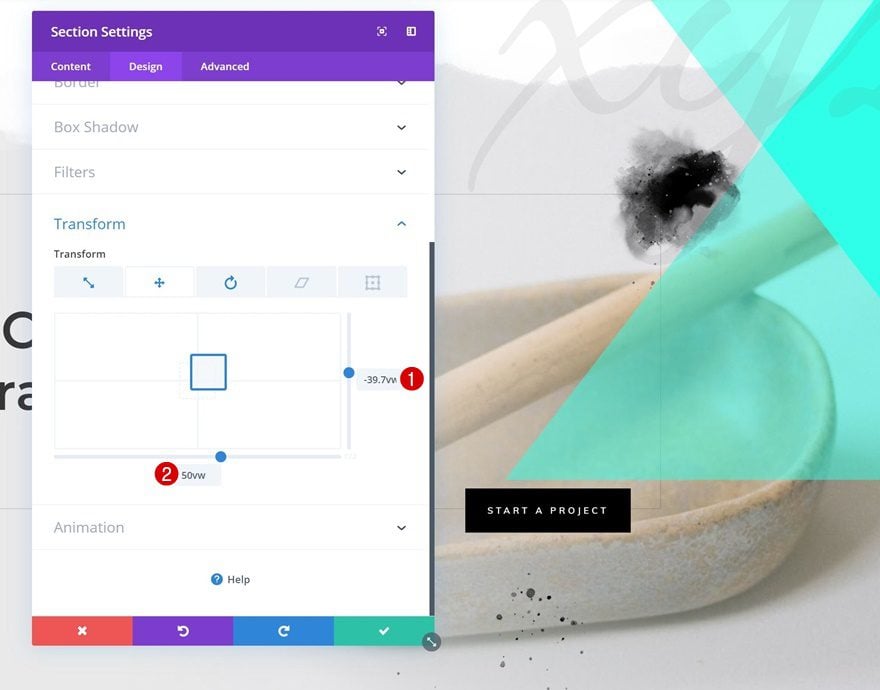
Transform Rotate
Continue by rotating the section 270 degrees.
- Left: 270deg
Transform Translate
Last but not least, change the position of the section by changing the transform translate inputs.
- Right: -39.7vw
- Bottom: 50vw
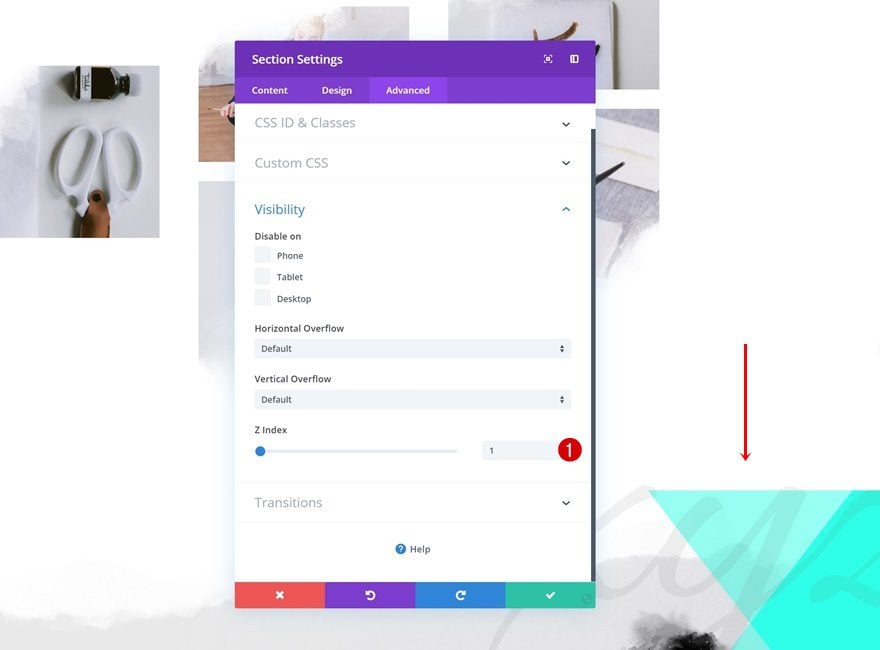
Add Higher Z Index to Section Above
To cut off a part of the section divider, we’re going to make sure the previous section is placed on top of both sections by increasing the Z Index in the visibility settings of the previous section.
- Z Index: 1
Recreate Example #4
Add New Section to Bottom of Page
On to the next and last example! Again, add a regular section to the bottom of the page.

Background Color
Open the section settings and add a transparent background color.
- Background Color: rgba(255,255,255,0)
Top Divider
Go to the design tab next and add a top divider using the following settings:
- Divider Style: Find in List
- Divider Color: #28b0ef
- Divider Height: 700px (Desktop), 300px (Tablet & Phone)
- Divider Arrangement: Underneath Section Content
Bottom Divider
Add a bottom divider as well.
- Divider Style: Find in List
- Divider Color: #28b0ef
- Divider Height: 700px (Desktop), 300px (Tablet & Phone)
- Divider Arrangement: On Top Of Section Content
Spacing
Continue by changing the margin and padding values in the spacing settings of the section.
- Left: 23vw
- Right: 23vw
- Top Padding: 0px
- Bottom Padding: 0px
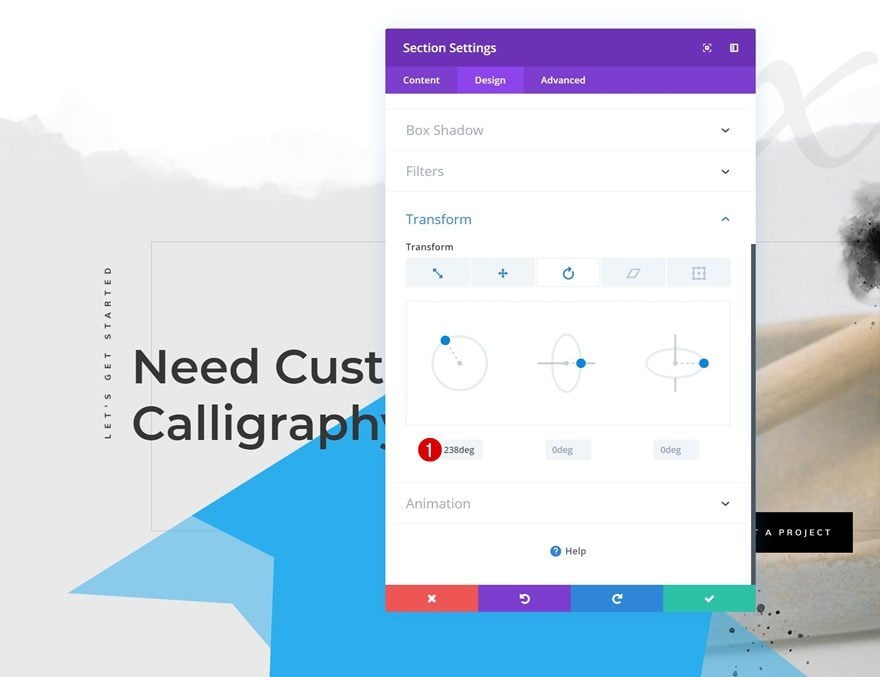
Transform Rotate
Move on to the transform settings and rotate the section accordingly:
- Left: 238deg
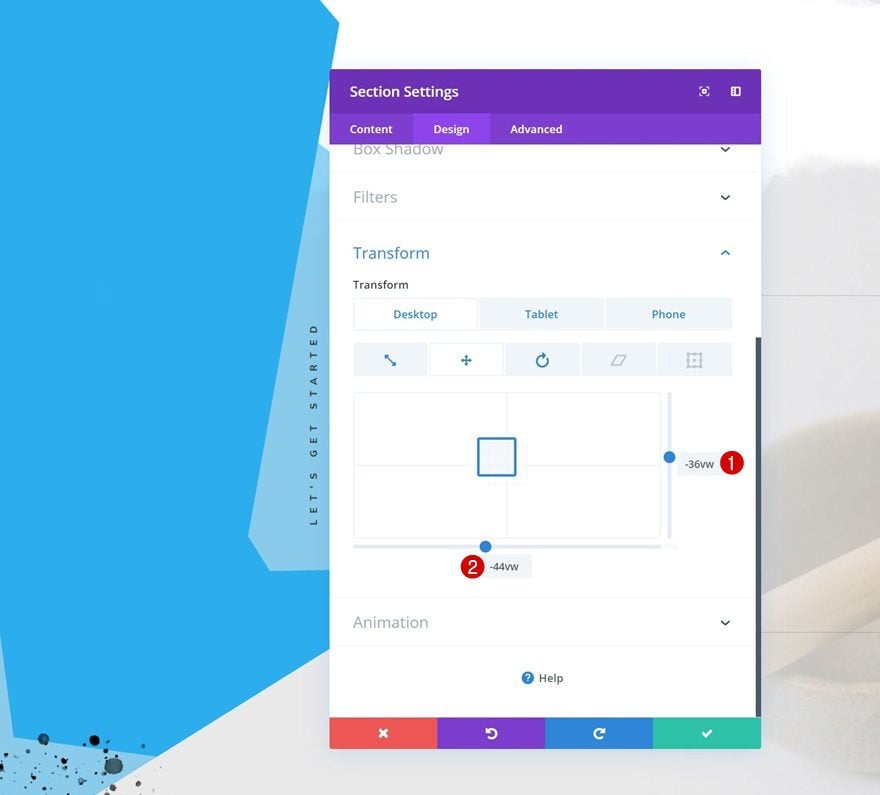
Transform Translate
Place the section at the left side of the page using the following transform translate values:
- Right: -36vw (Desktop), -46vw (Tablet), -53vw (Phone)
- Bottom: -44vw
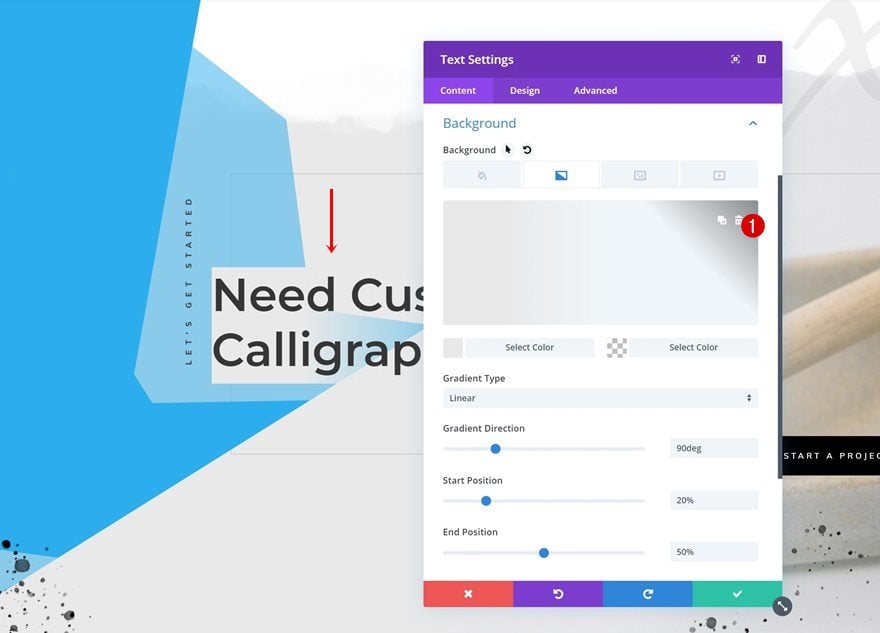
Remove Text Module Gradient Background
Last but not least, remove the gradient background of the Text Module marked in the print screen below and you’re done!
Preview
Now that we’ve gone through all the steps, let’s take a final look at all four examples we’ve recreated and how they look across different screen sizes.
Example #1
Example #2
Example #3
Example #4
Final Thoughts
In this post, we’ve shown you how to rotate section dividers to create stunning side borders for any kind of website you build. This approach allows you to view Divi’s built-in options from another perspective. By creatively combining various settings, the need for image editing software becomes almost non-existent. This tutorial is part of our ongoing Divi design initiative, where we try to put something extra into your design toolbox, each and every week. If you have any questions or suggestions, make sure you leave a comment in the comment section below!
If you’re eager to learn more about Divi and get more Divi freebies, make sure you subscribe to our email newsletter and YouTube channel so you’ll always be one of the first people to know and get benefits from this free content.


I love this article, thx!
Awesome.
Like the idea.
The DIVI is getting better. I’ve tried it before, but I didn’t like it. It may be worthwhile to try another test!
Thanks very helpful article
As usual an awesome creative application of the built in features.
Cheers
James
I love these new possibilities!
OH YEAH!!!