
Every website should have a Terms and Conditions Agreement in place. Although it isn’t required by law (like a Privacy Policy), it can be extremely vital to the health of your online business. The Terms and Conditions (T&C) agreement can also be referred to as Terms of Service or Terms of Use. It is a legal contract between you and your visitors that sets the rules, terms, and/or guidelines for your using the website. It can be useful for protecting your website content and design, terminating user accounts that are in violation, and even limiting your own liability.
A great place to require users to agree with your T&C is on a contact form. You have seen this many times I am sure. You may be prompted to check a box with the label “I agree with the terms and conditions” when registering for a membership, purchasing a product, or filling out a simple contact form. This is a great way to require an agreement to these terms early on.
For this use case tutorial, I’m going to be walking you through how to build a contact form with Caldera Forms and Divi’s Business Consultant Layout Pack which requires users to agree to your terms and conditions before submitting the form. Caldera Forms is one of many contact form plugins for WordPress that have a wide array of uses for contact and other types of forms.
More specifically, this tutorial will help you create a custom form that contains:
- A required checkbox field asking visitors to agree with the T&C.
- A link to the corresponding T&C page so visitors can conveniently find and read the T&C before agreeing to it.
- Conditional logic requires users to agree with the T&C in order to submit the form.
Let’s get started.
- 1 What you will Need for This Use Case Tutorial
- 2 Preview
- 3 Creating Your Form
- 4 Adding Conditional Logic
- 5 Form Redirects and Autoresponders
- 6 Add Form Shortcode to Your Contact Page
- 7 Styling your Contact Form Button
- 8 Using the Auto Terms of Service and Privacy Policy Options Plugin to Create Your T&C Content
- 9 Create Your Terms and Conditions Page
- 10 Other Options for Creating your Terms and Conditions
- 11 Final Thoughts
What you will Need for This Use Case Tutorial
- The Divi Theme (Installed and Active)
- The Business Consultant Layout Pack. I will be using the Case Study page and Contact page layouts within this pack.
- Caldera Forms Plugin (Installed and Active)
- Auto Terms of Service and Privacy Policy Plugin (Installed and Active)
Preview
Here is a quick preview of the contact form and Terms and Conditions page we will be creating.

Creating Your Form
With you Caldera Forms plugin installed, navigate to Caldera Forms > Forms and click the New Form button at the top of the page.

Select the Contact Form Template to get a head start on setting up the fields.
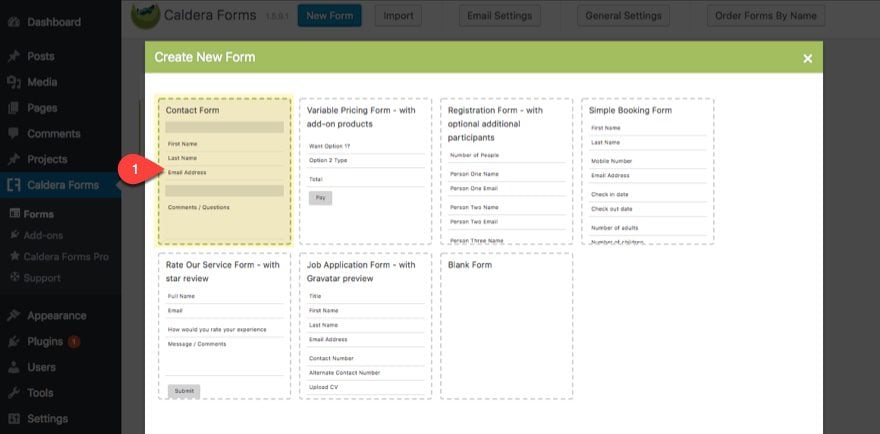
Give the form a name and then click the Create Form button.
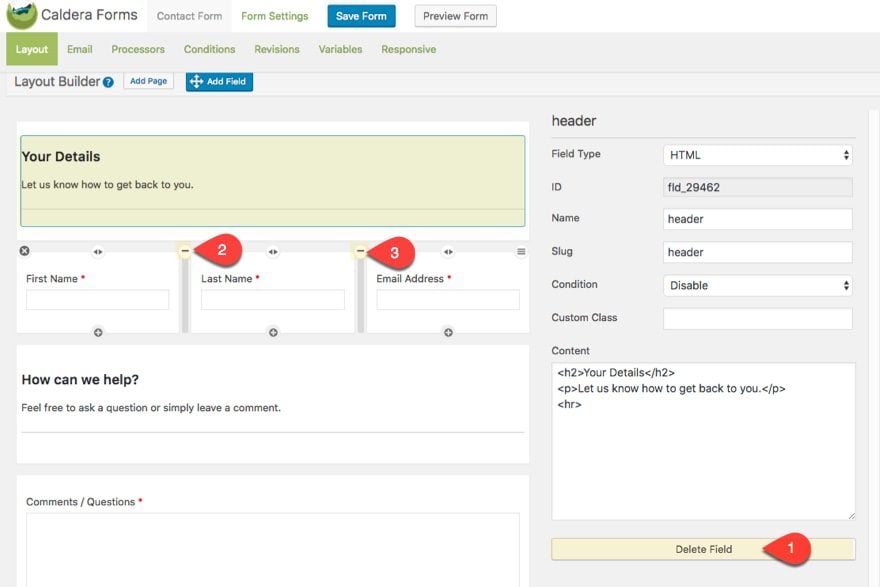
Under the layout tab for your new form, you can edit the layout using the layout builder.
Delete the first row with the HTML content.
Then take away the row splits in the three-column row containing the first name, last name, and email by clicking the minus symbols when hovering over the row.
Now add a new row by clicking the gray box with the dotted border and the plus sign in the middle. Then drag the new row above the row containing the “send message” button.
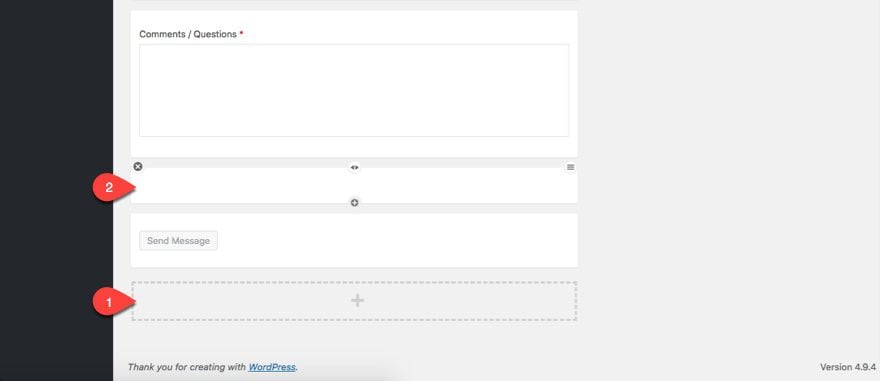
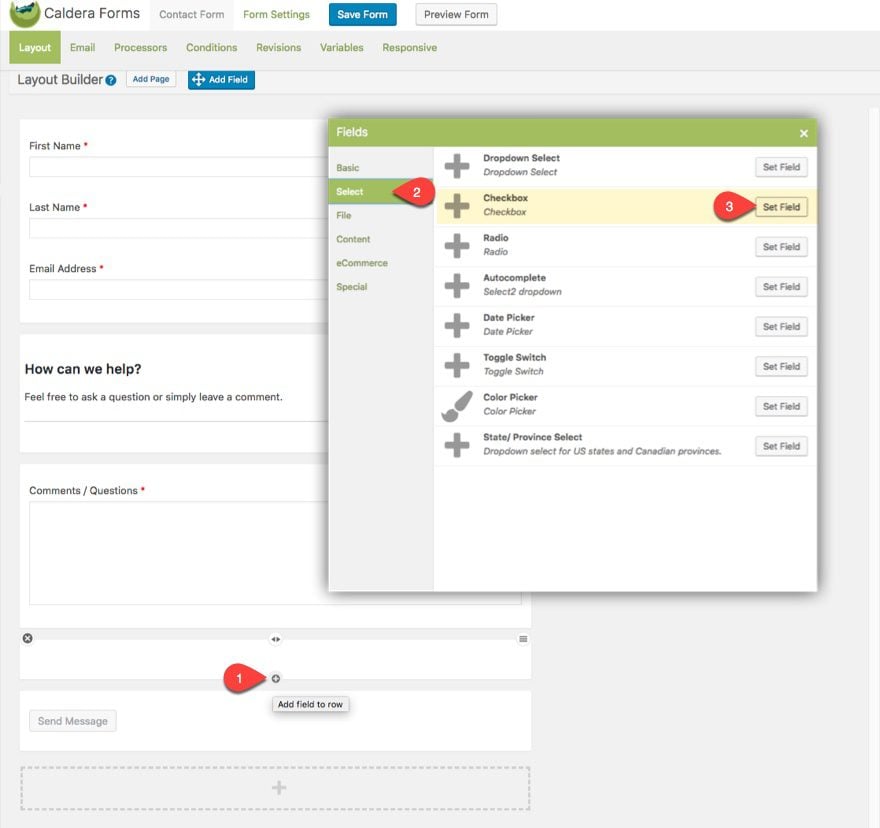
In the new row you created, add a new field to the row by clicking the small plus symbol at the very bottom of the row. In the Fields popup box, click the select tab and then add a Checkbox field by clicking the Set Field button next to “Checkbox”.
Then fill in the following in the field settings at the right of the page.
Name: accept terms (this can be anything you want since we are going to be hiding the label anyway)
Hide Label: yes (check this box)
Slug: accept_terms (this should be auto-generated for you)
Required: Yes (check this box)
At the bottom of the section select Add Option and enter the following into the label input box:
I Accept the <a href="enter url to page here" target="_blank">Terms and Conditions</a>
Notice that this html has a custom link that is supposed to link to your terms and conditions page. You will need to replace the text “enter url to page here” with the url of your actual page. Including ” target=”_blank”” will open the url in a new tab.
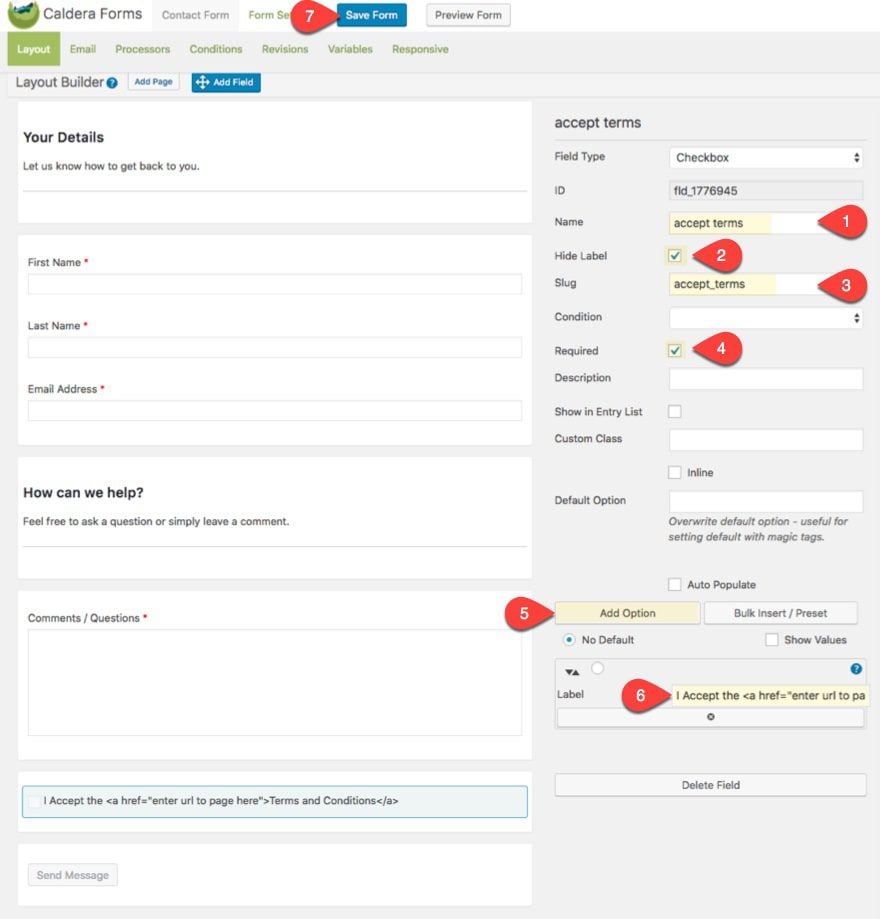
Save your form
Adding Conditional Logic
Within the Caldera Form Layout Builder, select the conditions tab at the top of the page and click Add Conditional Group. Name the group, select the type “Show”, and click the Add Conditional Line button. In the conditional line that appears add the following condition:
if [accept terms] is "I Accept the <a href="enter url to page here">Terms and Conditions</a>"
Then under the Applied Fields section to the right, select “Send Message [submit]”.
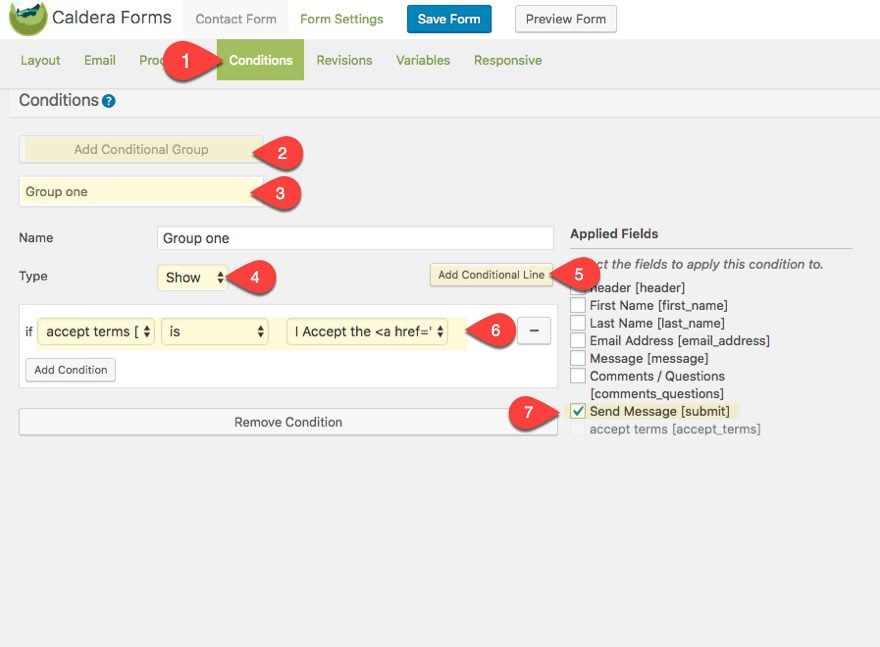
This condition will show the Send Message button only when the user selects that they agree with the terms and conditions by clicking the checkbox.
Here is what this looks like…
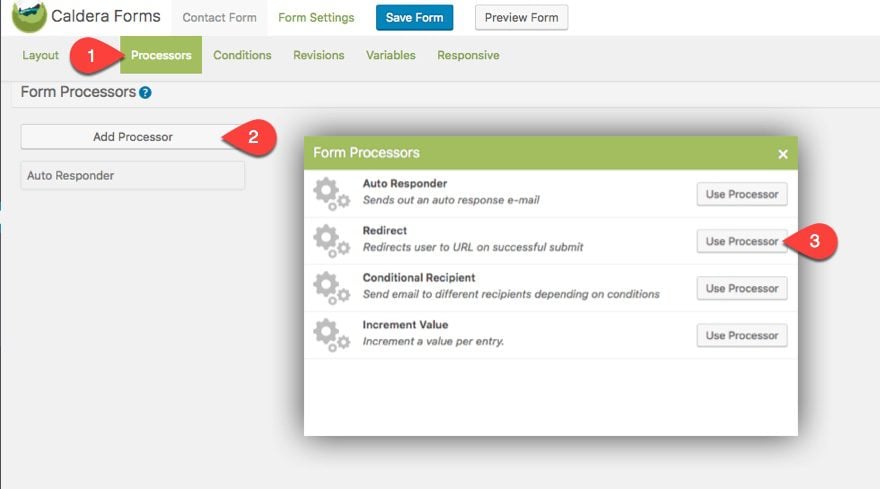
Form Redirects and Autoresponders
By default Caldera Forms includes an autoresponder that sends a notification email to users upon completing the form. You can edit this autoresponder or create new ones. And, you can also create other form processors to your form including redirects after form submission. These autoresponders are under the processors tab within your form settings.
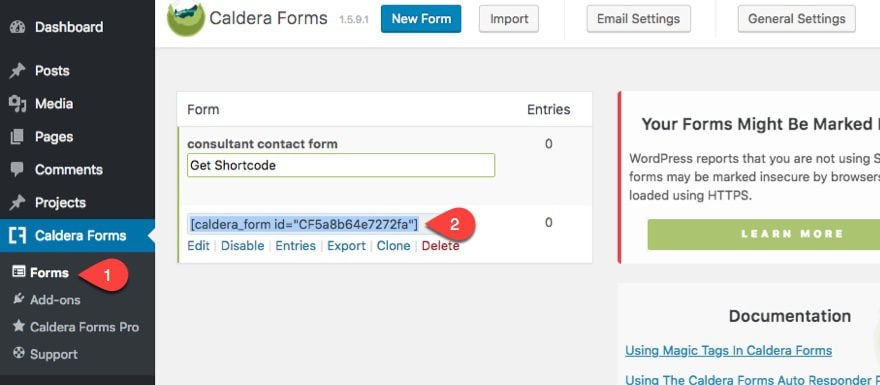
Add Form Shortcode to Your Contact Page
You can find the shortcode to display your form in your WordPress Dashboard under Caldera Forms > Forms and clicking Get Shortcode on your form from the list.
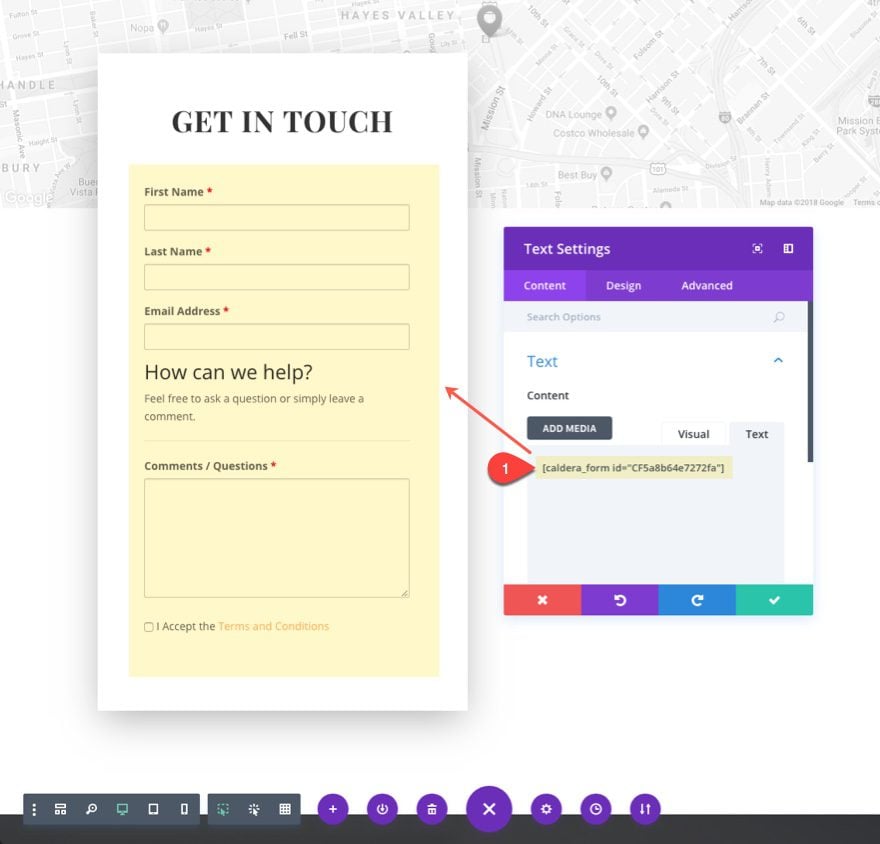
Go to your contact page and make sure you are using the Business Consultant Contact Page layout. Then deploy the Visual Builder. Delete the contact form module that is inside the row of your specialty section. Then add a text module where the contact form module was and enter the shortcode in the content box to display the form.
Now, copy the style of the text module in the footer section holding the dummy “lorem ipsum” text.
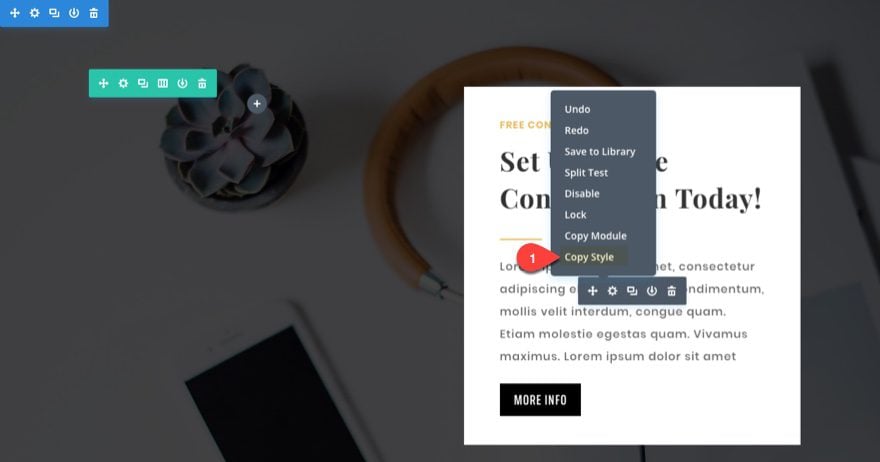
And paste the style to the text module containing your form shortcode.
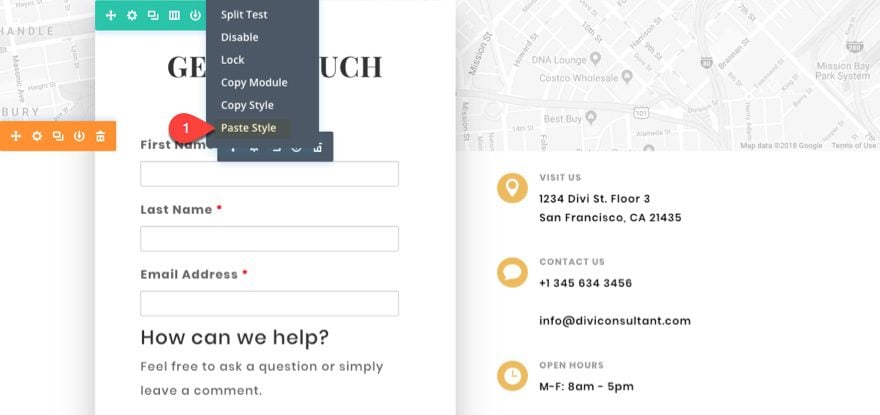
Now your form text matches the layout.
Here is a little trick to style your form button without having to add custom CSS. Since Divi already uses CSS Classes to style the default buttons through the theme, you can add the classes Divi already uses to your Caldera Form button field. Then once these classes have been added, you can set your default button styles in the theme customizer to style the form button.
Click to edit the Send Message button field within the layout builder. For the custom class input box, add the class et_contact_bottom_container. In the class input box, delete the classes currently in there and add the class et_pb_button.
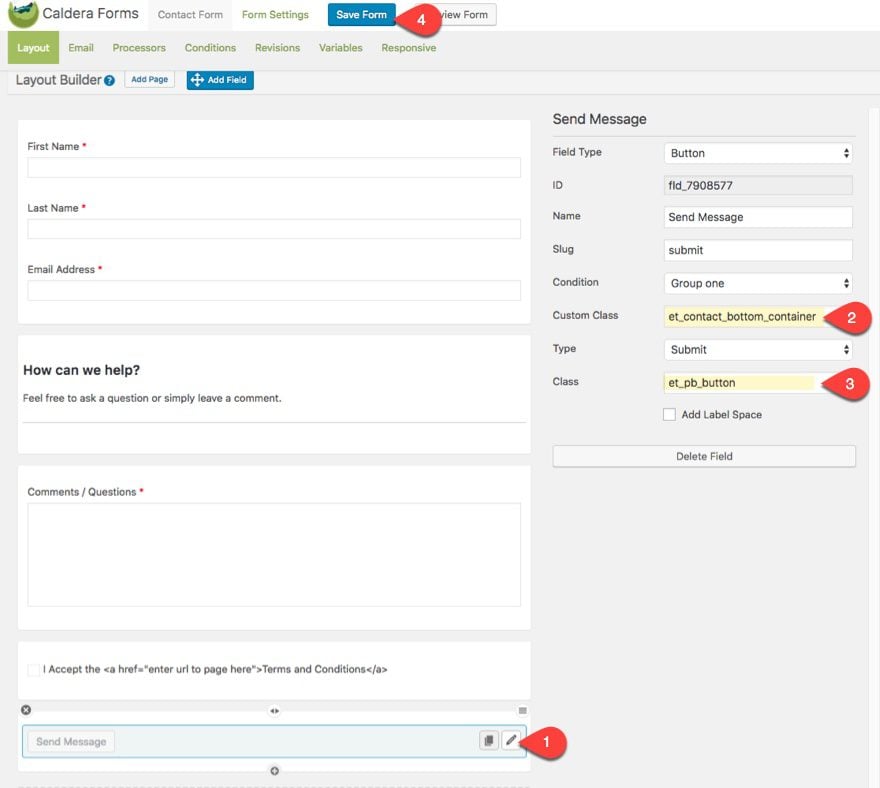
Save your form and then go over to the Theme Customizer and navigate to Buttons > Buttons Style and style your button to match your layout.

Now let’s check out the final result…

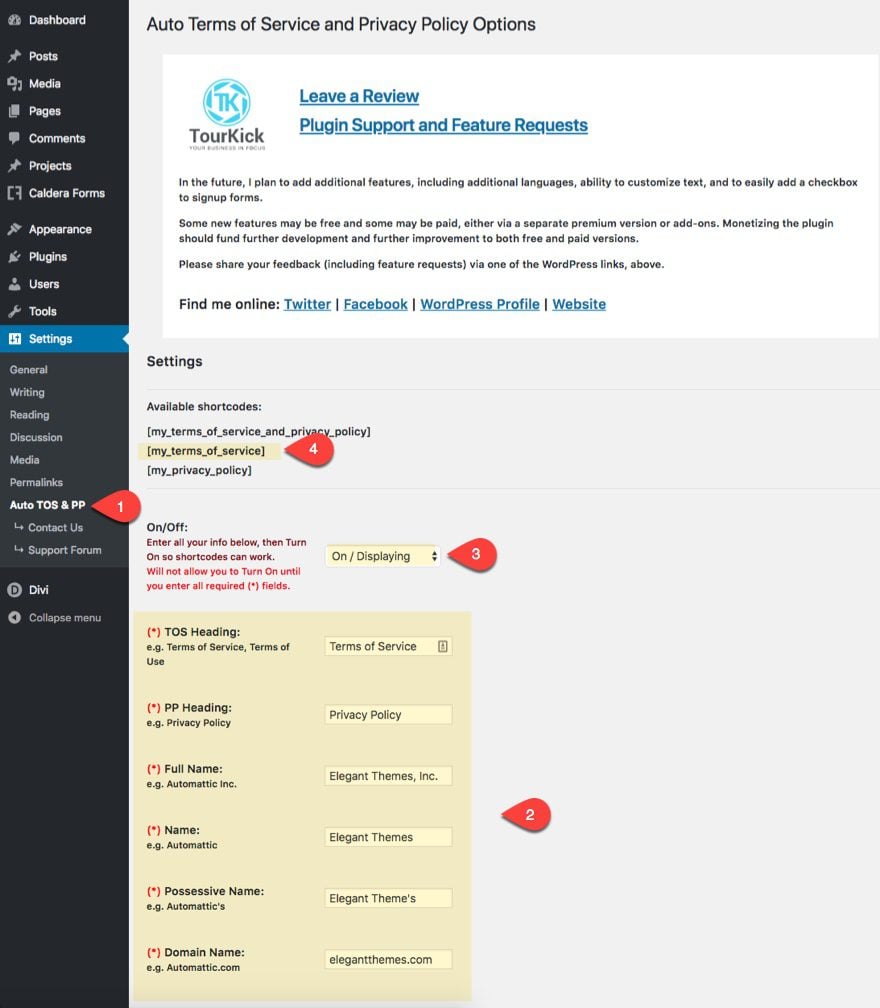
Using the Auto Terms of Service and Privacy Policy Options Plugin to Create Your T&C Content
With the Auto Terms of Service and Privacy Policy Options Plugin installed, navigate to Settings > Auto TOS & PP. Enter all of the info into the input boxes to be automatically added to the T&C content. Then turn on the shortcode by selecting “On/Displaying” from the dropdown next to the On/Off option. Finally, grab the terms of service shortcode to be used in the next section when we build the terms and conditions page.
Create Your Terms and Conditions Page
Creating a Terms and Conditions page is quite simple with the Business Consultant Layout Pack. First add a new page and add the Case Study layout to the page using the Visual Builder.
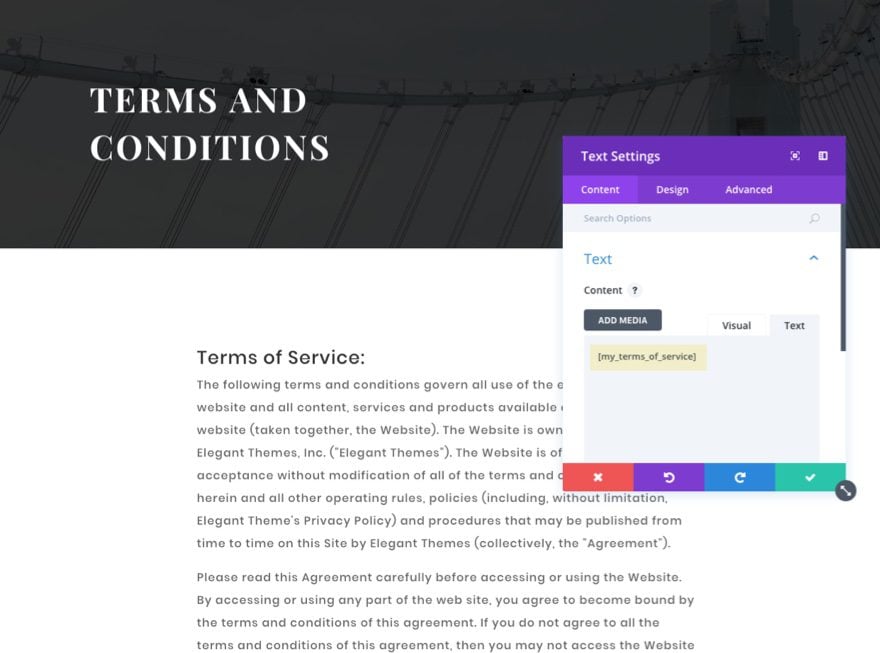
Then update the header section with a new title called Terms and Conditions and center the alignment of the text.
In the section below the header section, update the top row to a single column structure and delete every module in the row except the text module containing the dummy “lorem ipsum” text. Update the text module design settings to have a custom width of 70% and a centered alignment. And finally, replace the content in the text module with your Terms and Conditions shortcode [my_terms_of_service].
Then delete all the other sections below to clean up the layout.
Simple as that.
Tip: Don’t forget that you can style the text of the shortcode even further by targeting elements within the text styling dropdowns under the design tab of the text module that holds your shortcode.
Also, don’t forget to update the checkbox form field with the url for the page you just created!
Here is the final Terms and Conditions page.
Other Options for Creating your Terms and Conditions
If you are interested in a more customizable (and less free) solution to generating a Terms and Conditions for your business, there are some good solutions out there including iubenda, and TermsFeed. For more info you can read one of our posts on “How to Create a Privacy Policy for your Website“.
Final Thoughts
Depending on your website and/or business, your terms and conditions may need a more prominent placement. A contact form is a perfect place for it. You can easily add a checkbox field to your form that both requires users to agree with your terms and conditions and also links them to your terms and conditions page. This is a convenient way to make sure your visitors see important info and are held accountable. The Caldera Forms plugin provides a free solution to add this functionality in a way that works well with Divi. And, creating your own terms and conditions content is really not that difficult if you utilize any one of the auto generating solutions out there.
So, if you need to prompt users to agree with your terms and conditions, I hope this post will point you in the right direction.
Looking forward to hearing from you in the comments.
Article thumbnail image by Blank-k / shutterstock.com


I hope that Elegant Themes will fix this workaround soon and provide a proper, native solution within the Divi Contact Form for the community. By the way, the exact same problem occurs with the newsletter optin form, which also needs this checkbox. Please do something here… there are so many users affected. I’m not very pleased that I actually have to rebuild all contact forms for my customers.
you can do this also with Contact Form 7 wich is my Favorit Contact Form. Just add an Acceptance Checkbox. If the user don’t check it, the contact form will not be able to send the request.
The checkbox privacy legal terms must be integrated with normals forms of divi. In a few days, a new law of data proteccion will become in Europe and this option it’s necessary.
Contact forms are necessary for a website and Terms and Conditions Agreement acts as a signal to users that the website is legal and secured. Great read!
Divi should have its own form bulder. Native form module in Divi now is trash. I just can’t use it because it’s illigal in my country to have forms without agreement with privacy politics checkbox.
But anyway, thanks for this guide. It’s a way to fix some Divi flaws.
Exactly in Poland for example the law requires us to have a checkbox with whole legal statement, it can’t be a checkbox with a link, also soon the GDPR will make it even more complicated – and:
The GDPR not only applies to organisations located within the EU but it will also apply to organisations located outside of the EU if they offer goods or services to, or monitor the behaviour of, EU data subjects. It applies to all companies processing and holding the personal data of data subjects residing in the European Union, regardless of the company’s location.
Thanks a lot, Jason.
Great guide with required setup information. It’s so easy to work with it, I can effectively use it. Thank you again for sharing.
Hi, with wpForms we can do the same?, im not sure
I +1 that. It’s vital that divi gets a more functional contact form. All it really needs for this to work is a clickable link to the terms and conditions in an “I accept the terms and conditions” field.
I don’t likie using caldera because it’s horrible to work with and takes so much more time than with the divi form module.
You guys have your own contactform, but you using another one? It will be nice for the divi users, that they can use the divi feautures..
It is not possible to add custom text field to Divi contact form. Well, at least it is not possible just like that ))
I agree. Why not use the built-in form in Divi?
I +1 that. It’s vital that divi gets a more functional contact form. All it really needs for this to work is a clickable link to the terms and conditions in an “I accept the terms and conditions” field.
I don’t likie using caldera because it’s horrible to work with and takes so much more time than with the divi form module.
My concern would be if only “I Accept the Terms and Conditions” check box is the proper way or efficient enough to handle various legal regulations such as the Canada’s Anti-Spam Law (CASL) or the upcoming General Data Protection Regulation (GDPR).
Thanks a lot, Jason.