
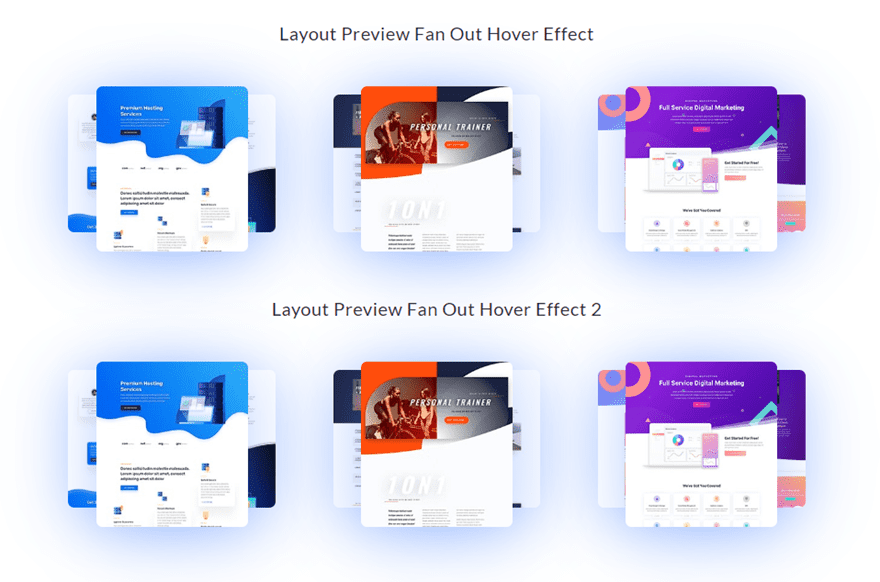
One of the cool features of the new website design of elegantthemes.com is the premade layout pack previews on the Divi product page. What makes this design unique is how each layout pack is featured with three separate images that fan-out on hover.
Today, we’re going to show you how to recreate the design of our layout pack previews with that same impressive fan-out hover effect in Divi. Because the design is a bit more advanced, we will be using some custom CSS in combination with Divi’s built-in design options. But don’t worry, it won’t take long to build and the result is definitely worth it.
Let’s get started.
- 1 Sneak Peek
- 2 Download the Layout Pack Preview Fan-Out Hover Effects Layout for FREE
- 3 Download For Free
- 4 What You Need to Get Started
- 5 Recreating ET’s Layout Pack Previews with Fan-Out Hover Effects in Divi
- 6 Optional Hover Effect: Rotating Image 1 and 2 Separately on Hover
- 7 Adding Links to Images
- 8 Adding new Layout Pack Previews to the Other Columns
- 9 Final Design
- 10 Final Thoughts
Sneak Peek
Here is a peek at the layout pack previews with a fan-out hover effect. Notice the bottom row has a secondary hover effect that rotates the images separately on hover.
The three column layout on desktop will adjust to one column on tablet and phone.

Download the Layout Pack Preview Fan-Out Hover Effects Layout for FREE
To lay your hands on designs from this tutorial, you will first need to download it using the button below. To gain access to the download you will need to subscribe to our newsletter by using the form below. As a new subscriber, you will receive even more Divi goodness and a free Divi Layout pack every Monday! If you’re already on the list, simply enter your email address below and click download. You will not be “resubscribed” or receive extra emails.

To import the layout to your page, simply extract the zip file and drag the json file into the Divi Builder.
Let’s get to the tutorial shall we?
Subscribe To Our Youtube Channel
What You Need to Get Started
To get started, you will need to have the following setup:
- The Divi Theme installed and active
- A new page created to build from scratch on Divi’s front end (visual) builder.
- Three images to be used for mock content. The images should be around 250px by 375px for best results. Since these are previews of webpages, you can create your own screenshots of any page design and then crop/resize each image accordingly.
After that, you will have a blank canvas to start building some hover tabs in Divi.
Recreating ET’s Layout Pack Previews with Fan-Out Hover Effects in Divi
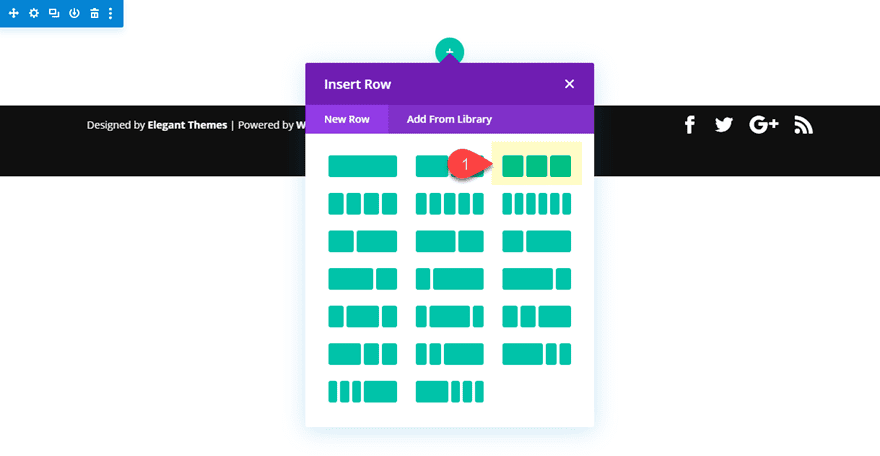
Building the Section and Row
Create a new regular section with a three-column row.
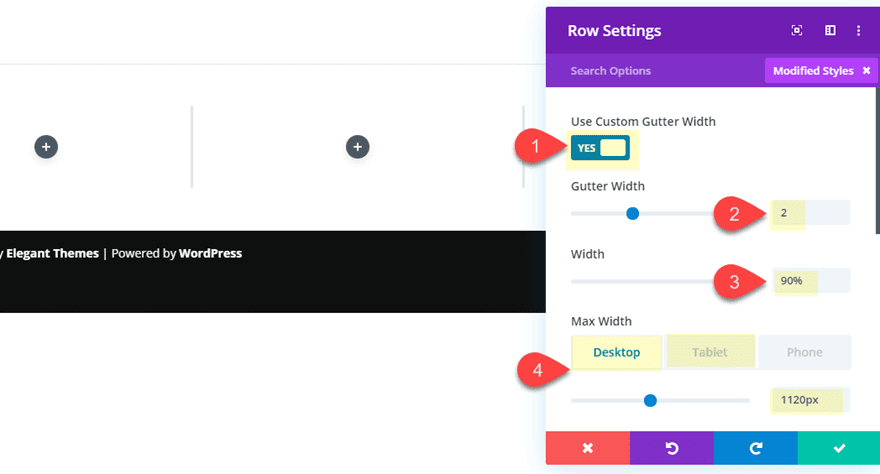
Before adding any modules, open the row settings and update the size and spacing as follows:
- Gutter Width: 2
- Width: 90%
- Max Width: 1120px (desktop), 400px (tablet)
Then add some padding to the row on tablet for more spacing on mobile.
- Column 1 Padding: 20% bottom
- Column 2 Padding: 20% bottom
- Column 3 Padding: 20% bottom

Adding Image 1
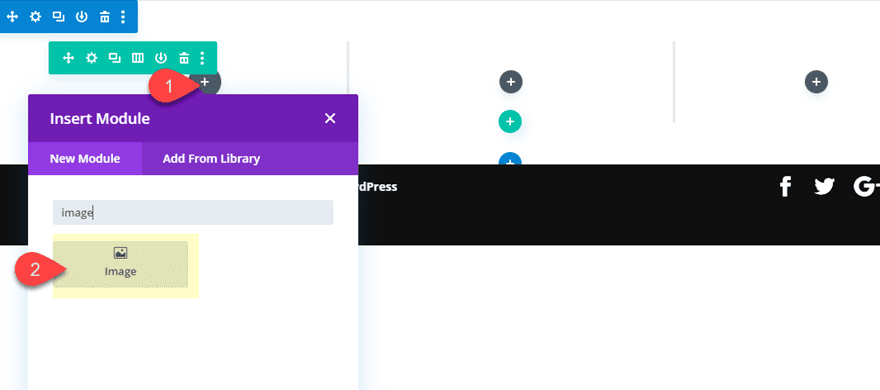
Now we are ready to add our first of three images that will make up our layout pack preview design. Go ahead and add an image module to column 1.
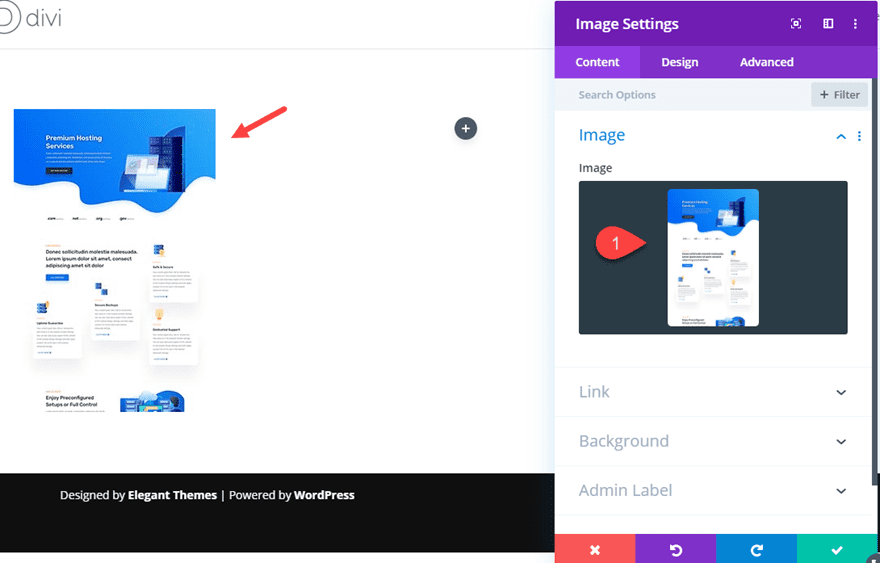
Then upload the image to the image module (it should be around 250px by 375px in size).
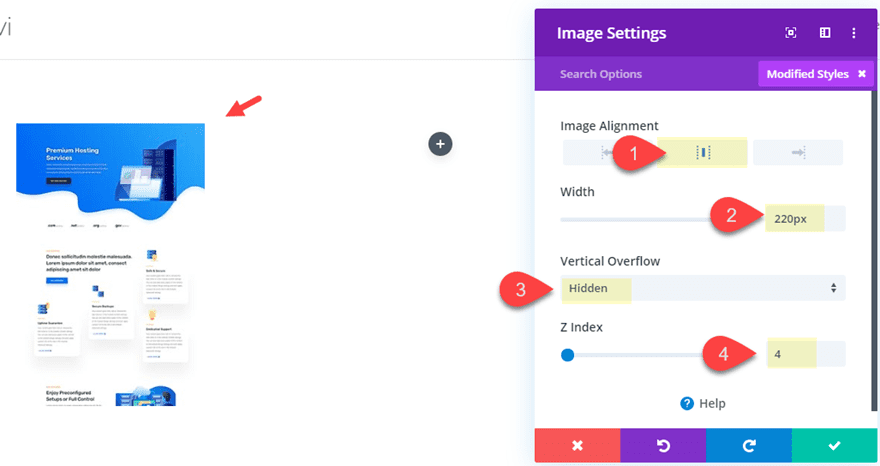
Then update the design settings as follows:
- Image Alignment: center
- Width: 220px
- Vertical Overflow: hidden
- Z index: 4
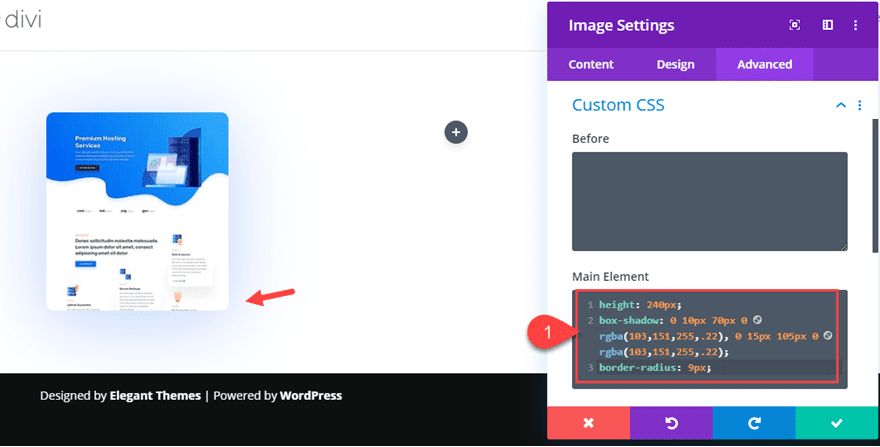
Since we are needing to target the image container (not the image itself), we need to add a custom height, box shadow, and border radius using custom CSS. Add the following CSS to the Main Element:
height: 240px;
box-shadow: 0 10px 70px 0 rgba(103,151,255,.22), 0 15px 105px 0 rgba(103,151,255,.22);
border-radius: 9px;
This will allow the image to adjust with the with of the image container when we add the hover effect later on. As you can see now, the image has been slightly cut off at the bottom because we have a custom height of 240px and the overflow set to “hidden”.
Adding Image 2
To create the second image, add a new image module below the first image module in column 1. Then upload a new image (250X350) to the module.
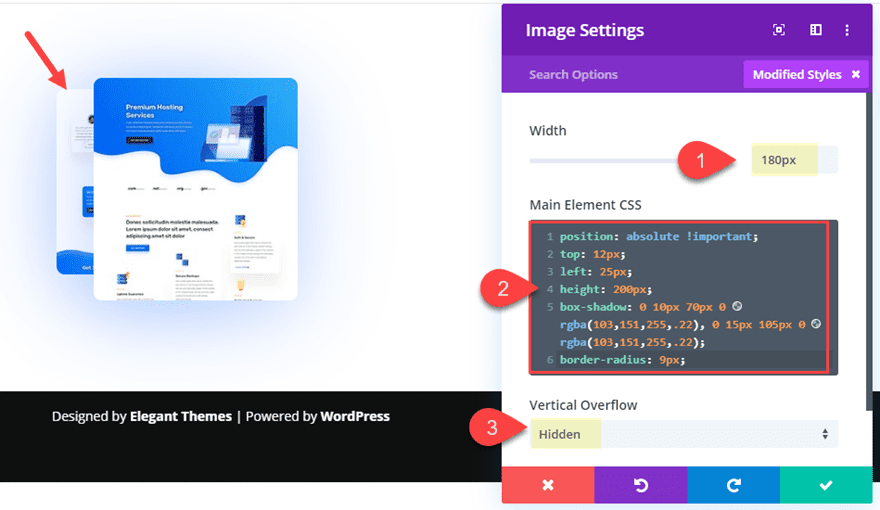
Then we need to position the image behind and slightly to the left of image 1. To do this we will need to add a custom width and height with the vertical overflow hidden (much like we did with image 1). The main difference here is that we need to give the image an absolute position so that displays at the top left of the column behind image 1.
To do this, update the following:
- Width: 180px
- Vertical Overflow: hidden
Then add the following custom CSS to the Main Element:
position: absolute !important;
top: 12px;
left: 25px;
height: 200px;
box-shadow: 0 10px 70px 0 rgba(103,151,255,.22), 0 15px 105px 0 rgba(103,151,255,.22);
border-radius: 9px;
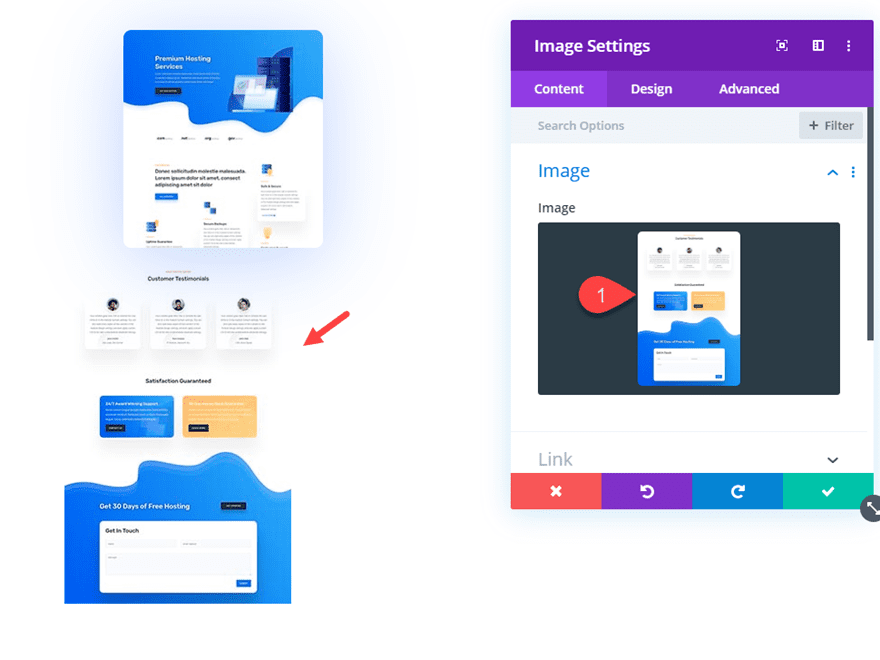
Adding Image 3
Now we are ready to add the third image to complete the layout pack preview. At this point it makes sense to use the wireframe view mode since we have some overlapping that makes using the visual builder more difficult. Deploy the wireframe mode and duplicate image 2.
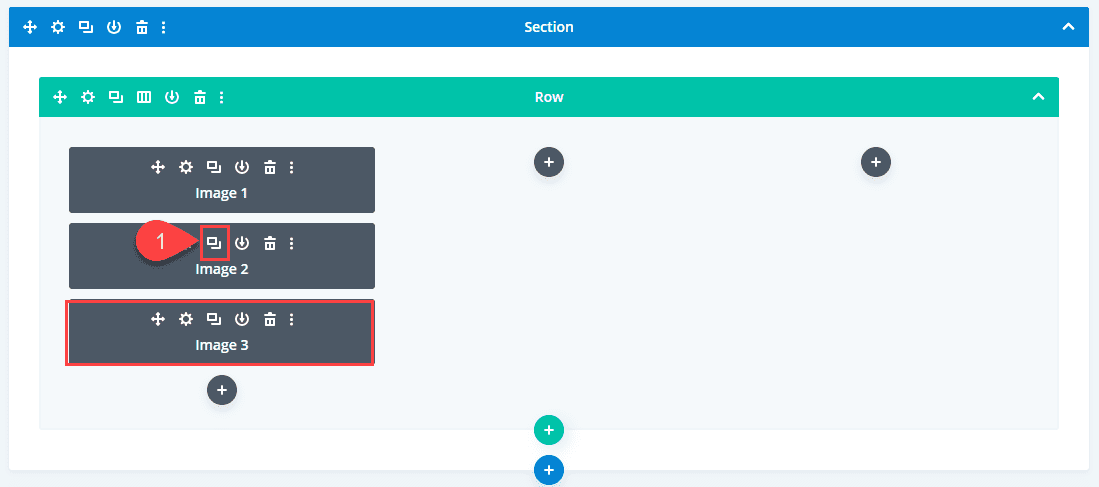
We duplicated the image because we want to carry over most of the settings that we used for image 2. The only difference (besides a new image) is we need to position the image to the right instead of the left.
Open the duplicated image (image 3) and update image module with a new image (250×375).
Then update the custom CSS by changing the left position property to a right position property. No other changes to the CSS are needed.
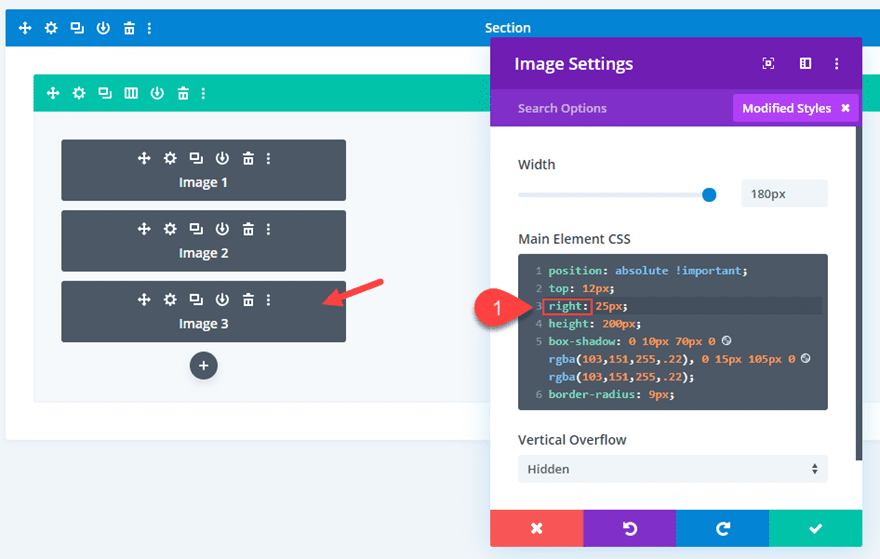
If you prefer, you can copy and paste the following CSS in the Main Element to replace the current CSS.
position: absolute !important;
top: 12px;
right: 25px;
height: 200px;
box-shadow: 0 10px 70px 0 rgba(103,151,255,.22), 0 15px 105px 0 rgba(103,151,255,.22);
border-radius: 9px;
So Far So Good
Here is the final result so far.

The design is actually really beautiful as is, but let’s kick it up a notch with a fan-out hover effect.
Adding the Fan-Out Hover Effect CSS
Normally, if we were dealing with just one image, we could easily add hover effects using built-in Divi options. But this fan-out hover effect requires that we engage the hover state of multiple child elements (images) at once when hovering over the parent column. When hovering over the column, we want the following to accomplish the following adjustments to the images.
- Add a transition duration to each image for a smooth transition on hover.
- Adjust Image 1 to have a width of 180px and a height of 240px. This will cause the image container to grow taller and narrower to show more of the image.
- Adjust Image 2 and 3 to have a width of 160px and a height of 220px. This will also cause the images to grow taller and narrower to show more of the image.
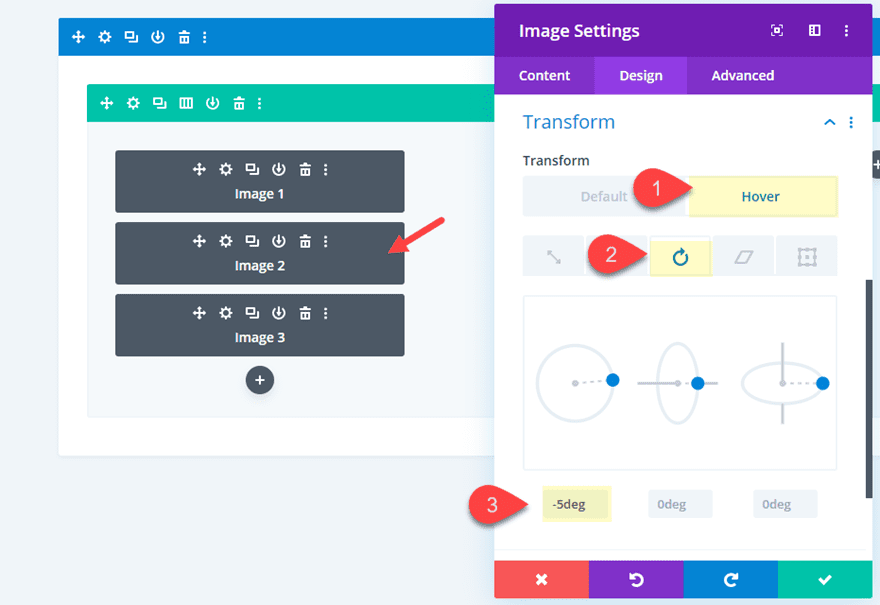
- Adjust Image 2 to rotate 5 degrees counterclockwise and move slightly to the left. We can do this by adding -5 degree value the
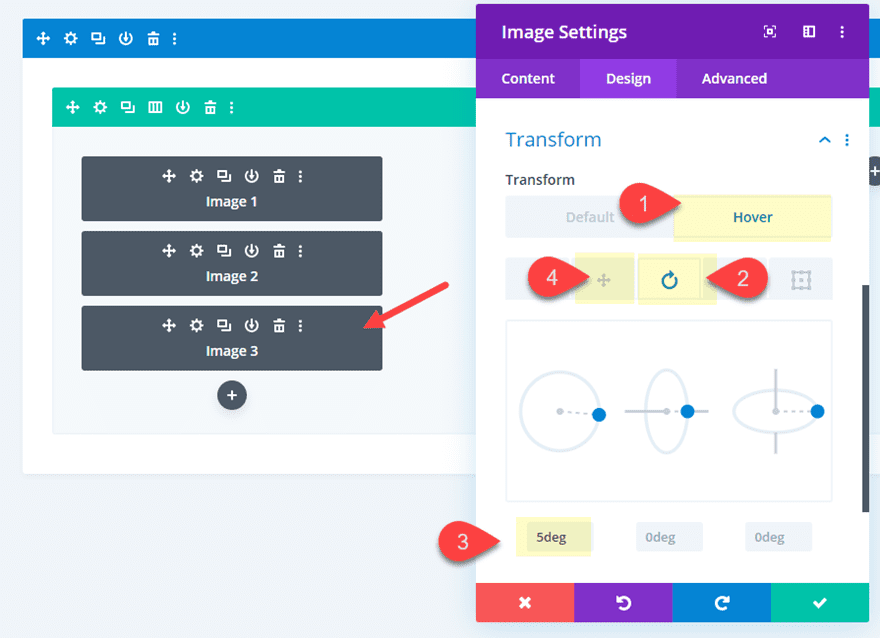
transform:rotateproperty and adjusting the value of theleftposition property to 0. - Adjust Image 3 to rotate 5 degrees clockwise and move slightly to the right. We can do this by adding a 5 degree value to the
transform:rotateproperty and adjusting the value of therightposition property to 0.
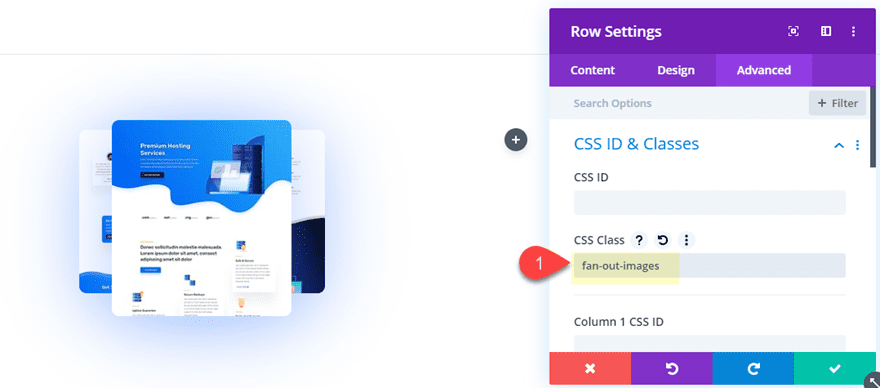
To add the custom CSS needed for these hover effects, we need to add a custom CSS class to the row containing the images. This will allow us to apply the custom CSS only to the images in a particular row.
Open the row settings and add the following CSS Class.
- CSS Class: fan-out-images
To add the custom CSS to the page, open the page settings and add the following Custom CSS under the Advanced tab.
/**transition duration and speed curve**/
.fan-out-images .et_pb_image {
  -webkit-transition: 300ms all cubic-bezier(.4,0,.2,1);
  transition: 300ms all cubic-bezier(.4,0,.2,1);
}
/**Change width and height of image 1 on hover**/
.fan-out-images .et_pb_column:hover .et_pb_image:first-child {
  width: 160px;
  height: 240px;
}
/**Change width and height of image 2 and 3 on hover**/
.fan-out-images .et_pb_column:hover .et_pb_image:nth-child(2), .fan-cards .et_pb_column:hover .et_pb_image:nth-child(3) {
  width: 160px;
  height: 220px;
}
/**Rotate image 2 counterclockwise and move to the left on hover**/
.fan-out-images .et_pb_column:hover .et_pb_image:nth-child(2) {
  left: 0;
  -webkit-transform: rotate(-5deg);
  transform: rotate(-5deg);
}
/**Rotate image 3 clockwise and move to the right on hover**/
.fan-out-images .et_pb_column:hover .et_pb_image:nth-child(3) {
  right: 0;
  -webkit-transform: rotate(5deg);
  transform: rotate(5deg);
}
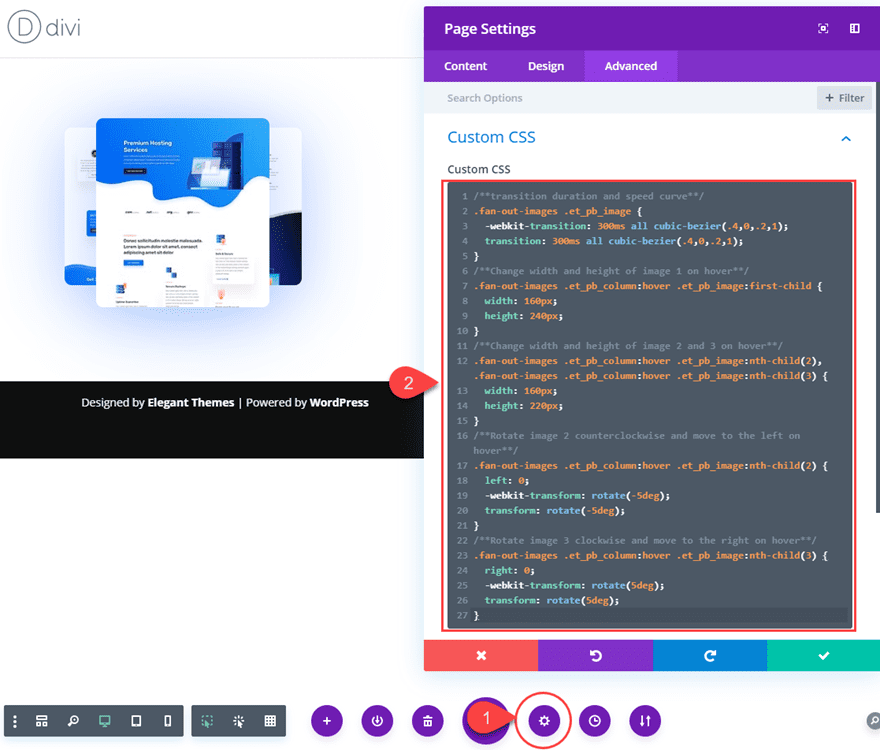
I’ve add a comment above each snippet of css to remind you what each is doing.
Once you are done. Check out the final result.
Final Result
Optional Hover Effect: Rotating Image 1 and 2 Separately on Hover
To add another level of engagement to the layout pack preview images, we can have the rotation of image 1 and image 2 happen separate from the initial hover effect. This will allow the user to interact with the images in a unique way. You can even add separate links or lightbox previews to those images if you want.
Here’s how you do it.
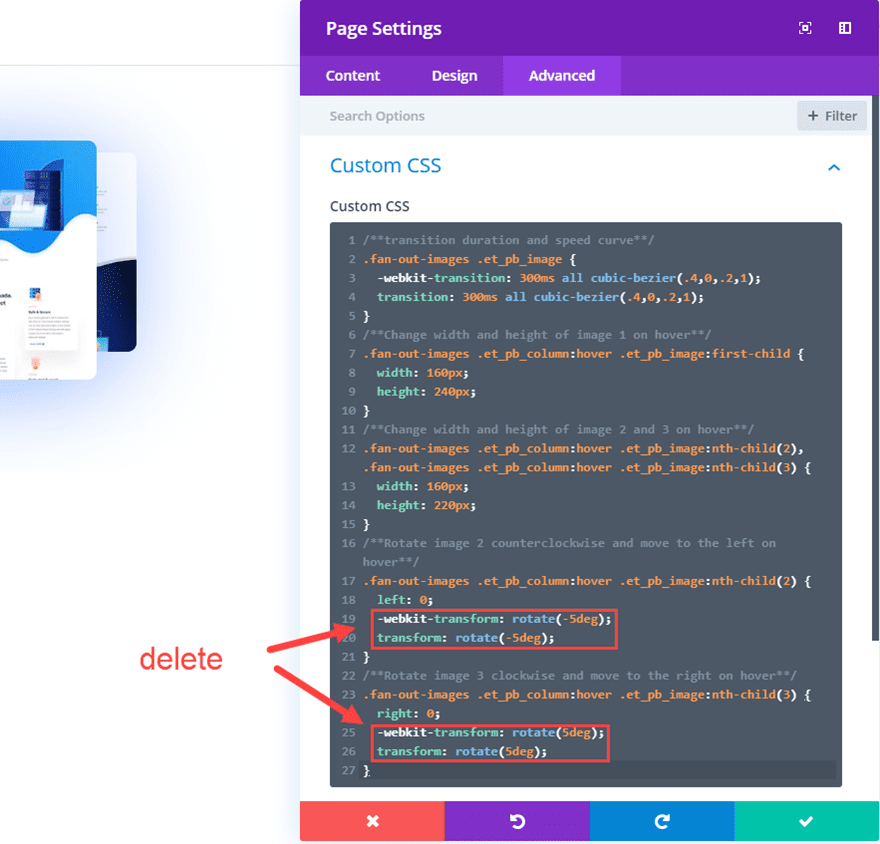
Taking out the Transform Properties from Page Settings Custom CSS
First, you need to take out the two lines of custom CSS that rotate the image when hovering over the column. Open the page settings custom CSS and take out the following:
  -webkit-transform: rotate(-5deg);
  transform: rotate(-5deg);
  -webkit-transform: rotate(5deg);
  transform: rotate(5deg);
Adding Transform Properties on Hover for Image 2
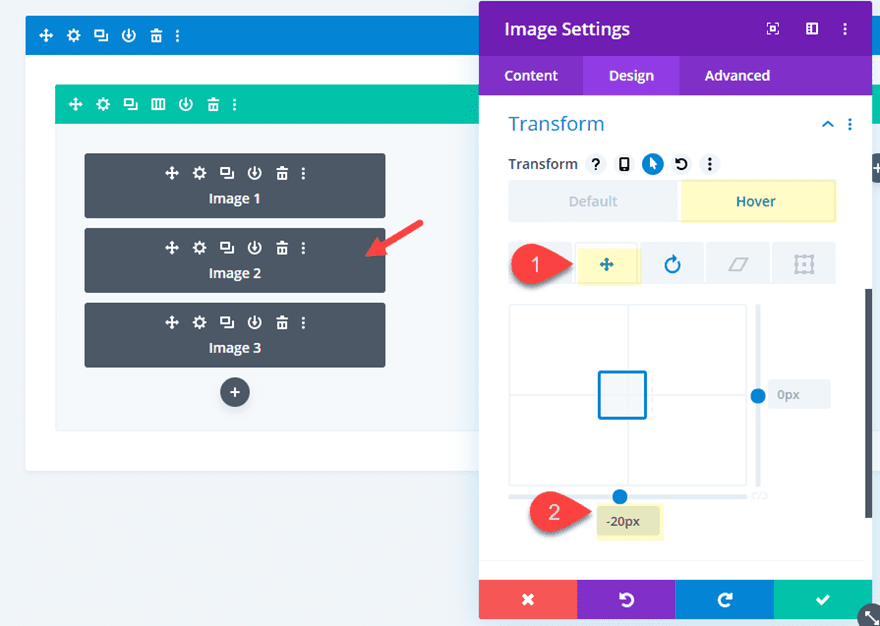
Then open the image module settings for image 2 and use Divi’s built-in transform options to add the same transform rotate value we deleted previously for the hover state.
- Transform Rotate Z Axis (hover): -5deg
- Transform Translate X axis (hover): -20px
Adding Transform Properties on Hover for Image 3
Then update the image module settings for image 3 to add the transform rotate property.
- Transform Rotate Z Axis (hover): 5deg
- Transform Translate X axis (hover): 20px
Now check out the final result.
Final Result
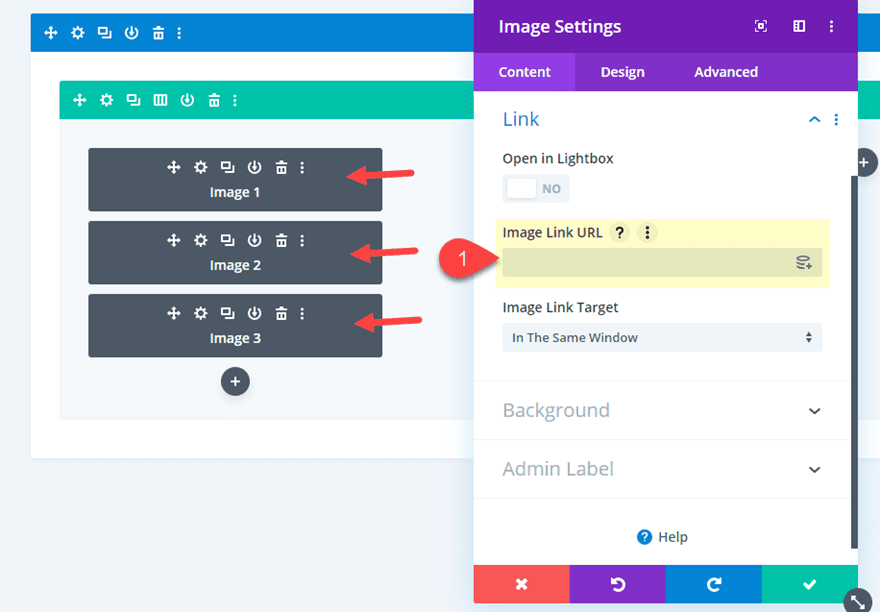
Adding Links to Images
If you want to create redirect links to showcase a particular layout pack or page design on a separate page, it would be best to add the same Link URL to all three images in the pack. To do this, open each of the image modules and add the link URL.
Adding new Layout Pack Previews to the Other Columns
To finish off the design, we can copy the three images in column 1 and pasted them into column 2 and column 3.
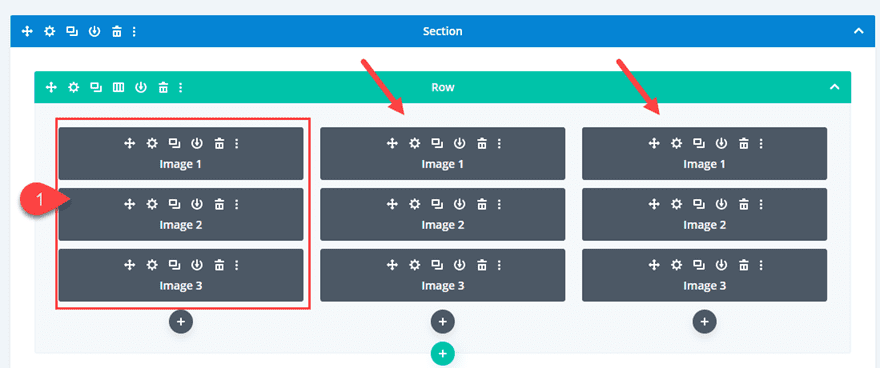
After that, all you need to do is update each of the images in column 2 and 3 with new ones.
That’s it!
Final Design
Here is the final design. The top row shows the hover fan-out hover effect when hovering over the column. The second row shows the secondary fan-out hover effect added to image 2 and 3 separately.
The three column layout on desktop will adjust to one column on tablet and phone.
Final Thoughts
The fan-out hover effect is a beautiful and engaging design element that you can use to feature page layouts on your very own website. The combination of custom CSS and built-in Divi settings we covered in this tutorial will work magically. And this setup will serve as a great starting point for exploring more design using the Divi builder. Hopefully, this gives you some inspiration to take your portfolio to the next level.
I look forward to hearing from you in the comments.
Cheers!


I made this 3 times and always have the same issue, where is the problem? My image 2, no matter size (the tutorial says to make it smaller than image 3) no matter what i change, it always look higher when mouse hover. You can check it here: https://www.uglmroma.it/progetti/convenzioni-2
Can someone explain me what’s wrong with it? I would like it to look symmetrical
Thanks, I am waiting for this.
Hello,
I am getting absolutely overwhelmed by all the designs and options you are sending. At the moment I haven’t even mastered just the Divi theme itself. So where do I access this information in the future when I am ready for it. I fear I may never find it again.
Hey on another note can you tell me how to adjust the captcha text on the contact forms I can darken all the text in the various fields but have not found out where or how to adjust the captcha text and thus can’t use this feature if I darken the background
Chris,
I would suggest subcribing to our blog and search the blog for under the category “divi resources”. That should pull up most of the Divi tutorials like this one. And you can always find what you need in the documentation area which will suggest posts in the search results as well.
https://www.elegantthemes.com/documentation/divi/
Love this look, thanks for sharing!
I only got to the adding an image part though – I don’t see the ‘vertical overflow’ and ‘z index’ options you have. I just updated both Divi and WP too but still no joy :-/ Any ideas?
sorry for the late response. Glad you liked the design. If you are still having issues, I would suggest bringing it to our support team. Thanks
Thanks for all the lovely work you share. I have never worked with a more generous vendor than the Divi Team at Elegant themes. You guys take a ton of heat, but I for one am grateful. You are the best!
That’s really great to hear, Donna. Thanks for the comment and support!
Really cool effect and great tutorial! I’ll definitely be trying this out on my own website!
Great tutorial and neat effect.
What do you guys use to take your screenshots? A web service? program? or just a regular keyboard screengrab?
Thanks, Ben.
I use Snagit for screenshots. But some of our other team members use Nimbus.
Thanks, much better than what I have now.
That’s a great way to share your Designs!?
Thanks Jason….
You’re welcome, Samar. Glad you liked it!