
Organization is key when it comes to designing websites. It helps streamline your workflow, keep files in order, and speeds up the design process.
Now with Divi Cloud, building websites is even faster.
Divi Cloud is like Dropbox for your Divi websites. You can store Divi Builder Elements on the cloud and access them on any Divi website you’re building that’s authenticated with your member API key. That means you can save and load your favorite page layouts, sections, rows, and modules with just a few clicks! And the best thing? It’s available right now with your Divi membership. Learn all about Divi Cloud here.
In this post, we’ll go over how to add and delete Divi Cloud categories and tags and more! Cloud categories and tags act similar to native WordPress categories and tags but do not impact SEO as WP categories and tags do.
Let’s get started!
Cloud categories and tags work exactly the same as WordPress local categories and tags. Assigning categories and tags to your Cloud items helps keep things organized and easily searchable.
How to Organize Divi Cloud Items By Category
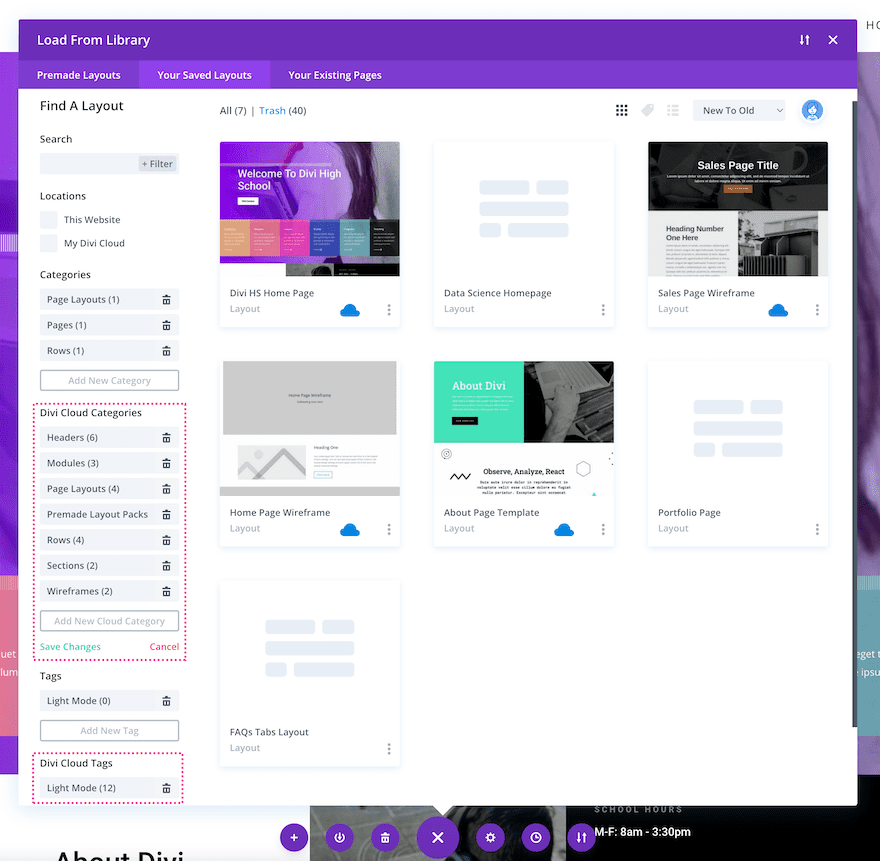
How To Add Cloud Categories
Navigate to any page and load the Visual Builder. Then, proceed by doing the following:
- Load the Divi Library by clicking the purple “+” icon on the Divi toolbar at the bottom of the page. This will bring up the Divi layouts library.
- To manage and view your Cloud Categories click “Manage Categories” on the left sidebar. This displays your (local) Categories and Divi Cloud Categories.
- To add a new Cloud category click “Add New Cloud Category”. This will add a blank input field where you can type in the name of the new category.
- Click “Save Changes” to save your work.
How To Delete Cloud Categories
If you’d like to delete a Cloud category, then click the trash icon next to the category you’d like to delete.
Want to use tags to organize your cloud items? You can do that as well. Here’s how:
- Navigate to any page and load the Visual Builder
- Load the Divi Library by clicking the purple “+” icon on the Divi toolbar at the bottom of the page. This will bring up the Divi layouts library.
- To manage and view your Cloud Tags click “Manage Tags” on the left sidebar. This displays your (local) Tags and Divi Cloud Tags.
- To add a new Tags category click “Add New A new Cloud”. This will add a blank input field where you can type in the name of the new tag. Click “Save Changes” to save your work.
If you’d like to delete a Cloud tag, then click the trash icon next to the tag you’d like to delete.
When you’re saving an item to the cloud, that is a great time to add categories and tags.
First, we’ll take a look at how you can save entire layouts to your Divi Cloud using categories and tags.
- Navigate to the page you want to save and enable the Visual Builder.
- Click the purple downward arrow icon on the Divi toolbar at the bottom of the page to save the page layout to your library.
- This brings up the Add To Library window with the following options:
- Layout Name – Name the page layout.
- Save To Divi Cloud – Toggle this option to “on” to save this page layout to the Divi Cloud.
- Add To Categories – Click the checkbox next to the category you want to be assigned to this layout, or create a new category by typing in the input field.
- Add To Tags – Click in the tags input field to apply existing tags, or create a new tag by typing in the second input field.
The approach is similar when it comes to sections, rows and, modules.
- Navigate to the section, row, or module you want to save and enable the Visual Builder.
- Click the purple downward arrow icon on the section, row, or module. This brings up the Add To Library window with the following options:
- Layout Name – Type the name of the section, row, or module you’re saving here.
- Save To Divi Cloud – Toggle this option to “on” to save this page layout to the Divi Cloud.
- Save As Global – Toggle this option to “on” if you’d like to save the item as a global item. Note: If you click Save To Divi Cloud, then you won’t be able to save this item as a global item. Same thing vice versa – if you save this item as a global item, you won’t be able to save it to the cloud.
- Add To Categories – Click the checkbox next to the category you want to be assigned to the item, or create a new category by typing in the input field.
- Add To Tags – Click in the tags input field to apply existing tags, or create a new tag by typing in the second input field.
Now, at some point, you might want to change the categories and tags that you’ve assigned to a specific cloud item. To do that, you can follow these steps:
- To change the tags and categories assigned to a Divi Cloud item, navigate to that item and click the 3 ellipses to bring up options. Then click “Edit Tags and Categories”.
- This brings up the categories and tags window where you can check or uncheck the categories you want to be assigned to this cloud item.
- If you have tags assigned to this item you’ll see them listed in the “Add To Tags” section. To add a new tag, type the name of the tag in the input field.
- Click the green checkmark to save your changes.
Final Thoughts
Whether starting from scratch or reworking your category and tag taxonomies, it’s essential to have a plan in place. This not only helps with staying organized, but it can save you time and frustration when searching for files! Speed up your web design process with Divi and Divi Cloud today. Still need a membership? Get one today!


Leave A Reply