
Divi’s footer is a great place to add a contact form. Fortunately, this is easy to do with the Divi Theme Builder. Of course, we don’t want to just add it anywhere as there are a few things to keep in mind for usability. In this post, we’ll see how to include a contact form in your Divi footer though you could use any contact form plugin that you prefer (though you’re on your own for designing it). We’ll go through a couple of examples to help you get started.
Let’s get started!
Preview


The footer is a location where visitors will look for specific information. This includes ways to contact you. Adding a contact form to the footer not only makes that contact information visual but also simplifies the process.
Where to Add the Contact Form
When choosing a location for the contact form, look at the other footer elements to see what would clash for attention.
It’s best to place the contact form near other contact information, but you don’t want it fighting the email form. Placing two forms next to each other can confuse your visitors. Place the contact form in a different Row or Section from the email form. Add enough whitespace around the contact form so that it stands apart from the rest of the content.
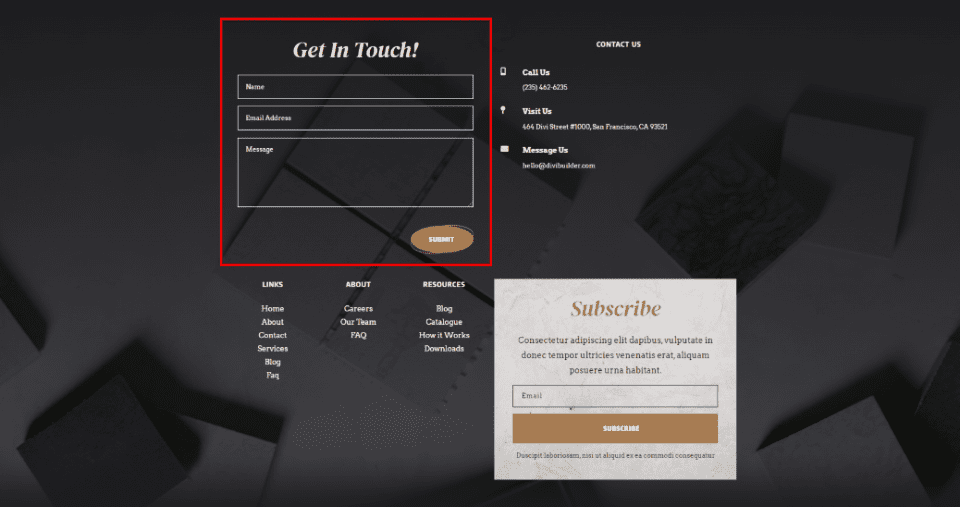
The example below is from the free Header and Footer Template for Divi’s Stone Factory Layout Pack. This is a great example of how to use a contact form in the footer. This layout includes a contact form and an email form. The contact form is placed with the contact information in a different Row from the links and email form. It’s also a different color than the email form and it’s labeled well, so visitors will know at a glance which form is which.
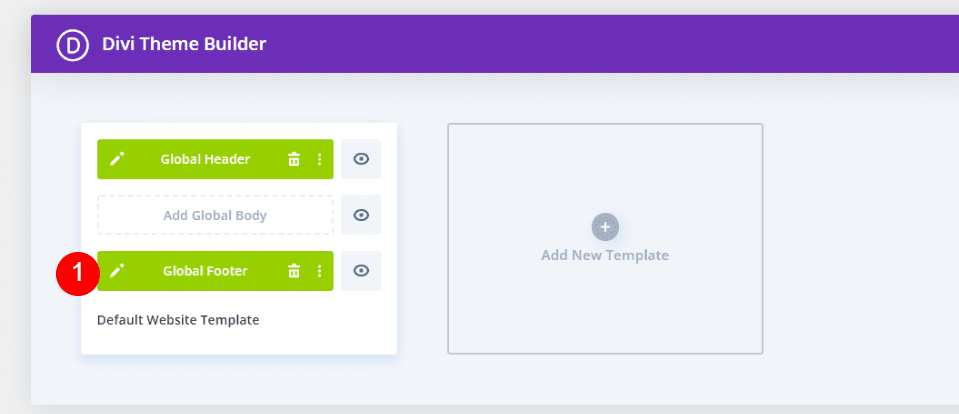
The best way to add a contact form to your Divi footer is by building the footer in the Divi Theme Builder. A contact form can also be added to any existing footer. The process of adding the form is the same.
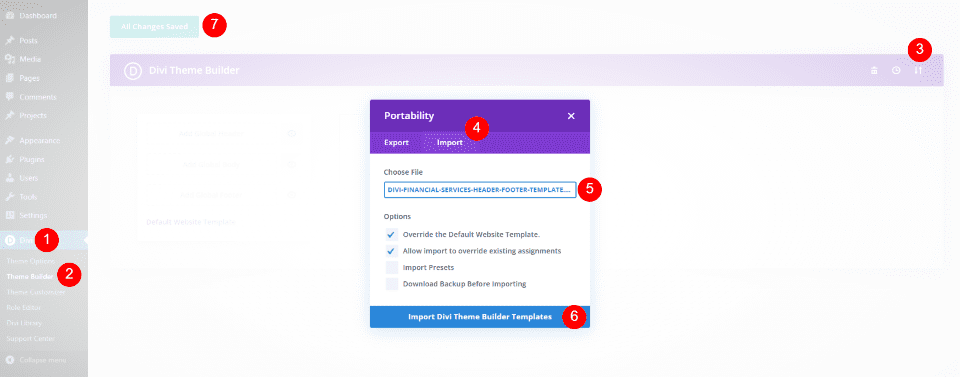
In the WordPress dashboard, go to Divi > Theme Builder. Select Add Global Footer if you don’t have a global footer, select Add New Template, or choose the footer template you want to add the contact form to. We’ll import a new footer. For this example, we’ll add a contact form to the Header & Footer for Divi’s Financial Services Layout Pack.
Select the Portability icon in the upper right corner of the Theme Builder. Navigate to your header and footer template on your computer, select it, and click Import Divi Theme Builder Templates. Save your changes.
Next, select the Edit icon for the footer template. This will open the footer template in the builder where we’ll make our changes.
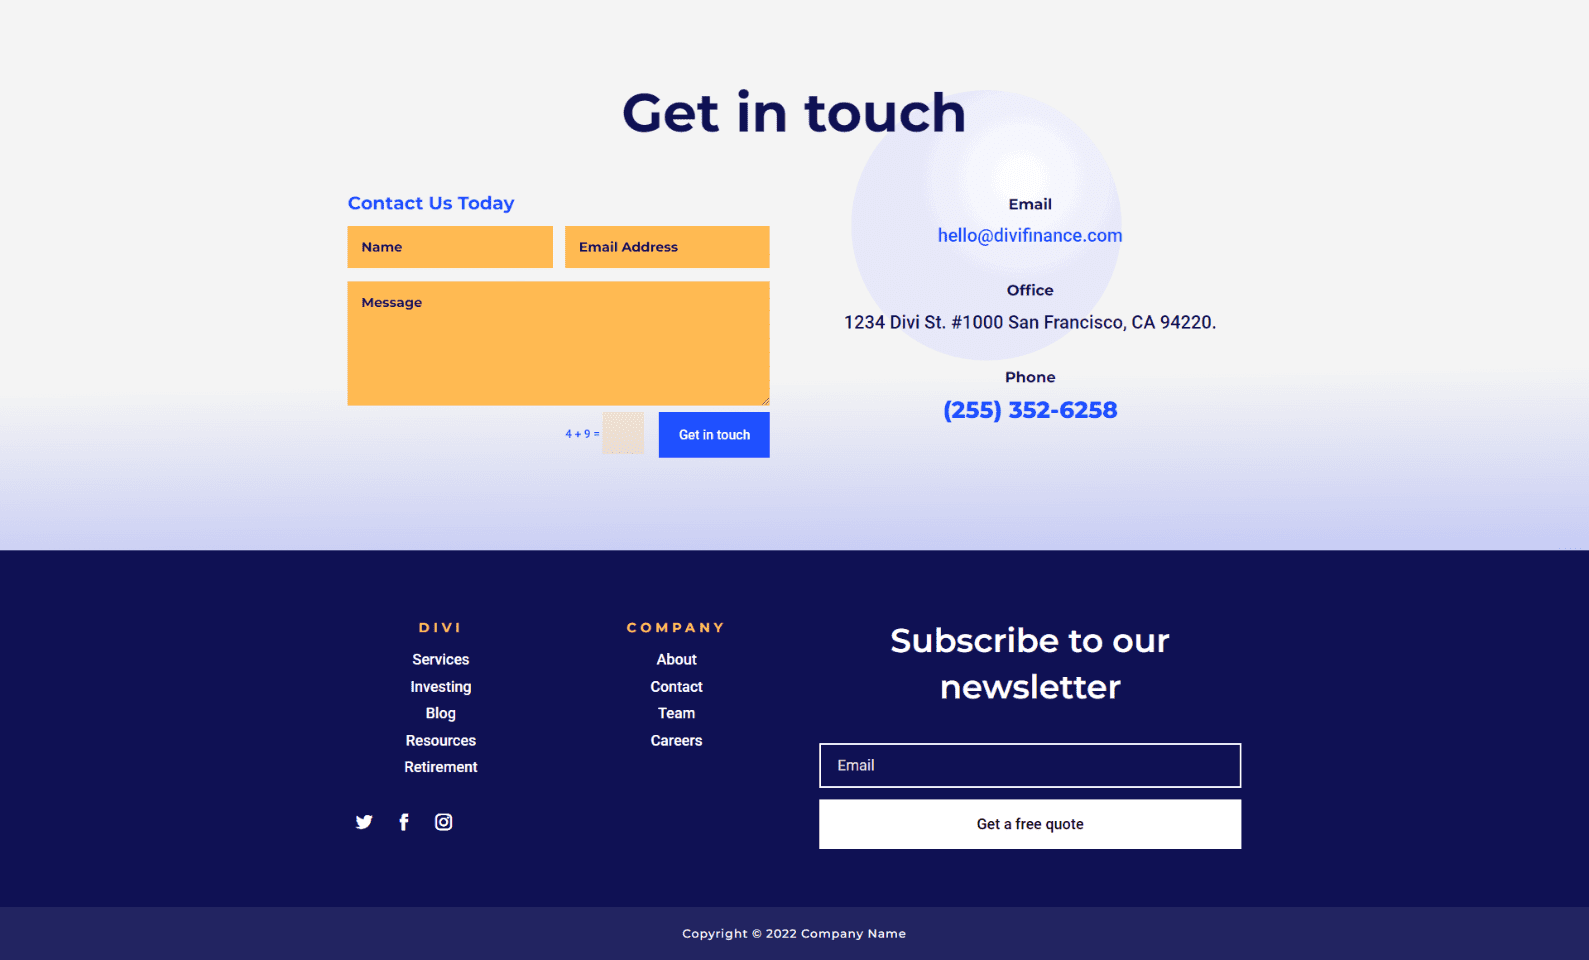
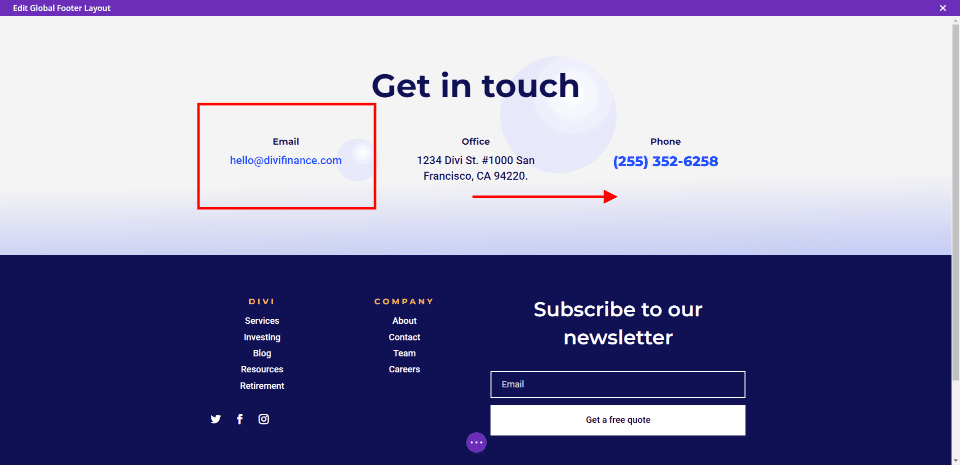
Next, we’ll add the contact form to the footer layout. First, we’ll need to make some adjustments to the layout’s design. We see the layout has two Sections. The top Section has a title to identify that it’s the contact information. This Section includes three types of contact information lined up horizontally.
We’ll stack the contact information on the right, above the email subscription form. Then, we’ll place a Divi Contact Form Module on the left. This increases the size of this Section and balances the footer with a form on each side.
Move the Contact Information
First, drag and drop the Text Modules to the right column. Stack them to show Email on top, Office in the middle, and Phone on the bottom.

Adjust the Row
Next, adjust the Row to show two columns instead of three.
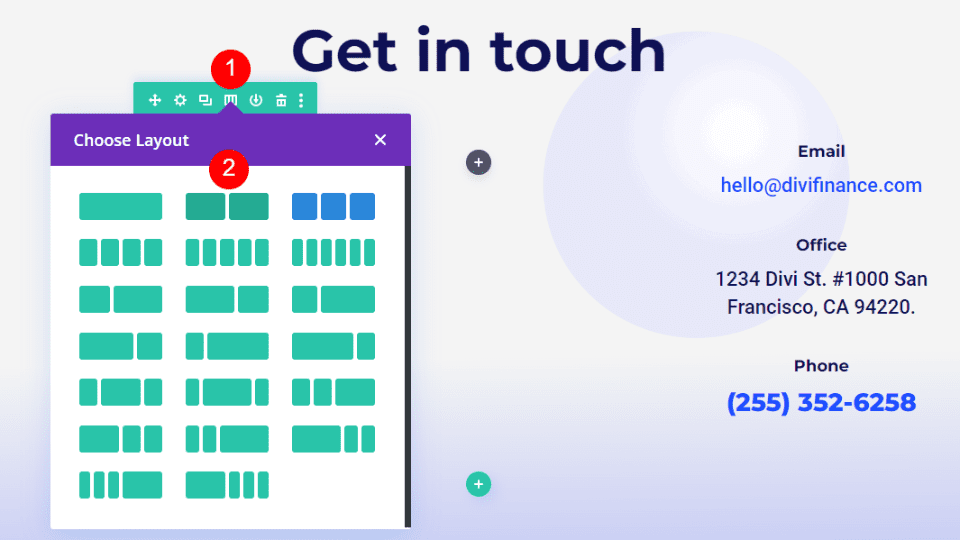
Add the Contact Form
Finally, add a Contact Form Module to the left Column.

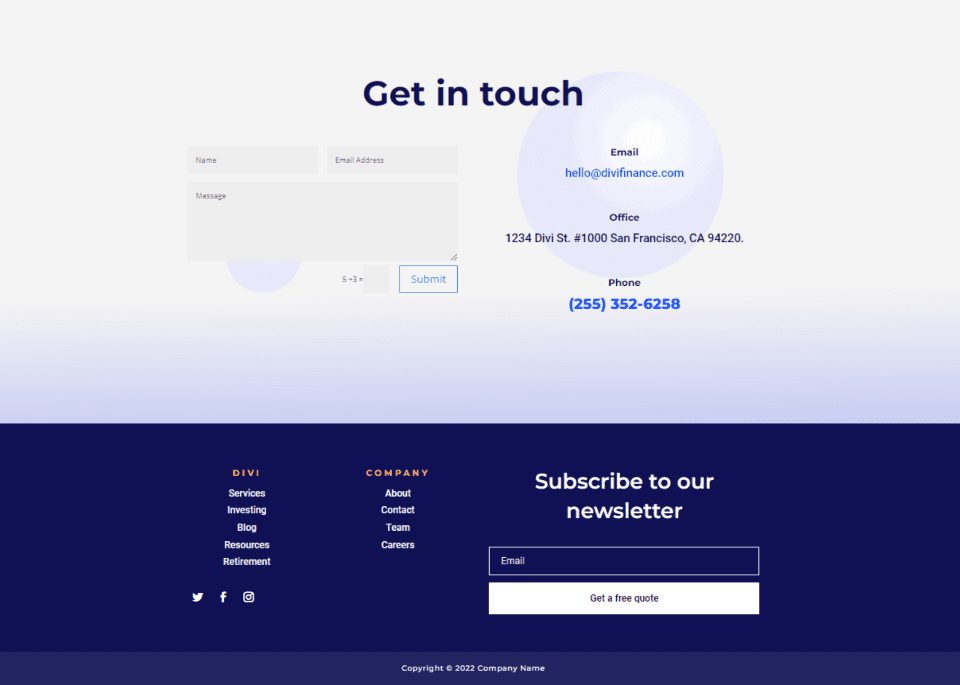
We now have a contact form added to our Divi layout. The contact form balances well with the email form on the other side of the layout. Of course, it works but it won’t fit well with the layout’s design until we style it.
Now, let’s see how to style the Divi Contact Form Module to match the layout. We’ll look at two examples, including the one we’ve already started. We’ll use design cues from the layout itself.
For this one, we’ll style the form we added in the previous section.
Text
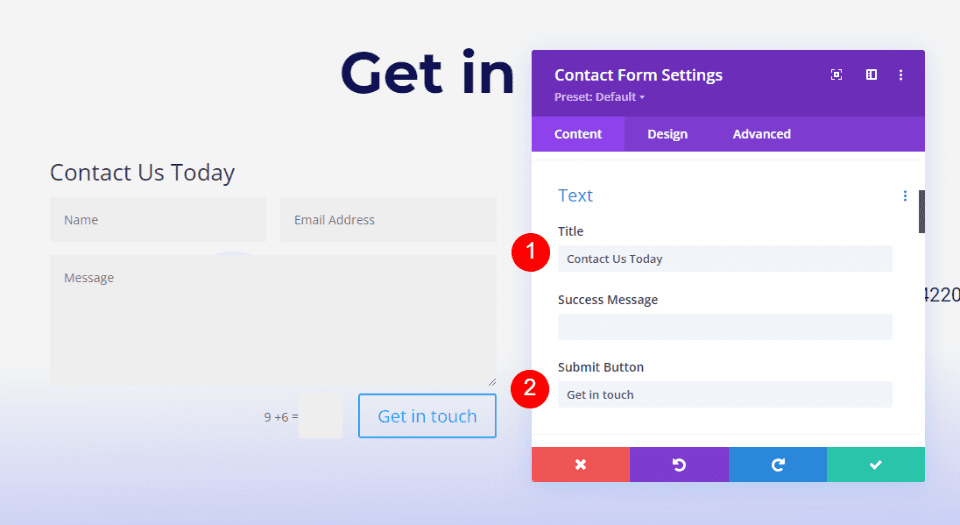
Open the Contact Form Module’s settings. Enter the text for the Title and Submit Button.
- Title: Contact Us Today
- Submit Button: Get in touch
Fields
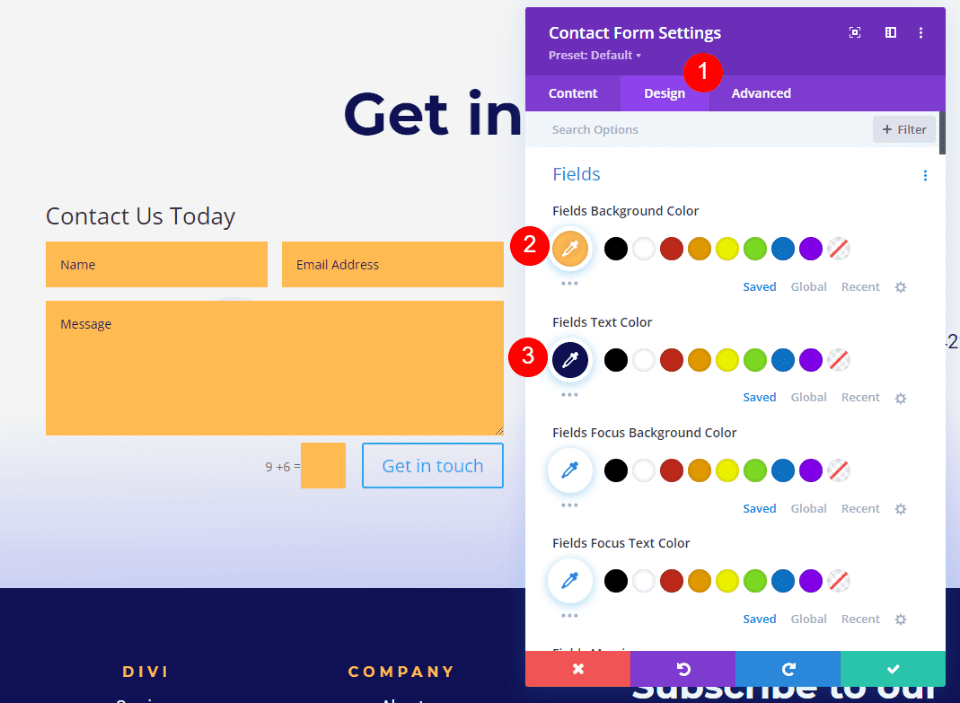
Next, go to the Design tab. Change the Fields Background Color to #ffba52 and change the Fields Text Color to #0f1154. Leave the focus colors at their default settings. This allows them to use the same colors as the regular fields.
- Background Color: #ffba52
- Text Color: #0f1154
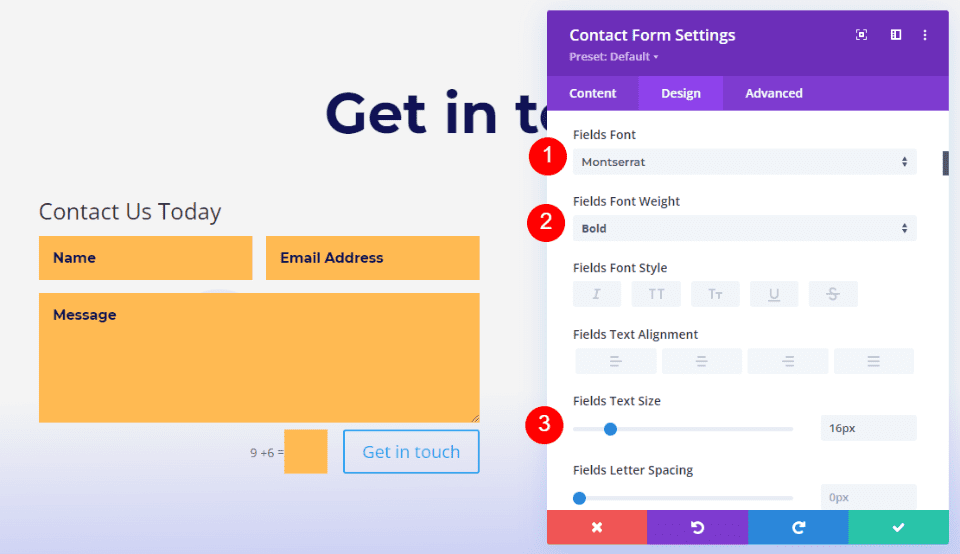
Next, change the Fields Font to Montserrat. Set the Weight to Bold and the Size to 16px.
- Font: Montserrat
- Weight: Bold
- Size: 16px
Title Text
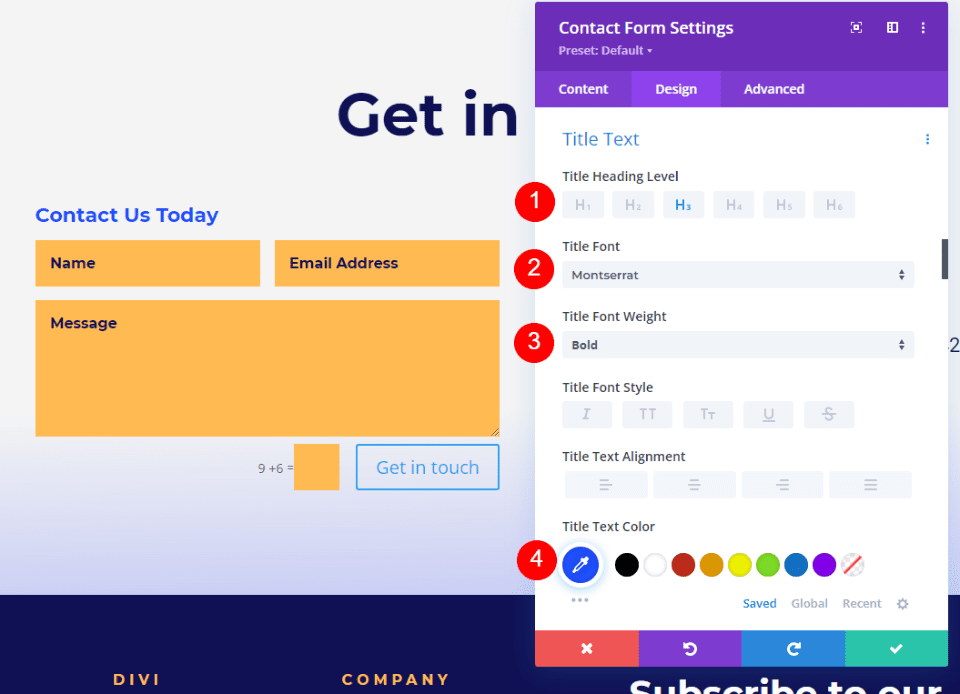
Next, scroll down to Title Text. Choose H3 for the Heading Level. The title of this section uses H2, so selecting H3 will build the proper page structure. Select Montserrat for the Font. Select Bold for the Weight and change the Color to #1d4eff.
- Heading Level: H3
- Font: Montserrat
- Weight: Bold
- Color: #1d4eff
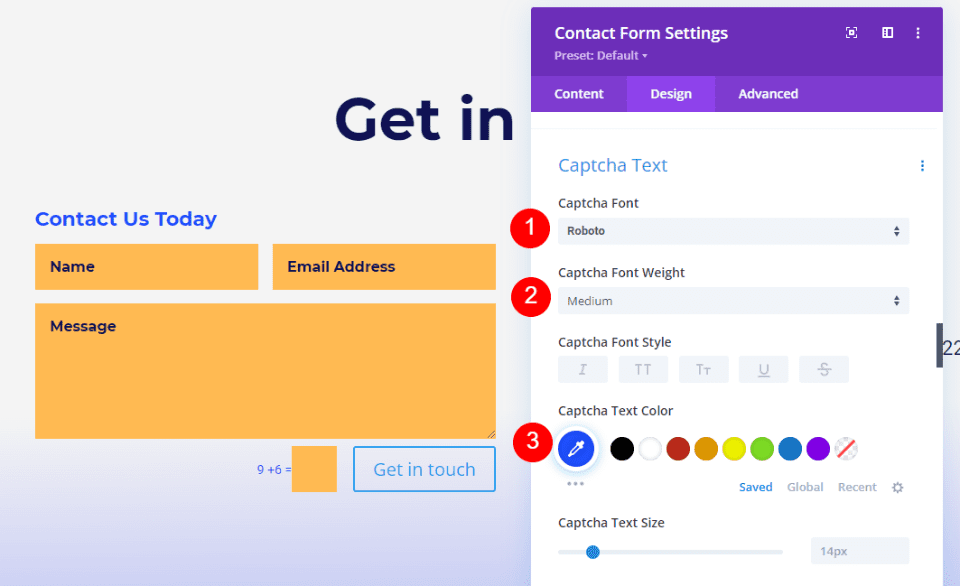
Captcha Text
Next, scroll down to Captcha Text. We’ll make changes to the Captcha Text in this setting, but we’ll also add some CSS to change the field color. Change the Font to Roboto, the Weight to Medium, and the Color to #1d4eff. We’ll add the CSS at the end.
- Font: Roboto
- Weight: Medium
- Color: #1d4eff
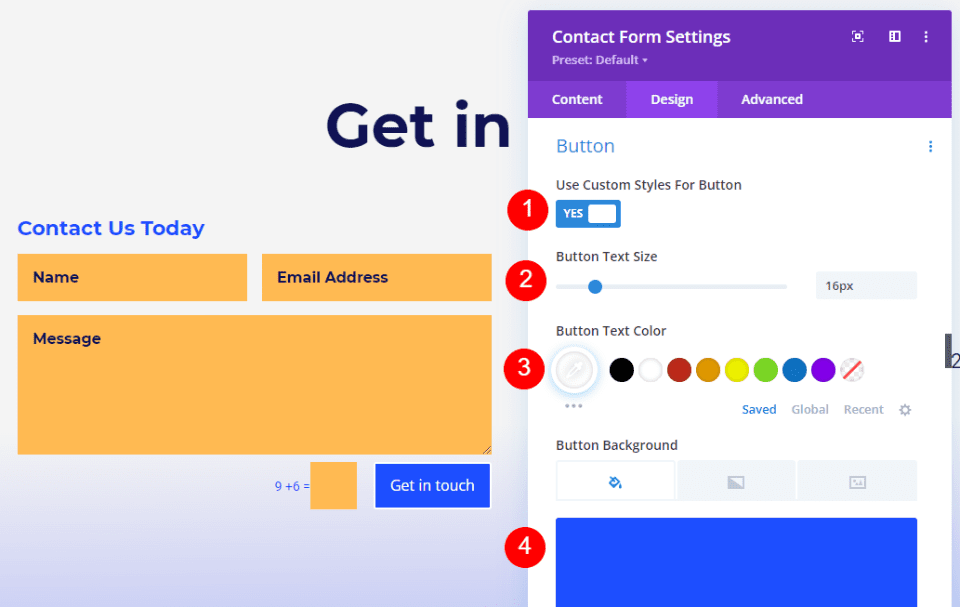
Button
Next, scroll down to Button and enable Use Custom Styles for Button. Change the Font Size to 16px, the Font Color to white, and the Background Color to #1d4eff.
- Use Custom Styles for Button: Yes
- Size: 16px
- Text Color: #ffffff
- Background Color: #1d4eff
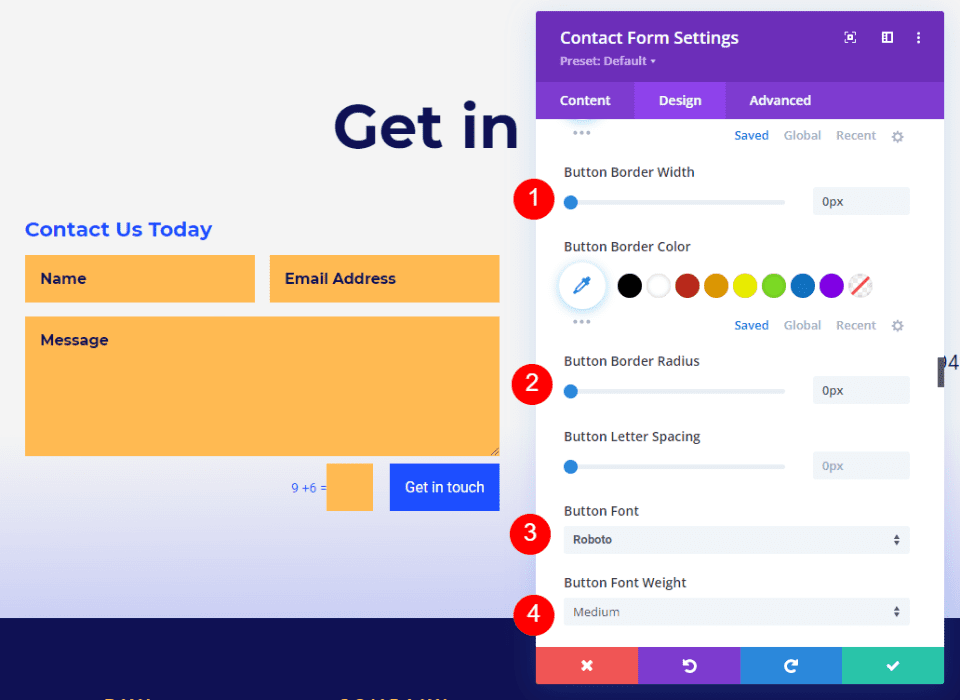
Set the Border Width and Border Radius to 0px for both. Change the Font to Roboto and the Weight to Medium.
- Border Radius: 0px
- Border Width: 0px
- Font: Roboto
- Weight: Medium
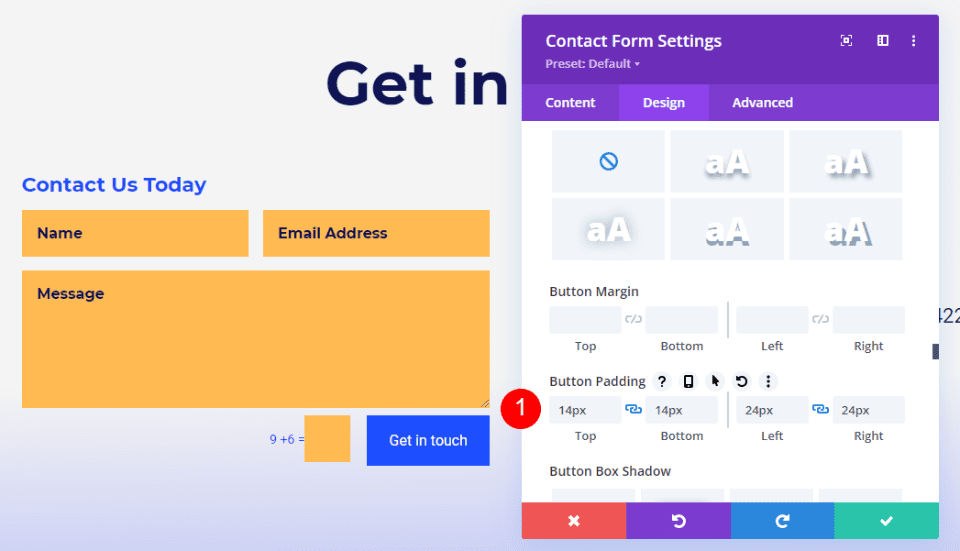
Next, scroll down to Button Padding. Enter 14px for the Top and Bottom Padding and 24px for the Left and Right Padding.
- Padding: 14px Top and Bottom, 24px Left and Right
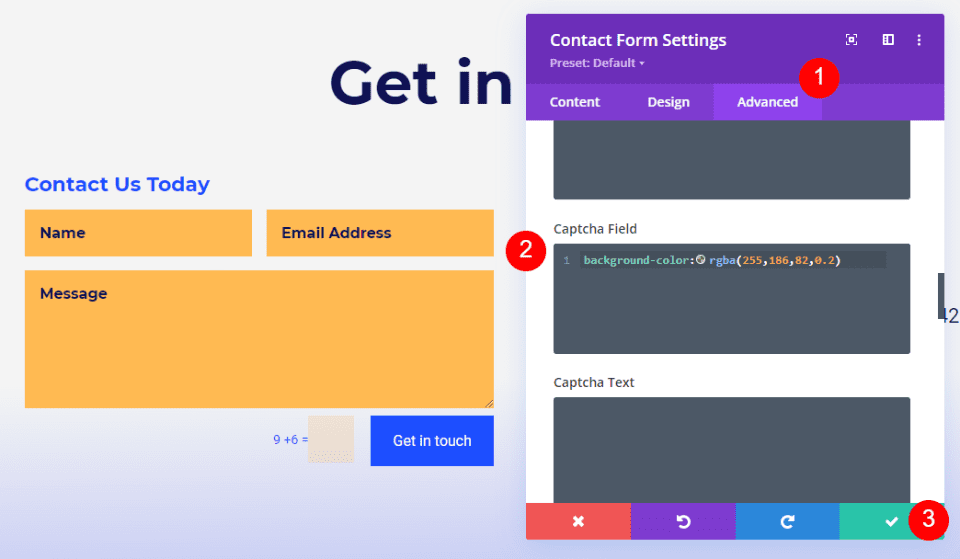
Captcha Background
Finally, go to the Advanced tab and scroll down to the Captcha Field. Enter the CSS below into the field. This gives the background a different color from the rest of the form, so users will know it’s different. Now, close the module and save your settings.
- Captcha Field CSS:
background-color:rgba(255,186,82,0.2)
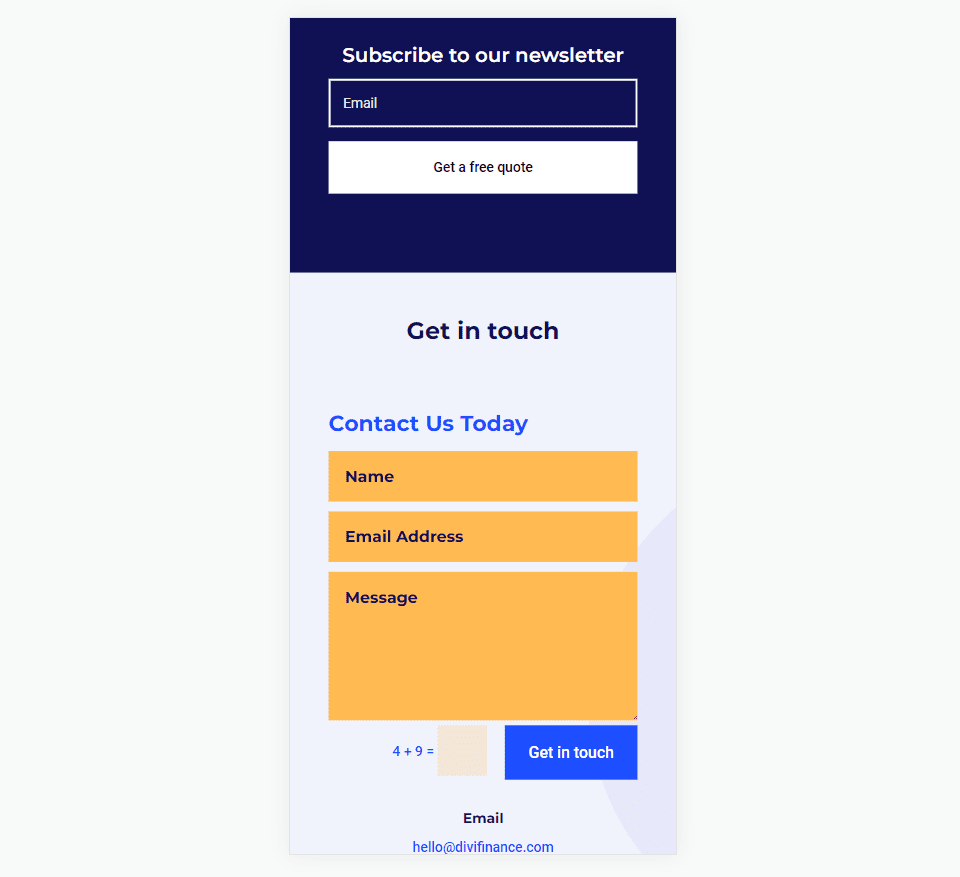
Let’s look at another example. For this one, I’m using the global footer from the free Header & Footer for Divi’s Podcaster Layout Pack. We’ll replace the contact email with a contact form.

Delete Email Text Module
First, delete the Contact Us and email Text Modules. We’ll replace the title with the one from the Contact Form Module.

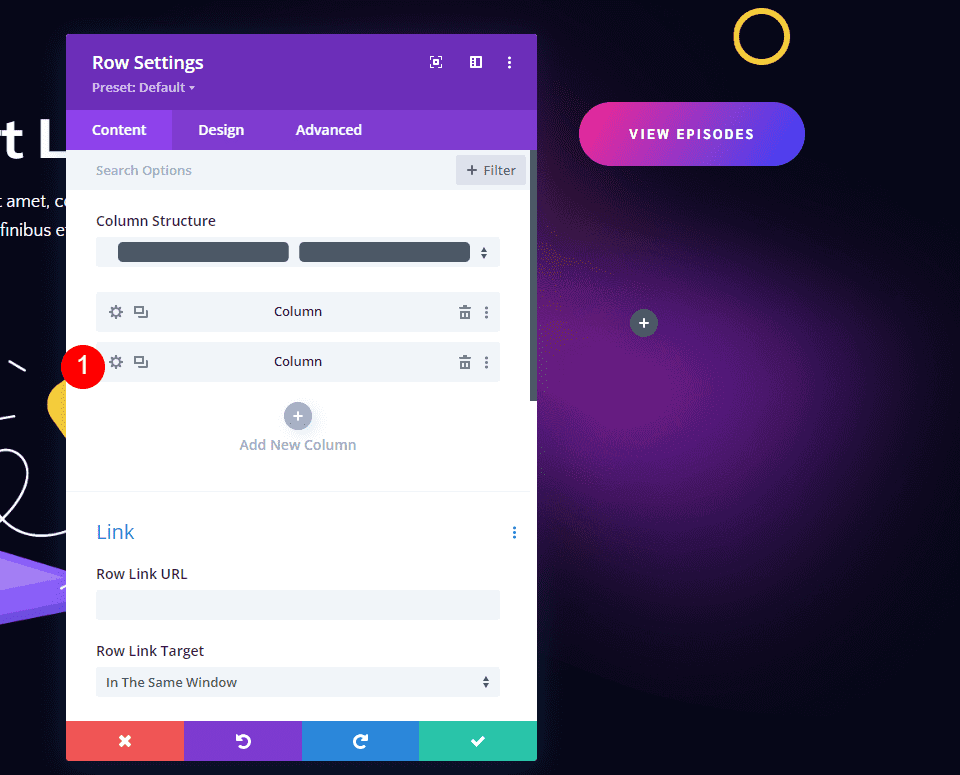
Change Row Column Width
Next, change the column layout to display two equal columns. This gives us more room for the contact form.

Adjust Column
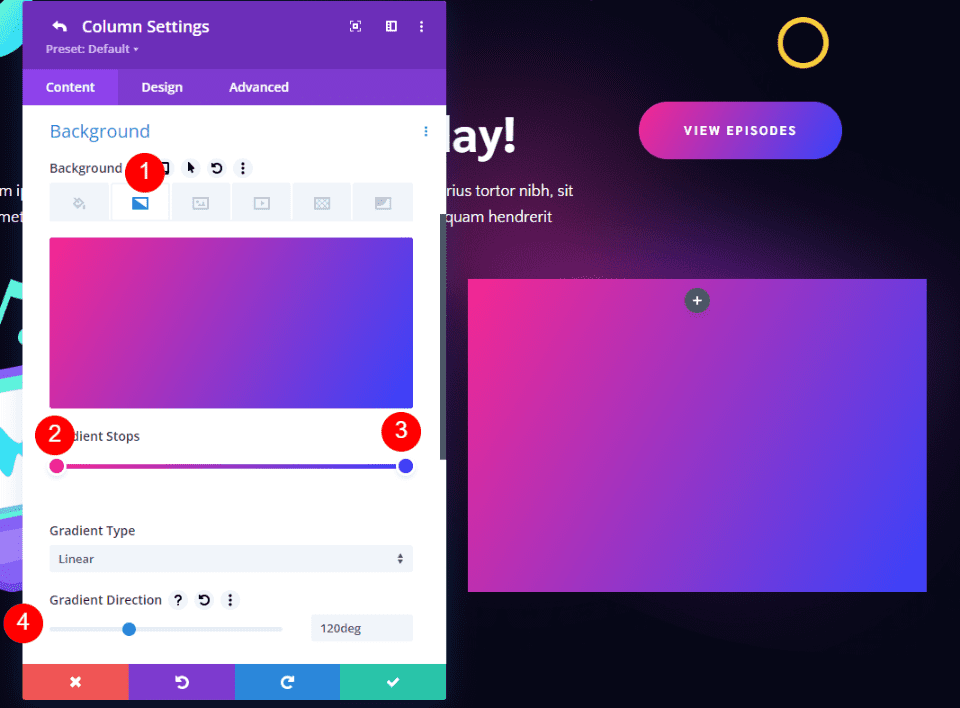
Next, we’ll change the Background of the column for the contact form. This gives us more control over the form’s design. Open the settings for the right column.
Scroll down to Background and select the Background Gradient tab. Set the first Gradient Stop’s Color to #f52791 and leave it at its position of 0%. Set the second Gradient Stop’s Color to #3742fb and leave its position at 100%. Change the Direction to 120deg.
- First Gradient Stop: #f52791, 0%
- Second Gradient Stop: #3742fb, 100%
- Direction: 120deg
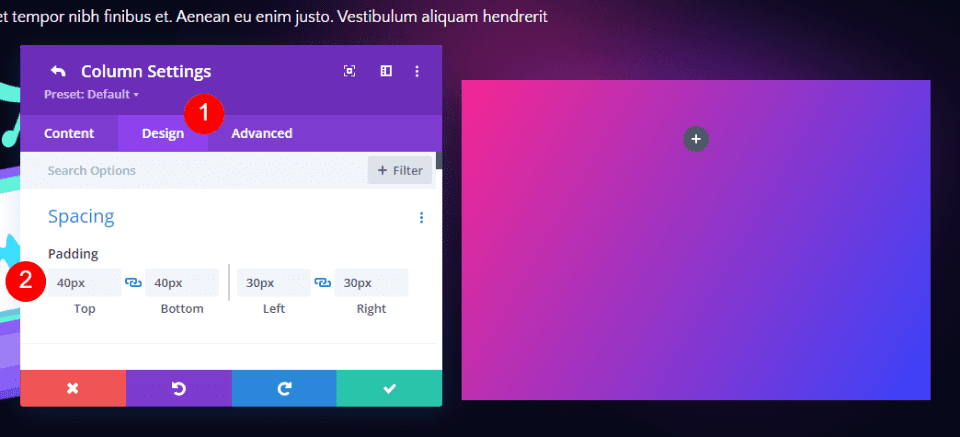
Next, go to the Design tab. Change the Top and Bottom Padding to 40px and the Left and Right Padding to 30px.
- Padding: 40px Top and Bottom, 30px Left and Right.
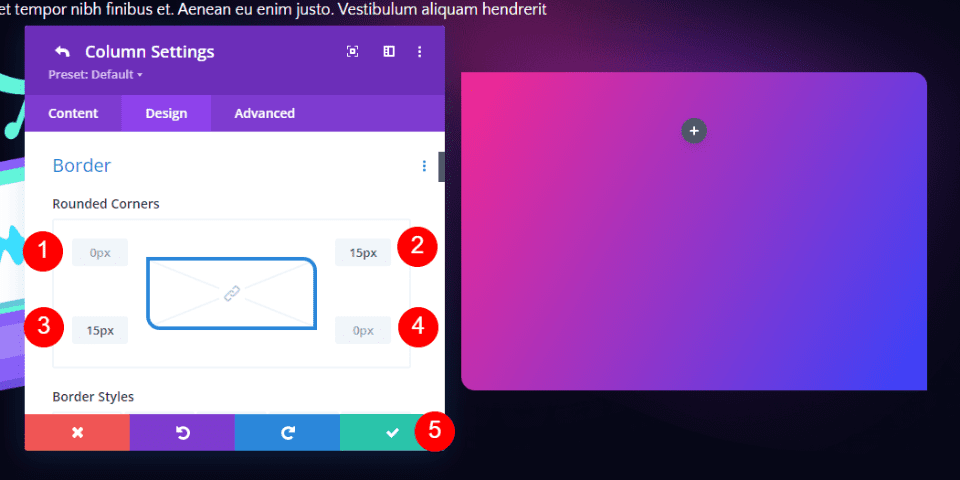
Next, scroll down to Border and adjust the Rounded Corners. Set the Top Left to 0px, the top Right to 15px, the bottom Left to 15px, and the bottom right to 0px. Close the Column and Row settings.
Rounded Corners:
- Top Left: 0px
- Top Right: 15px
- Bottom Left: 15px
- Bottom Right: 0px
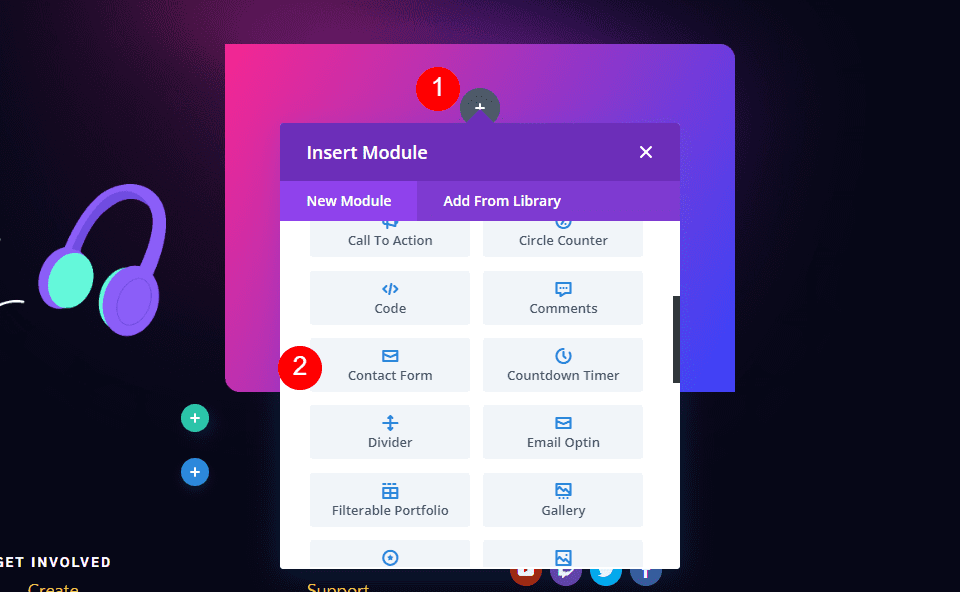
Add a Contact Form Module
Next, add a Contact Form Module in place of the Text Modules.
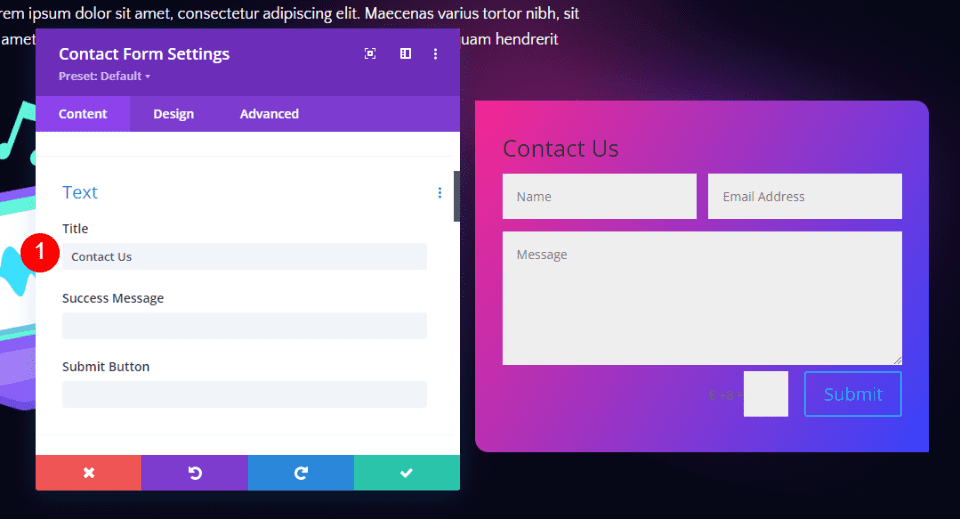
Contact form Content
Add the Title content.
- Title: Contact Us
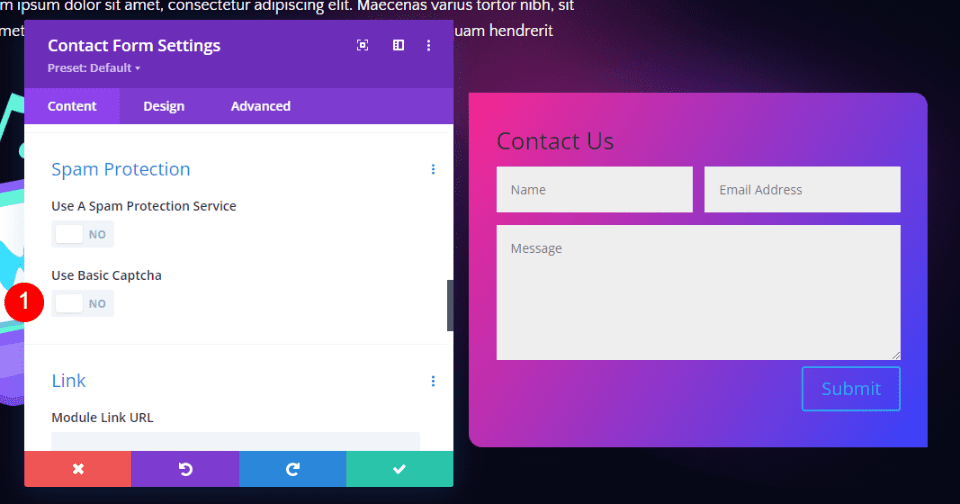
Spam Protection
Scroll down to Spam Protection and disable it.
- Use Basic Captcha: No
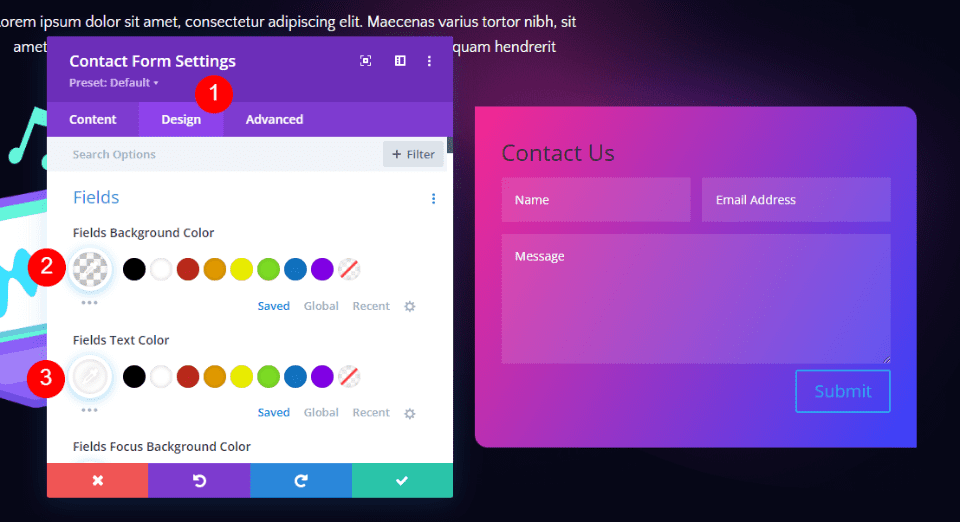
Fields
Go to the Design tab. Change the Fields Background Color to rgba(255,255,255,0.12) and change the Text Color to white.
- Fields Background Color: rgba(255,255,255,0.12)
- Fields Text Color: #ffffff
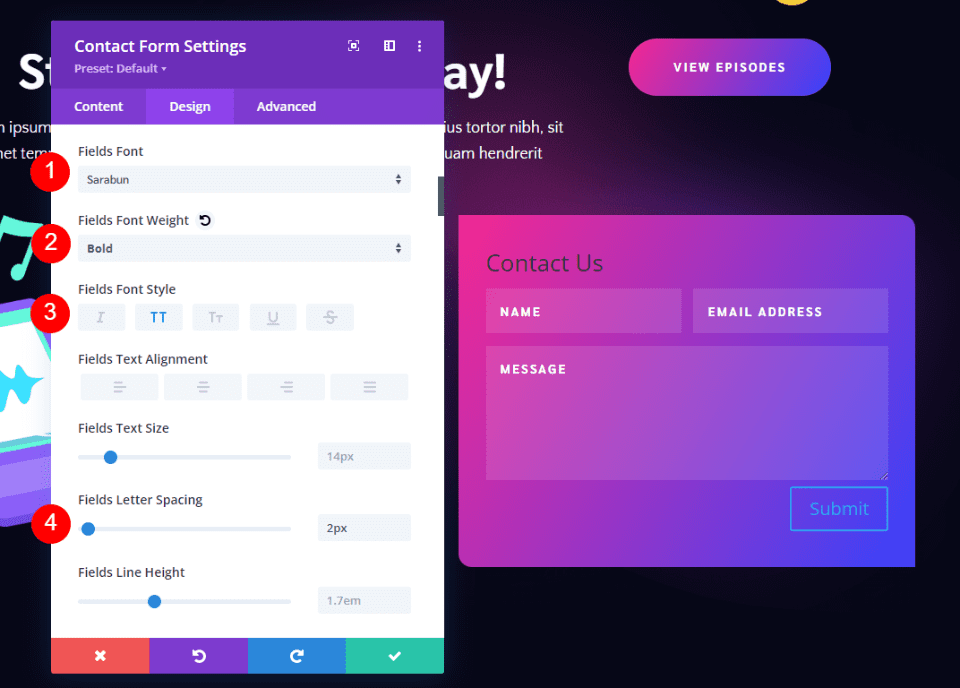
Change the Fields Font to Sarabun. Set the Weight to Bold, the Style to TT, and the Letter Spacing to 2px.
- Fields Font: Sarabun
- Weight: Bold
- Style: TT
- Letter Spacing: 2px
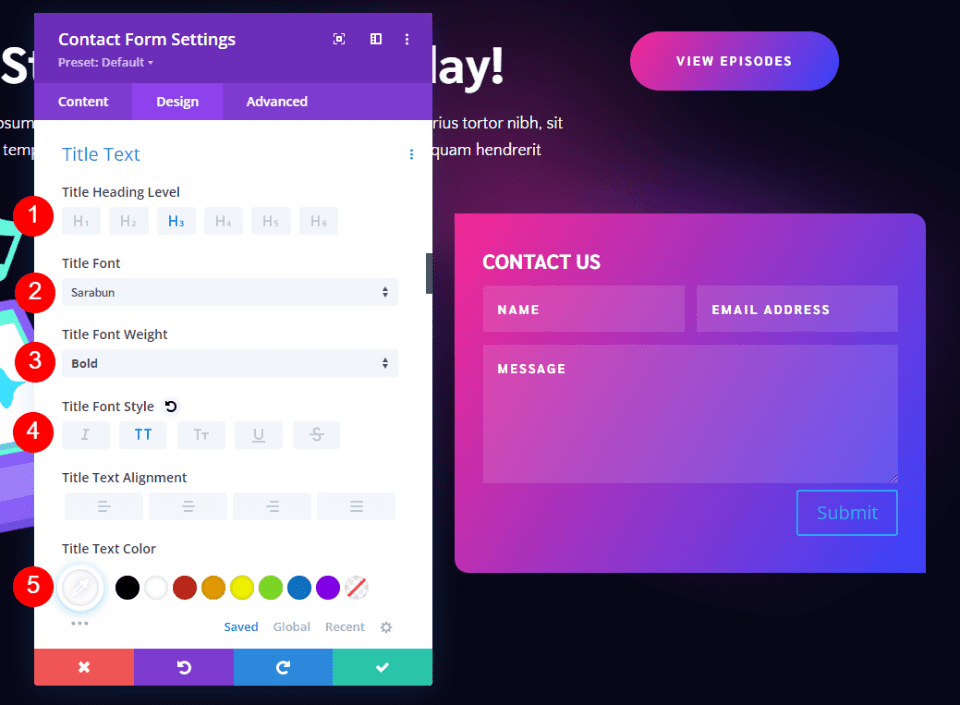
Title Text
Next, scroll down to Title Text. Change the Title Font to Sarabun, the Weight to Bold, the Style to TT, and the Color to white.
- Heading Level: H3
- Fields Font: Sarabun
- Weight: Bold
- Style: TT
- Color: #ffffff
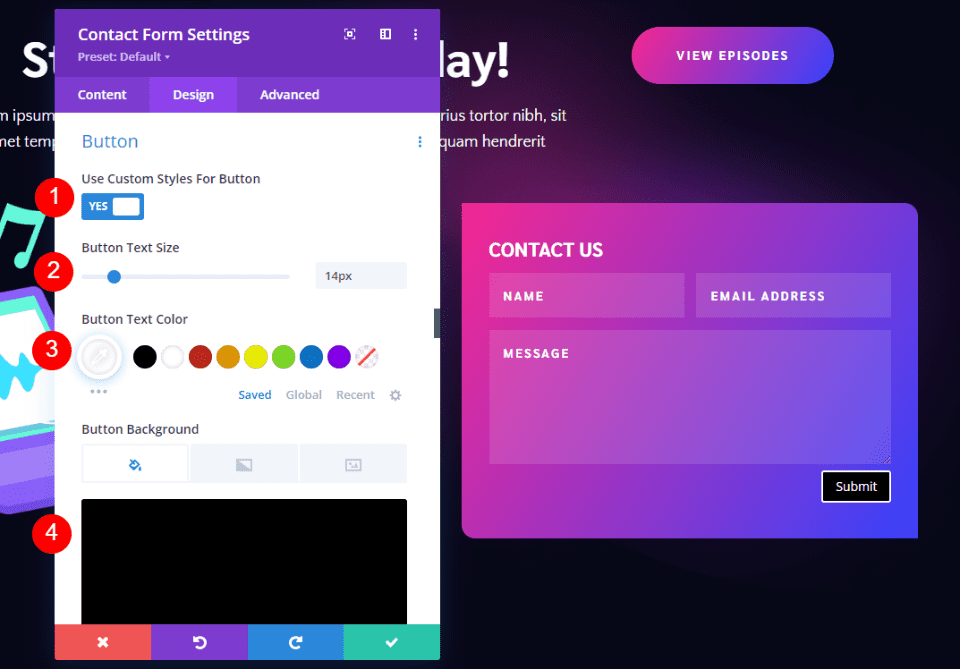
Button
Next, scroll down to Button and enable Use Custom Styles for Button. Change the Font Size to 14px, the Font Color to white, and the Background Color to black.
- Use Custom Styles for Button: Yes
- Size: 14px
- Text Color: #ffffff
- Background Color: #000000
Change the Border Width to 0px and Border Radius to 50px. Set the Letter Spacing to 2px, the Font to Sarabun, the Weight to Bold, and the Style to TT.
- Border Width: 0px
- Border Radius: 50px
- Letter Spacing: 2px
- Font: Sarabun
- Weight: Bold
- Style: TT
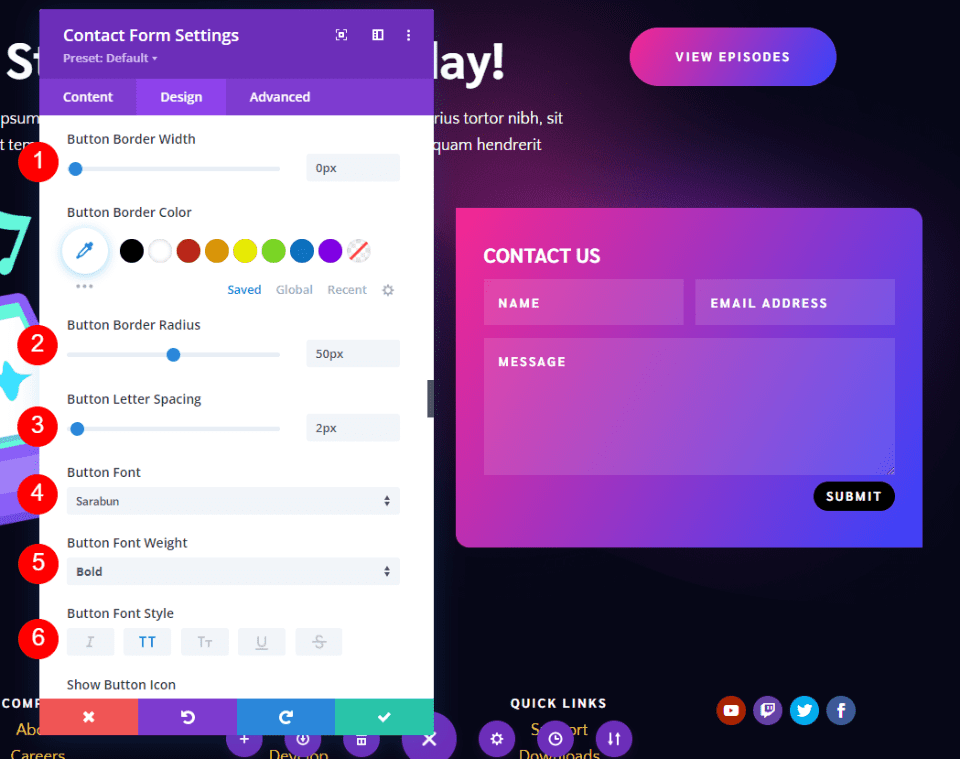
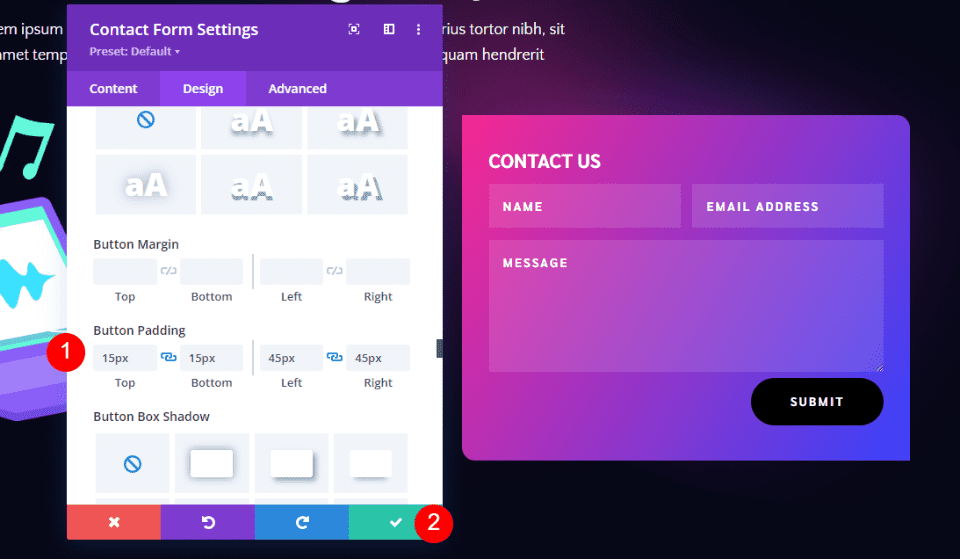
Next, scroll down to Button Padding. Enter 15px for the Top and Bottom Padding and 45px for the Left and Right Padding. Close the module and save your settings.
- Padding: 15px Top and Bottom, 45px Left and Right
Results
Ending Thoughts
That’s our look at how to include a contact form in your Divi footer. The Divi Contact Form Module is simple to add to any Divi footer layout and it’s easy to style to match any Divi layout. Following a few design principles will ensure you get the most out of the footer’s space.
We want to hear from you. Do you include a contact form in your Divi footer? Let us know in the comments.


Leave A Reply