
If you are looking to design a creative background for your website, Divi has some powerful built-in design options for you to explore. We’ve already shown you how to combine Divi’s background gradients, masks, and patterns using the background options for a single section. But, today, we are pushing the limits of background design. In this tutorial, we are going to show you how to design backgrounds with two layers of gradients, masks, and patterns in Divi. This doubles the number of background options for a single background design. And with all those optional design layers, the possible design combinations increase exponentially.
In this post we’ll show you how to design a background with:
– two masks (one on each side)
– two overlaying advanced gradients
– two patterns that blend with the design
Plus, we’ll demonstrate how easy and fun it can be to change the design combinations with a few simple clicks.
Let’s have some fun!
Subscribe To Our Youtube Channel
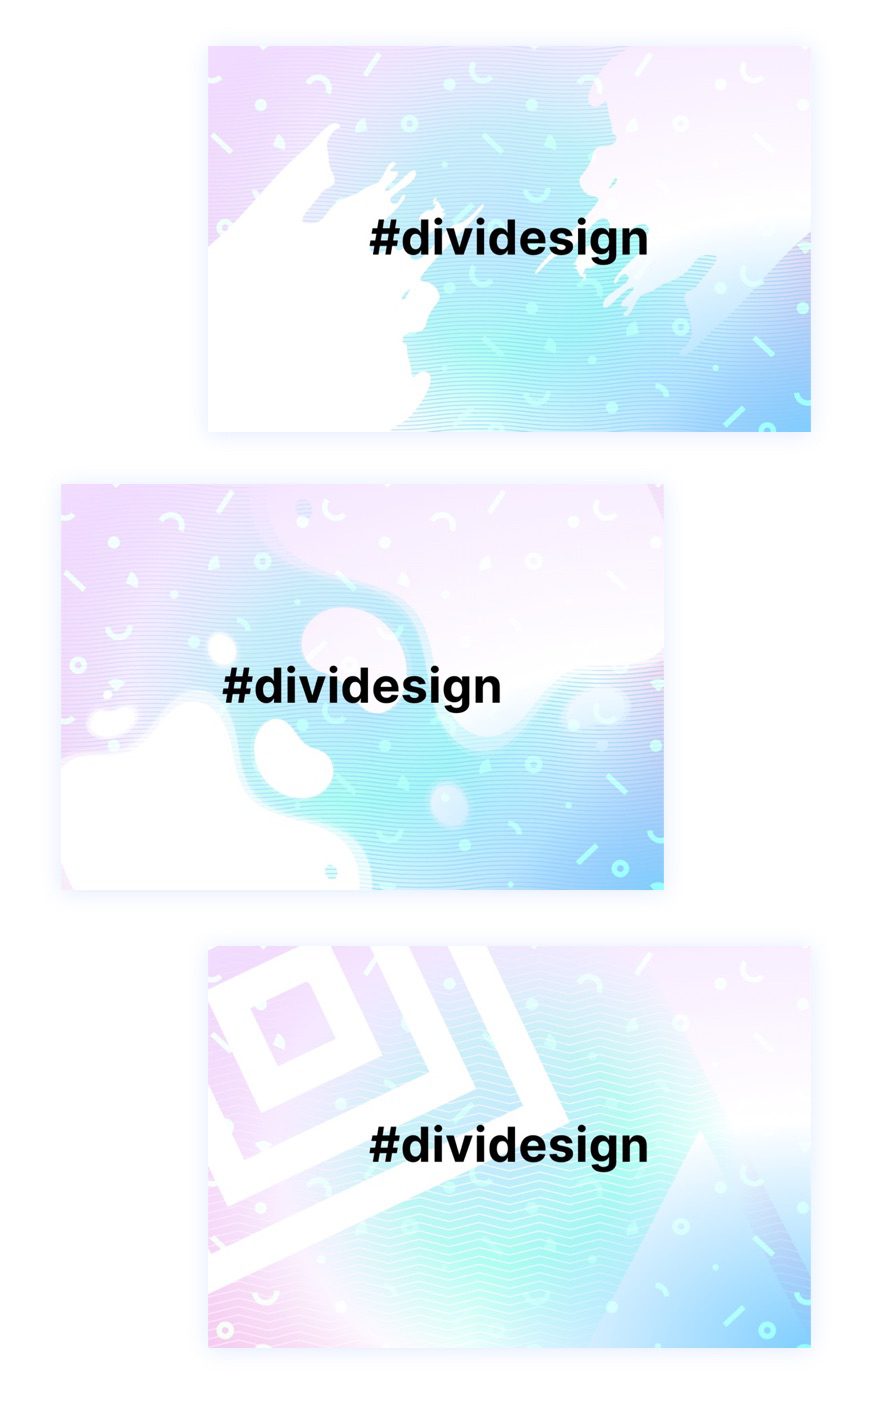
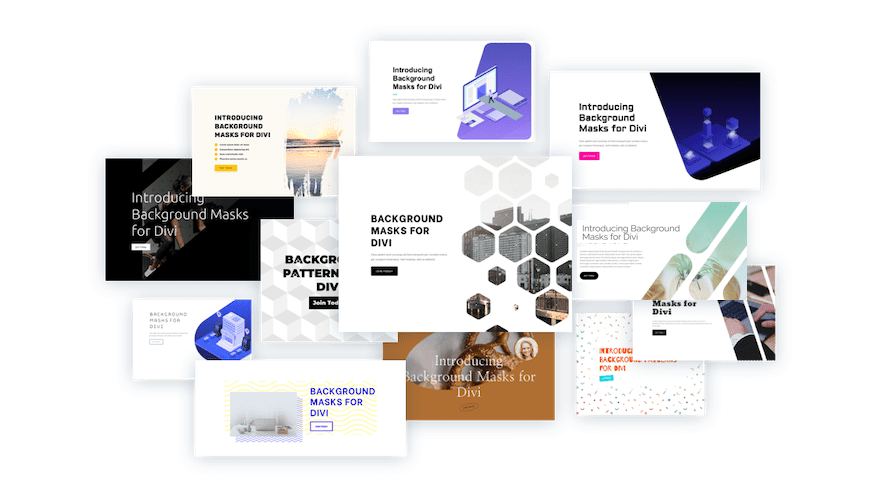
Sneak Peek
Here are a few example designs we can build using this tutorial.
The Concept
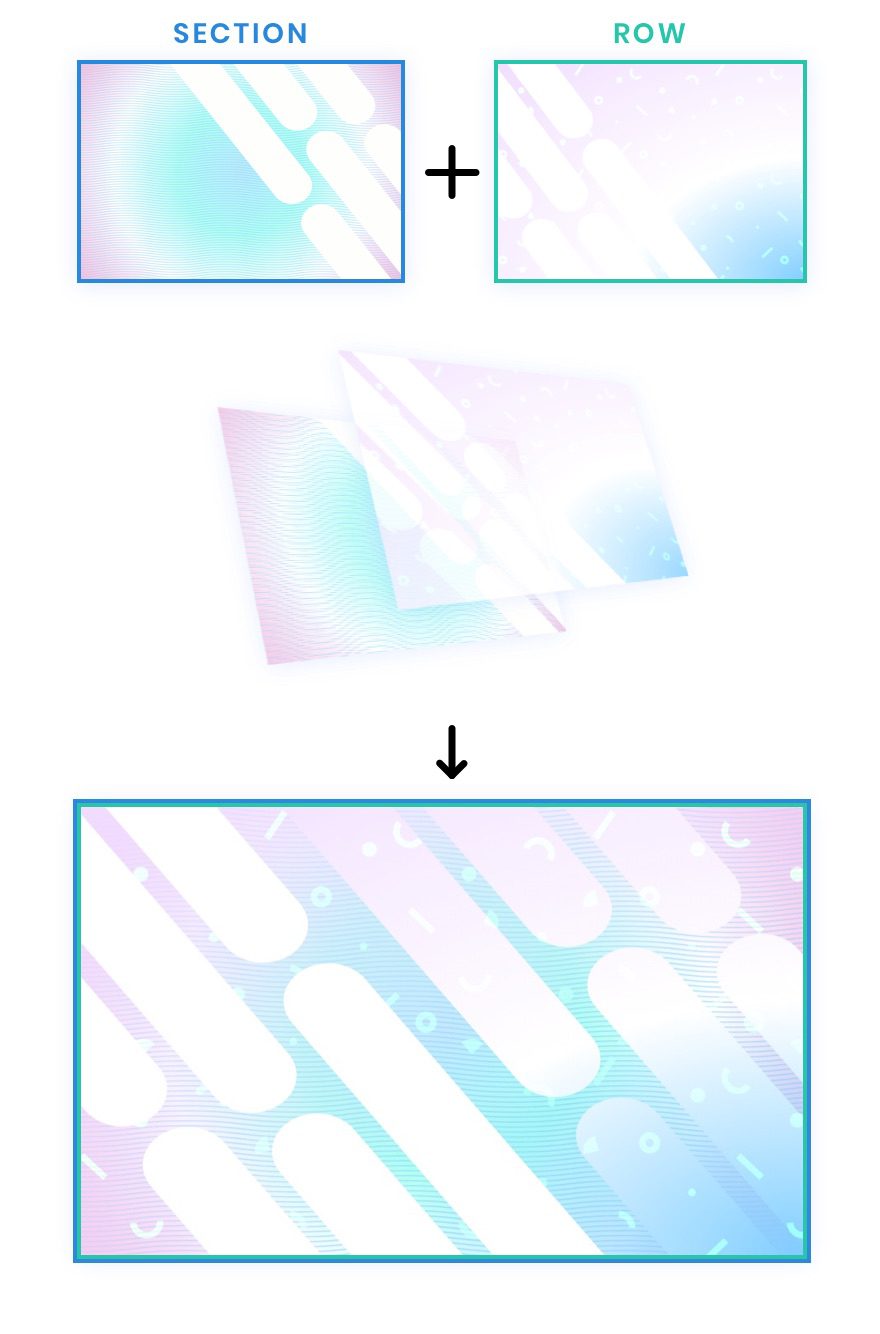
The concept for this design is pretty simple. We start with a section that has Divi’s built-in background design options (gradient, masks, patterns, etc.). Then we create a row that is positioned so that it completely covers the section (like an overlay). Since a Divi row also has the same built-in background design options, we now have two layers (the section and the row) of background options to design a background for our content.
Download the Layout for FREE
To lay your hands on the layout design from this tutorial, you will first need to download it using the button below. To gain access to the download you will need to subscribe to our newsletter by using the form below. As a new subscriber, you will receive even more Divi goodness and a free Divi Layout pack every Monday! If you’re already on the list, simply enter your email address below and click download. You will not be “resubscribed” or receive extra emails.

To import the section layout to your Divi Library, do the following:
- Navigate to the Divi Library.
- Click the Import button at the top of the page.
- In the portability popup, select the import tab
- Choose the download file from your computer (make sure to unzip the file first and use the JSON file).
- Then click the import button.

Once done, the section layout will be available in the Divi Builder.
Let’s get to the tutorial, shall we?
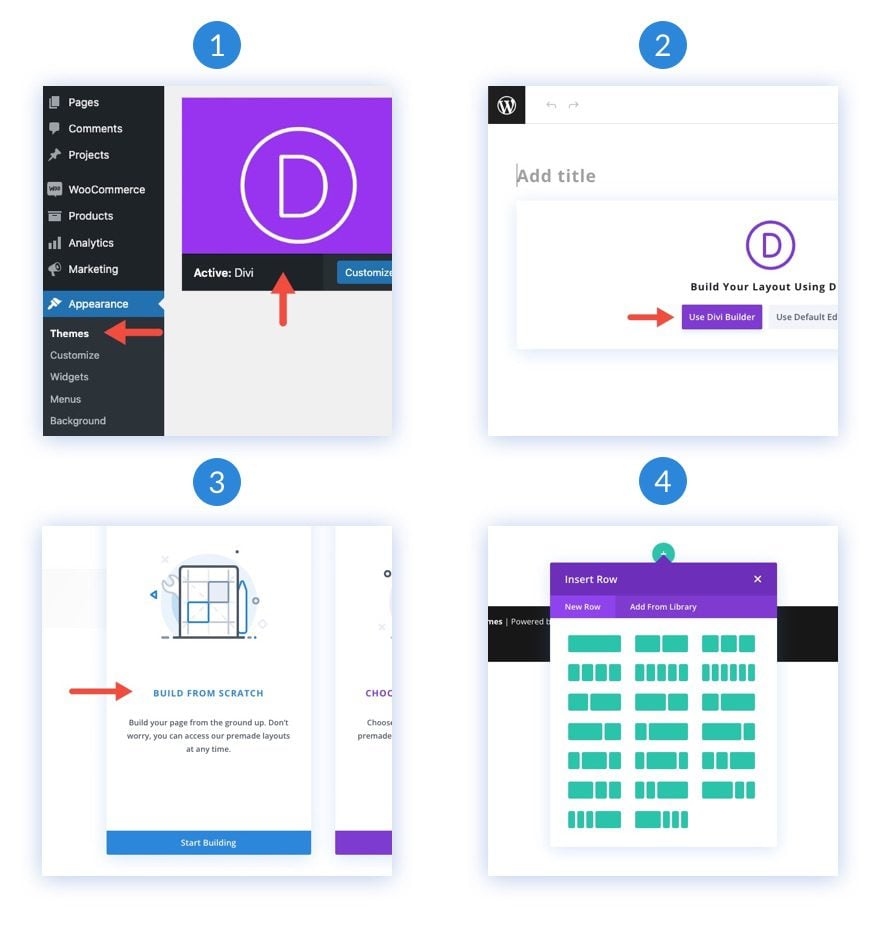
What You Need to Get Started
To get started, you will need to do the following:
- If you haven’t yet, install and activate the Divi Theme.
- Create a new page in WordPress and use the Divi Builder to edit the page on the front end (visual builder).
- Choose the option “Build From Scratch”.
- Now have a blank canvas to start designing in Divi!
How to Design a Background with Two Layers of Gradients, Masks, and Patterns
Add Rows to the Section
To start things off, add a one-column row to the existing section in the builder. This row will eventually become the second layer of background design.
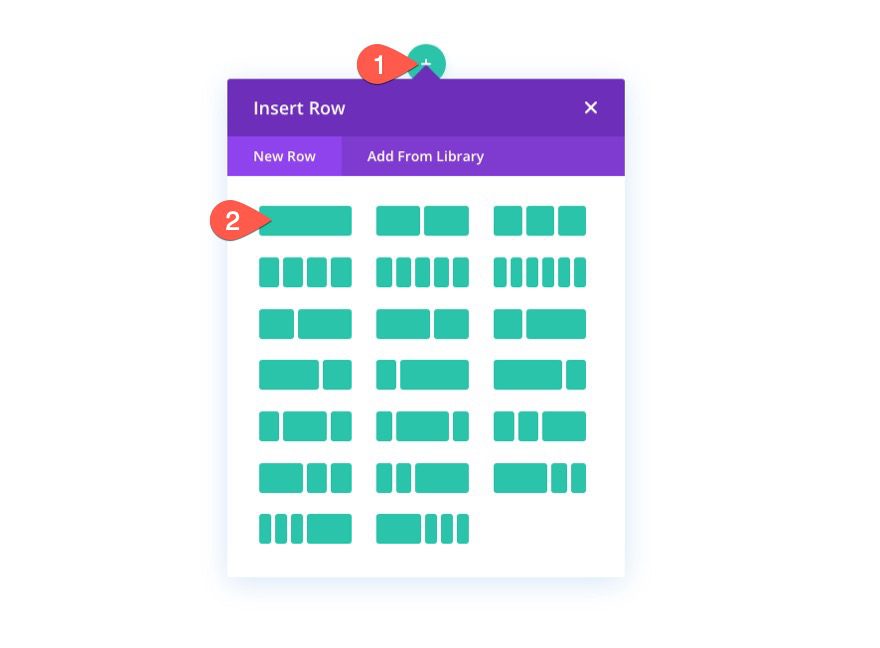
Next, duplicate the row you just created. This second (duplicate) row will be used for our content just like you would normally. Now you should have one top row for the extra background layer and one row for regular content.
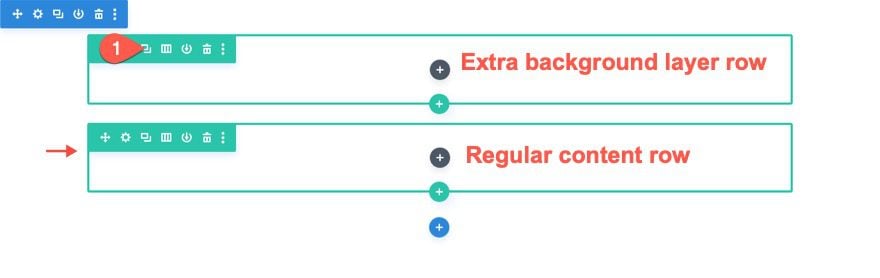
We’ll circle back to the rows later. For now, we are going to start designing the first layer of our background design using the section.
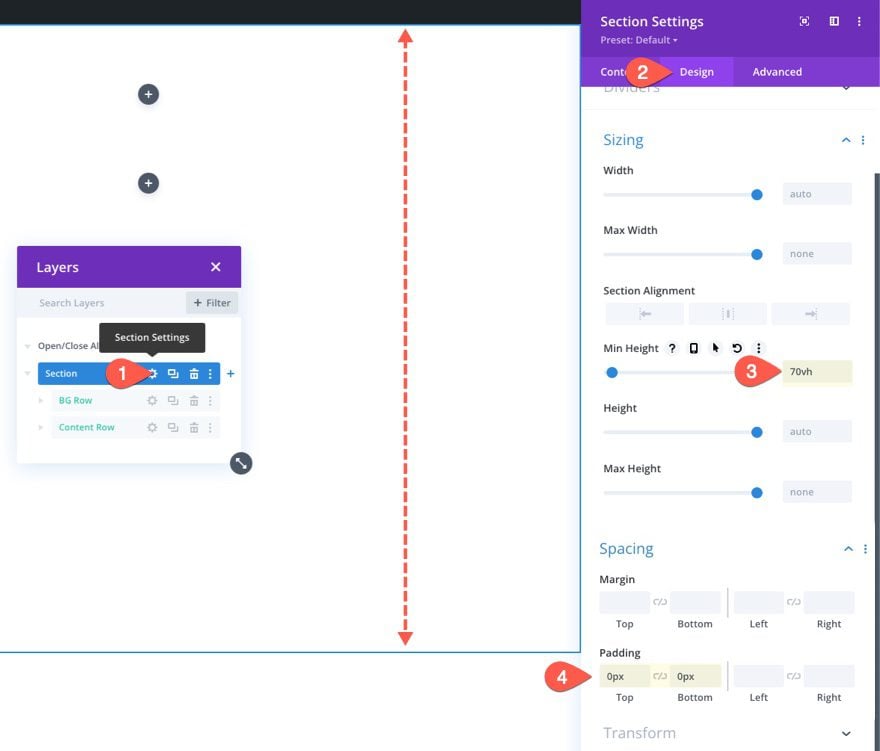
Add Vertical Spacing to the Section
In order for our background design to fill the browser, we need to add some vertical height to the section. An easy way to do that is to add a minimum height value to the section.
Open the settings for the section. Under the design tab, update the height and padding as follows:
- Min Height: 70vh
- Padding: 0px top, 0px bottom
Create the Section Background Design (the First Layer)
Now that we have our section height in place, we have our canvas to create our first background design layer. Divi has many options available for designing backgrounds. For this tutorial, we are going to concentrate on background gradients, masks, and patterns.
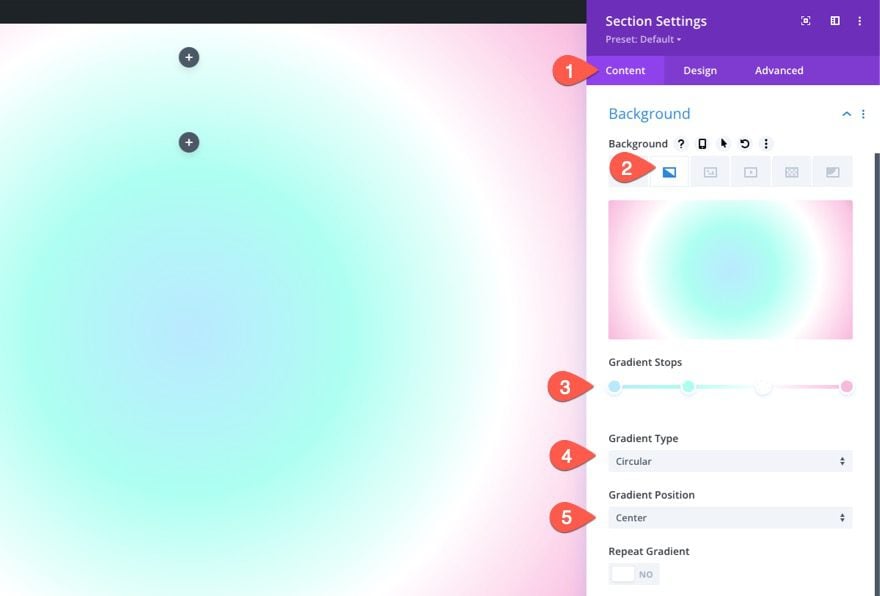
Design a Background Gradient for the Section
For our first background design element, we can add a custom background gradient to the section. For this gradient, we are going to add 4 gradient stops that are spaced out pretty evenly. These 4 colors will create a beautiful multicolored gradient for the first layer of our background design.
To add the first gradient stops, make sure you have the section settings open under the content tab. Then select the gradient tab and click to add a new gradient. This will add two default gradient colors. Starting with the first gradient stop on the left, update/add the following gradient stops with a color and a position as follows:
Gradient Stop #1
- Gradient Stop Color: #bae9ff
- Gradient Stop Position: 0%
Gradient Stop #2
- Gradient Stop Color: #adfff1
- Gradient Stop Position: 32%
Gradient Stop #3
- Gradient Stop Color: #ffffff
- Gradient Stop Position: 64%
Gradient Stop #4
- Gradient Stop Color: #f9b8dd
- Gradient Stop Position: 100%
Then update the Gradient Type and Position:
- Gradient Type: Circular
- Gradient Position: Center
Create a Background Pattern for the Section
Now that our background gradient is ready, we can add a background pattern to compliment the design. In this example, we are going to create a subtle pattern using the Waves pattern.
Under the patterns tab, update the following:
- Background Pattern: Waves
- Pattern Color: rgba(127,206,255,0.59)
- Pattern Size: Custom Size
- Pattern Width: 30vw
- Pattern Height: 10px
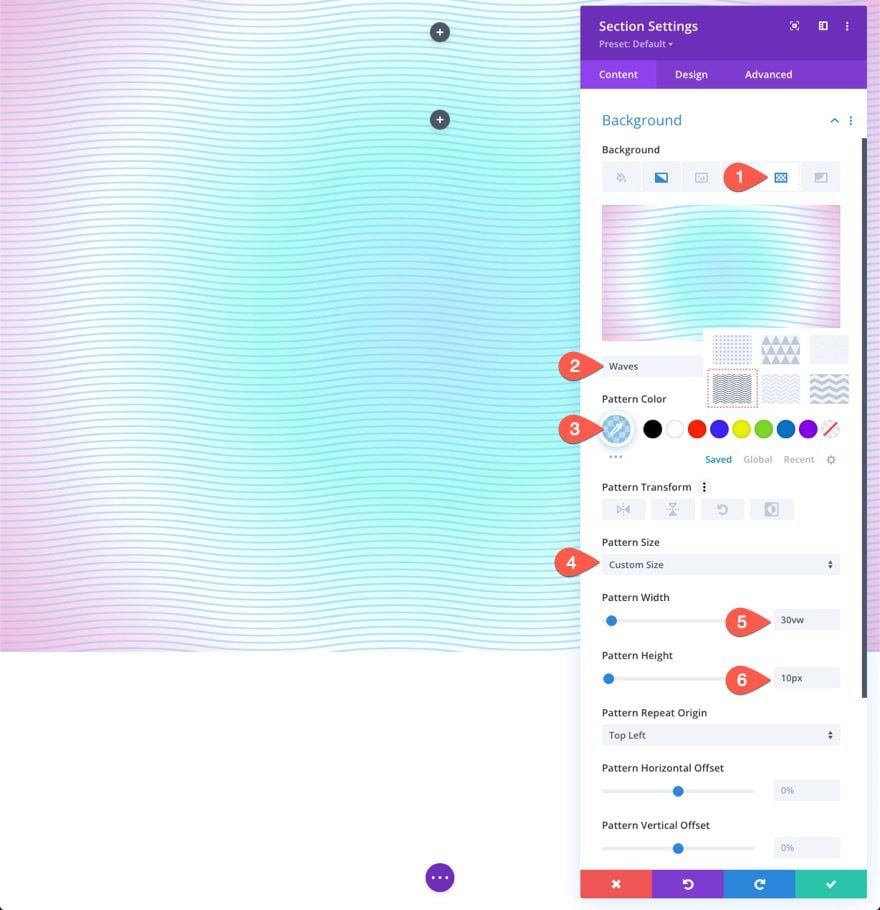
TIP: With background patterns, it is generally better to keep it subtle. Try using custom sizes for patterns that are smaller and then drop the opacity of the color. That said, don’t be afraid to think outside the box.
Create a Background Mask for the Section
With our background pattern in place, we are ready to add a background mask to complete our background design for the first layer. There are a bunch of options and variations to choose from. For this example, we are going to use the Diagonal Pills mask.
Under the masks tab, update the following:
- Mask: Diagonal Pills
- Mask Color: #ffffff
- Mask Transform: Vertical Flip, Invert
- Mask Size: Stretch to Fill
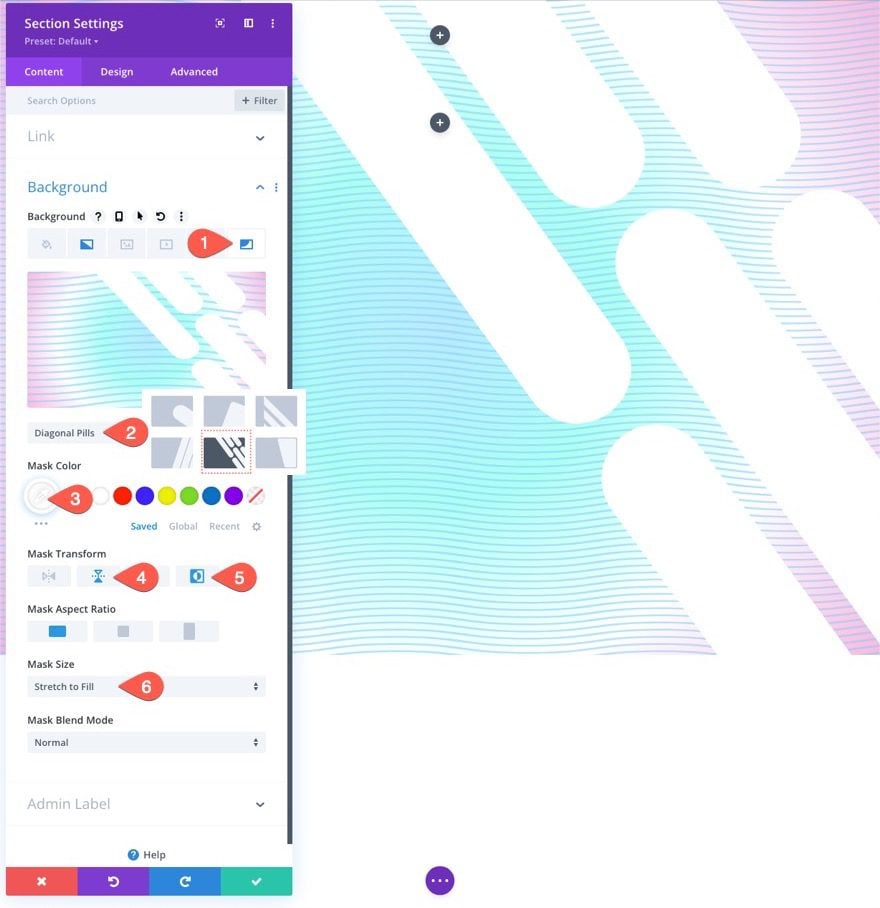
Here is the result so far…

Position the Row as a Second Layer
Now that our section background design is ready to go, we can add the second layer using the row we created earlier. To edit the row, click on the gear icon of the top row in the section.
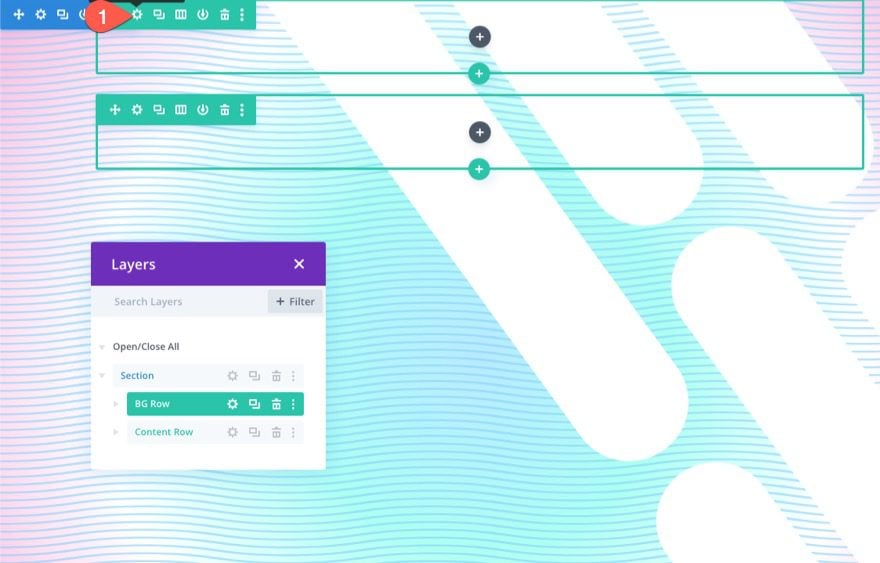
It is important to use the top row so that the background design doesn’t overlay the other row designated for our content (an easy way to avoid dealing with Z Index).
Under the Advanced tab, update the following:
- Position: Absolute
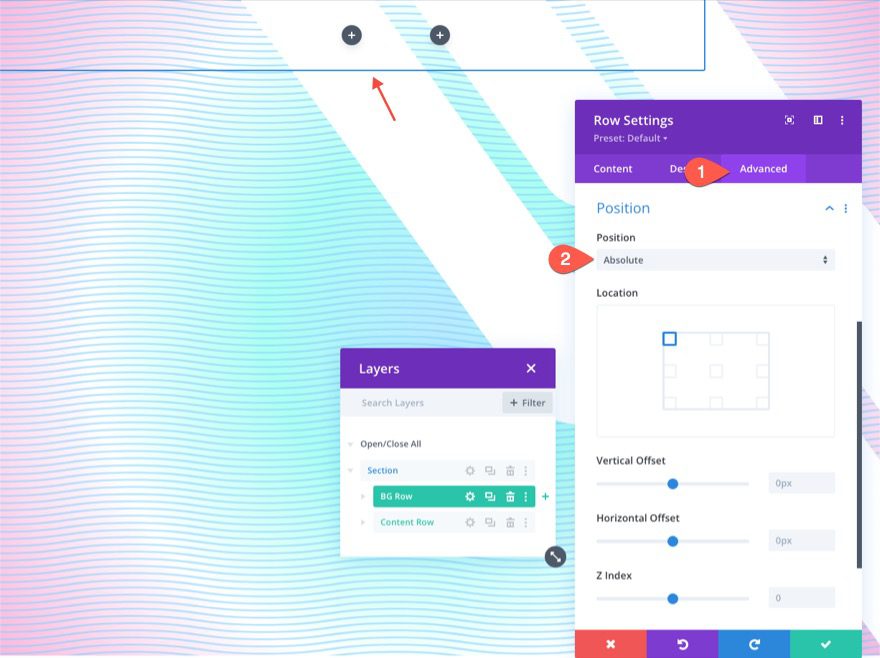
This will allow the row to sit above (or overlay) the section without taking up any actual space in the document. Now, all we need to do is update the height and width so that it spans the full width and height of the section. This will create the overlay we need and our second layer of background design.
Under the design tab, update the sizing options as follows:
- Equalize Column Heights: YES
- Width: 100%
- Max Width: 100%
- Height: 100%
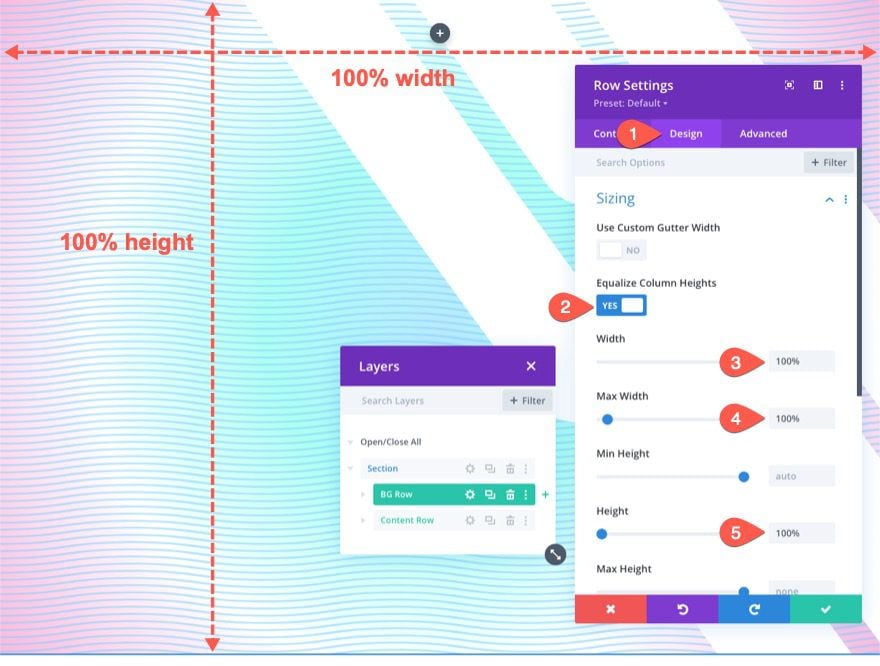
Make sure to take out the padding from the row as well.
- Padding: 0px top, 0px bottom

Create the Row Background Design (the Second Layer of Design)
Now you may not be able to see the row, but it is now perfectly overlaying the entire section background. This gives us our second layer and another blank canvas to complete our design.
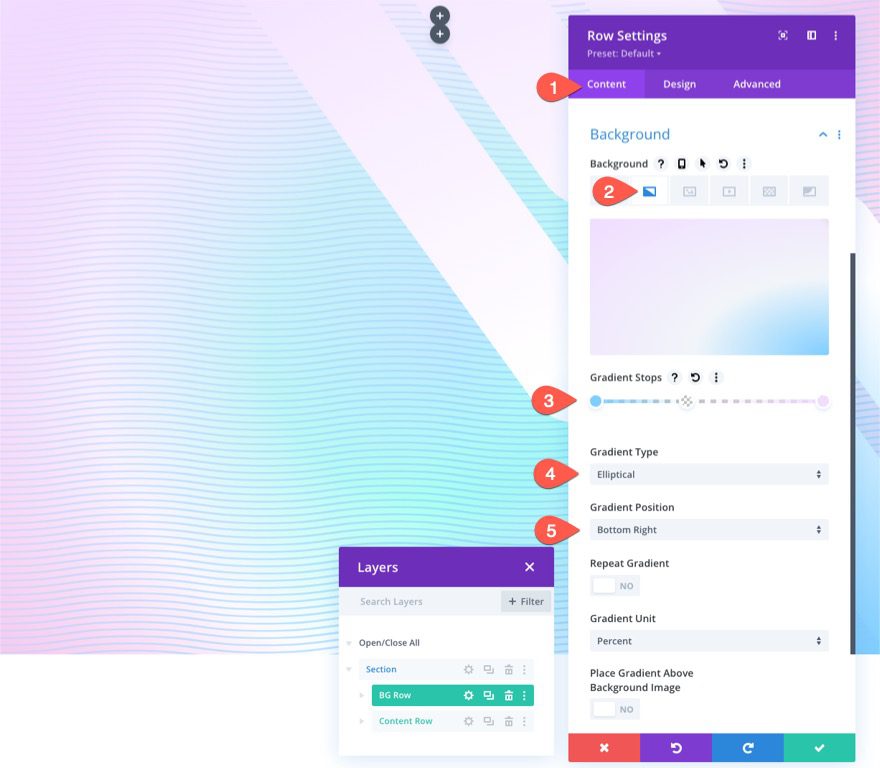
Design a Background Gradient for the Row
Because this is our second layer gradient, it is important that we use transparent (or semi-transparent) color stops so that the first layer gradient colors remain visible in certain areas. This allows you to create a more unique blending of colors that isn’t possible with just one layer of gradients.
For this gradient, we are going to add 3 gradient stops that are spaced out pretty evenly. The middle gradient stop is transparent to reveal the first layer gradient design. Together, these subtle colors compliment the gradient in the first layer nicely.
To add the first gradient stops, make sure you have the section settings open under the content tab. Then select the gradient tab and click to add a new gradient. This will add two default gradient colors. Starting with the first gradient stop on the left, update/add the following gradient stops with a color and a position as follows:
Gradient Stop #1
- Gradient Stop Color: #7fceff
- Gradient Stop Position: 0%
Gradient Stop #2
- Gradient Stop Color: transparent
- Gradient Stop Position: 40%
Gradient Stop #3
- Gradient Stop Color: #f1ddff
- Gradient Stop Position: 100%
Then update the Gradient Type and Position:
- Gradient Type: Elliptical
- Gradient Position: Bottom Right
Create a Background Pattern for the Section
Now that our second layer gradient is in place, we can add a background pattern to compliment the design. For our second layer pattern, we are going to use the Confetti pattern.
Under the patterns tab, update the following:
- Background Pattern: Confetti
- Pattern Color: #00ff4c
- Pattern Size: Custom Size
- Pattern Width: 45vw
- Pattern Blend Mode: Screen
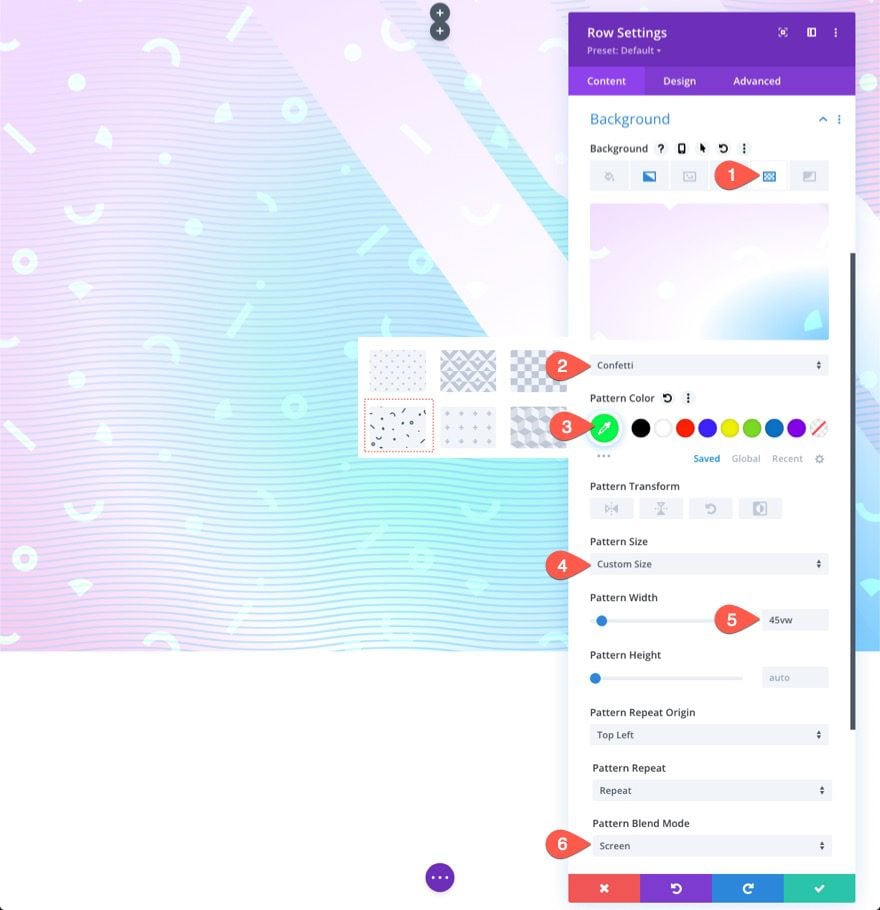
This pattern uses Screen blend mode to a light version of the pattern color mixed with the gradient colors behind it. It enhances the design and makes the pattern more subtle.
Create a Background Mask for the Row
With our second layer pattern in place, we are ready to add a second layer mask to complete our two-layer background design. For the second layer mask, we are going to use the same Diagonal Pills mask inverted and flipped horizontally so that it appears on the left side of the section, adjacent to the mask in the first layer.
Under the masks tab, update the following:
- Mask: Diagonal Pills
- Mask Color: #ffffff
- Mask Transform: Horizontal Flip, Invert
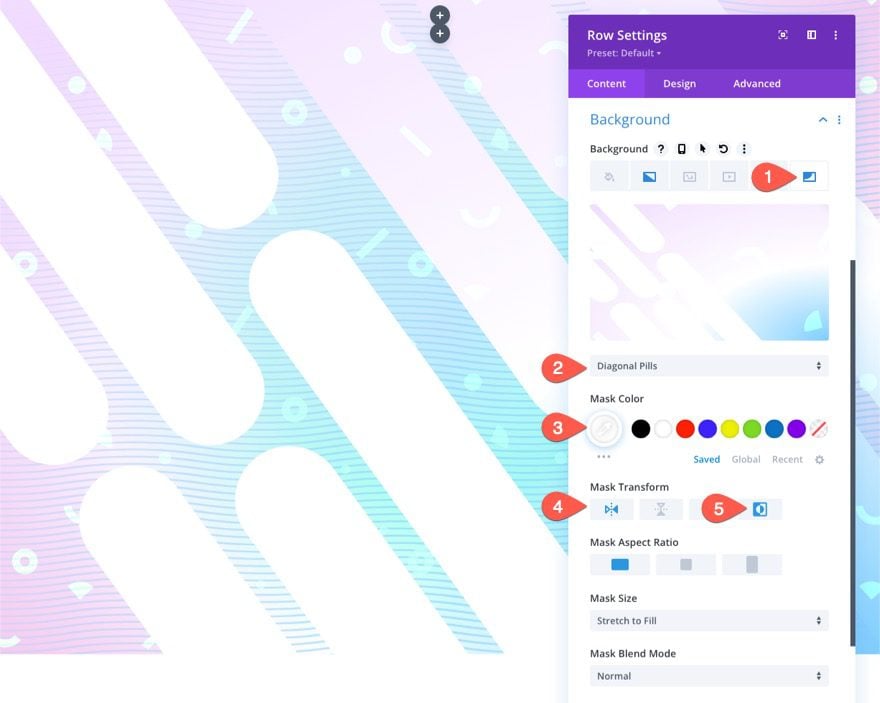
Here is the result so far…

The Two Layers (before and after)
Here is a quick illustration of what the first layer looks like before the second layer is applied.
Add the Headline
In the row we saved for our content, add a text module for your main heading.
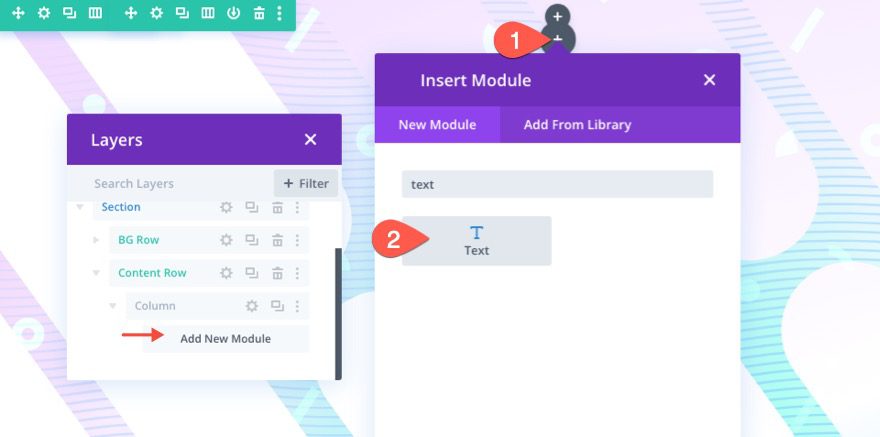
Then open the text module settings and update the following:
- Body Text: [add heading with H1 tag]
- Heading Font: Inter
- Heading Font Weight: Bold
- Heading Text Color: #000000
- Heading Text Size: 8vw (desktop), 62px (tablet), 32px (phone)
- Margin: 30vh top, 30vh bottom
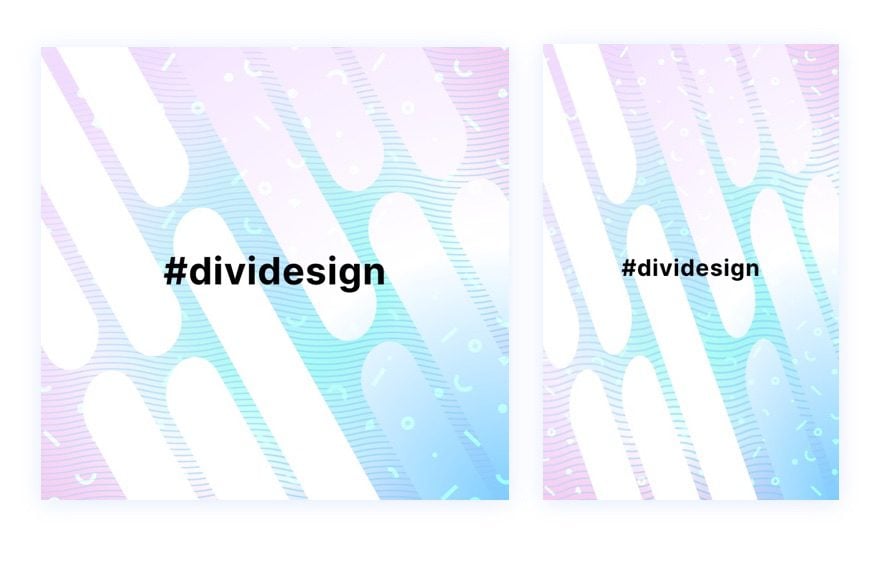
Final Result
Let’s take a look at the final result of our design on desktop and mobile devices.
Change it Up!
For a different look, you can try out different masks and patterns on each layer.
Here are a few examples.
Try More Gradients!
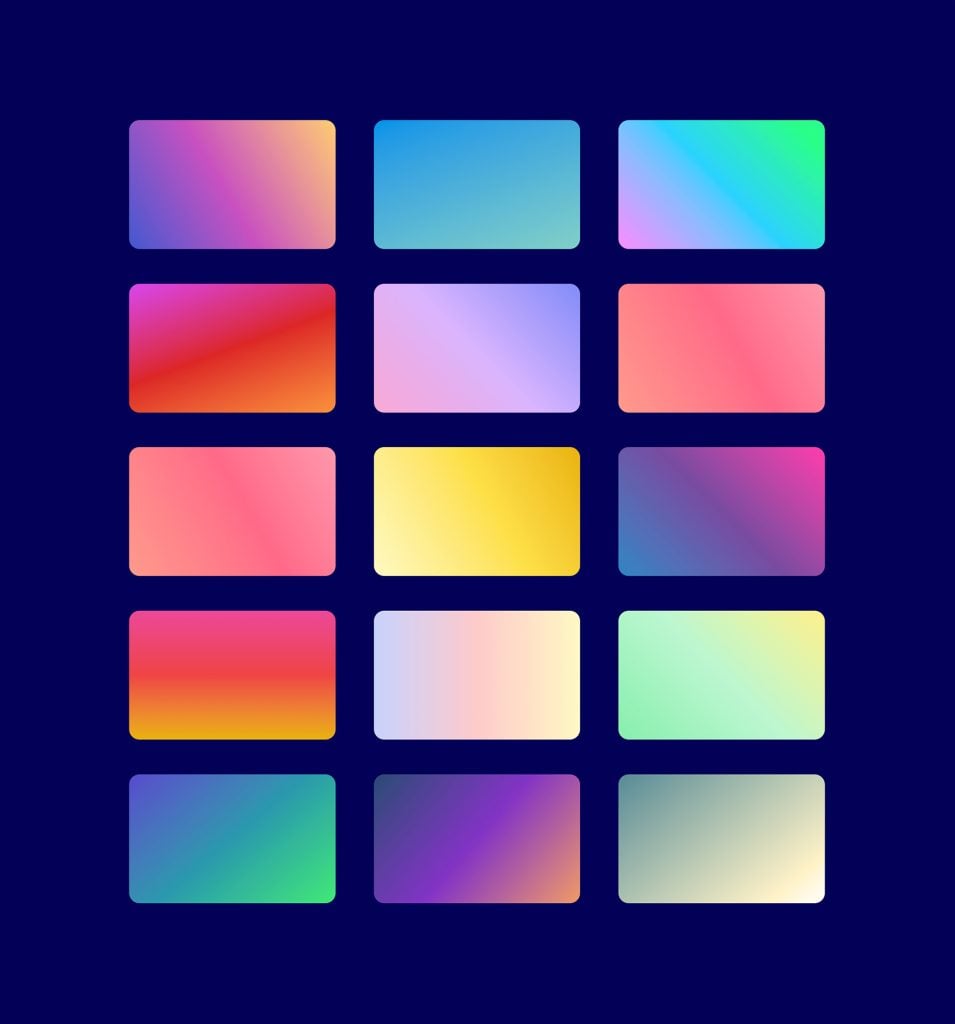
The Gradient Builder can create so many more colors and gradient types you can use to make these layered background designs stand out. You can check out our live demos of more background gradient design possibilities.
Get More Background Mask and Pattern Designs!
If you want more inspiration for how to use background masks and patterns, check out these 12 background mask and pattern designs free for download.
Final Thoughts
It is amazing how easy it is to create such beautiful background designs with Divi’s background options. And, adding another layer of background design increases the design possibilities exponentially. Plus, we didn’t even mention the third layer which is also available within the design from this tutorial. Can you guess what it is?
For more, check out our feature release posts on the gradient builder and background masks and patterns. You may also find it helpful to know how to use masks and patterns to design a hero section.
I look forward to hearing from you in the comments.
Cheers!


There was very good idea about elegant themes…Thank you for sharing knowledgeable blog!
You are most welcome, Motaleb. Appreciate the support.
I think I just might have to switch to elegant themes… Good read! thanks!
That’s great to hear, Sean! Glad you liked it.
and what is the next?
Billie,
If you are referring to the third background layer available in the design, it is the column of the row background. Since the row background (second layer) is already overlaying the section, the column of the row will be as well. So you can add background styling to the column for the third layer of background design that overlays the row and section backgrounds. Hope that makes sense.
Thanks for explaining the concept first. That’s a real time saver for people who don’t need detailed instructions.
Thanks for that, Jean. That’s great feedback for future posts. Also, I’m sure you already noticed this but, just in case you didn’t, you can use the column of the row for a third background layer!
thank you for sharing knowledgeable blog
Very good tips for designing the background using two layers of gradients masks and patterns. I love divi.
Thanks, Mohit. Glad it was helpful!