
Creating section divider scroll effects is a simple and fun technique that can add life to your Divi website. A section divider continues to be a versatile design element, useful for adding a touch of creativity to your page content transitions. But with Divi’s scroll effects, section dividers get even more interesting! The trick is to isolate a section dedicated to the divider style of choice. Then you can add all kinds of scroll-generated motion to the section to create beautiful scroll effects as a background for page content.
Let’s get started!
Sneak Peek
Here is a peek as the designs we will build today.
Download the Layout for FREE
To lay your hands on the designs from this tutorial, you will first need to download it using the button below. To gain access to the download you will need to subscribe to our newsletter by using the form below. As a new subscriber, you will receive even more Divi goodness and a free Divi Layout pack every Monday! If you’re already on the list, simply enter your email address below and click download. You will not be “resubscribed” or receive extra emails.

To import the layout to your page, simply extract the zip file and drag the JSON file into the Divi Builder.
Let’s get to the tutorial, shall we?
What You Need to Get Started

To get started, you will need to do the following:
- If you haven’t yet, install and activate the Divi Theme.
- Create a new page in WordPress and use the Divi Builder to edit the page on the front end (visual builder).
- Choose the option “Build From Scratch”.
After that, you will have a blank canvas to start designing in Divi.
How to Create Animated Section Dividers on Scroll with Divi
Creating the Two Content Sections
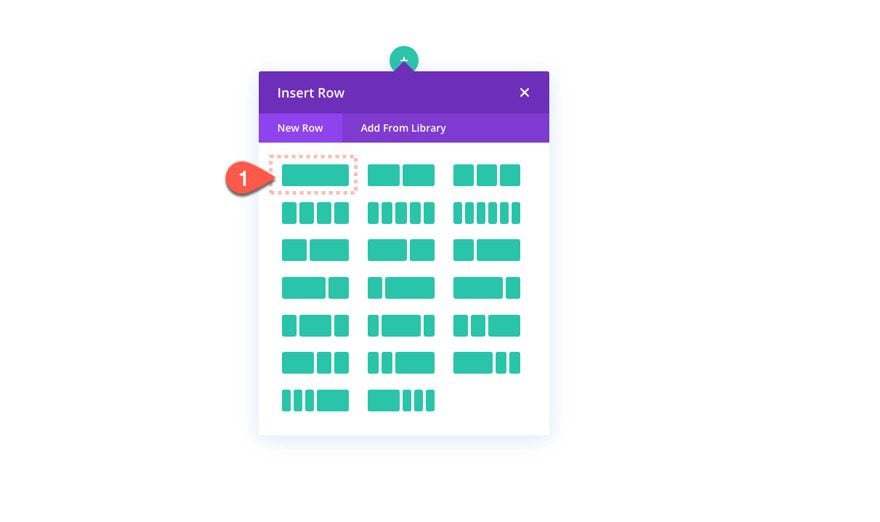
Add Row
To begin, create a one-column row inside the default section.
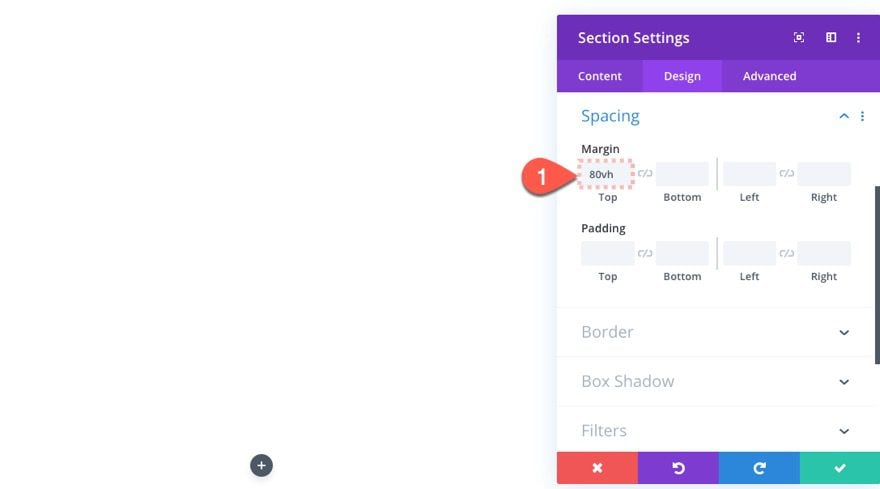
Section Margin (for testing)
For testing purposes, add some top margin to the section so that we can have room for scrolling. Open the section settings and add the following:
- Margin Top: 80vh
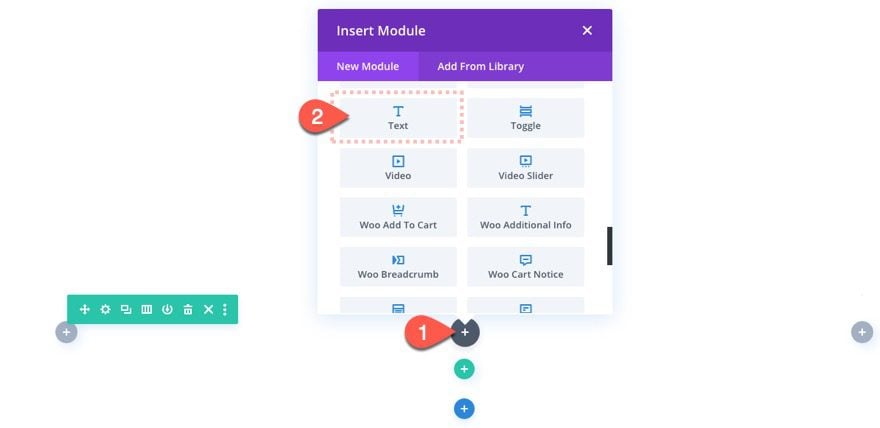
Add Text Module
Inside the one-column row, add a new text module.
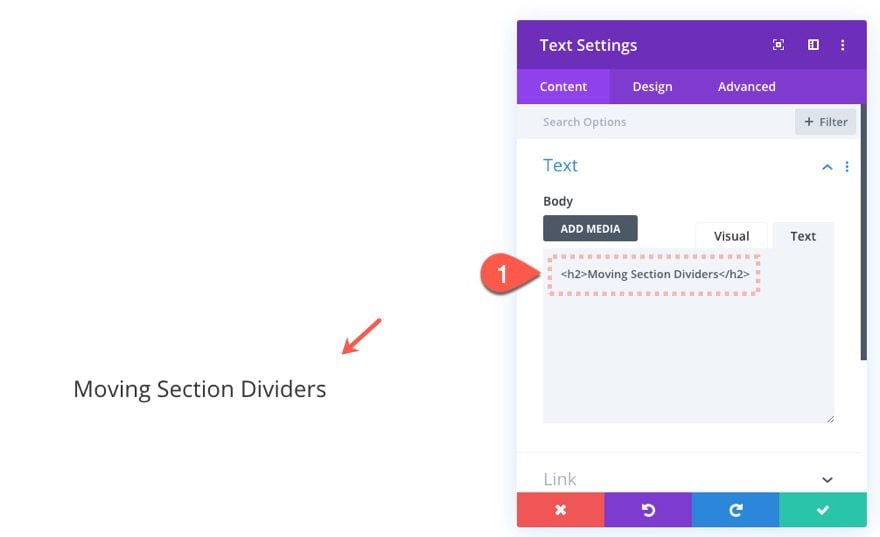
Text Module Content
Inside the body content, add the following H2 heading:
<h2>Moving Section Dividers</h2>
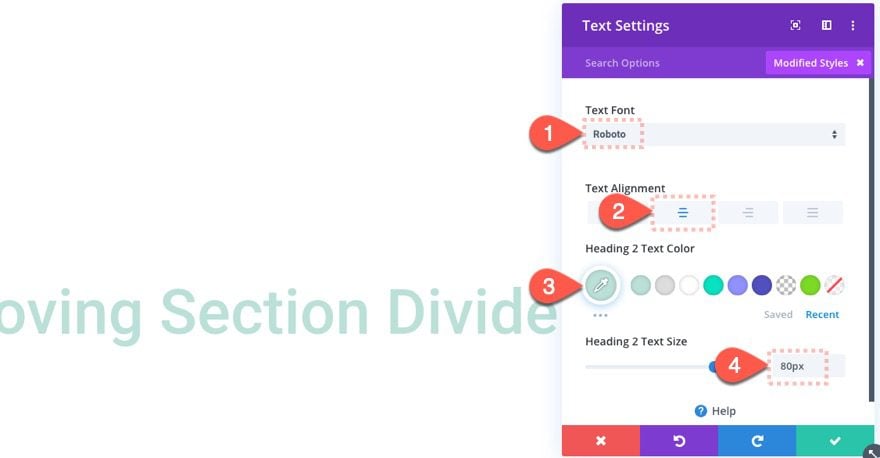
Text Module Design
Under the design settings, update the following:
- Text Font: Roboto
- Text Alignment: Center
- Heading 2 Text Color: #bae0d8
- Heading 2 Text Size: 80px (desktop), 50px (tablet), 30px (phone)
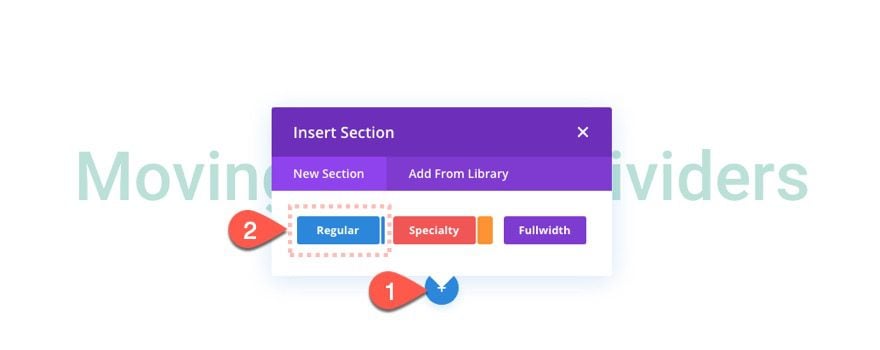
Add Second Content Section
Under the previous section, add a new regular section.
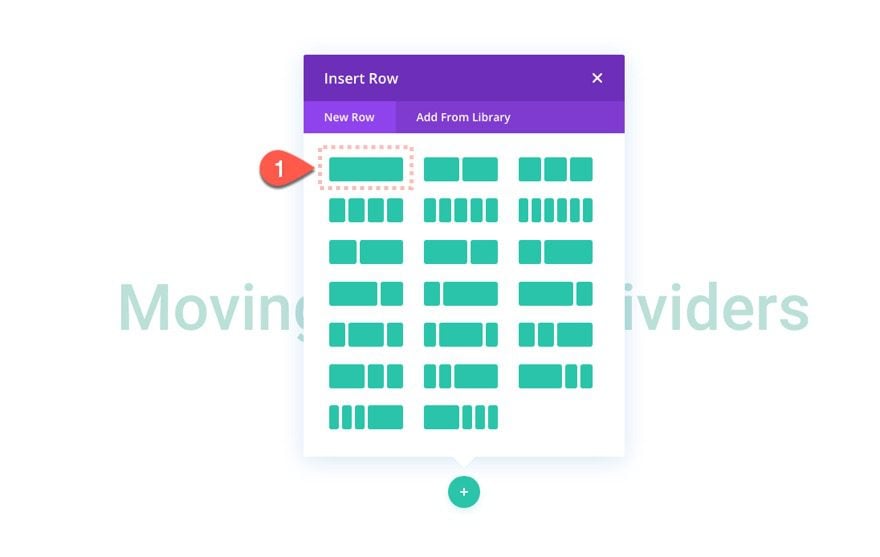
Add Row
Inside the new section, add a one-column row.
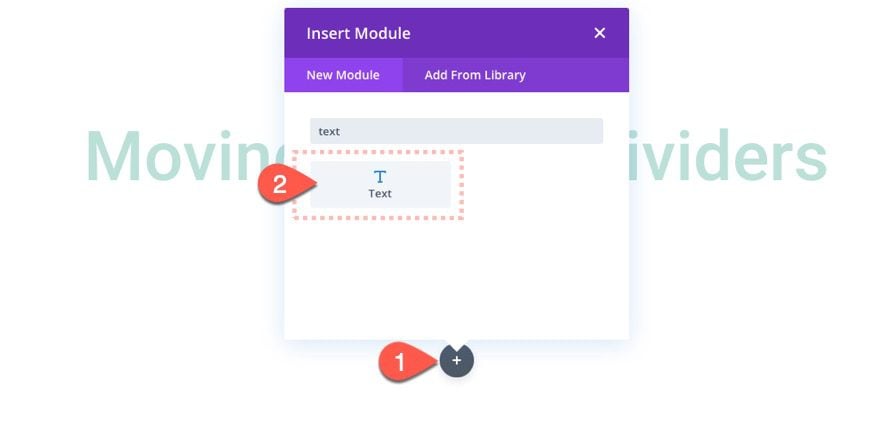
Add Text Module
Then add a new text module to the row.
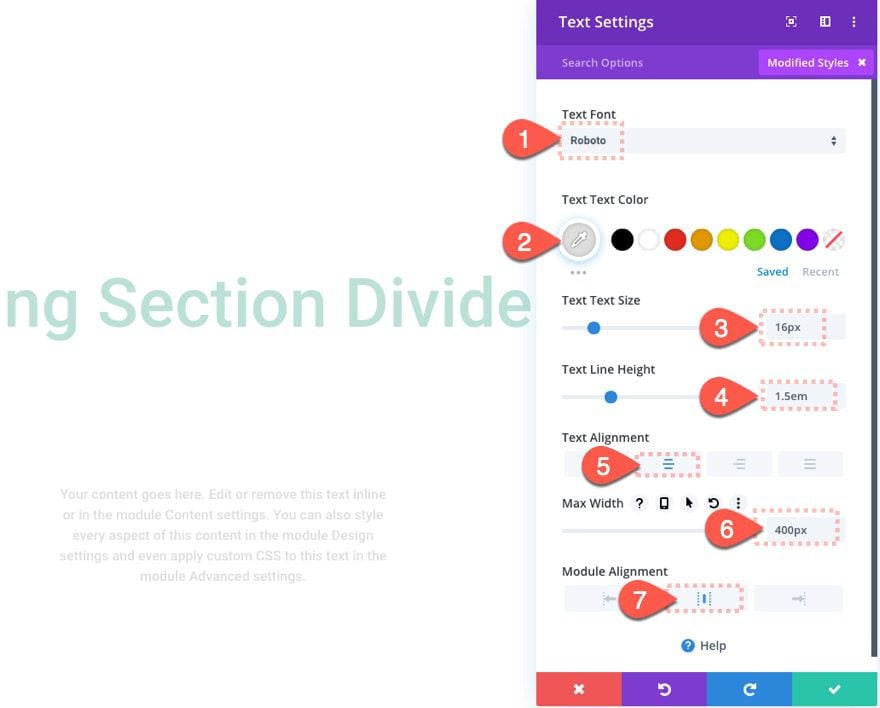
Text Module Design
We can keep the default filler content inside the body for now. Let’s jump over to the design tab and update the following:
- Text Font: Roboto
- Text Text Color: #dddddd
- Text Text Size: 16px
- Text Line Height: 1.5em
- Text Alignment: Left
- Max Width: 400px
- Module Alignment: Center
Section Settings
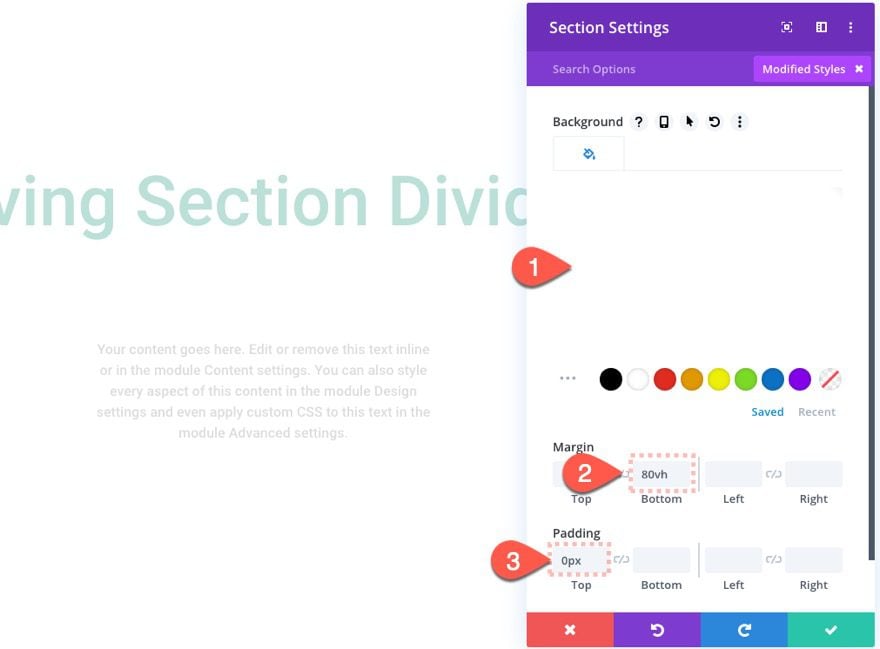
Make sure to take out the default background color of the section but giving it a completely transparent background. Then we can take out the top padding and add some bottom margin for scroll testing purposes.
To do this, open the section settings and update the following:
- Background Color: rgba(0,0,0,0)
- Margin Bottom: 80vh
- Padding: 0px
Creating the Animated Section Divider
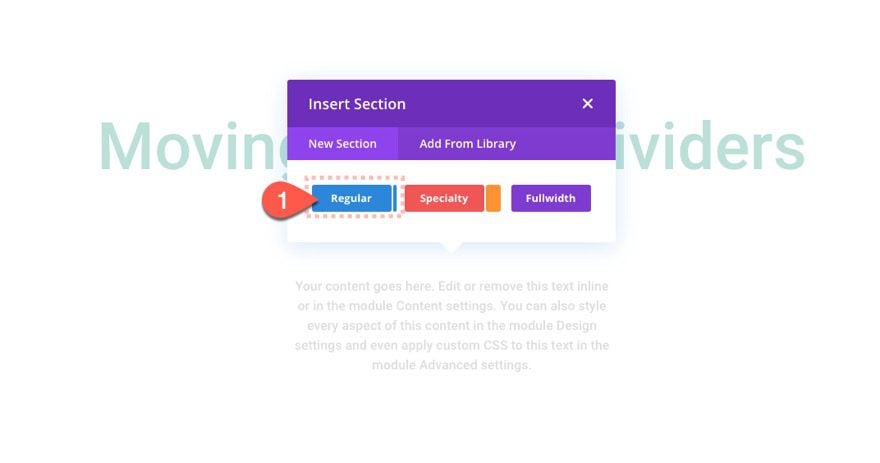
Once out two sections of content are complete, we are ready to add the section for our animated section dividers.
Add New Section
Go ahead and create a new regular section in the middle of the two content sections.
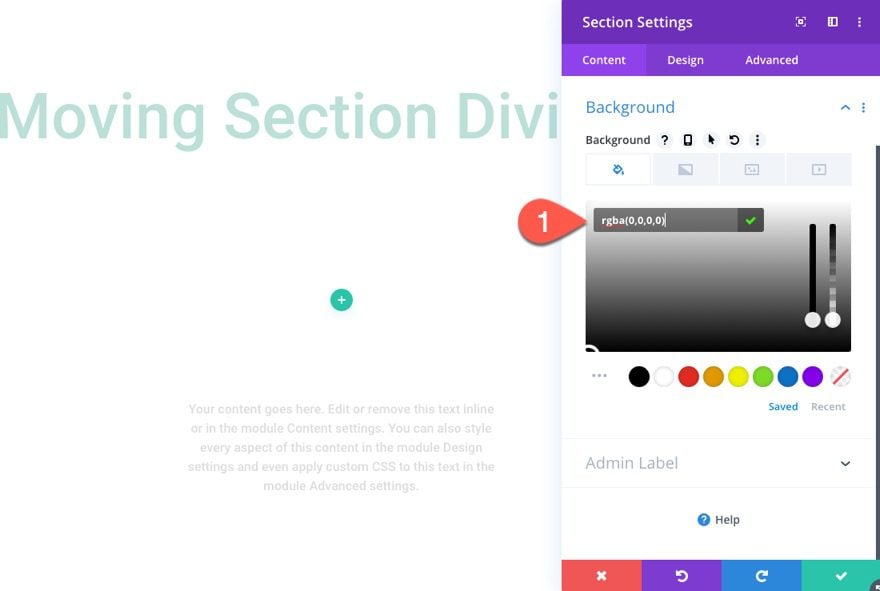
Section Background
And again, take out the default background color of the section but updating the following:
- Background Color: rgba(0,0,0,0)
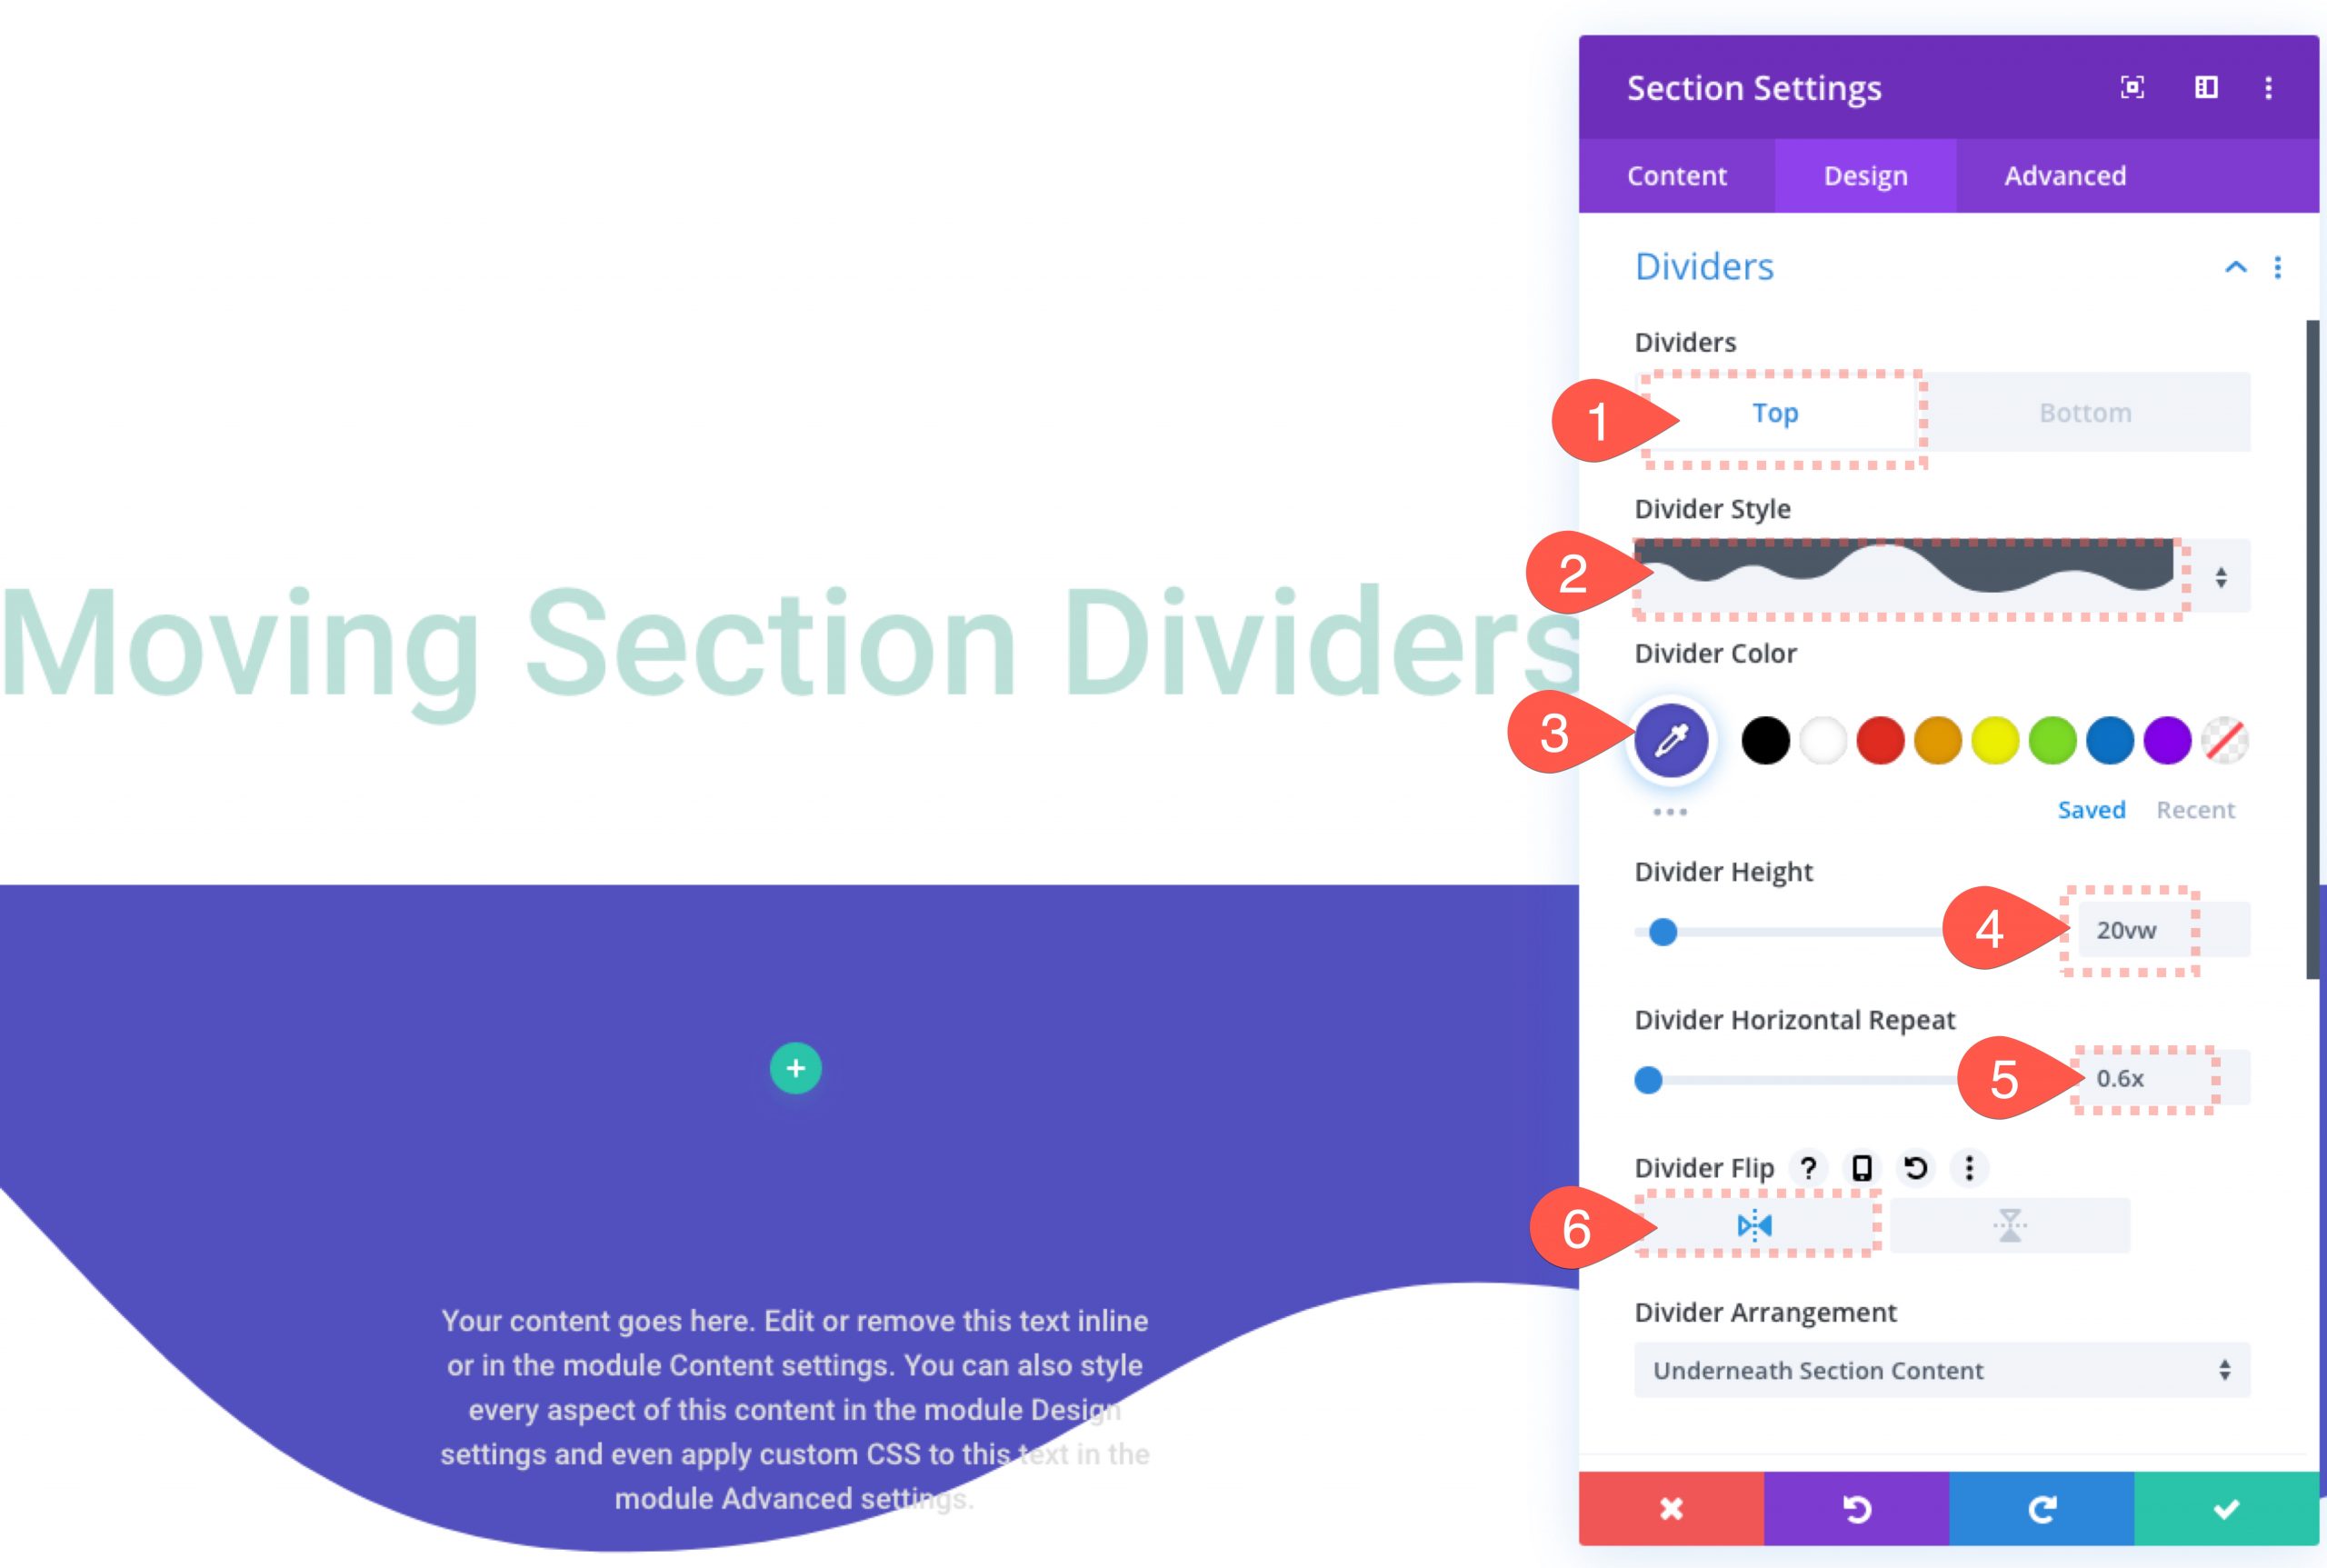
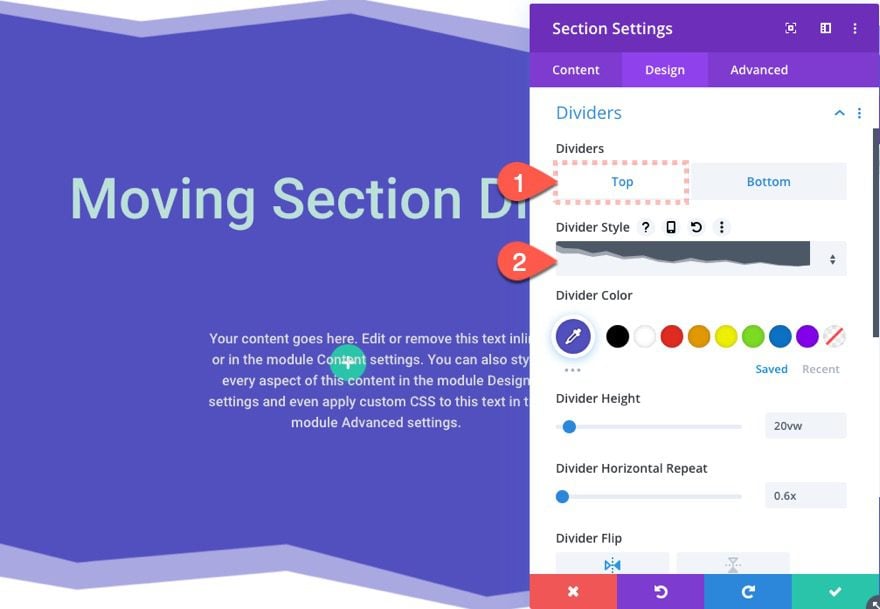
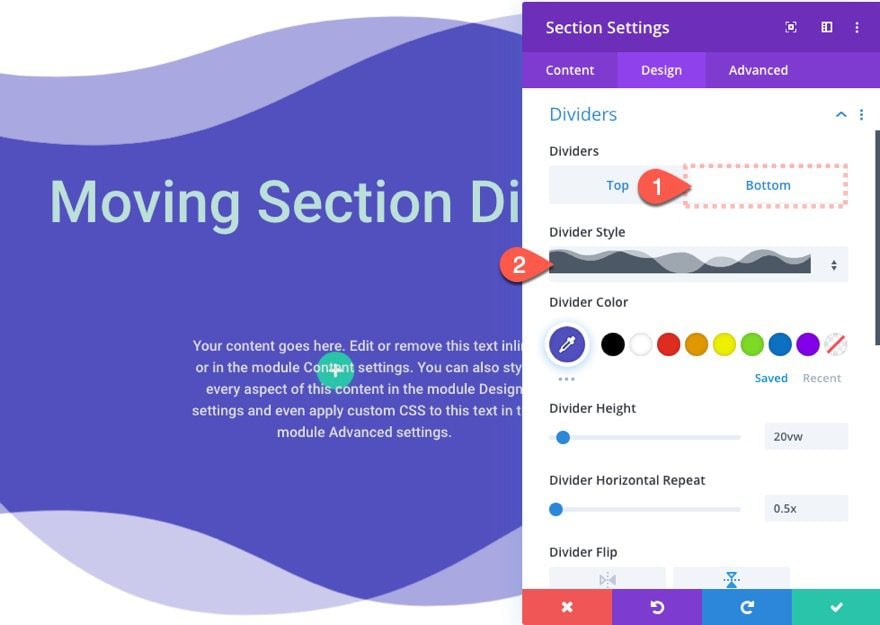
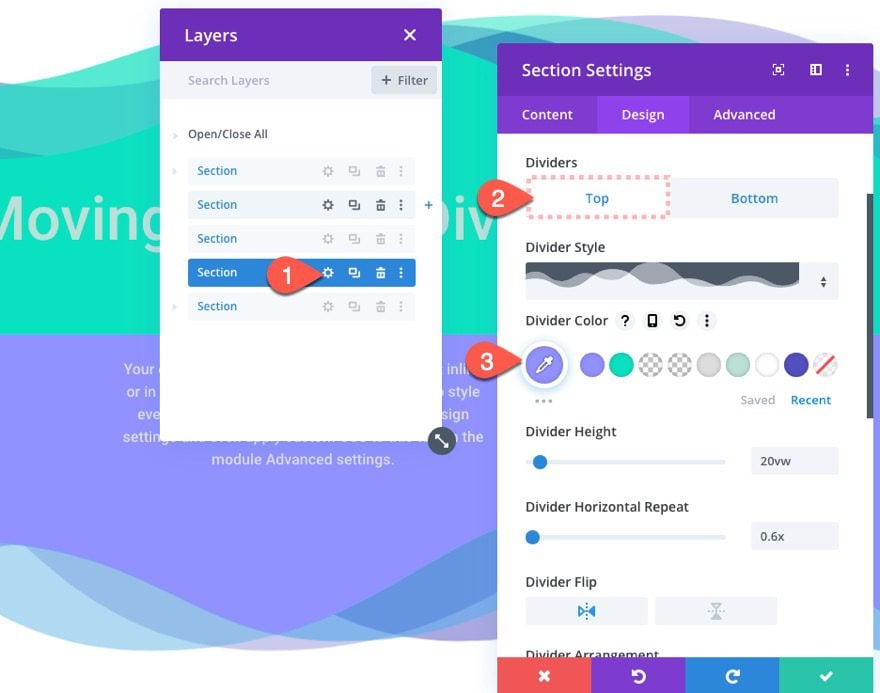
Section Divider Design
Don’t worry we are going to create our background color with the section dividers. To do this, click the design tab and add a top and bottom divider to the section as follows:
Top Divider Design
- Top Divider Style: see screenshot
- Top Divider Color: #524fbf
- Top Divider Height: 20vw
- Top Divider Horizontal Repeat: 0.6x
- Top Divider Flip: horizontal
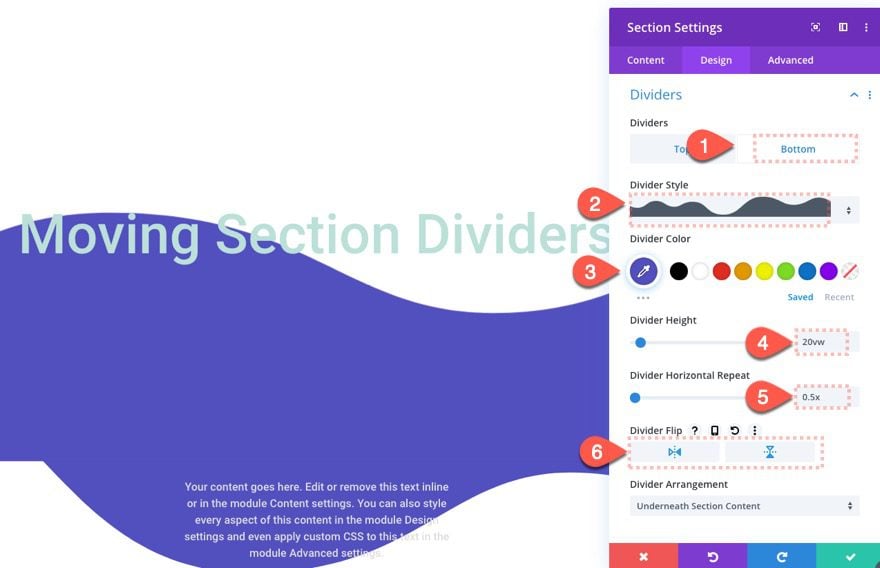
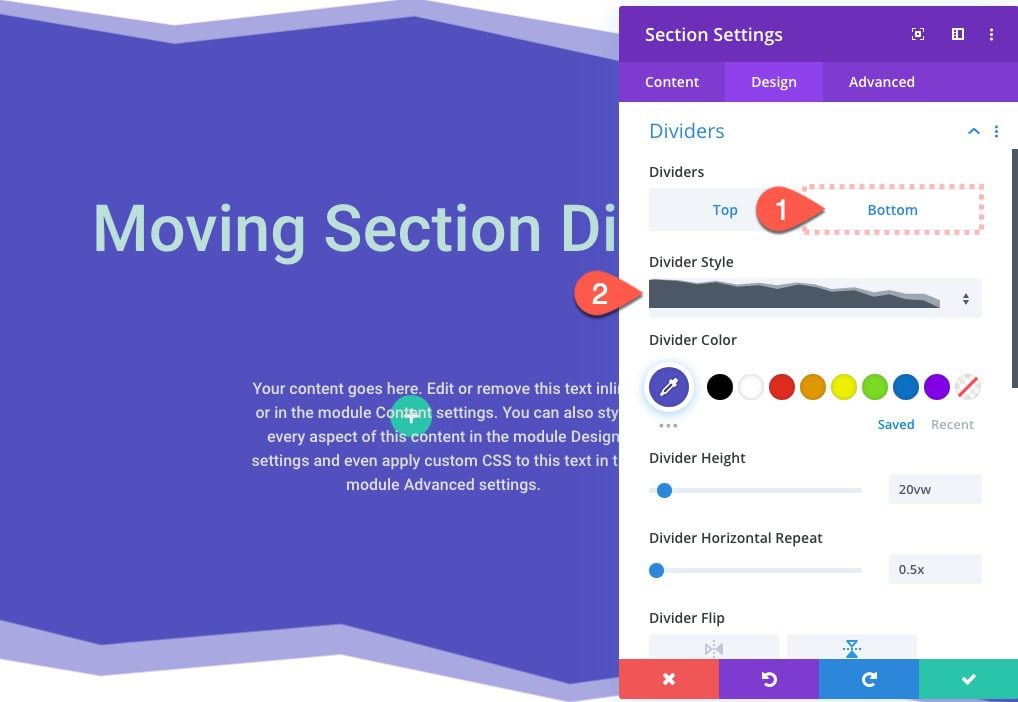
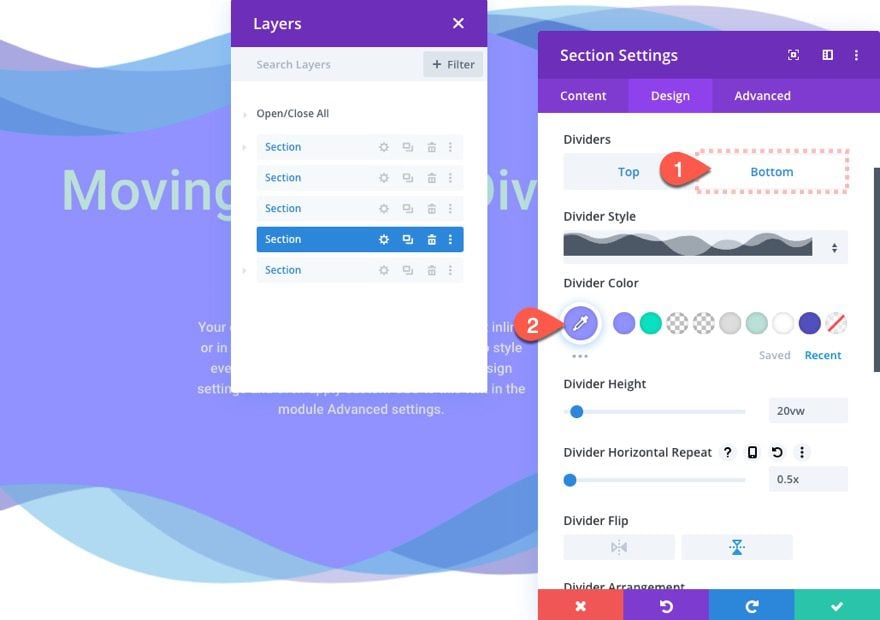
Bottom Divider Design
- Bottom Divider Style: see screenshot
- Bottom Divider Color: #524fbf
- Bottom Divider Height: 20vw
- Bottom Divider Horizontal Repeat: 0.5x
- Bottom Divider Flip: horizontal and vertical
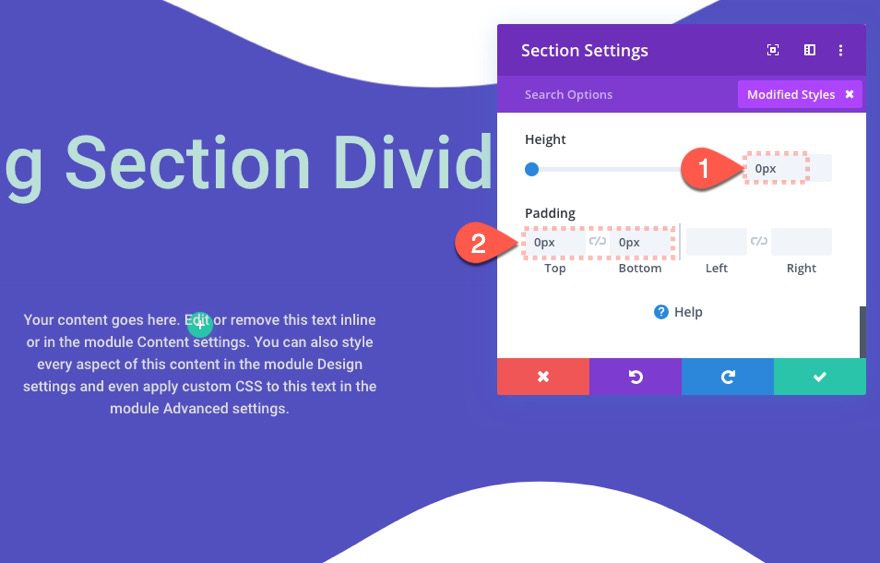
Section Height and Padding
Since this section is purely for the divider design, we can get rid of the height and padding so that only the divider style shows and no unnecessary space comes between the two content sections. Update the following:
- Height: 0px
- Padding: 0px top, 0px bottom
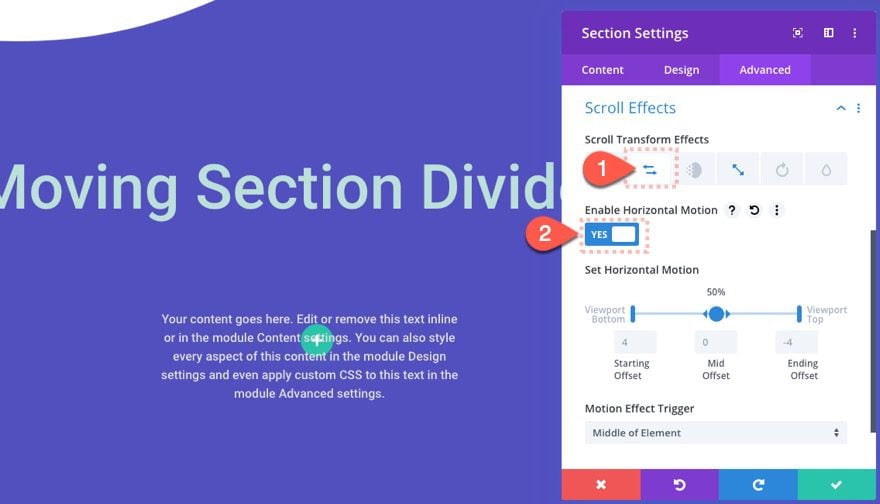
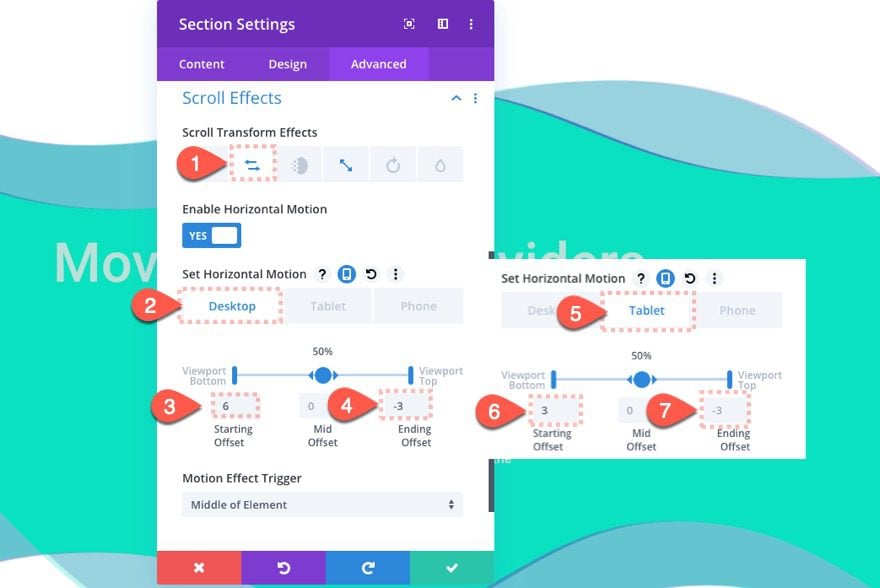
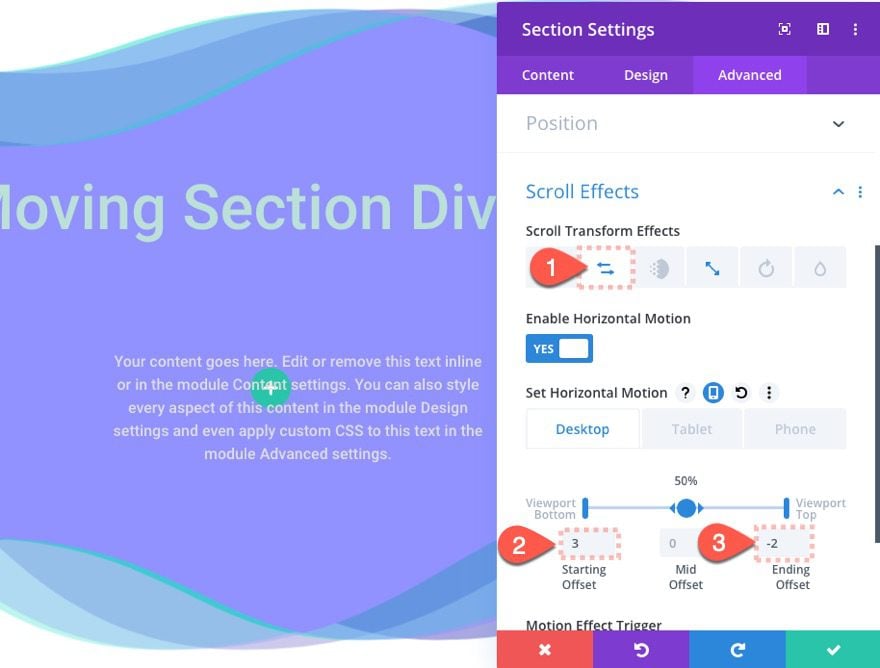
Section Divider Scroll Effects
Then give the section the following scroll effects:
Under the Horizontal Motion tab…
- Enable Horizontal Motion: YES
We can keep the default settings for this one on desktop view.
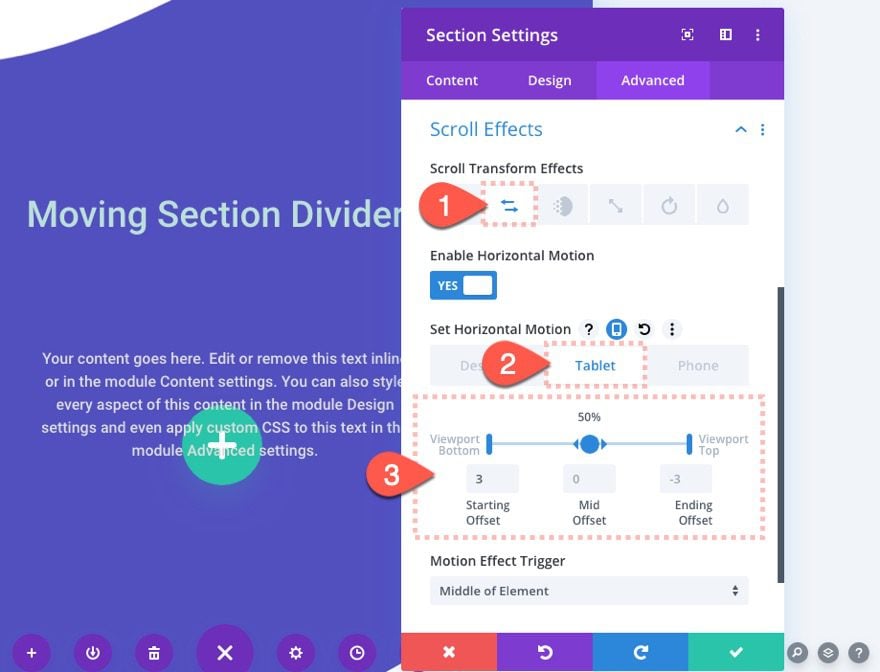
Then update the Horizontal Motion settings on tablet:
- Starting Offset: 3 (at 0% viewport)
- Mid Offset: 0 (at 50% viewport
- Ending Offset: -3 (at 100% viewport)
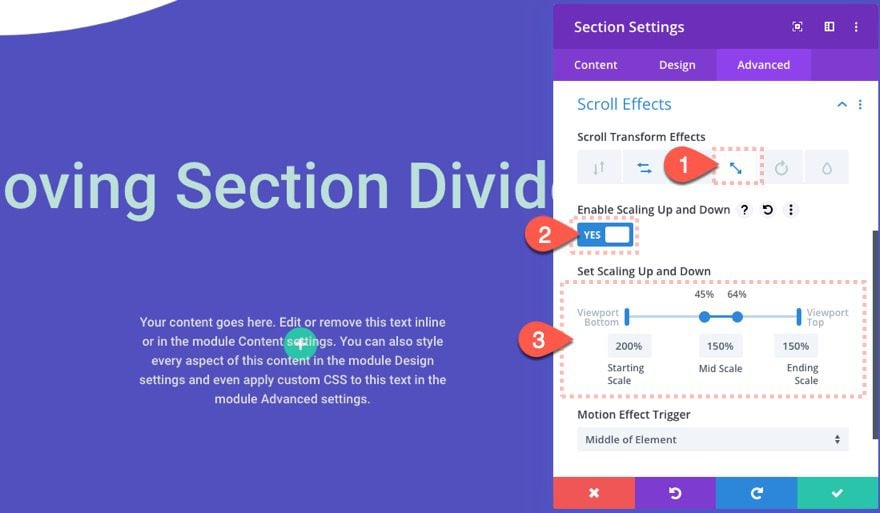
Under the Scaling Up and Down Effect tab, update the following on desktop…
- Starting Scale: 200% (at 0% viewport)
- Mid Scale: 150% (at 45%-65% viewport
- Ending Scale: 150% (at 100% viewport)
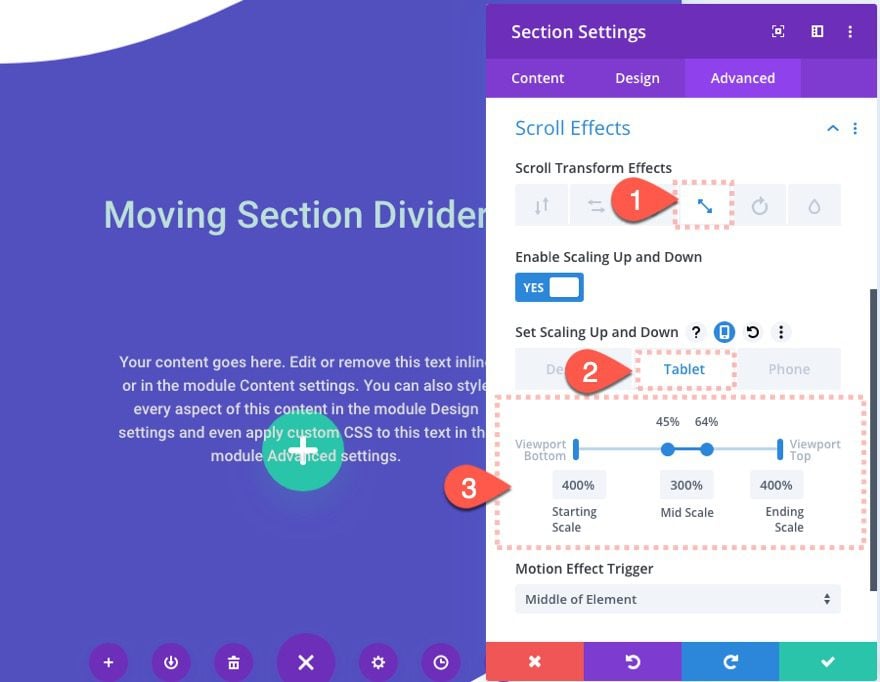
Then update the Scaling Up and Down effect on tablet as follows:
- Starting Scale: 400% (at 0% viewport)
- Mid Scale: 300% (at 45%-65% viewport
- Ending Scale: 400% (at 100% viewport)
The main reason we need to adjust the motion effects on tablet (and phone) is due to the horizontal motion values using pixel length units (ie. 3 = 300px), which are absolute and won’t adjust to the width of the browser.
Now let’s check out the final result of our animated section divider on scroll.
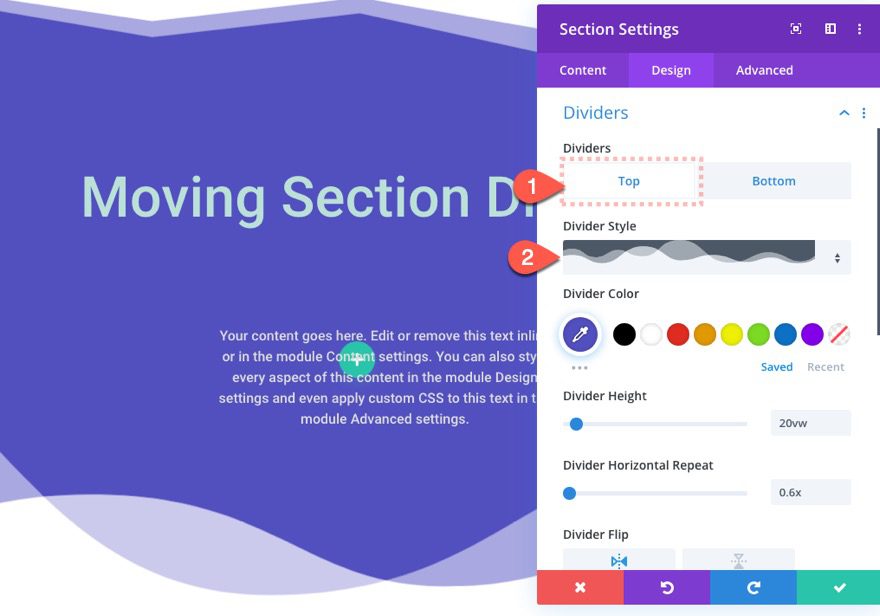
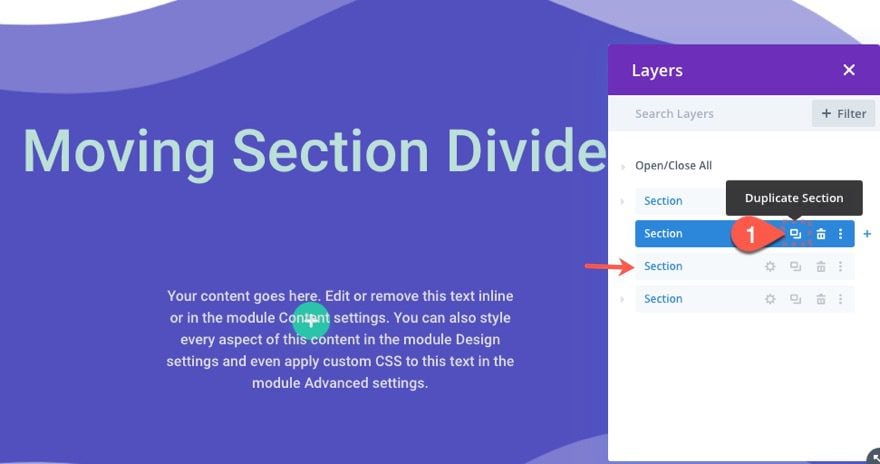
Creating New Divider Styles with Ease
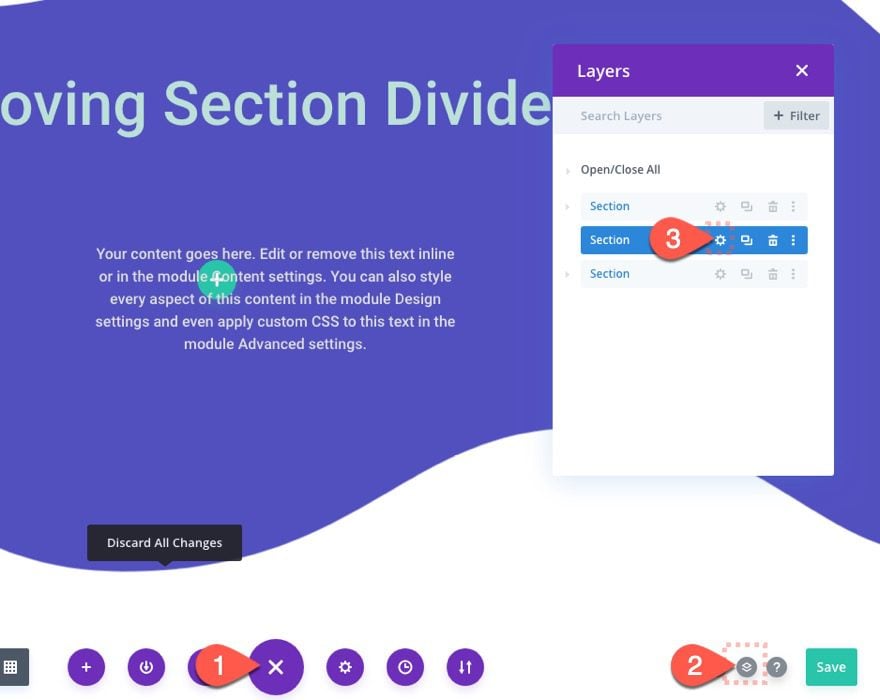
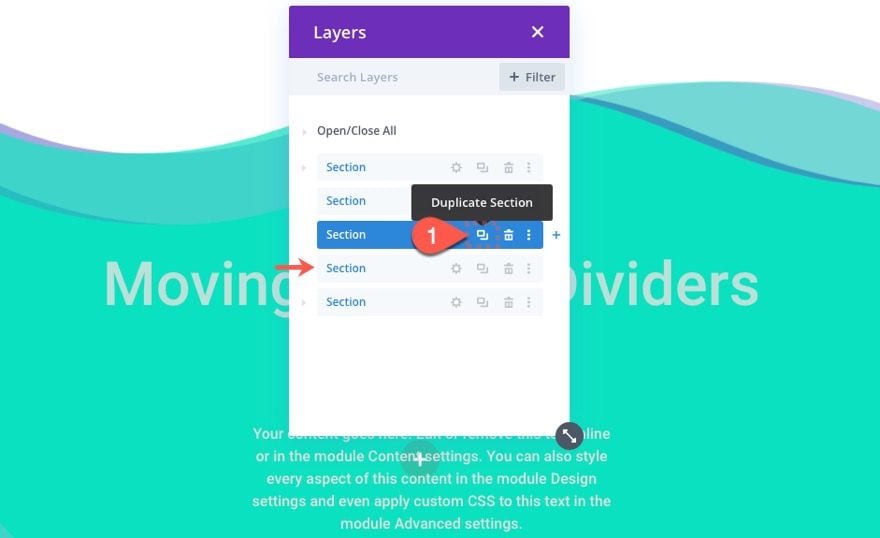
With this simple template in place, we can explore new section divider styles with ease. To update the section divider style, deploy the layers box by clicking the layers icon in the Divi Builder Settings menu. Then click to open the settings of the middle section containing the divider styles.
Then give the divider a new top divider style:
And then give the divider a new bottom divider style:
And just like that, you have a new animated section divider design:
Creating Multiple Layers of Animated Section Dividers
Since the section used for the divider design has no height, it can easily be duplicated to create overlapping animated section divider designs. This opens the door for much more creative designs.
Here’s how to do it.
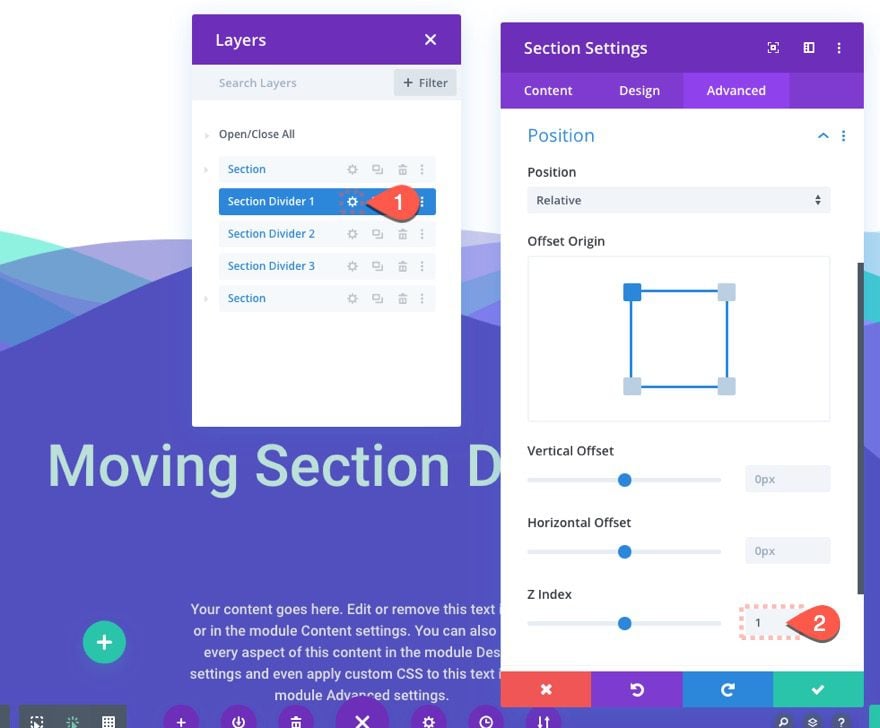
Update Divider Style for Section Divider 1
First, open the section settings for the middle section again and update the top and and bottom divider style with the following (see screenshots):
Create Section Divider 2 (the second layer)
Then use the layers box to duplicate that middle section to create another (identical) section divider design. Because both sections have 0px height, they will sit on top of each other.
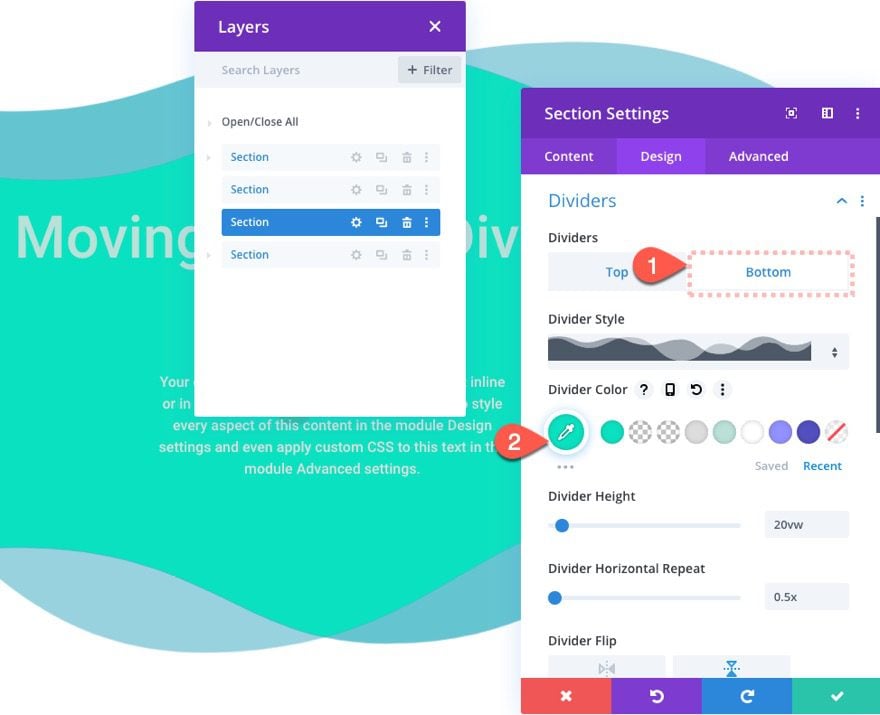
Section Divider Color
Then open the new duplicate section and update the following:
- Top Divider Color: #08e1c0
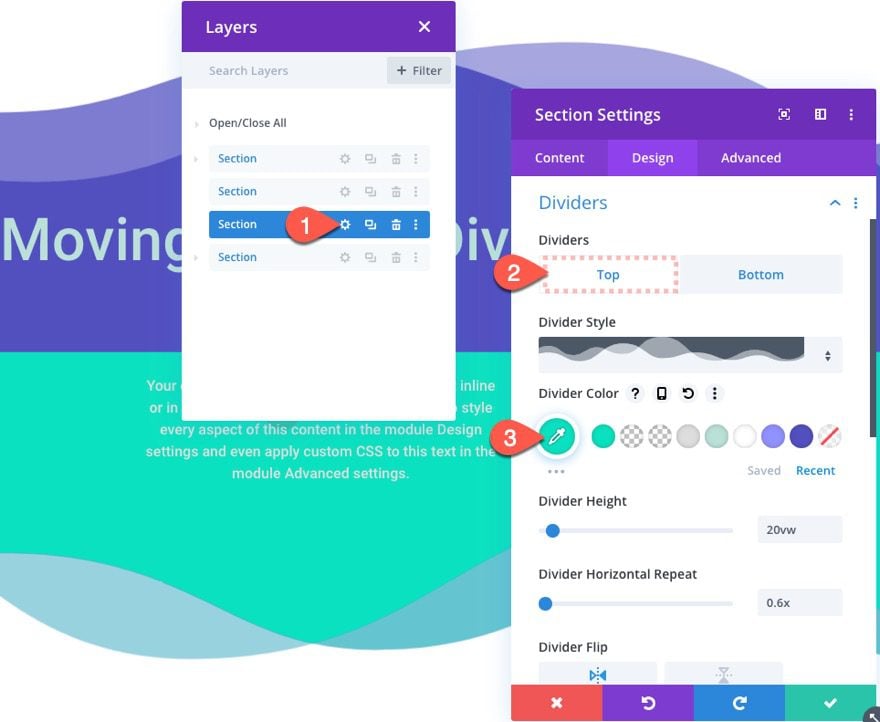
- Bottom Divider Color: #08e1c0
Section Divider Scroll Effects
Then update the horizontal motion scroll effect as follows:
For Desktop…
- Starting Offset: 6 (at 0% viewport)
- Mid Offset: 0 (at 50% viewport
- Ending Offset: -3 (at 100% viewport)
For Tablet…
- Starting Offset: 3 (at 0% viewport)
- Mid Offset: 0 (at 50% viewport
- Ending Offset: -3 (at 100% viewport)
Create Section Divider 3 (the third layer)
To create the third layer of our animated section divider design, duplicate the previous section.
Section Divider 3 Color
Open the duplicate section and update the following divider styles:
- Top Divider Color: #9191ff
- Bottom Divider Color: #9191ff
Section Divider 3 Scroll Effects
Then update the horizontal motion scroll effect as follows:
- Starting Offset: 3 (at 0% viewport)
- Mid Offset: 0 (at 50% viewport)
- Ending Offset: -2 (at 100% viewport)
Basically we are making small tweaks to the scroll effect offsets of each layer to create more sporadic movement in the background of the content.
Section Divider Z Index
Now that we have our three layers complete, we can choose which divider we want to show on top by updating the z index for that section. In this example, let’s update the first section divider with a great z index as follows:
- Z Index: 1
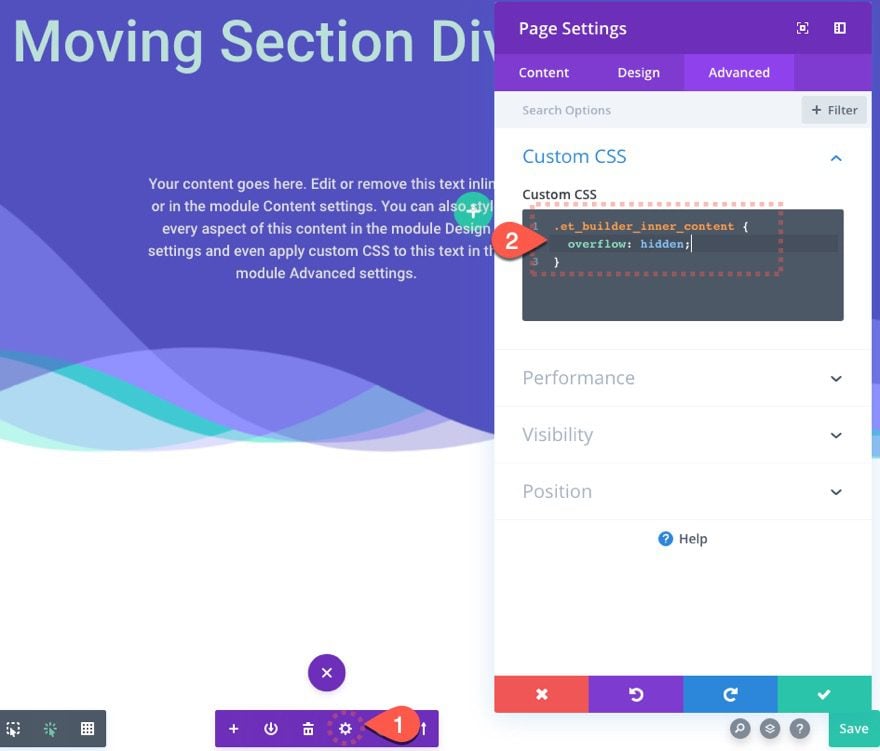
Hiding Overflow
As a final step, we need to make sure our scaling sections do not overflow outside the page container. To make sure this doesn’t happen, open the page settings and add the following Custom CSS:
.et_builder_inner_content {overflow: hidden;}
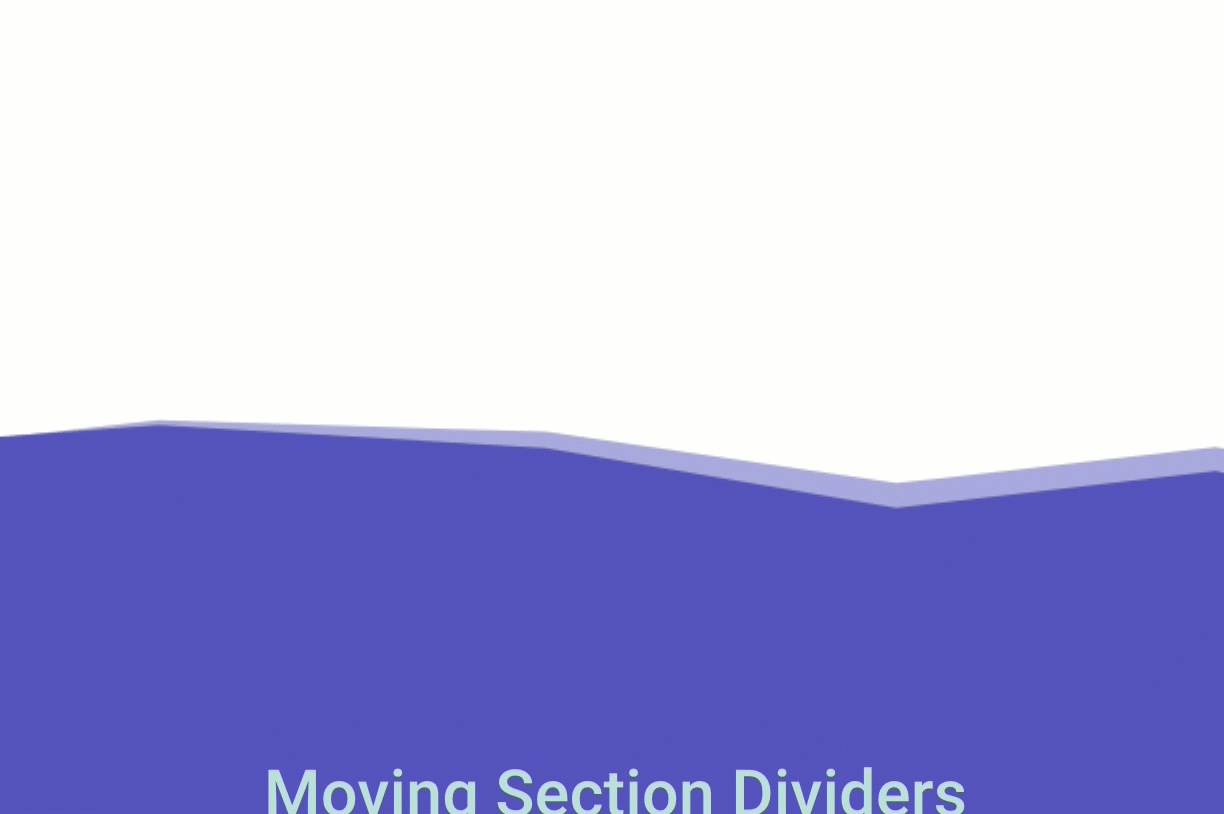
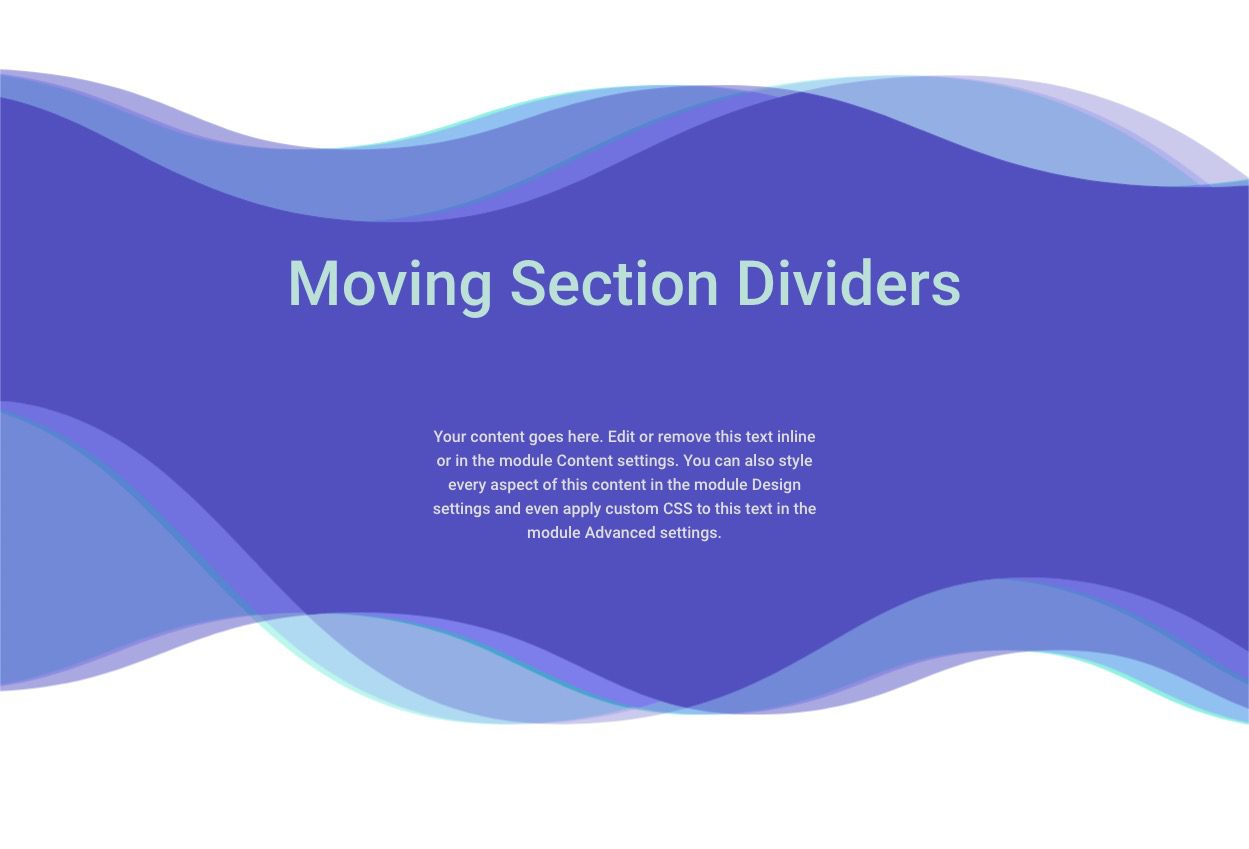
Final Result
Here is the final static design.
And here is the design as the user scrolls down the page. Notice the beautiful moving colors!
Final Thoughts
Animating section dividers on scroll is a fun and effective way to bring more life to a web page. Hopefully, this will give you a little inspiration to spark even more creative designs on your own.
I look forward to hearing from you in the comments.
Cheers!


Can’t set the “Bottom Divider Horizontal Repeat” to 0.5x, minimum is 1x.
Hey, Rafael! You are correct, since the publication of the article there have been some changes and the sub-1x value can no longer be applied.
Thank you for the report, we have informed our Content Team about this inaccuracy.
I used this effect on my website (desktop version) but it looks like it widens my page to the right. Is there a quick and easy fix for this?
Had the same problem, but I got a solution.
Go to the site-settings (main purple module) and navigate to the “Advanced Settings”. Click on “Visibility” and there will be an option named “Horizontal Overflow”. Set the option to “Hidden” and the problem will be fixed.
For the love of everything that is simple and straight forward, please stop using animations to show the effect you are demonstrating and just show it in the content before the tutorial.