

Horizontal Pricing Tables are a great way to promote products with a lot of features. And, with Divi and its new five column layout, this is surprisingly easy to do. However, as with any layout that has five or more columns, the challenge comes with making the layout responsive so that it looks good on mobile as well. In this tutorial, I’m going to show you how to create horizontal pricing tables that look great on all devices. And, I’ll even show you how easy it is to duplicate your horizontal pricing tables and use new design features like “find and replace” to quickly change the color scheme of each of your tables in a few clicks.
Let’s get started.
- 1 Sneak Peek
- 2 Getting Started
- 3 Setting up the Five Column Row for your Horizontal Pricing Tables
- 4 Filling the Columns with Modules of Content
- 5 Adding the Arrow Design and Responsive Column Spacing
- 6 Duplicating the Table for New Tables and Color Schemes
- 7 Using Find and Replace to Test out Fonts
- 8 Final Thoughts
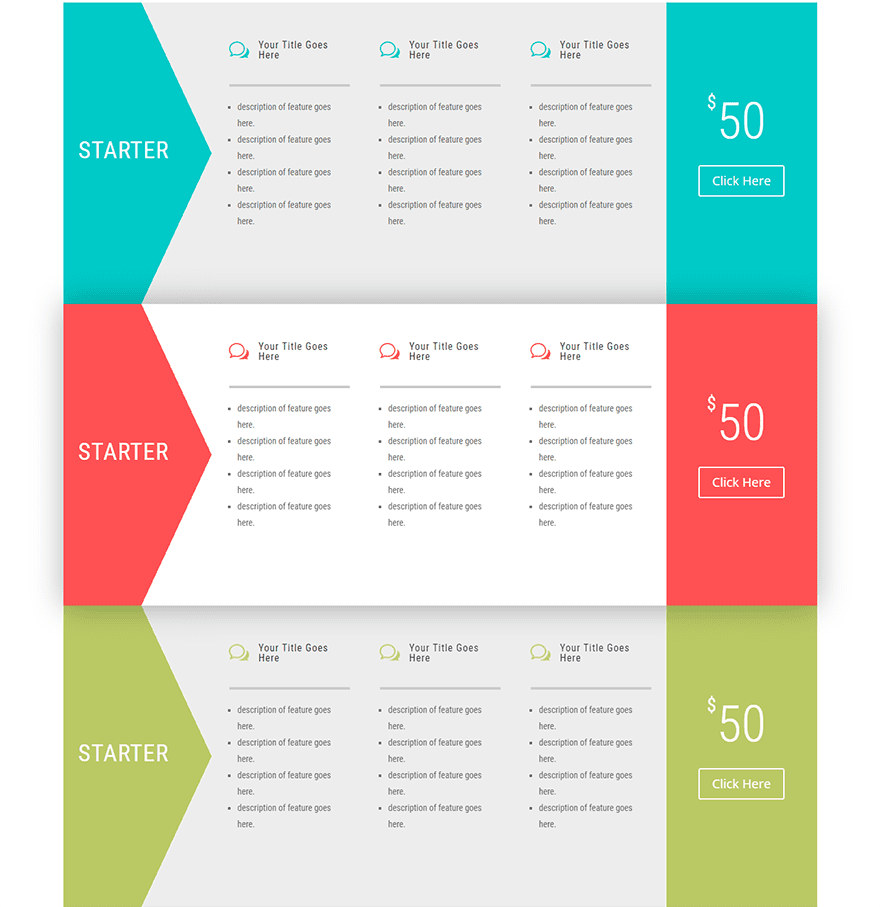
Sneak Peek
Getting Started
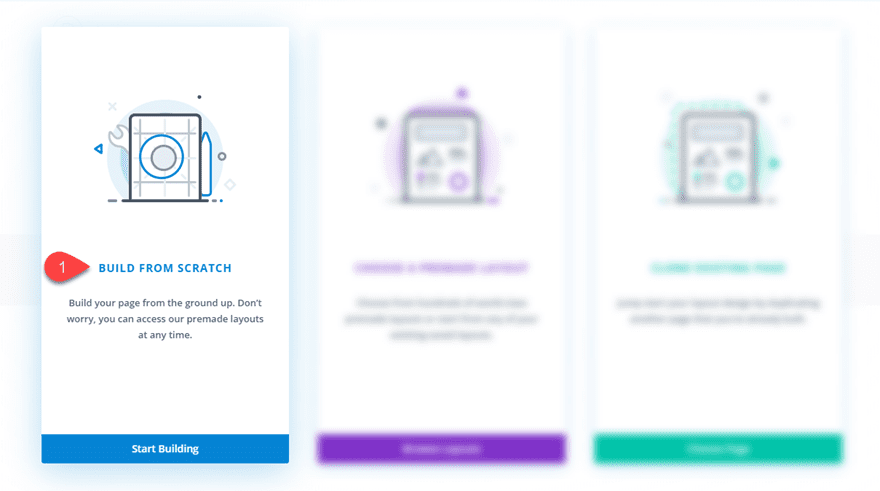
For this tutorial, all you will need is Divi. And we will be using the Visual Builder. Since we will be building the tables from scratch, you will need to create a new page, deploy the visual builder and then select the option “Build Layout from Scratch”.
After that, you are ready to start. Let’s do it!
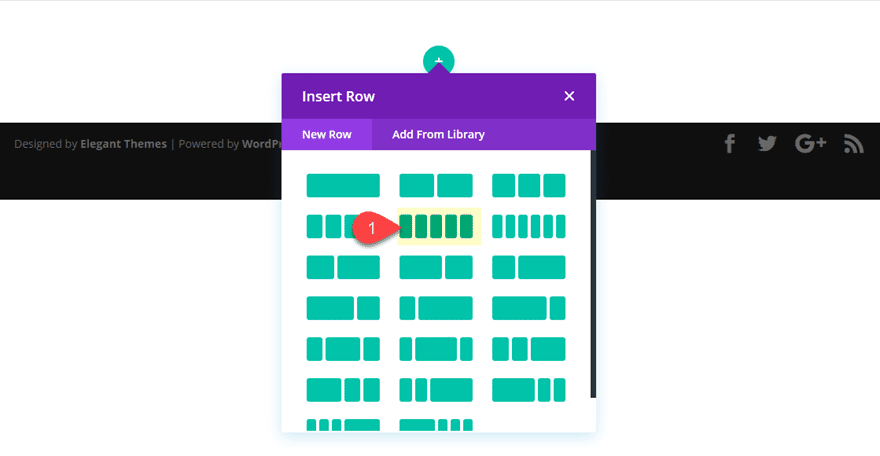
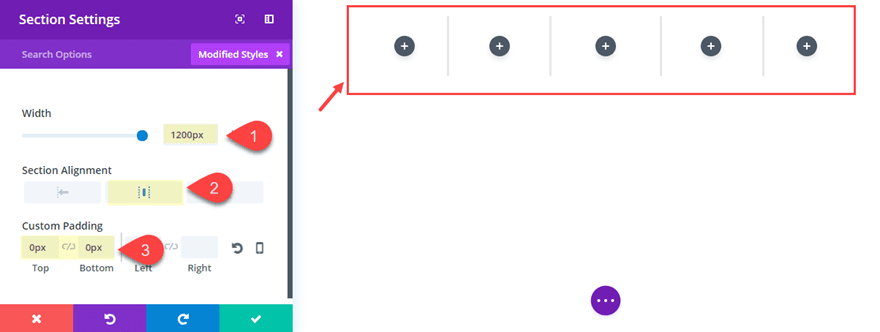
Setting up the Five Column Row for your Horizontal Pricing Tables
For starters, Let’s give a five column layout to the section already waiting for us in the visual builder.
Before we start adding any modules, let’s update the section settings to have a custom width without any top or bottom padding.
Width: 1200px
Section Alignment: Center
Custom Padding: 0px Top, 0px Bottom
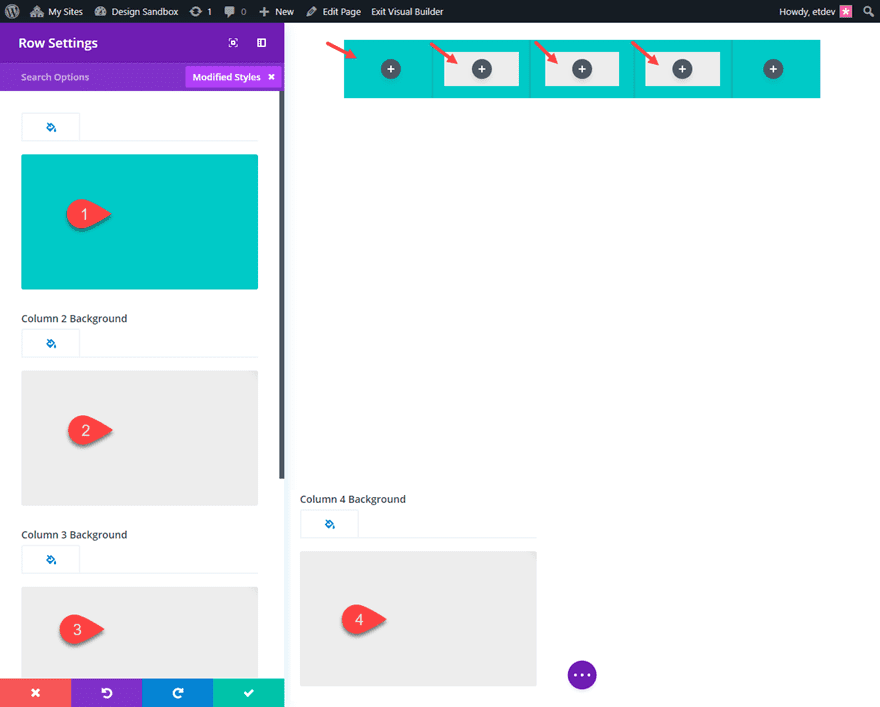
Then go to the row settings to quickly give a background color to your row and also to the three middle columns as follows:
Background Color: #00cbc9
Column 2 Background Color: #00cbc9
Column 3 Background Color: #eeeeee
Column 4 Background Color: #eeeeee
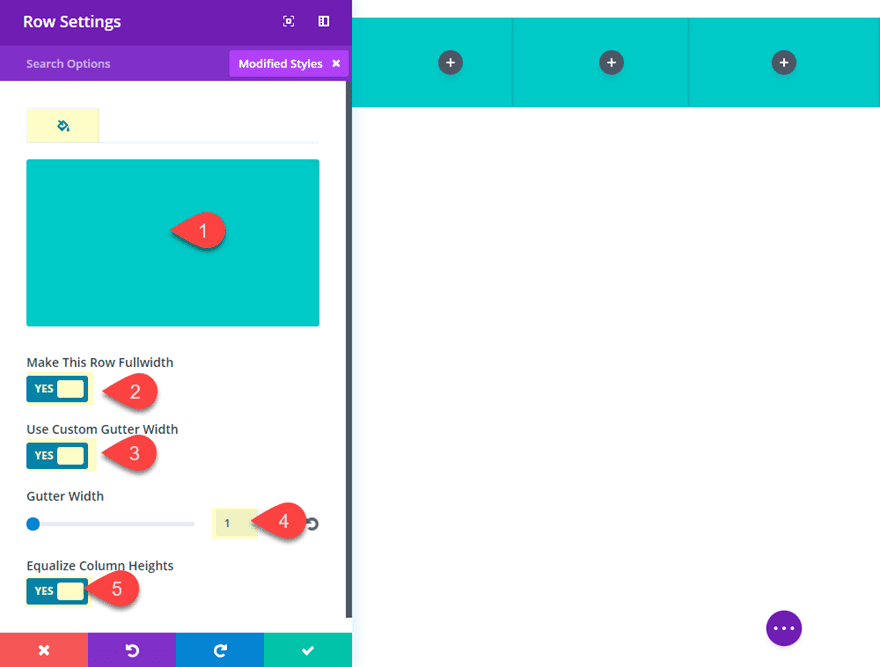
Then update the sizing as follows:
Make this Row Fullwidth: YES
Gutter Width: 1
Equalize Column Heights: YES
We will need to come back to the row settings in a bit to update spacing, but for now let’s start adding the blurbs to each of our columns for content.
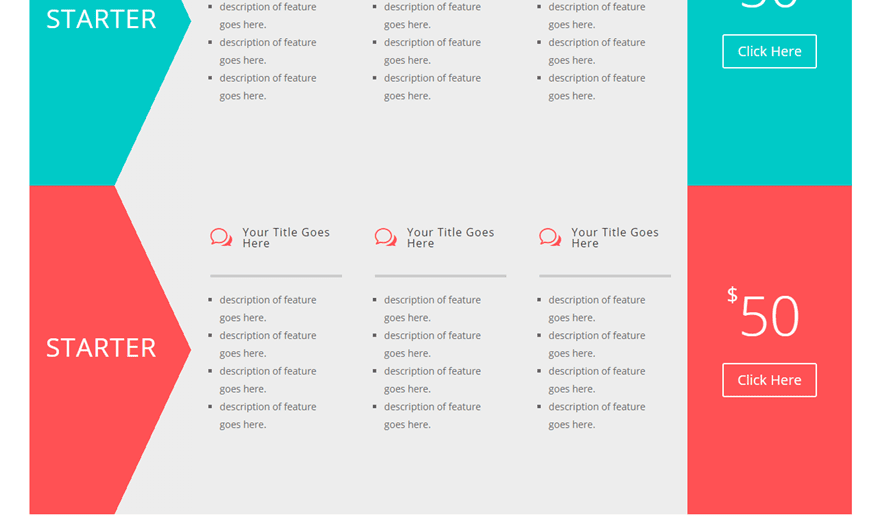
Filling the Columns with Modules of Content
The Title of the Product
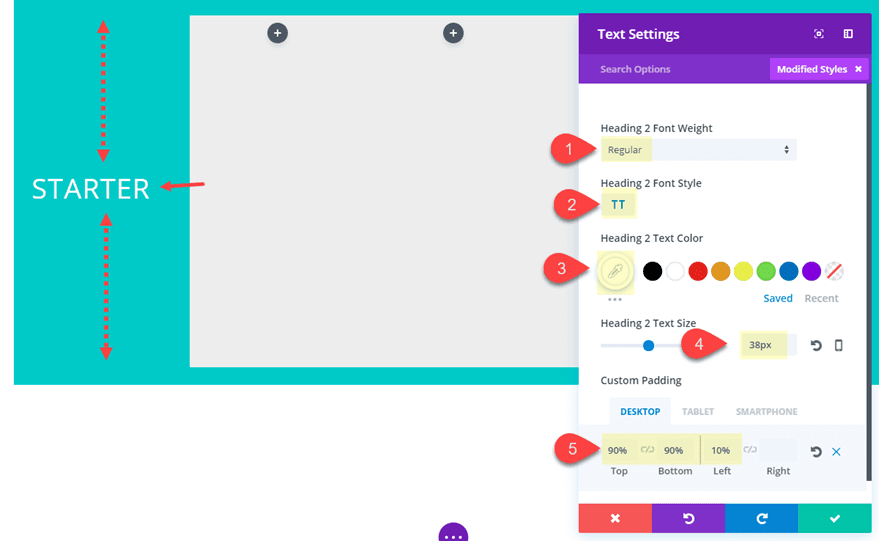
In the first column, add a text module with the following header in the content box (under the text tab):
<h2>Starter</h2>
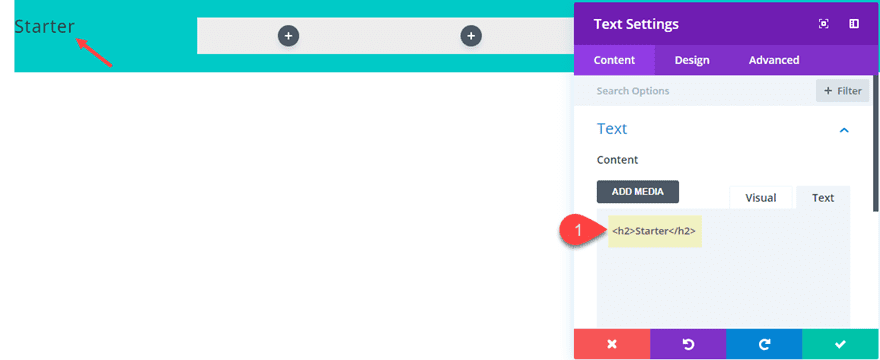
This will serve as the spot for the title of your plan or product you are featuring. In this example, this would be a “Starter” plan of some kind.
Then update the following design settings:
Heading 2 Font Style: TT
Heading 2 Text Color: #ffffff
Heading 2 Text Size: 38px
Custom Padding (desktop): 90% Top, 90% Bottom, 10% left
Custom Padding (tablet): 30% Top, 30% Bottom
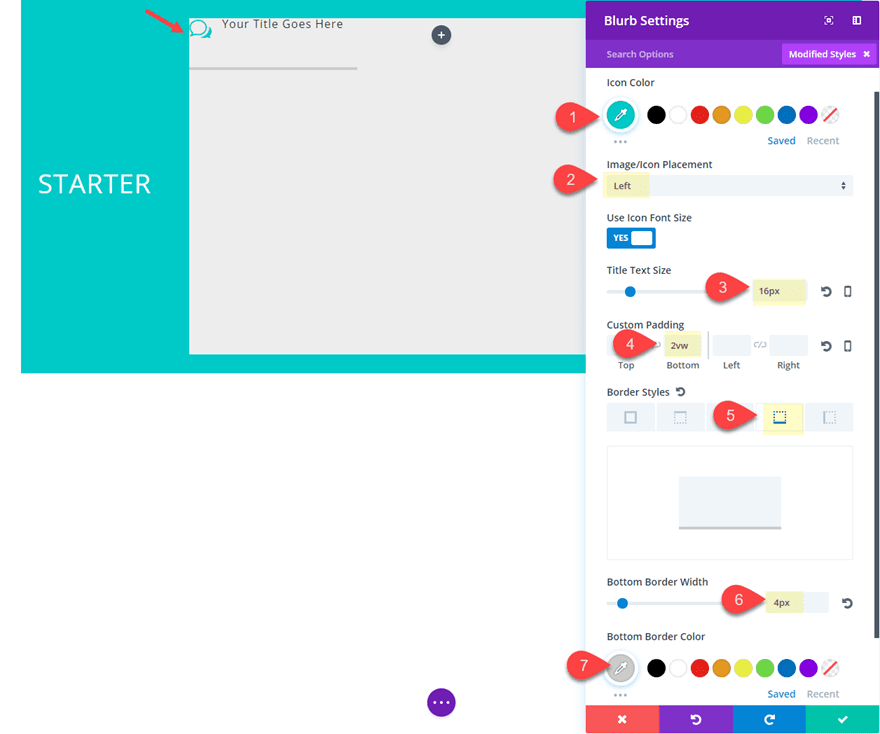
Add Blurbs for Feature Category Headings
In the second column, add a blurb module. Then delete the filler text in the content box and leave the Title text alone. Then choose to use an icon instead of an image and update the icon with one of your choice.
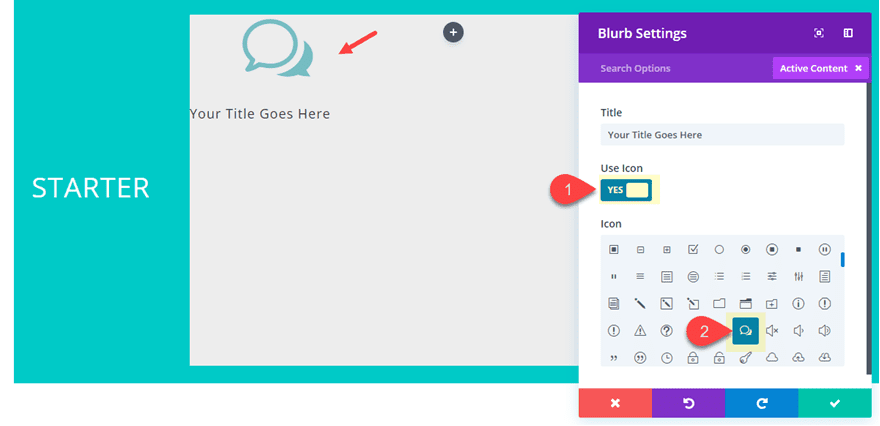
Jump over to the design tab and update the rest of the settings as follows:
Icon Color: #00cbc9
Image/Icon Placement: Left
Title Text Size: 16px
Custom Padding: 2vw Bottom
Bottom Row Border Width: 4px
Bottom Border Color: #cccccc
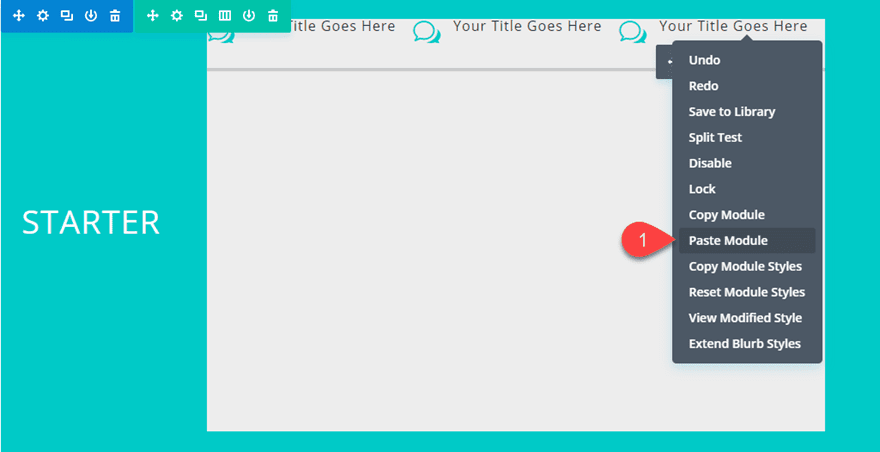
Since this blurb design will be used as a feature category title in columns 2, 3, and 4, you can copy the blurb module and paste it into the second and third column.
I realize the spacing doesn’t really look great right now. And you may be tempted to add some spacing at the module level, but for this design, I find it easier to make spacing adjustments at the column level (under row settings). We will get to that later.
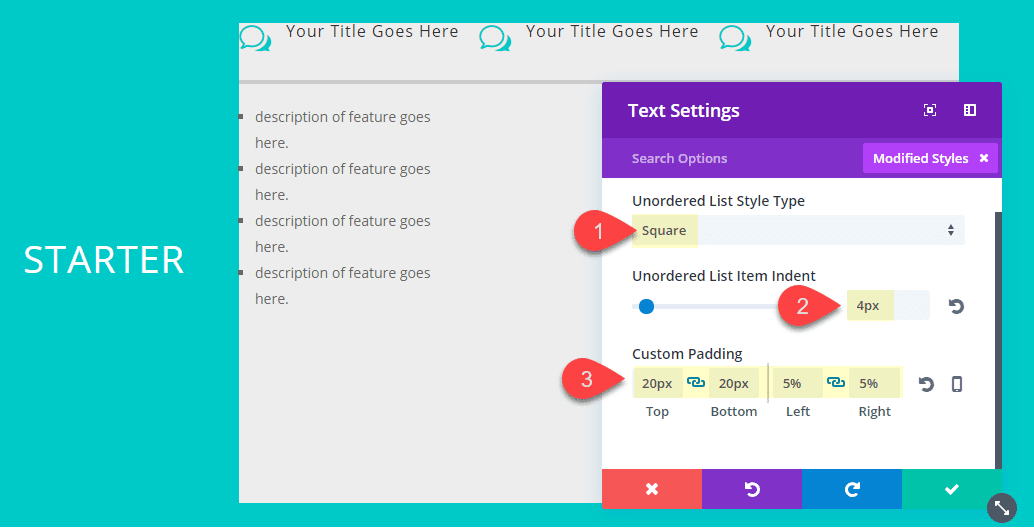
Add Text Modules for a List of Feature Descriptions
Next Add a text module under the blurb in the second column. Then add the following table html code in the content box:
- description of feature goes here.
- description of feature goes here.
- description of feature goes here.
- description of feature goes here.
Unordered List Style Type: Square
Unordered List Item Indent: 4px
Custom Padding: 20px Top, 20px Bottom, 5% Left, 5% Right
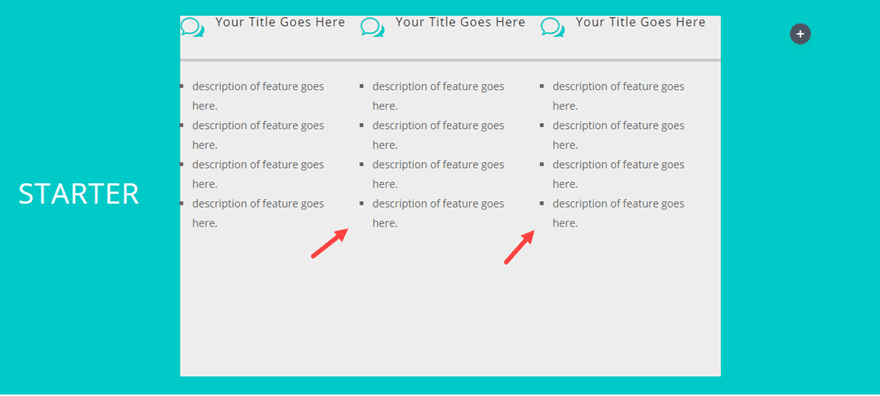
Now like we did for the blurbs, go ahead and copy the text module and paste it under each of the blurb modules in columns 3 and 4.
In the last column (Column five), I’m going to use a pricing table module to get the design of the pricing text with the dollar sign. This is all we really need from the pricing tables module so I will be gutting out the rest of the content and design elements, leaving on the pricing text and the dollar sign. I could use the button that is included with the pricing tables module, but this was a bit more difficult to do some responsive magic on tablet (you will see what I mean later). So I will be using a button module as well.
Go ahead and add the Pricing tables Module to the fifth column. Delete one of the two tables that are included by default by clicking the trash can icon on the right of one of them.
Then get rid of the background color by adding a completely transparent color code.
Background Color: rgba(255,255,255,0)
Then update the following:
Table Header Background Color: rgba(255,255,255,0)
Currency & Frequency Text Color: #ffffff
Currency & Frequency Text Size: 30px
Price Text Color: #ffffff
Border Width: 0px
Custom Margin (tablet): -100% Right
Custom Margin (smartphone): 0% Right
Custom Padding: 0px Top, 10px Bottom, 0px Left, 0px Right

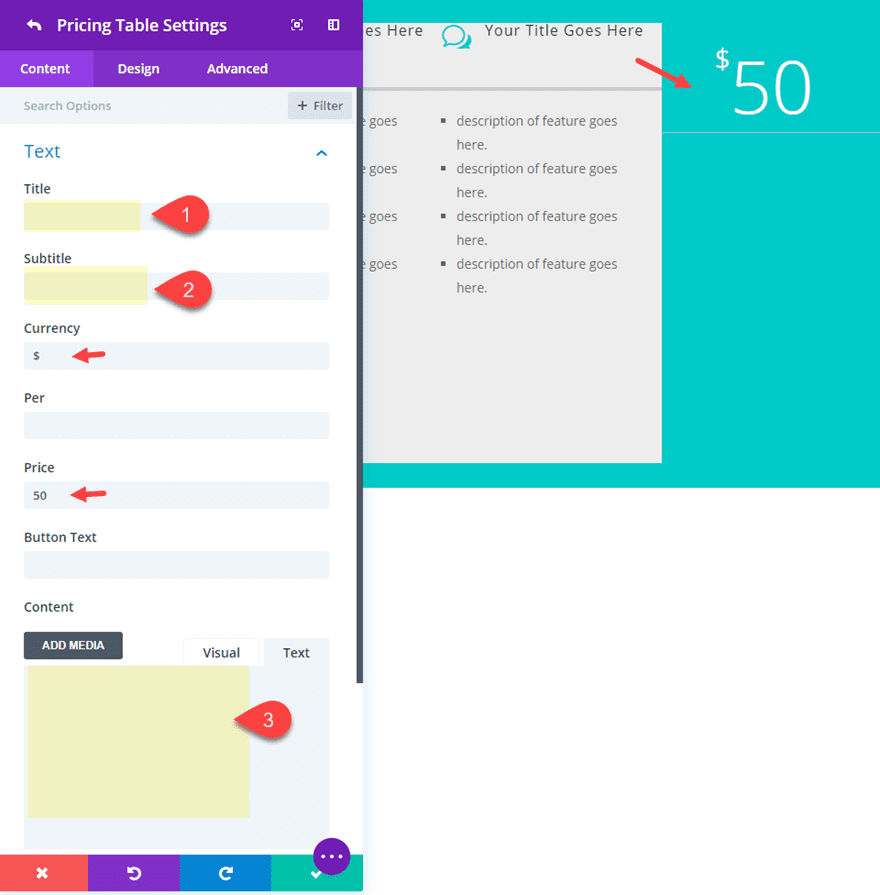
Now go to the individual table settings by clicking the gear icon on the left of the individual table display menu.
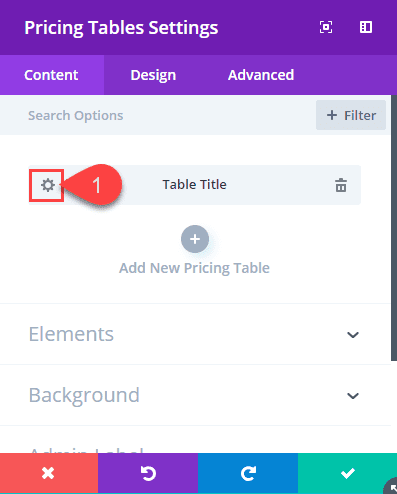
Now delete the default content for the Title, Subtitle, and Content. This will leave only the Currency and Price Text.
Now I know what you are thinking at this point. What to do about that border line under the price text? Well, there is a small snippet of custom css for that. Go to the advanced tab and add the following CSS to the Pricing Top input box:
Pricing Top:
border: none;
Now that is how you successful gut the pricing table for only the Pricing Text and Currency symbol!
For the button, add a button module under the pricing tables module and update the following:
Button Alignment: Center
Text Color: Light
Custom Margin (tablet): -100% Right
Custom Margin (smartphone): 0% Right

The custom margin will match the margin we added to the pricing tables module in order to get a fullwidth module on tablet. Since the five column layout on tablet will put the fifth column on the left side of a two column layout, pulling the module over by -100% to the right will force the module to the fullwidth of the row.

Adding the Arrow Design and Responsive Column Spacing
Adding the Arrow by layering Gradients
To create the arrow design effect in the first column we will be layering two gradient backgrounds. The first gradient background will be added at the column level. We will add the next one later at the module level.
To add the gradient background, go to the row settings and add the following:
Column 1 Gradient Background Left color: rgba(255,255,255,0)
Column 1 Gradient Background Right color: #eeeeee (this should match the background color of column 2)
Gradient Direction: -245deg
Start Position: 75%
End Position: 0%
![]()
Save settings and jump over to the text module settings in column one. This is where we will add the second layer of background gradient to complete the arrow. Update the following:
Column 1 Gradient Background Left color: #eeeeee
Column 1 Gradient Background Right color: rgba(255,255,255,0)
Gradient Direction: 245deg
Start Position: 25%
End Position: 0%
Notice that the values are equally opposite each other. For example, the color order has changed, the 245deg changed from negative to positive, and the 75% is now 25% (the difference). This is how you get the sides of the arrow point to be perfectly symmetrical.
![]()
Spacing the Row and Columns
Go back to the row settings and let’s adjust the spacing of our Row and Columns by updating the following:
Custom Padding: 0px Top, 0px bottom, 0px Left, 0px Right
Custom 2 Padding: 5% Top, 5% bottom, 2% Left, 2% Right
Custom 3 Padding: 5% Top, 5% bottom, 2% Left, 2% Right
Custom 4 Padding: 5% Top, 5% bottom, 2% Left, 2% Right
Custom 5 Padding: 10% Top, 10% bottom
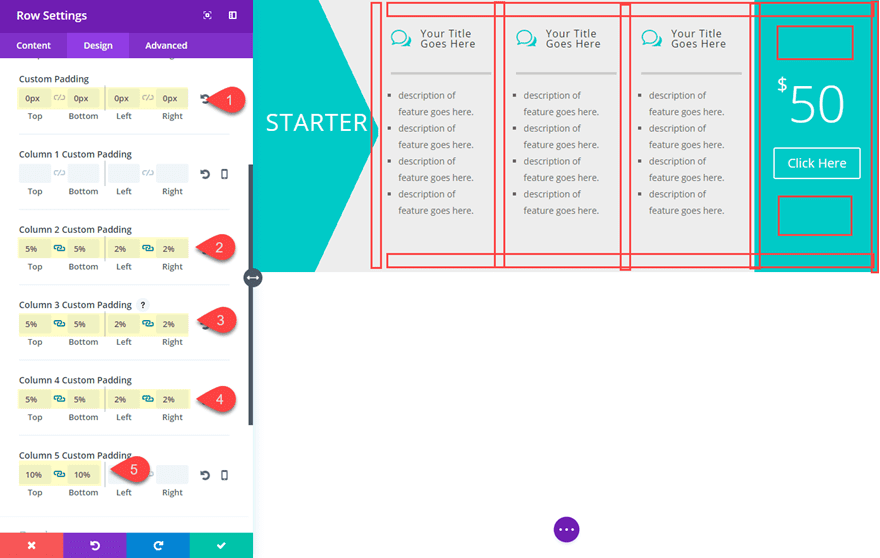
You may be wondering why I didn’t just use a 2 gutter width and be done with it. Well, that’s because I wanted to maximize the space within the columns containing text as much as possible to improve readability on all devices. Every little bit of space we can save matters. That is why the margins between columns are created with left and right padding percentages.
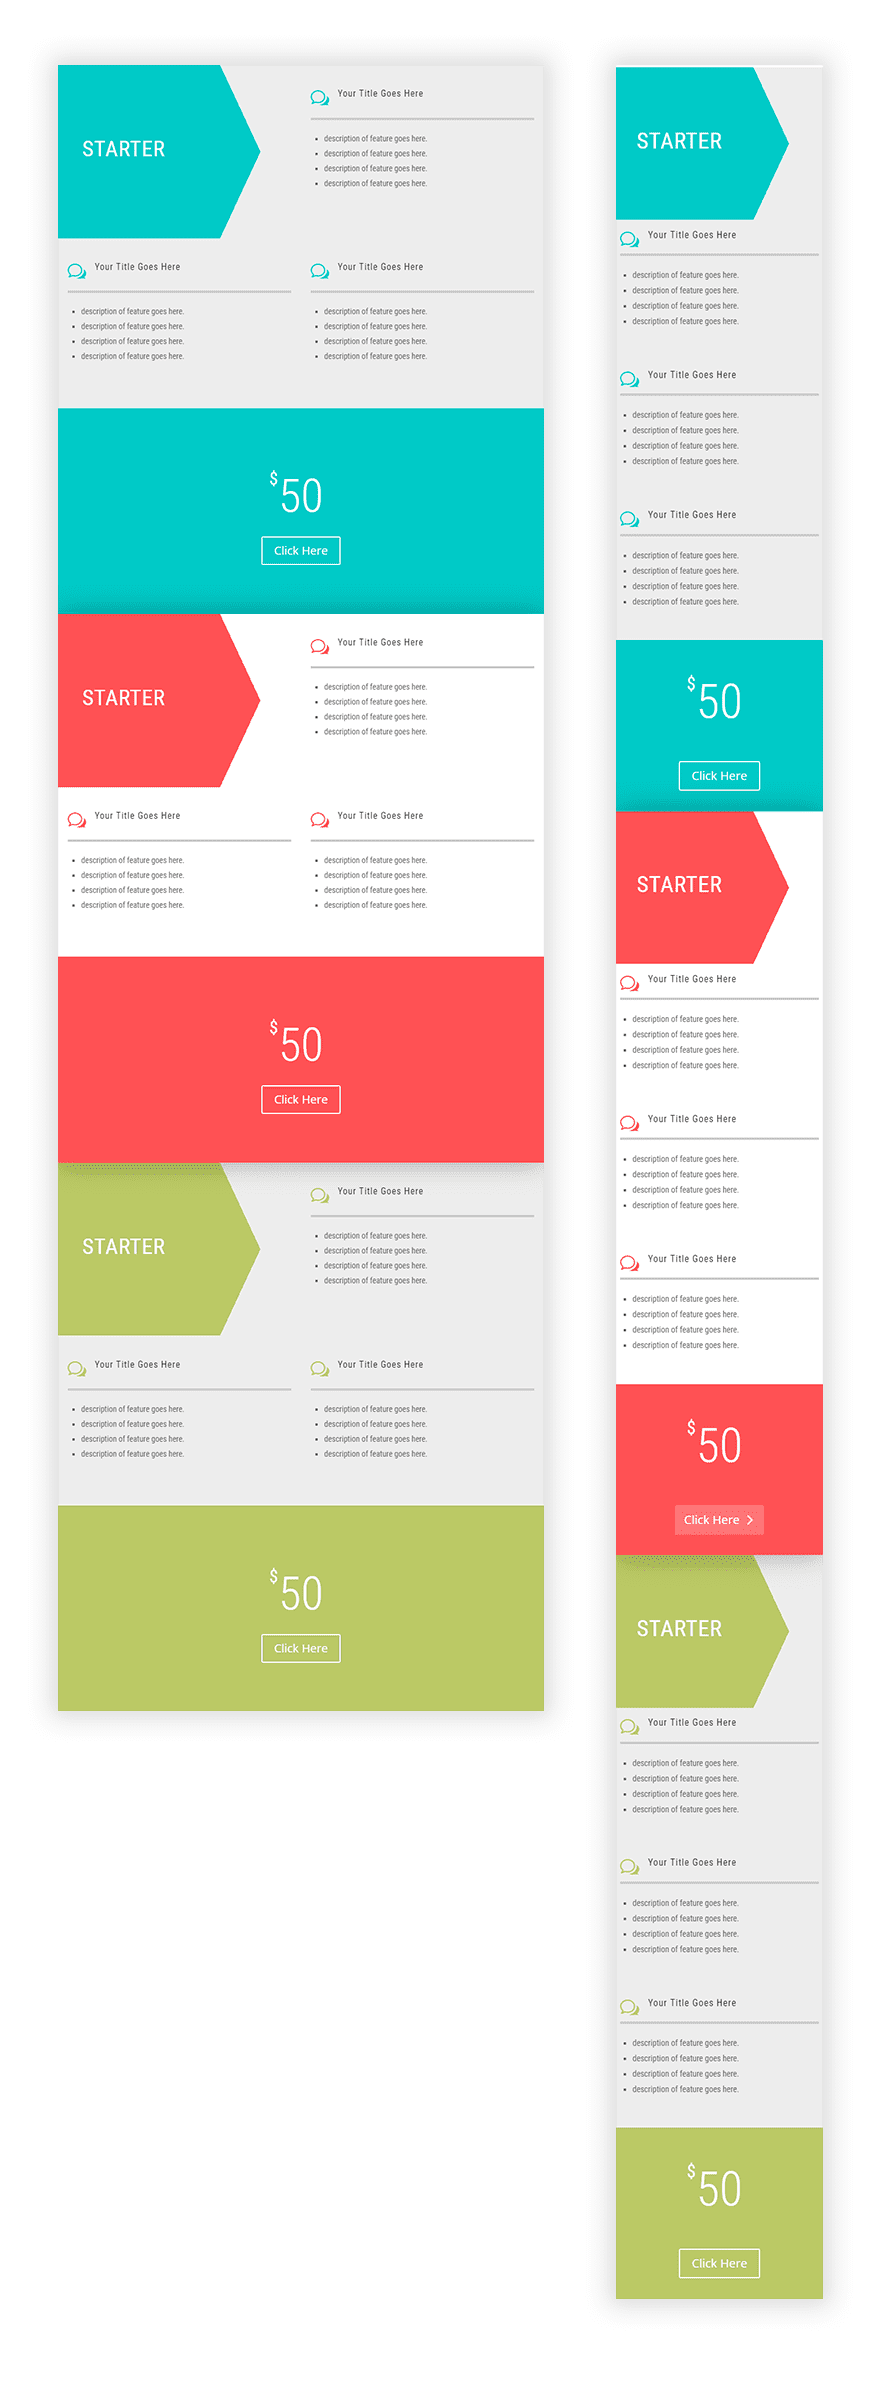
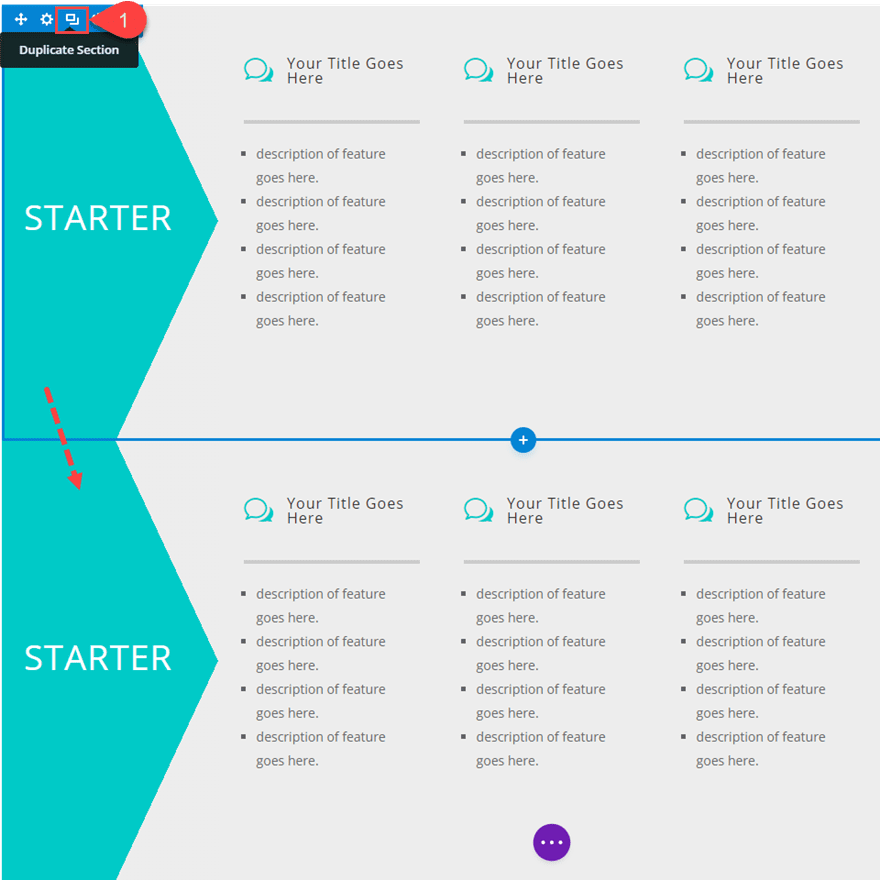
Duplicating the Table for New Tables and Color Schemes
Obviously, you will want to have multiple horizontal pricing tables for users to compare. To create the second pricing table, duplicate the entire section containing the first table you created.
Then open the Row settings and hover over the background color and click find and replace.
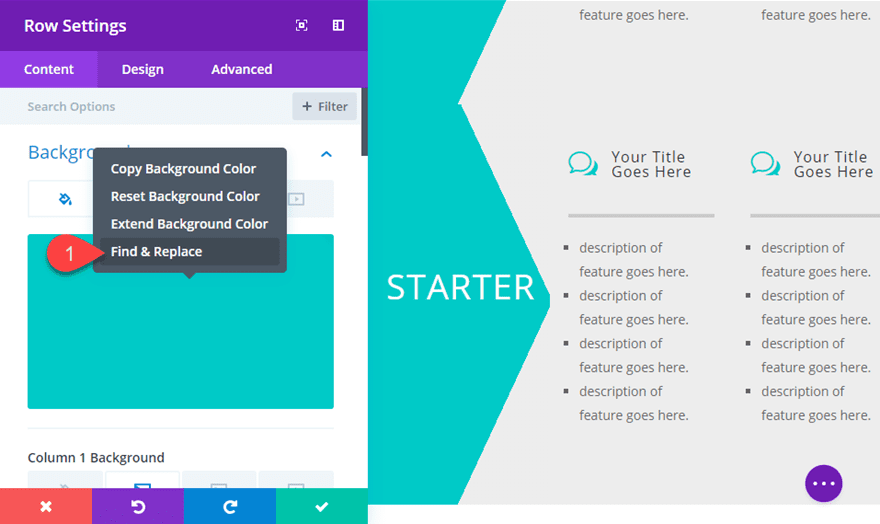
Under “Within” choose “This Section”.
Under “Replace Width”, add the color: #f84f51
Then check the box to Replace All the values found in the section (not just background color).
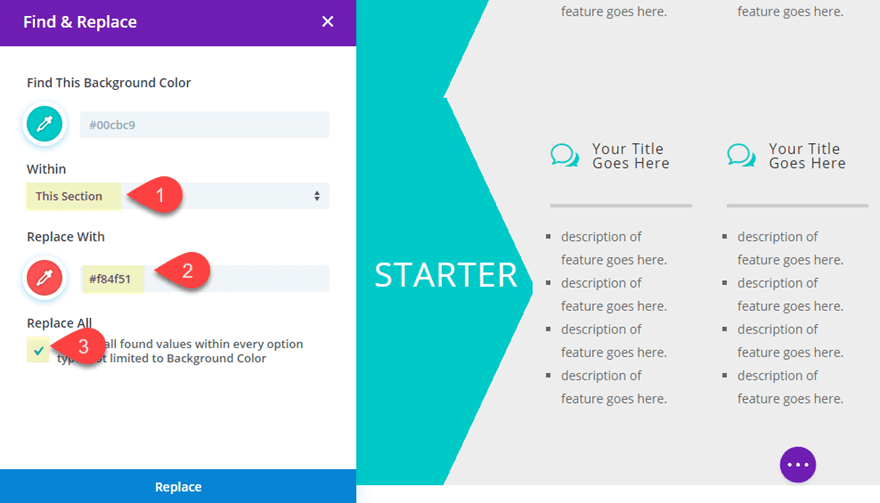
Then click Replace and watch the magic happen. This is a quick and easy way to change all the instances of the previous color with a new color.
Don’t forget to save the row settings before exit to save the changes.
Now you have a new table with a new color scheme.
Repeat this process again to add another table with the color: #bdc958
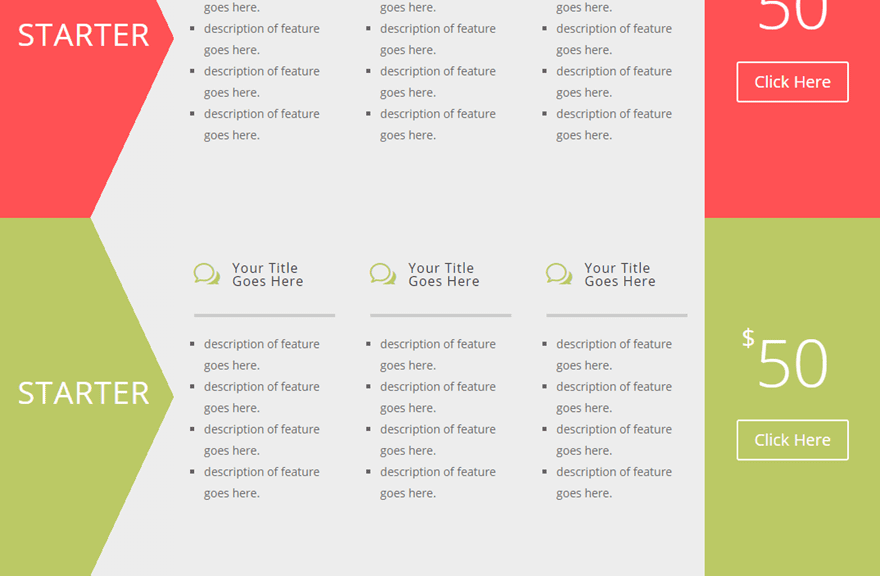
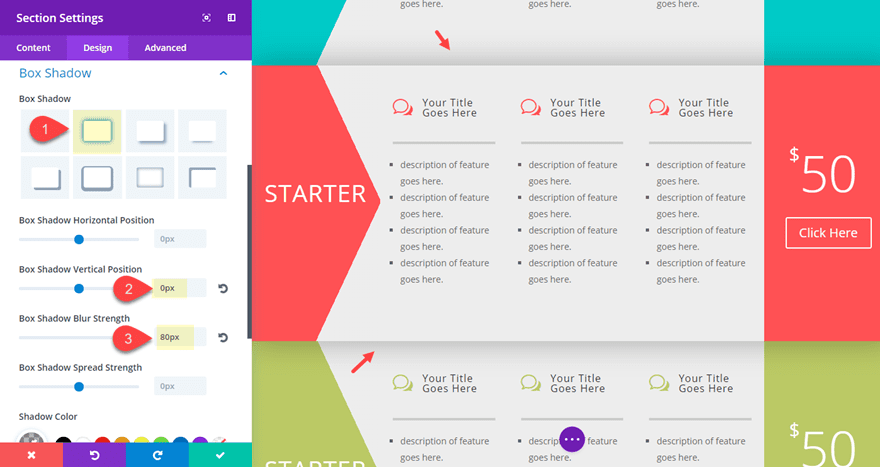
Making a Featured Table
In order to make one of your tables look featured and stand out a bit, you can add a box shadow to the section holding the table as well as change the gray color used for column backgrounds and gradients to a nice white color.
To do this, go to the section settings for the second section (the middle one) and update the following:
Box Shadow: see screenshot
Box Shadow Vertical Position: 0px
Box Shadow Blur Strength: 80px
To replace the gray background color, go to the row settings and find the column 2 background color (#eeeeee). Right click on it and click “find and replace”. The update the following:
Under “Within” choose “This Section”.
Under “Replace Width”, add the color: #ffffff
Then check the box to Replace All the values found in the section (not just background color).
Then click “Replace”.
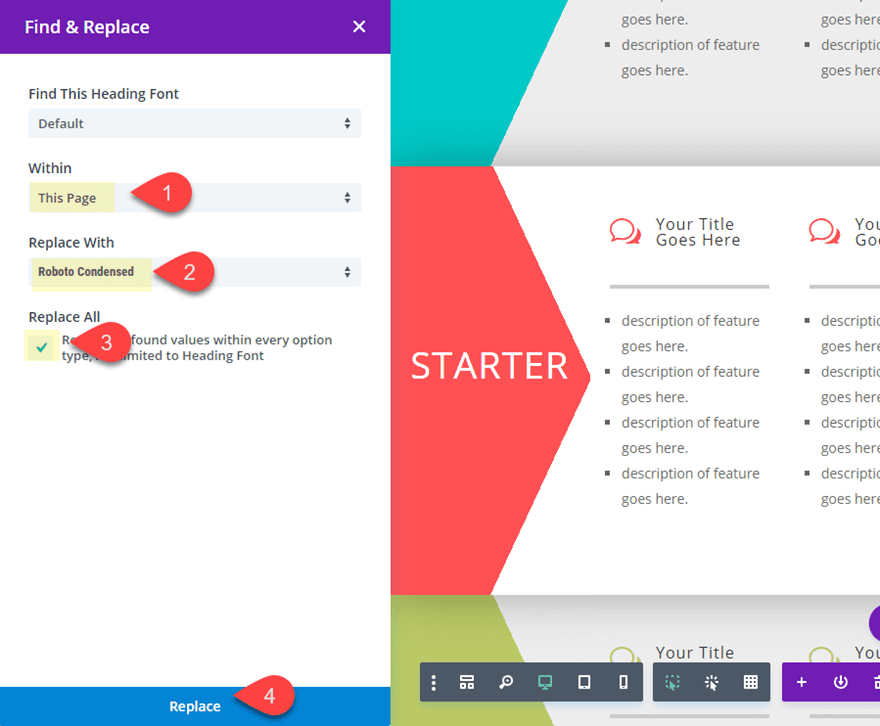
Using Find and Replace to Test out Fonts
If you want to use a different font throughout your table, you can easily test out different ones by using the “Find and Replace” feature. I purposefully left the default font for all modules to make this process a smooth one. To change the font for your entire page of tables, all you need to do is open the settings of the text module in the first column of any table section (it actually can be any module using the default font on your page). Then right click on the Heading 2 Font being used and select “Find and Replace”. Then update the following:
Under “Within” keep “This Page”.
Under “Replace Width”, select a font (I’m using Roboto Condensed).
Then check the box to Replace All the values found in the section (or you could not check it to replace all h2 fonts).
Then click “Replace”.
Now all the fonts have been changed throughout the entire page.
That’s it! Now the horizontal pricing tables are complete.
Let’s check out the result.
The five column adjustment on tablet and smartphone works beautifully as well.
Final Thoughts
Divi’s five column layout, along with the powerful design features available in the Visual Builder, allow you to make some beautiful horizontal pricing tables. And adjusting the colors and fonts throughout using Find and Replace is a great time saver, improving the design process all the more. I hope that you find the tutorial both informative and inspirational.
I look forward to hearing from you in the comments.
Cheers!


i cannot make the arrow style, i followed all the tutorial but the module gradient overlay the column gradient, help
Please correct.. the Column 2, Background Color… it should be “#eeeeee” not “#00cbc9” as mentioned in the below text…
Then go to the row settings to quickly give a background color to your row and also to the three middle columns as follows:
Background Color: #00cbc9
Column 2 Background Color: #00cbc9
Column 3 Background Color: #eeeeee
Column 4 Background Color: #eeeeee
Hi Jason, great tutorial but I’ve got a little question. After duplicating the section you can see that arrows do not fit perfectly (you can see that on your screen captures). After replacing colors all is ok again on screen captures. But the mis-alignment is still there in my builder . How can I correct that ? I tried playing with gradient background values but not so easy… Thanks….
Great tutorial!
As always I made it right away… 😉
Please make those downloadable 🙂 you made importing easy, you build such beautiful things, why not let us use them?
For the row and column backgrounds: It is written columns 3 & 4 are #eeeee, and 2 is #00cbc9. But in the example and in going through this, it looks like 1 and 5 are #00cbc9 and 2,3,4 a re #eeeeee. Yes?
Leslie,
Good catch! Column 2 background color should be #eeeeee. Thanks.
I’m working on the tut which I love the final product! Lovely! I’m on 3.15, but I don’t have the options for modified styles, unordered list type, unordered list indent, and it’s custom padding. Where can I find this feature?
Nevermind. There isn’t one so blind who cannot see the icon right in front of my face. lol
To take this a step further, you could make it change the chevron where the word Starter is to pointing down rather than blanking pointing off to the right on mobile. This would give the appearance of a much more finished looking product that someone actually thought through the design aspects of instead of just leaving it hanging out like a sore thumb.
Thanks for the suggestion, David.
For me, this has far more value than a layout. Not only am I getting a specific design component, but I’m learning about how certain tweaks/decisions affect the results.
Keep it up!
Thanks Randy. Will do!
Would be awesome to include the json or include these in the layouts built into divi.
This looks really nice!
Great tutorial, thanks for sharing!
I couldn’t find a download link of the layout. I think all tutorials should have the link for downloading the layout at the end. It is good to see how it is done, but even better is to download it ready.
Really good and will try on our next pages
We will look to try this on our new page using divi
Awesome thanks can’t wait to try this on my new website.
Great stuff, I tried it and it works beautifully on all mobile devices.
Awesome!
Hi Jason,
Great stuff and something I would use on my own website Im upgrading ATM. Quick question, is there a place to purchase a json for all this. As a busy (1 person) agency it would save hours upon hours of production. Cheers
Wow, this is really great. I am going to work on this today and I can use this information today for my website. This seems much better than plugins that have limited options. I see a lot of potential here. Thak you for the great blog post.
William,
I totally agree. This is more customizable than a lot of the third party plugin solutions out there. Glad you found this helpful.
Super I loved it.Please keep Doing and help us to learn
Exquisite design, Great tutorial. Thank you!
Thanks Dennis. And you are very welcome.