

Gradient backgrounds are nowadays part of almost every modern website you come across. But as soon as you want to create a more complex gradient, you’re probably tended to reach for image editing software. With Divi, there’s an alternative. Thanks to the many built-in options Divi has, you can turn Image Modules into blurred backgrounds. We’ll blur the backgrounds up to a point where only the colors show through and thus form a gradient. We’ll recreate a beautiful example from scratch and also share the design example JSON file for free!
Let’s get to it!
- 1 Preview
- 2 Download The Blurred Backgrounds Layout for FREE
- 3 Download For Free
- 4 You have successfully subscribed. Please check your email address to confirm your subscription and get access to free weekly Divi layout packs!
- 5 Approach
-
6
Let’s Start Recreating
- 6.1 Add New Section
- 6.2 Add New Row
- 6.3 Add Text Module #1 to Column 1
- 6.4 Add Divider Module to Column 1
- 6.5 Add Text Module #2 to Column 1
- 6.6 Add Button Module to Column 1
- 6.7 Add Image Module #1 to Column 2
- 6.8 Add Image Module #2 to Column 2
- 6.9 Add CTA Module to Column 2
- 6.10 Clone All Modules in Column 2 & Place Duplicates in Column 3
- 7 Preview
- 8 Final Thoughts
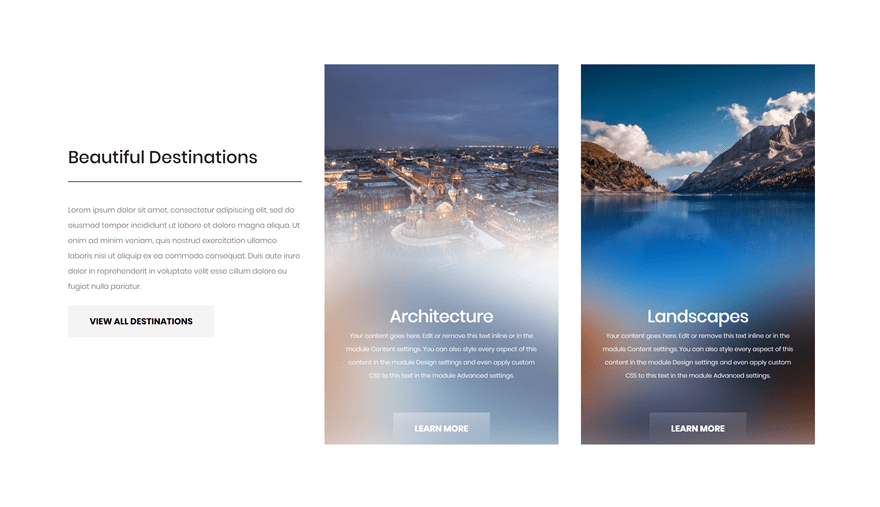
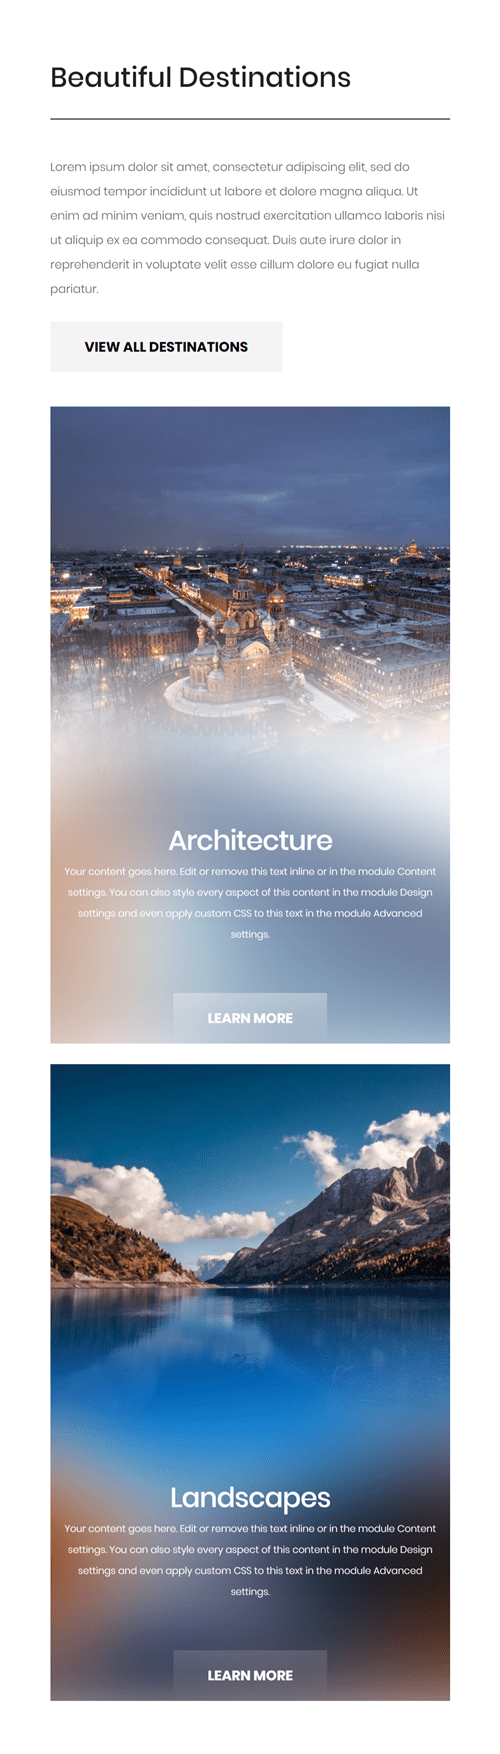
Preview
Before we dive into the tutorial, let’s take a quick look at the outcome across different screen sizes.
Desktop
Mobile
Download The Blurred Backgrounds Layout for FREE
To lay your hands on the free blurred backgrounds layout, you will first need to download it using the button below. To gain access to the download you will need to subscribe to our newsletter by using the form below. As a new subscriber, you will receive even more Divi goodness and a free Divi Layout pack every Monday! If you’re already on the list, simply enter your email address below and click download. You will not be “resubscribed” or receive extra emails.

Approach
- We’re adding three different modules to one column; two Image Modules and one CTA Module
- The first image keeps its initial look
- The second image will be blurred and increased in size
- We’ll also enhance the colors by playing around with the other filters settings that are included in the Image Module
- The CTA module will overlap the blurred Image Module and use it as its background
- To make sure the blur and size increase of Image Module #2 don’t surpass the column container, we’re going to hide the column overflow
Let’s Start Recreating
Subscribe To Our Youtube Channel
Add New Section
Start by adding a new regular section to the page you’re working on.

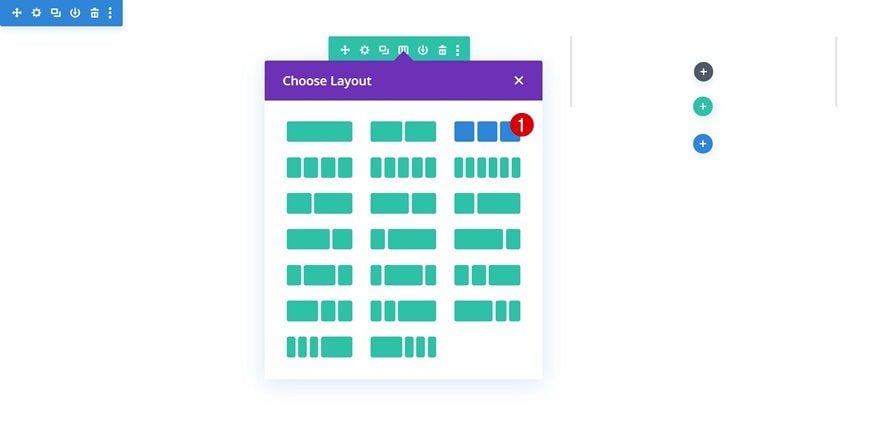
Add New Row
Column Structure
Continue by adding a new row using the following column structure:
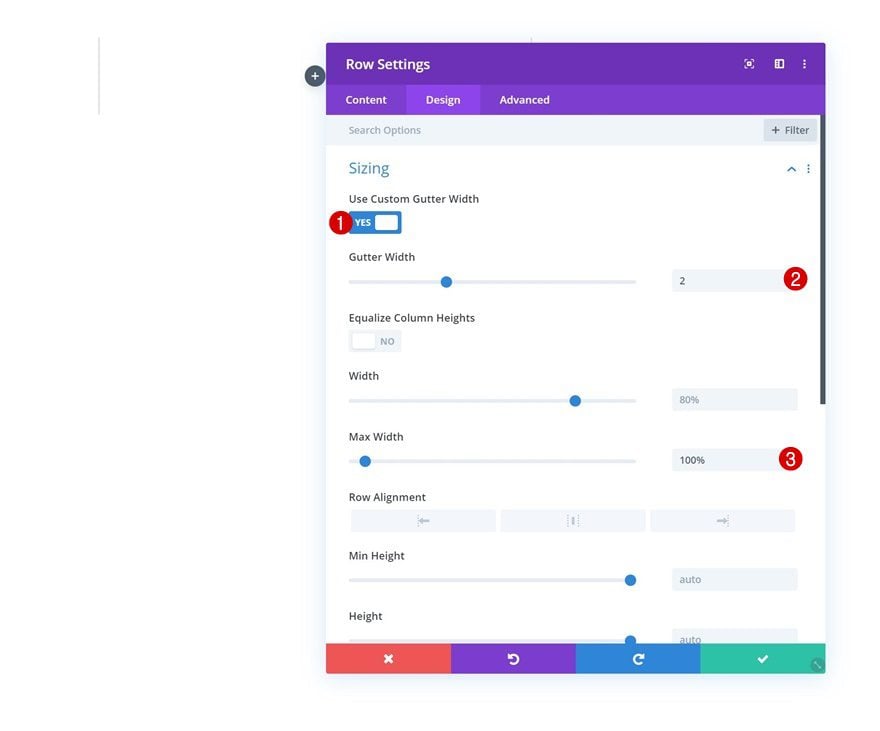
Sizing
Without adding any modules yet, open the row settings and change the sizing settings in the design tab.
- Use Custom Gutter Width: Yes
- Gutter Width: 2
- Max Width: 100%
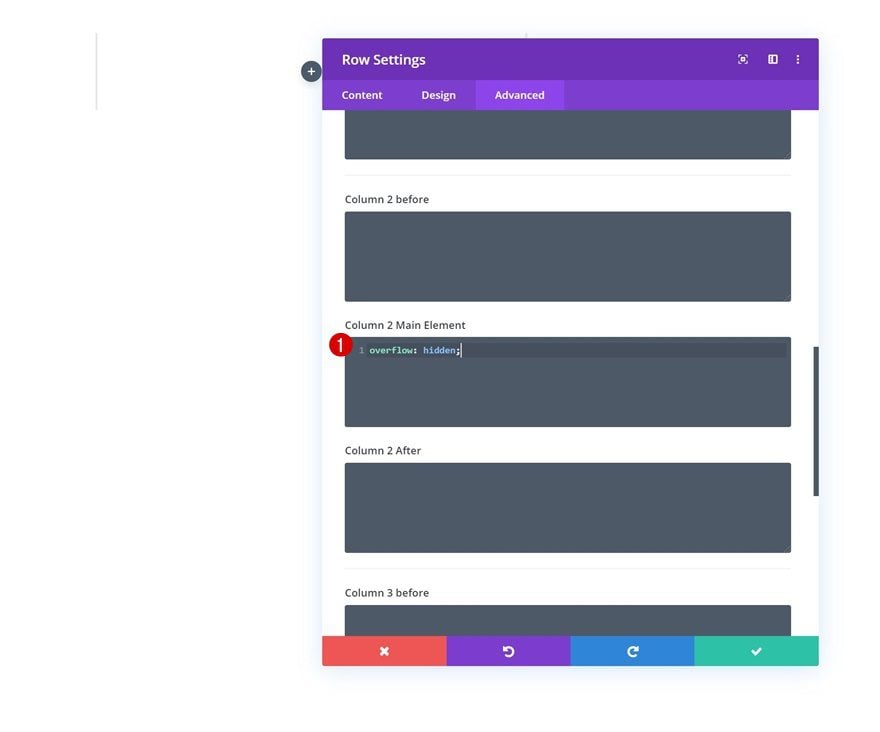
Column 2 Overflow
Move on to the advanced tab and hide the column 2 overflow using one single line of CSS code. Doing this will help us make sure nothing exceeds the column container. This will particularly become important once we start transforming an Image Module into a blurred background and increase its size.
overflow: hidden;
Column 3 Overflow
Do the same thing for the third column.
overflow: hidden;

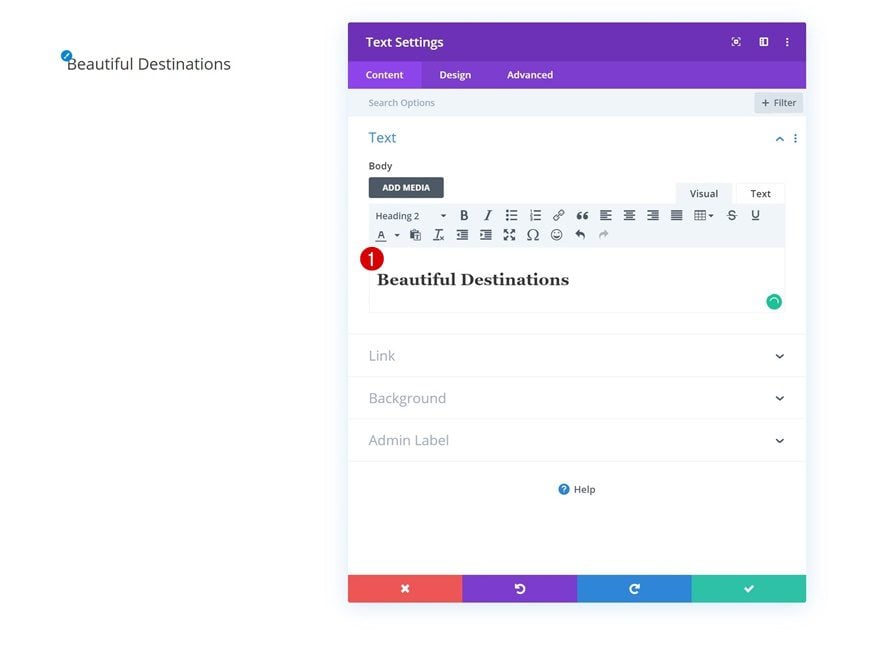
Add Text Module #1 to Column 1
Add H2 Copy
Time to start adding modules, starting with a Text Module in the first column. Enter some H2 content of your choice.
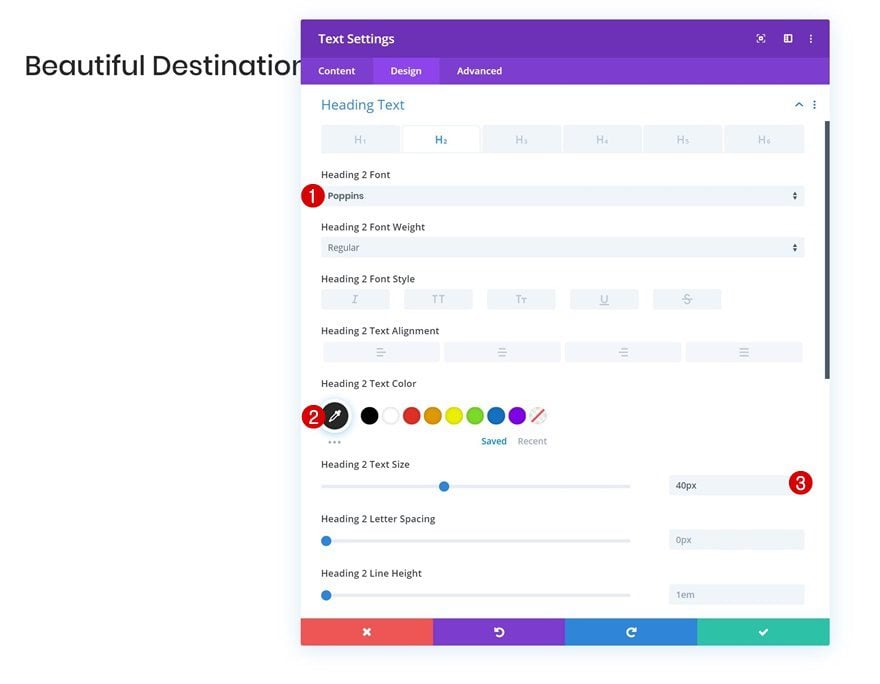
H2 Text Settings
Move on to the design tab and change the H2 text settings.
- Heading 2 Font: Poppins
- Heading 2 Text Color: #232323
- Heading 2 Text Size: 40px
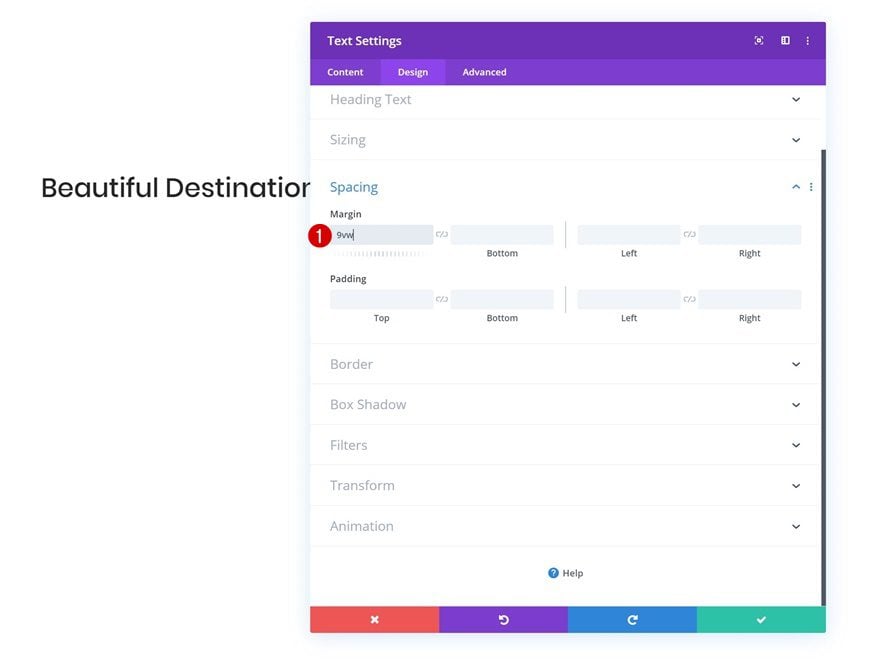
Spacing
Add some custom top margin as well.
- Top Margin: 9vw
Add Divider Module to Column 1
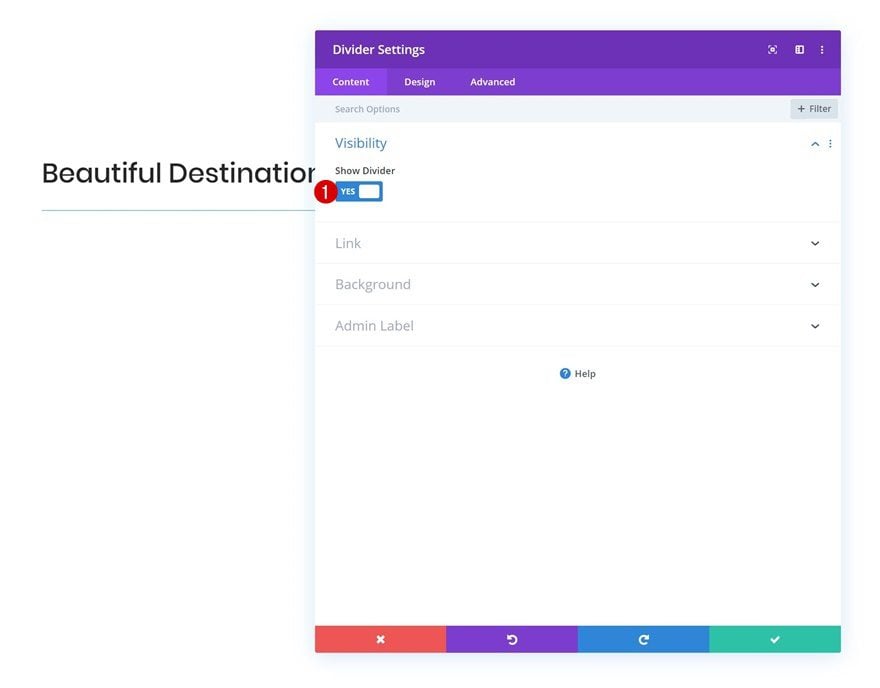
Visibility
The second module we need in column 2 is a Divider Module. Make sure the ‘Show Divider’ option is enabled.
- Show Divider: Yes
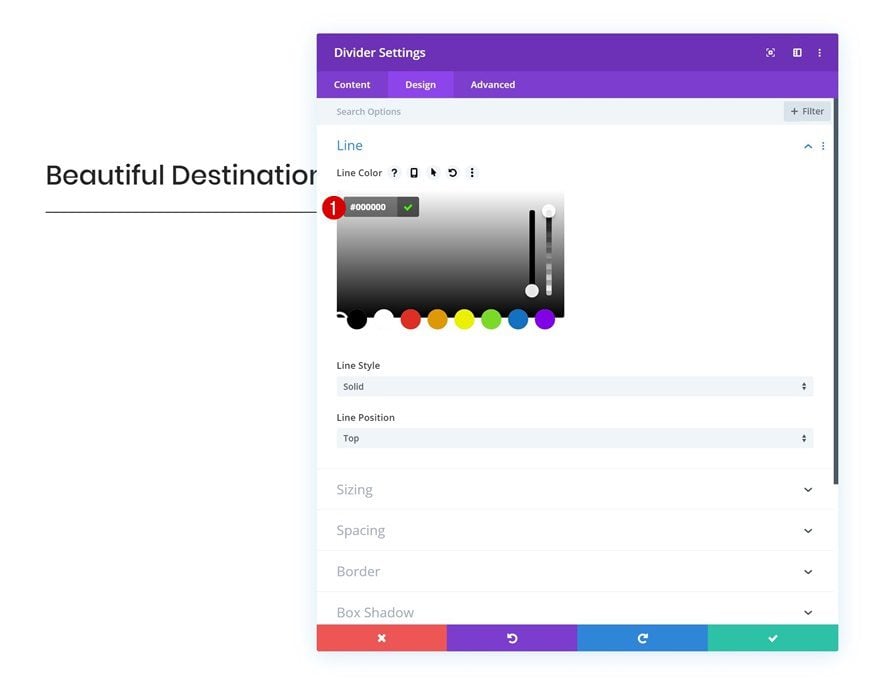
Line
Move on to the design tab and change the line color.
- Line Color: #000000
Add Text Module #2 to Column 1
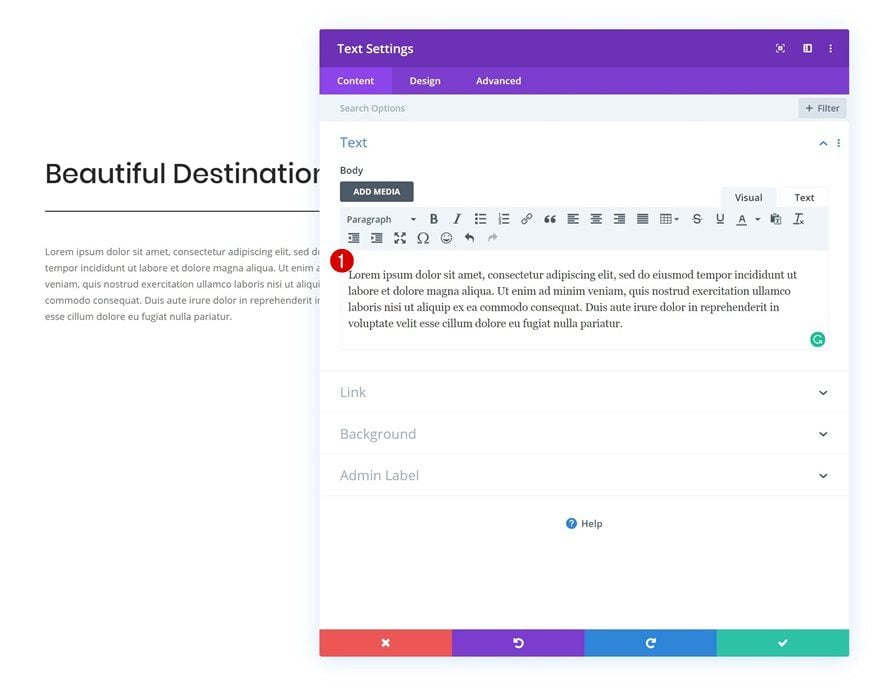
Add Content
Continue by adding another Text Module with some paragraph content of your choice.
Text Settings
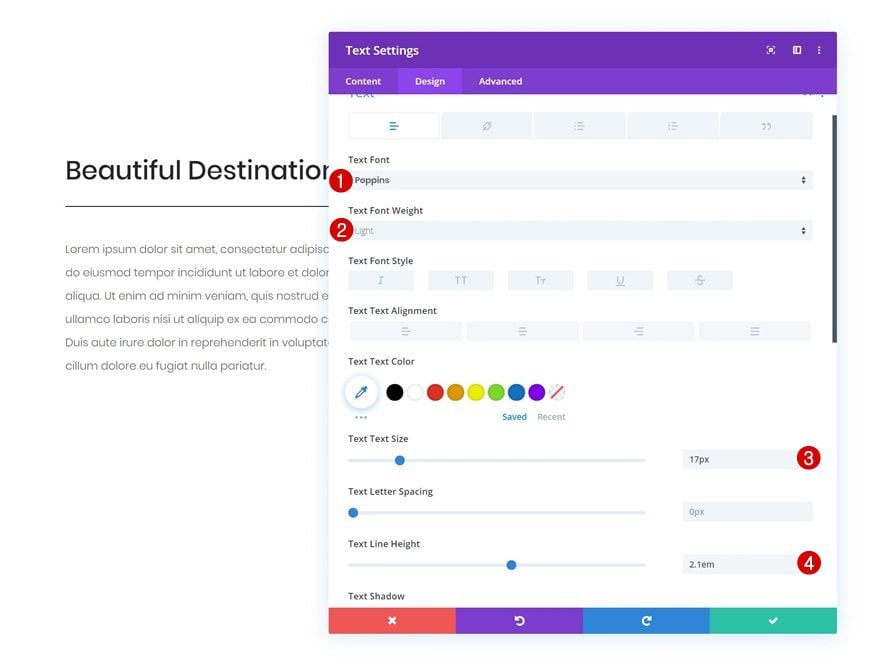
Change the text settings next.
- Text Font: Poppins
- Text Font Weight: Light
- Text Size: 17px
- Text Line Height: 2.1em
Add Copy
The next and last module we need in column 1 is a Button Module. Enter some copy of your choice.
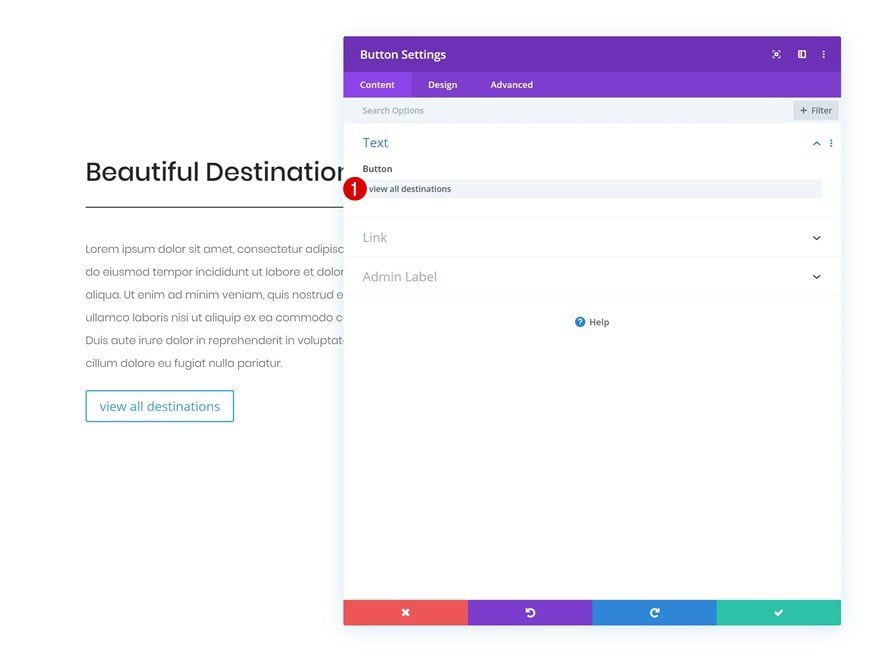
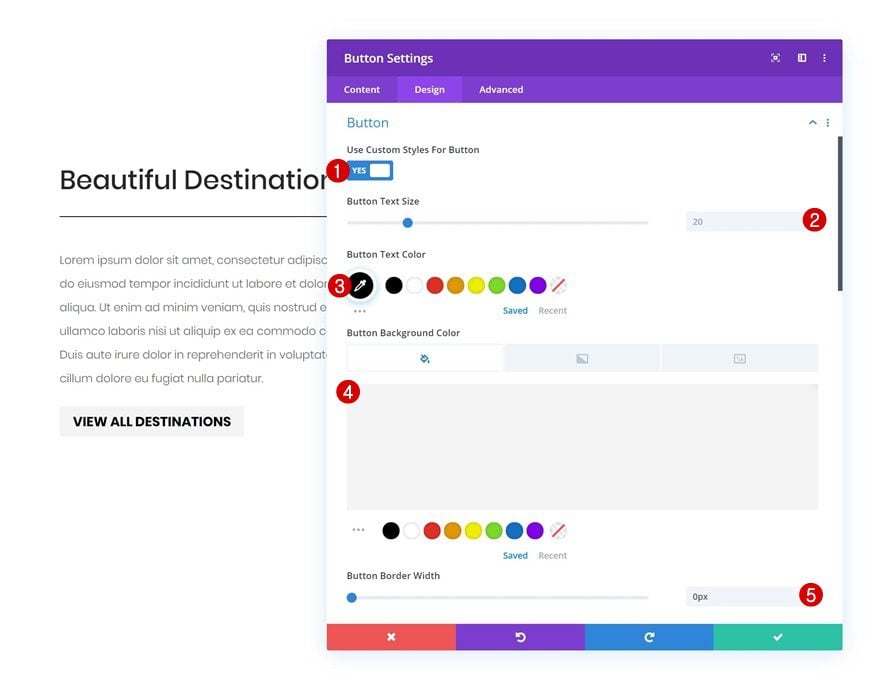
Button Settings
Move on to the design tab and style the button in the button settings.
- Use Custom Styles for Button: Yes
- Button Text Size: 20px
- Button Text Color: #000000
- Button Background Color: #f4f4f4
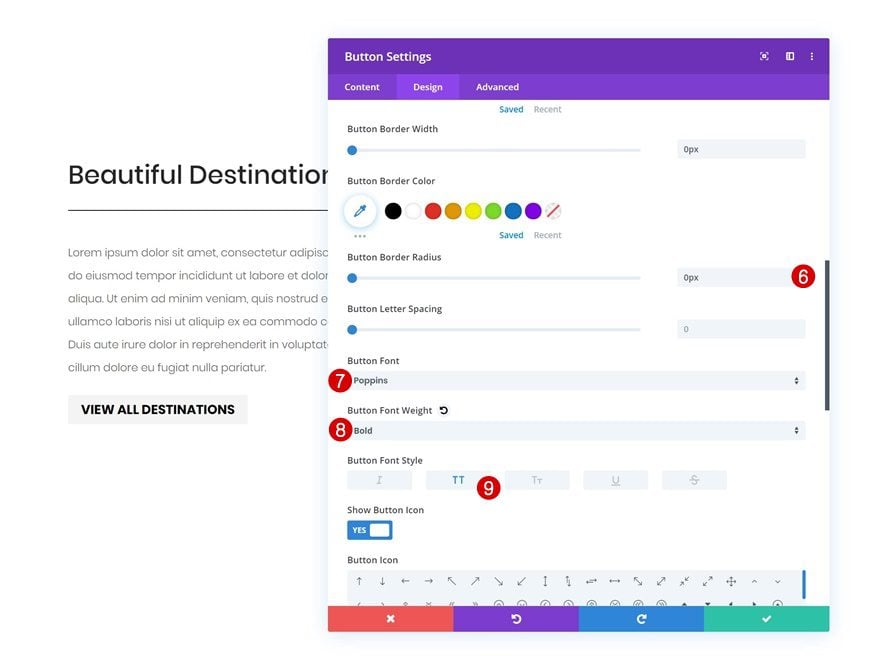
- Button Border Width: 0px
- Button Border Radius: 0px
- Button Font: Poppins
- Button Font Weight: Bold
- Button Font Style: Uppercase
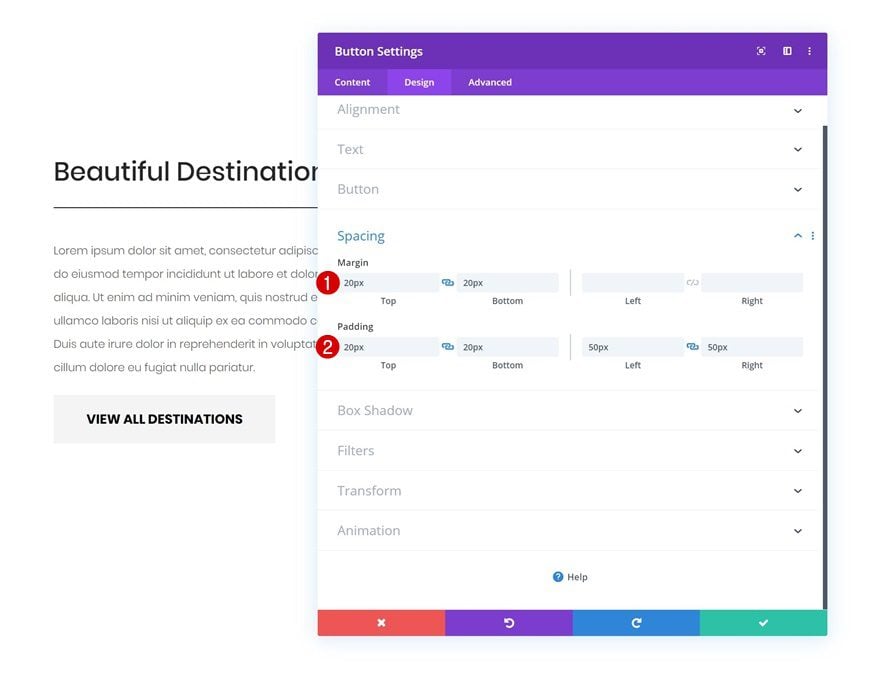
Spacing
Add some custom spacing values as well.
- Top Margin: 20px
- Bottom Margin: 20px
- Top Padding: 20px
- Bottom Padding: 20px
- Left Padding: 50px
- Right Padding: 50px
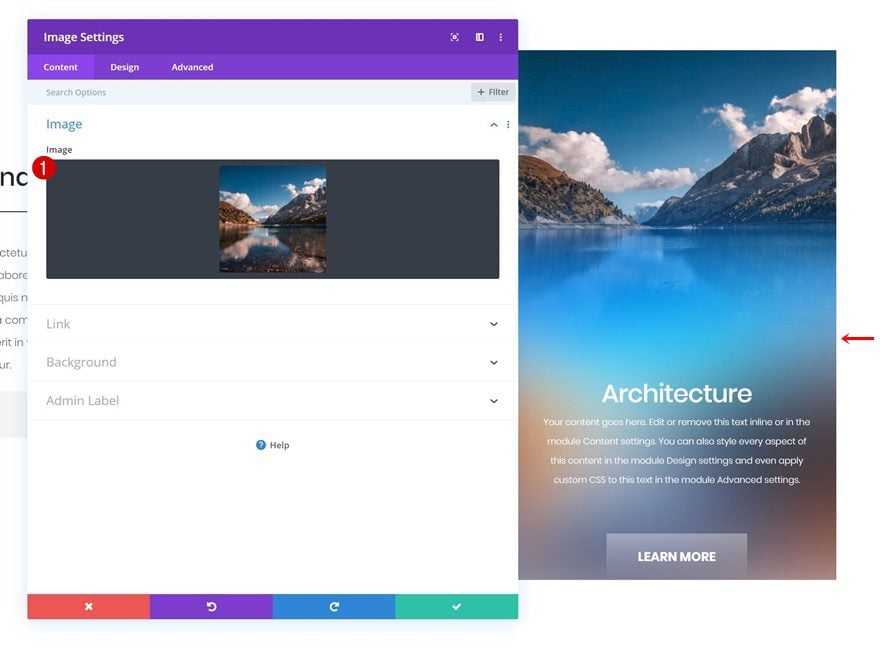
Add Image Module #1 to Column 2
Upload 1:1 Image
On to the second column! Here, the first module we need is an Image Module. Upload an image with a 1:1 ratio. This means that your image has to be a perfect square (width should equal the height).
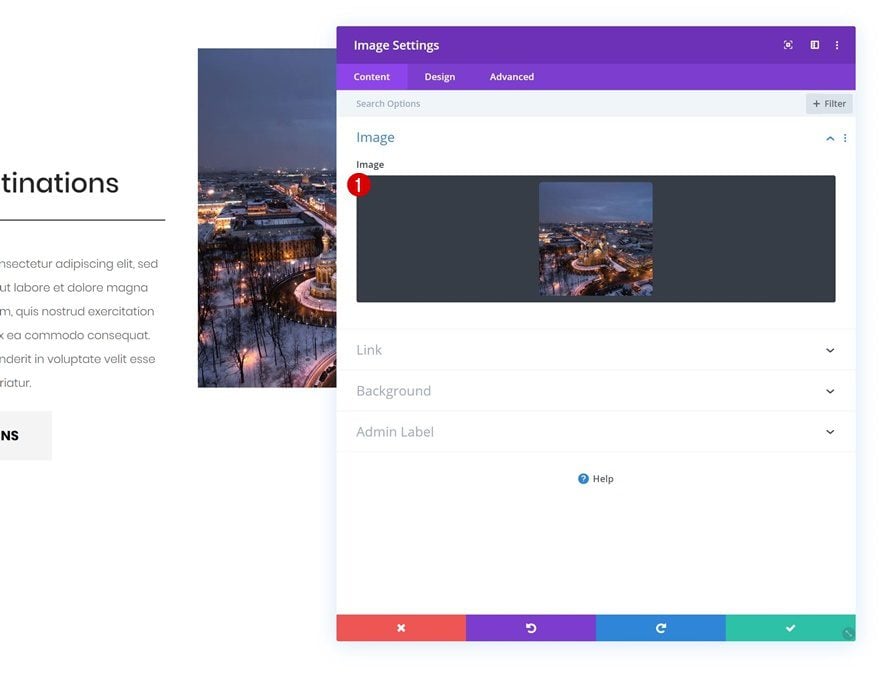
Sizing
Move on to the design tab and enable the ‘Force Fullwidth’ option.
- Force Fullwidth: Yes
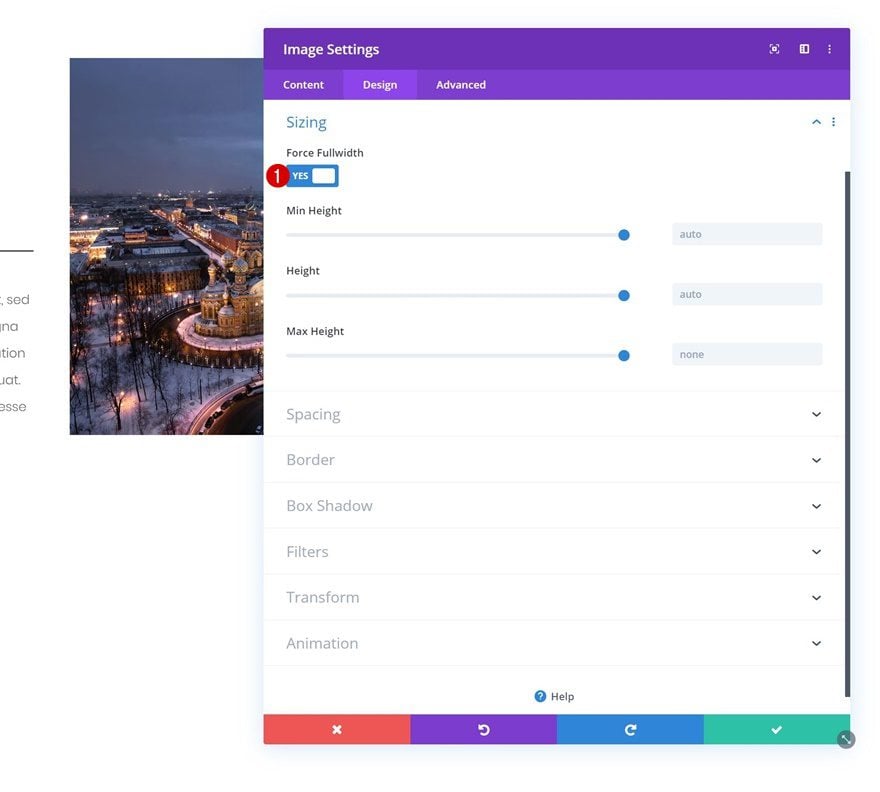
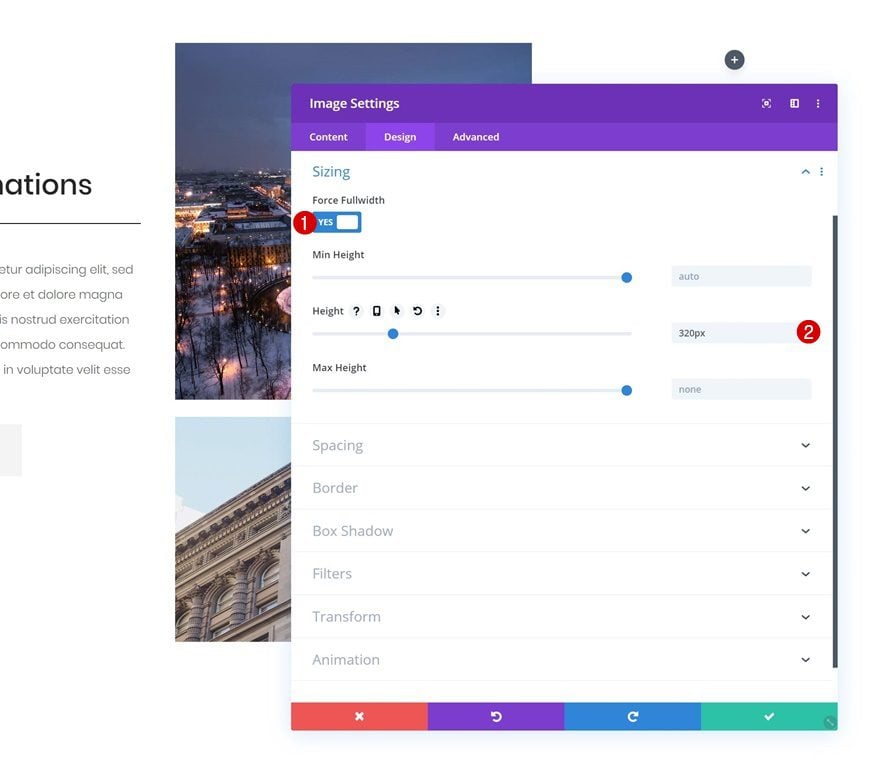
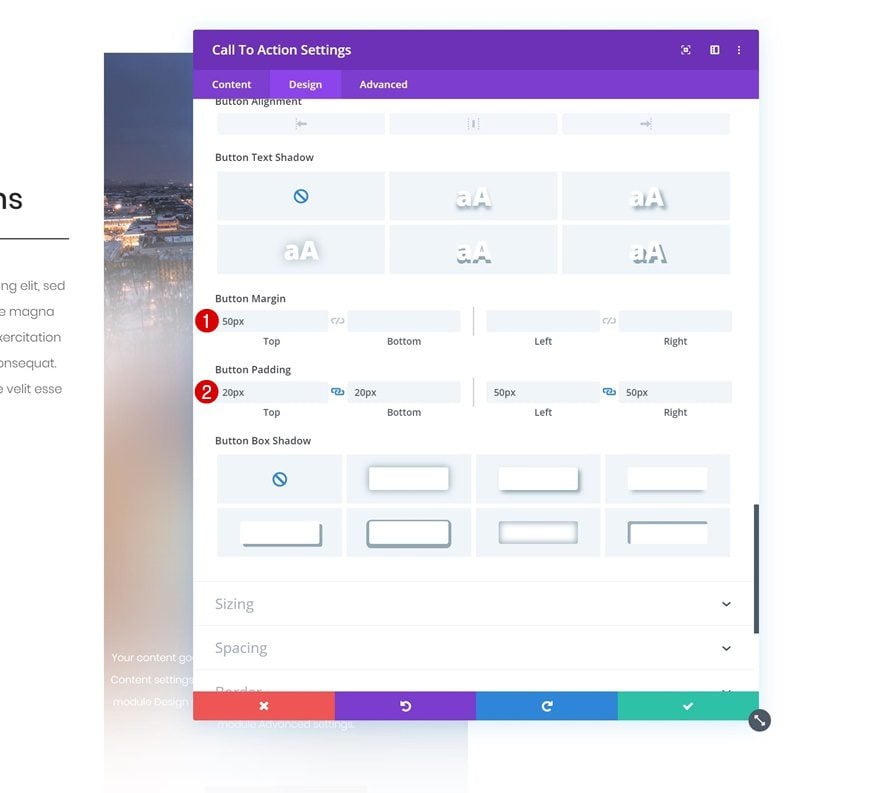
Add Image Module #2 to Column 2
Upload 1:1 Image
The second module we need in column 2 is another Image Module. We’re, again, using an image with a 1:1 ratio.

Sizing
Move on to the design tab and change the sizing settings.
- Force Fullwidth: Yes
- Height: 320px
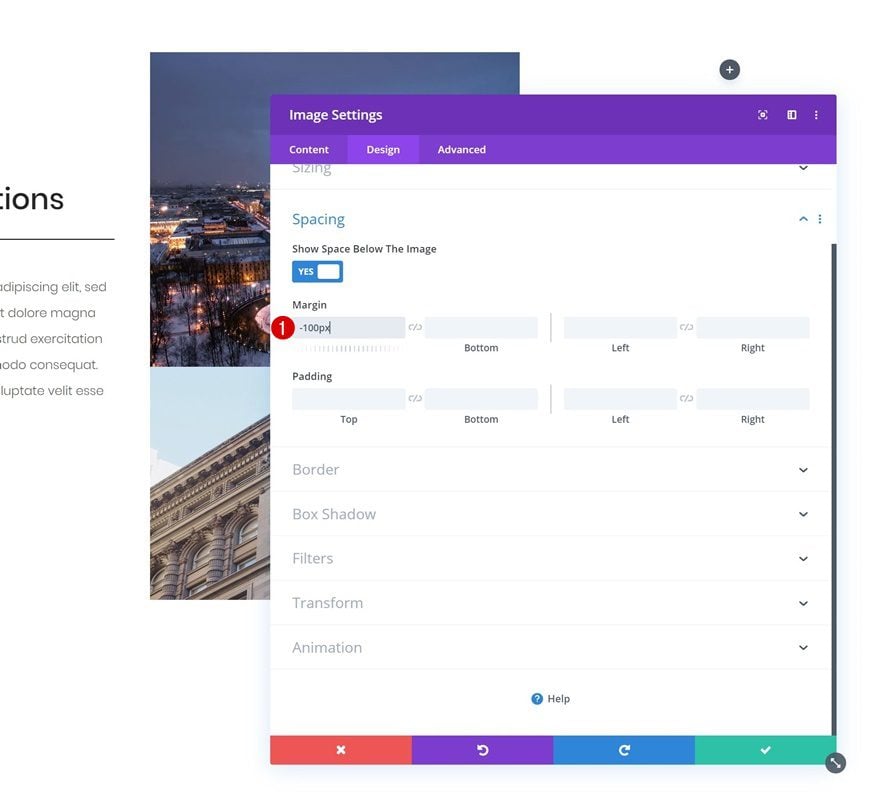
Spacing
Create an overlap between this and the previous module by adding some negative top margin.
- Top Margin: -100px
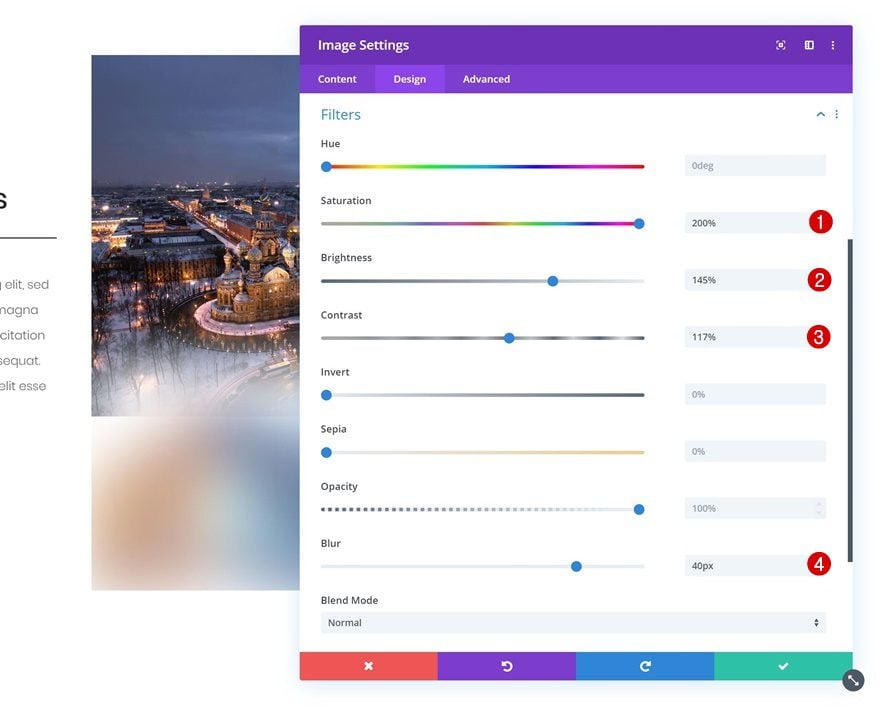
Filters
Next, we’re going to change the filters settings. This is the part where we turn the image into a blurred background.
- Saturation: 200%
- Brightness: 145%
- Contrast: 117%
- Blur: 40px
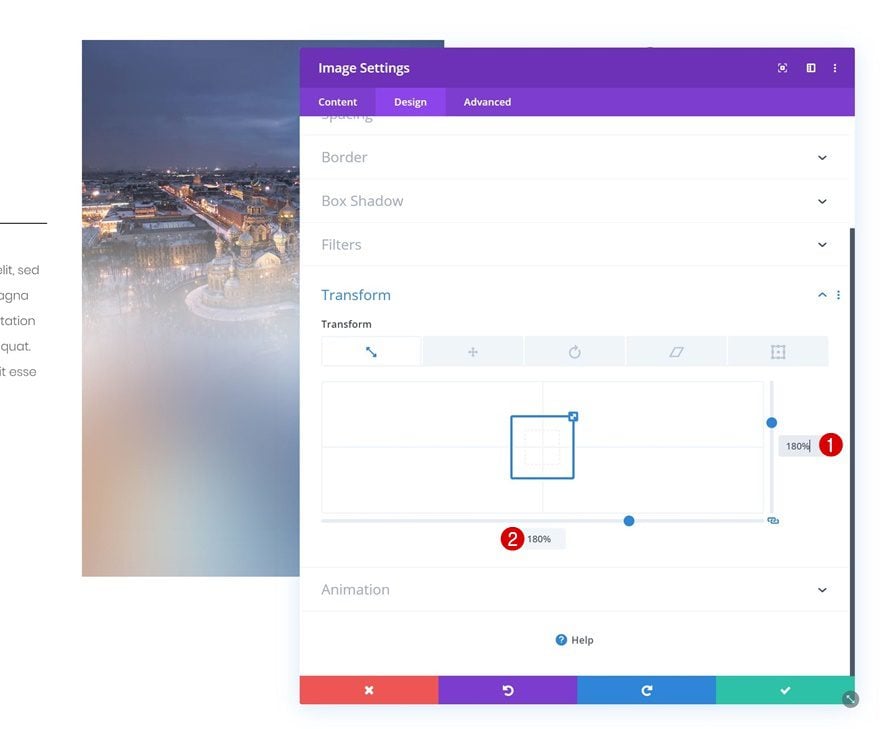
Transform Scale
To make sure the image covers the entire width of the column, we’ll increase the size in the transform settings. Thanks to the hidden column overflow we’ve added to the row settings, nothing will surpass the column container.
- Right: 180%
- Bottom: 180%
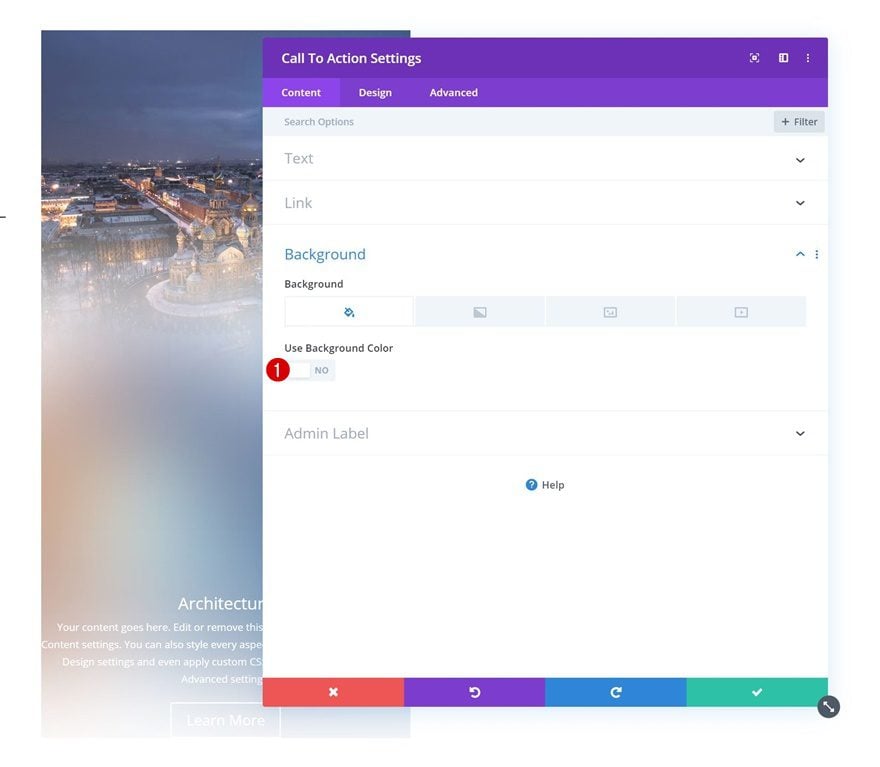
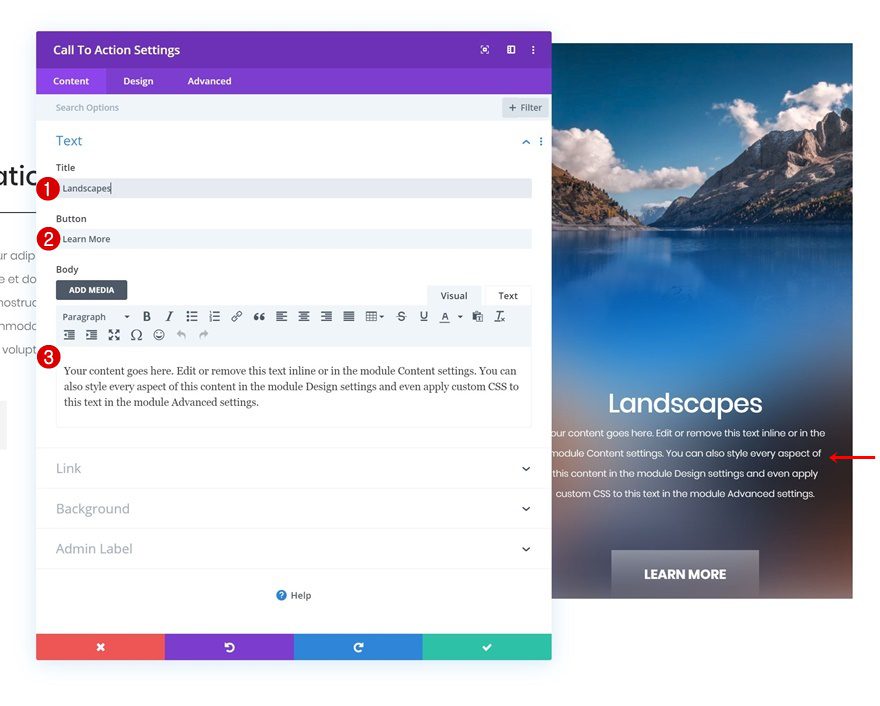
Add CTA Module to Column 2
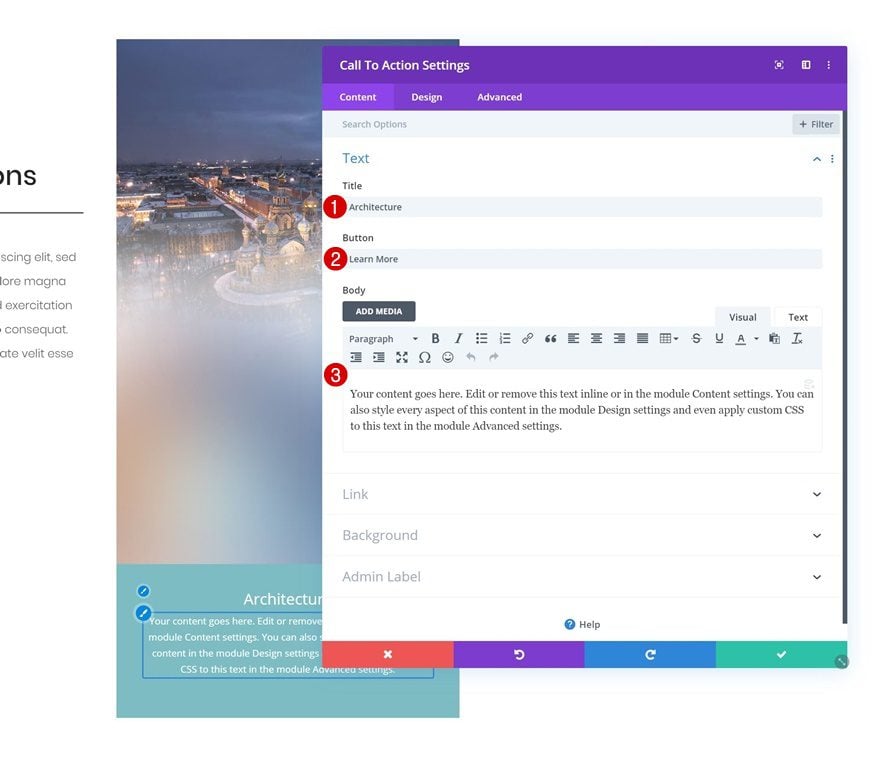
Add Content
The next and last module we need in the second column is a CTA Module. Enter some copy of your choice.
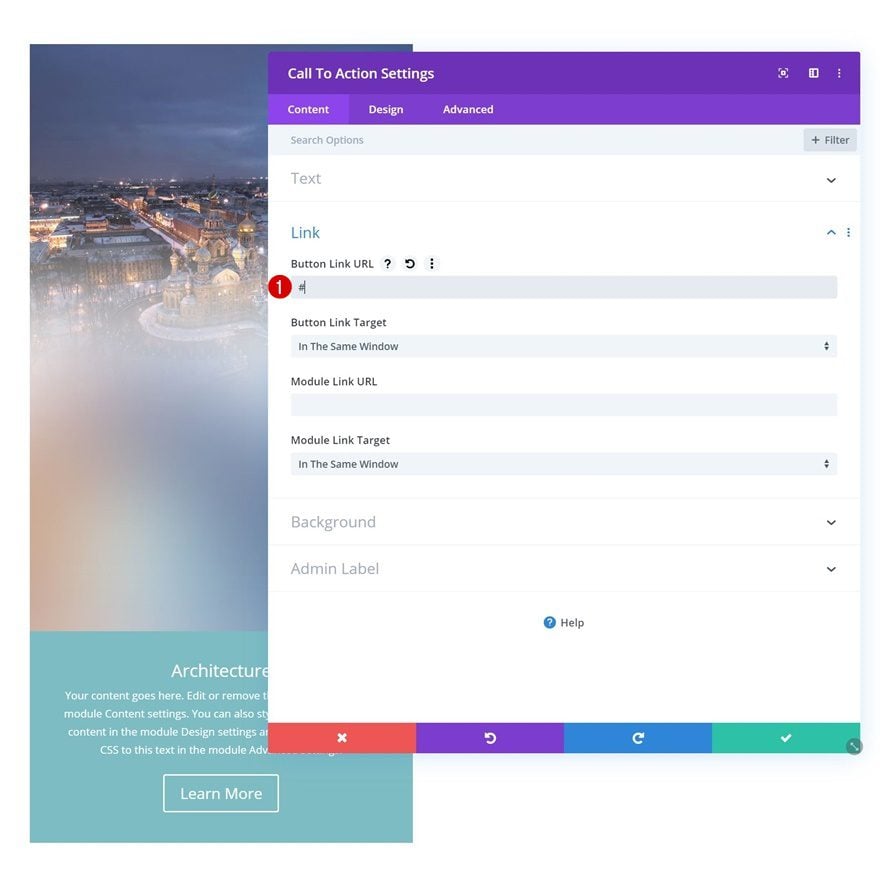
Add Link
Move on to the link settings and add a button link URL to make the button show up in the design.
Remove Background Color
Remove the background color as well.
- Use Background Color: No
Title Text Settings
Continue by going to the design tab and changing the title text settings.
- Title Heading Level: H3
- Title Font: Poppins
- Title Text Size: 40px
- Title Letter Spacing: -1px

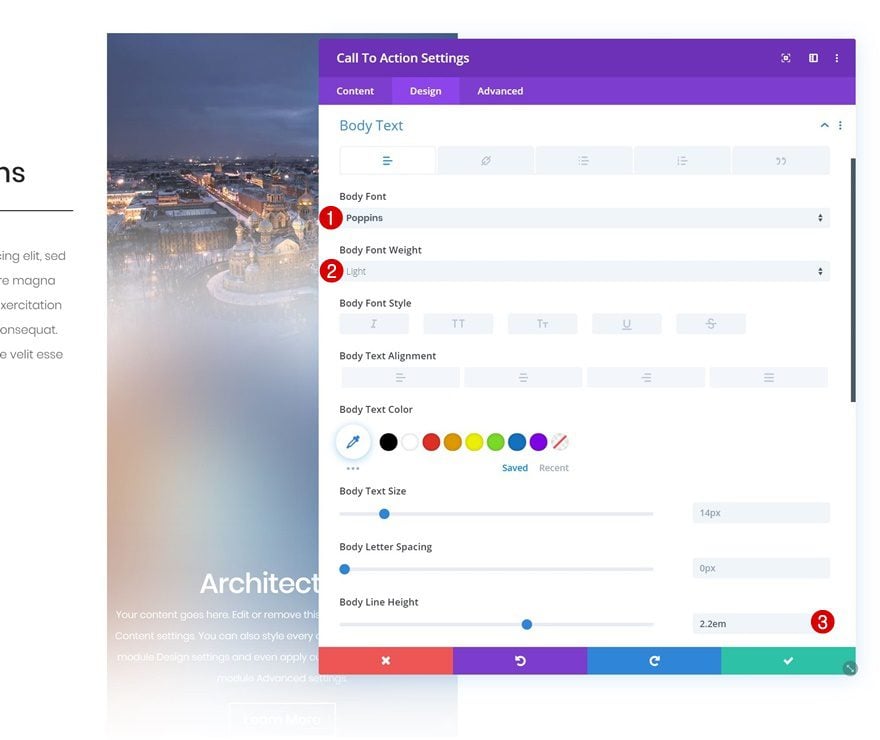
Body Text Settings
Modify the body text settings as well.
- Body Font: Poppins
- Body Font Weight: Light
- Body Line HEight: 2.2em
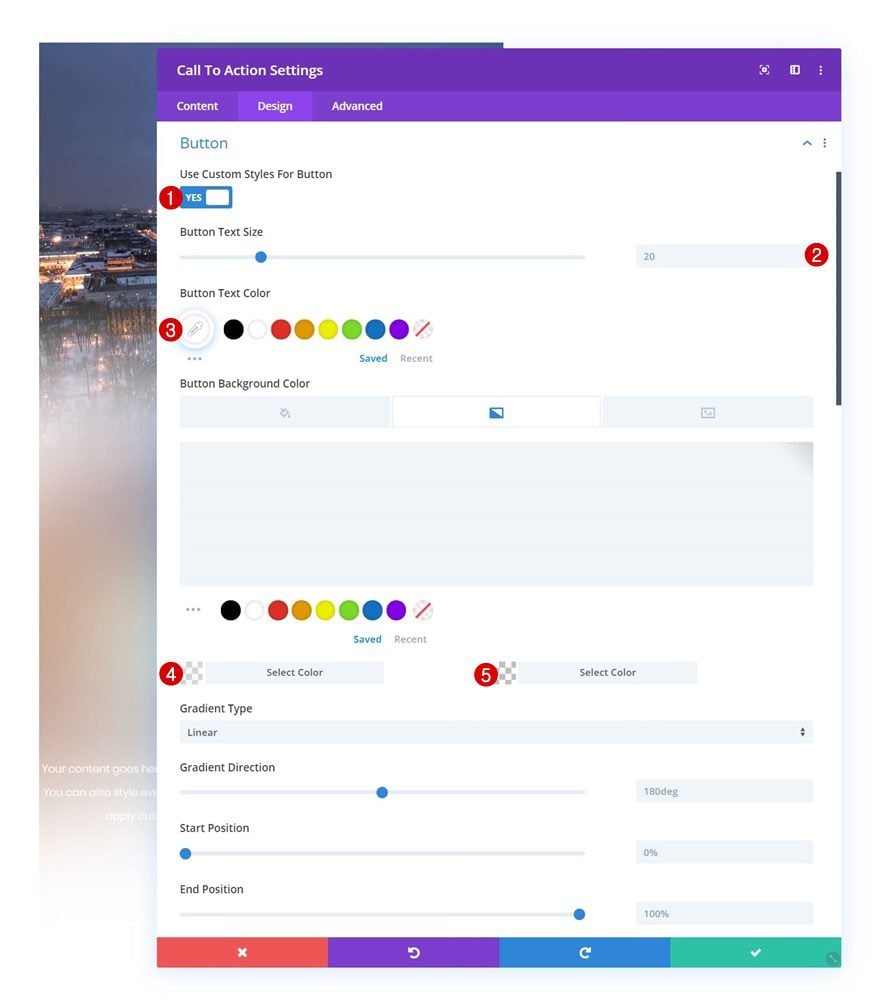
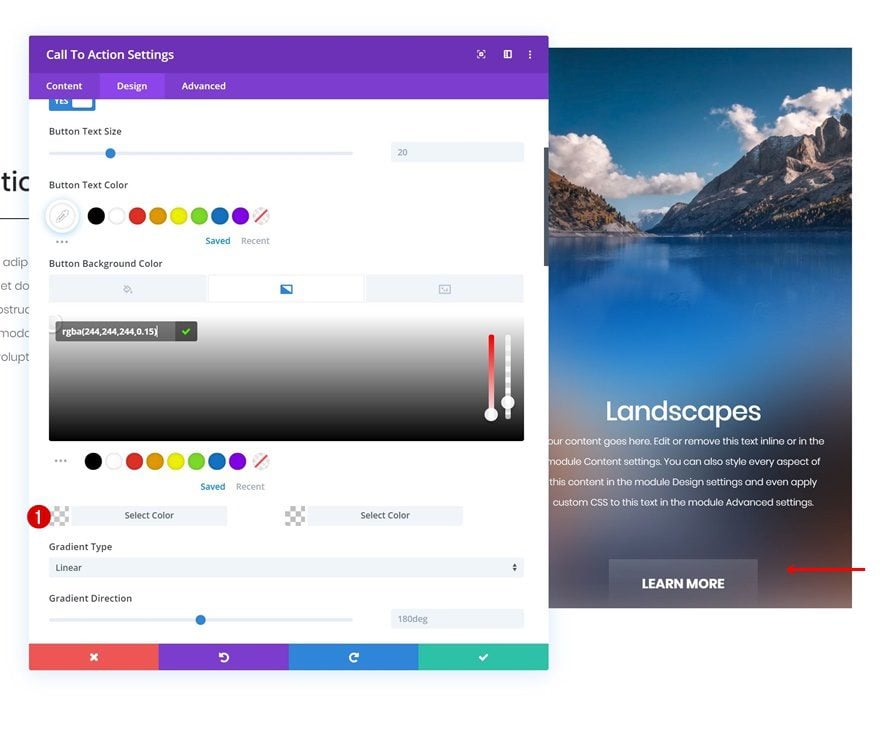
Button Settings
Along with the button settings.
- Use Custom Styles for Button: Yes
- Button Text Size: 20px
- Button Text Color: #ffffff
- Gradient Color 1: rgba(244,244,244,0.4)
- Gradient Color 2: rgba(255,255,255,0)
- Button Border Width: 0px
- Button Border Radius: 0px
- Button Font: Poppins
- Button Font Weight: Bold
- Button Font Style: Uppercase
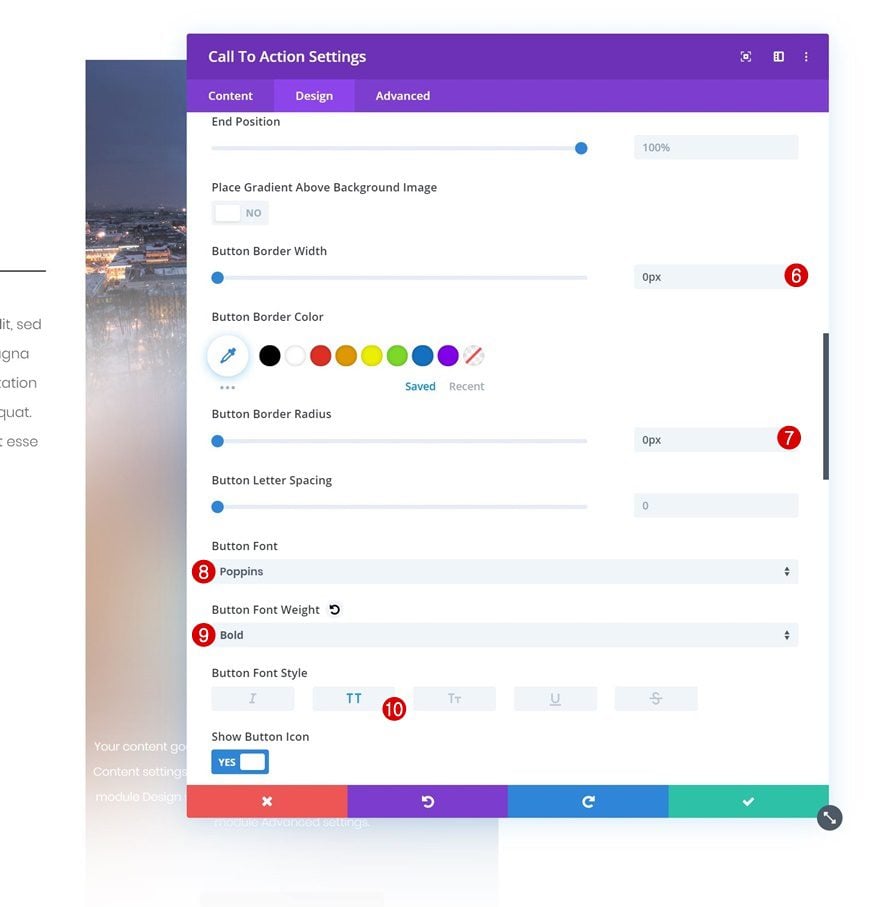
- Top Margin: 50px
- Top Padding: 20px
- Bottom Padding: 20px
- Left Padding: 50px
- Right Padding: 50px
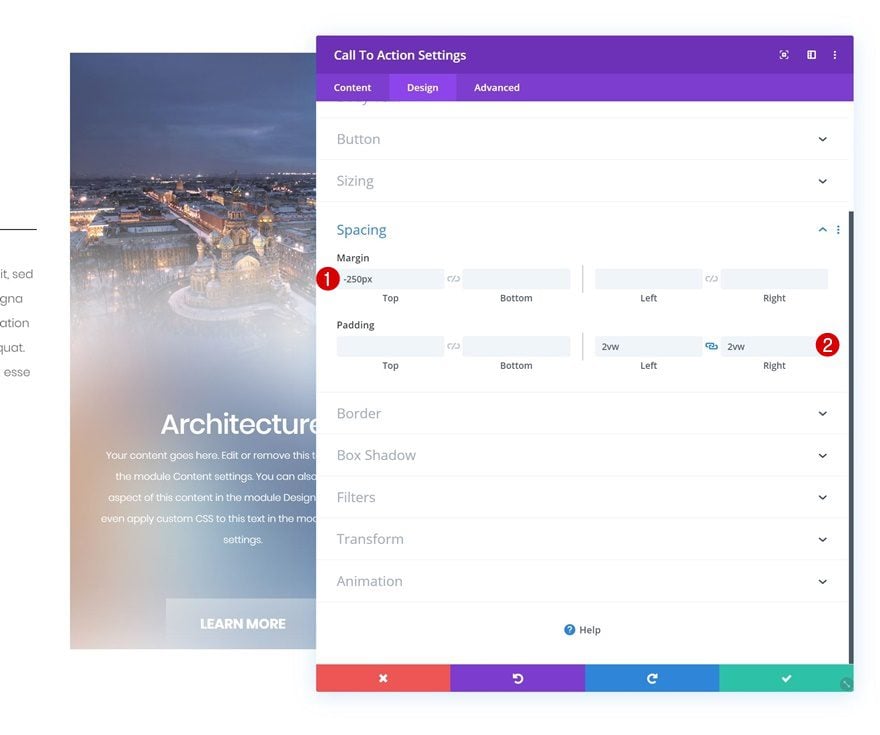
Spacing
Last but not least, create an overlap between this module and the blurred background by adding some negative top margin. We’re also leaving some whitespace at the left and right side of the module
- Top Margin: -250px
- Left Padding: 2vw
- Right Padding: 2vw
Clone All Modules in Column 2 & Place Duplicates in Column 3
Once you’ve completed all modules in the second column, you can clone them and place the duplicates in the third column.
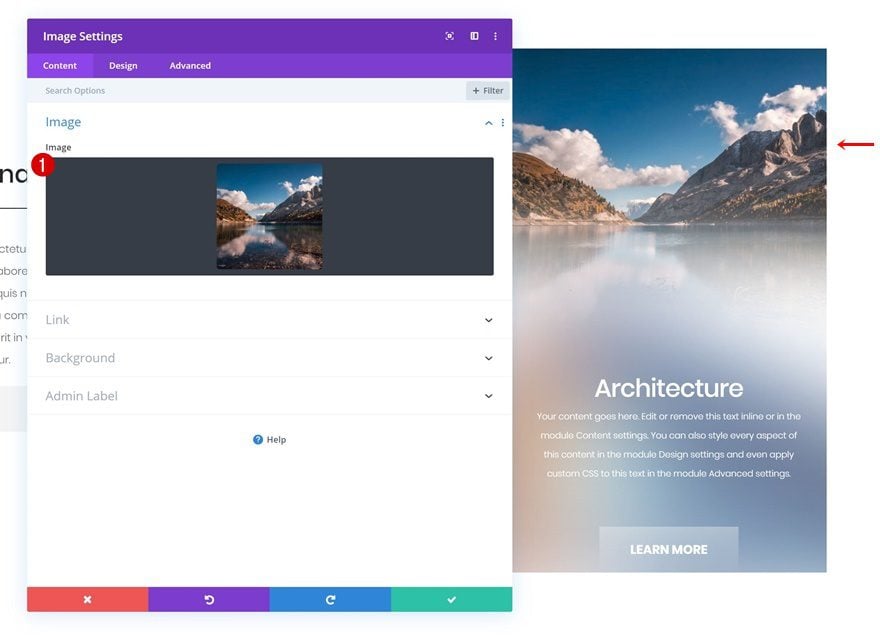
Change Duplicate Image Module #1
Change Image
Change the image in Image Module #1.
Change Duplicate Image Module #2
Change Image
Do the same for the second Image Module in the column.
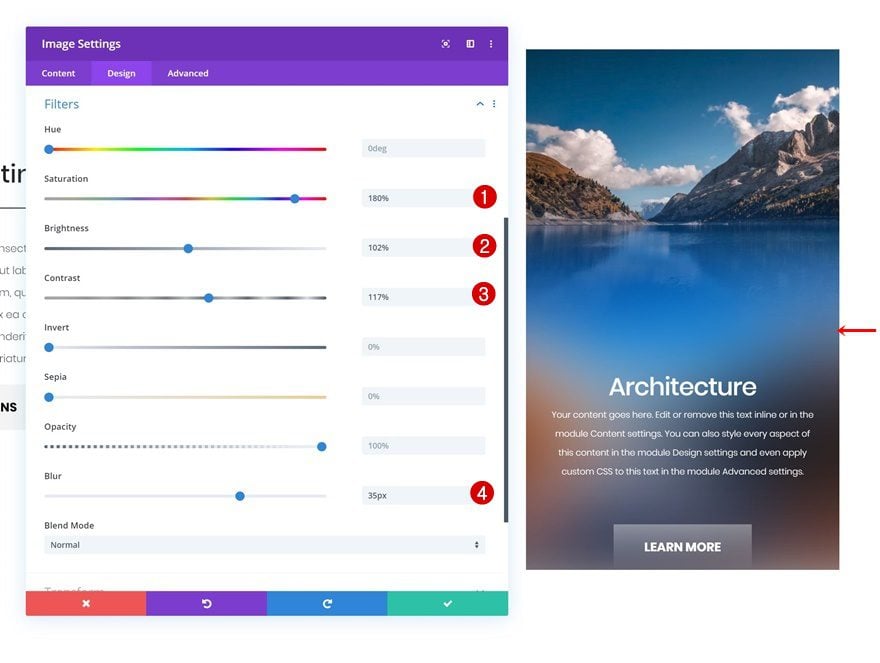
Change Filters Settings
And modify the filters settings of the second Image Module as well.
- Saturation: 180%
- Brightness: 102%
- Contrast: 117%
- Blur: 35px
Change Duplicate CTA Module
Change Copy
Continue by changing the CTA Module’s content.
Change Button Gradient Background
Along with the first button gradient color and you’re done!
- Gradient Color 1: rgba(244,244,244,0.15)
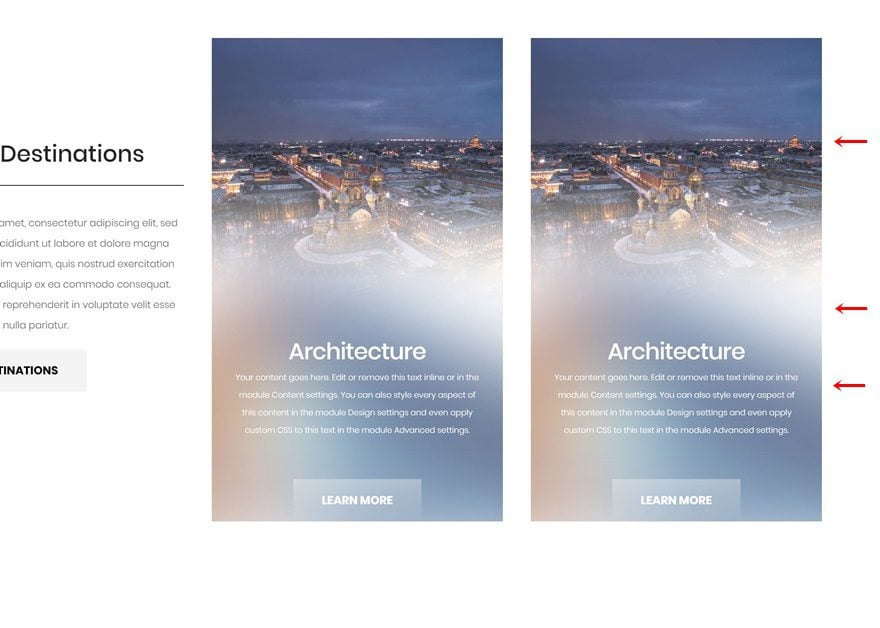
Preview
Now that we’ve gone through all the steps, let’s take a final look at the outcome across different screen sizes.
Desktop
Mobile
Final Thoughts
In this post, we’ve shown you how to create blurred backgrounds using Divi’s built-in options only. We’ve recreated a beautiful example from scratch that you can use for any kind of website you create. We hope this tutorial inspires you to create your own customized designs using the tips that were shared in this tutorial. If you have any questions or suggestions, make sure you leave a comment in the comment section below!
If you’re eager to learn more about Divi and get more Divi freebies, make sure you subscribe to our email newsletter and YouTube channel so you’ll always be one of the first people to know and get benefits from this free content.


Clever! Thanks for sharing 😀
Happy to hear you’ve enjoyed the tutorial, Bjarne! 🙂
It looks very nice when you design it but it does not look the same in the browser.
Hey Uriel, the new column update changes the way it looks a bit. Add a bottom transform skew value of 25deg to both blurred Image Modules and it should be fixed! 🙂
Hi Donjete, can you please explain in a bit more details what you mean exactly by “Add a bottom transform skew value of 25deg to both blurred Image Modules “. A screenshot would be most helpful.
Hello all,
By simply downloading the file, I don’t get this result. Images don’t blend and even the layout does not look the same.
When I try to reproduce it, the images won’t blend either.
Hey there, the new columns update seems to change the effect. Adding 25deg bottom transform skew to the blurred images should fix it!
This is a great feature to create blurred backgrounds. It’ll save time and money. It’s not that easy to edit a photo with photo editing programs, if you’re not experienced.
Happy you like it! 🙂
Very cool effect thank you for sharing, I’ll definitely be borrowing this in the future!
thanks this looks beautiful, I’ll give it a try:)
Definitely do, Yvonne!
thank you! that is nice design trick! is cool and beautiful! it is nicely written article..love all the article you have done ! with passion!keep up the good work!
Thanks, Joseph! Happy you like it 🙂
Probably in Photoshop is obtained much faster 🙂