
Image overlays continue to be a popular design asset when displaying images on your website. Not only do they offer a creative way to showcase images, but also they can make viewing images more fun and engaging for visitors, especially when you add custom animations when hovering or clicking the image.
In this tutorial, we are going to show you how to create an image overlay with split text shutter animation in Divi. First, we’ll show you how the build the custom image overlay with split text shutters. Then we’ll show you how you can use Divi’s built-in transform options to create the three completely unique image overlay shutter animation designs. We’ll even show you a few more example designs to get those creative juices flowing.
Let’s jump in and get started!
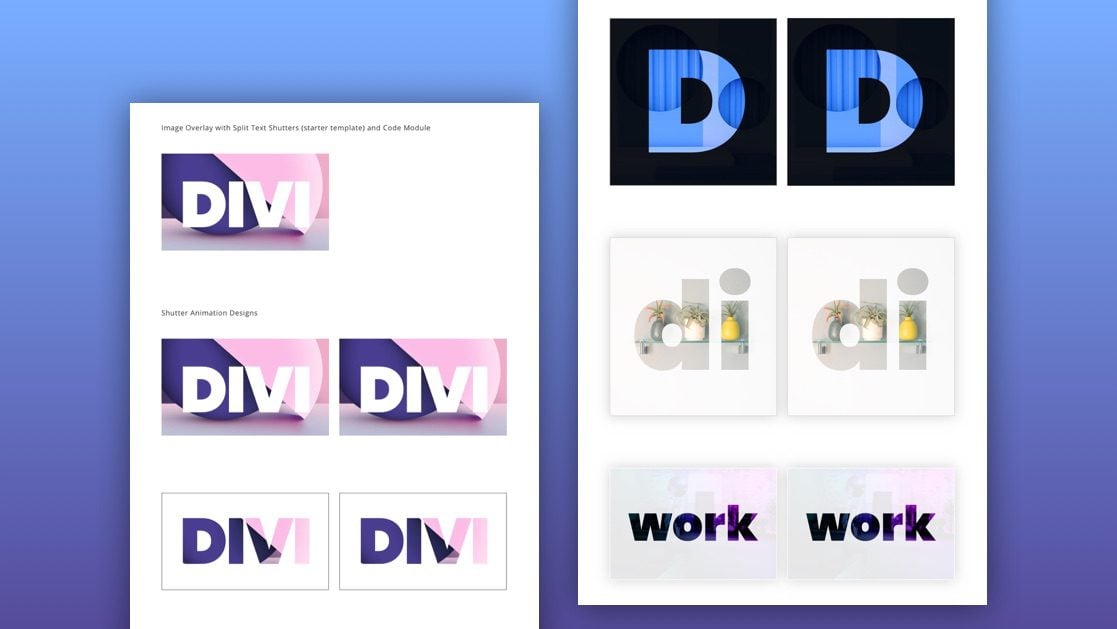
Sneak Peek
Here is a quick look at the Image overlay designs from this tutorial.
And here is a codepen that demonstrates the same design used in this tutorial.
Download the Layout for FREE
To lay your hands on the image overlay split text shutter animation designs from this tutorial, you will first need to download them using the button below. To gain access to the download you will need to subscribe to our newsletter by using the form below. As a new subscriber, you will receive even more Divi goodness and a free Divi Layout pack every Monday! If you’re already on the list, simply enter your email address below and click download. You will not be “resubscribed” or receive extra emails.

To import the section layout to your Divi Library, navigate to the Divi Library.
Click the Import button.
In the portability popup, select the import tab and choose the download file from your computer.
Then click the import button.

Once done, the section layout will be available in the Divi Builder.
Let’s get to the tutorial, shall we?
What You Need to Get Started

To get started, you will need to do the following:
- If you haven’t yet, install and activate the Divi Theme.
- Create a new page in WordPress and use the Divi Builder to edit the page on the front end (visual builder).
- Choose the option “Build From Scratch”.
After that, you will have a blank canvas to start designing in Divi.
Part 1: Building the Image Overlay with Split Text Shutters
For this first part of the tutorial, we are going to build the initial setup of the image overlay with the split text shutters. Once this is done we can add animation to the shutters later on.
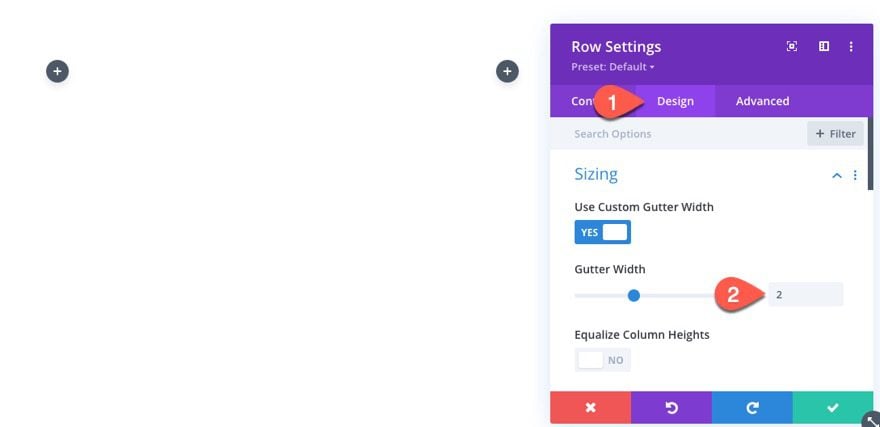
The Row
To start, add a two-column row to the regular section.
Before, adding modules, open the row settings and update the gutter width:
- Gutter Width: 2
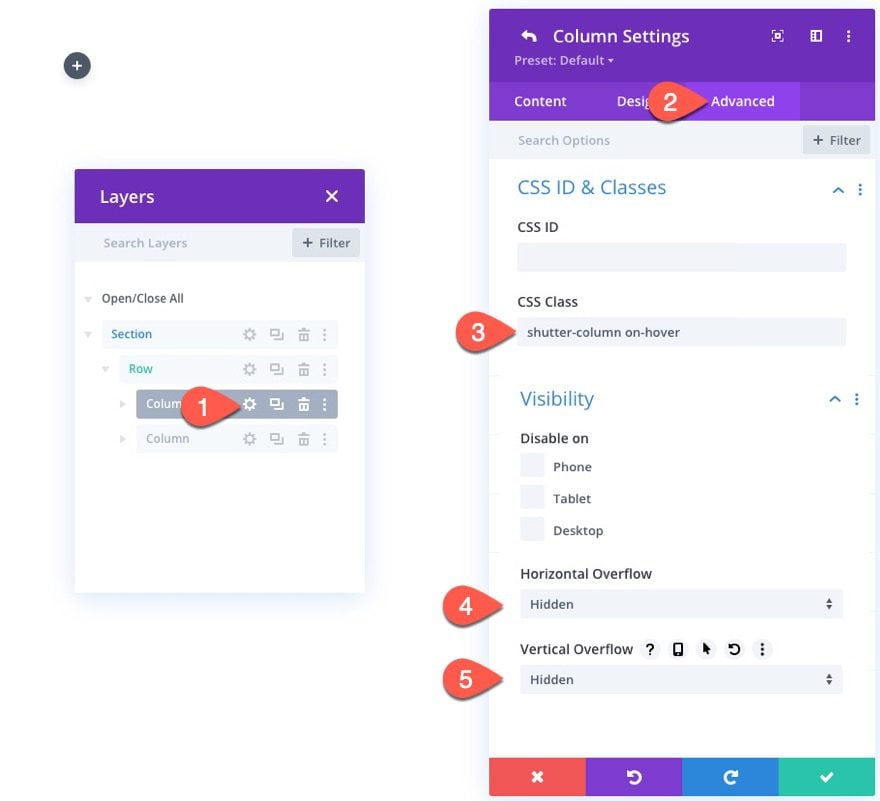
Updating the Column
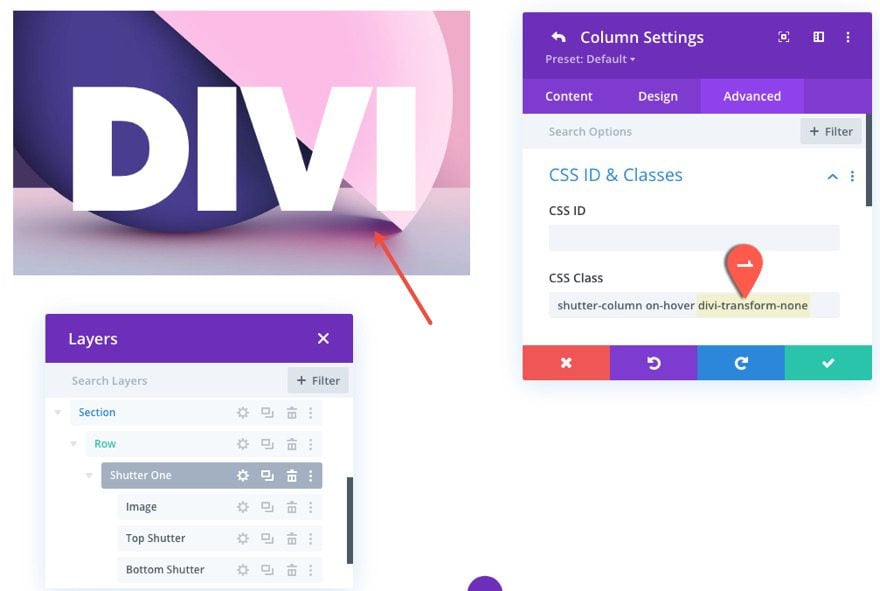
The column will be the main container that will hold our image and the shutter overlay elements. It will also be the main target that will initiate the shutter animation on hover. In other words, when the cursor moves inside the column, the animation of the child elements (the shutters) will toggle on and when the cursor moves outside the column, the animation will toggle off.
To designate our column as the “shutter column” and to animate it later “on hover”, add the following CSS Classes to the column:
- CSS Class: shutter-column on-hover
Then update the overflows to hidden so that we won’t see the transformed elements once they go beyond the column container during the animation.
- Horizontal Overflow: Hidden
- Vertical Overflow: Hidden
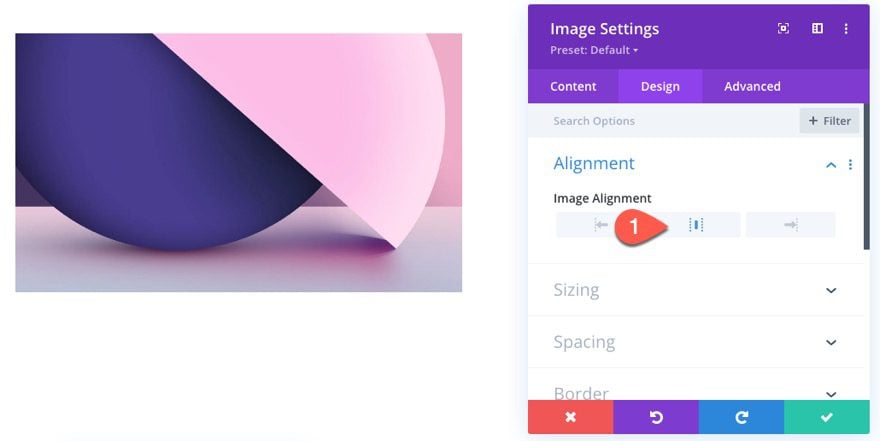
Adding the Main Image
Inside column 1, add an image module. This will serve as the main image that we will sit behind the shutter overlay.

Upload an image to the image module.
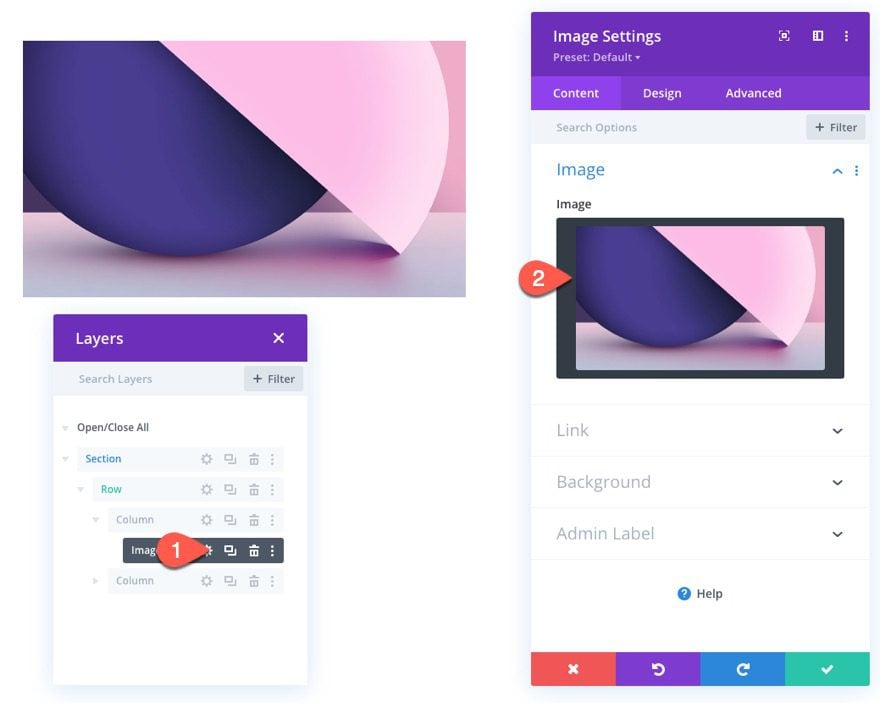
Then set the alignment of the image to the center.
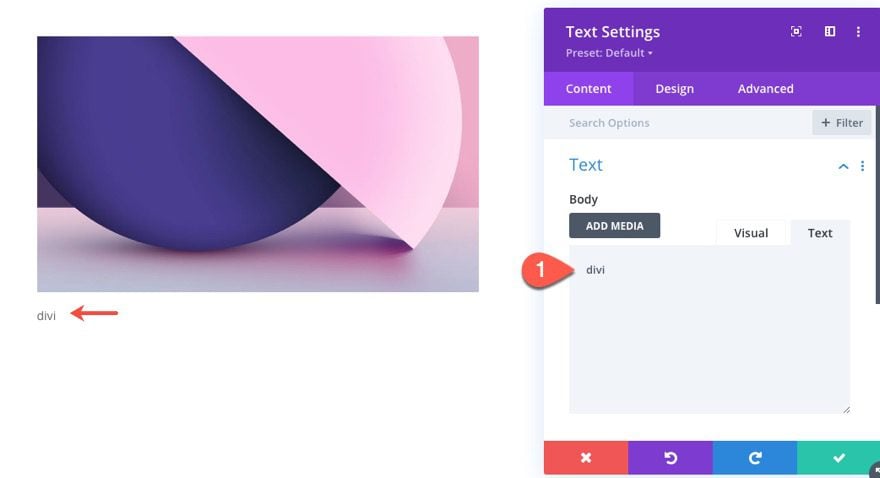
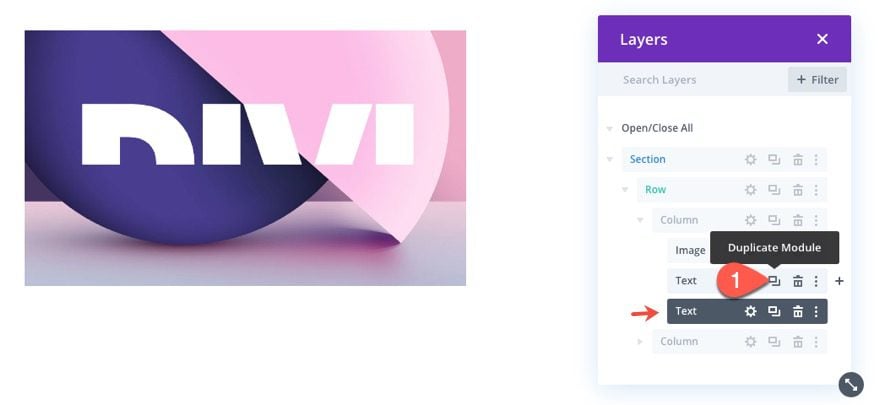
Creating the Top Shutter with Split Text
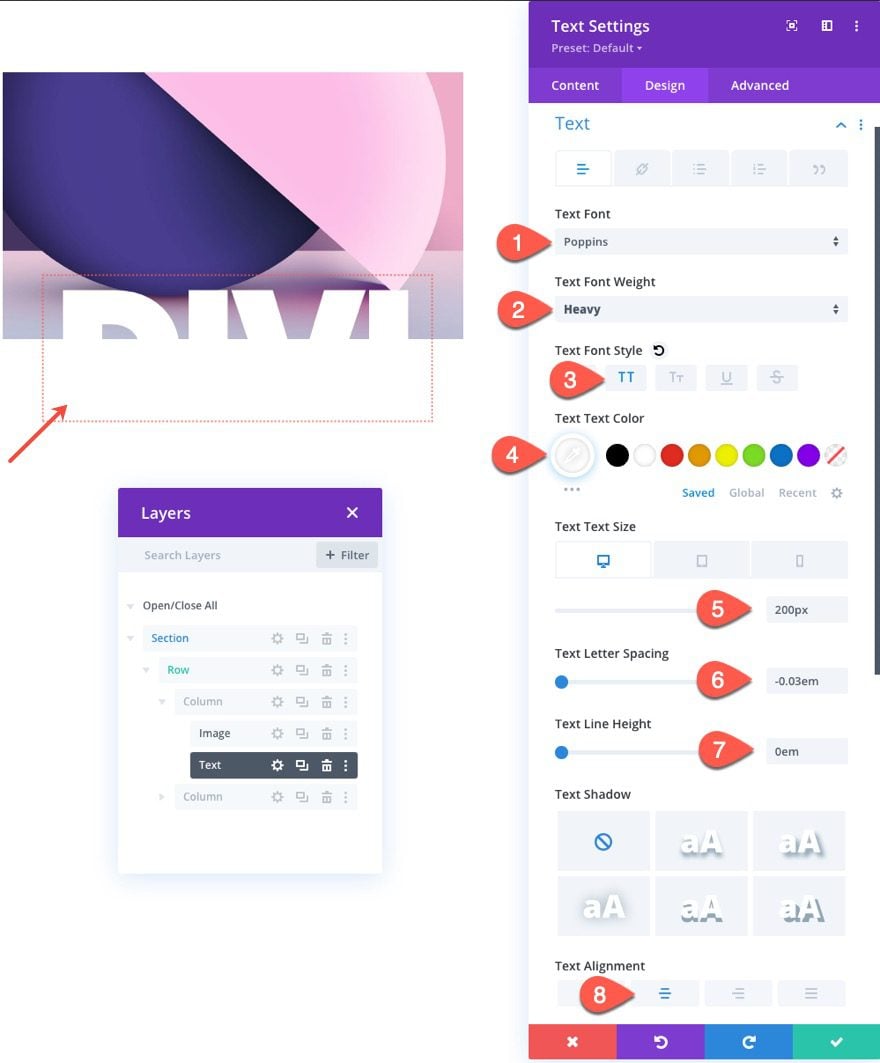
Now that our image is in place, we are going to add the top shutter using a text module. Add a new text module under the image.
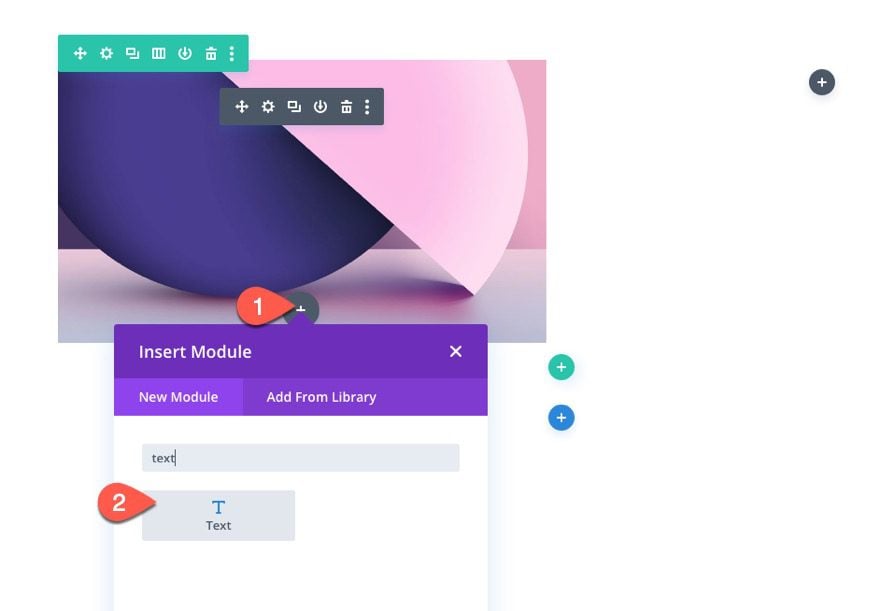
Update the text module content by adding the text “divi” to the body area.
Under the design tab, update the text style as follows:
- Text Font: Poppins
- Text Font Weight: Heavy
- Text Font Style: TT
- Text Text Color: #ffffff
- Text Text Size: 200px (desktop), 30vw (tablet and phone)
- Text Letter Spacing: -0.03em
- Text Line Height: 0em
- Text Alignment: Center
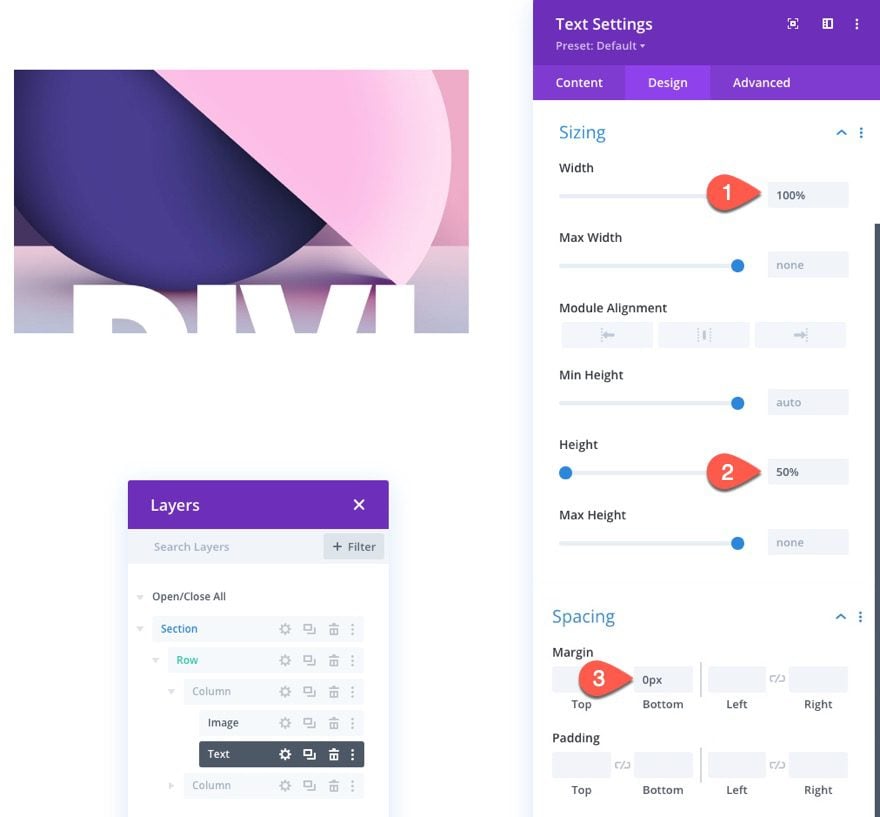
Next, update the sizing and spacing options:
- Width: 100%
- Height: 50%
- Margin: 0px bottom
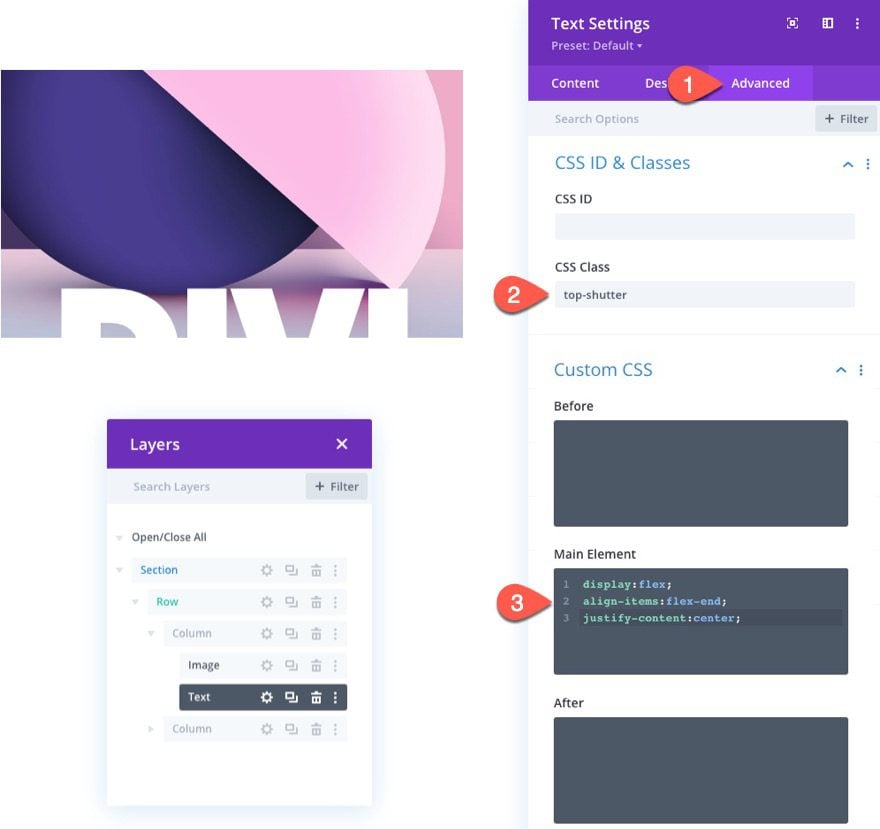
Under the Advanced tab, update the following:
- CSS Class: top-shutter
We’ll use the CSS Class to toggle the transform animation on and off with our code later on.
Then add this custom CSS to the Main Element:
display:flex;
align-items:flex-end;
justify-content:center;
This code uses flex to make sure the text is vertically aligned at the bottom of the module. Since the text has a line-height of 0, the text will be shown as split showing only the top half.
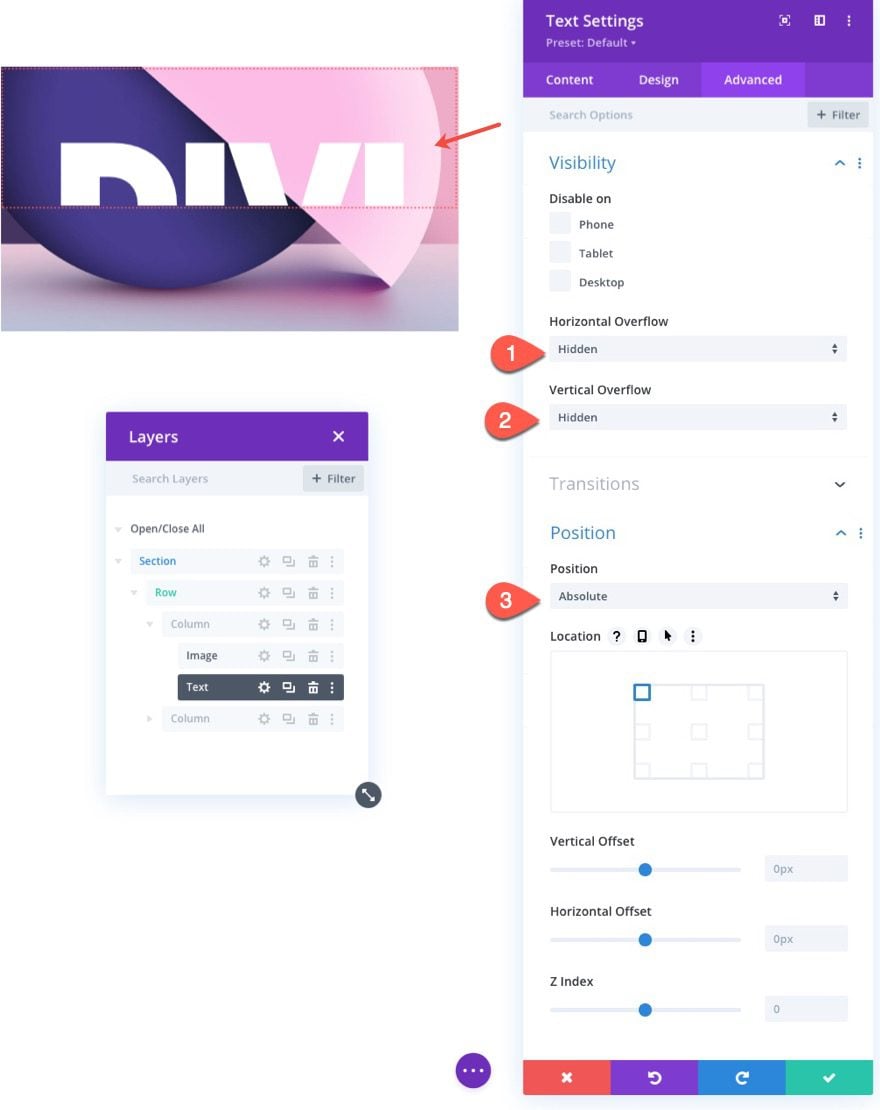
To position our top shutter, we need to first hide the overflow of the text and then give it an absolute position as follows:
- Horizontal Overflow: Hidden
- Vertical Overflow: Hidden
- Position: Absolute
This will move the shutter over the top half of the image.
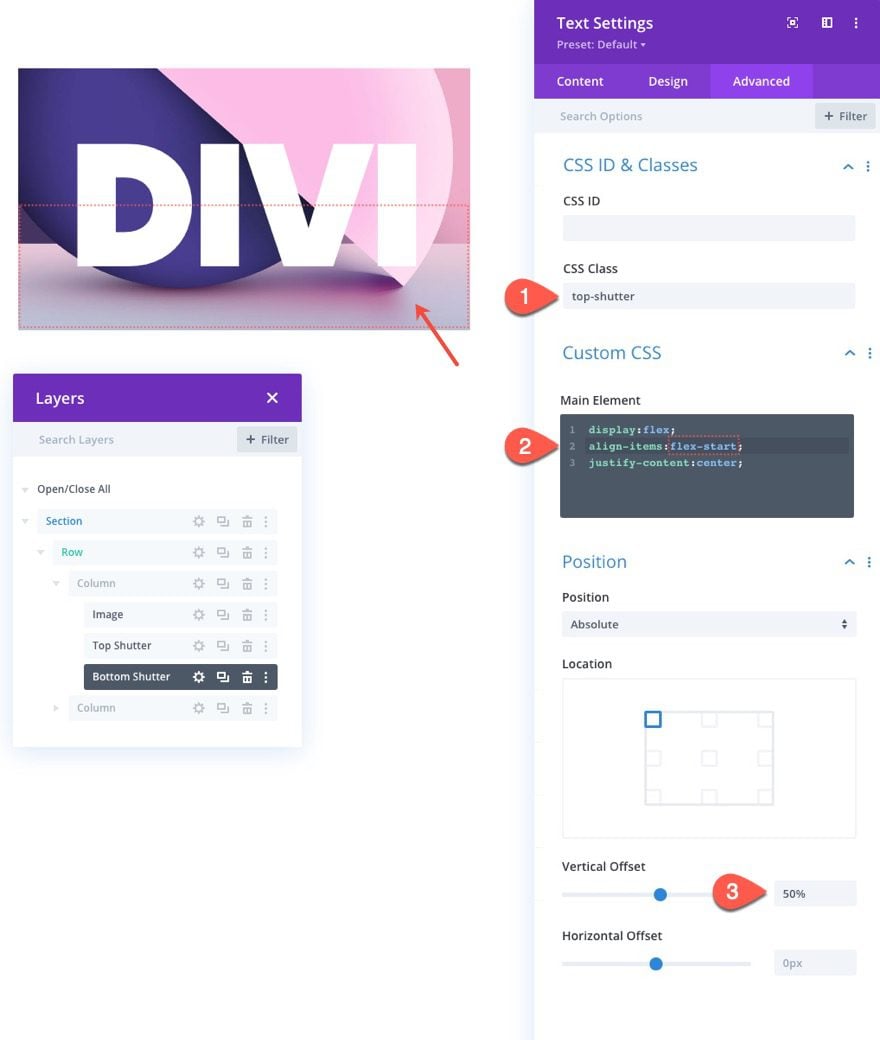
Creating the Bottom Shutter with Matching Split Text
Now that we have our top shutter completed, we can jumpstart the creation of the bottom shutter by duplicating the top shutter text module.
Then open the duplicate text module and update the following:
- CSS Class: top-shutter
Update the Main Element CSS by replacing the “flex-end” with “flex-start” for the align-items property. Here is the final CSS:
display:flex;
align-items:flex-start;
justify-content:center;
With “flex-start” the text is vertically aligned at the top of the module. And since the text has a line-height of 0, the text will be shown as split showing only the bottom half.
Then update the absolute position with a vertical offset as follows:
- Vertical Offset: 50%
This brings the shutter text module to sit above the bottom half of the image.
The split text on both shutters should now be aligned as a perfect match.
At this point, we have successfully created the setup for our split text shutter image overlay. This consists of the shutter column as the container, the main image, the top shutter that sits at the top half of the image, and the bottom shutter that sits at the bottom half of the image.
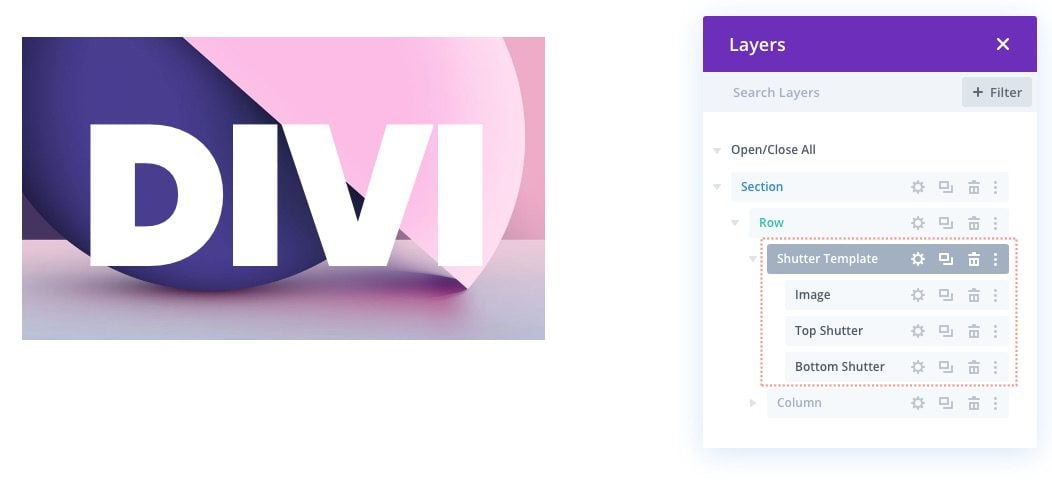
We will use this as kind of a starter template for the next few examples that will include the shutter effect animations using transform properties.
Part 2: The Code
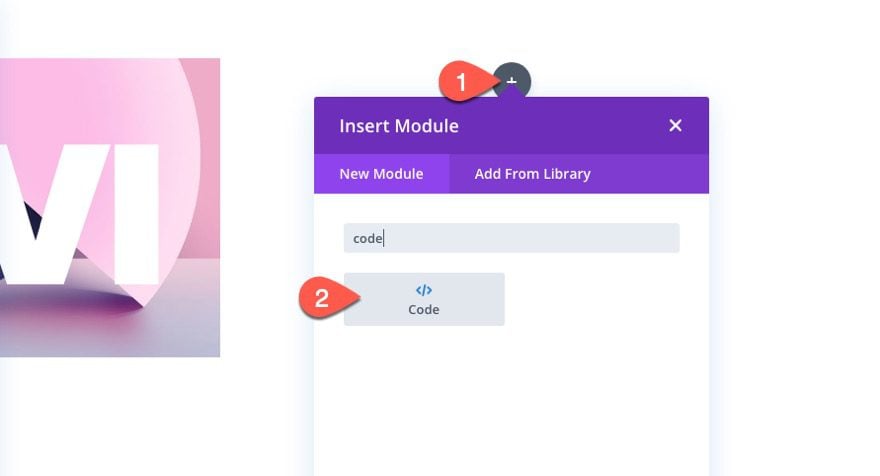
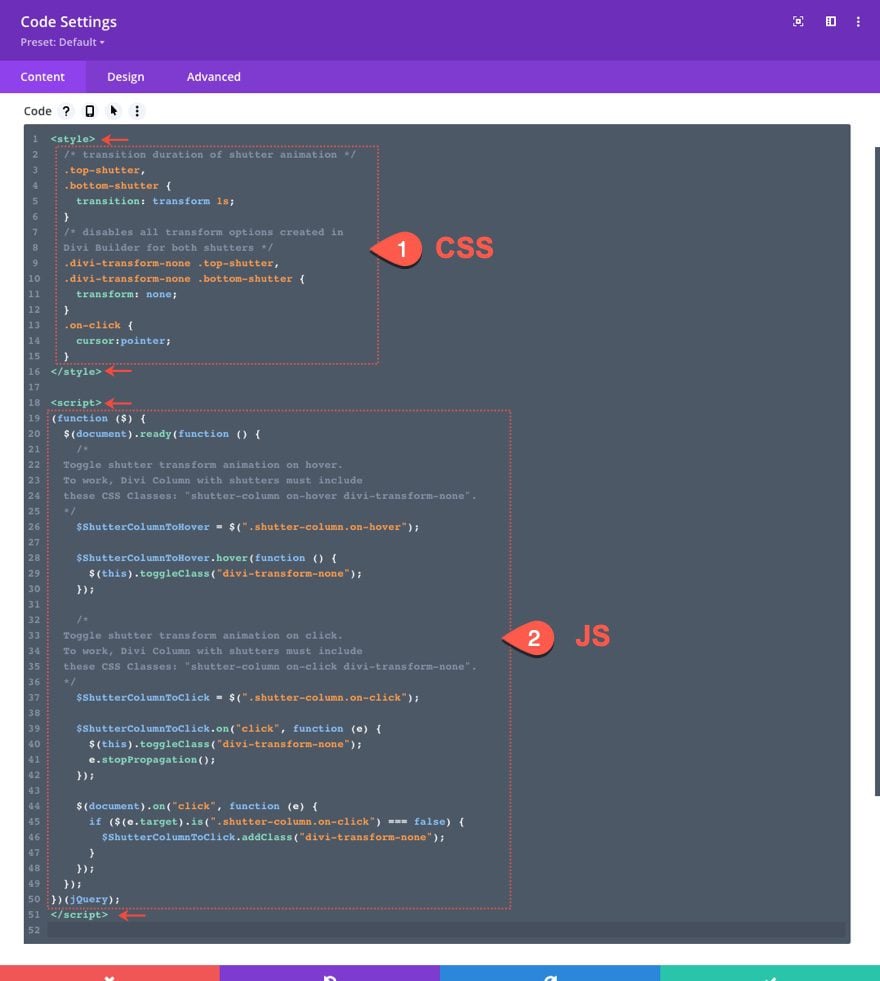
To add the functionality of the shutter animation, we need a few snippets of CSS and JS using a Code module.
Add a new code module to the page. We can add it to the right column of the very first top section we used for our initial overlay build.
The CSS
Paste the following CSS in the code box making sure to wrap it with the necessary style tags:
  /* transition duration of shutter animation */
  .top-shutter,
  .bottom-shutter {
    transition: transform 1s;
  }
  /* disables all transform options created in
  Divi Builder for both shutters */
  .divi-transform-none .top-shutter,
  .divi-transform-none .bottom-shutter {
    transform: none;
  }
  .on-click {
    cursor:pointer;
  }
This CSS is really simple. All it is doing is applying transform: none to the shutters inside the column with the class “divi-transform-none”. This class will be toggled on and off with JS to create the animation. The transition: transform 1s simply sets the duration of the transition (or animation) to last 1 second.
The JS
After the CSS, add the following JQuery to the code box making sure to wrap it with the necessary script tags:
(function ($) {
  $(document).ready(function () {
    /*
  Toggle shutter transform animation on hover.
  To work, Divi Column with shutters must include
  these CSS Classes: "shutter-column on-hover divi-transform-none".
  */
    $ShutterColumnToHover = $(".shutter-column.on-hover");

    $ShutterColumnToHover.hover(function () {
      $(this).toggleClass("divi-transform-none");
    });

    /*
  Toggle shutter transform animation on click.
  To work, Divi Column with shutters must include
  these CSS Classes: "shutter-column on-click divi-transform-none".
  */
    $ShutterColumnToClick = $(".shutter-column.on-click");

    $ShutterColumnToClick.on("click", function (e) {
      $(this).toggleClass("divi-transform-none");
      e.stopPropagation();
    });

    $(document).on("click", function (e) {
      if ($(e.target).is(".shutter-column.on-click") === false) {
        $ShutterColumnToClick.addClass("divi-transform-none");
      }
    });
  });
})(jQuery);
The first part of the code adds the functionality that toggles the shutter transform animations on hover whenever a column has the classes “shutter-column on-hover divi-transform-none”.
    $ShutterColumnToHover = $(".shutter-column.on-hover");

    $ShutterColumnToHover.hover(function () {
      $(this).toggleClass("divi-transform-none");
    });
The second part of the code adds the functionality that toggles the shutter transform animations on click whenever a column has the classes “shutter-column on-click divi-transform-none”.
    $ShutterColumnToClick = $(".shutter-column.on-click");

    $ShutterColumnToClick.on("click", function (e) {
      $(this).toggleClass("divi-transform-none");
      e.stopPropagation();
    });

    $(document).on("click", function (e) {
      if ($(e.target).is(".shutter-column.on-click") === false) {
        $ShutterColumnToClick.addClass("divi-transform-none");
      }
    });
Part 3: Split Text Shutter Animation Designs
Design #1
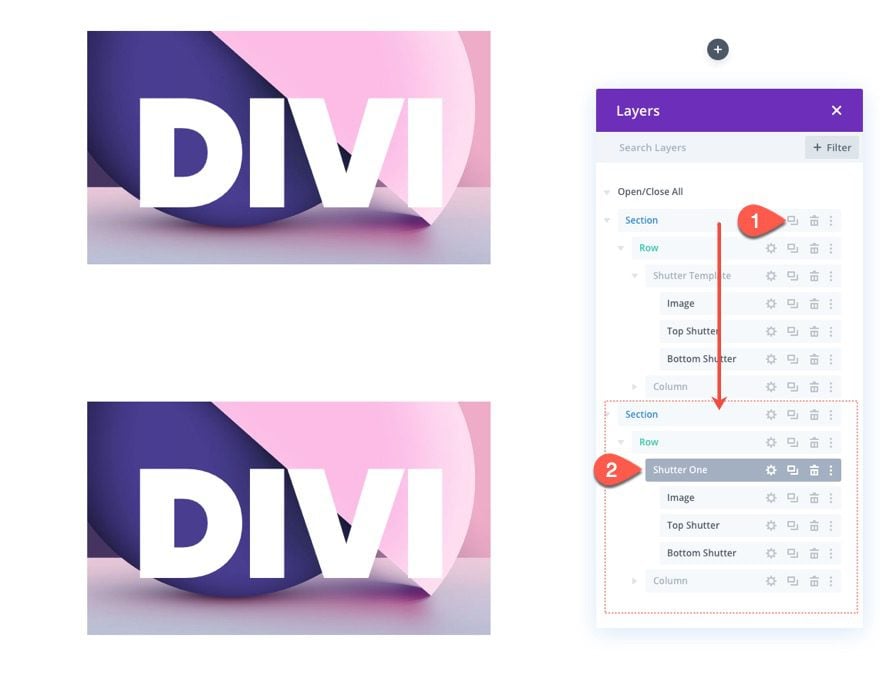
To create our first shutter animation design, we are going to jumpstart the design process by duplicating the first section. This will give us a new section with a pre-built image overlay with the split text shutters ready to go.
Add Transform Properties to the Top Shutter
Normally when you use CSS to animate something with transform properties, the element would have no transform styling initially, and then the transform styling would be applied whenever the user hovers or clicks on the item. In Divi, we are going to flip the process and start by adding the transform styling to the element using the Divi Builder first. This allows us to use the built-in transform options while editing the design visually. Then once we are finished adding all of the transform design elements, we can disable them initially (using a CSS class), and then toggle it on and off when the user interacts with the overlay.
To add the transform design to the top shutter, open the top shutter text module settings and update the following:
- Transform Scale (X and Y): 150%
- Transform Translate Y axis: -101%
- Transform Origin: top center
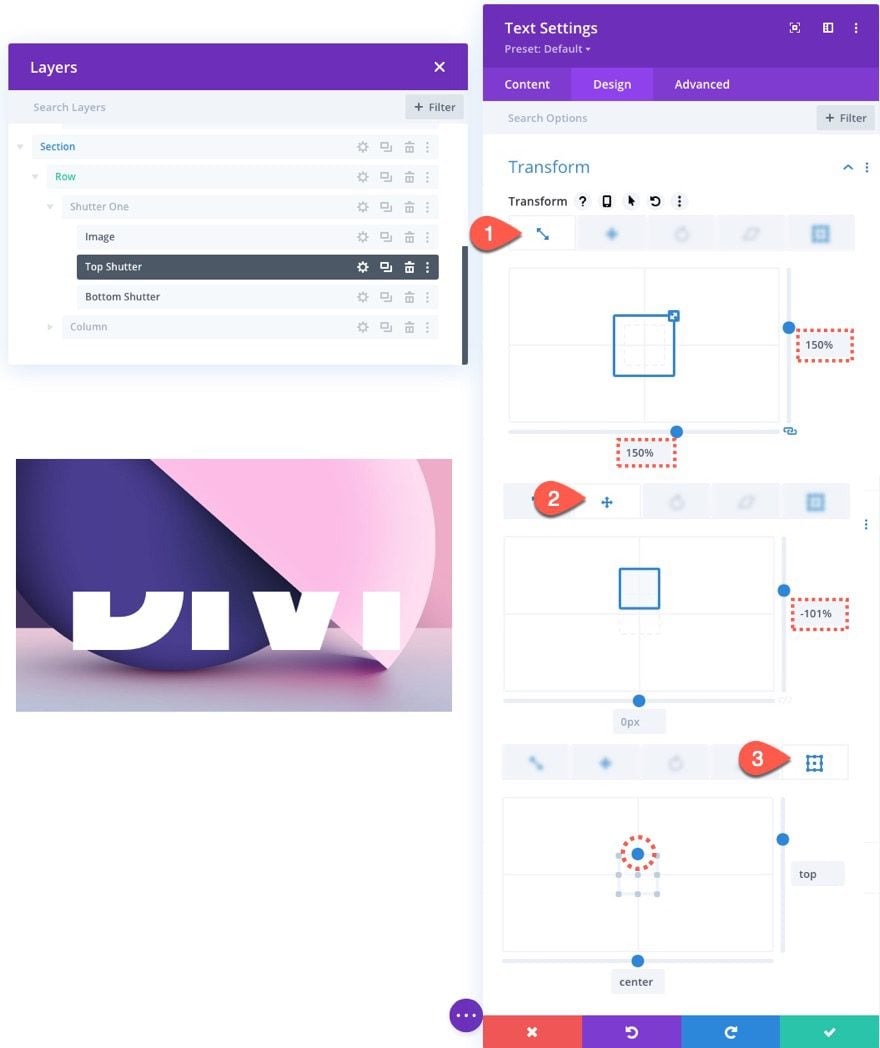
If you did it right, the top shutter will no longer be visible which is what we want because we want the entire main image exposed after the animation transition.
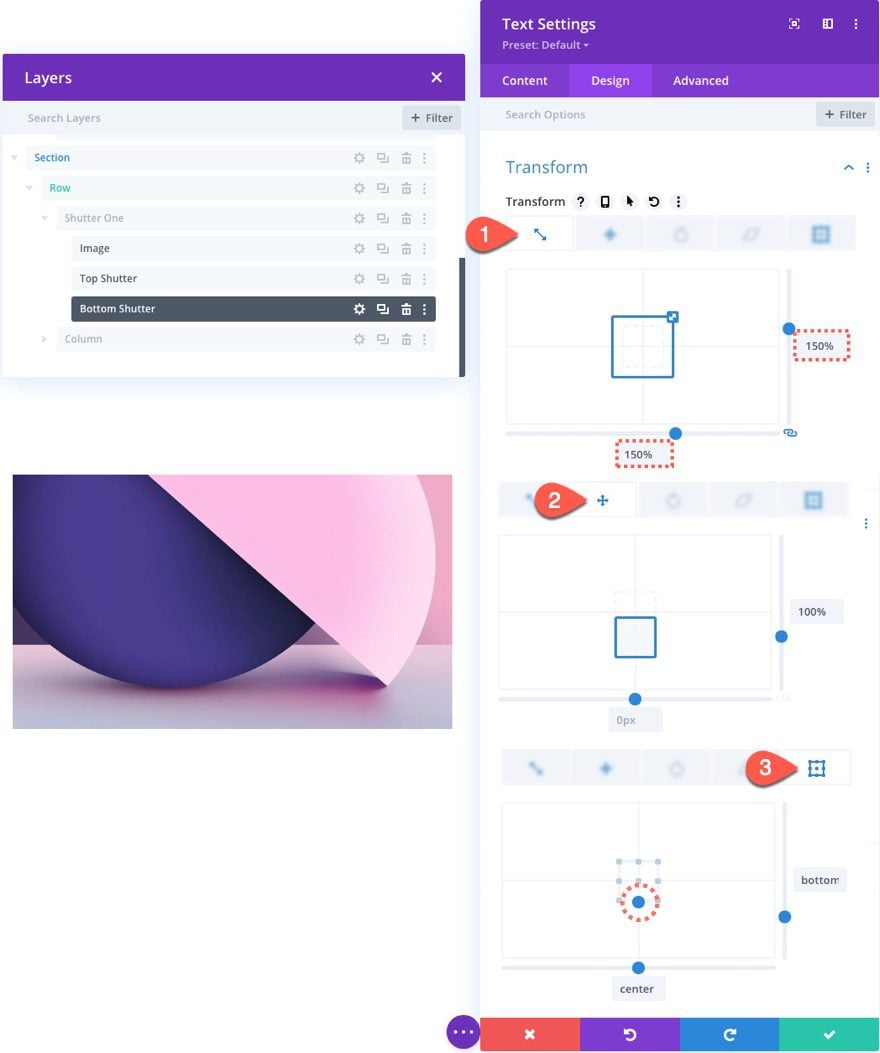
Add Transform Properties to the Bottom Shutter
For the Bottom Shutter, update the following transform design options:
- Transform Scale (X and Y): 150%
- Transform Translate Y axis: 101%
- Transform Origin: bottom center

Add a Class to Disable the Transform Designs Initially
Like I mentioned earlier, once we are done adding the transform designs needed for our shutter animation, we can disable those transform designs initially by adding a CSS Class.
Because of the custom CSS code we added earlier, the design will appear without any transform designs in place.
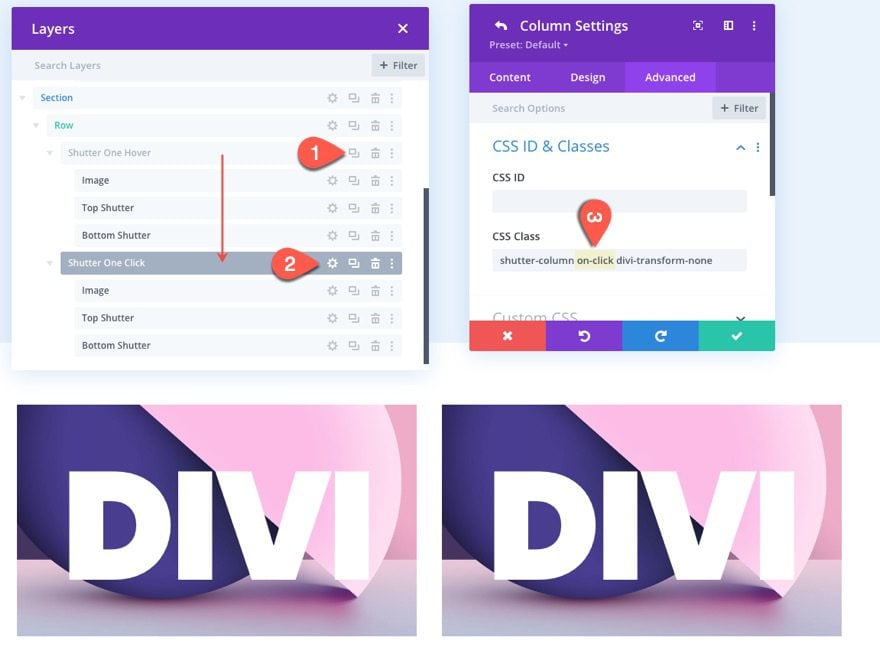
Add On-Click Functionality with a Single Class
To get the same animation triggered on click instead of on hover, all we need to do is replace a single class in the column.
First, duplicate column 1 with our first working example on hover. Then delete the empty column. Now you should have two identical columns with the same classes and content.
Open the settings for column 2 and replace the “on-hover” class with the “on-click” class. Here is what the final three classes should be:
- CSS Class: shutter-column on-click divi-transform-none
Result
Reversing the Shutter Animation on Hover
If you want the main image to be displayed uncovered initially and then add the overlay when hovering over the image (the reverse of how it works now), you can remove the class “divi-transform-none” in the column used for the shutter. This will give you the following effect.
Design #2
To create the second shutter animation, we can use duplicate the previous section with our first shutter animation.
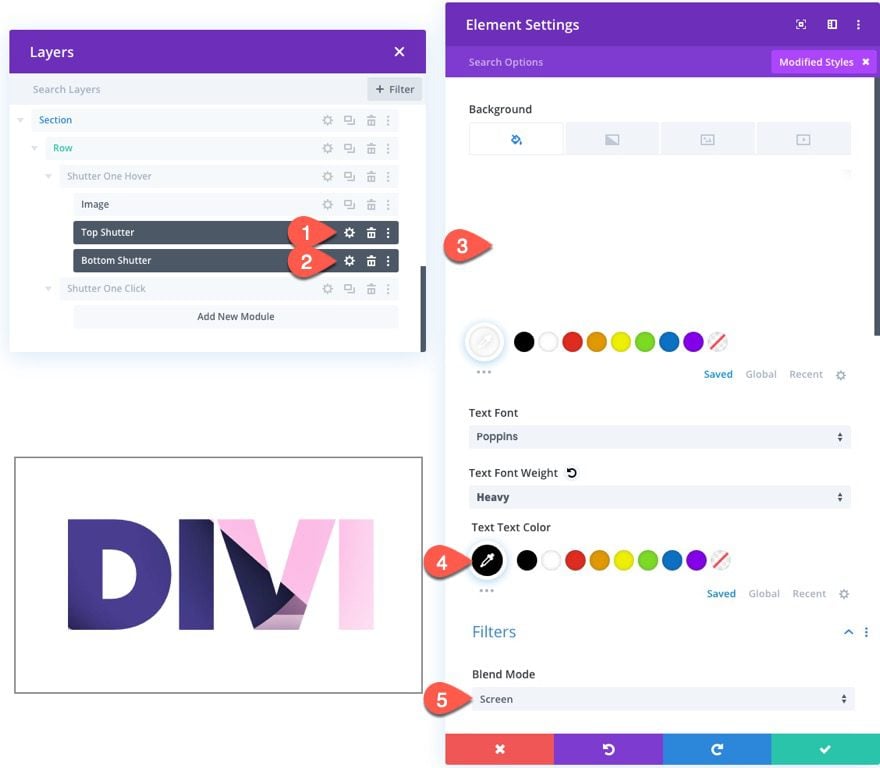
Update Shutters
Then use multiselect to select the top shutter and bottom shutter text modules. Then open the element settings for both and update the following:
- Background: #ffffff
- Text Text Color: #000000
- Blend Mode: Screen
Result
Design #3
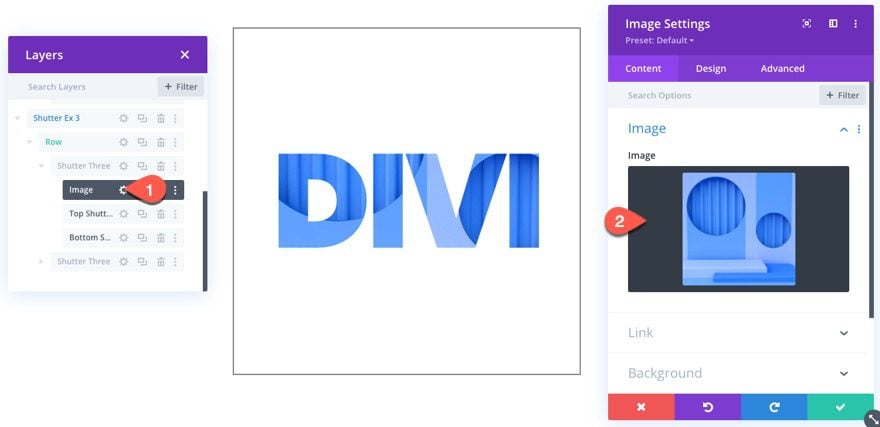
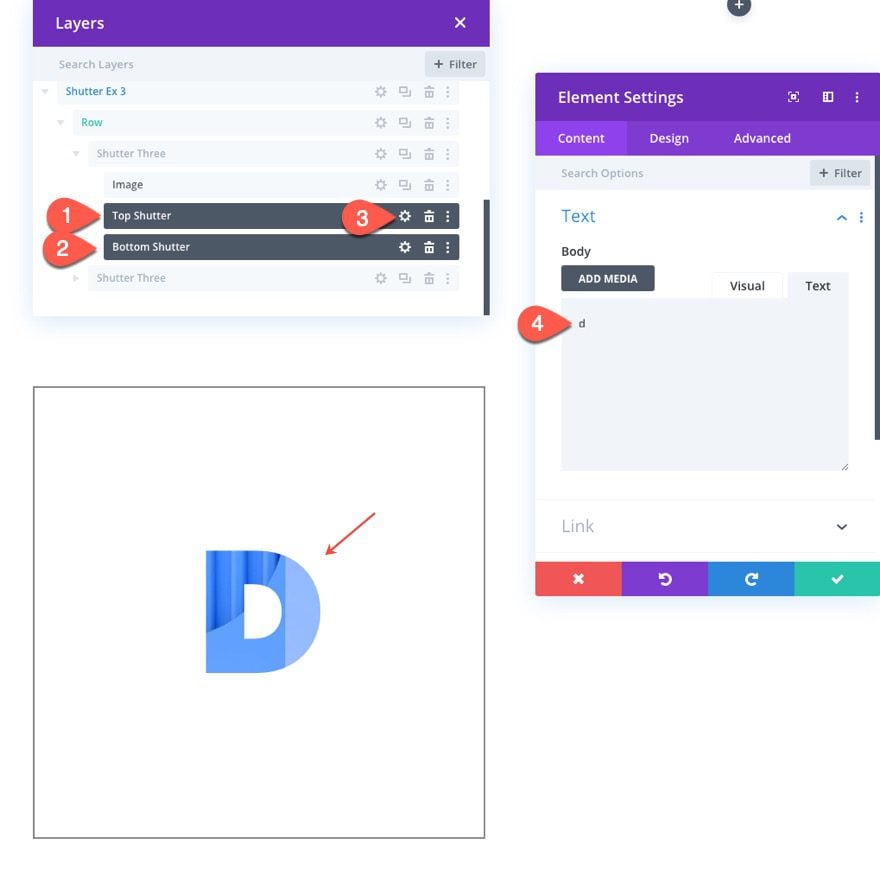
To creating the third shutter animation image overlay design, duplicate the previous section.
Add New Image
Then update the image module with a new image.
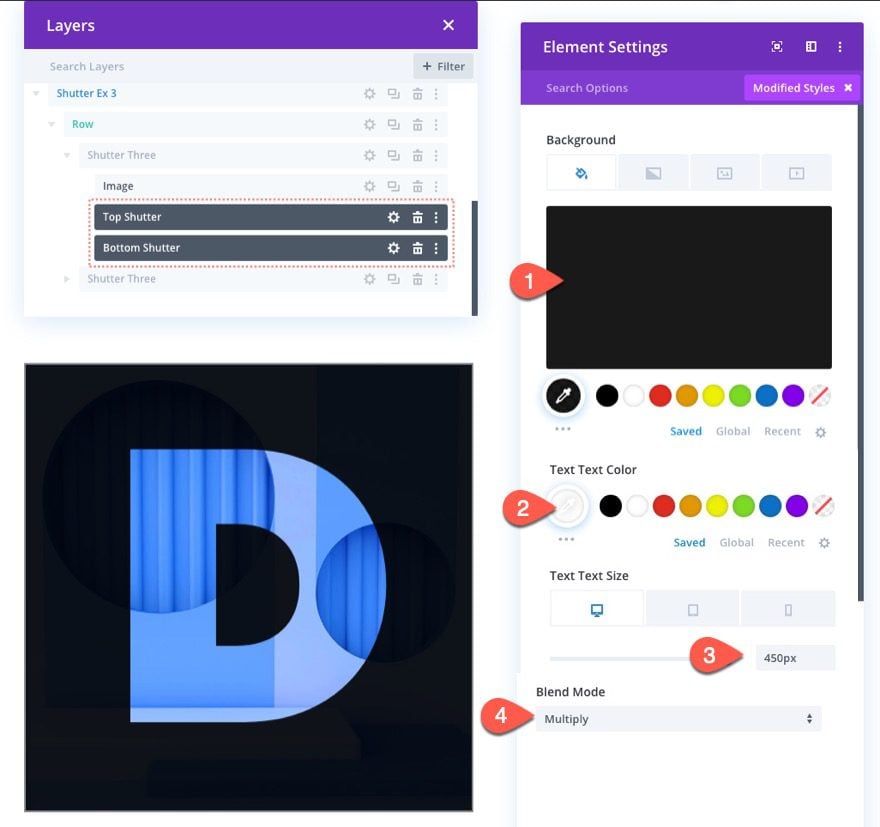
Update Shutters
Use multiselect to select both the top shutter and bottom shutter text modules and open the element settings for both to update the following:
- Body Content: d
- Background: rgba(0,0,0,0.9)
- Text Text Color: #ffffff
- Text Text Size: 450px(desktop), 70vw (tablet and phone)
- Blend Mode: Multiply
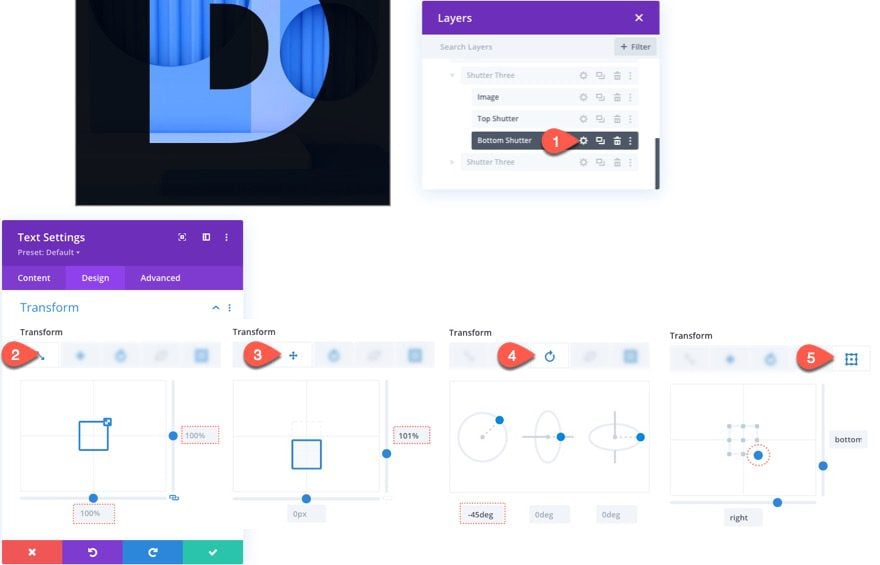
Open the top shutter text module settings and update the following transform options:
- Transform Scale (X and Y): 100% (default)
- Transform Translate Y axis: -101%
- Transform Rotate Z axis: -45deg
- Transform origin: top left

Then update the bottom shutter text module settings and update the following transform options:
- Transform Scale (X and Y): 100% (default)
- Transform Translate Y axis: 101%
- Transform Rotate Z axis: -45deg
- Transform origin: bottom right
Result
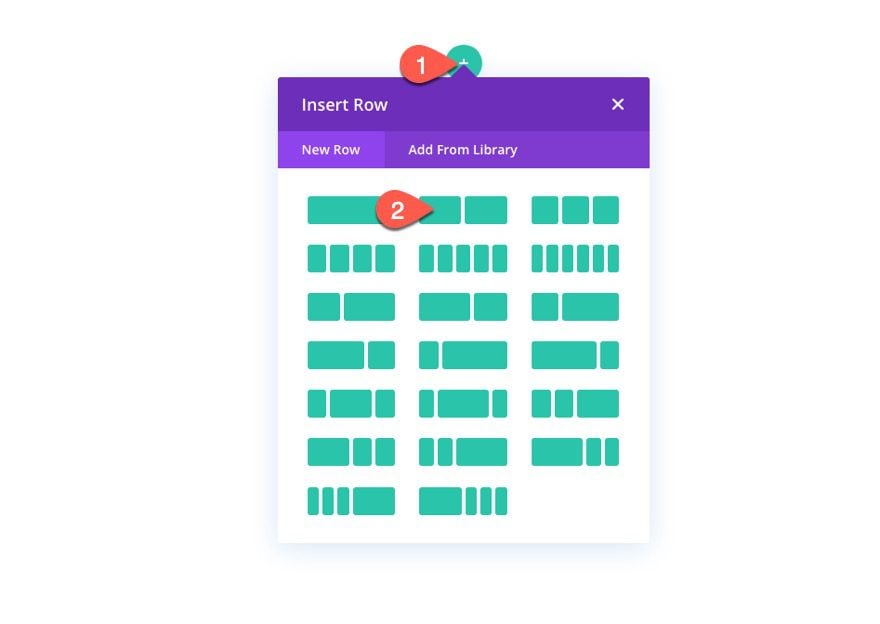
More Examples and Possibilites
Here a couple of more example designs using the same techniques.
Here is one that is similar to design #2 but without the transform scale on the shutters. It also shows how the lightbox effect still works on the image.
And here is another example that uses transform translate to slide the shutters horizontally.
Final Results
Final Thoughts
Creating image overlays with split text shutter animations in Divi can be an effective approach for making your images stand out and engaging visitors in a fresh way.
Hopefully, this will spark your creativity to add your own designs and transform animation effects using different colors, fonts, blend modes, etc. The possibilities seem endless.
I look forward to hearing from you in the comments.
Cheers!


this article is very good . tnx.
This is the kind of magic behind why I bought Divi. Amazing
Thanks, Shane. I also believe in Divi magic 🙂
I love this technique, I am going to use it with my website made in DIVI to be able to give an animated and elegant touch to my website.
Is it compatible with mobiles?
Thanks!
Thanks, Jose. Yes, it should be responsive.
OMG this is so helpful, I’ve been using one of your themes for a long time and only now started really reading the blog ( i’m sorry ) but it’s very helpful
Awesome to hear, Samy!
Thanking you for sharing this artical and useful Information
Hi, Fantastic – I love these. However, as they work on hover I guess they are only suitable for computers as opposed to mobile. I often wonder in mobile-first design if hover now has a place.
That is why I included the “on click” functionality as well. See the steps for creating the first example for hover and on click.
The code allows for both hover and click functionality. Use the class “on-click” on the column with the image overlay.
Hi Jason, I followed all the steps but the text doesn’t move, no hover and not by clicking as well. What am I missing?
Thnx in advance, mariska
Hard to say without looking at your setup. My first thought would be that you duplicated the code module? Make sure you have only one.
Hello,
Really great !
Thank you
You are very welcome. Thanks, Bruno.
Awesome!