
 to Divi Sections")
Sometimes it is more convenient to navigate page content by clicking buttons rather than scrolling. This is especially true for one-pagers or if you have certain sequential sections on a page that warrant optimal accessibility for users. Adding sticky page navigation links to the bottom of sections can be a unique alternative to having users scroll constantly or to including anchor links in your primary header menu.
In this tutorial, we are going to show you how to add sticky page navigation links (next, previous, first, last) to a page in Divi. This will allow you to navigate to specific sections throughout a page with ease.
Let’s get started!
- 1 Sneak Peek
- 2 Download the Layout for FREE
- 3 Download For Free
- 4 You have successfully subscribed. Please check your email address to confirm your subscription and get access to free weekly Divi layout packs!
- 5 What You Need to Get Started
-
6
Adding Sticky Page Navigation Links to Divi Sections
- 6.1 Creating the Top Section
- 6.2 Creating Section 1
- 6.3 Creating Sticky Row for Section 1
- 6.4 Adding Divider and Next Button to Sticky Row (Section 1)
- 6.5 Creating Section 2
- 6.6 Creating Section 3
- 6.7 Creating the Bottom Section
- 6.8 Creating the Sticky Bottom Section
- 6.9 Creating Row for First and Last Navigation Links
- 6.10 Add First and Last Buttons for Sticky Bottom Section
- 6.11 Update Section Settings for Sticky Bottom Section
- 7 Final Result
- 8 Final Thoughts
Sneak Peek
Here is a quick look at the design we’ll build in this tutorial.
Notice how the sticky navigation links change when scrolling down the page.
Notice how easy it is to navigate to each section by clicking the navigation links.
And here is how the design looks on mobile.
And here is a codepen that demonstrates the core functionality.
Download the Layout for FREE
To lay your hands on the designs from this tutorial, you will first need to download it using the button below. To gain access to the download you will need to subscribe to our newsletter by using the form below. As a new subscriber, you will receive even more Divi goodness and a free Divi Layout pack every Monday! If you’re already on the list, simply enter your email address below and click download. You will not be “resubscribed” or receive extra emails.

To import the section layout to your Divi Library, navigate to the Divi Library.
Click the Import button.
In the portability popup, select the import tab and choose the download file from your computer.
Then click the import button.

Once done, the section layout will be available in the Divi Builder.
Let’s get to the tutorial, shall we?
What You Need to Get Started

To get started, you will need to do the following:
- If you haven’t yet, install and activate the Divi Theme.
- Create a new page in WordPress and use the Divi Builder to edit the page on the front end (visual builder).
- Choose the option “Build From Scratch”.
After that, you will have a blank canvas to start designing in Divi.
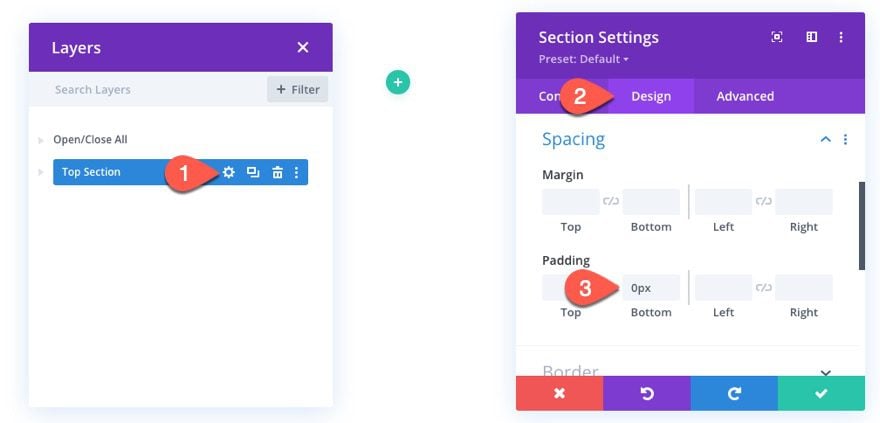
Creating the Top Section
By default, there will be a regular section ready to use in the Divi Builder. Using the default regular section, open the section settings and take out the bottom padding as follows:
- Padding: 0px bottom
Row Settings
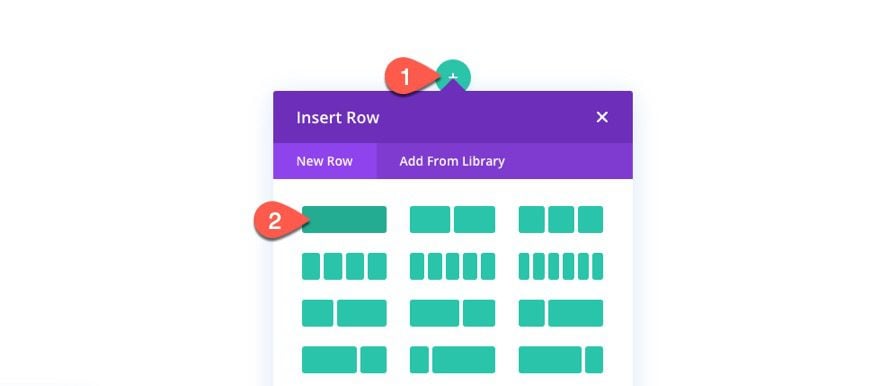
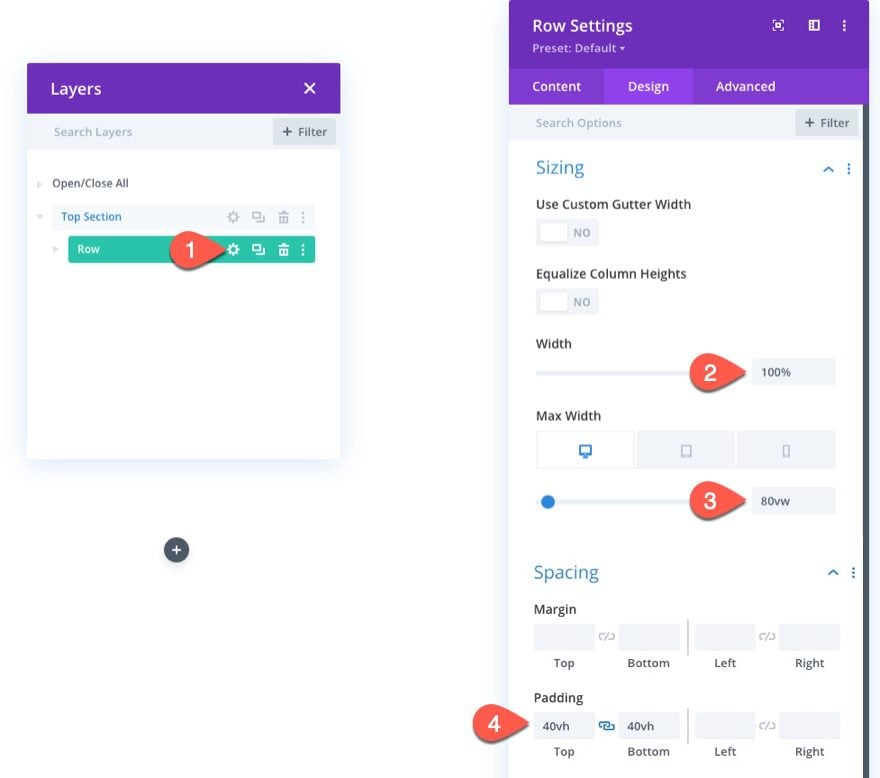
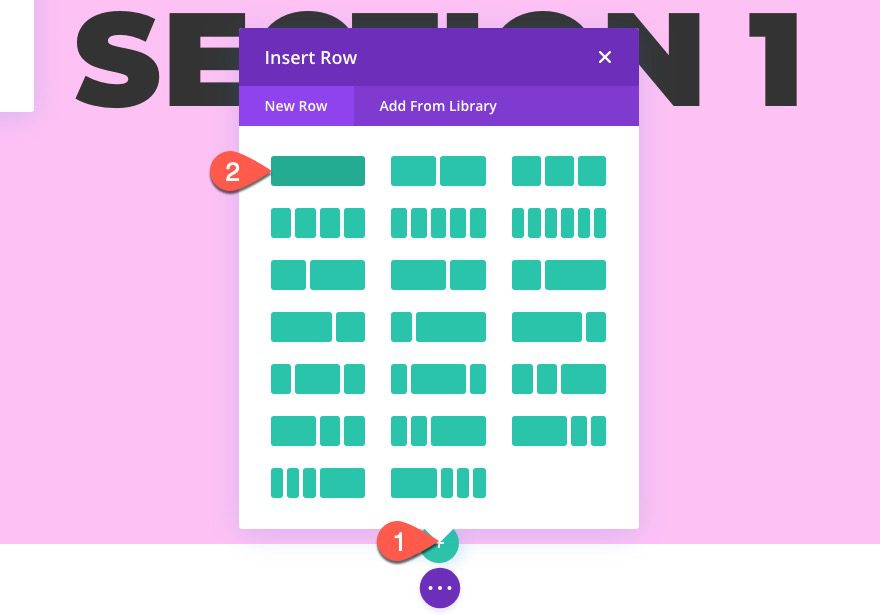
Add a one-column row to the section.
Then update the design settings for the row as follows:
- Width: 100%
- Max Width: 80vw (desktop, tablet), 95vw (phone)
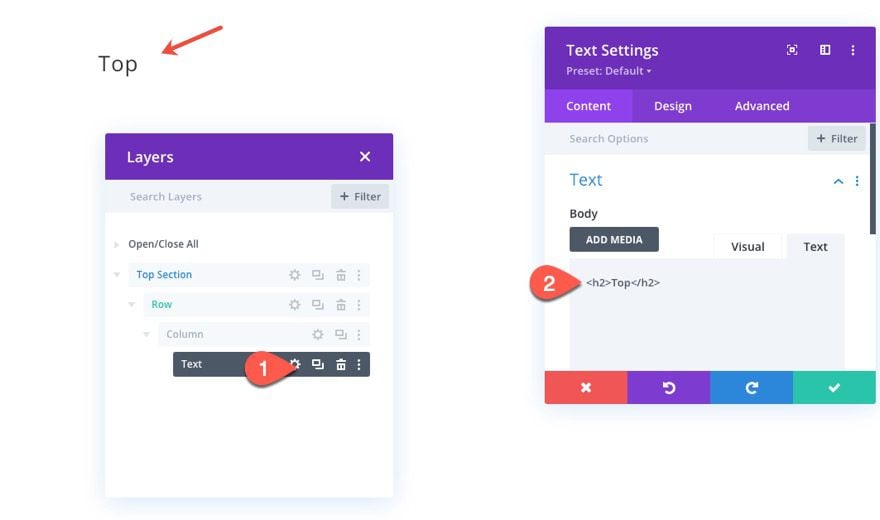
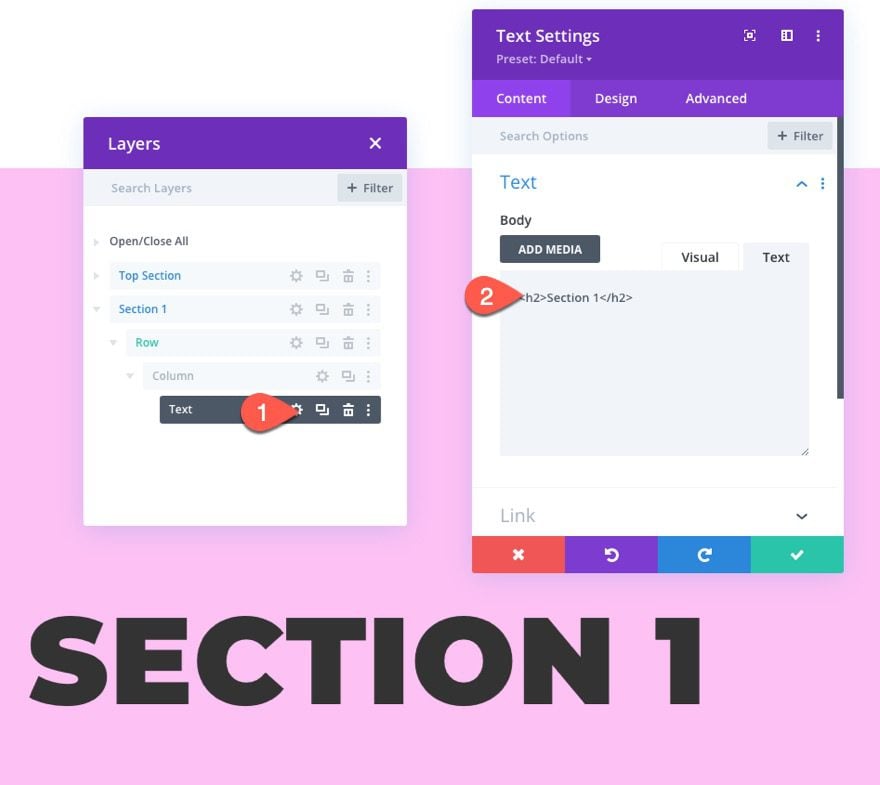
Section Title
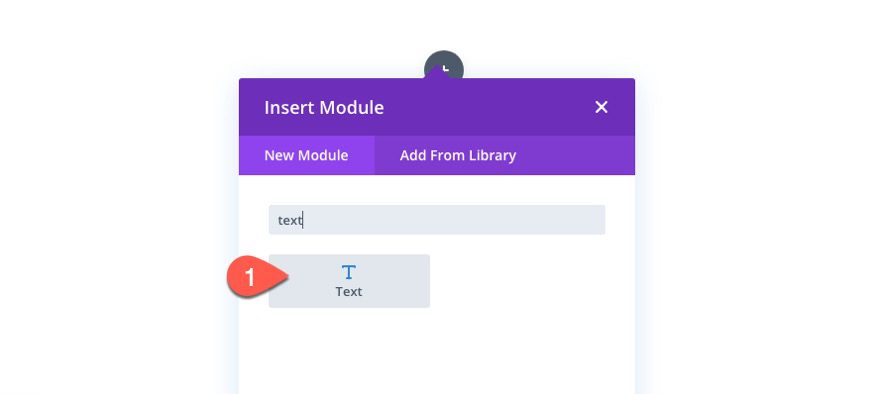
To create the section title, first, add a new text module to the row/column.
Then update the body text with the following H2 title:
<h2>Top</h2>
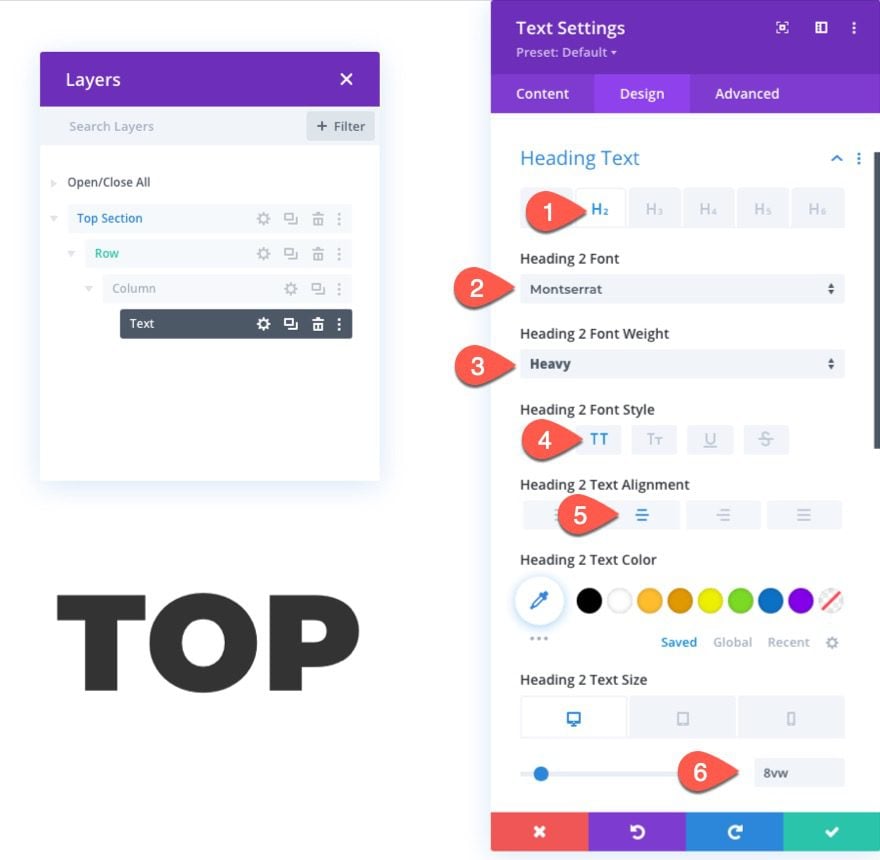
Under the design tab, update the text settings for the H2 heading as follows:
- Select the H2 tab
- Heading 2 Font: Montserrat
- Heading 2 Font Weight: Heavy
- Heading 2 Font Style: TT
- Heading 2 Text Alignment: center
- Heading 2 Text Size: 8vw (desktop, tablet), 61.36px (phone)
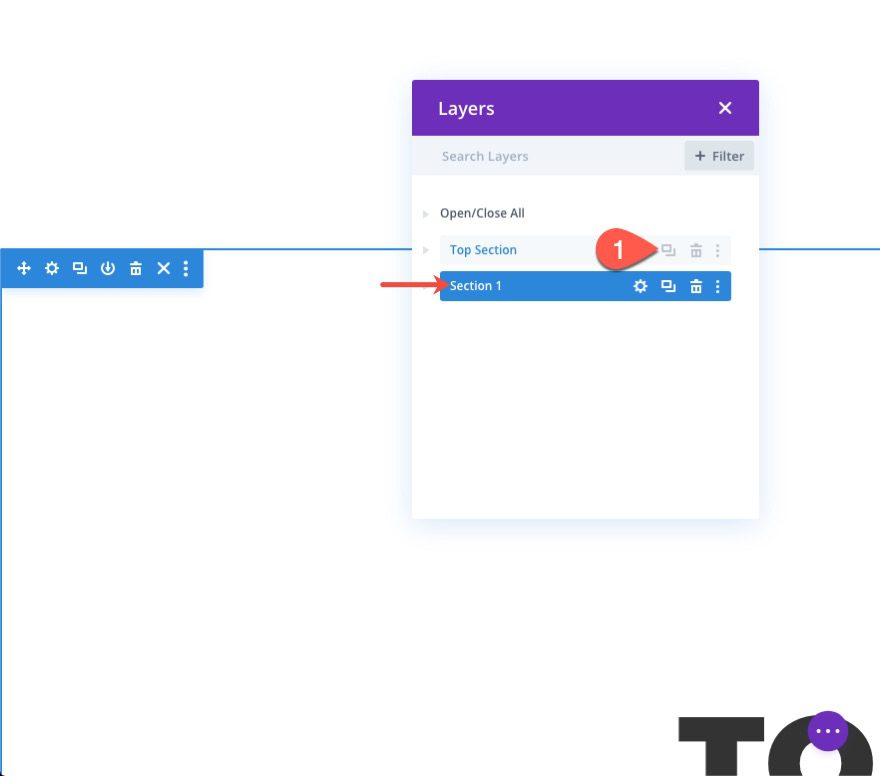
Creating Section 1
Next, we are going to create our first section that will contain sticky navigation links. To create Section 1, duplicate the top section and label the duplicate section accordingly in the layers view.
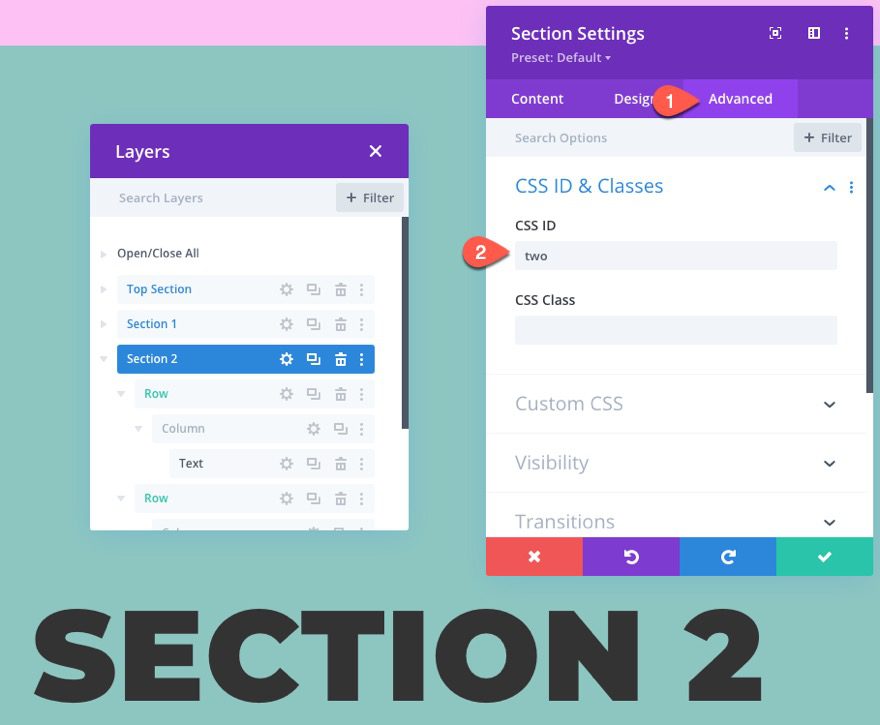
Section 1 Background Color
Open the settings for Section 1 and update the background color:
- Background Color: #fec0f4

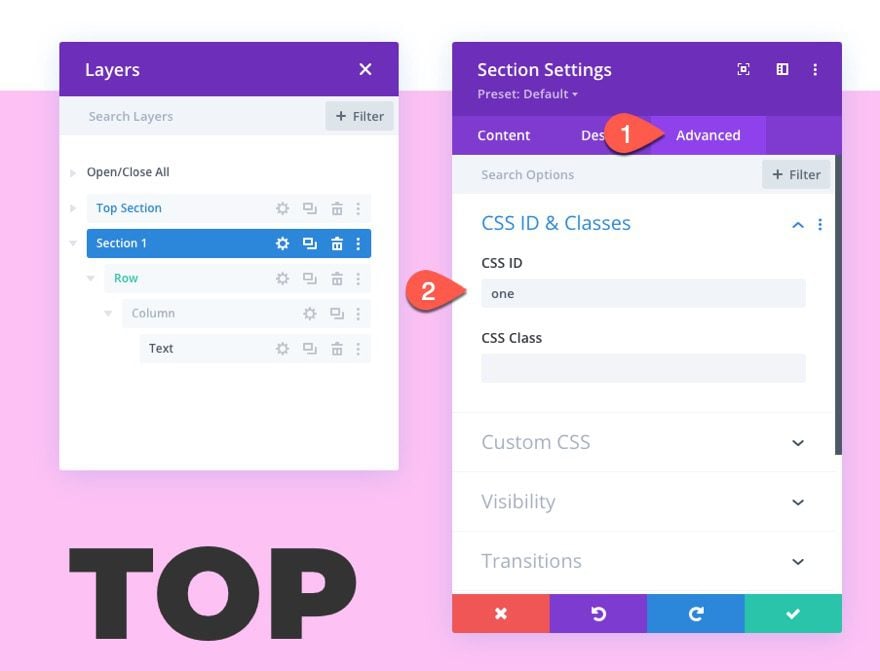
Section 1 CSS ID for Anchor Link Navigation
In order to link to this section using our anchor links, we need to add a CSS ID. Under the advanced tab, add the following CSS ID:
- CSS ID: one
Update Title Text
Then update the title text in the text module to read “Section 1”.
Creating Sticky Row for Section 1
Once the Section and Title are updated, we are going to create a sticky row that will eventually hold our navigation links. To do this, add a new one column row under the existing row in Section 1.
Because our section has no bottom padding, the row should sit nicely at the very bottom of the section.
Sticky Row Settings
To make the row sticky, we need to update the row settings.
Sticky Options
Under the advanced tab, update the sticky position options as follows:
- Sticky Position: Stick to Bottom
- Top Sticky Limit: Section
- Offset from Surrounding Sticky Elements: NO
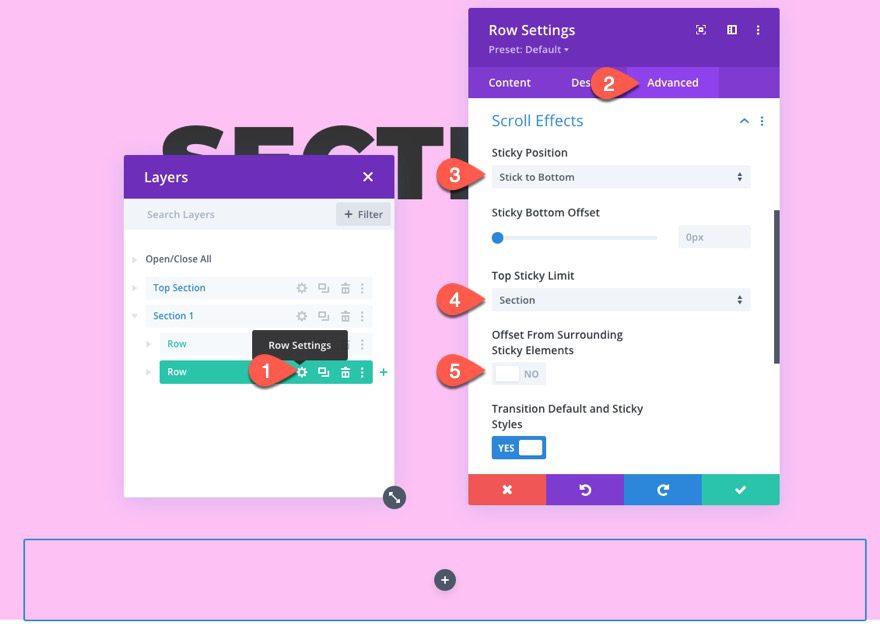
This will make sure the sticky row will be contained within the section.
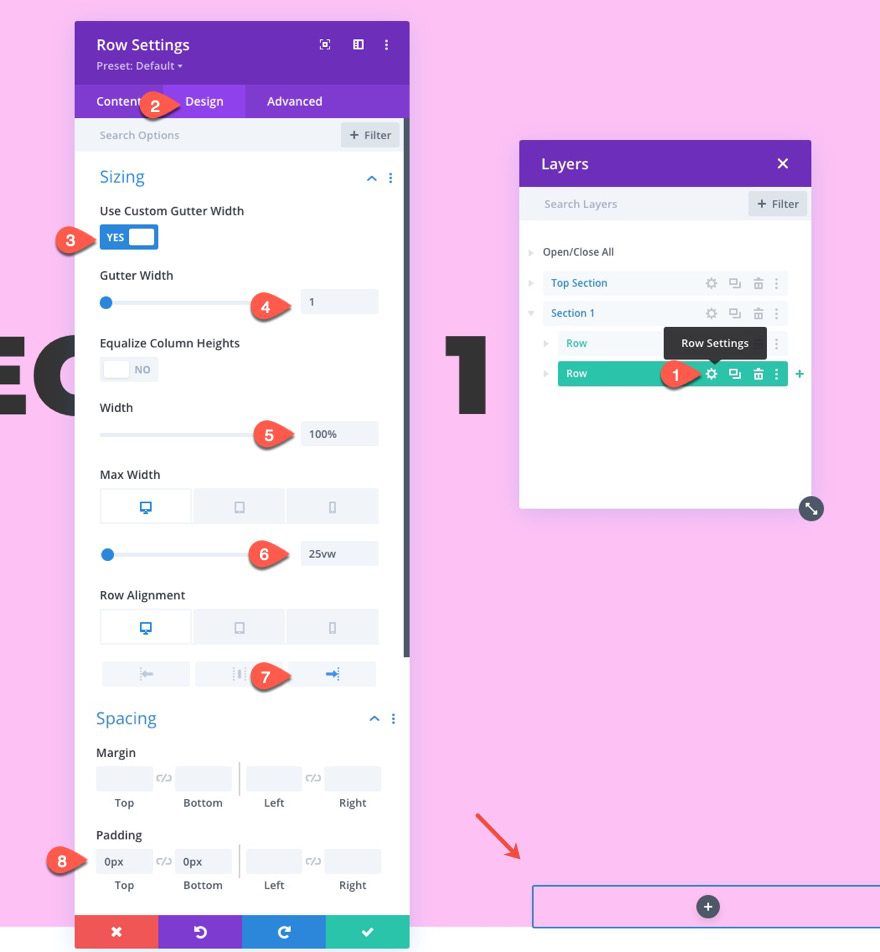
Design settings
Under the design tab, update the following:
- Use Custom Gutter Width: YES
- Gutter Width: 1
- Width: 100%
- Max Width: 25vw (desktop, tablet), 50% phone
- Row Alignment: right (desktop, tablet), left (phone)
- Padding: 0px top, 0px bottom
In order to hide the row (along with the buttons it will contain), we will move the row behind the section below it using the transform translate settings. Then we will move the row upward into view when in the sticky state. This will make sure the buttons are only visible when in the sticky state.
To do this, click the sticky icon (thumbnail) when hovering over the transform option title to activate the sticky tab. Then update the transform options as follows:
- Transform translate Y Axis (desktop): 100%
- Transform translate Y Axis (sticky): 0%
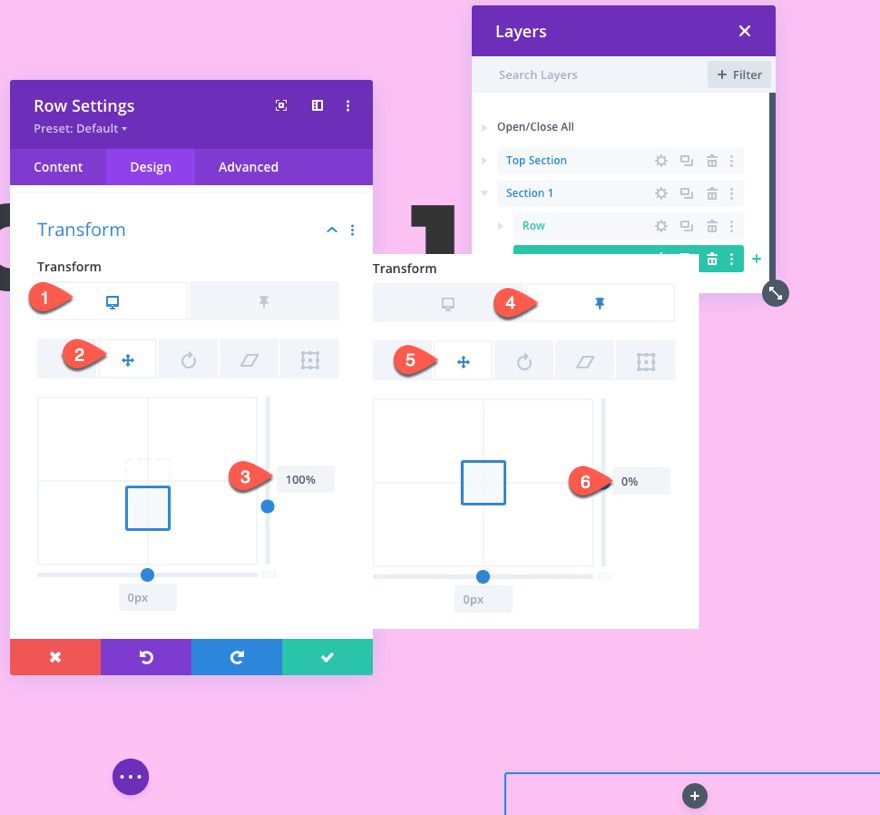
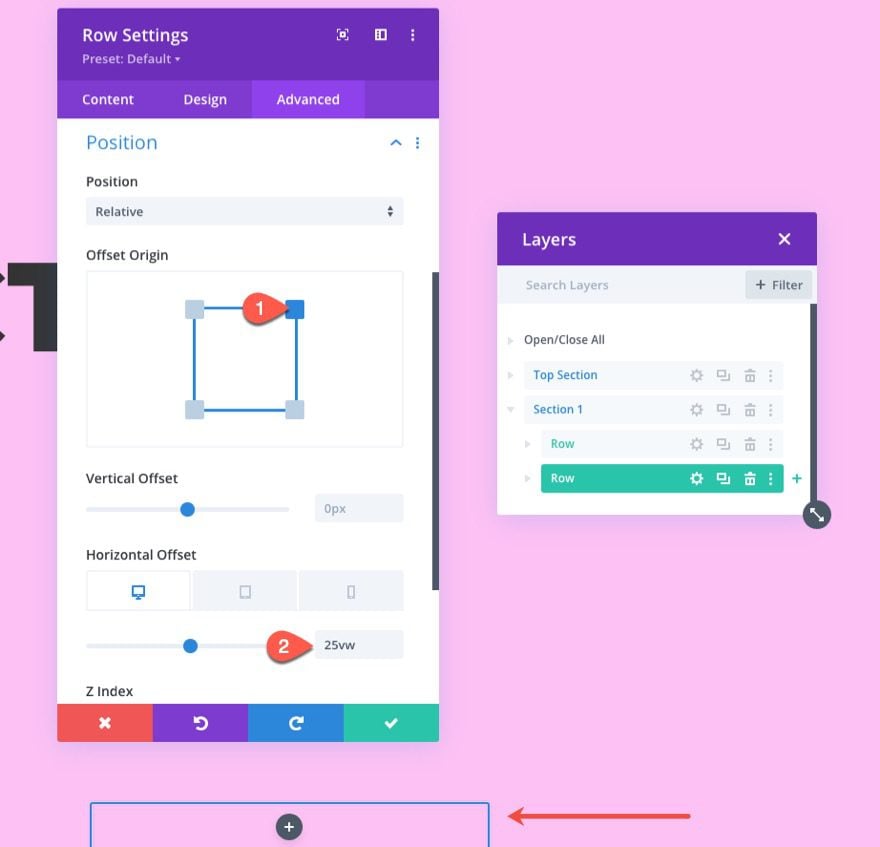
Position Offset
Eventually, we will have another stick row for the first and last buttons that will stick to the bottom right of the window. So we need to move this stick row to the left.
To move the sticky row, go to the advanced tab and update the position offset options as follows:
- Offset Origin: top right
- Horizontal Offset: 25vw (desktop, tablet), 0px (phone)
Note: The offset on phone is set to 0px because the row alignment will be set to the left and the width will be 50%.
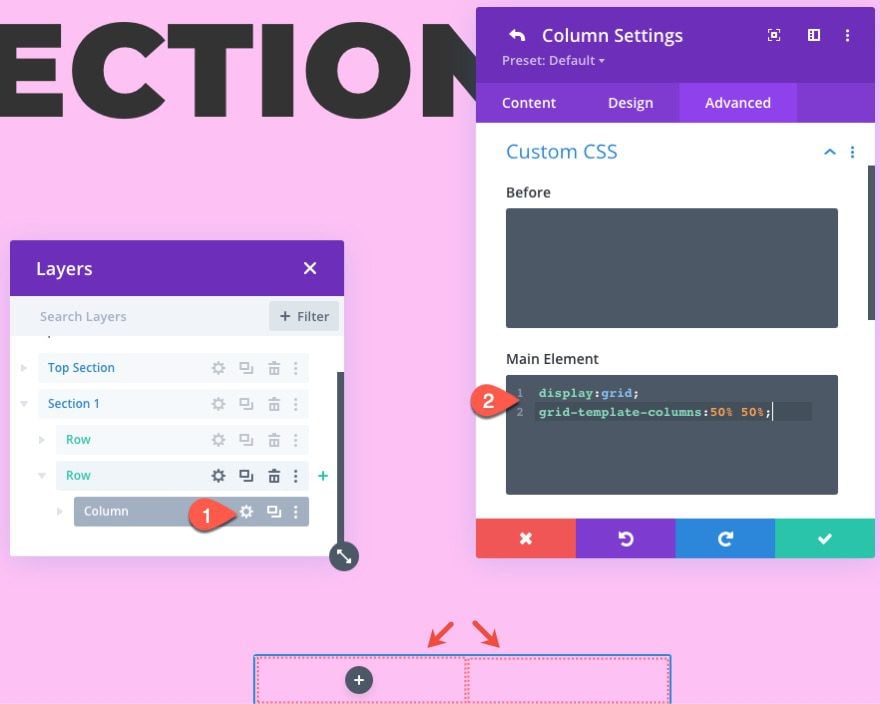
Sticky Row Column CSS
In order to make sure our buttons sit perfectly adjacent to one another and aligned vertically, we are going to add a small snippet of custom CSS to put the buttons in a CSS grid layout.
Under the advanced tab, add the following CSS to the Main Element:
display:grid;
grid-template-columns:50% 50%;
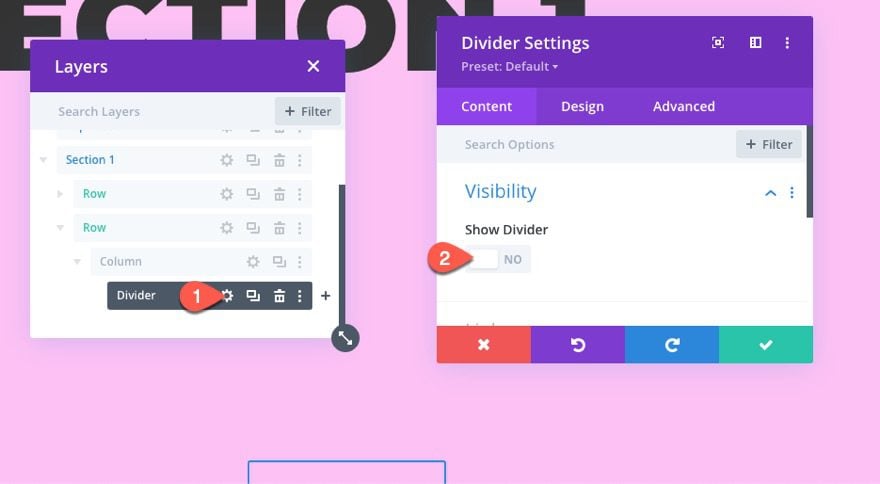
Now it is time to start adding our buttons to the column. For this first section, we only need a Next Button. So, we need a divider to serve as a placeholder for the left button.
Divider
Add a new divider to the column.
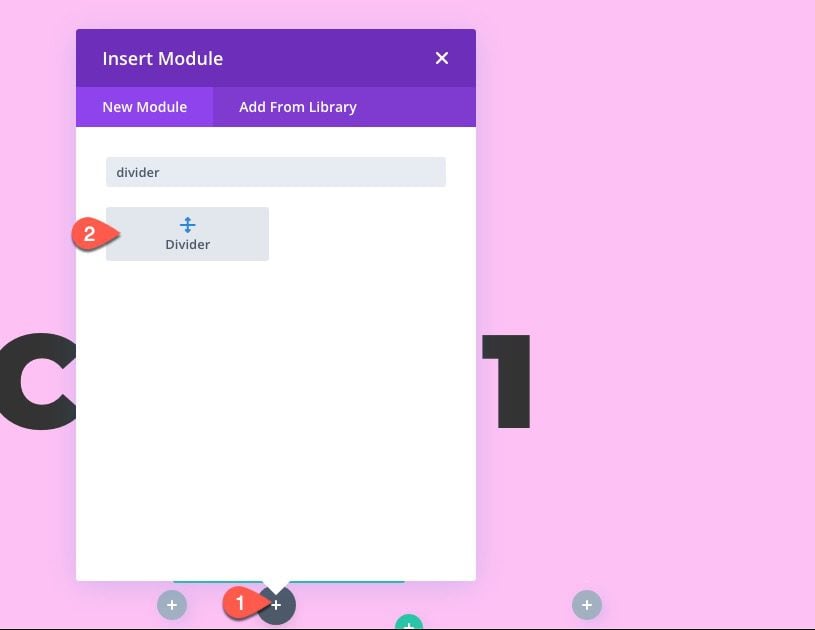
Then set the Show Divider option to “NO”.
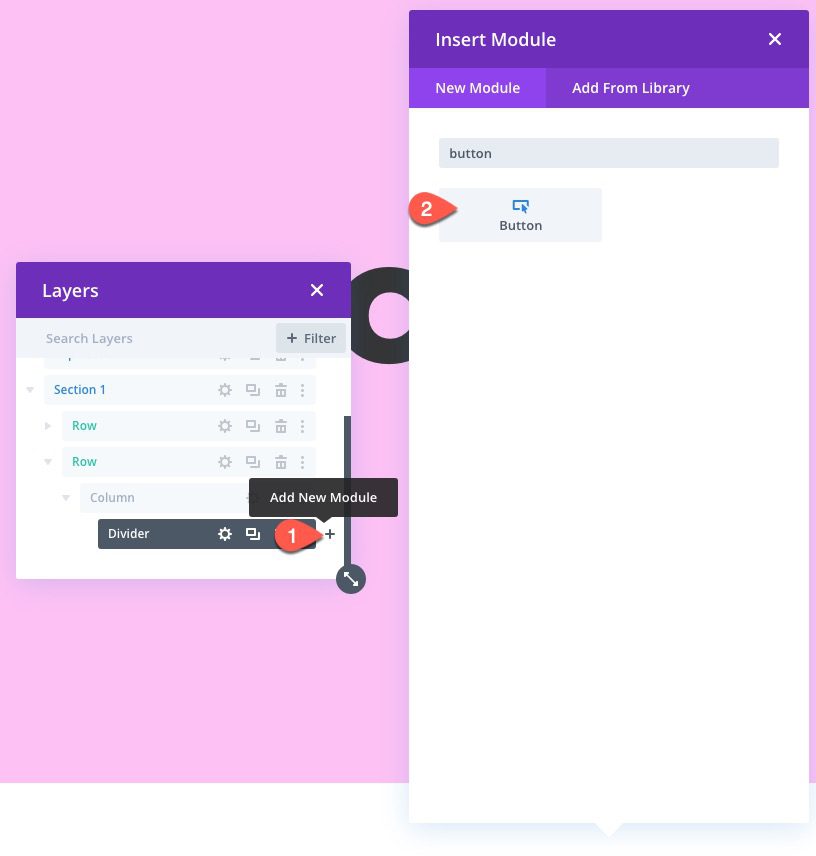
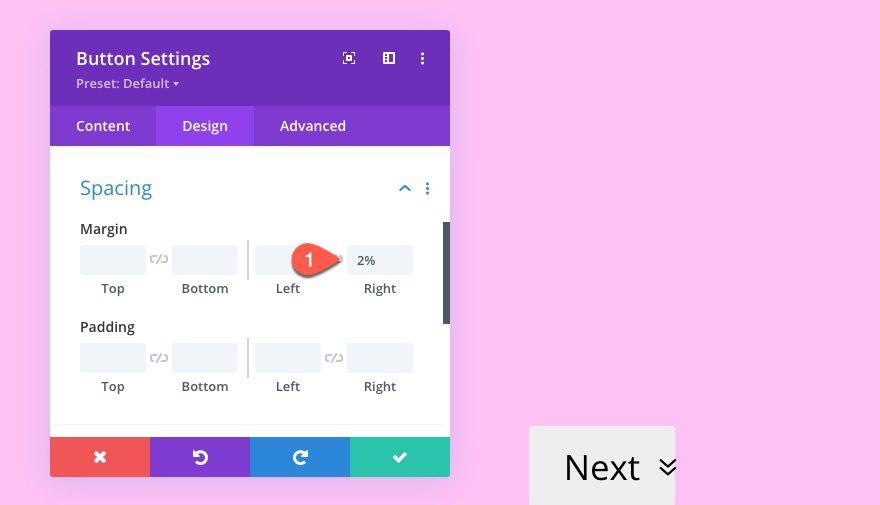
Next Button
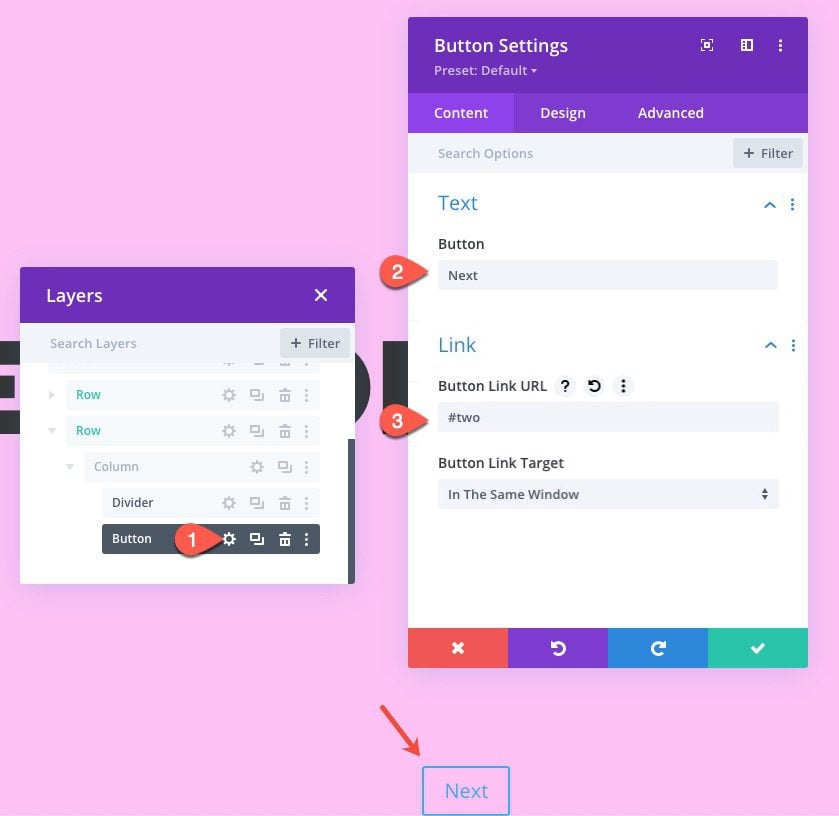
Under the divider module, add a button module.
Then update the button content settings:
- Button Text: Next
- Button Link URL: #two
The “#two” URL will jump to the next section we will create with the CSS ID “two”.
Under the design tab, update the following:
- Button Alignment: center
- Use Custom Styles For Button: YES
- Button Text Size: 2.1vw (desktop, tablet), 16.1px (phone)
- Button Text Color: #000000
- Button Background: #eeeeee
- Button Border Width: 0px
- Button Icon: down arrow (see screenshot)
- Only Show Icon on Hover for Button: NO
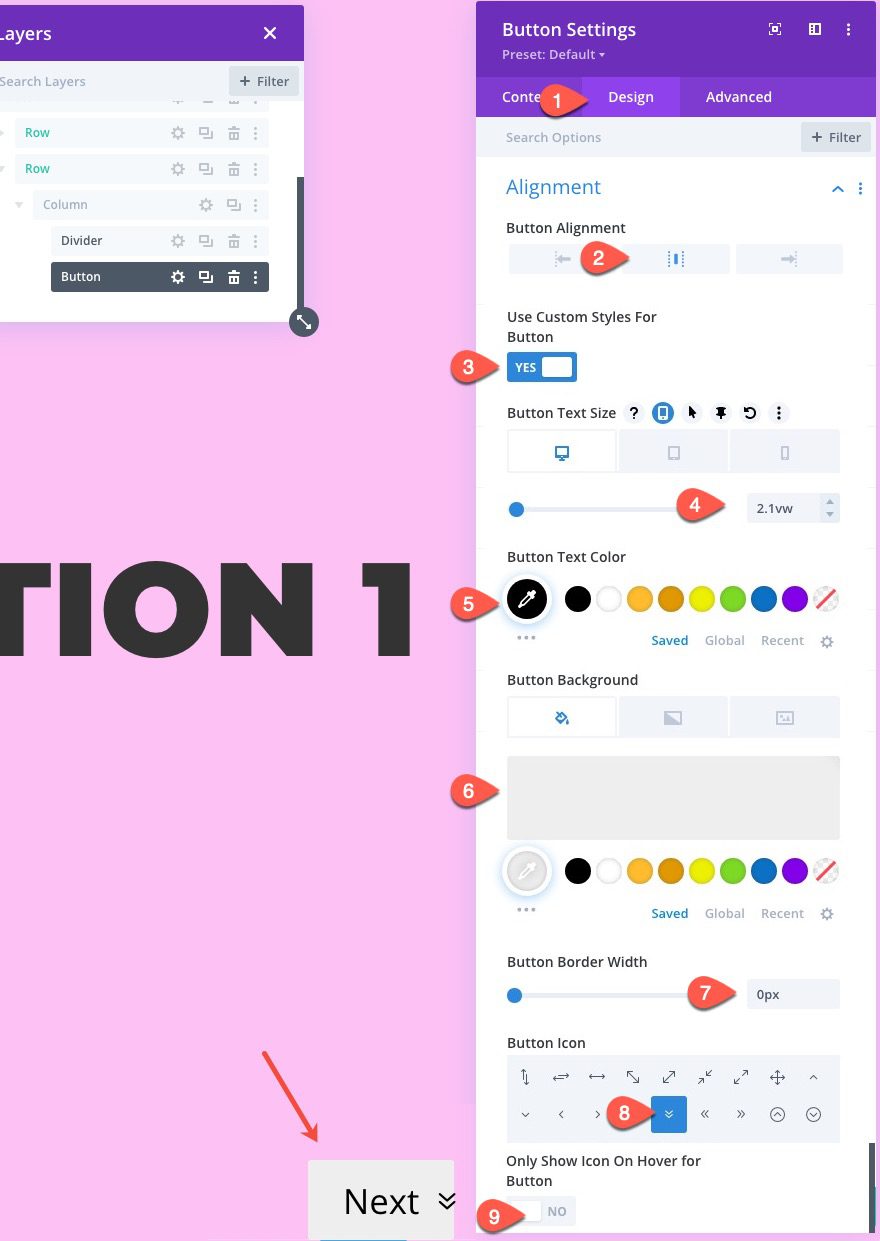
- Margin: 2% right
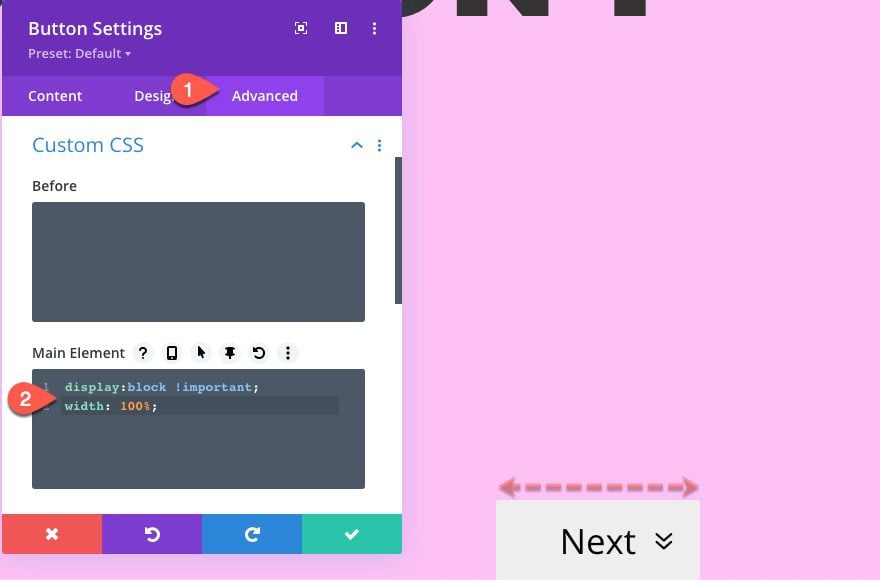
To make sure the button spans the full width of the CSS grid column, add the following custom CSS to the Main Element:
display:block !important; width: 100%;
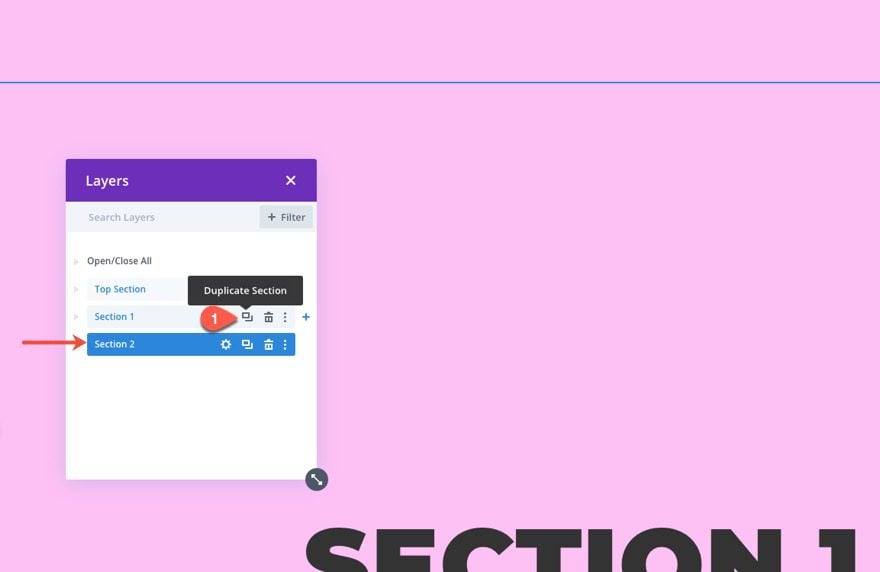
Creating Section 2
Now that we have finished Section 1, duplicate Section 1 to create Section 2 and update the label in layers view accordingly.
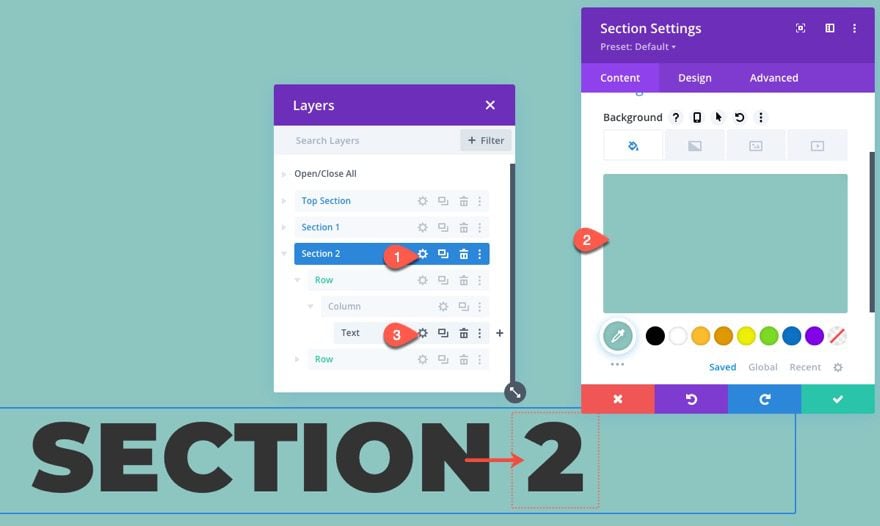
Update Section 2 Background Color and Title Text
Next, update the section background color:
- Background Color: #8dc6c1
Then update the title text to read “Section 2” in the text module of the top row.
Update Section 2 CSS ID
Under the advanced tab, update the section with a new CSS ID:
- CSS ID: two
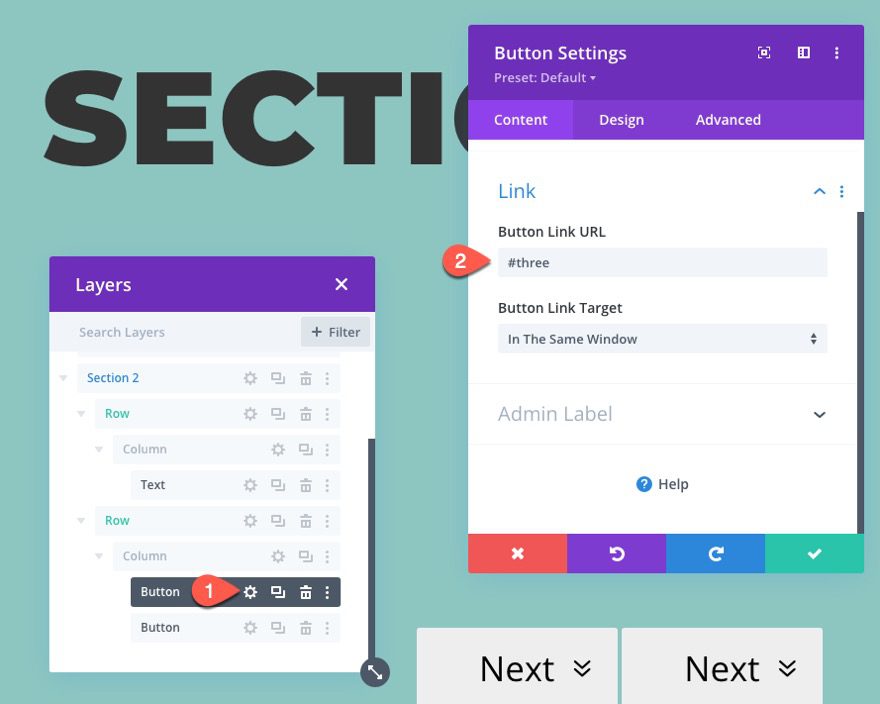
Add Next and Previous Buttons to Sticky Row (Section 2)
Inside the sticky row of Section 2, delete the divider module and duplicate the Next button so that you have two buttons.

Update Next Button Link URL
Open the settings for the first/left Next button and update the button link as follows:
- Button Link URL: #three
The “#three” URL will jump to the next section we will create with the CSS ID “three”.
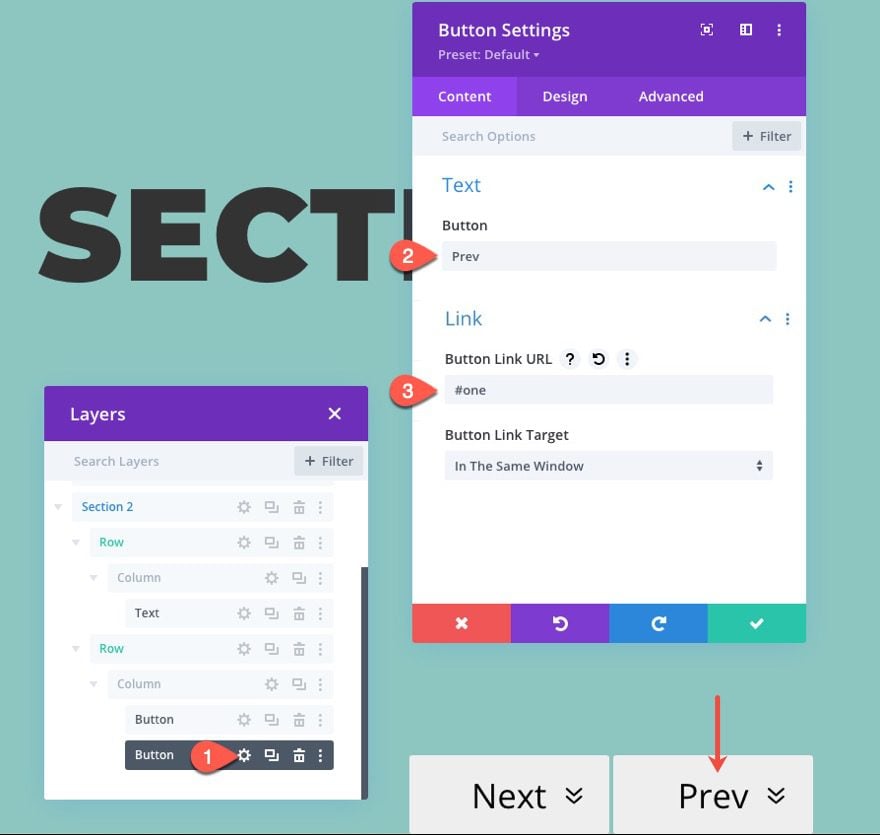
Add Previous Button Text and Link URL
To make the Previous button, open the settings for the second/right button and update the following:
- Button text: Prev
- Button Link URL: #one
The “#one” URL will jump back up to the section with the CSS ID “one”.
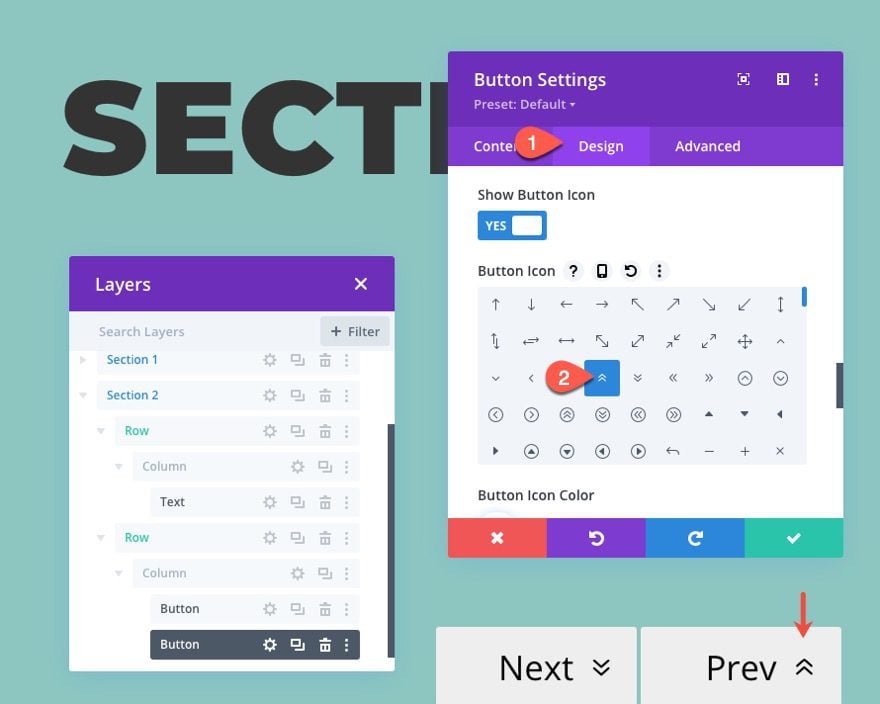
Add Previous Button Icon
Then update the icon:
- Button Icon: up arrow (see screenshot)
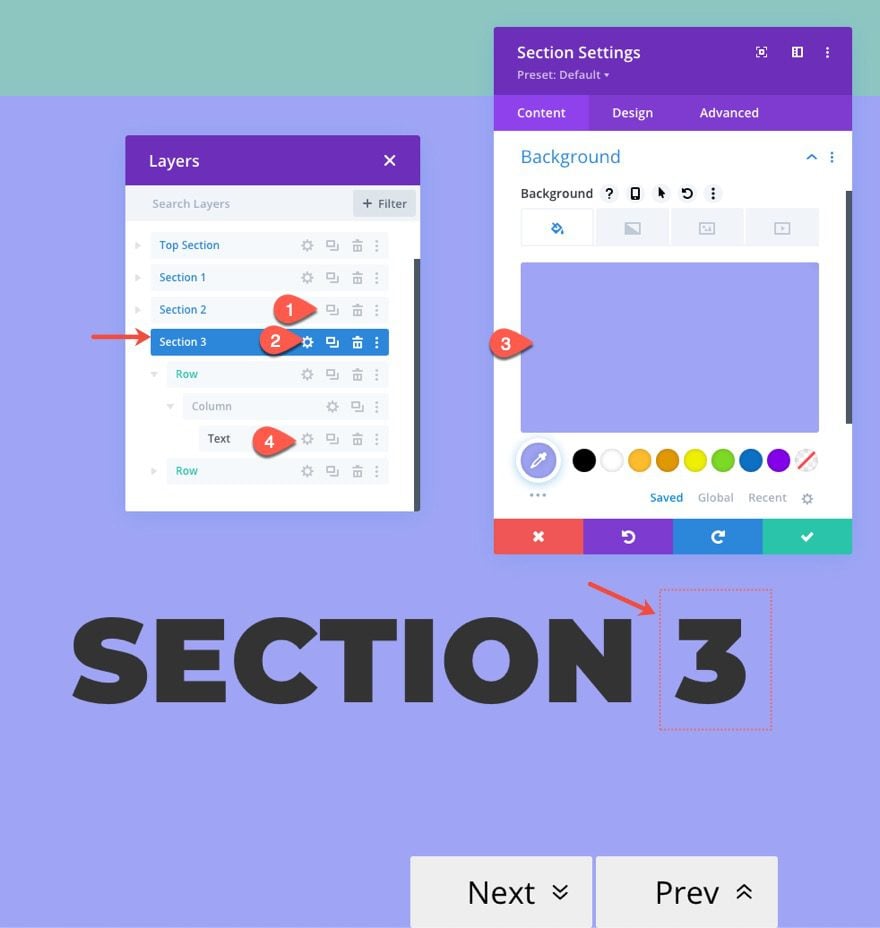
Creating Section 3
Now that we have finished Section 2, duplicate Section 2 to create Section 3 and update the label in layers view accordingly.
Update Section 3 Background Color and Title Text
Add a new background color to the section:
- Background Color: #9fa5f4
Then update the title text to read “Section 3” in the text module of the top row.
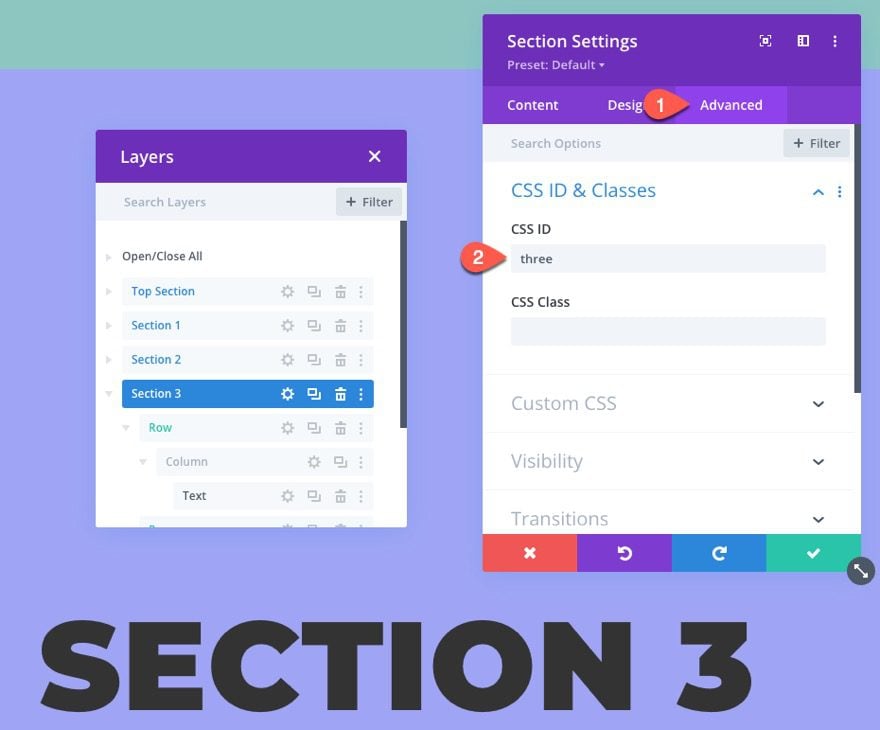
Update Section 3 CSS ID
Under the advanced tab, update the section with a new CSS ID:
- CSS ID: three
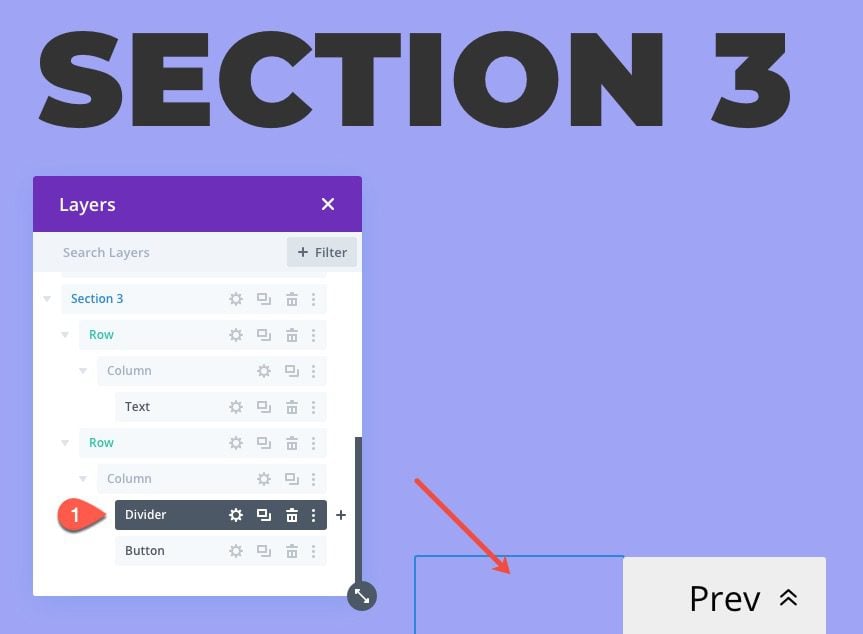
Add Divider and Previous Button to Sticky Row (Section 3)
Add Divider and Delete Next Button
We could go on and create as many sections as needed to include Next and Previous buttons. But for this example, we are going to make Section 3 the last section with Navigation Links.
So, since we won’t need a Next Button, delete the Next Button and replace it with a divider like we did in Section 1.
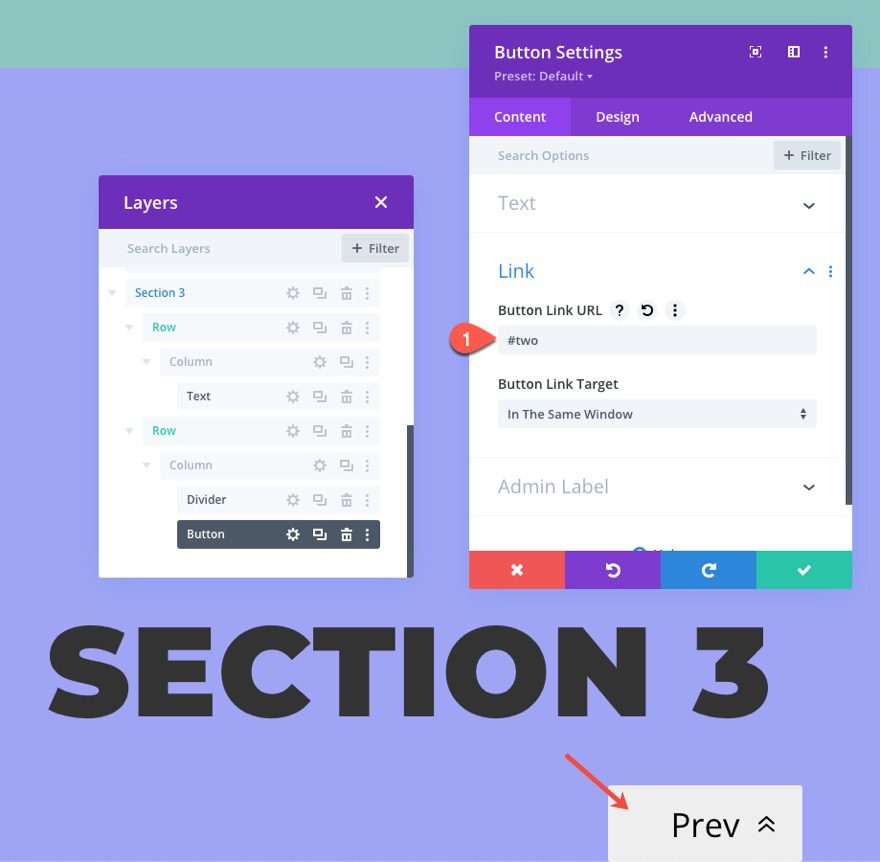
Update Previous Button Link URL
Then, open the settings for the Previous button and update the Link URL:
- Button Link URL: #two
The “#two” URL will jump back up to the section with the CSS ID “two”.
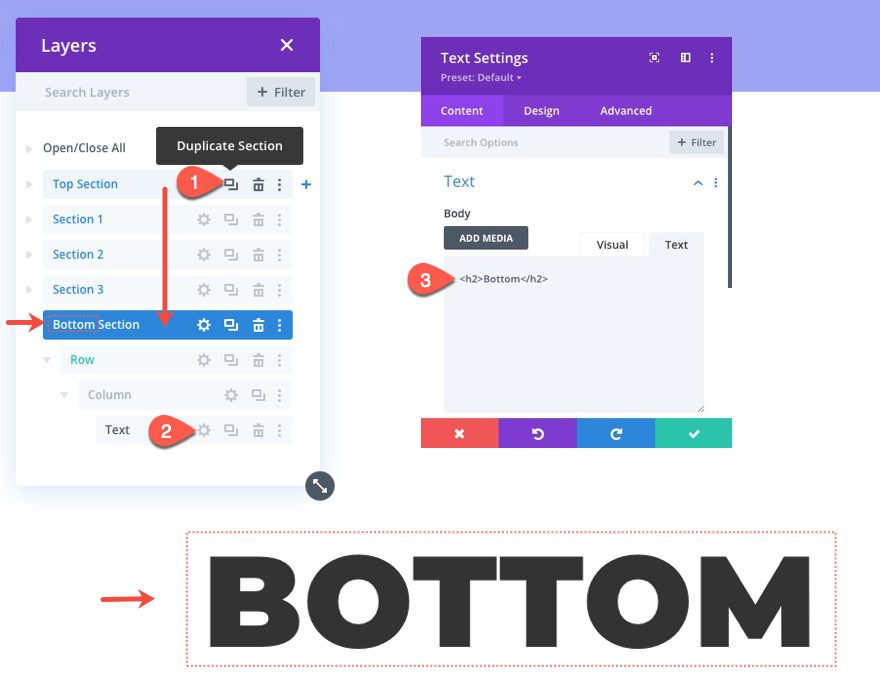
Creating the Bottom Section
Now that are 3 sections are complete with their sticky row navigation and anchor link functionality, we will create a bottom section that will serve as a section of the page that doesn’t include Next/Prev sticky navigation. This is to demonstrate if there is additional sections on the page that may not need sticky navigation.
To create the bottom section, simply duplicate the Top Section and drag it below Section 3.
Then update the title text to read “Bottom”.
Creating the Sticky Bottom Section
For our last step, we need to create a sticky section that will stick to the bottom of the page and contain our First and Last navigation (anchor) links. This section must be at the bottom of the page if you want the navigation links to appear on all sections of the page when scrolling.
Under the Bottom Section, create a new regular section.
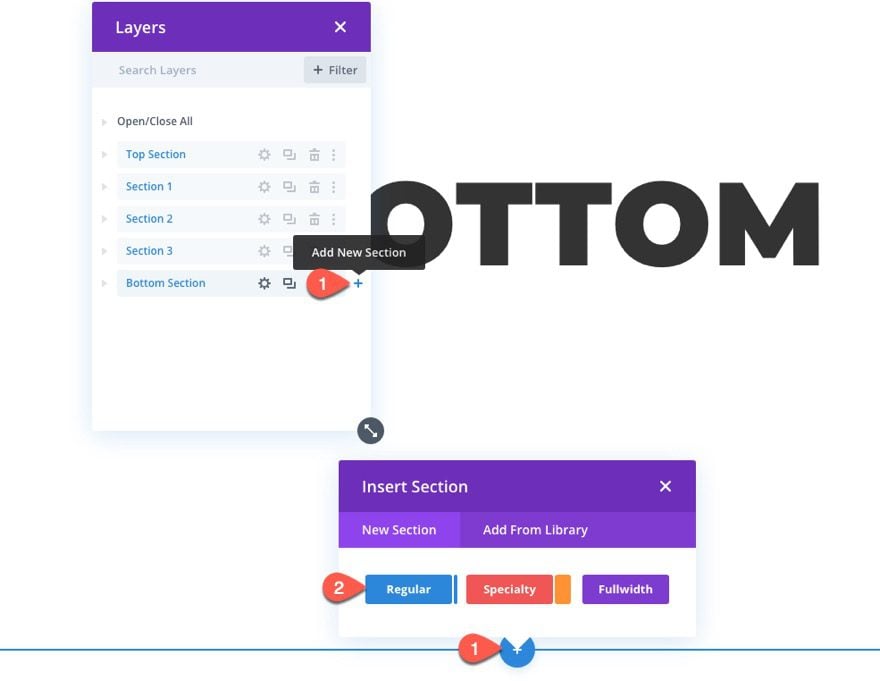
Then update the section lable in layers view accordingly (ie. “Sticky Bottom Section”).
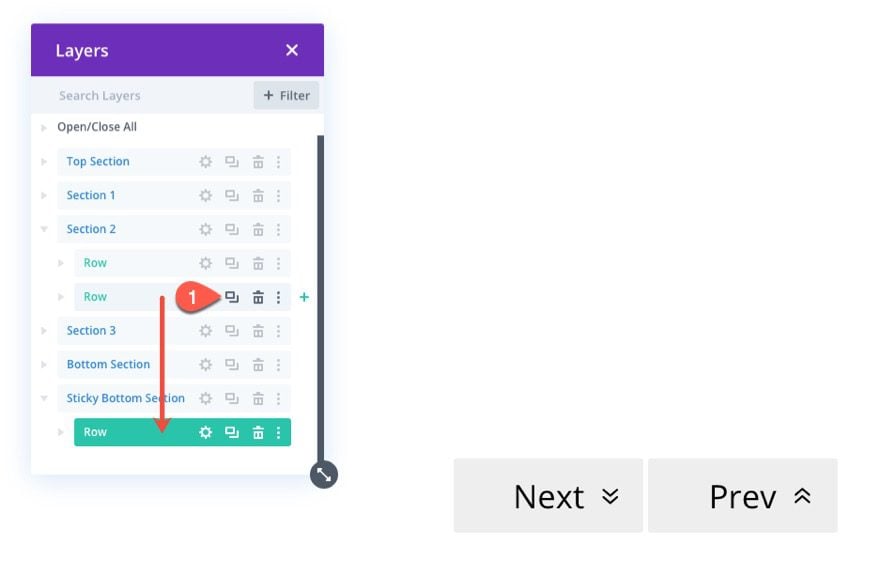
To add more navigation functionality to our page of sections, we will create two additional buttons (or anchor links) that will jump to the first (section 1) and last (section 3) sections on the page.
Duplicate Sticky Row in Section 2 and Drag it to Sticky Bottom Section
To create the row for our First and Last navigation links, we can duplicate the sticky row (row 2) from Section 2 and drag it into the new Sticky Bottom Section.
Update Row Settings
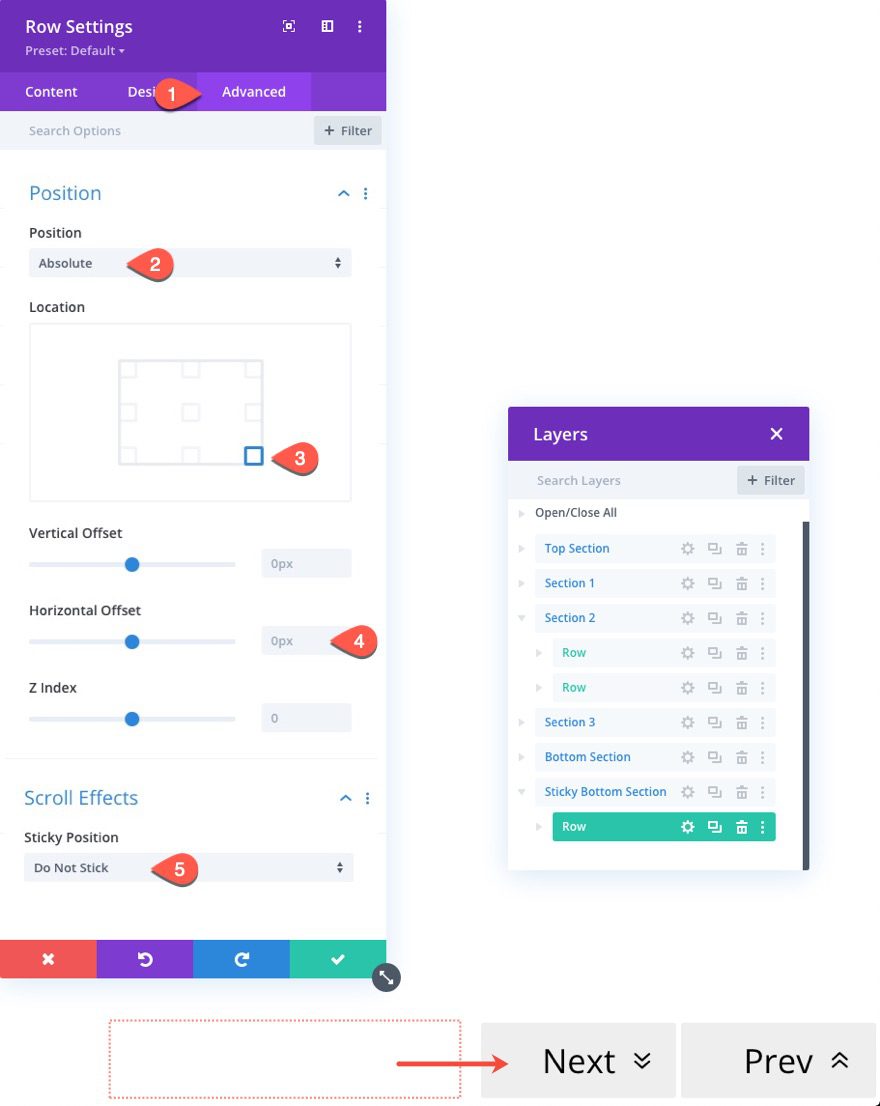
For this last section, we are going to make the entire section sticky so we can take out the sticky settings inherited from our duplicate row settings and give it an absolute position instead.
Open the row settings and udpate the following:
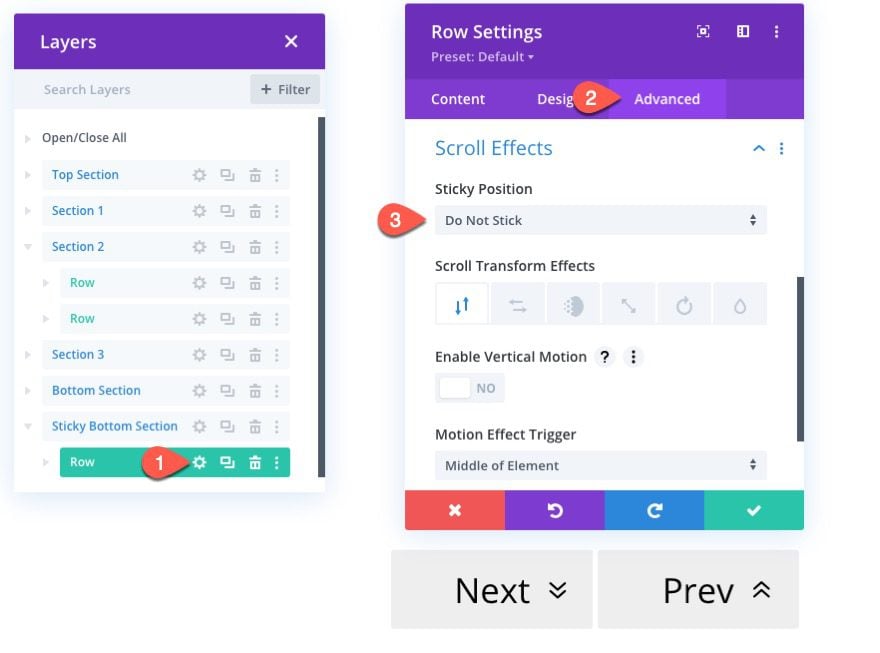
Next, update the position options as follows:
- Position: Absolute
- Location: bottom right
- Horizontal Offset: 0px
- Sticky Position: Do Not Stick
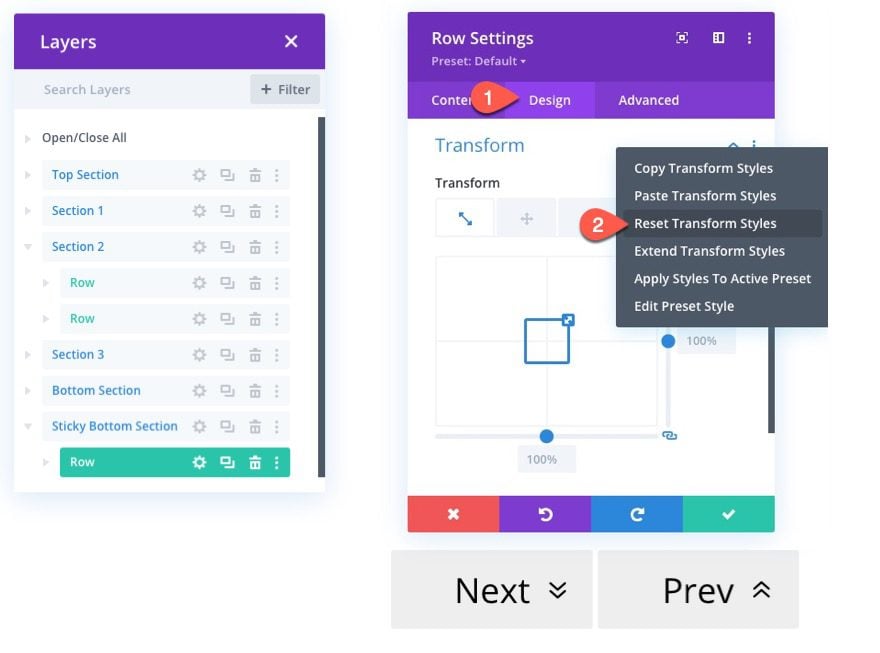
Under the design tab, reset the transform options for the row.
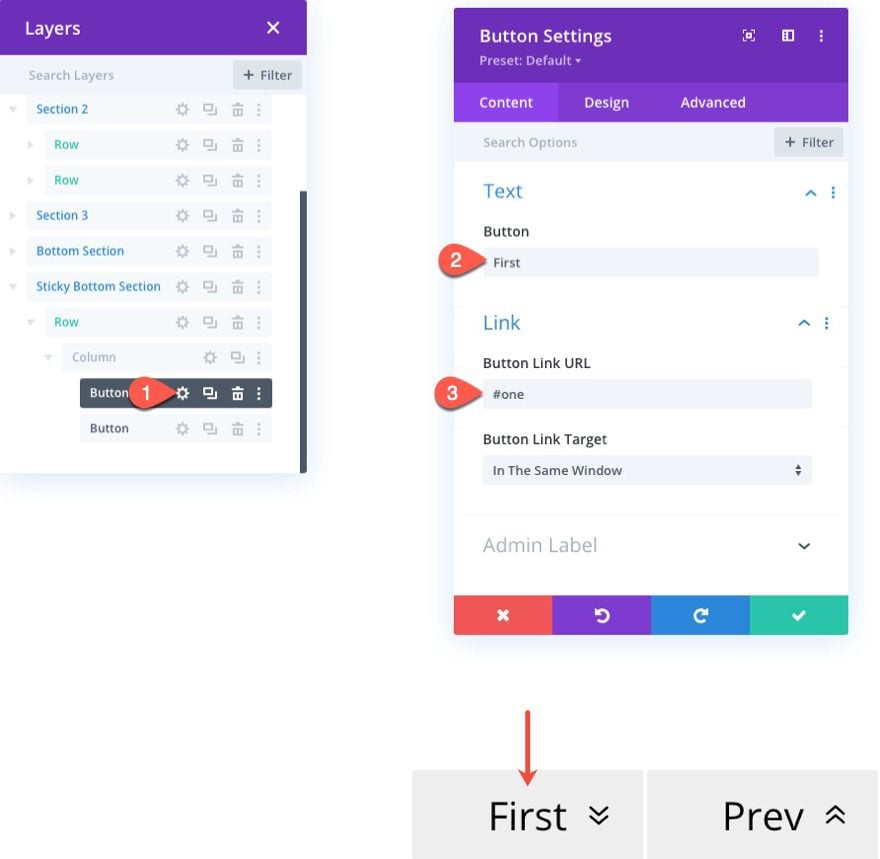
To create the First button, open the settings for the button on the left and update the following:
- Button Text: First
- Button Link URL: #one
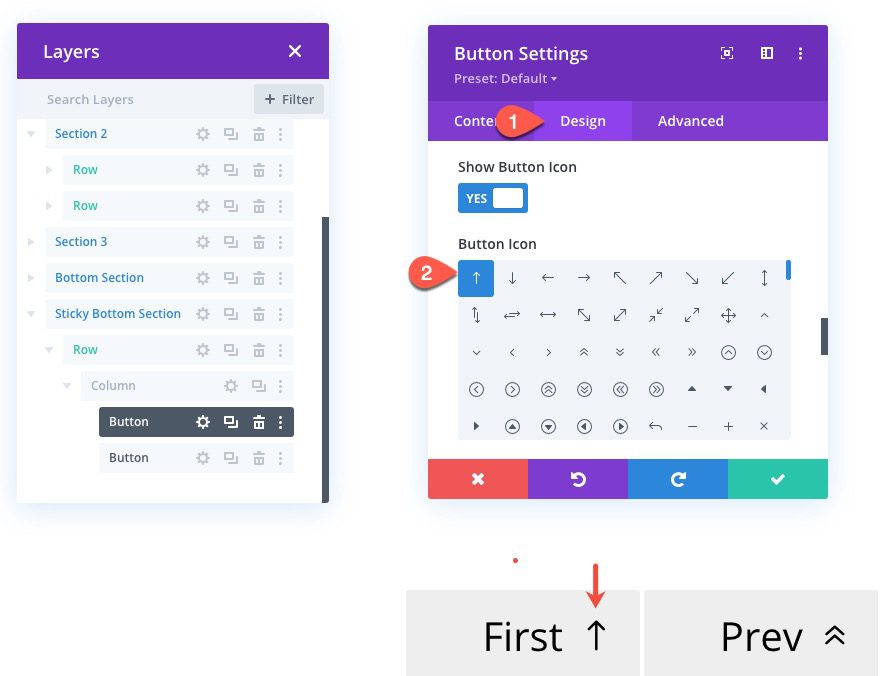
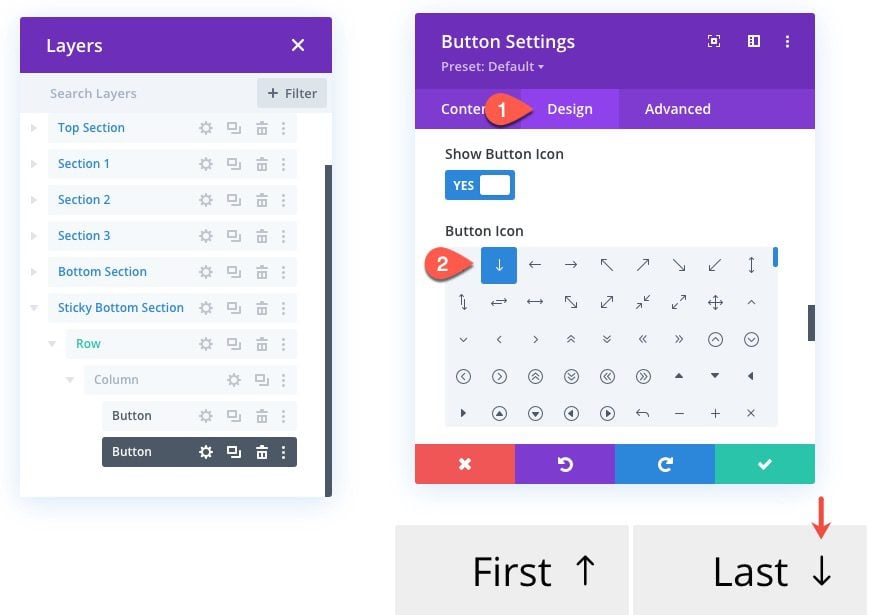
Then update the Button icon to a different up arrow.
To create the Last button, open the settings for the button on the right and update the following:
- Button Text: Last
- Button Link URL: #three
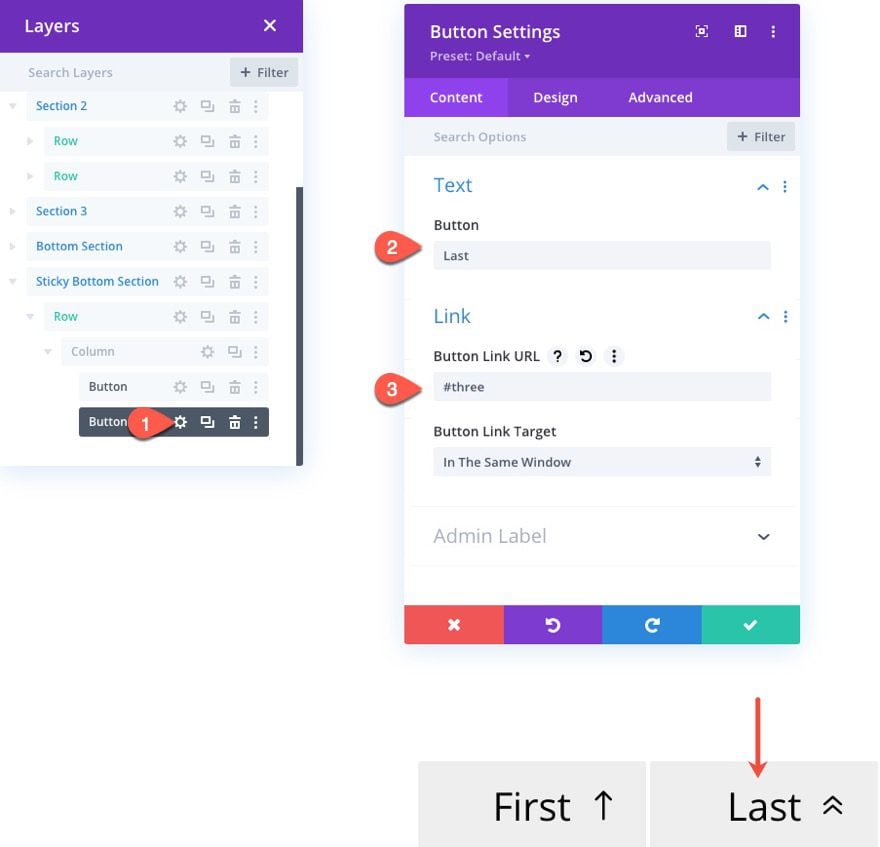
Then update the Button icon to a different down arrow.
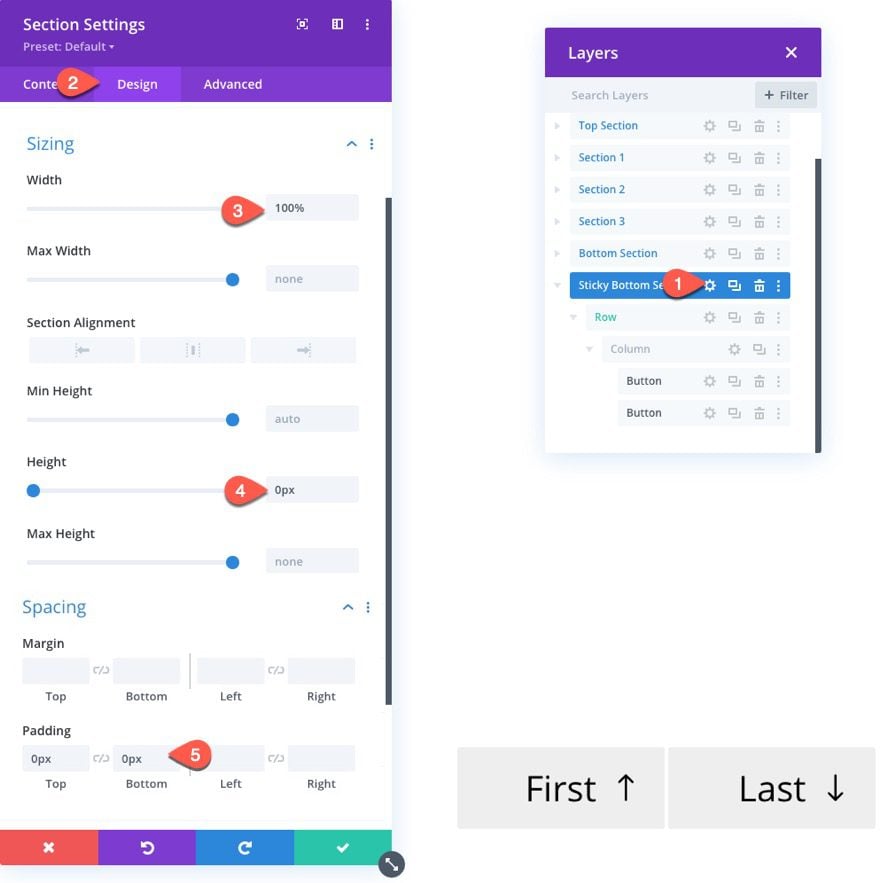
Update Section Settings for Sticky Bottom Section
Next, open the section setting and update the following:
- Width: 100%;
- Height: 0px;
- Padding: 0px top, 0px right
This basically makes sure the section doesn’t take up any actual space on the page. But because the row has an absolute position, it will still show above the section.
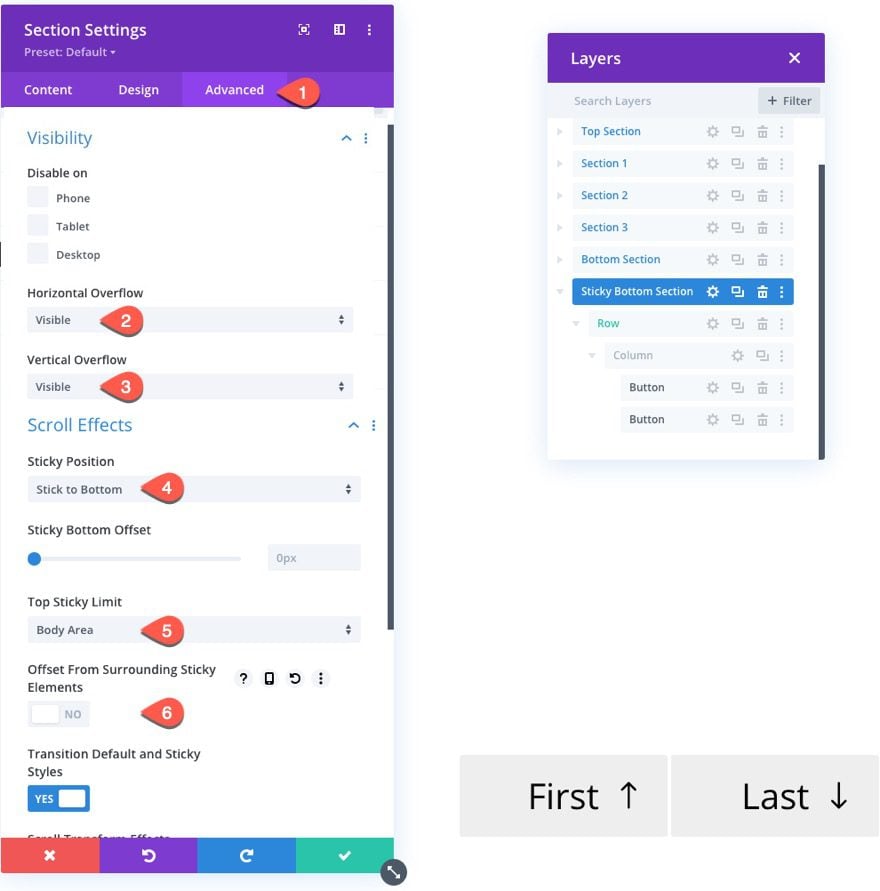
Lastly, under the advanced tab, update the following:
- Vertical Overflow: visible
- Horizontal Overflow: visible
- Sticky Position: Stick to Bottom
- Top Sticky Limit: Body Area
- Offset From Surrounding Sticky Elements: NO
Final Result
Notice how the sticky navigation links change when scrolling down the page.
Notice how easy it is to navigate to each section by clicking the navigation links.
And here is how the design looks on mobile.
Final Thoughts
The sticky page navigation links we built in this tutorial should come in handy for those looking for an effective alternative to traditional scrolling or including anchor links in your global header. And, you can easily duplicate the sections and update the anchor links (and corresponding CSS IDs for each section) to create more content.
For best results, each section should have enough content to extend beyond the browser height. If not, those anchor links may not become sticky (or visible). One easy way to make sure this happens is to give each of your sections a minimum height of 100vh. If you don’t like that, you can always choose to get rid of the transform translate sticky option for each of the sticky rows so that the buttons remain visible.
I look forward to hearing from you in the comments.
Cheers!


Hi Jason,
Great work again!
Greetz,
Joost
Thanks, Joost!
It’s really cool to have a sticky page navigation
Thanks. Glad you liked it.
You really did hard research and wrote very well. I will try to always keep in mind these points. Great job 🙂
Much appreciated, Haasim!
I really loved what you had to say, and more
than that, how you presented it. Too cool!
That means a lot. Thanks for the support, Rajinder.
heads up , great information