Hey Divi Nation! I’m back with another pen to share with you all that will add a Floating Action Menu to your Divi website. I’m going to show you two different ways to implement it on your site. The first is taking advantage of Divi’s Code Module, something I’m hoping to encourage more of this year, and the second is using Divi’s Theme Options.
Let’s get into it!
Subscribe To Our Youtube Channel
How to Add the Codepen

Here is how to add the above pen into a single post or page of your Divi website:
Fist, make sure you have created a free codepen.io account and logged in. It takes less than a minute and you’re up and running. So don’t worry, it’s painless. Once you’re logged in on your own account navigate to the pen I’ve created for this tutorial, the floating action menu.
Press “command + s” to save the pen under your own account. You should see the name change under “a pen by” in the top left corner, to your name. Now that you’ve copied the pen to your account you can edit it.
In the html panel, start by locating this line of code:
<img alt="Andy Tran" src="https://en.gravatar.com/userimage/64217327/096c4ecedf5cf0259c707b7f5255246d.jpg?size=400" />
Editing this line will change the profile image. Change the alt text to your name and change the src link to your own Gravatar image. You can also use the image link of a photo you’ve uploaded to your WordPress website by navigating to your media library, editing the photo, and then copying that image’s link into the src space indicated above.
Next we’re going to change the name next to the profile image by editing this line of html:
<h2 class="at-floating-navigation__title">Andy Tran</h2>
Simply swap out “Andy Tran” for your own name.
Next, we’re going to change the link for the text, “view profile” by changing the link in this line of code:
<a href="https://andytran.me">View Profile</a>
Once that is complete we can move on to changing the links for the menu items Settings, Help Desk, and Log Out.
<a class="at-floating-navigation__item" href="https://andytran.me">Settings</a>
    <a class="at-floating-navigation__item" href="https://andytran.me">Help Desk</a>
    <a class="at-floating-navigation__item" href="https://andytran.me">Log Out</a>
For that matter, you can also change the menu items themselves by changing the words “Settings”, “Help Desk”, and “Log Out” to whatever you want.
When all of your edits have been made, hit “command + s” again to save. Then copy the page url and head over to the codepen generator I created to compile this code into a single easily paste-able block of code.
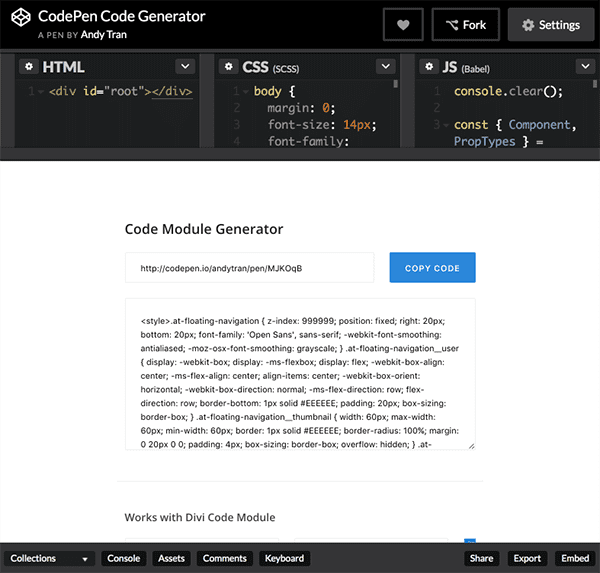
Paste the url into the url field there and click the blue “Generate” button. Right away you’ll see the code block below and the blue button will now say “Copy Code”. Click the blue button again to copy the code block to your clipboard.
We’re now ready to add the action menu we’ve created to our desired Divi post or page. Add a code module to the post or page you’d like your floating action menu to appear on. It doesn’t matter where the code module is located.
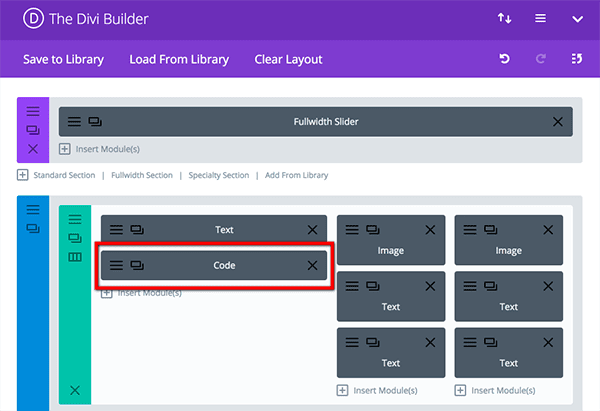
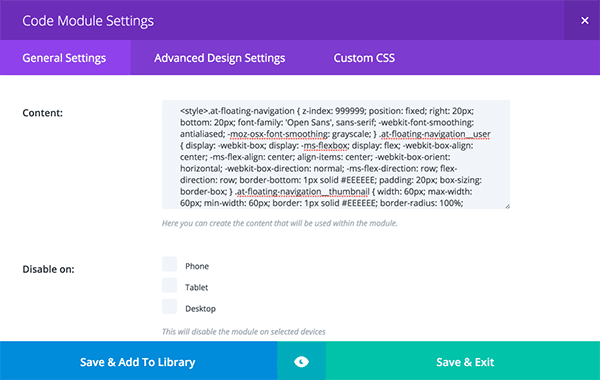
Open up the code module and paste in the code you’ve copied from the codepen generator. Save changes and update the post or page when complete.
Then, go ahead and check out the result!

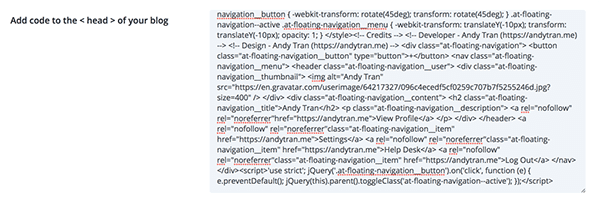
If you would like your new floating action menu to appear across your entire site instead of a single page or post, right-click deactivate your new code module and navigate in your WordPress Admin to Divi > Theme Options > Integration.
Paste the code you copied from the code generator into the section called “Add Code to the < head > of your blog”. Save your changes and check out the floating action menu now appearing on every page of your Divi website.
Wrapping Up
Well that’s all for this tutorial. If you have any questions about it let me know in the comments below. Likewise, if you have any requests for code module tutorials or what’s possible with the code module you can leave those too.


This is great 🙂 Now if we want to make this a modal pop up? Next tutorial maybe? Or can someone help please?
Can make menu drop like that ?
Hi, where is de code module now?…
The CodePen Code Module Generator doesn’t seem to be working.
That is really great, thank you so much!!
How can I make the menu to be open by default though..?
The best investment of my life… i have a major crush on Divi! Thanks guys for all the hard work.
Cool! Thanks for this! – I’d also like to know what you use to create your animated GIF’s for your post image 🙂
Love it!
Cool!
How do we change the color of the floating circle? I’m guessing we need to add some CSS to the main element?
Beautiful…
I just added some modifies of your code, Andy.
1- Now, when you close the “Module” the links are hiding.
– The code to modify
&__menu {
…
/* Add this */
display: none;
}
.at-floating-navigation__menu {
…
/* Add this */
display: block;
}
2- Some Hover effects, on the list of Items and Button.
– The code
/* Add this */
&__item:hover{ color: #CE3532; }
&__button:hover{ color: #CE3532; }
3- You can Removethe js code:
e.preventDefault();
CodePen Link at:
http://codepen.io/Dany46/pen/pRGOBa
Thank you for sharing,
Dany…
This was awesome! thanks so much for sharing, would anyone know how to modify the code so the floating action menu starts in the open window position?
Looking nice! I have to understand the code session!
Love it!! I have moved it to the top but I can’t succeed in have the box open downwards. Anybody have any ideas?
Hi Steffen,
try to modifing the snippet:
.at-floating-navigation__menu {
transform: translateY(-10px);
opacity: 1;
}
to this:
.at-floating-navigation__menu {
transform: translateY(320px); /* custom as you want */
opacity: 1;
}
See You,
Dany
Hide the menu, but the links are still on the page, even if hidden.
Luis, please see my custom code at:
http://codepen.io/Dany46/pen/pRGOBa
See you,
Dany.
Cool feature, thanks for sharing! 🙂
How cool is that? Will need to give this a go.
Thanks 🙂
Very awsome! I love it!
awesome thx dude
I tried creating my own and also tried just copying your original and can’t get it to work in any browser. Does it only work for Gavatar Profiles? Is there a delay before it pops up? Does it require scrolling down the page?. Is there a setting to control when it pops up or if it always pops up? Does is require a browser to allow popups?
http://miamirumfest.com/testpage/
Your test works for me Robert?
Thanks Andy
🙂
Very awesome!
How can I set a different image and name for every account?
I would like that every one can see their own information if logged in, or if logged out a simple “login button”
Thanks for delivering regulary great stuff!
There are a lot of bloggers out there wich sometimes are posting good things but you are constantly showing that you are passionat about what you are doing, keep going!
I am trying to add this floating action menu my website but not every this I do this site does not remain Responsive. Please Help 🙁
Nice post! I’ll try out the code module.
Very nice – thanks for sharing this one.
Lovely and very useful.
Looks great! Will definitely try this.
Very nice, is it possible to show the menu only when scrolling down???
Awsome! I love it!
Thanks for sharing
really nice…
thanks 😉
Really Nice.
This is awesome. Thanks divi fam!