
Headers and footers appear across multiple areas of your site, so they are some of the templates you will revisit most often in Divi 5. A logo update, refreshed contact details, a new footer link, or a quick style adjustment are all small changes, but they used to interrupt your workflow by sending you back to the Theme Builder.
Editable Theme Builder Areas in Divi 5 offer a cleaner way to work. Instead of editing page content in one place and global templates in another, you can edit the assigned header, footer, and template body from the front end in a single builder session. That is especially useful when you want to make fast global updates without breaking your focus.
The Problem With Context Switching
Divi’s Theme Builder handles the global parts of your site, including headers, footers, post templates, product templates, and archive templates. Build them once, assign them where needed, and Divi applies them automatically.
That separation is useful for organization, especially on larger sites. But it also creates friction when you notice a global issue while working on a live page. Maybe your footer address is outdated, your header CTA needs new copy, or your logo sizing needs adjustment. In older workflows, fixing that meant leaving the page, opening the Theme Builder, finding the right template, making the change, and then returning to what you were doing.
On busy projects, that extra back-and-forth slows you down more than it should.
Introducing Editable Theme Builder Areas In Divi 5
Editable Theme Builder Areas in Divi 5 solve that problem by loading your assigned header, body template, page content context, and footer into the same Visual Builder session.
That means you can open Divi from the front end and edit the parts of the site that matter in context, without opening the Theme Builder separately. The result is less context switching, faster global edits, and better design decisions because you can see how your header and footer actually relate to the content on the page.
Divi 5 also expands where Edit With Divi appears on the front end. It is no longer limited to standard singular content like pages and posts. You can now launch the builder from more template-driven areas, including archive pages, WooCommerce product pages, and other supported front-end views that use Theme Builder layouts.
That broader access matters because it removes one more layer of hunting around in the backend. Browse to the area you want to work on, click Edit With Divi, and open the relevant layout in context.
One practical note: on some template-driven areas, especially archive pages, you may need at least a Theme Builder header or footer to exist before the Edit With Divi option appears there.
Editable Theme Builder Areas are simple in practice, but a few details are worth seeing clearly. Here is the workflow that makes header and footer edits faster in Divi 5.
Finding The Header On The Page
Once you open the Visual Builder, the boundary between your header and the rest of the page is easy to identify. A green Header label marks the template area, making it clear that you are looking at a live Theme Builder layout, not just static page content.
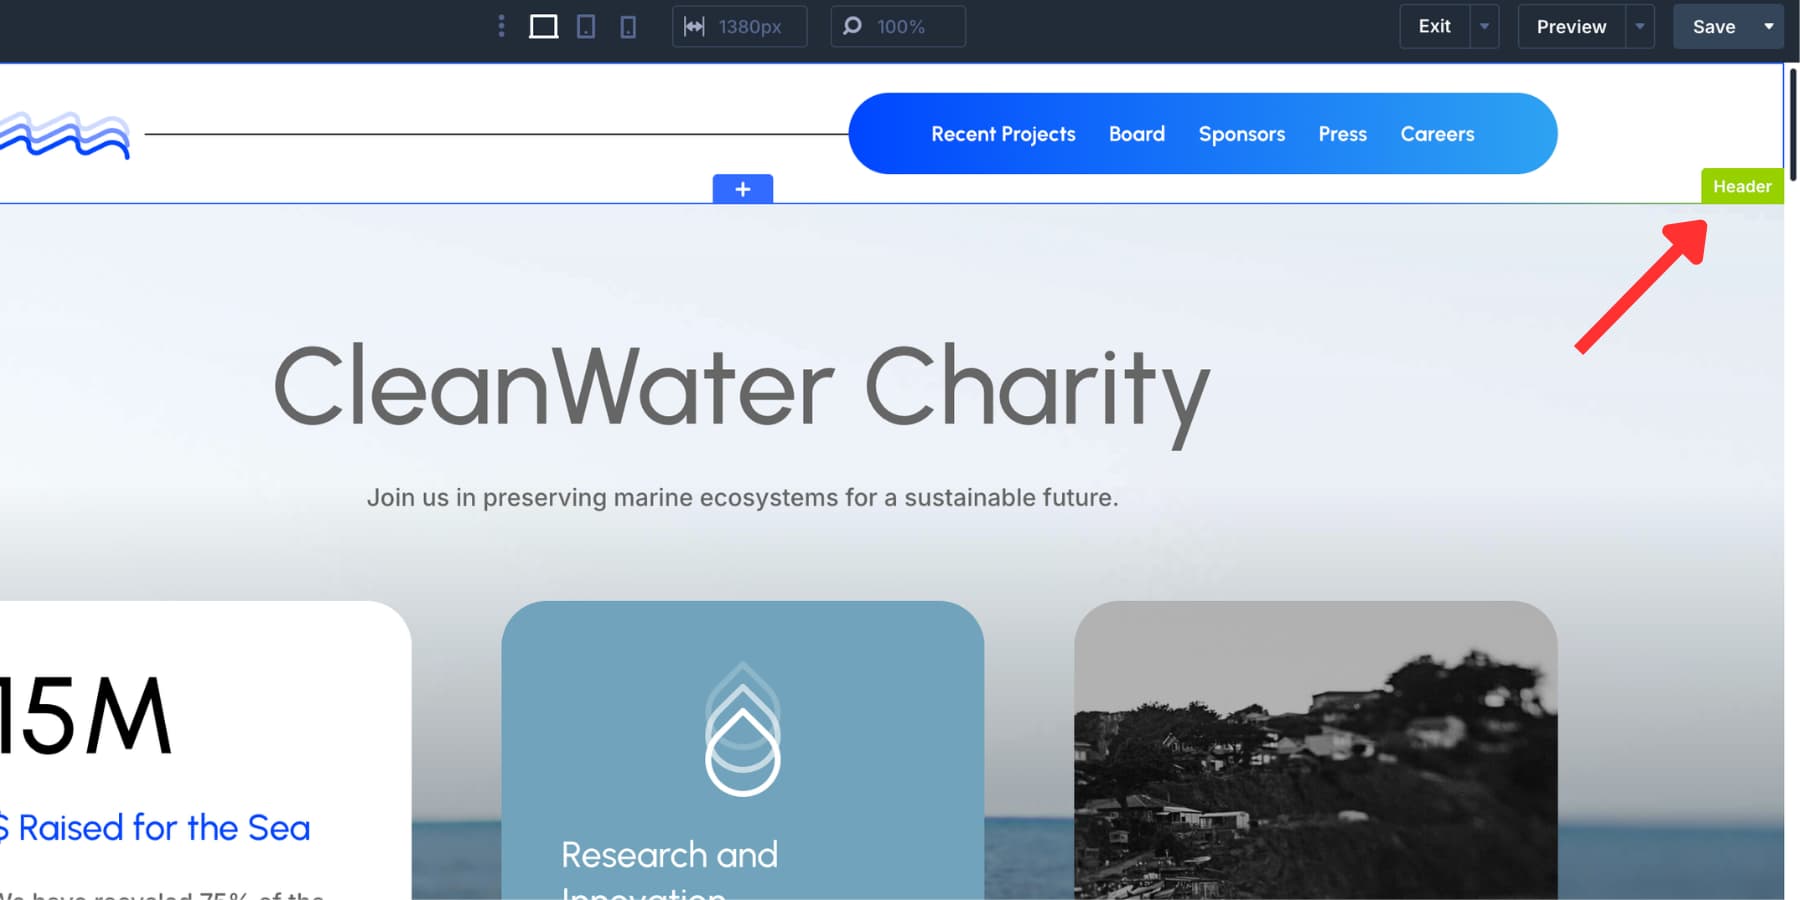
The Layers panel also lists the header as its own labeled area, separate from the page content below it.

These labels are more than visual guides. They confirm that the header is active and editable in the same builder session. Click a module directly on the canvas to open its settings, just as you would anywhere else in Divi.
This is where the feature becomes especially useful. Because your page content stays visible underneath the header, you can judge spacing, color contrast, logo scale, button visibility, and overall balance in real context instead of editing the header in isolation.
One important distinction: if your navigation is powered by a WordPress menu, Editable Theme Builder Areas let you edit the Menu Module and the header layout around it, but the actual menu items themselves are still managed through WordPress menu settings.
Save your changes once, and Divi applies that updated header everywhere the template is assigned.
The footer works the same way. A green Footer label marks the editable area on the canvas, and the Layers panel lists it separately for quick access.
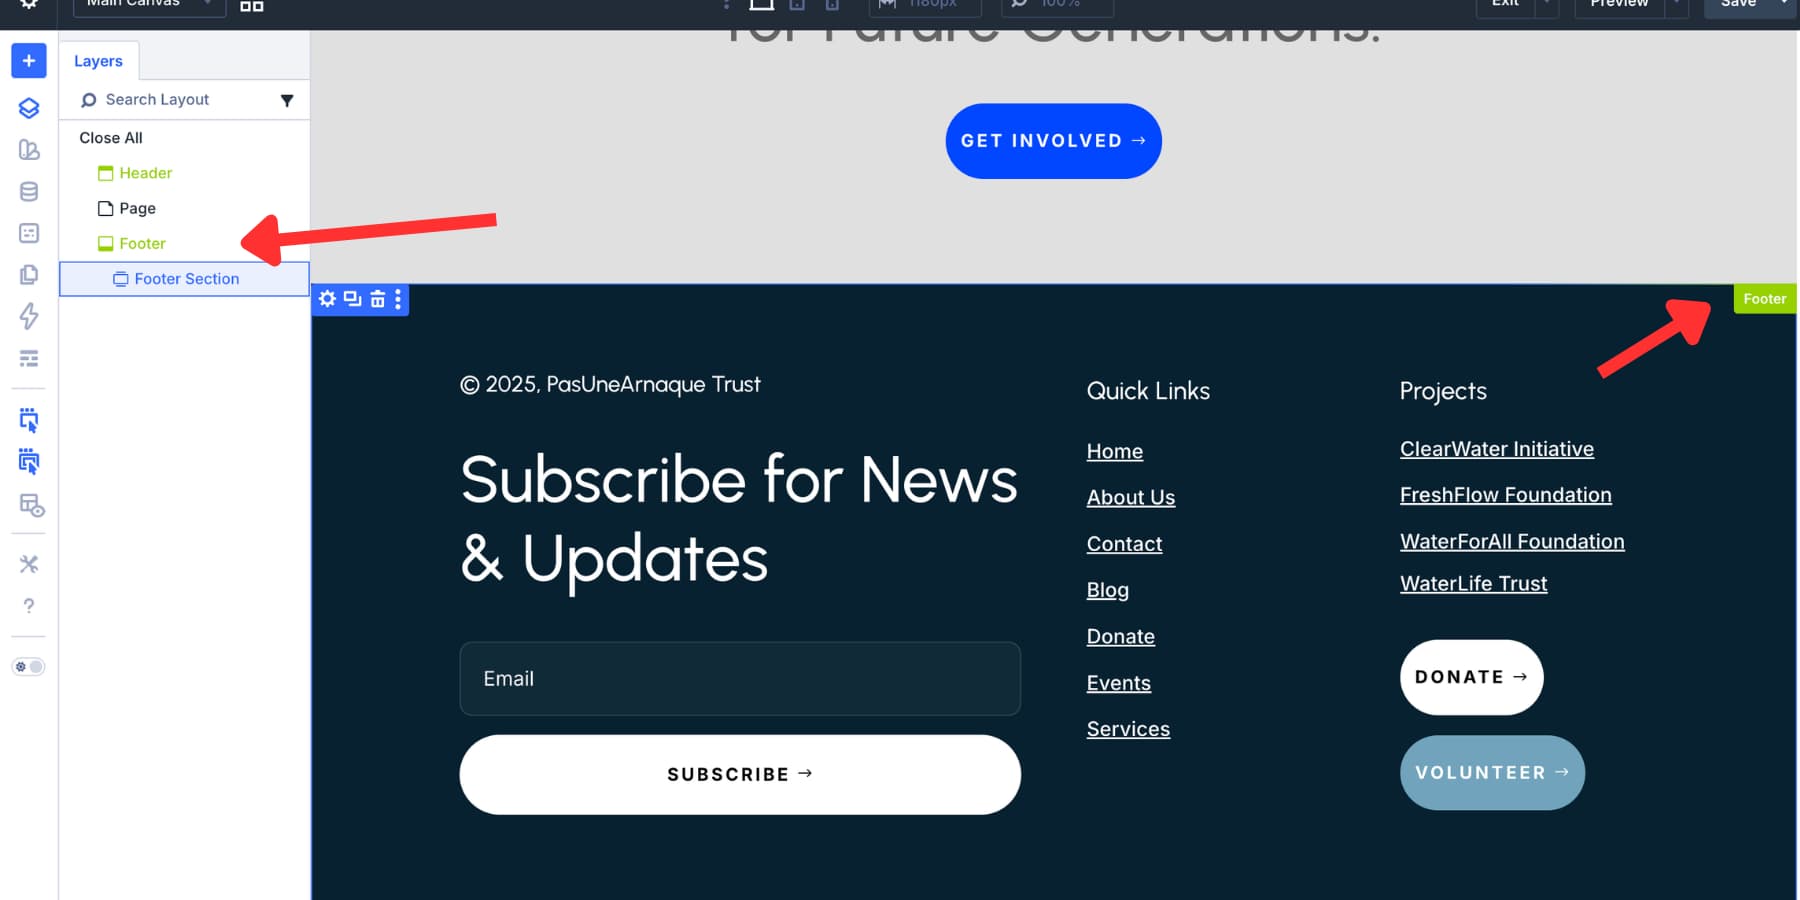
Click any footer module to open its settings. Contact details, social icons, footer links, disclaimers, copyright text, and CTA elements can all be updated directly from the same session.
Because the header, footer, and page context all load together, Divi 5 also makes it easier to move content between these areas. You can copy, paste, drag, and reorganize modules between the page, header, and footer without opening separate builder sessions.
Say you built a CTA button on your homepage and want the same styling in your footer. Copy the module, paste it into the footer area, and then adjust the content as needed. The same goes for social follow modules, icon groups, blurbs, and other reusable elements.
You can also use the Layers panel to drag and position elements more precisely across loaded areas.
That saves real time because you are reusing working elements instead of rebuilding them from scratch.
Turning Off Theme Builder Layouts When You Want A Narrower Editing Scope
Not every editing session needs the full site loaded at once. Divi 5 gives you a built-in way to simplify the workspace when you want to focus on a page or post without the surrounding Theme Builder areas.
Open the builder settings and disable Show Theme Builder Layouts. This hides the loaded header, footer, and other Theme Builder areas from the current editing session without affecting the templates themselves.
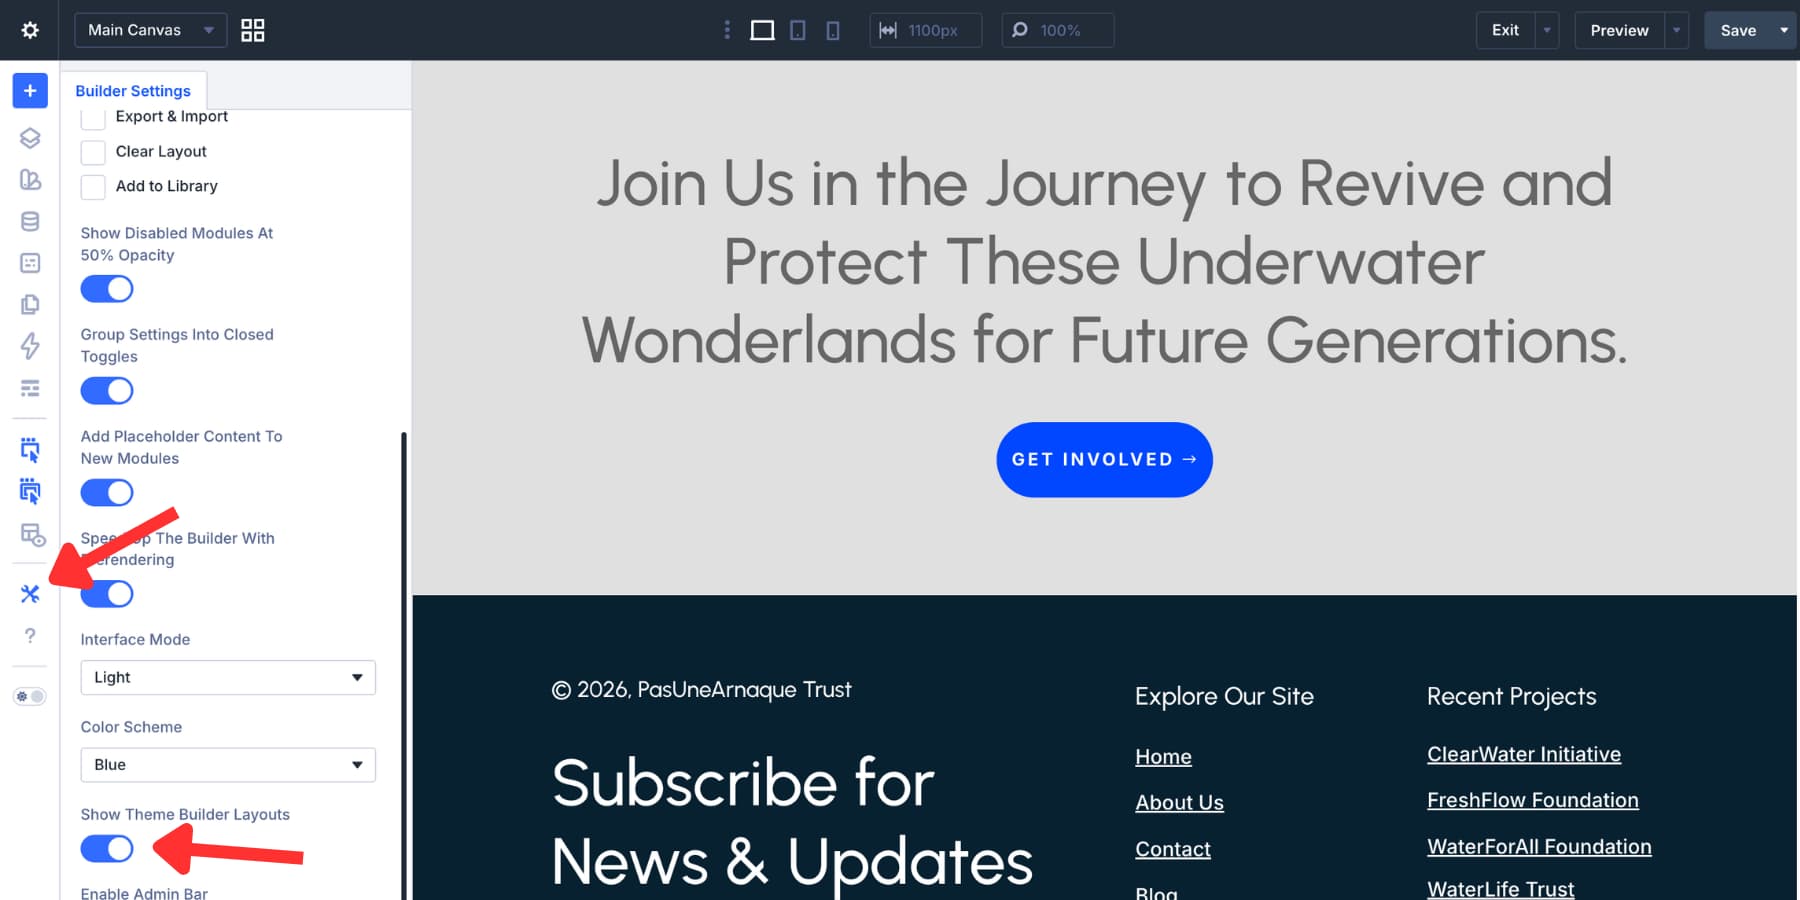
This can be helpful on more complex layouts where the Layers panel starts to feel crowded. For example, on a WooCommerce product page, you may be working with product content, template structure, and global layout areas all at once. Hiding Theme Builder layouts can make the editing experience easier to scan and manage.
It is also useful for teams that prefer to separate page editing from template editing, even though Divi 5 now allows both in one place.
Bonus: Restricting Editable Theme Builder Areas For Clients
Editable Theme Builder Areas are powerful, but that does not mean every user should have access to them. On client sites, it often makes sense to let users edit page content while protecting global layouts from accidental changes.
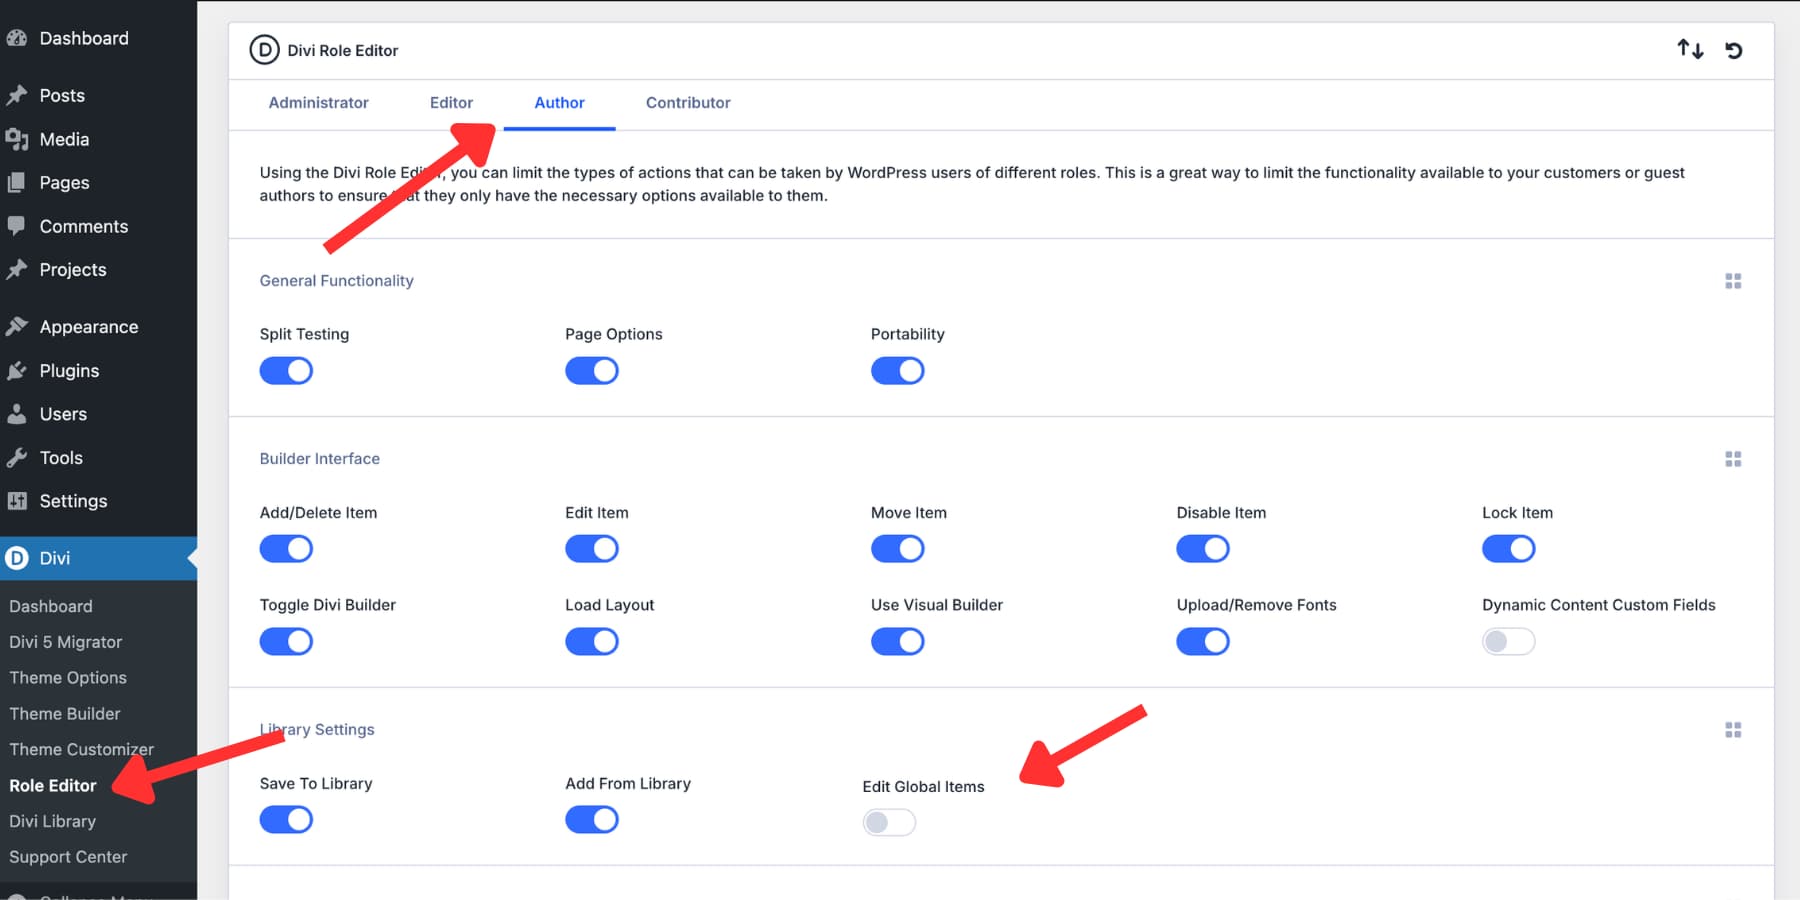
This is where the Divi Role Editor is useful. It lets you control what each WordPress user role can access inside Divi 5, including Theme Builder access, builder actions, settings tabs, and global module editing.
To configure this, go to Divi > Role Editor in your WordPress dashboard. Choose the role you want to restrict, such as Editor or Author, and then review the available permission groups.
For the cleanest handoff, pay special attention to these areas:
- General Functionality: Restrict access to Theme Builder, Divi Library, Theme Options, and other top-level Divi features.
- Builder Interface: Limit actions such as editing, moving, or deleting modules, rows, and sections, if needed.
- Library Settings: Restrict access to Global Modules, since edits to them can affect the entire site.
- Settings Tabs: Disable Design and Advanced tabs if you want clients limited to content-only edits.
This gives clients a safer editing experience. They can update text, images, and day-to-day content while the site-wide structure stays protected.
Try Editable Theme Builder Areas In Divi 5 Today!
Divi 5 makes header and footer editing much more practical by eliminating unnecessary trips back to the Theme Builder. When you can edit global areas directly from the front end, the workflow feels faster, more visual, and more connected to the page you are actually working on.
That translates into real benefits:
- Less context switching while building
- Faster edits to global templates
- Better design decisions because you see global areas in context
- Easier reuse of modules between page and template areas
- Safer client handoffs through Role Editor restrictions
If you are already using Theme Builder templates in Divi 5, Editable Theme Builder Areas make routine header and footer work noticeably smoother.


I would like to hide the header and footer from all my editing, just allowing to edit them in the theme builder itself. And not disabling it in other roles or page by page or sedsion by session. Is this possible, too?
…I think I found the required setting in the Builder Settings in the sidebar of the editor: “Show Theme Builder Layouts” and switched it off. 🙂