
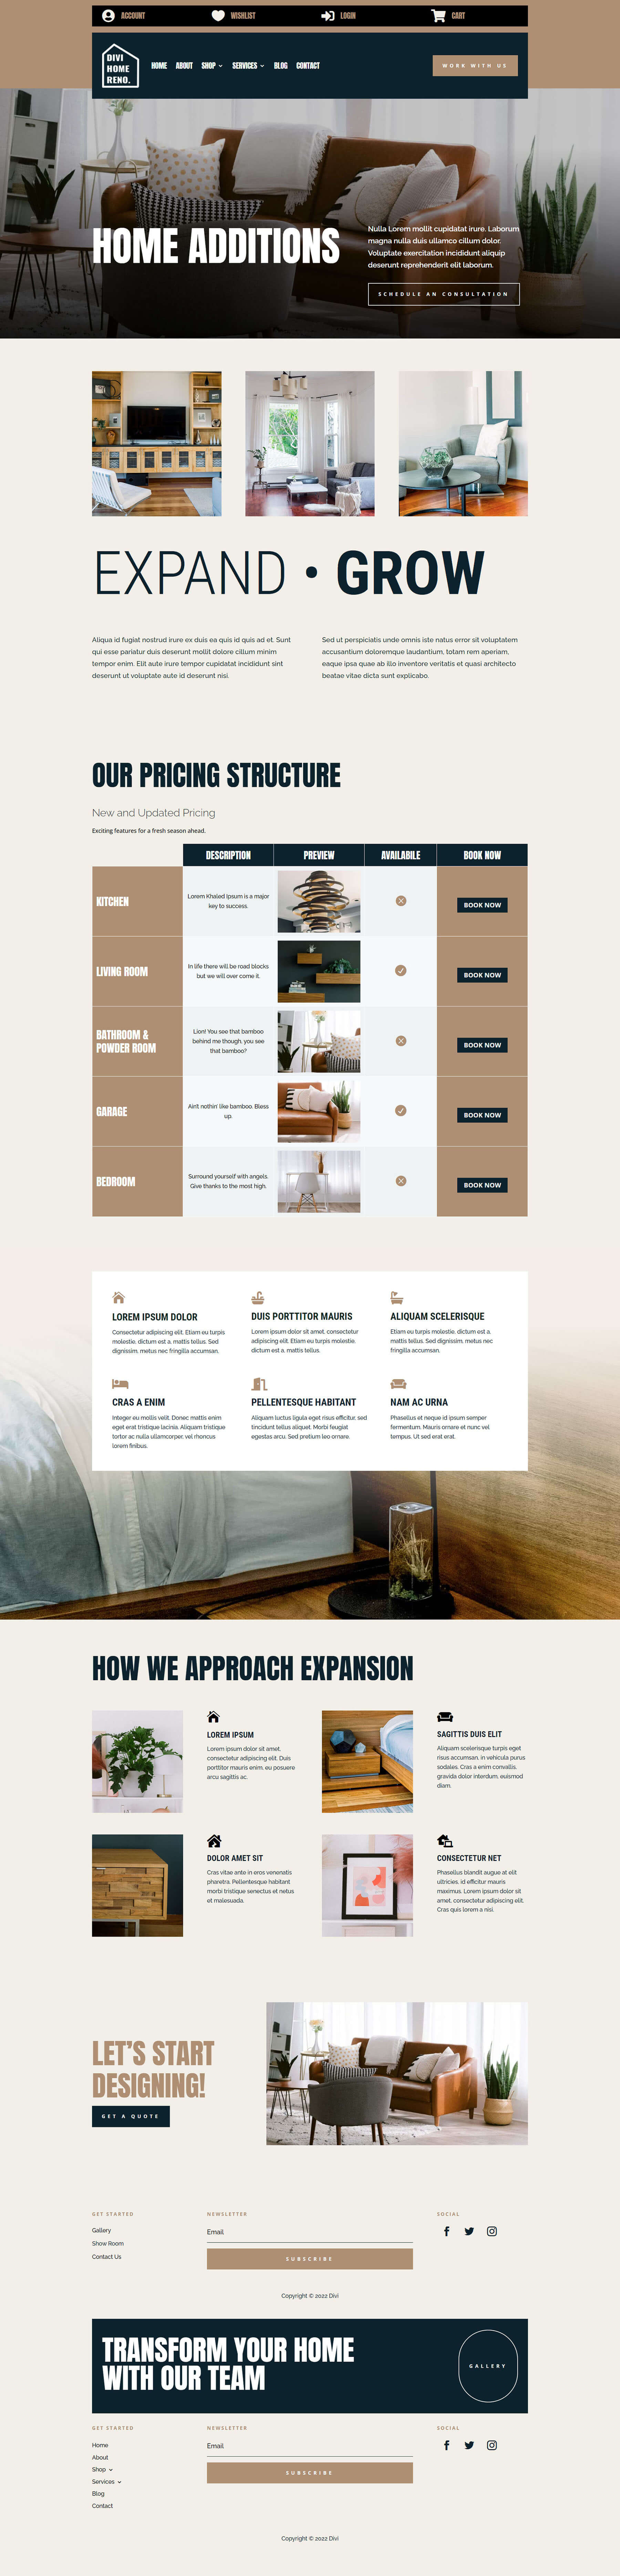
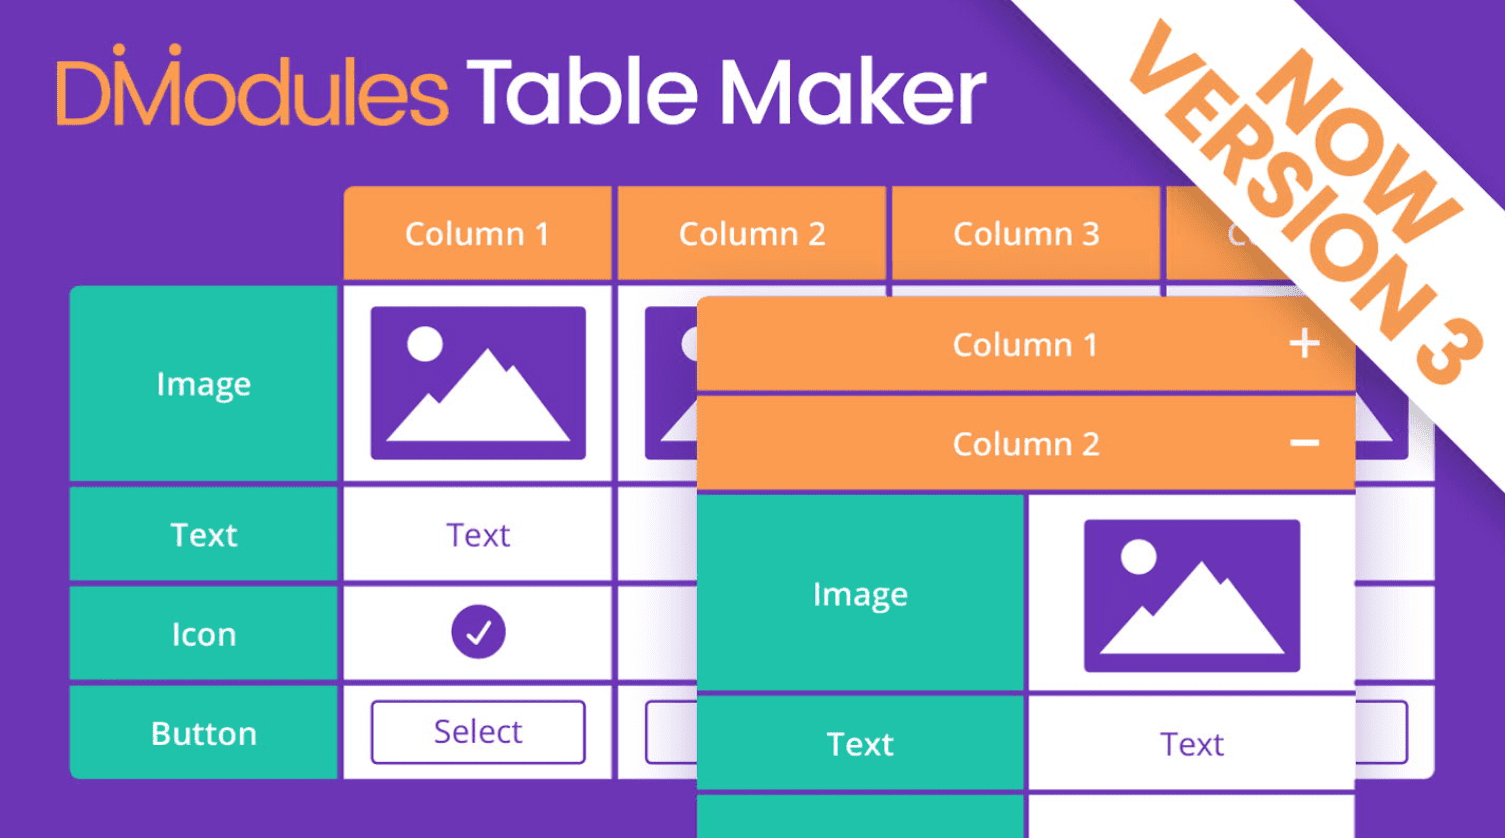
Table Maker is a third-party module for the Divi Builder that does exactly what the title describes—it makes tables. This is a powerful module that simplifies making tables of any size. It’s even featured as one of the top options for table plugins for WordPress sites. Add any type of content and style the table with the standard Divi settings as well as settings for each element. The latest version adds even more options. In this post, we’ll take a close look at Table Maker – alongside our Divi Home Remodeling Layout Pack – to help you decide if it’s the right product for your needs.
- 1 Table Maker Module Settings
- 2 Table Maker Column Submodule
-
3
Adding Content to Table Maker Cells
- 3.1 Table Maker Column Content
- 3.2 Style the Content with Markup
- 3.3 Adding Escape Characters
- 3.4 Adding Buttons
- 3.5 Customize the Button
- 3.6 Add an Icon to the Table
- 3.7 Add an Image to the Table
- 3.8 Display the Images
- 3.9 Shortcodes and iFrames
- 3.10 Style the Content with CSS
- 3.11 Customizing the Table Maker Cell Itself
- 3.12 Column Width
- 3.13 Table Title
- 3.14 Table Description
- 3.15 Table Columns
- 3.16 Table Rows
- 3.17 Table Corners
- 3.18 Table Responsive
- 3.19 Table Scrolling
-
4
Styling the Tabel Maker Table
- 4.1 Table Maker Table Title
- 4.2 Table Description
- 4.3 Table Accordion
- 4.4 Table Frame
- 4.5 Table Stripes
- 4.6 Table Hover
- 4.7 Table Text
- 4.8 Table Cells
- 4.9 Table Maker Column Header Text
- 4.10 Column Header Cells
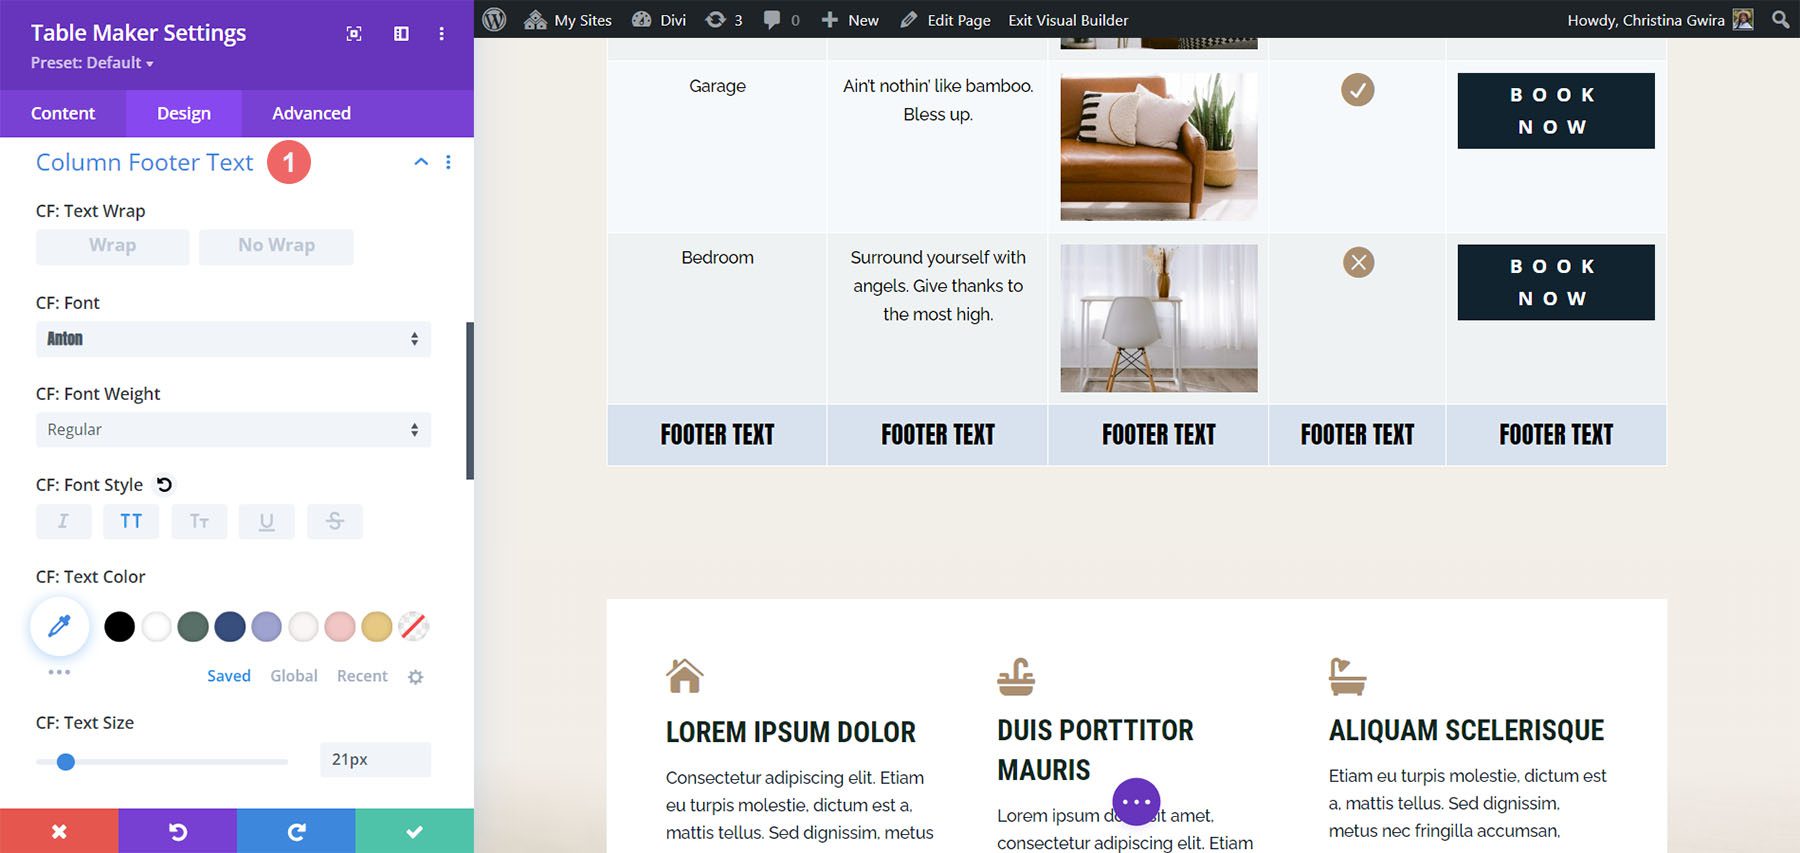
- 4.11 Column Footer Text
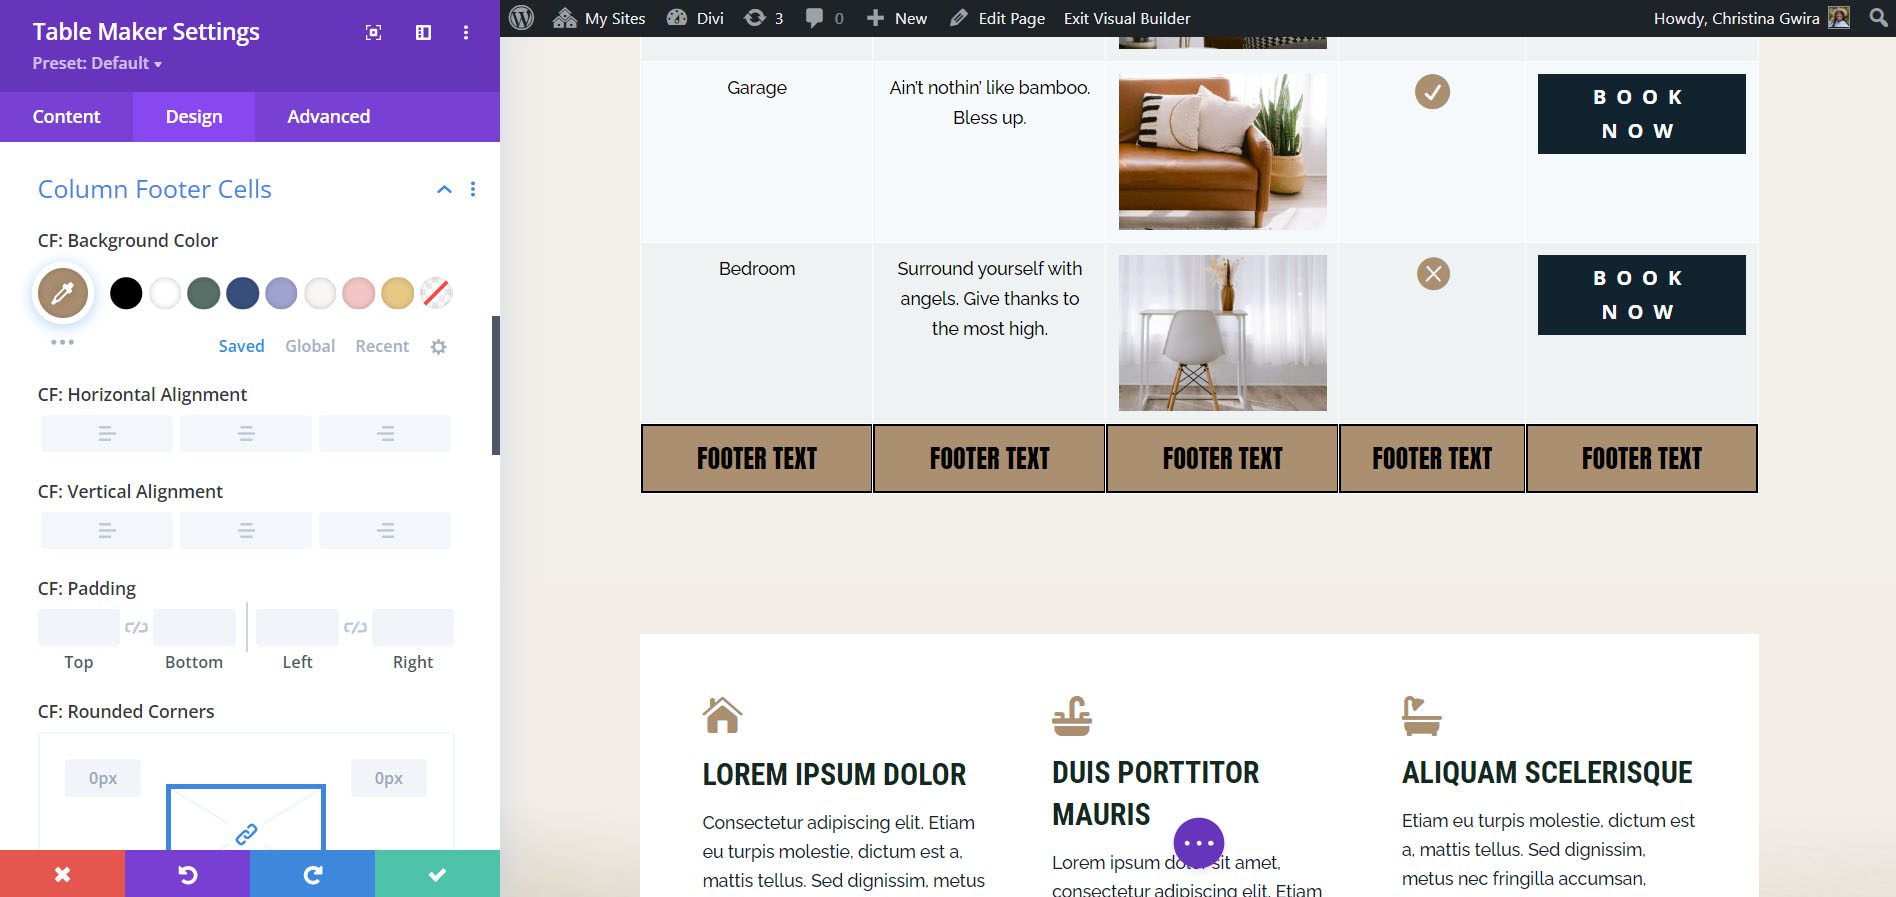
- 4.12 Column Footer Cells
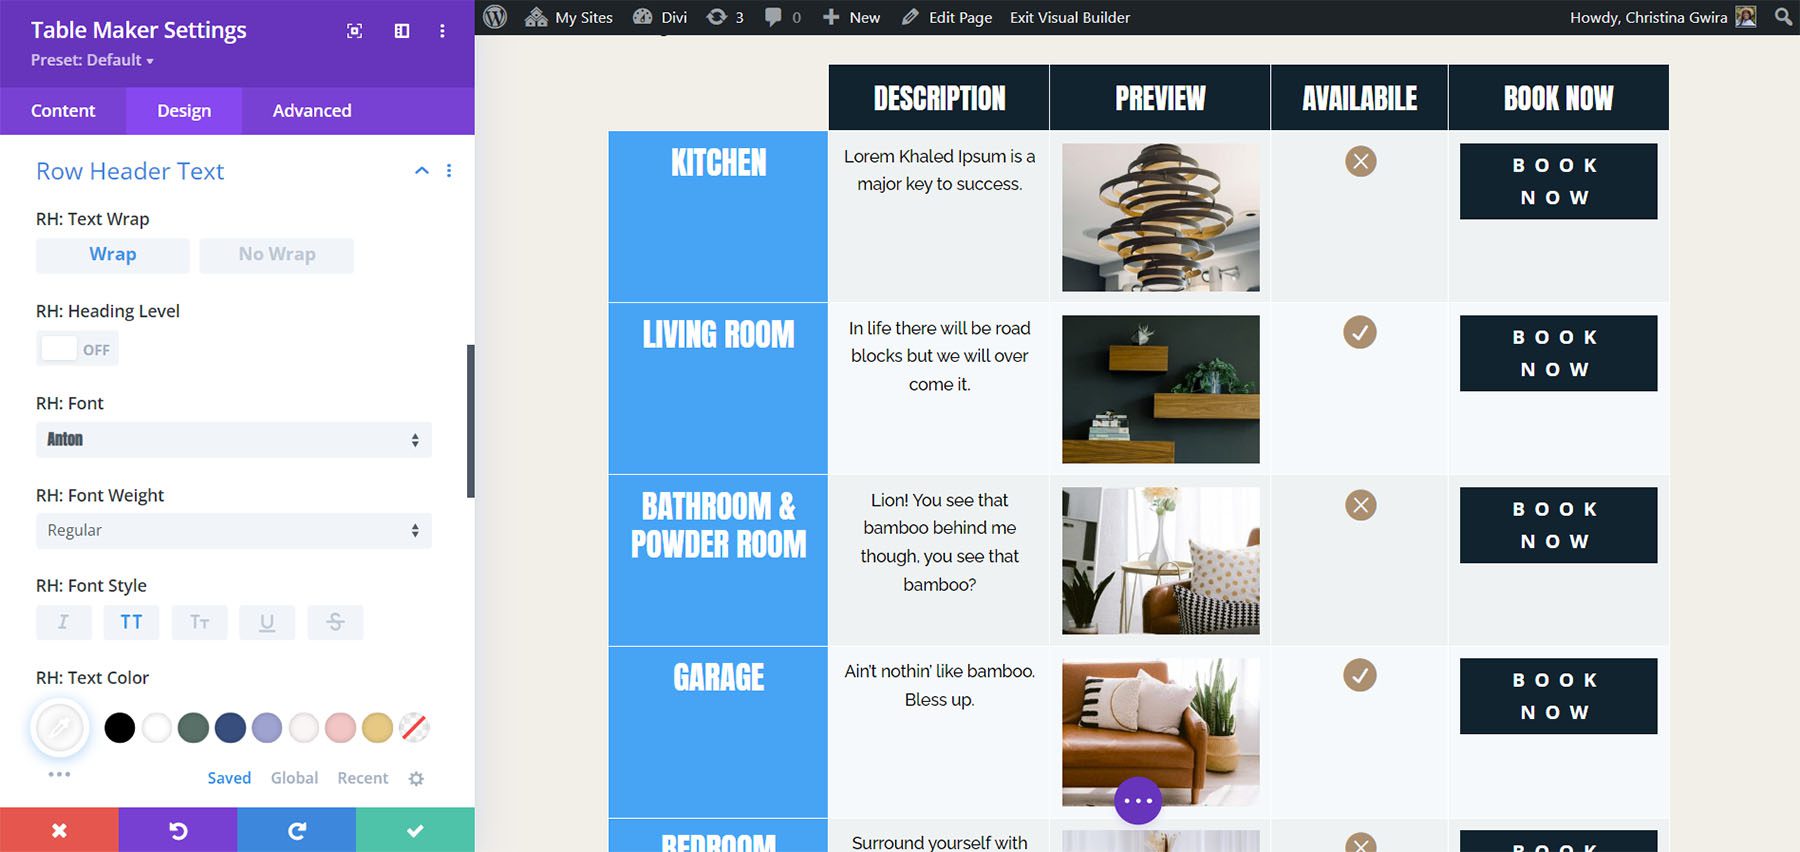
- 4.13 Row Header Text
- 4.14 Row Header Cells
- 4.15 Row Footer Text
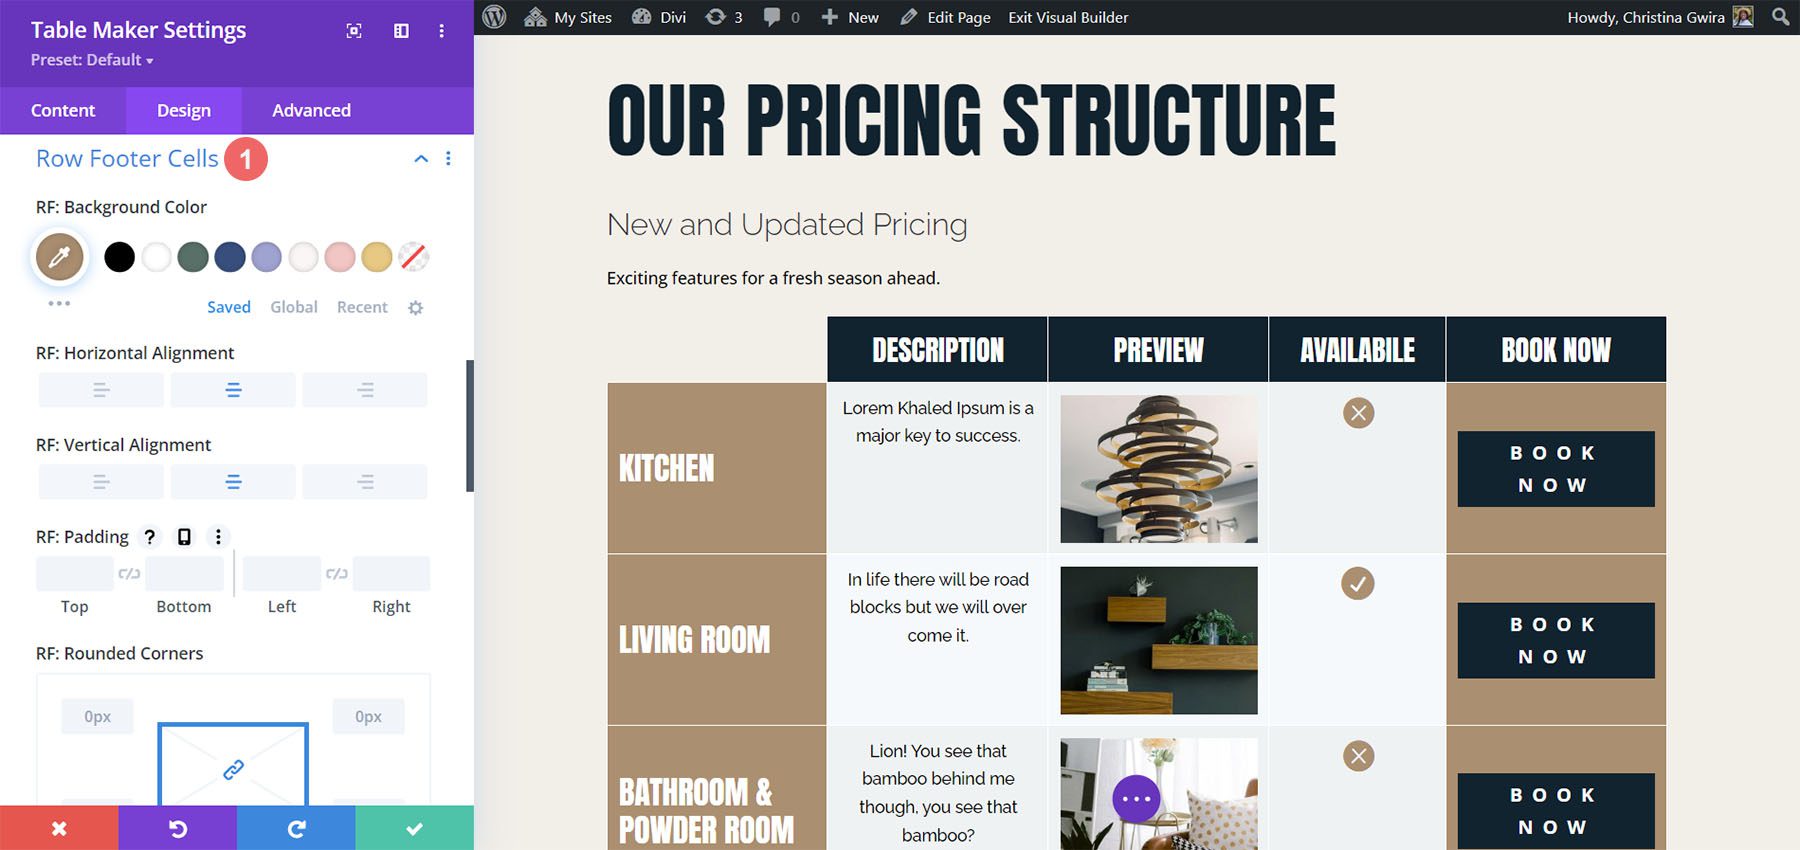
- 4.16 Row Footer Cells
- 5 The Updated Layou with Finished Table
- 6 Purchase Table Maker
- 7 Ending Thoughts
Table Maker Module Settings
A new Module is added to the Divi Builder called Table Maker. Add this module to your Divi layouts as you would any Divi Module. We are using the module to add a pricing table to the Service Page Layout of the Divi Home Renovation Layout Pack.
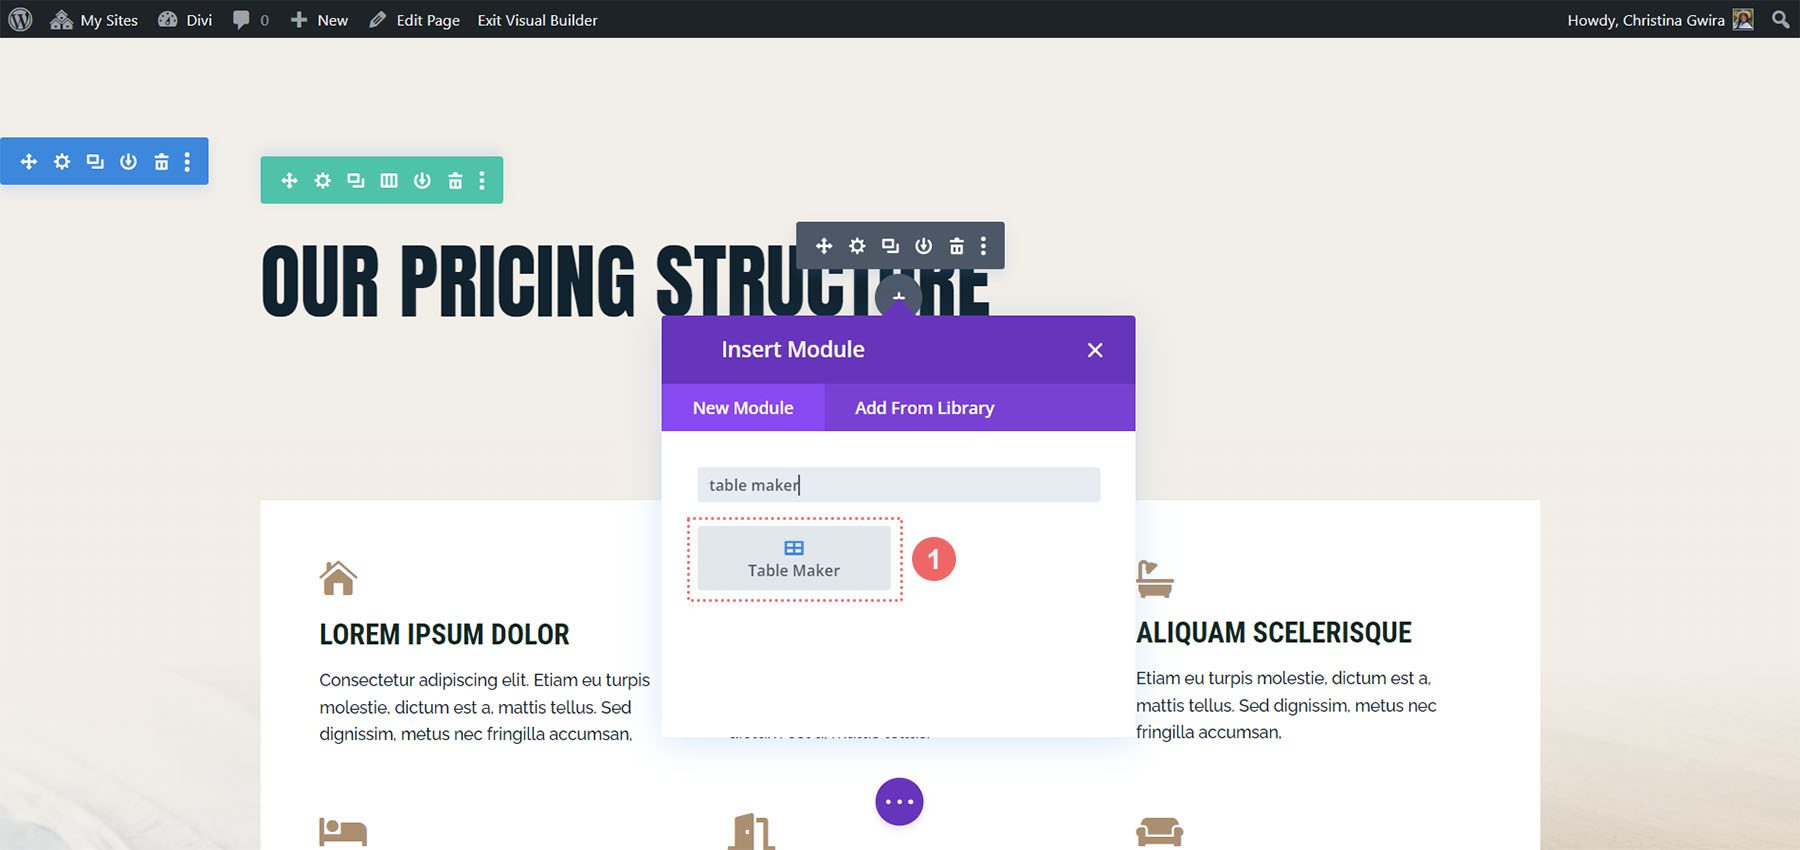
The General tab includes submodules for each column. Add as many as you want by clicking Add New Column. It also includes settings for the title, description, columns, rows, making it responsive, adjusting how it scrolls, and adjusting the icons, buttons, and images. The submodules also include settings that override the module settings.
Table Maker Column Submodule
Clicking Add New Column creates a column submodule and opens its settings. Add as many columns as you want.
Adding Content to Table Maker Cells
Before we see the Table Maker’s settings, let’s see how to add cells and content. We can add lots of different types of content to the cells.
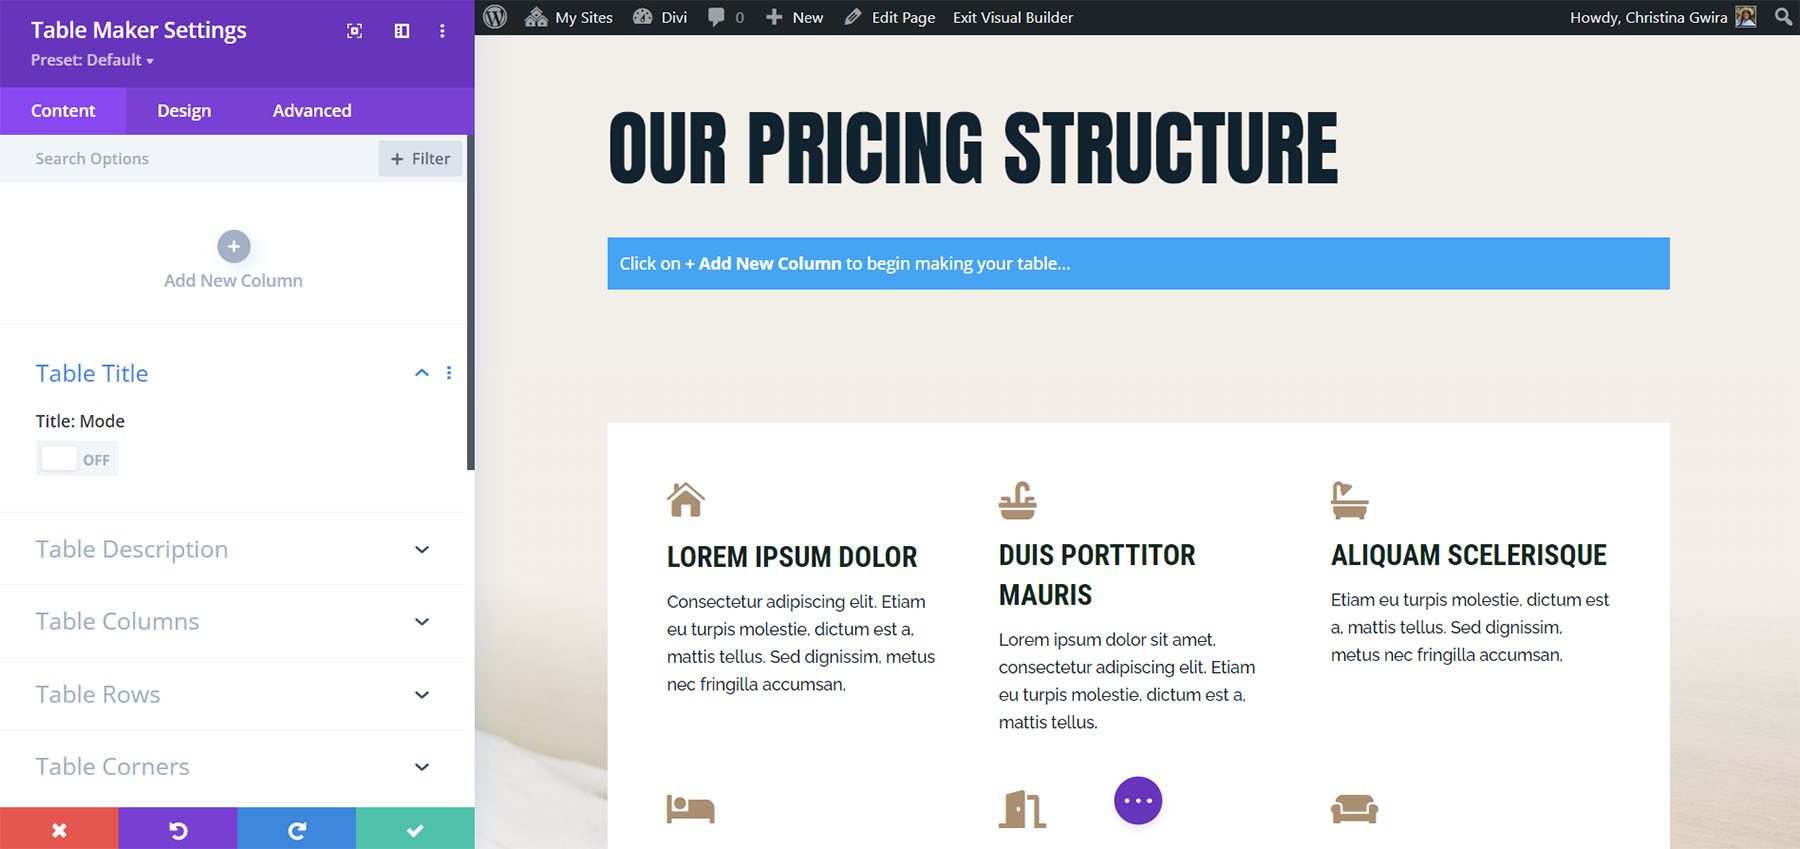
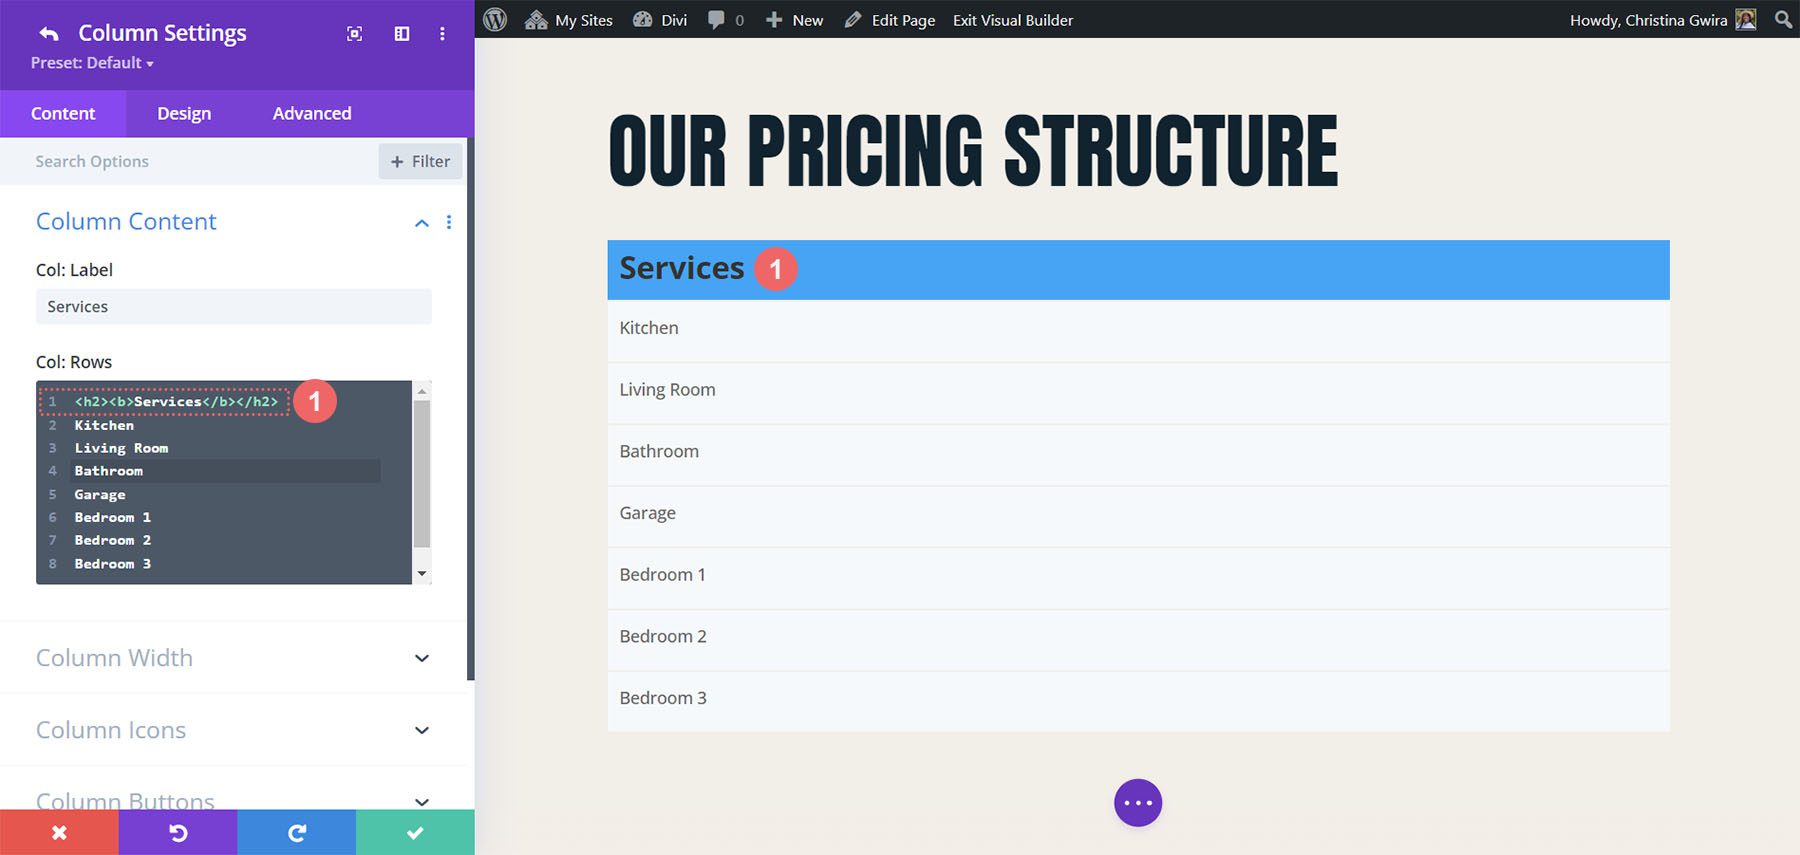
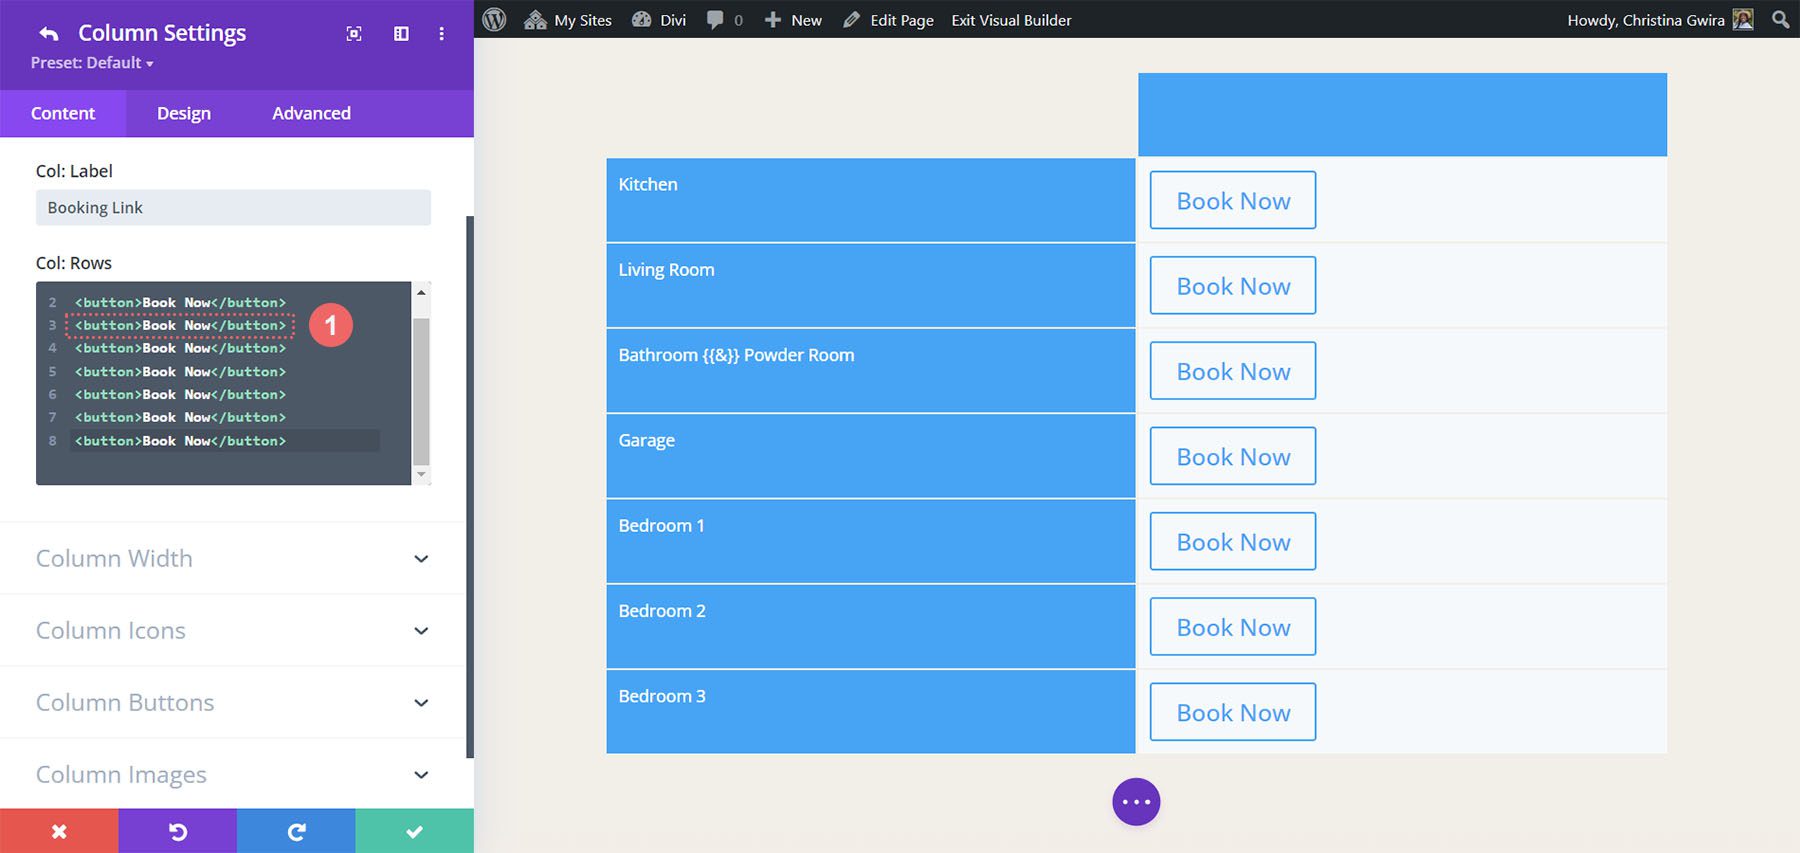
Table Maker Column Content
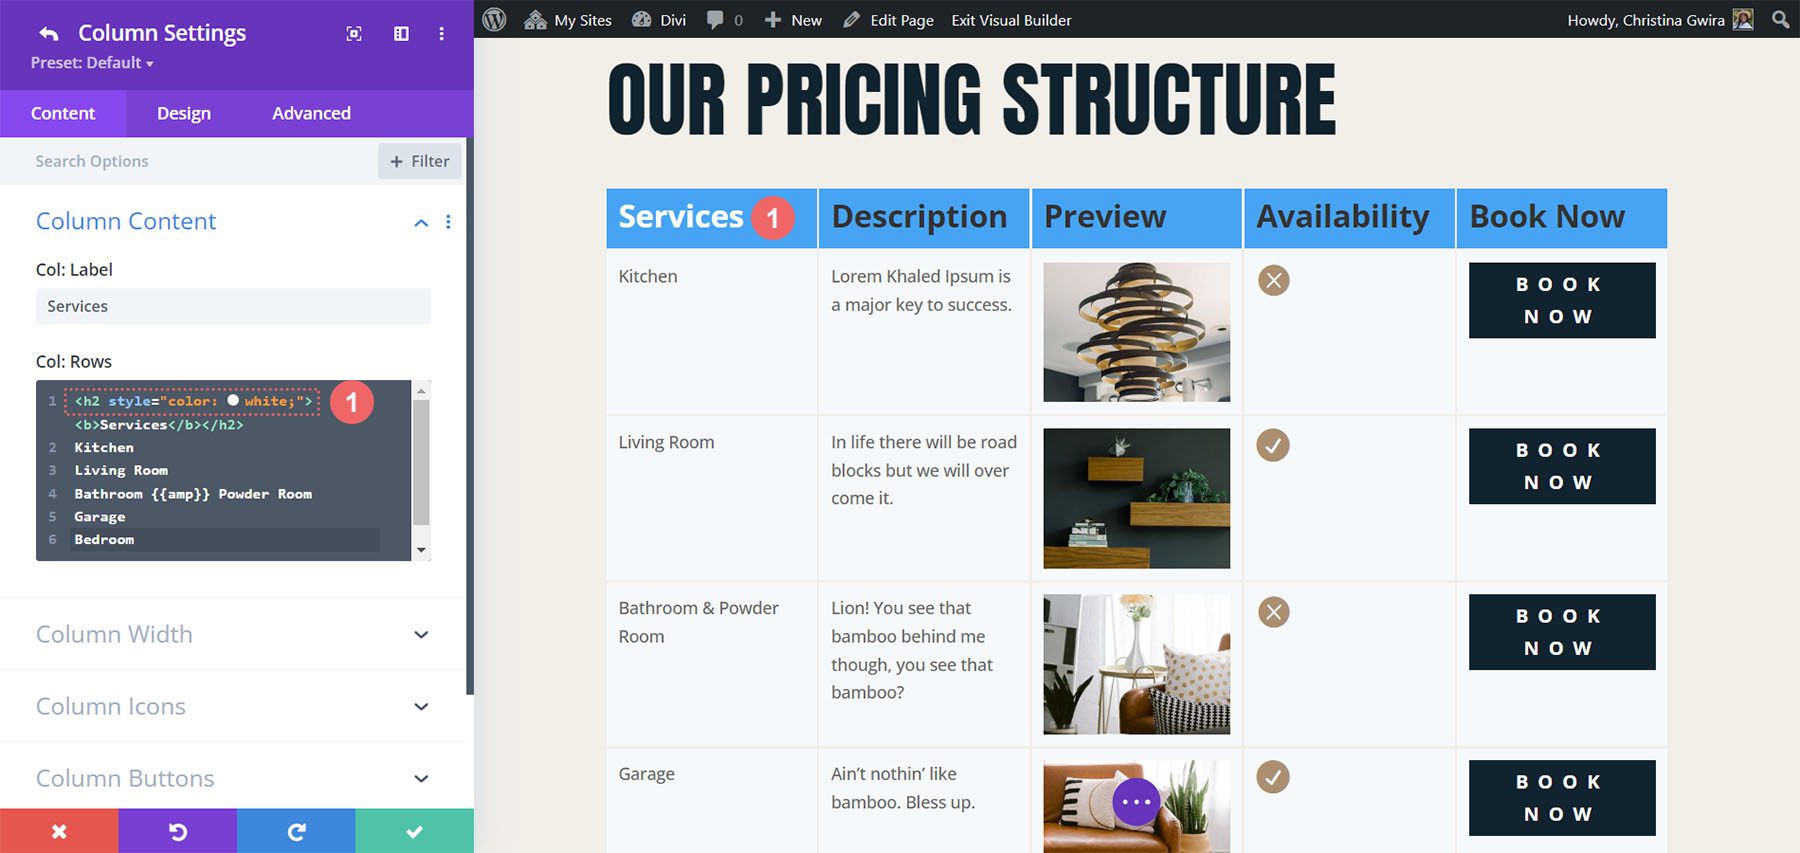
Within the column submodule, you’ll find the Rows field. This is an HTML editor. You can create the Rows just by entering the content for each row. Each row is numbered. The numbers correspond to a cell, so every numbered line is a new cell. To add content to a certain cell, just add that content to the line that’s numbered for that cell. This includes text, code, links, videos, or anything you want.

Style the Content with Markup
If you’ve added text to the cells, you can markup the text with HTML. This means you can easily add bold, italics, paragraphs, breaks, headings, links, images, or even an entire layout. Just make sure all the HTML is on a single line.
For example, I’ve added tags for H2 and bold to a few of the cells in this image.
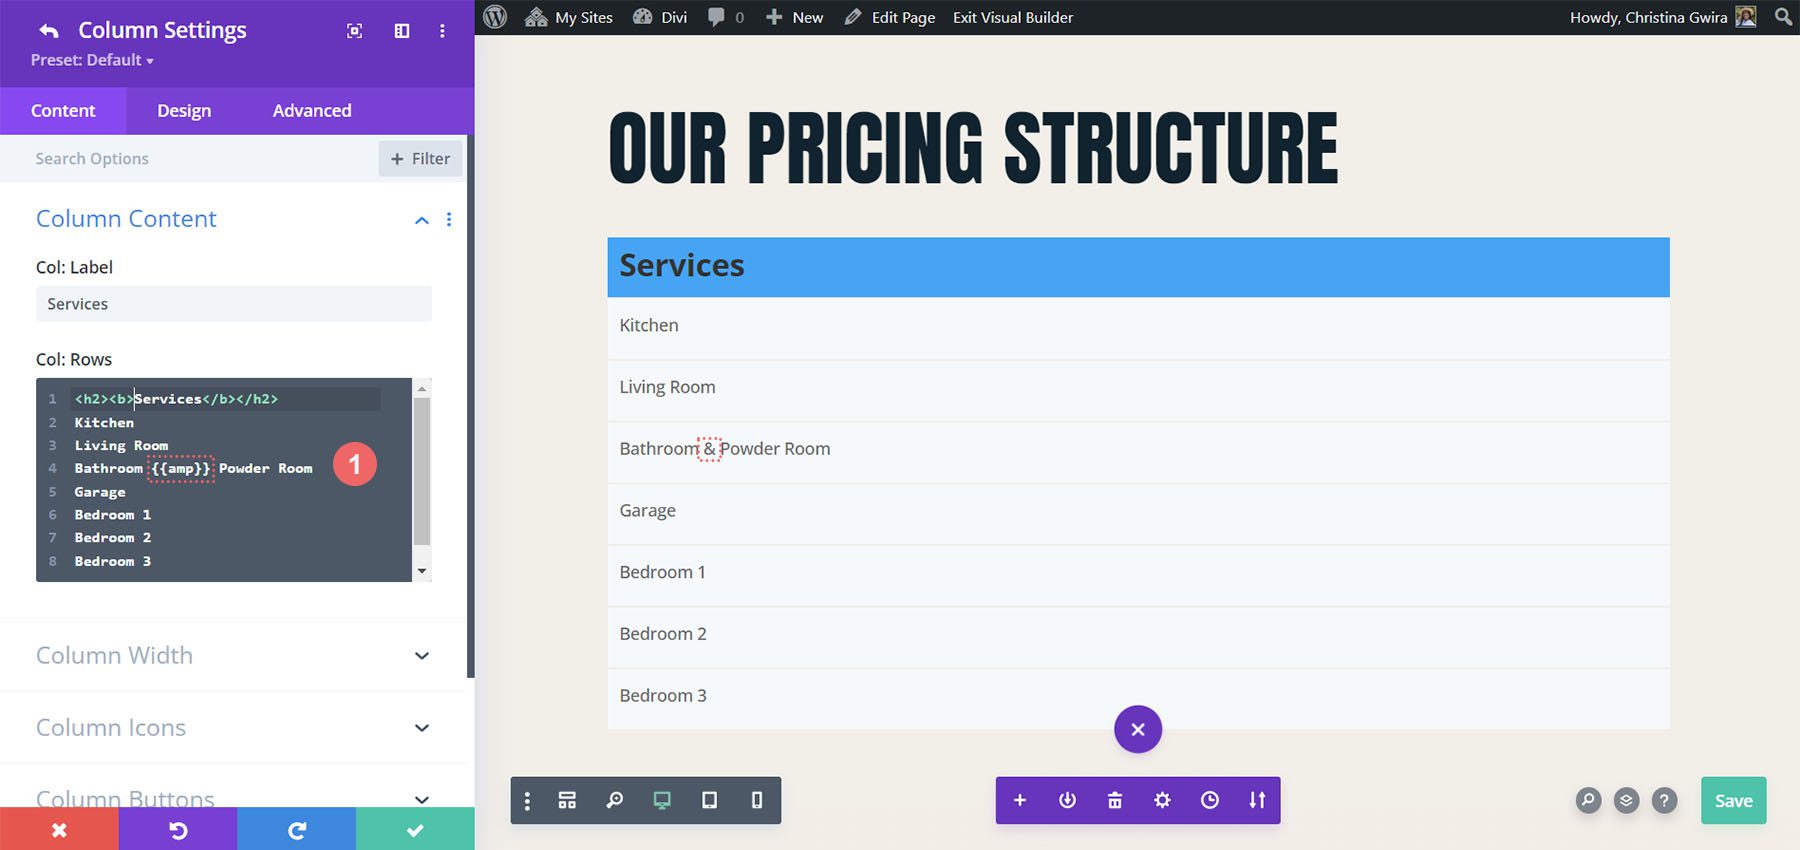
Adding Escape Characters
Since the Row editor is an HTML field, there are certain characters that we can’t usually use, such as the ampersand, quote, apostrophe, and great than and less than symbols. Fortunately, these characters can still be used within Table Maker’s fields. Table Maker uses special characters, called escape characters, to tell the cells to display those characters. To use them, add double curly brackets and the abbreviation for the character.
For example, to show an ampersand, you’d enter {{amp}}, as I’ve done in row 4 in the example below.
Add a button by entering the button tag to the cell you want to display a button. Once you enter the tag for the button, you’ll see the default button. Add the text you want to display within the tags.
The button can be customized in the Content tab of the Table Maker module’s settings and the individual submodule’s settings. Add the button text, URL, link target, set the button width based on the text or the cell, and use custom styles.

Add an Icon to the Table
Include an icon by entering the icon tag. You can include the icon’s name to display it or select an icon in the Content tab. You can also add as many icons as you want by adding more tags and the icon name within the tag. For example, to add a cross icon, add this code: <icon>cross_alt</icon>. I’ve also added this code to add a different icon: <icon>check_alt</icon>. You can find a full list of available icons on the Divi Table Maker website.
![]()
You can also choose to select a uniform icon choice. To do this, scroll down to Table Icons in the Content tab. Use the Content tab of the module to choose an icon that can be placed in all the cells. There is also the option to choose an icon specifically for that cell. You can also adjust the icon’s size and color, as I’ve done in the example below.
![]()
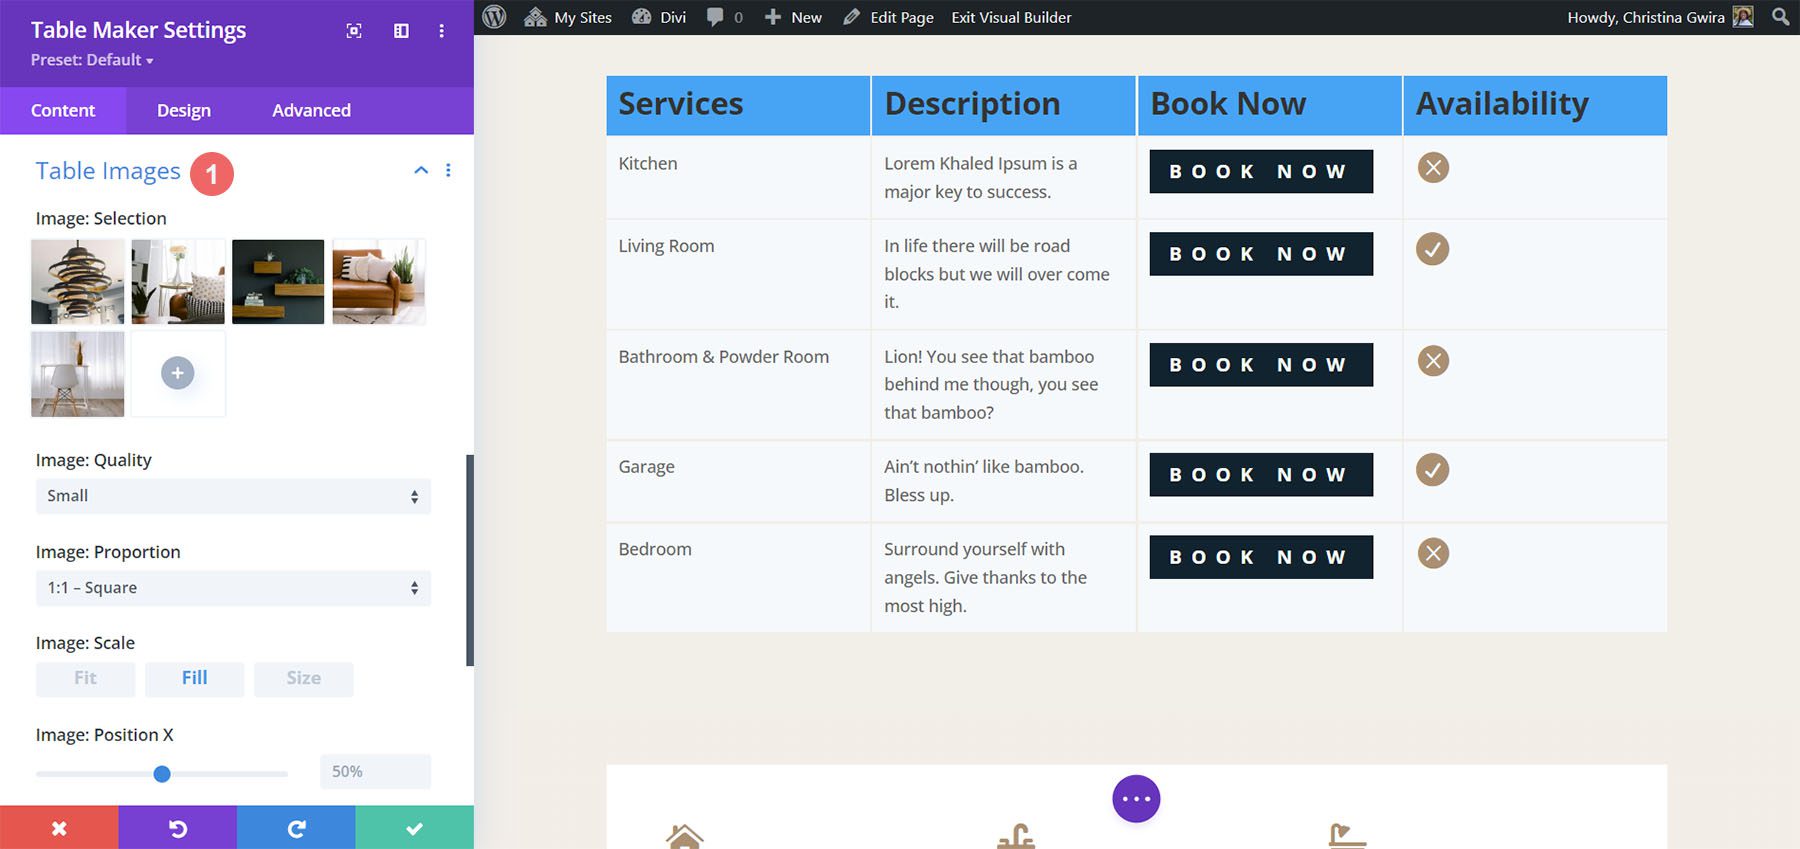
Add an Image to the Table
To add the images to the table, scroll down to Table Images in the Content tab. Add the images as a gallery from the media library. You can also select the image quality, proportion, scale, vertical alignment, and horizontal alignment. You can also access these settings for each cell in the submodules, so you can override the standard module settings.
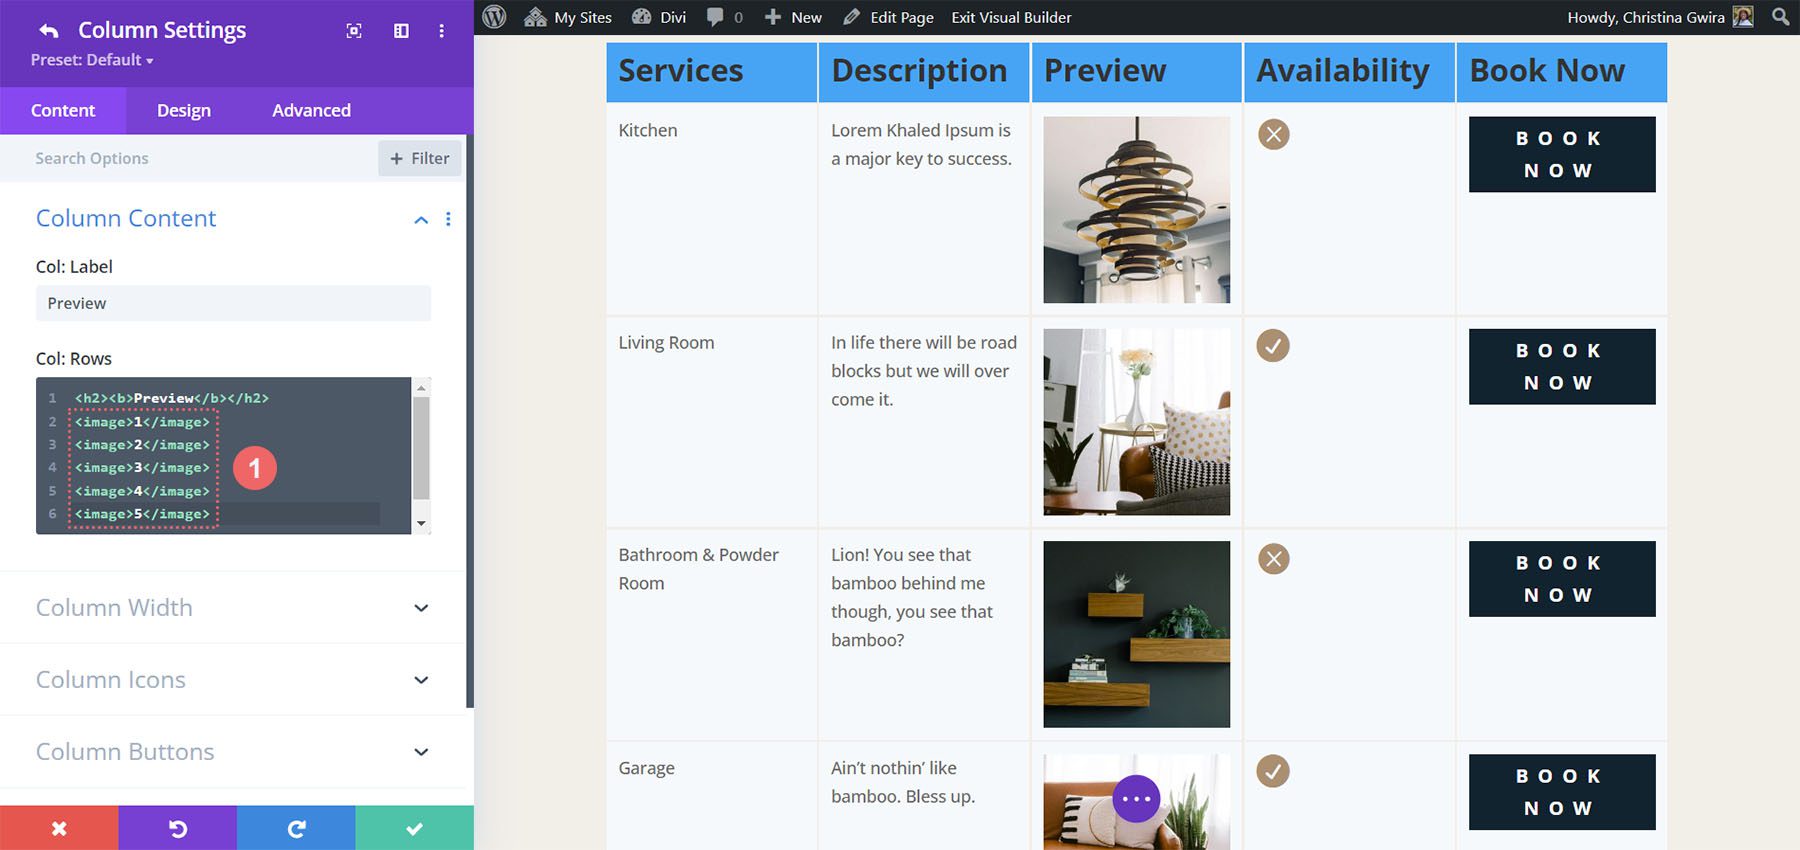
Display the Images
Display the images by adding the image tag and the image number in the cell. For example, if you want the second cell of your column to display an image, enter the HTML image tag into that cell. Change the number to show a specific image based on the order that it appears in the gallery.
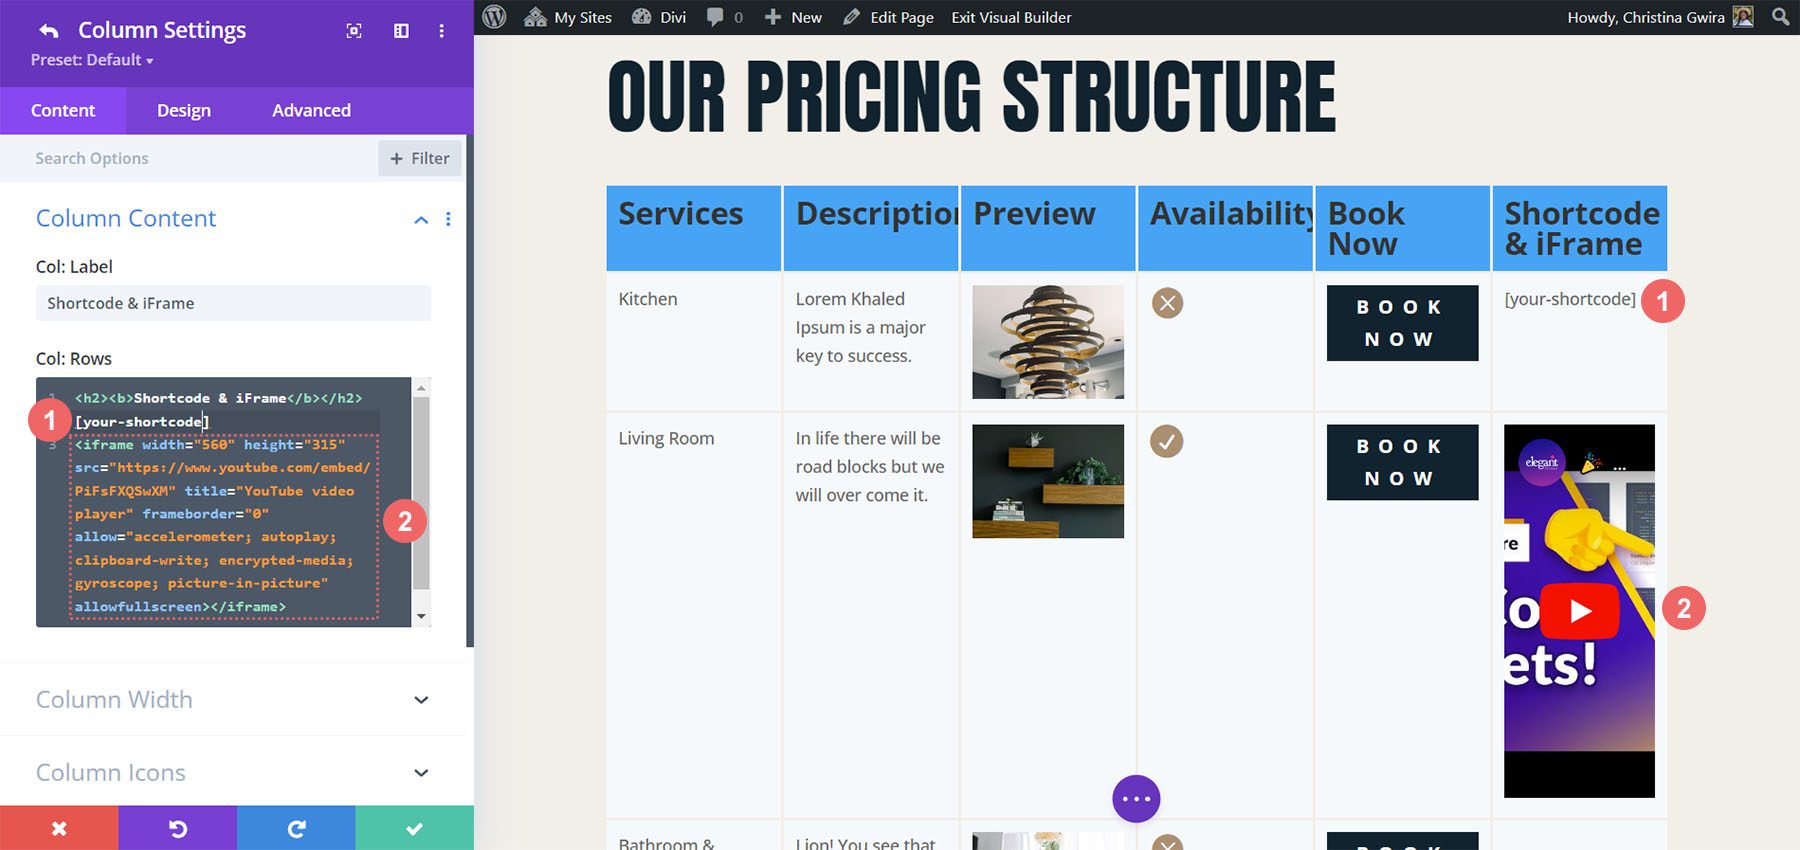
Shortcodes and iFrames
You can also add shortcodes and iFrames to the cells. Simply paste them on the line for the cell you want. You won’t see a preview of the shortcode in the Divi Builder, but they do run on the website. Paste iFrames the same way as shortcodes. They do show a preview in the Divi Builder, but it might not show the same way that it will on the front end. They do show correctly on the front end.
Style the Content with CSS
You can also style the content with inline CSS. This can be used to control the colors of the text, the size of the text, underline, etc. Simply add the inline CSS as you would in any WordPress content editor. For example, to make the first column heading text white, you can add this CSS:
<h2 style="color: white;"></h2>
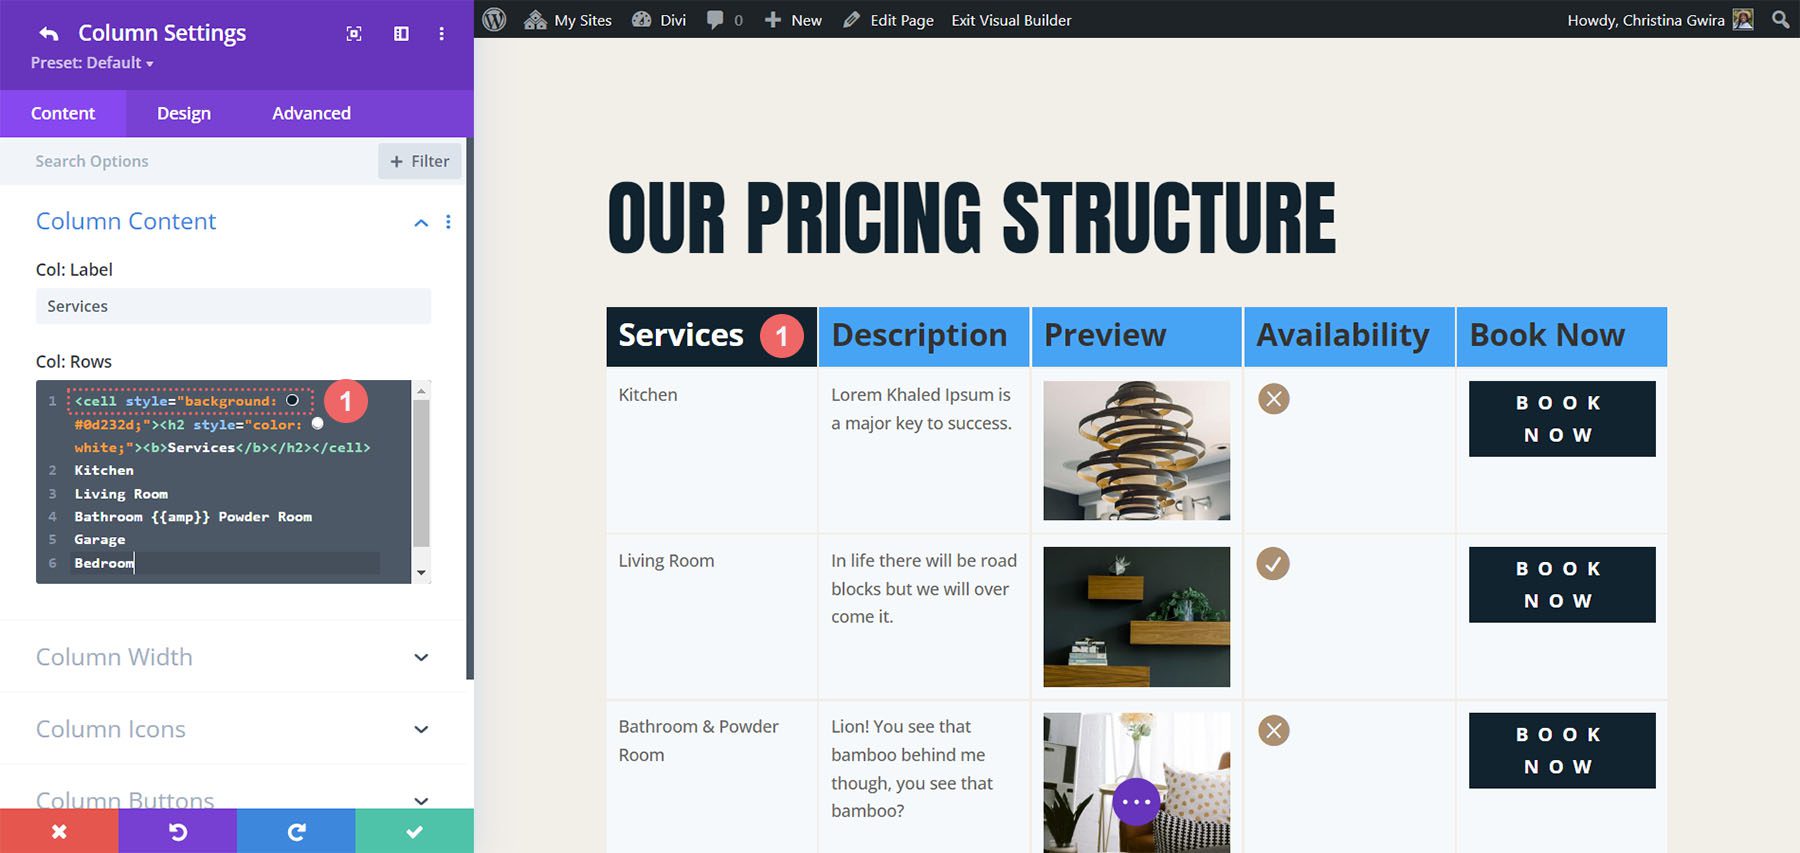
Customizing the Table Maker Cell Itself
You can customize the cell itself using the cell tag and inline CSS. For example, this inline CSS would change the cell’s background:
<cell style="background: #0d232d;"></cell>
For our example, we place the heading of the cell – which we had previously styled with inline CSS – within the cell tag.
Column Width
Adjust the Max Width and Min Width of each column independently.
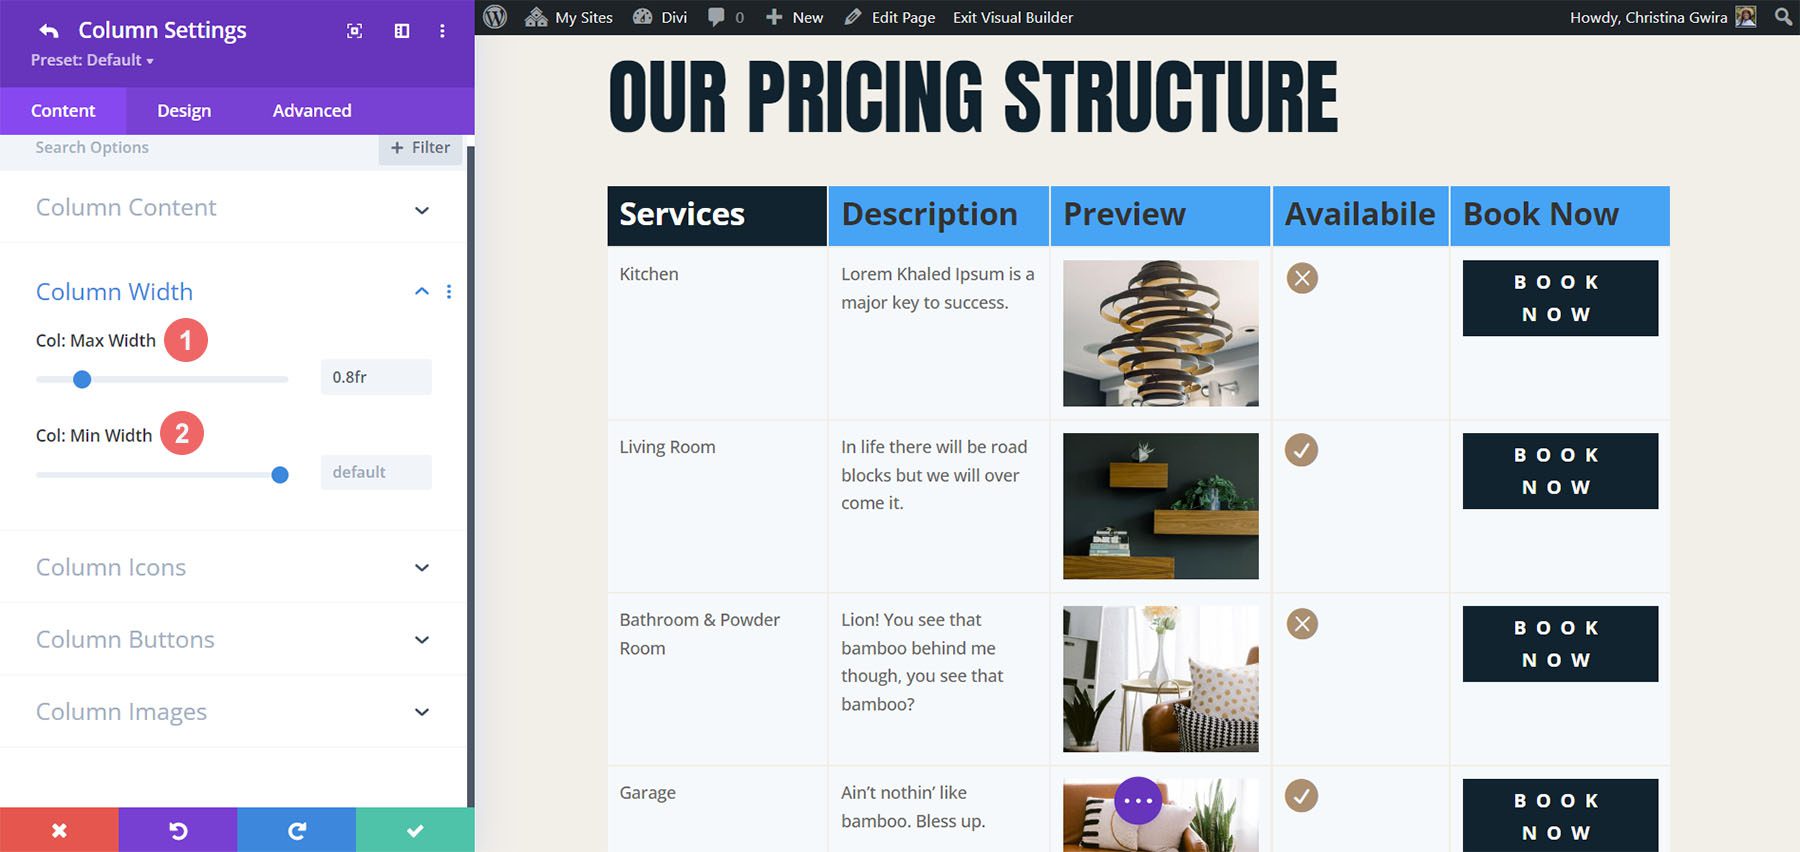
Table Title
Table Title is a new feature. It’s disabled by default. Enable it and add a title in the field. You can also choose its position. Options include above the table, below the table, and hidden.
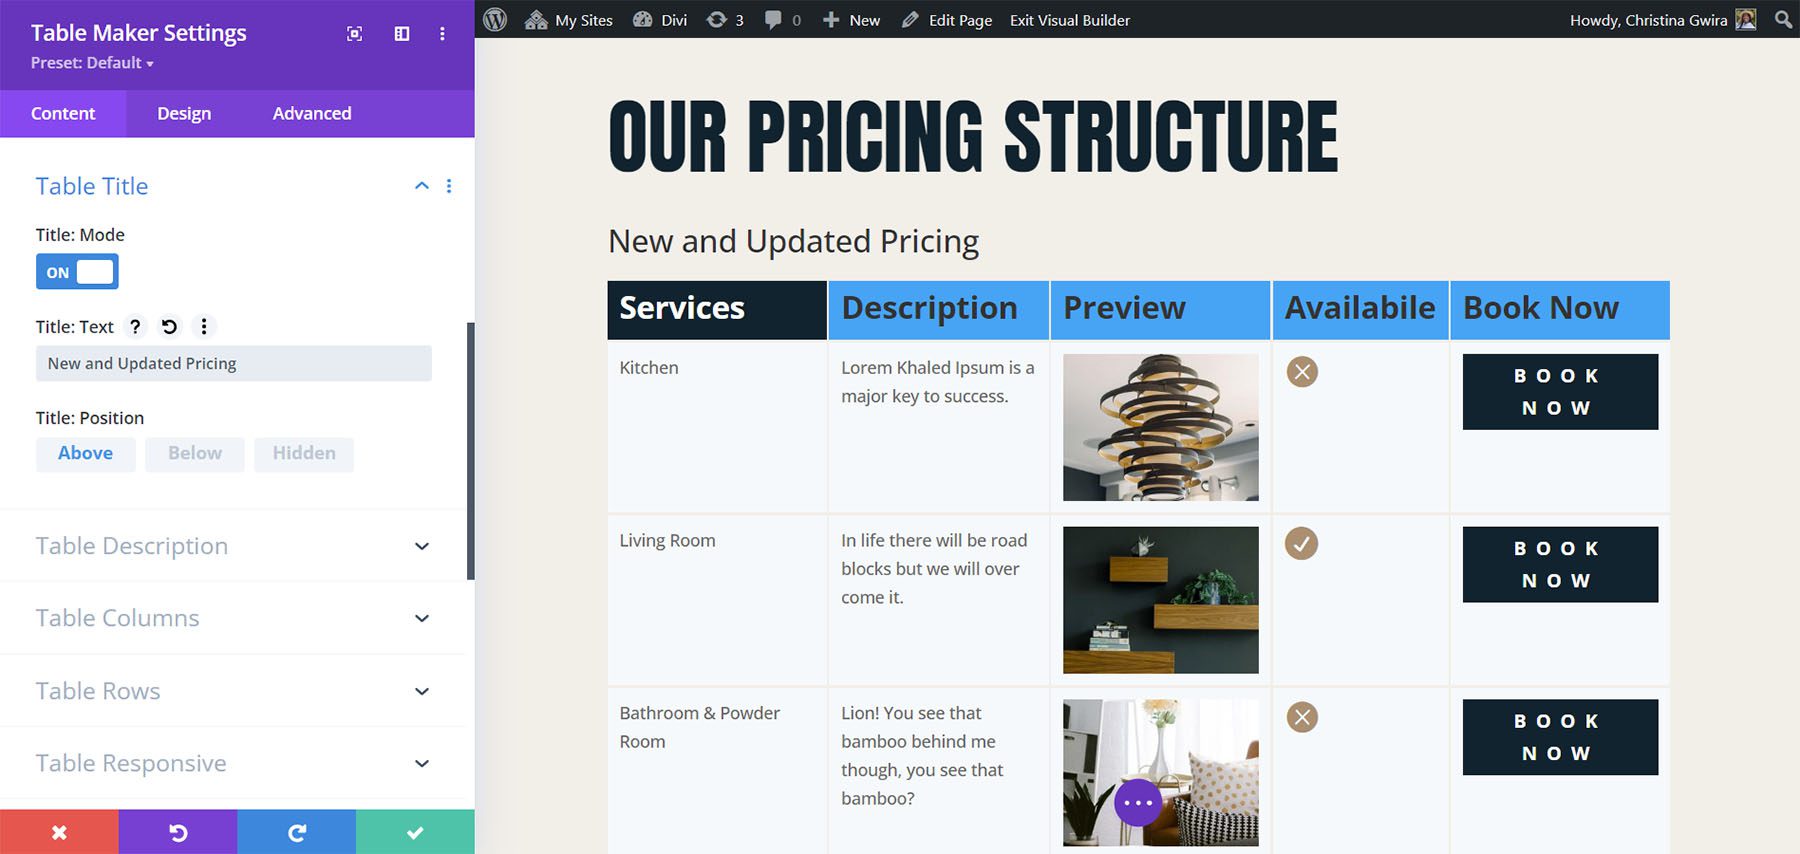
Table Description
Table Description is another new feature. It’s also disabled by default. Enable it and add the description into the field. You can also choose its position from above, below, or hidden.
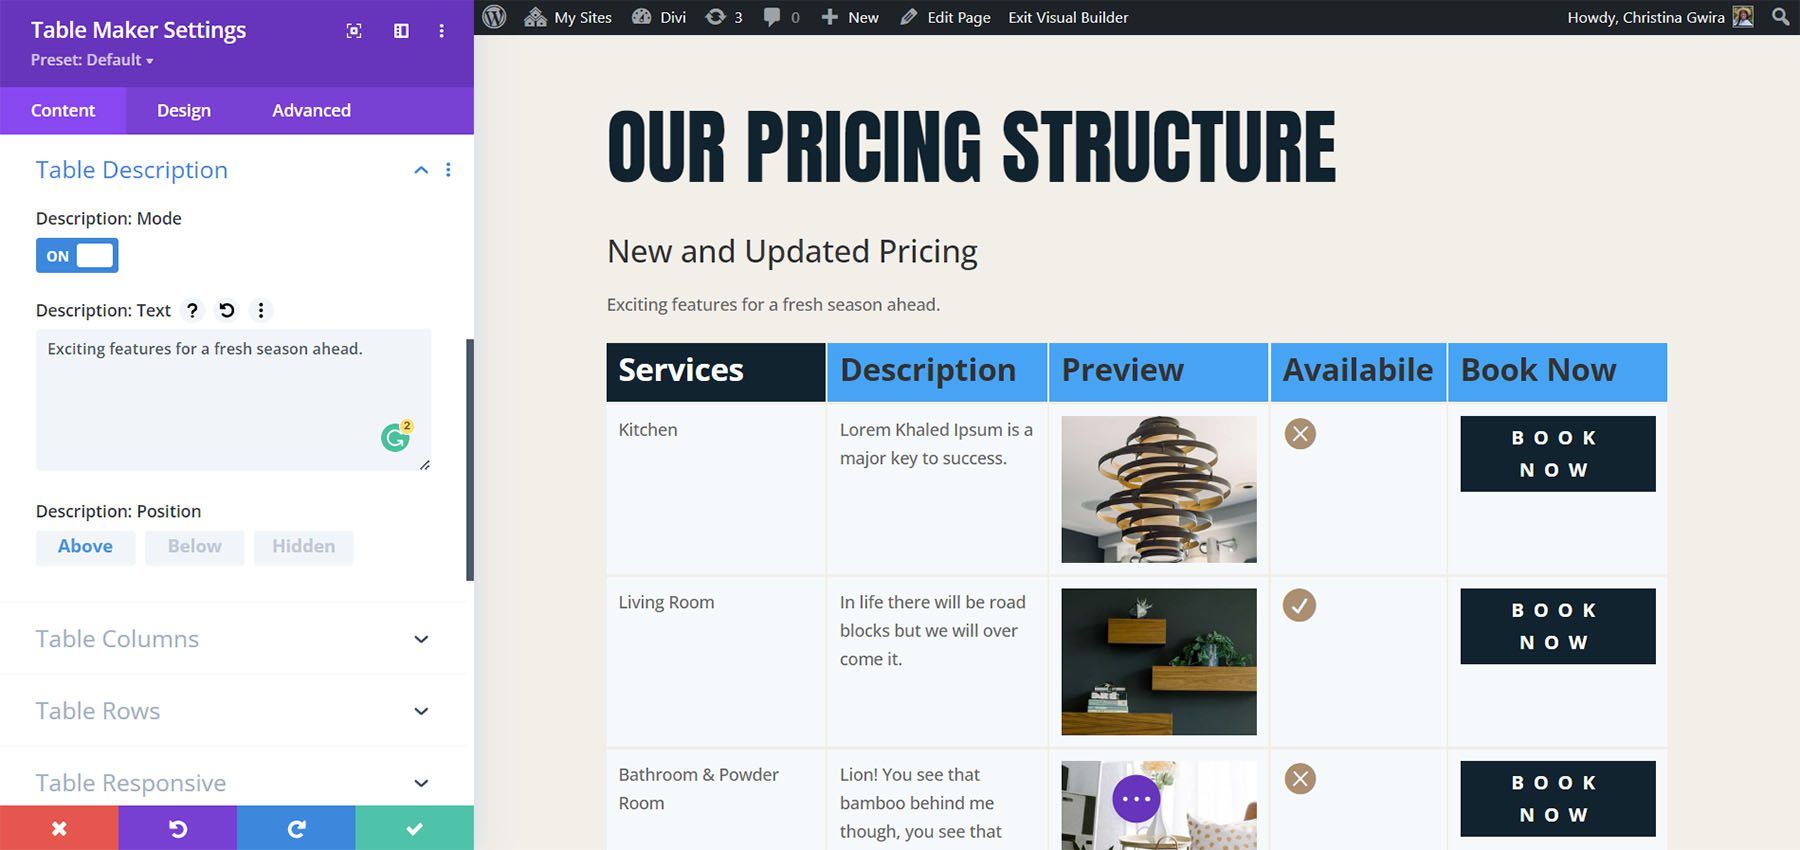
Table Columns
Adjust the Header Count, Footer Count, Max Width, and Min Width. The Header Count and Footer Count lets you choose the number of cells to use for each.
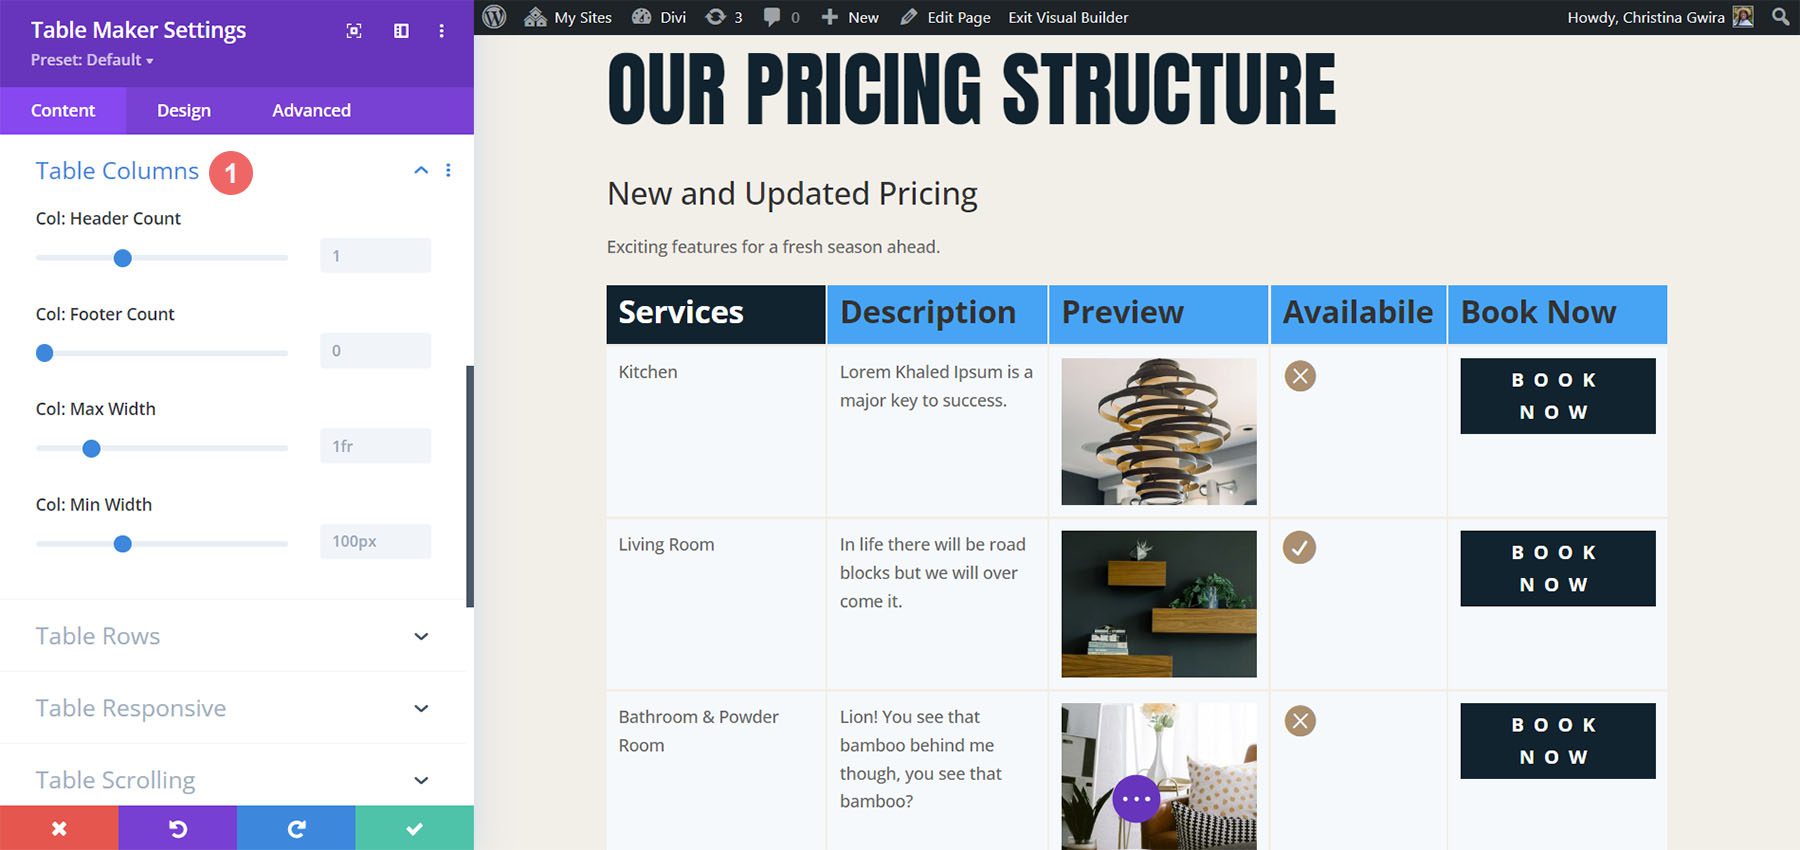
Table Rows
Table Rows also has adjustments for the Header Count, Footer Count, Max Width, and Min Width. The Header Count and Footer Count lets you choose the number of cells to use for each.
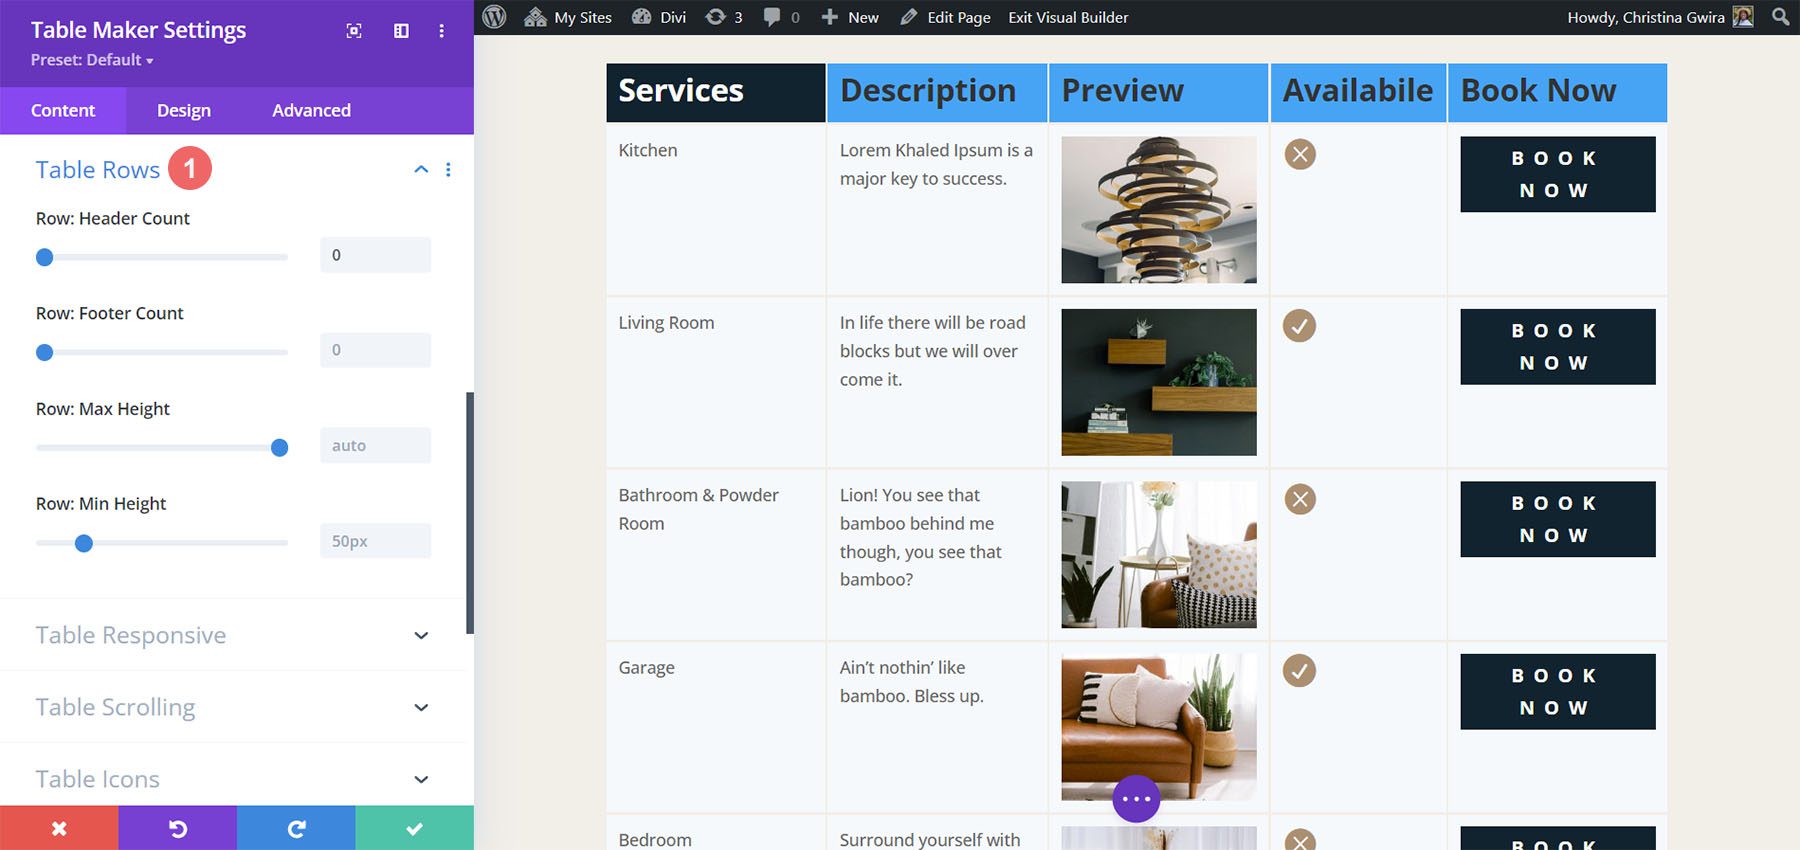
Table Corners
Table Corners is another new feature. It’s disabled by default. This lets you style the corner as part of the Row Header or Column Header. Table Corners works with Column Footer and Row Footer. If it’s enabled, you’ll have new settings in Table Corners to style them.
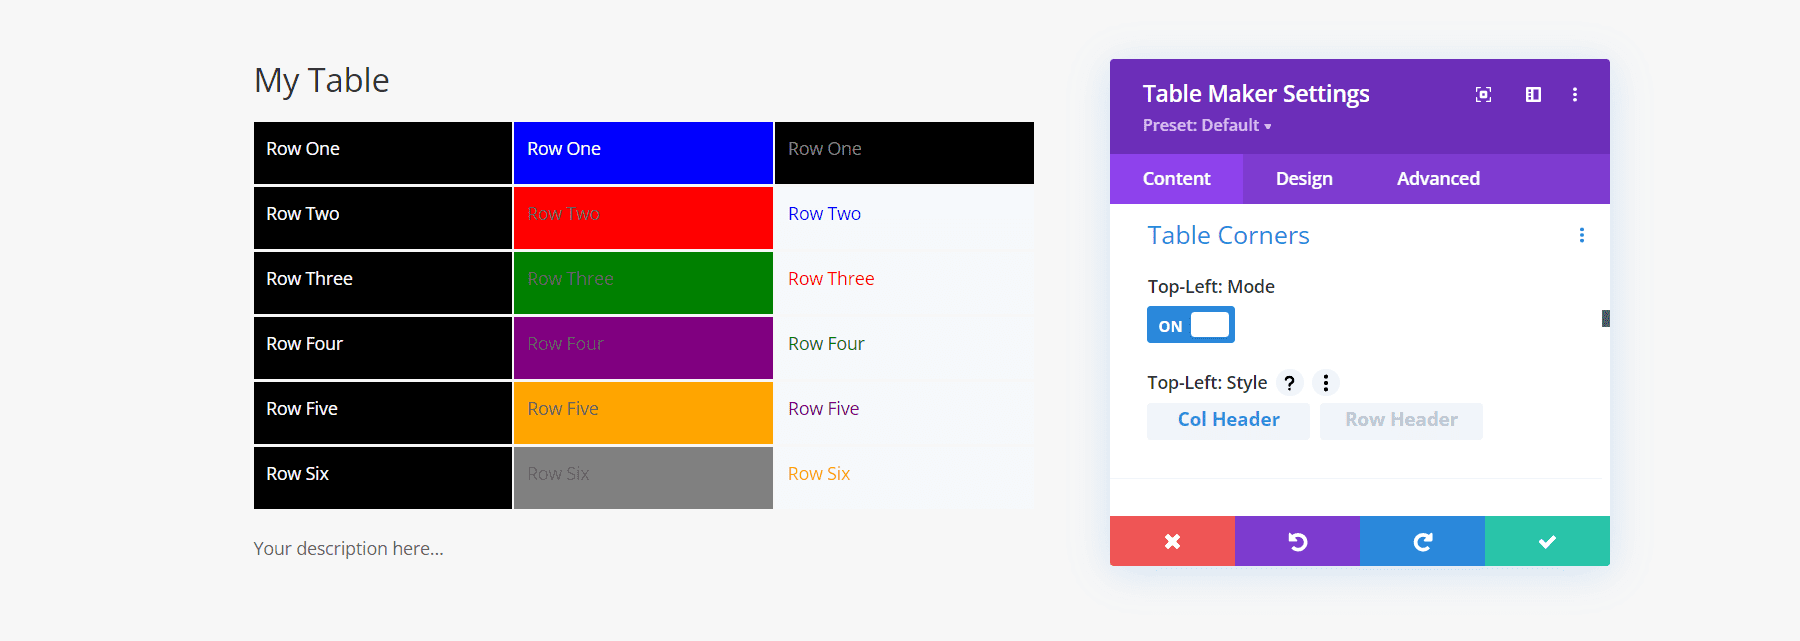
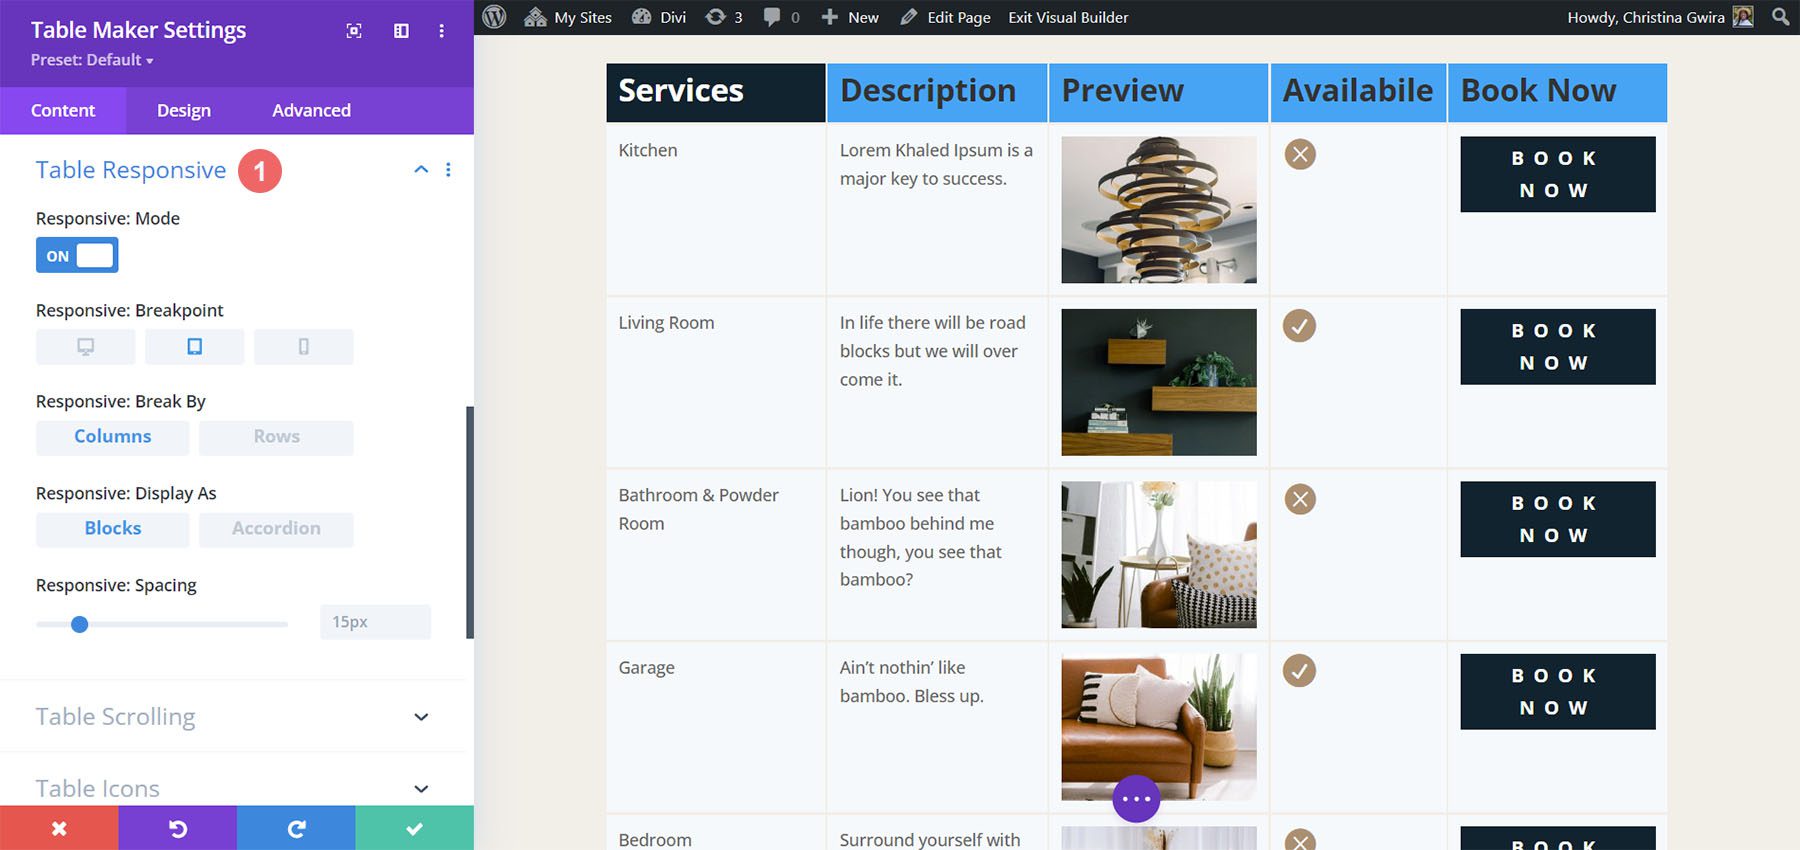
Table Responsive
The responsive features are interesting. You can set the breakpoint based on the device type and have it break by columns or rows. You can also display the cells as blocks or as an accordion. The latest update adds the breakpoints to desktops so you can create accordions on desktops if you want. Your visitors won’t see the full table layout if you use either blocks or accordion for the desktop. This example shows blocks.
This example shows the Accordion. I’ve opened the second accordion to show how the table looks.
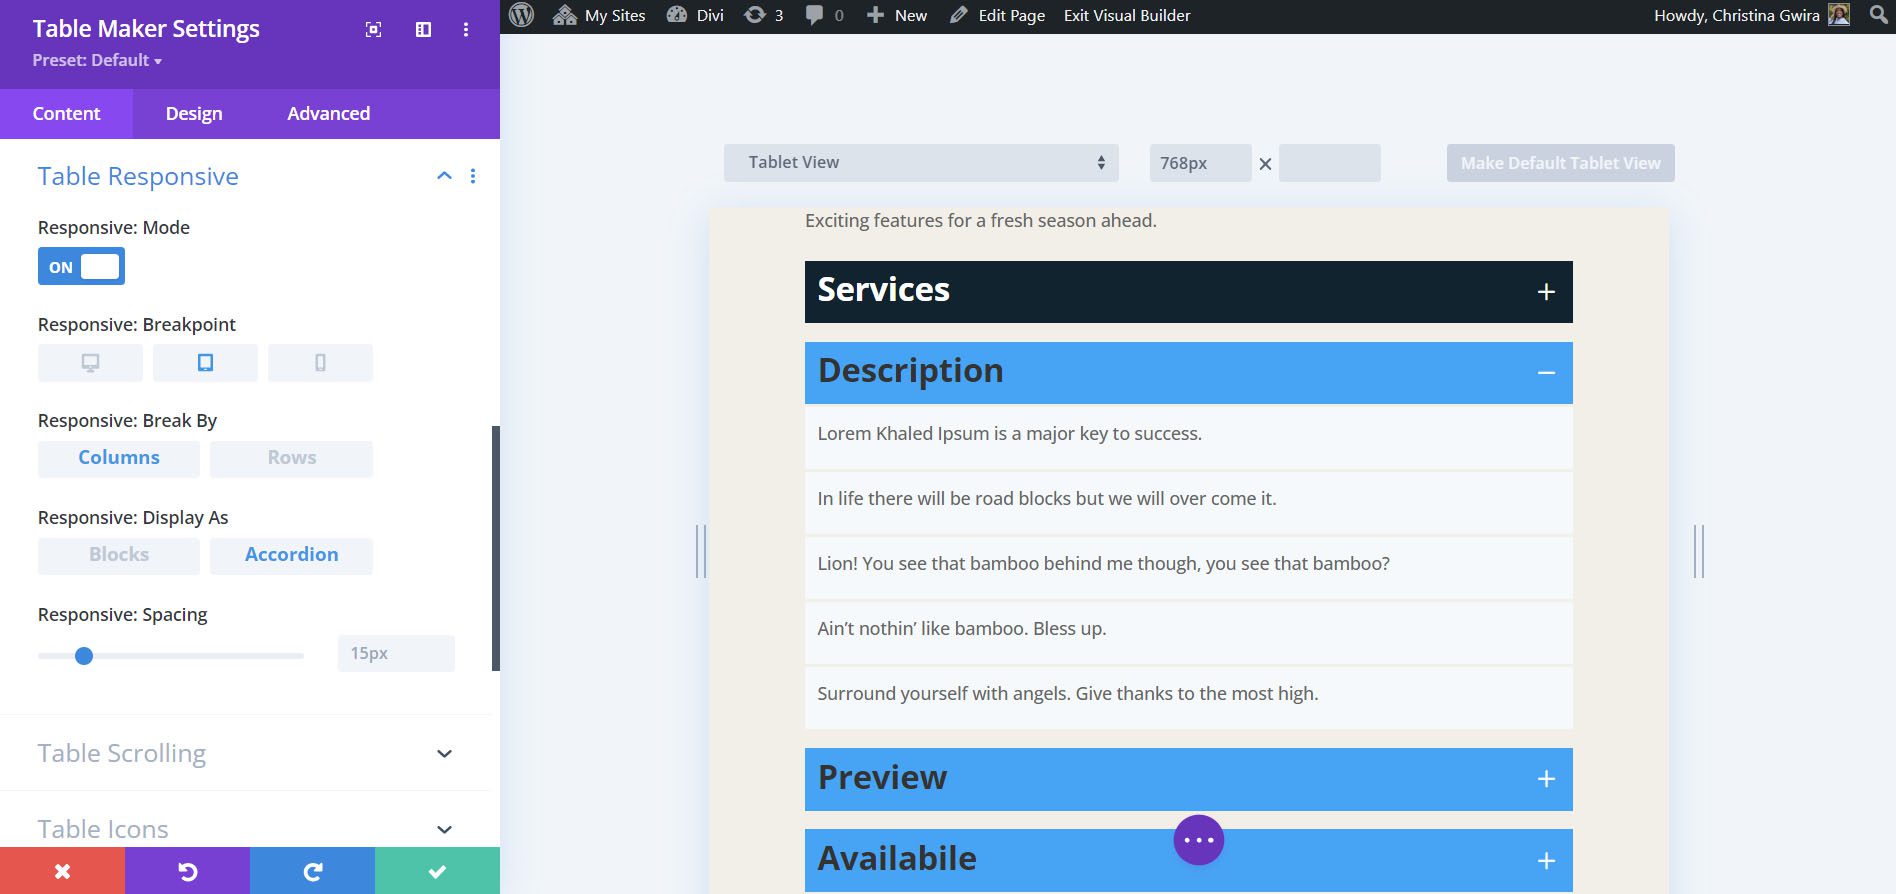
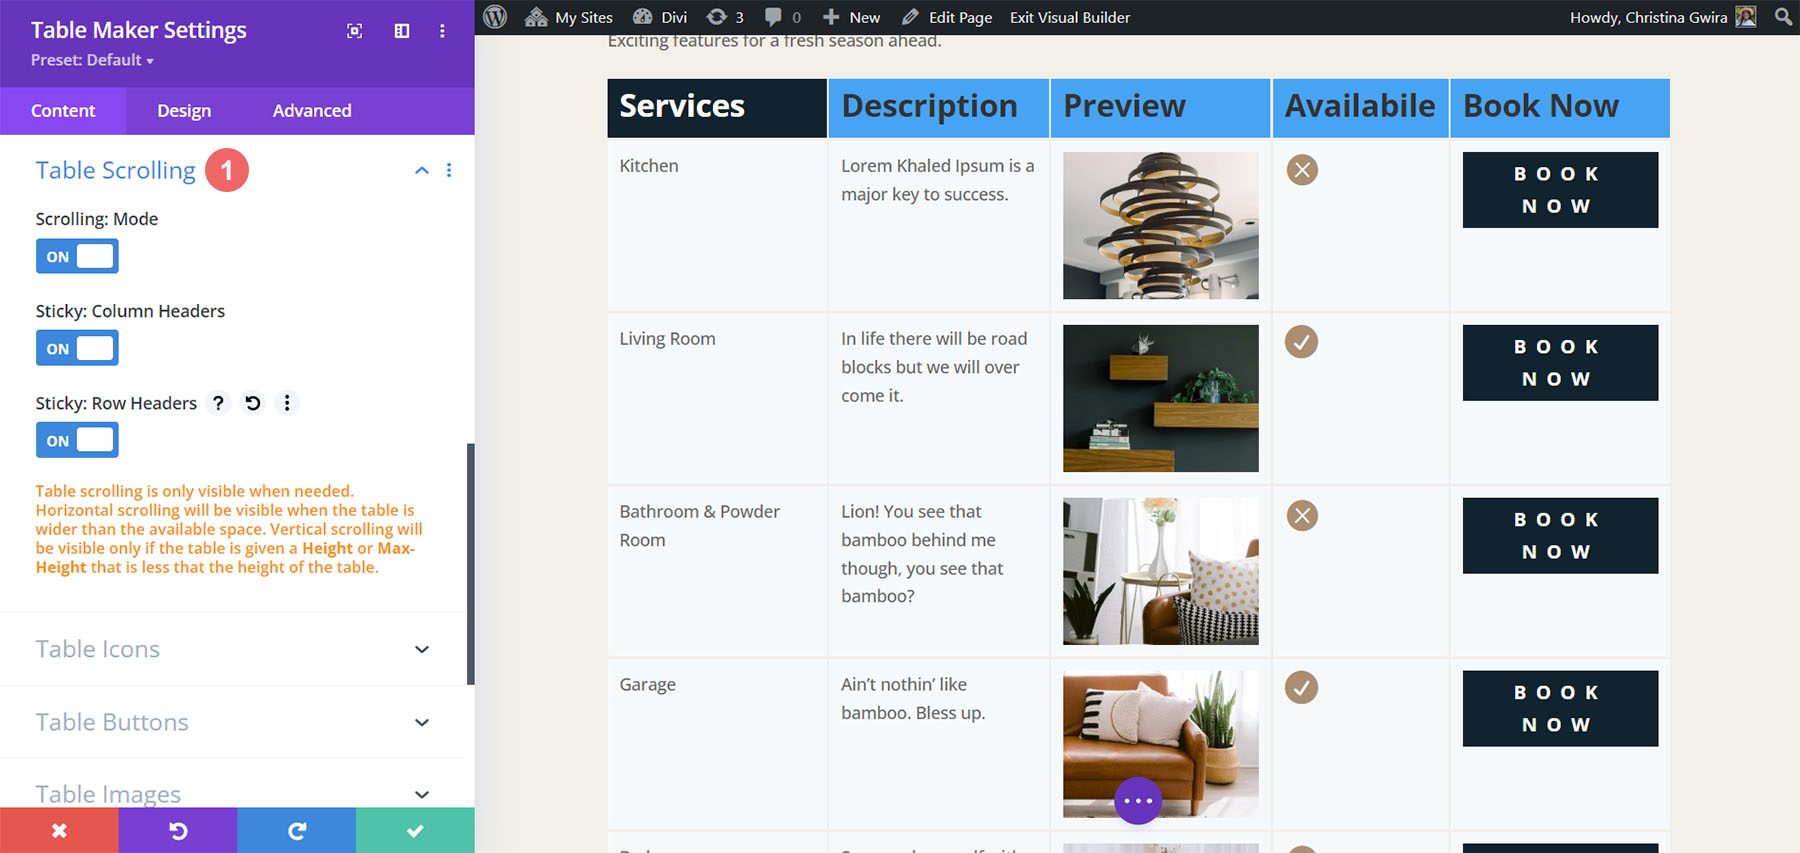
Table Scrolling
Scrolling lets you display a larger table in the same space. You can also make the column and row headers sticky.
Styling the Tabel Maker Table
Table Maker has extensive styling options in the Design tab of the submodules and the main module. Adjust the colors, stripes, cells, text, header text, column headers, row headers, column footers, row footers, footer text, and all the standard Divi options. Style all the cells together or each cell independently. Let’s look at a few examples. I’ll describe the settings as we go.
Table Maker Table Title
If you have Table Title enabled, you’ll see design settings for the title. The settings include most of the standard text options for fonts, colors, alignment, etc. It adds spacing between the table and the title text. In the example below, I’ve changed the font to match the body font used within our layout pack, Raleway.
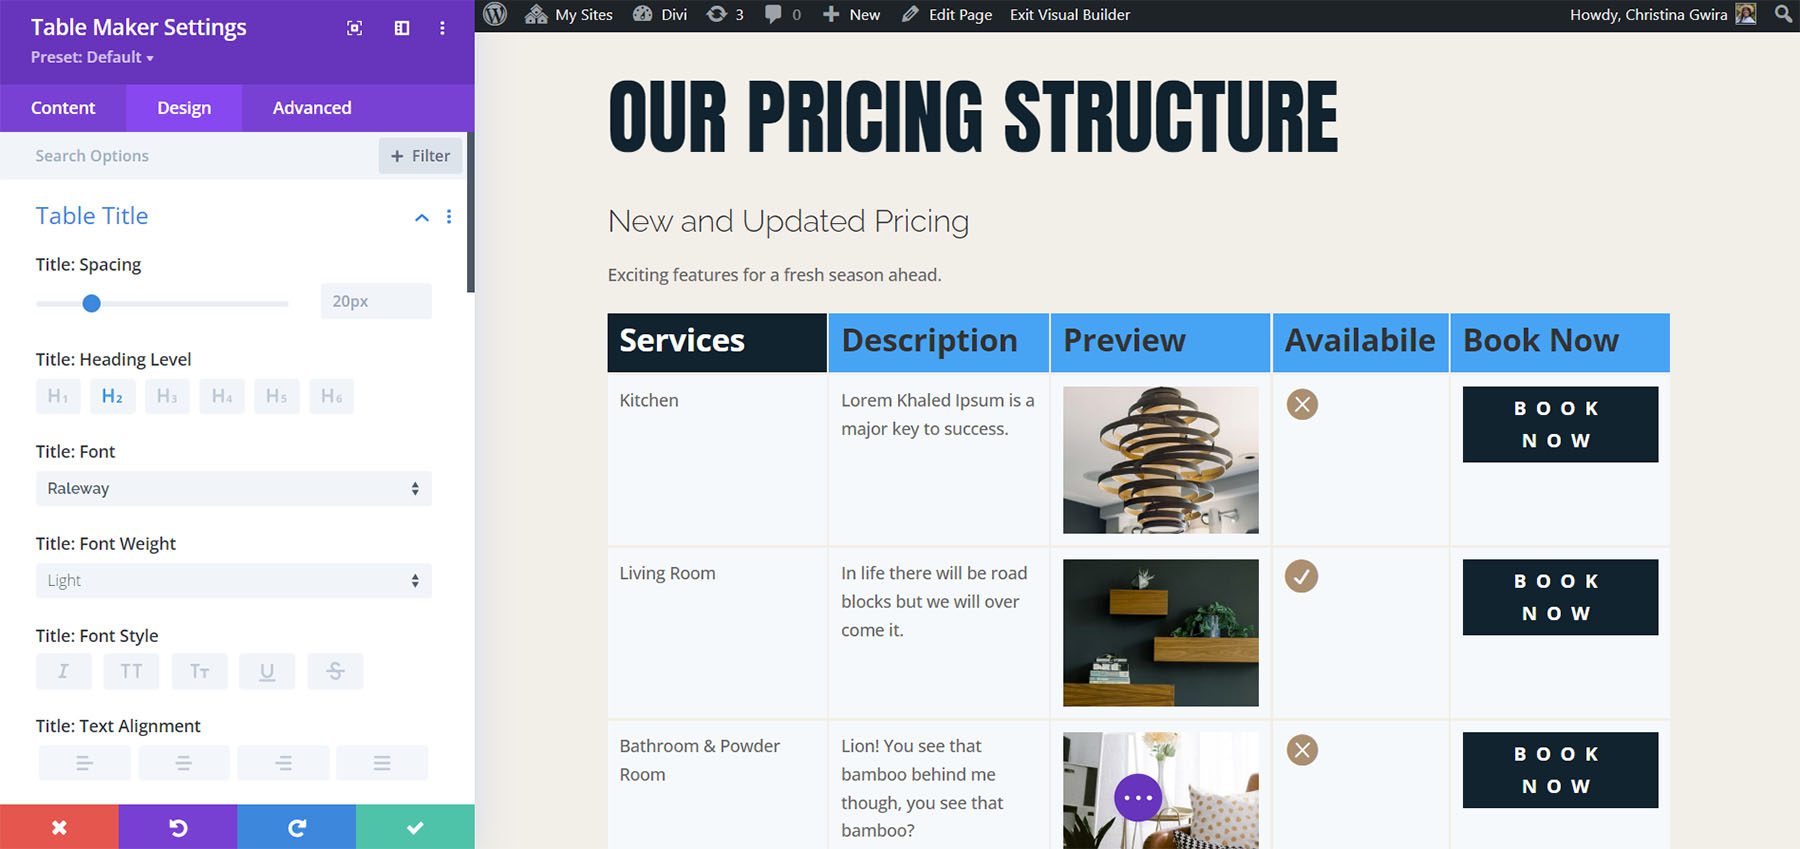
Table Description
If you have Table description enabled, you’ll see the design settings for the description text. Settings include most of the text options including size, fonts, wights, etc. It also adds spacing between the table and the description text. In this example, I’ve adjusted font and color to better match our layout pack.
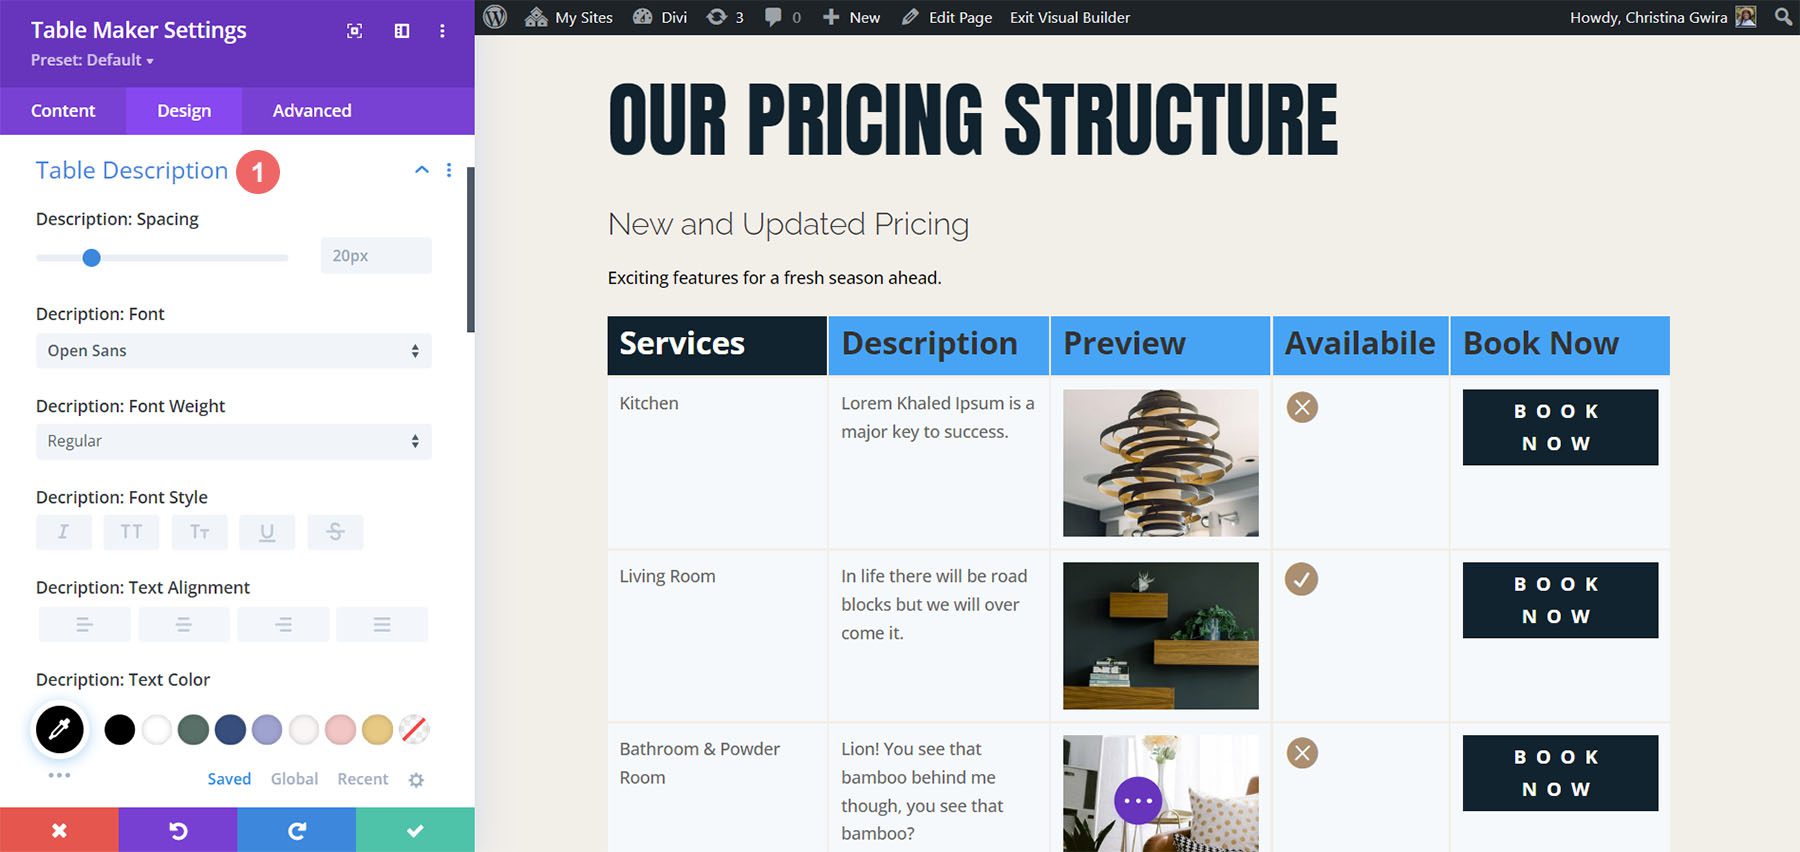
Table Accordion
If you have the Accordion option selected under Table Responsive, you’ll have design settings for the accordion. All accordions are closed by default. You can set a specific toggle to be open if you want. The Toggle Opened option lets you select which toggle to open by default. Set the icon alignment, change the size, choose an open icon, and choose a close icon.
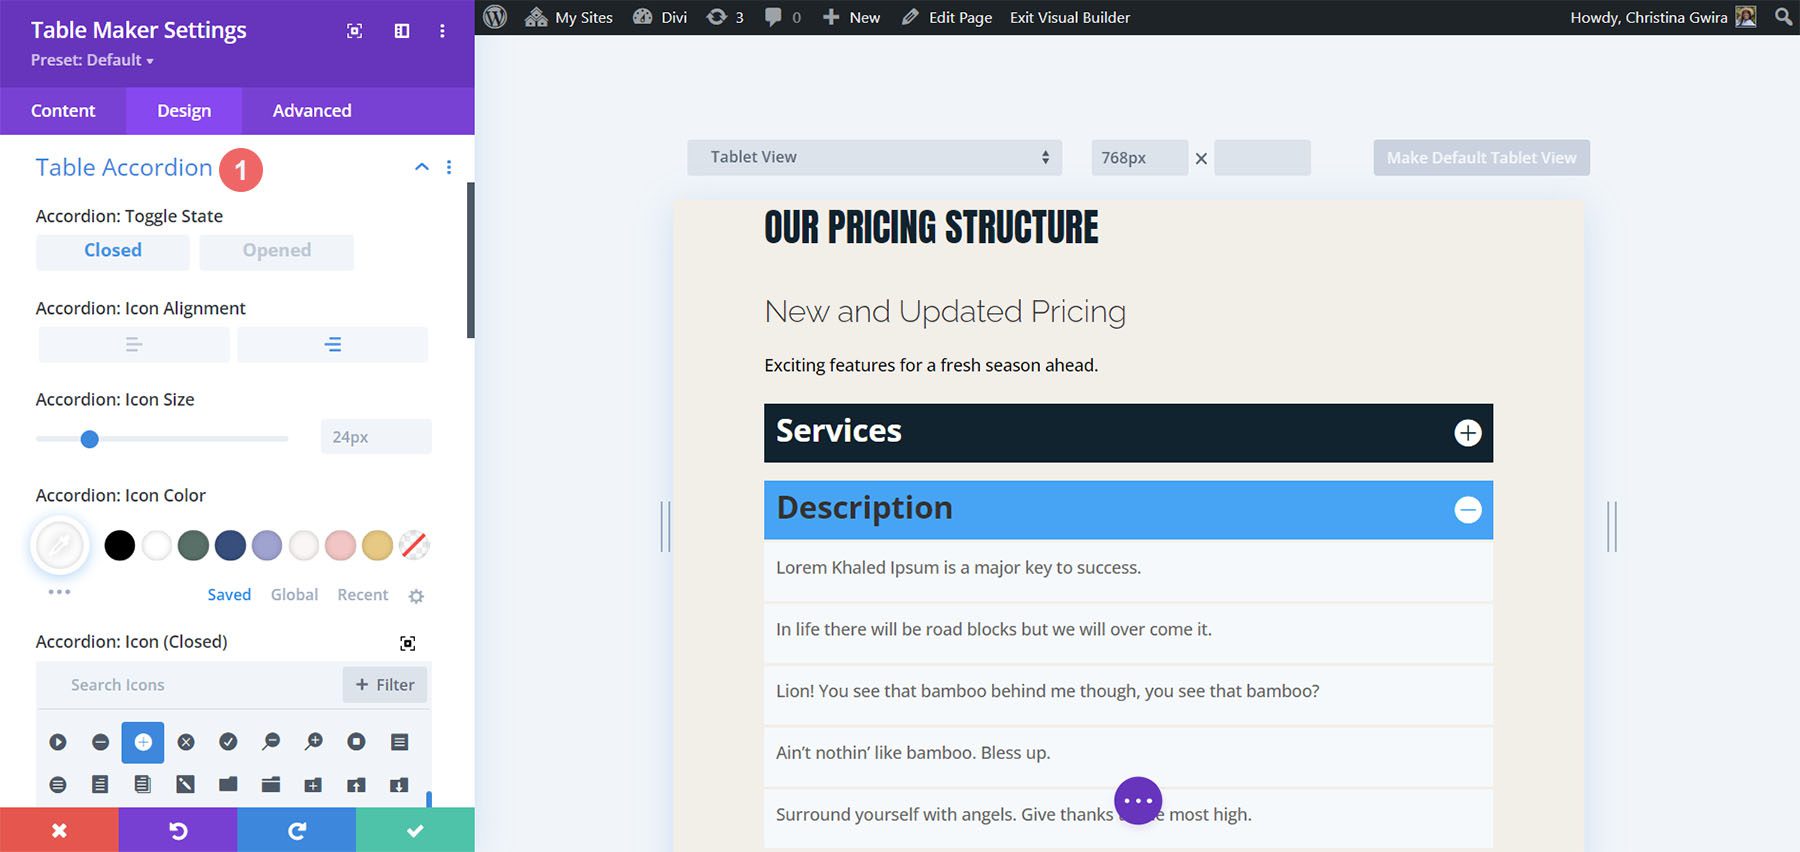
Table Frame
The Table Frame options let you add gaps or lines to the cells, choose a border type, change the border color, and change the line width. In this example, I’ve selected the lines style, and changed the color.
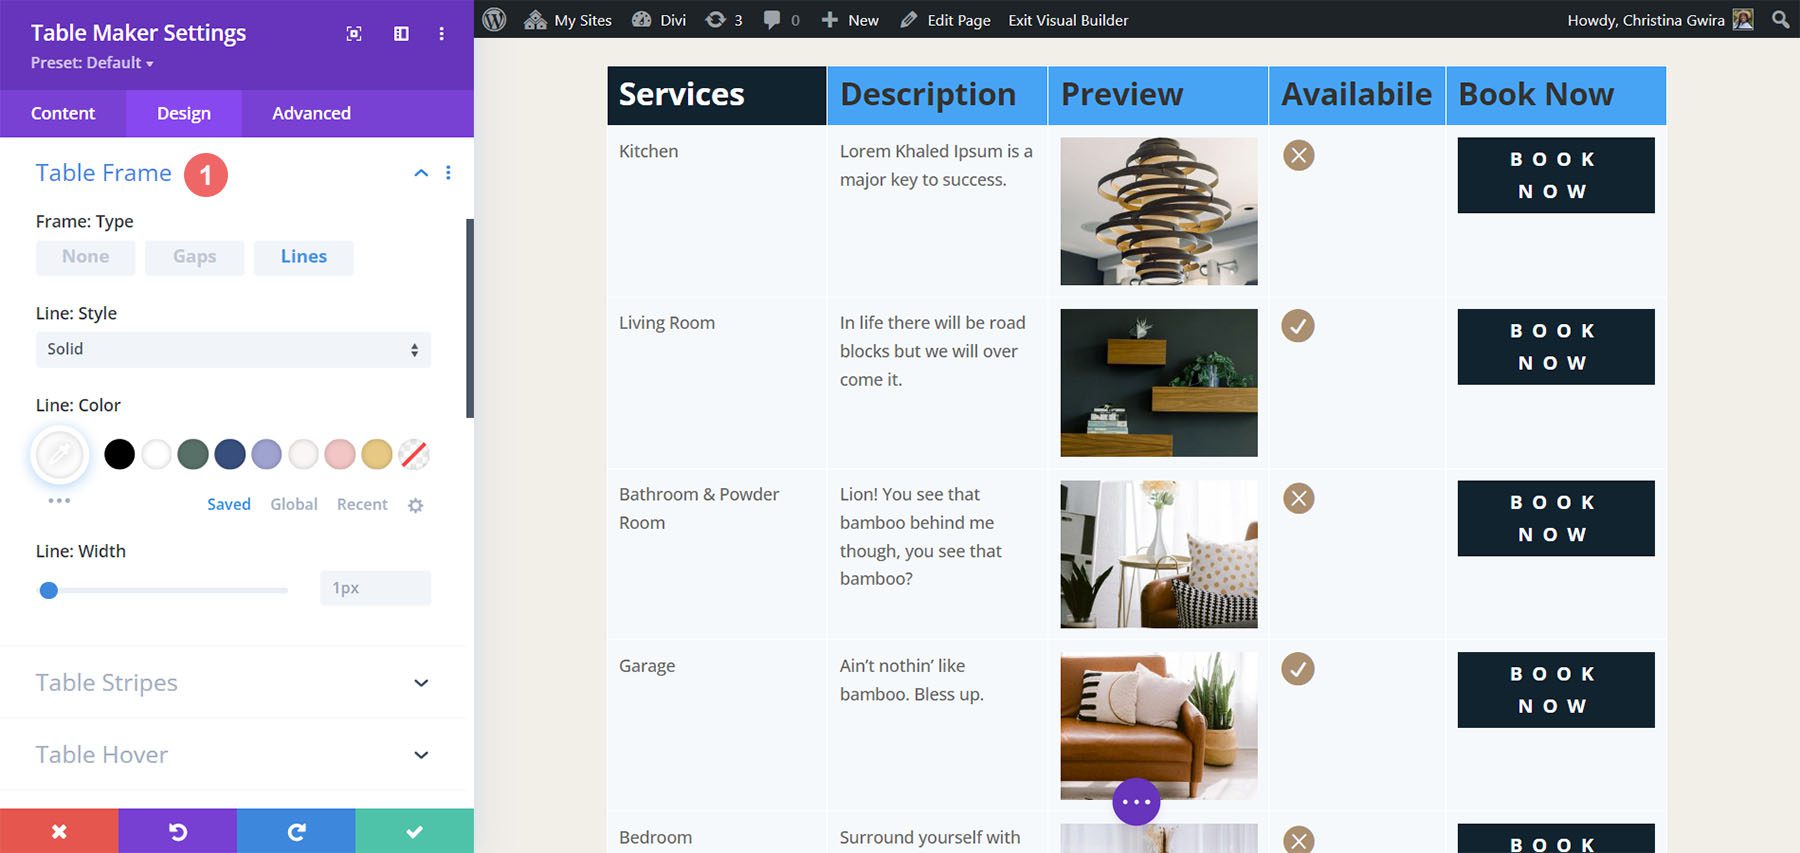
Table Stripes
Table Stripes places stripes behind the odd or even fields and can be horizontal or vertical. You can choose the field types that include the stripes and choose between odd and even rows. Stripes can now be a tint, a blended color (which includes the tint), or regular color options. The responsive size can go in a different direction, or you can disable them. Apply the stripes to the table body, column header, column footer, row header, and row footer individually.
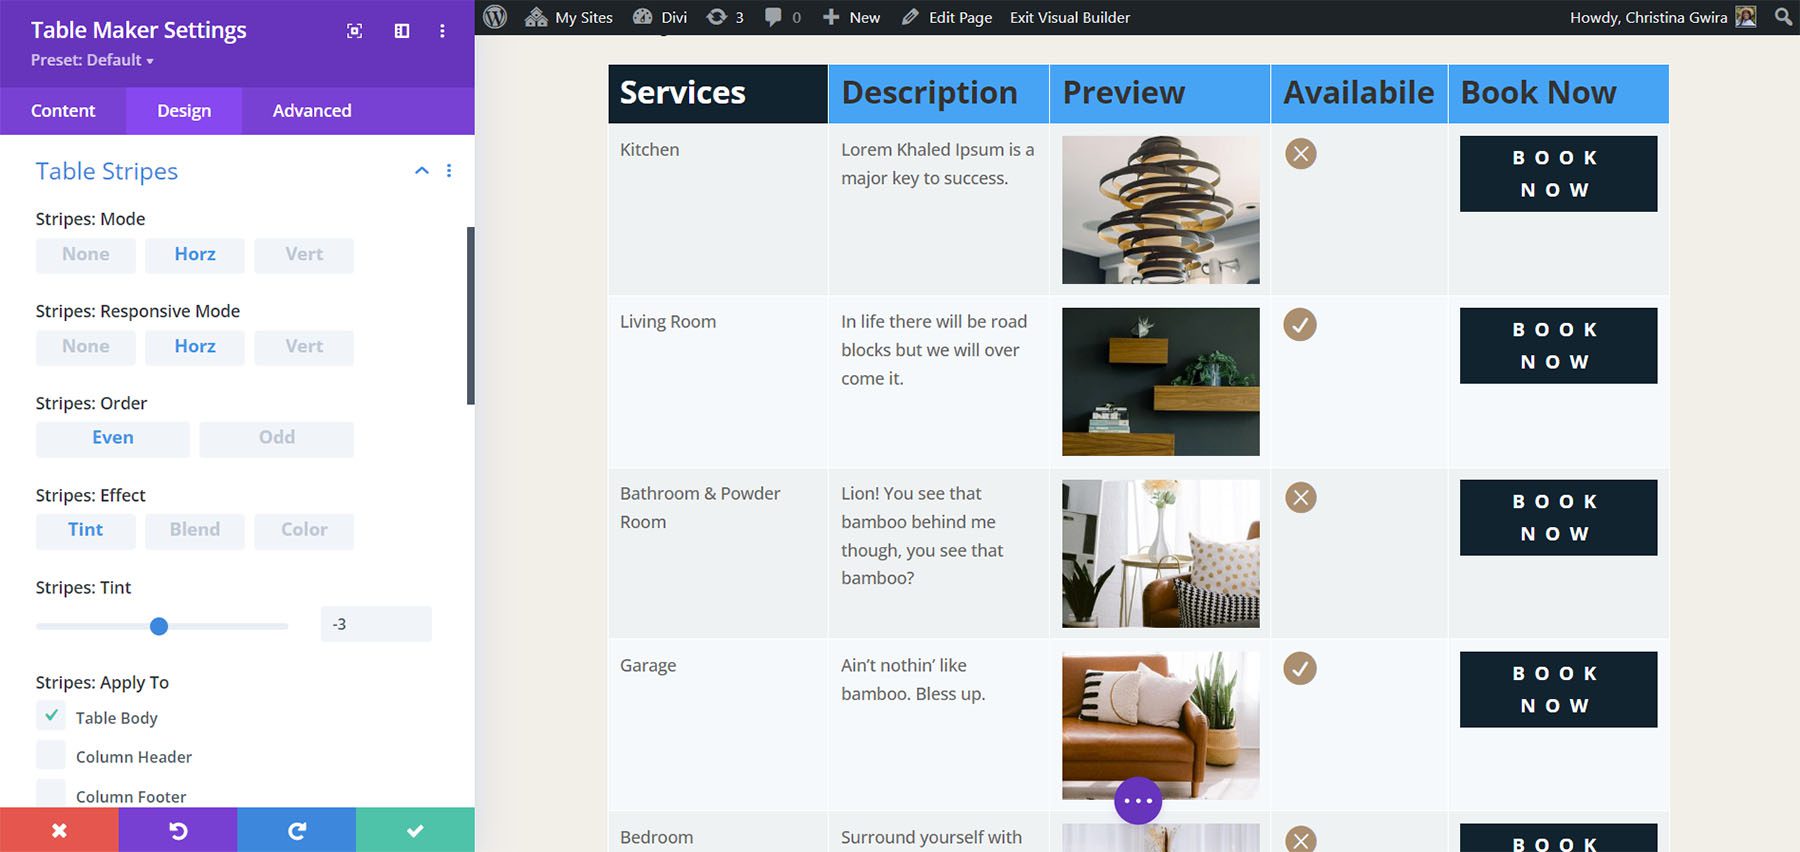
Table Hover
Table Hover is a new setting that highlights a row or column as you hover, so they can be horizontal or vertical. The responsive size can have a different direction or none. You can also adjust the color. Choose from tint, blended color, or solid color. In the example below, I’ve selected horizontal and color. I’m hovering over the second row.
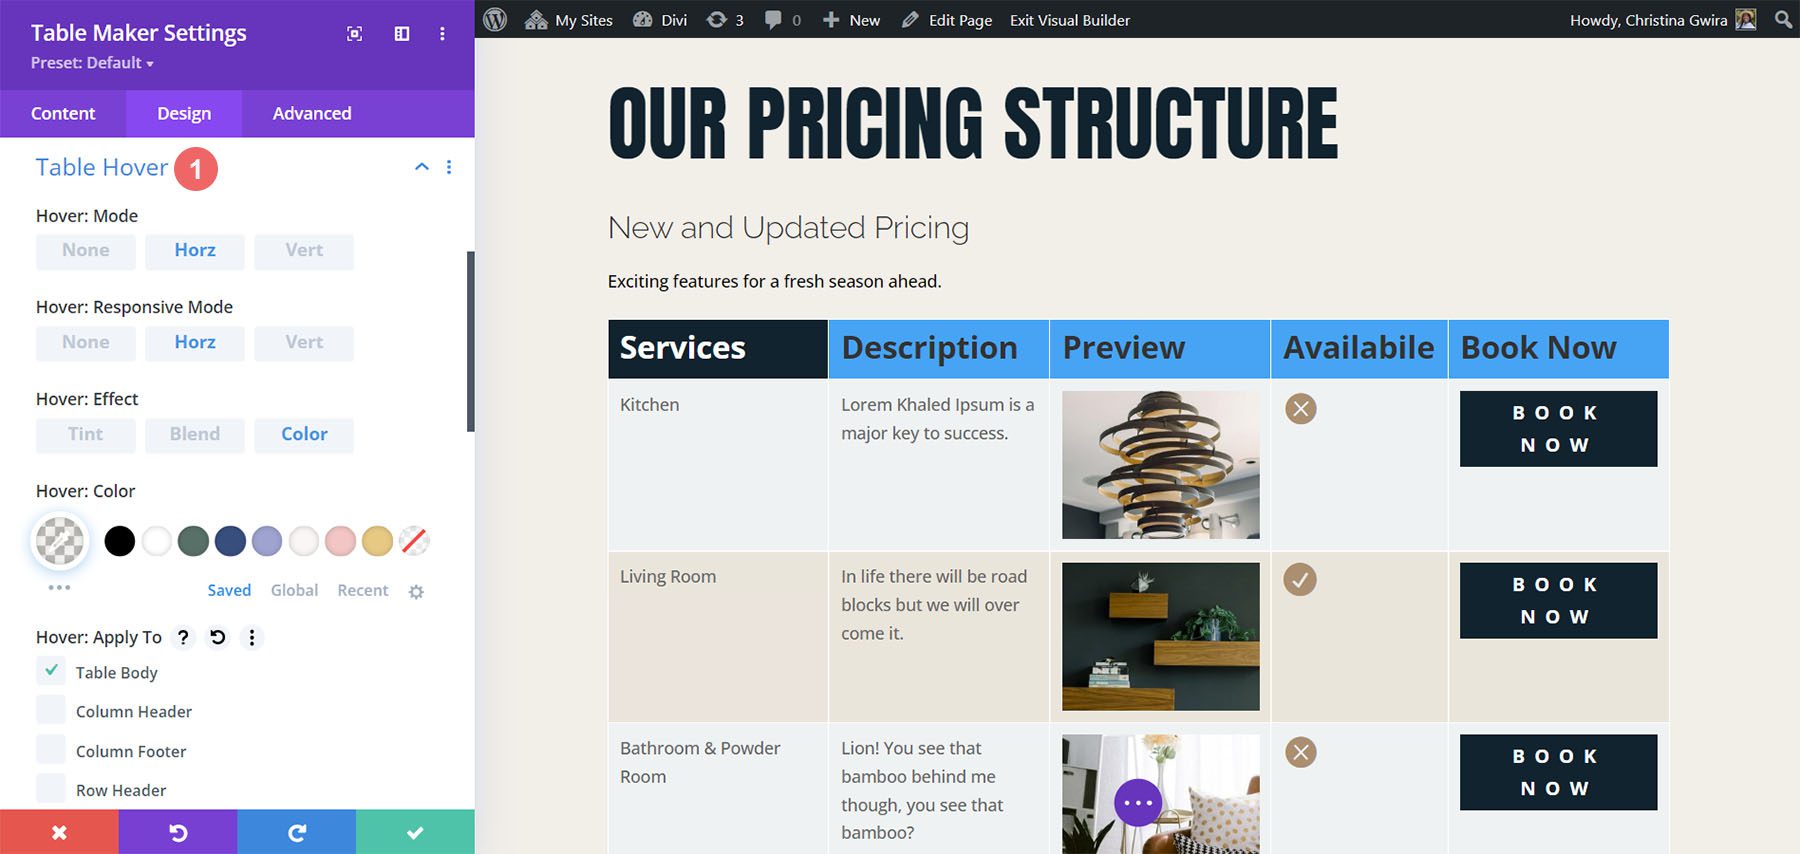
Table Text
Table Text includes all the standard text options and adds a wrap feature, giving you control over how the text behaves. In this example, I’ve set it to wrap, and changed the font family, text color, and font size.
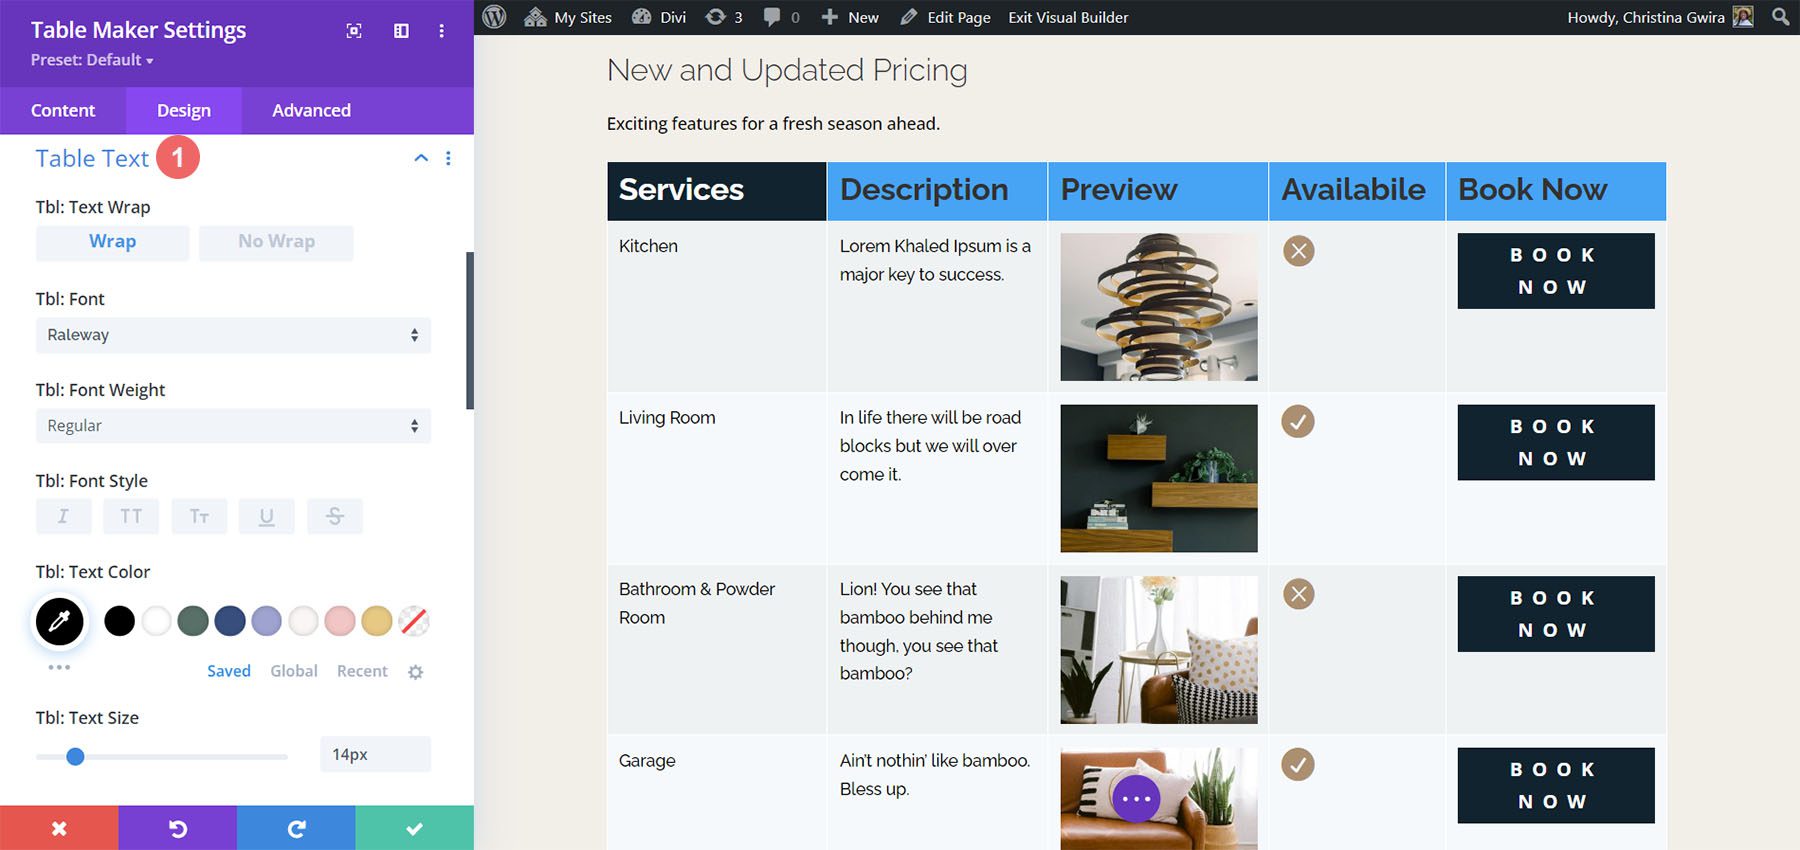
Table Cells
The settings for Table Cells let you change the background color of the cells, set the text alignment for vertical and horizontal alignment, add padding, customize the border, and add a box shadow.
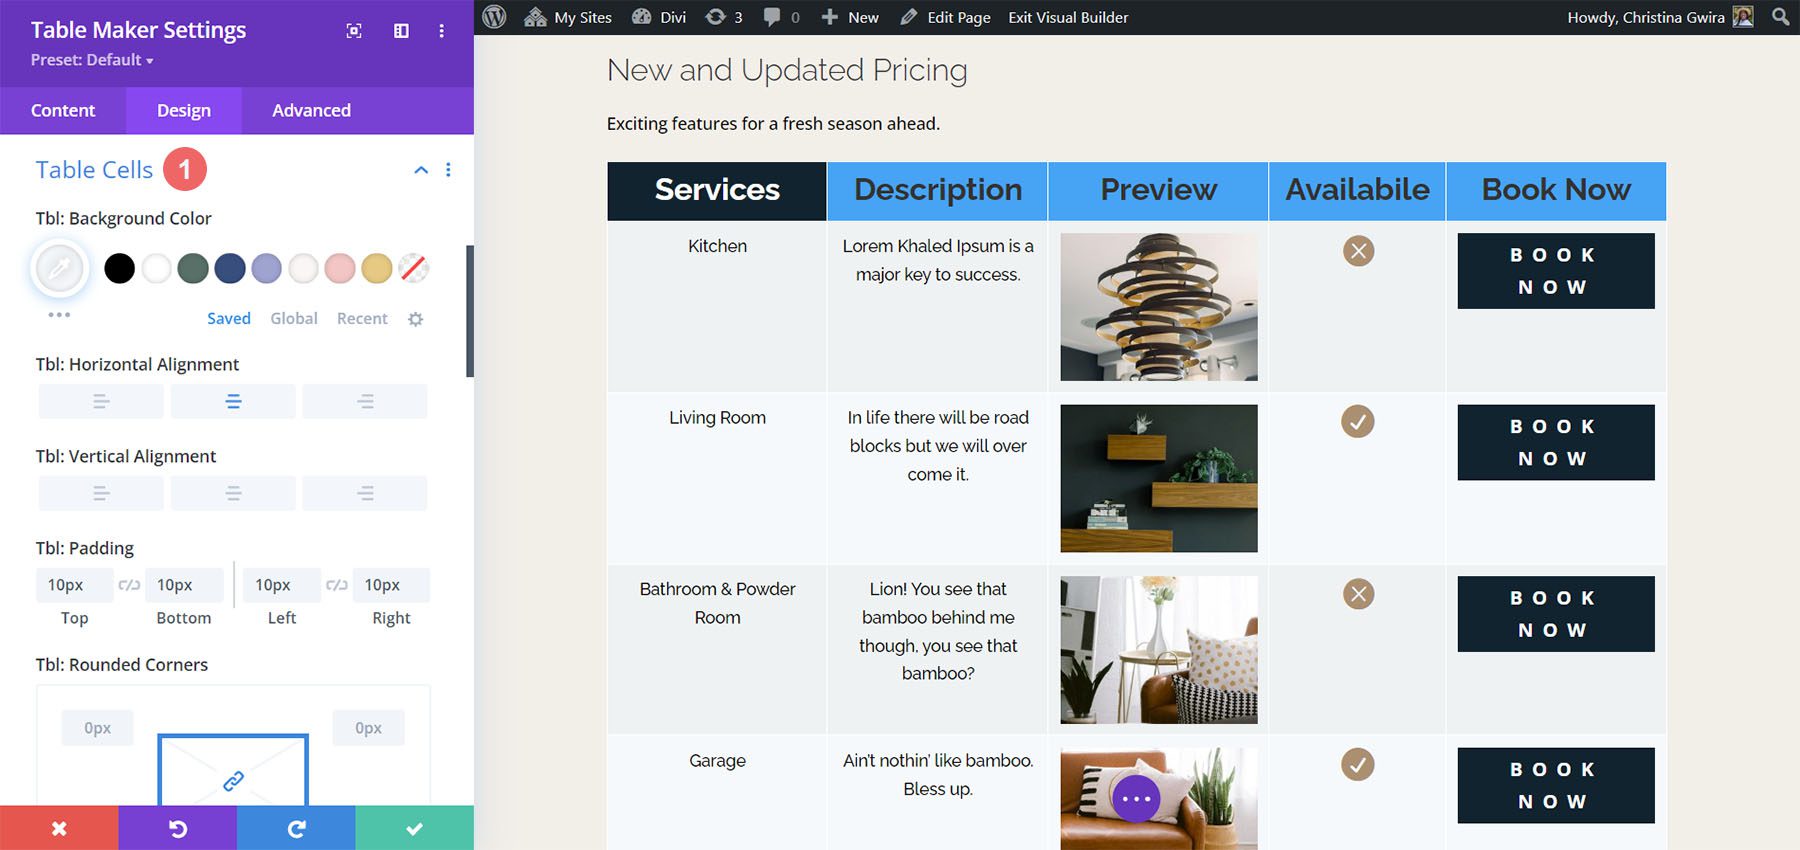
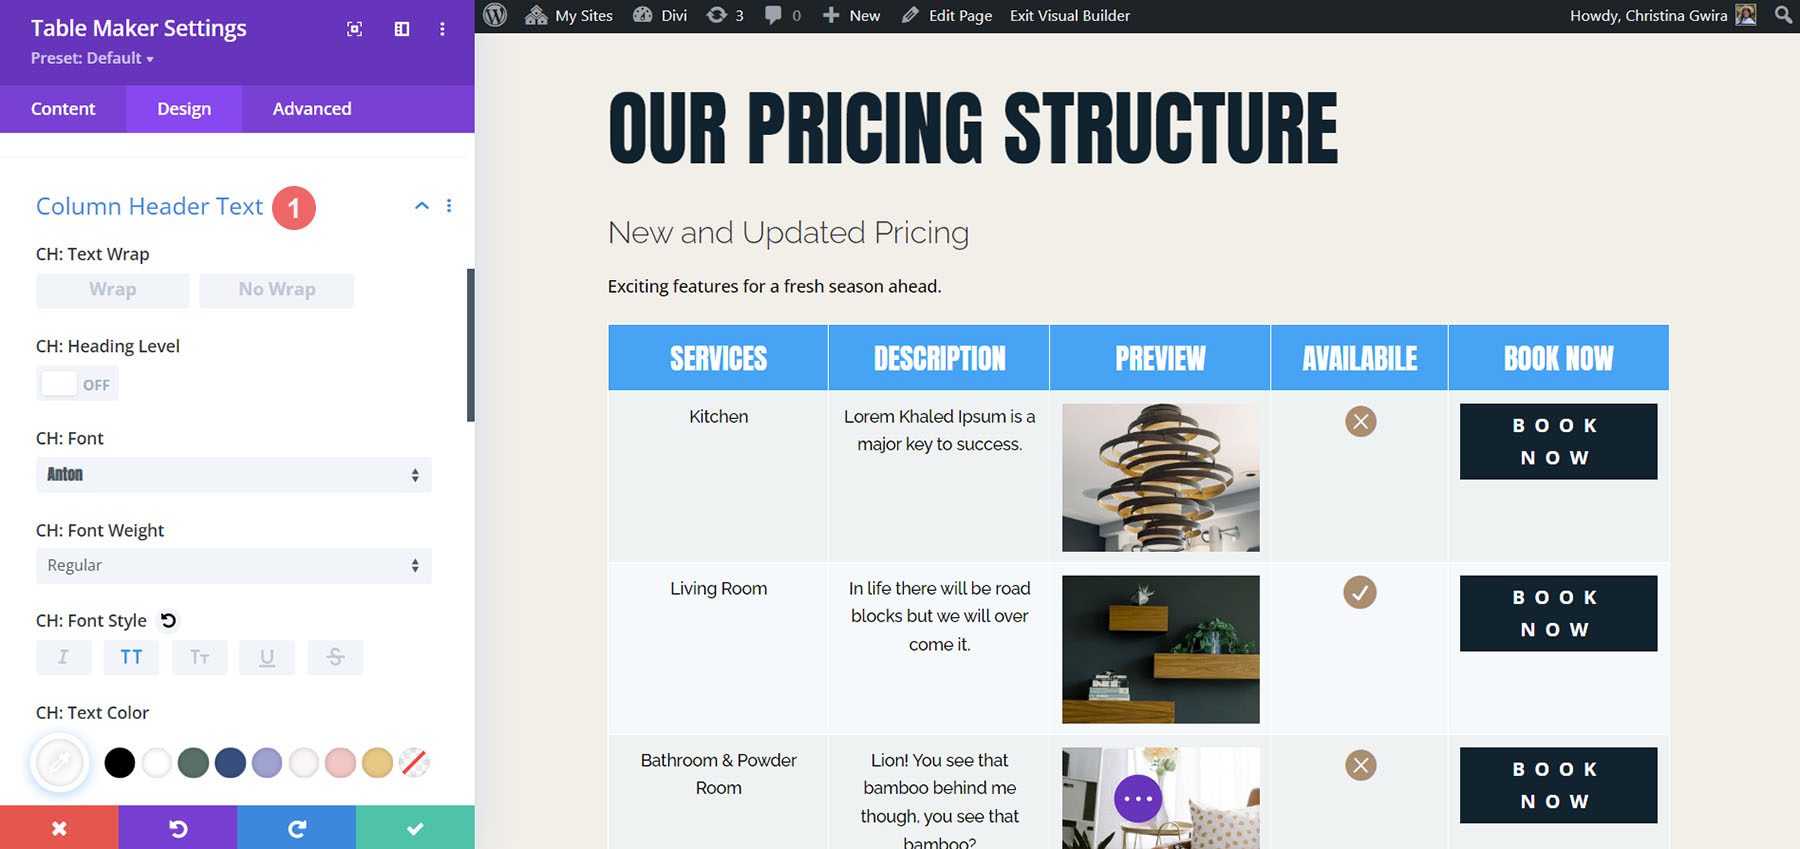
Table Maker Column Header Text
Originally, the row and column header text were wrapped in header and bold tags. This did cause problems with accessibility readers. Now, the setting is off by default. You can turn it back on if you have issues with older tables, but it’s better to leave it off and style the text with the settings provided by Divi Table Maker. For this example, I’ve made capitalized the titles, increased the line height, increased the font size and ensured that the inline styling has been removed.
Column Header Cells
Column Header Cells adjusts the background color of the heading cells. It includes the standard cell settings. I’ve adjusted the background color in this example.

The Column Footer Text adjusts the text in the footer. It includes all the standard settings.
Column Footer Cells adjusts the cells for the footer. It includes all the standard settings. I’ve adjusted the background color, border color and border style, and border width in this example.
Row Header Text
Like the Column Header Text, Row Header Text also has the heading level disabled by default to improve accessibility. The row header is on the left. It also includes the standard font settings. In this example, I’ve added text wrap, changed the font family, updated the font style, and adjusted the text color and line height.
Row Header Cells
Row Header Cells controls the background of the cells used for the row’s header. In this example, I’ve adjusted the background color, plus both horizontal and vertical alignment.

The Row Footer Text settings adjust the text for the row footer, which is on the right. In our example, the row footer holds the Book Now buttons. So the example of the row footer text would be in the very last cell of this table.

The Row Footer Cells settings control the cell used for the footer row. I’ve adjusted the background color, horizontal and vertical alignment.
The Updated Layou with Finished Table
This is the updated Service Page Layout with the fully styled Table Maker module, coupled with the FREE Header and Footer Template for the Home Remodeling Layout Pack.
Purchase Table Maker
Table Maker is available in the Divi Marketplace for $39. It includes a 30-day money-back guarantee and one year of support and updates.
Ending Thoughts
That’s our look at Table Maker for Divi. This is a powerful table-making module. The latest update adds lots of new features. The new accessibility updates allow tables made with Table Maker to pass Google’s Lighthouse accessibility audit. You can make any size table and add just about anything to a cell with tags. Add HTML, CSS, shortcodes, iFrames, and more. Style the cells for the entire table at once or style them individually. The responsive tools make the tables look great on any device. If you’re interested in a powerful tool to create tables in Divi, Table Maker is a great choice.
We want to hear from you. Have you tried Table Maker for your Divi website? Let us know what you think about it in the comments.


Hey,
Is there anyway to omit the vertical line that divides the columns when using the table frame option?
Ohhh was what I needed for my website, it is not so easy to find a plugin that makes responsive tables.
Another great feature, I’m sure I will make use of this on my latest project
John,
Here you go…
https://www.elegantthemes.com/marketplace/table-maker/
How about giving everyone a link to find the Table Maker?
Up!
Table Maker looks like a winner. I’ve used TablePress in the past but it doesn’t have the features of Table Maker. The ability to use TP inside the Divi Builder should make this a go-to for Divi tables! Can’t wait for a project to try it on.
There is no comparison to TablePress. TablePress provides full function spreadsheet /interactive data deliverables, that you can use on your website including data functions. TableMaker is a DIVI plugin specifically for HTML tables i.e. not comparable. There is no data function. Also you cannot deliver data (interactive data) just flat tables. In other words it is strictly design and tables is used specifically in the HTML sense, not in the larger sense that includes both design/style and data. To say TableMaker doesn’t have the features of TablePress may in some way be true (for example it is not a divi plugin) but is a gross misrepresentation. TablePress is a feature packed tool based upon very mature code (that exists outside of the WordPress universe) that has outstanding capabilities to deliver interactive data to websites. If all you want is a way to setup table layouts in your divi pages, TableMaker may be better for you. I just wanted to address the disregard for TablePress which in my opinion is a great tool. I have no stake in TablePress other than having used it.
I fully agree, TablePress has a lot to offer. I use especially the import functionality a lot and yes, TablePress is also Responsive.
TableMaker seems to be good for static content. The fact that you have to code for formatting cell content makes it not very attractive for the end user.
Paul,
I don’t disagree with your comments. Just to clarify, when I said TablePress doesn’t have the features of Table Maker I was referring to the ability to use Table Maker in the Divi Builder. I should have been more clear in my comments. Certainly didn’t mean to disregard TablePress which is a wonderful plugin.
Chuck
Hi Paul. This is David, the maker of Table Maker. Good on you for defending TablePress. 🙂 As you rightly point out, TablePress has many features that Table Maker does not, and it was never my intention to try to complete with it. As I mentioned to Stanford above, my intention for Table Maker was for it to be more of a display table, rather than a data-driven table. Table Maker focuses on providing as many styling options as is reasonable and providing the ability for Divi users to build tables directly within the Visual Builder, something that Divi lacks, until now. Kind regards, David.
Hello, I may be asking too much, but is there a way to upload/connect an excel file that populates the custom table I create in Divi?
Hi Stanford. This is David, the maker of Table Maker. No, Table Maker doesn’t have the ability to import data, either by file or dynamic content. It was always my intention for Table Maker to be more of a display table rather than a data-driven table. This is partly because Divi just doesn’t have appropriate interface elements to allow for building such a complex module but also because there are already excellent exisiting plugins out there for doing such things… see Chuck Hersey’s comment below. Kind regards, David.