
")
Over time our blogs and websites tend to grow. When that happens we find ways to add on to our sites. One of the greatest things about WordPress is its expandability. You can turn your WordPress site into almost anything you can imagine (and even some things you can’t image).
Some expansions are small. They add a single feature. These are usually easy to implement without any harm to the site. Other expansions take your site into a new direction. They add full e-commerce, or integrate your site with a forum, adding code to your theme to add sidebars, using an auction plugin to make a site similar to eBay, and so much more.
Unfortunately, this expandability is also one of its dangers – if you aren’t careful you can break your site. These kind of expansions will need testing and adjusting. They can make your site look broken and give your visitors a bad impression.
It is easy to add features. Little things can make your site sparkle. You can install things that your visitors are used to seeing everywhere. They may not even notice that the features are there, but they do notice when they’re not. For example, bread crumbs, social sharing buttons, search boxes, forums (bbPress), your own social networks within your site (BuddyPress), accordions, and more. You can even make changes under the hood with SEO, security, and improvements to the visual editor. And the list goes on.
You can add features to your WordPress site through:
- Plugins
- Adding code to your theme
- Adding code to your widgets
- Adding code to your CSS
In this article we want to look at ways to expand your site safely, without breaking it. We will look at how to stay safe, and then we will look at some examples. Before you make any changes to your site, make a backup.
Make a Backup Before Making Any Changes
First things first. Always have a recent backup before you start expanding your WordPress site. Here is a look at what needs to be backed up and why.
Database
Some expansions might make major changes to your database. Before expanding your site make a backup of your database.
Theme, CSS, Files, etc.
If you have made modifications to your theme, such as modifying your header and footer files, CSS styles, and any changes to your PHP files, you will have to re-implement them if they’re not backed up when you perform a restore. Depending on your modifications, this can take a lot of time and effort in coding and debugging.
Performing a Backup with Plugins
There are lots of plugins available for backing up your WordPress files and database. Let’s look at one called UpdraftPlus.
UpdraftPlus Backup and Restoration
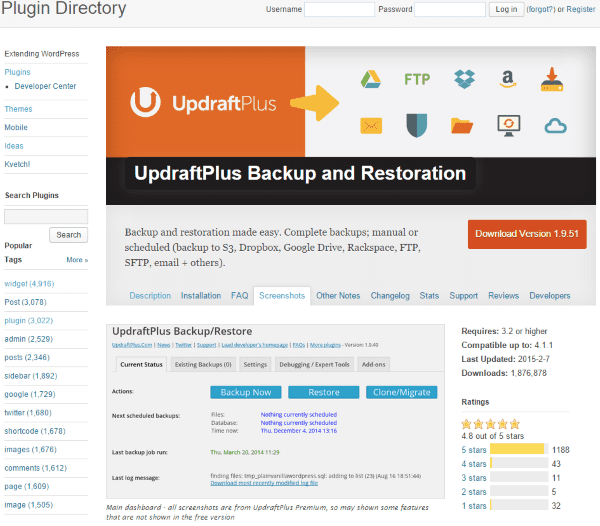
UpdraftPlus is a free plugin that will let you manually and automatically backup and restore the files and databases of your WordPress site. You can back up to the cloud (Amazon S3, Dropbox, Google Drive, Rackspace Cloud, DreamObjects, FTP, SFTP, SCP, WebDAV, OpenStack Swift and email) and restore with a single click. You can backup files and database on separate schedules.
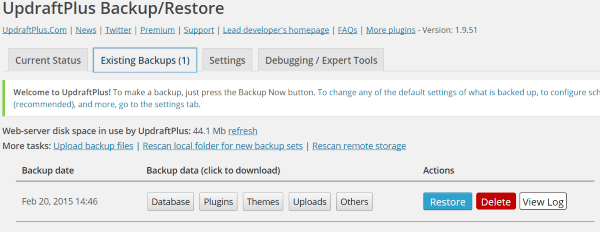
Here’s why I like UpdraftPlus. After hitting the Backup Now button and waiting for the backup to complete, I clicked on the Existing Backups tab where I can restore my database, plugins, themes, uploads, and others, independently of each other. This isn’t the only plugin that does this, but this is a great feature that saves you time if you just need to restore a theme.
At almost 2 million downloads and a rating of 4.8 of 5, UpdraftPlus is one of the best WordPress backup plugins.
Use a Test Server
I might be crazy, but I like the idea of testing and debugging on a separate WordPress installation before moving the updates to my live site. There are two ways you can do this:
- A WordPress installation on another domain.
- An offline test server.
An offline test server is your best bet. This lets you make changes on a clone of your website and work out the bugs and make any tweaks you want to make before making the changes to your live and running website. When you’re ready, you can move the changes to the live site.
Moving the Changes to the Live Site Using Maintenance Mode
Once you have all the bugs worked out it’s time to move the updates to the live site. There still could be some problems and your site could still need some set up and adjustments before it’s ready for visitors to see. The best way to do this is by scheduling some downtime. Let you visitors know ahead of time when your site will be down. Let them know when, why, and for how long. Plan ahead and try to be as accurate as you can. Then once you’re ready, put it in maintenance mode. One way to do this is by using a maintenance mode plugin such as Anticipate.
Anticipate
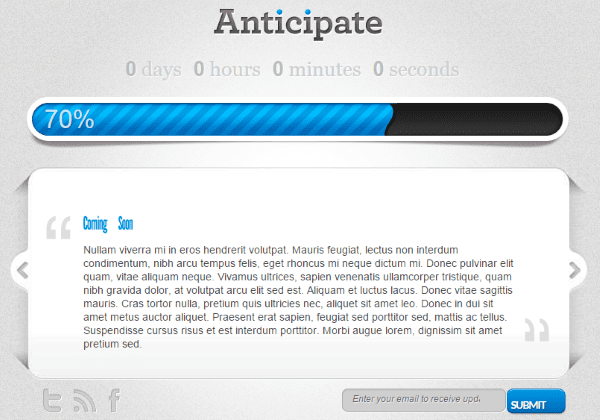
Anticipate is ET’s maintenance mode plugin that hides your site and displays a message to your visitors. They will see a countdown, a progress bar, a message, social networking links, and an email submission form. You can use your own logo. Visitors can shuffle through any of the pages that you’ve supplied for the slider area. This is a great way to let visitors know that you’re performing some updates and gives them a way to follow you and get updates through email. Any users that are signed in will see the regular site as it is. This way you can see the affect that any changes you make have on your site.
Anticipate is part of the $89 per year Developer plan. It includes access to all themes and plugins, perpetual updates, premium support, and layered Photoshop files.
Quick Tip About the Other Maintenance Mode
When you update a plugin or theme, WordPress goes into maintenance mode. If your site doesn’t finish an update it could get stuck in maintenance mode. When you go to your site you will see this error message instead of your home page or your dashboard:
Briefly unavailable for scheduled maintenance. Check back in a minute.
There’s a good chance this message will still be there no matter how long you wait. This kills both the front end and back end. This means you can’t run your restore plugin from the backend. Fortunately this is easy to fix. Here’s one way to fix it using FTP. For this example I used FileZilla.
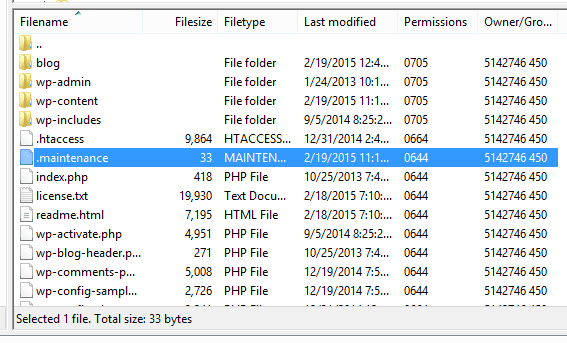
Using FTP, log in to your site and go to the main folder for the site itself. This is most likely the first folder you see when you log in. Scroll down until you see a file named .maintenance. Highlight it and delete it. Now you can go back to your site and access both the front end and the back end. Just be careful what you delete. There is a great potential to delete files that you need.
Plugins and Widgets
Most expansions are done with plugins and widgets. With so many ways to improve and expand WordPress, and with so many WordPress updates, there’s bound to be at least one plugin that doesn’t do what you expect. Not every plugin is fully compatible with your theme and other plugins. With so many choices it’s hard to know exactly what will work the best for you. We often try several in an experiment to help us make our choices.
It is easy to grab a plugin and click the activate button. Unfortunately, this doesn’t always give the results you might expect. Probably most of us have installed a plugin and went to see our home page only to see a white screen with an error code and a string of code across the top. You can use FTP to delete the plugin if needed. Here are a few tips on how to avoid this problem.
Some Quick Tips About Plugins
Pay attention to the reviews and the date that a plugin was last updated before installing it. As an example, if a plugin has a lot of reviews, check the latest round of reviews. It could have 500 5 star reviews and five 1 star reviews. If the 1 star was because it doesn’t work with the latest version of WordPress, then the 5 stars are irrelevant. The same goes the other way. The 1 stars are irrelevant if the problem they had has been resolved. None of this matters if it hasn’t been updated in a year.
Check the recent conversations to see if anyone is having issues with the plugin and if they’re getting the support they’re asking for. If the last response from the programmer was over a year ago and users are still having problems it might be a good idea to skip the plugin and look for another option.
Check your WordPress installation after every plugin you install. This will help you figure out which plugin has caused a problem.
An Example: Adding a Store with WooCommerce
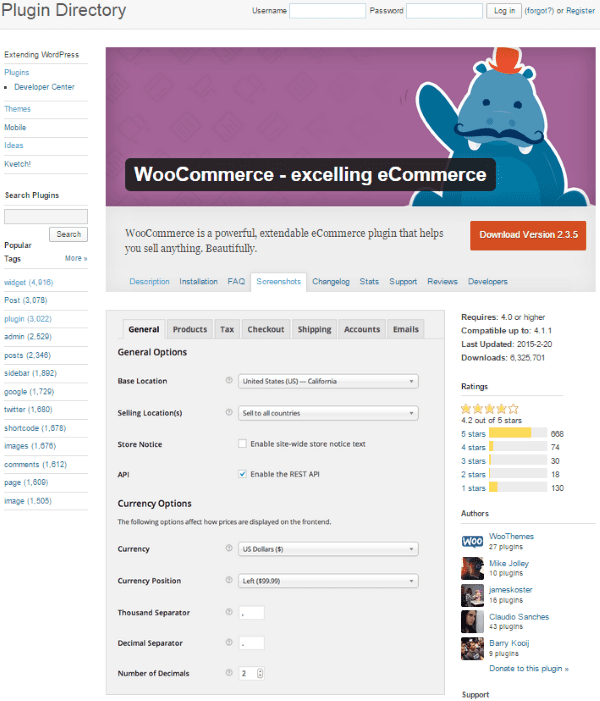
In this example, we’re expanding a WordPress website by installing WooCommerce. Simple enough, right? You just install the plugin and you can start selling your products, right? So here’s the thing: WooCommerce doesn’t come set up the way you need it to. It comes with British pounds as the default currency, it doesn’t have your shipping options set the way you want them, it doesn’t have the shopping cart set up with your accounts, and the most obvious… it doesn’t come with your products uploaded into your inventory list.
That’s a lot of things to set up, and that doesn’t even cover it all. That’s just what I rattled off the top of my head. Why does this matter? Well, none of your buying options would work, and if they did you could have buyers placing items in their shopping carts before you get your prices and inventory levels correctly set. Also, your site will look broken until you get everything completed. Your inventory will look bare. Suffice it to say your visitors might find your site aggravating. That’s not what you want.
As soon as you install WooCommerce, a link to the shop and a shopping cart will appear on your home page. Your visitors will be clicking on these only to find that your site doesn’t work.
WooCommerce actually has a lot of adjustments that have to be made before your site will be in working order. This will take some time. It’s not something that can be done in just a few minutes, especially if you have a lot of inventory.

In order to keep your site from looking broken, and to keep from working incorrectly because it is still untested, perform the install on a test server, test site, or place your site into maintenance mode.
Adding Code to Your Theme
Themes can be expanded by adding code. You can add features such as banner ads, new widget areas, footer areas, modify the CSS, and much more. Code is a picky beast. It doesn’t care what you meant to type. It only knows what you did type and it doesn’t even care if it works or not. It’s way too easy to place code in the wrong location or to leave off an important portion of the syntax.
If done incorrectly you might see something like this:
Parse error: syntax error, unexpected T_ENCAPSED_AND_WHITESPACE, expecting T_STRING or T_VARIABLE or T_NUM_STRING in /home/content/Sample/html/example/wp-content/themes/twentyfourteen/functions.php on line 64
To avoid any unforeseen issues it is best to try out your code on your test server first.
Try Code Before Running on Your Site
You can test your code online to help you work out the bugs. One such example is WriteCodeOnline.
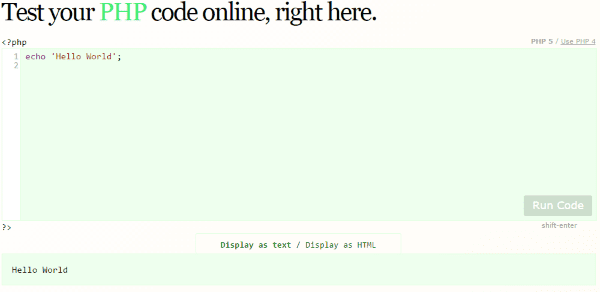
Here you can type in your code and hit run. It will test PHP5, PHP4, and JavaScript.
There are plenty of other options online. Just type test code online in your favorite browser and you’ll find what you need.
Some Quick Tips About Themes and Handling Code
You can add features to your theme but you don’t want to add them while visitors are on your site looking at your content. Whether you’re tweaking your CSS, adding things to your header or footer, are adding sidebar areas, you want to make the additions on a test server first. Once you have all the bugs worked out and the theme looks and works the way you want it to, move the changes to the live site.
WordPress doesn’t know what you meant to type. It can only follow the instructions you give it.
Make sure code you copy from tutorials are for your database, WordPress, and PHP version.
Test code that you copy. Anyone can make a typing error in their code.
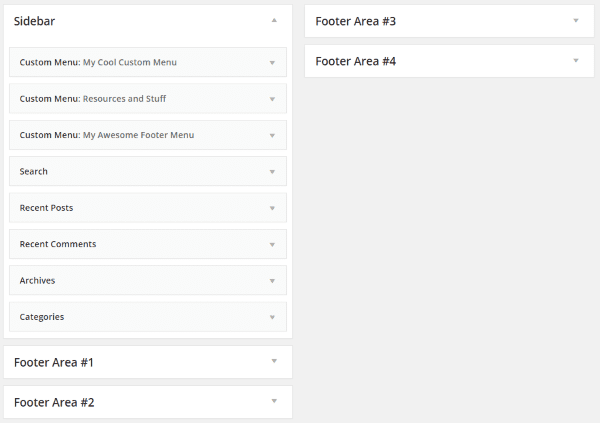
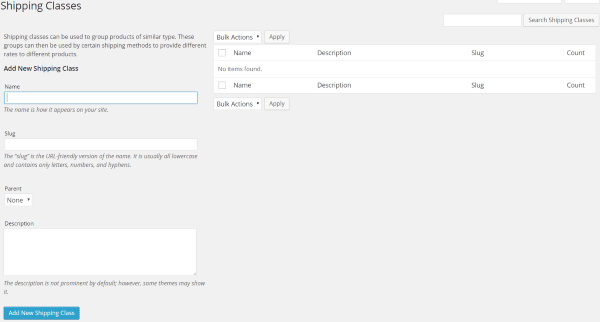
There comes a time when you just have to have another sidebar. This can happen if you want to expand the functionality of your current theme or if you change themes and you need to add a sidebar in order to maintain your current number of sidebars. You can expand your site by adding a sidebar using PHP.
You can use PHP to register more than one sidebar. In wp-includes/widgets.php you find the function-definition for register-sidebars(). You can use this to make a custom function within your theme-folder (functions.php – if you do not have this you can create an empty php file by that name).
Here’s the code:
<?php if ( function_exists ('register_sidebar')) {
register_sidebar ('custom');
} ?>
<pre>
In this example from the WordPress Codex, ‘custom’ is a sidebar file called sidebar-custom.php. Sidebars get indexed in your WordPress database with your default sidebar (sidebar.php) being indexed as 1. Every sidebar will have an index higher than 1. Once registered they will appear in your sidebar area.
You should be able paste in this code and your theme will have an extra sidebar area to drag and drop widgets to. If it works perfectly your visitors won’t even know that you’ve made a modification until your place a widget in the new sidebar. However, if something goes wrong your site could be down and your visitors will see an error message instead of your site.
To get around problems like this, try the code out on your test site first. Once you’re satisfied that it’s working like you intend, carefully paste the code into place. Have a recent backup ready, just in case.
CSS, Styles, and Your Visual Editor
With CSS you can modify the fonts on your site. You can add new font styles and sizes, new colors, etc. Not all modifications are on the front end. There are plenty of ways to expand your WordPress site on the back end. These can be done with plugins and code. The same cautions and testing applies, however the results might not be the same. You can expand the back end without your visitors being any the wiser, however you can still bring your side down if code is not handled properly. Adding features such as colors and styles can be easy to do, but you don’t always know how they will look until you test them.
One such expansion is to add styles to your visual editor.
TinyMCE Custom Styles
WordPress’s visual editor, TinyMCE, has an API that you can use to make custom styles that can be inserted into your posts from the Visual editor. This API uses a hidden button called Styleselect. You must activate Styleselect and define your styles that will show in your menu. This code from the WordPress Codex will go in your functions.php file.
Enable the Stylesheet
// Callback function to insert 'styleselect' into the $buttons arrayfunction my_mce_buttons_2( $buttons ) {         array_unshift( $buttons, 'styleselect' );         return $buttons;}// Register our callback to the appropriate filteradd_filter('mce_buttons_2', 'my_mce_buttons_2');
<pre>
This activates the stylesheet pull-down menu in the Visual Editor. You enable to stylesheet by filtering the buttons that are loaded into TinyMCE and add these buttons to the second row.
Registering Custom Styles
Next you have to register your styles by using the style_formats array within your TinyMCE configuration array. You can register each style with several configuration settings.
// Callback function to filter the MCE settings
function my_mce_before_init_insert_formats( $init_array ) {
// Define the style_formats array
$style_formats = array(
// Each array child is a format with it's own settings
array(
'title' => '.translation',
'block' => 'blockquote',
'classes' => 'translation',
'wrapper' => true,
),
array(
'title' => '⇠.rtl',
'block' => 'blockquote',
'classes' => 'rtl',
'wrapper' => true,
),
array(
'title' => '.ltr⇢',
'block' => 'blockquote',
'classes' => 'ltr',
'wrapper' => true,
),
);
// Insert the array, JSON ENCODED, into 'style_formats'
$init_array['style_formats'] = json_encode( $style_formats );
return $init_array;
}
// Attach callback to 'tiny_mce_before_init'
add_filter( 'tiny_mce_before_init', 'my_mce_before_init_insert_formats' );
<pre>
Simple enough for custom coding, but you have to add code to multiple locations. This is not something you should do in a hurry. Just like any code, try it out on a test site or server first and then move the code to the live site.
Wrapping Up
There are plenty of ways you can expand WordPress, but most are either by a plugin/widget, code, or CSS (just to over simplify). Most actual expansions are plugins that add features. Both plugins and themes can be edited using the built in editor, and you can use those to add lots of new features to your WordPress site. However, testing and debugging can break your site, and that’s not what your visitors are looking for. Using offline servers, test sites, code testing, maintenance mode, and backups, you can set up plugins and expand WordPress without breaking your site.
How about you? Have you had any of the experiences I’ve discussed here? Do you have a different solution to expand your WordPress site without breaking it? Did I leave anything out? I’d like to hear about it in the comments below!
Article thumbnail image by Rashad Ashurov / shutterstock.com


Interesting article as it came up when i googled is it good or bad to add www. in front of your domain….do you have any thoughts on this??
I think adding www will increase your chance of higher serp ranking. I tested few top authority sites and found that. It’s my personal view.
This backup plugin seems to be exactly the tool i was looking for !
I recently gave updraftplus a try and it’s fantastic. It lets me put my backups in amazon s3. I suggest you install another copy of WP in a demo site and do your experiments over there in-case something goes wrong. And be cool because you won’t learn anything without making a mistake.
I haven’t tried expanding my site before, in any major way before. But, I am glad I read this. It will make things easier When the time comes.
Soon, I will be selling my health ebooks from my site. Let me bookmark this page to help me with setting up woocommerce.
Thanks.
Woooow!!!! Brenda…… What an amazing writeup . Am happy ma, but sad I left wp for blogger. I’ll come back soon.
I found this blog wonderfullllllllllll I missed my seo settings though
Great advice. I never heard of Tiny MCE Advanced. I will give that a try.
Great basics, these articles should have been around when I started out 🙂
I’m using InfiniteWP to do my backups and updates, but for one website UpdraftPlus is really a great outcome.
Wonderful article! I’ve been using Updraft Plus for over a year now, and I have to agree with everything in this article. It’s easy and convenient to use, and always takes reliable backups. Even the free version comes a lot of options to customize.
Definitely a great plugin for people who don’t want to worry about backups, or spend a lot of time creating them. 🙂
I have been using the free version of UpdraftPlus Backup for a little over a year now and can attest to its usefulness – very easy to use and I really like that I can save my backups to Google Drive. I actually had to use a backup not too long ago when a plugin ‘broke’ my site. Very easy to restore back to normal!
The secret to modifying one’s site is backup, backup, and backup some more! =)
Thanks for the tips!
A great article, I use Updraftplus all the time, it’s a brilliant plugin. But two things you haven’t mentioned
1) If you are using Updraftplus and coding on a test server, you will need the Migration plugin ($30) to transfer the site to a live server, but it’s well worth the expense.
2) If you are adding code or CSS to an existing theme that gets updated by the original developers, create a child theme first, otherwise any updates will overwrite your code when the theme is updated. A great plugin for that is https://wordpress.org/plugins/child-theme-configurator/
Very useful information. I use the free BackWPup plugin. Had not heard of the UpdraftPlus Backup and Restoration plugin. I will install and check it out.
.
You didn’t mention the staging site option that many hosting companies are now supporting. Is a staging site a good or bad idea?
I just starting using a staging site but I’m still a little uncomfortable that something will not sync properly.
….so I still make a backup just before making any major changes/upgrades.
Any comments on staging sites?
Charlie, lately, I, too have been doing staging. I password protect my staging sites so that search engine spiders don’t accidentally find them. I can relax and make my changes, ensure everything works properly, then upload the entire staging site to the production server and I’m set to go. I use BackupBuddy (not sure it is any better than Updraft) to put an exact copy of my production site onto the staging site. I make my changes, then copy the whole thing to my production site.
Be very careful that both sites have the correct settings when restoring. It is possible for the settings to get confused, in which case you might go to the staging site and log in, but your changes are really getting made on the production site. (Fortunately, the one time I did this it was my own site, not a client’s….) With BackupBuddy, if you are paying any attention at all to what it is telling you as you do the restore, this won’t happen. But if it is late at night and you’re in a rush…
Fortunately, if you do get that all messed up, it is easy to go into the database and fix the URL in 2 places; then all is back to normal except that the changes you made by mistake to your production site will need to be undone.
Another possible dilemma: If you’re working on the staging site for very long, you’ll get comments on your production site. You’ll have to figure out a way to get those comments into the staging site so that they don’t get discarded when you overwrite the production site with the staging site’s database. If somebody knows of an easy way to do this, please reply.
To create a home for a staging site, I just use the option the hosting company offers to create a sub-domain. Then I put the staging site, password protected, in that sub and it works great. When done, you can go in and just delete the sub-domain completely.
Pros have a term for making major changes directly to a production WordPress site instead of doing the staging / moving steps. They call it “cowboying” – the way they say it does not make me think they hold cowboys in as high regard as I do.
It’s very well writen article with very useful info. I will try the UpdraftPlus Backup and Restoration plugin.
Thanks for sharing!
Another great article! Thanks! I always learn something new from your posts.
I like the look of Tiny MCE Advanced as you can do things like alter font sizes for different paragraphs.
Any problems with using this on Elegant Themes themes?
I use TinyMCE Advanced on all my Elegant Theme sites. Never had an issue. It is awesome.
Hi Brenda
I’m afraid that I stopped at “UpdraftPlus Backup and Restoration”
Looks like a fabulous plugin and with a rating of 4.8 out of 5 it looks as though it is highly recommended.
A lot more to read in this post so thanks for sharing.
I great offline test server is DesktopServer. Check it out for free!
Can desktopserver be used as a production server? I am using xampp in production currently and also not sure how easy it is to update the core modules like Apache php, MySQL with xampp.
With you all the way on that Gregg.
I used XAMPP for years but updates where always a problem, no such problems with DesktopServer.