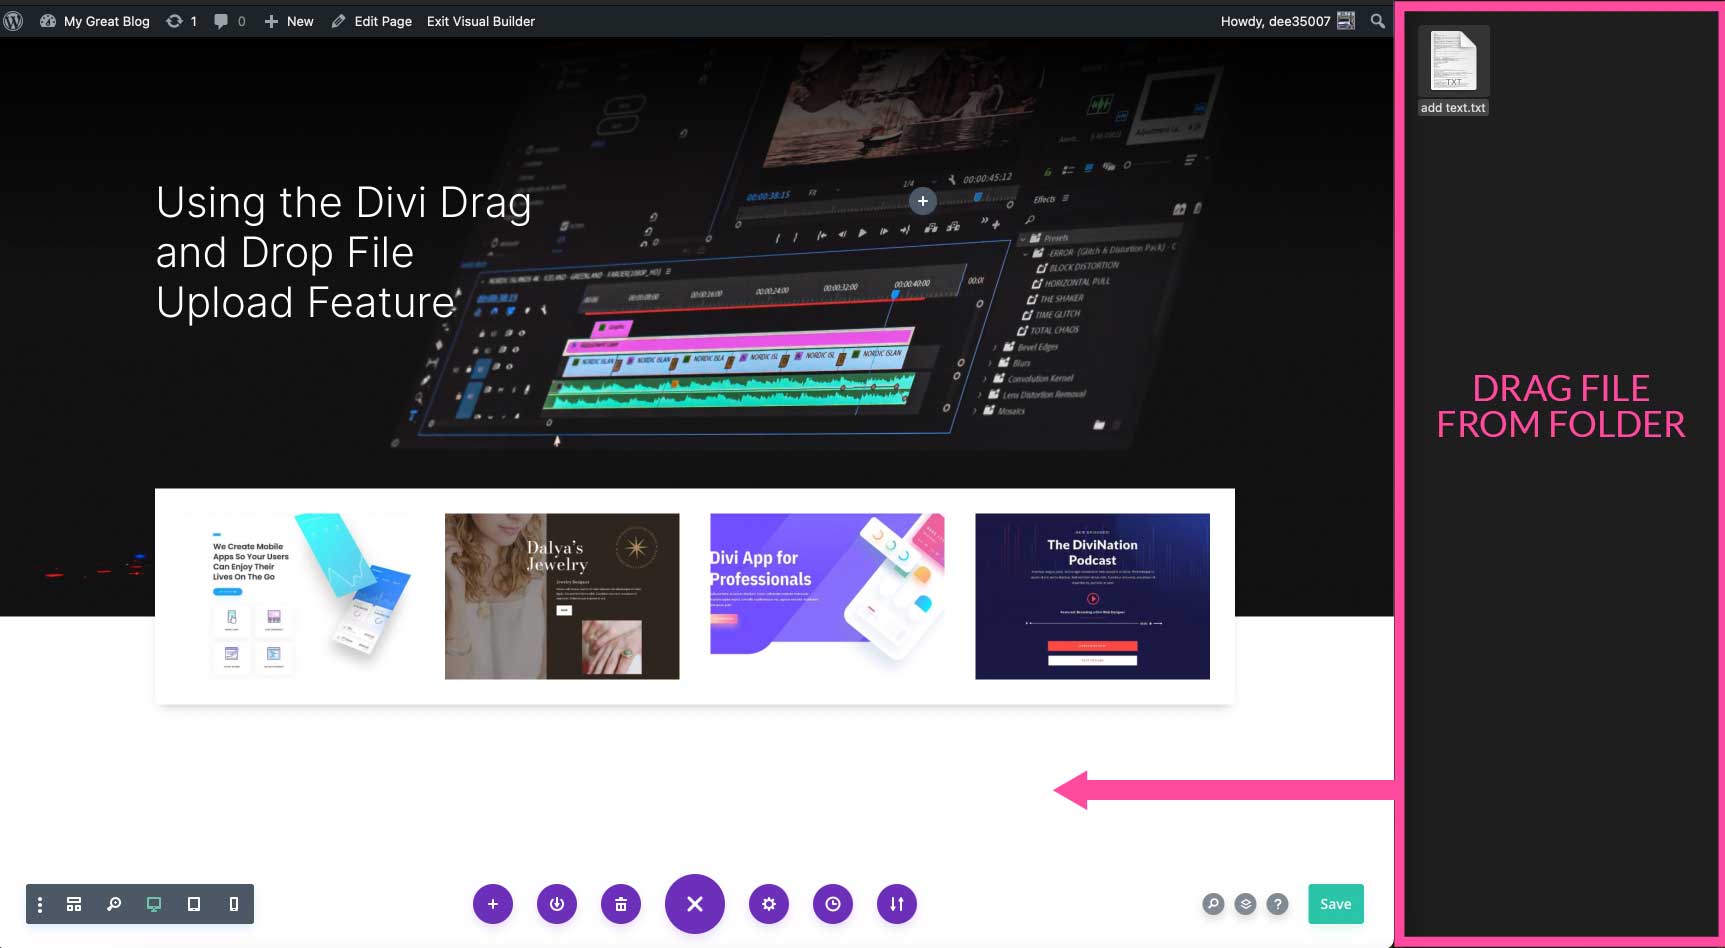
Using the Divi Drag and Drop File Upload Feature
With Divi’s drag and drop file upload feature users can drop image files, as well as text documents, web files, and more directly into any Divi page.
With Divi’s drag and drop file upload feature users can drop image files, as well as text documents, web files, and more directly into any Divi page. Let’s delve into how to use the system, and cover some best practices to make the most out of your Divi experience.
Overview of Divi Drag and Drop File Upload
Building webpages is easy using Divi’s drag and drop feature. You can upload files individually or add multiple files at once. Once the file is dropped into the builder, files convert to modules instantly. This is a huge time saver and is a revolutionary experience for those who are looking to build websites more efficiently. Here is what happens when you drag and drop a file into the Divi Builder when editing your page:
- Divi creates a new regular section with a one column row at the bottom of your page layout.
- Divi Creates a new module and fills it with your file content based on the type of file.
- Divi adds the new module inside the one-column row of the section that was created at the bottom of the page.
- For convenience, the module settings modal will pop up automatically so you can start customizing the design of your content.
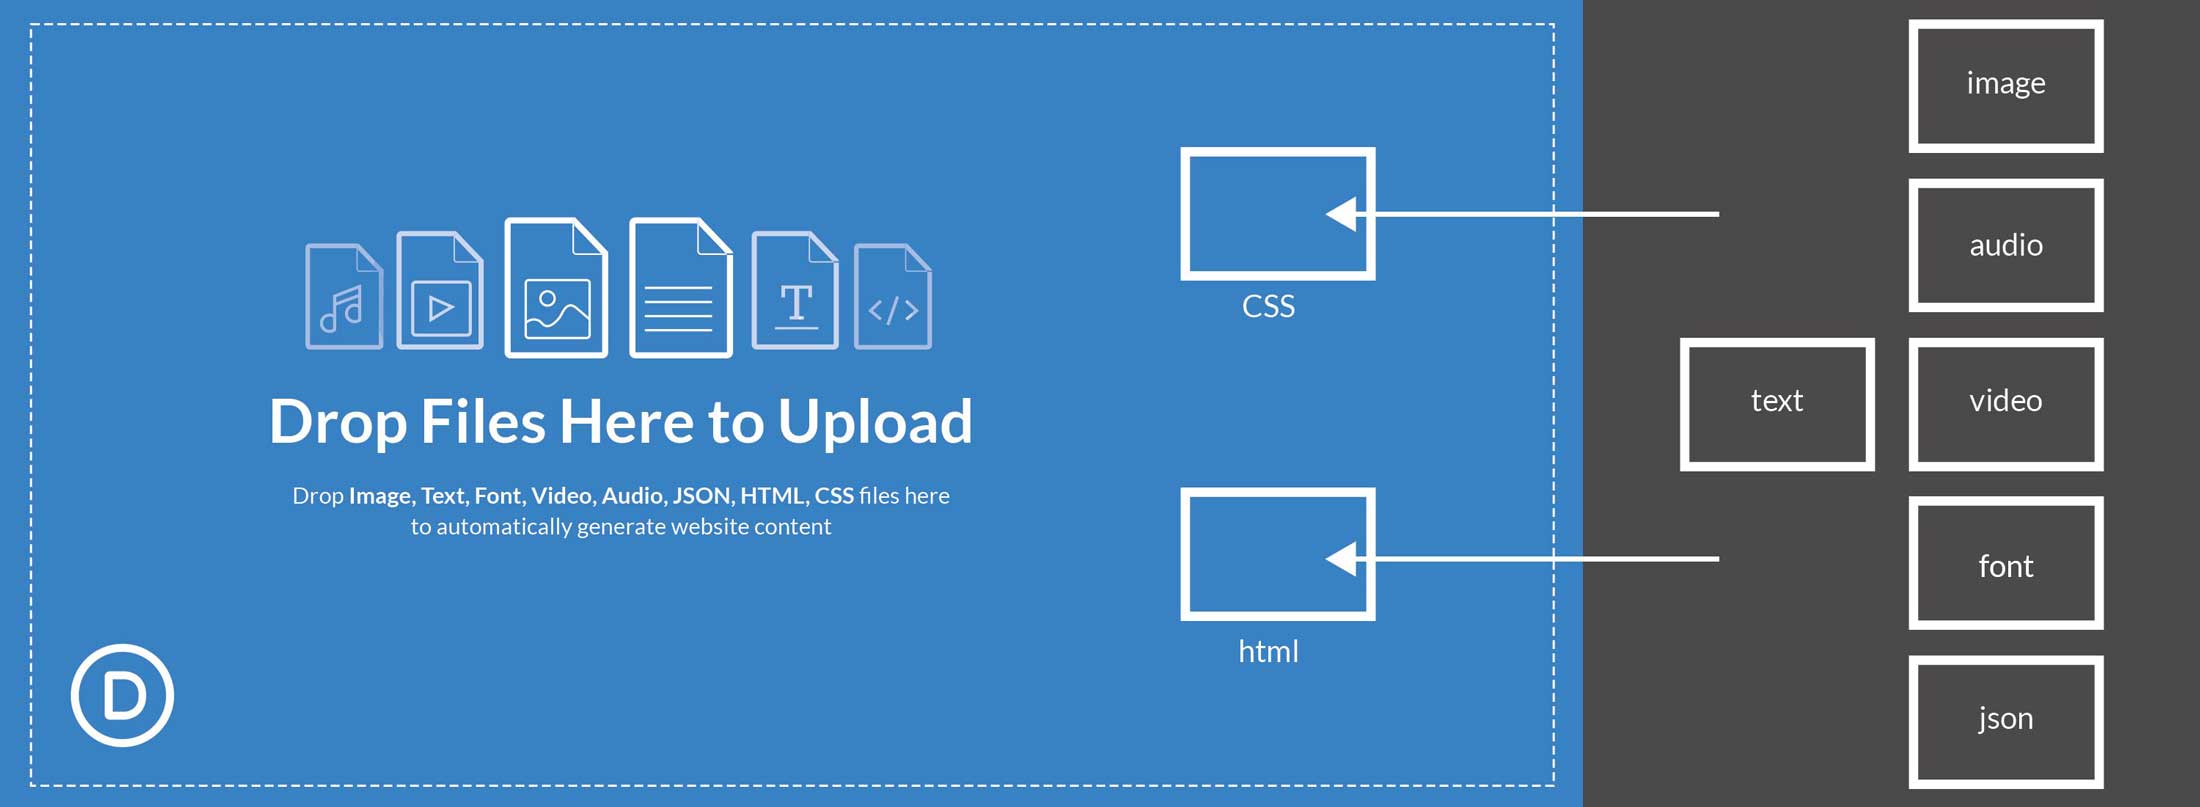
Supported File Types for Drag and Drop Uploads
The Drag and Drop feature supports file types that every developer uses to add content and design to their pages. Here is list of all file types currently supported by the Drag & Drop feature that you can use:
- Image Files (jpg, png, tif, gif)
- Text Files (txt)
- Video Files (m4v, mov, webm, wmv, mp4)
- Audio Files (mp3, wav)
- Web Files (json, html, css)
- Font Files (otf, ttf) (
Now that we understand more of what the Drag and Drop feature is, let’s explore how this convenient feature works for each file type.
The Drag and Drop Functionality for Each File Type
Image File Uploads
Divi’s Drag and Drop functionality streamlines the design process of adding new images to your page using the Divi Builder.
When using the Drag and Drop feature for images, there are four supported image formats:
- jpg
- png
- tif
- gif
Single Image Drag and Drop Functionality
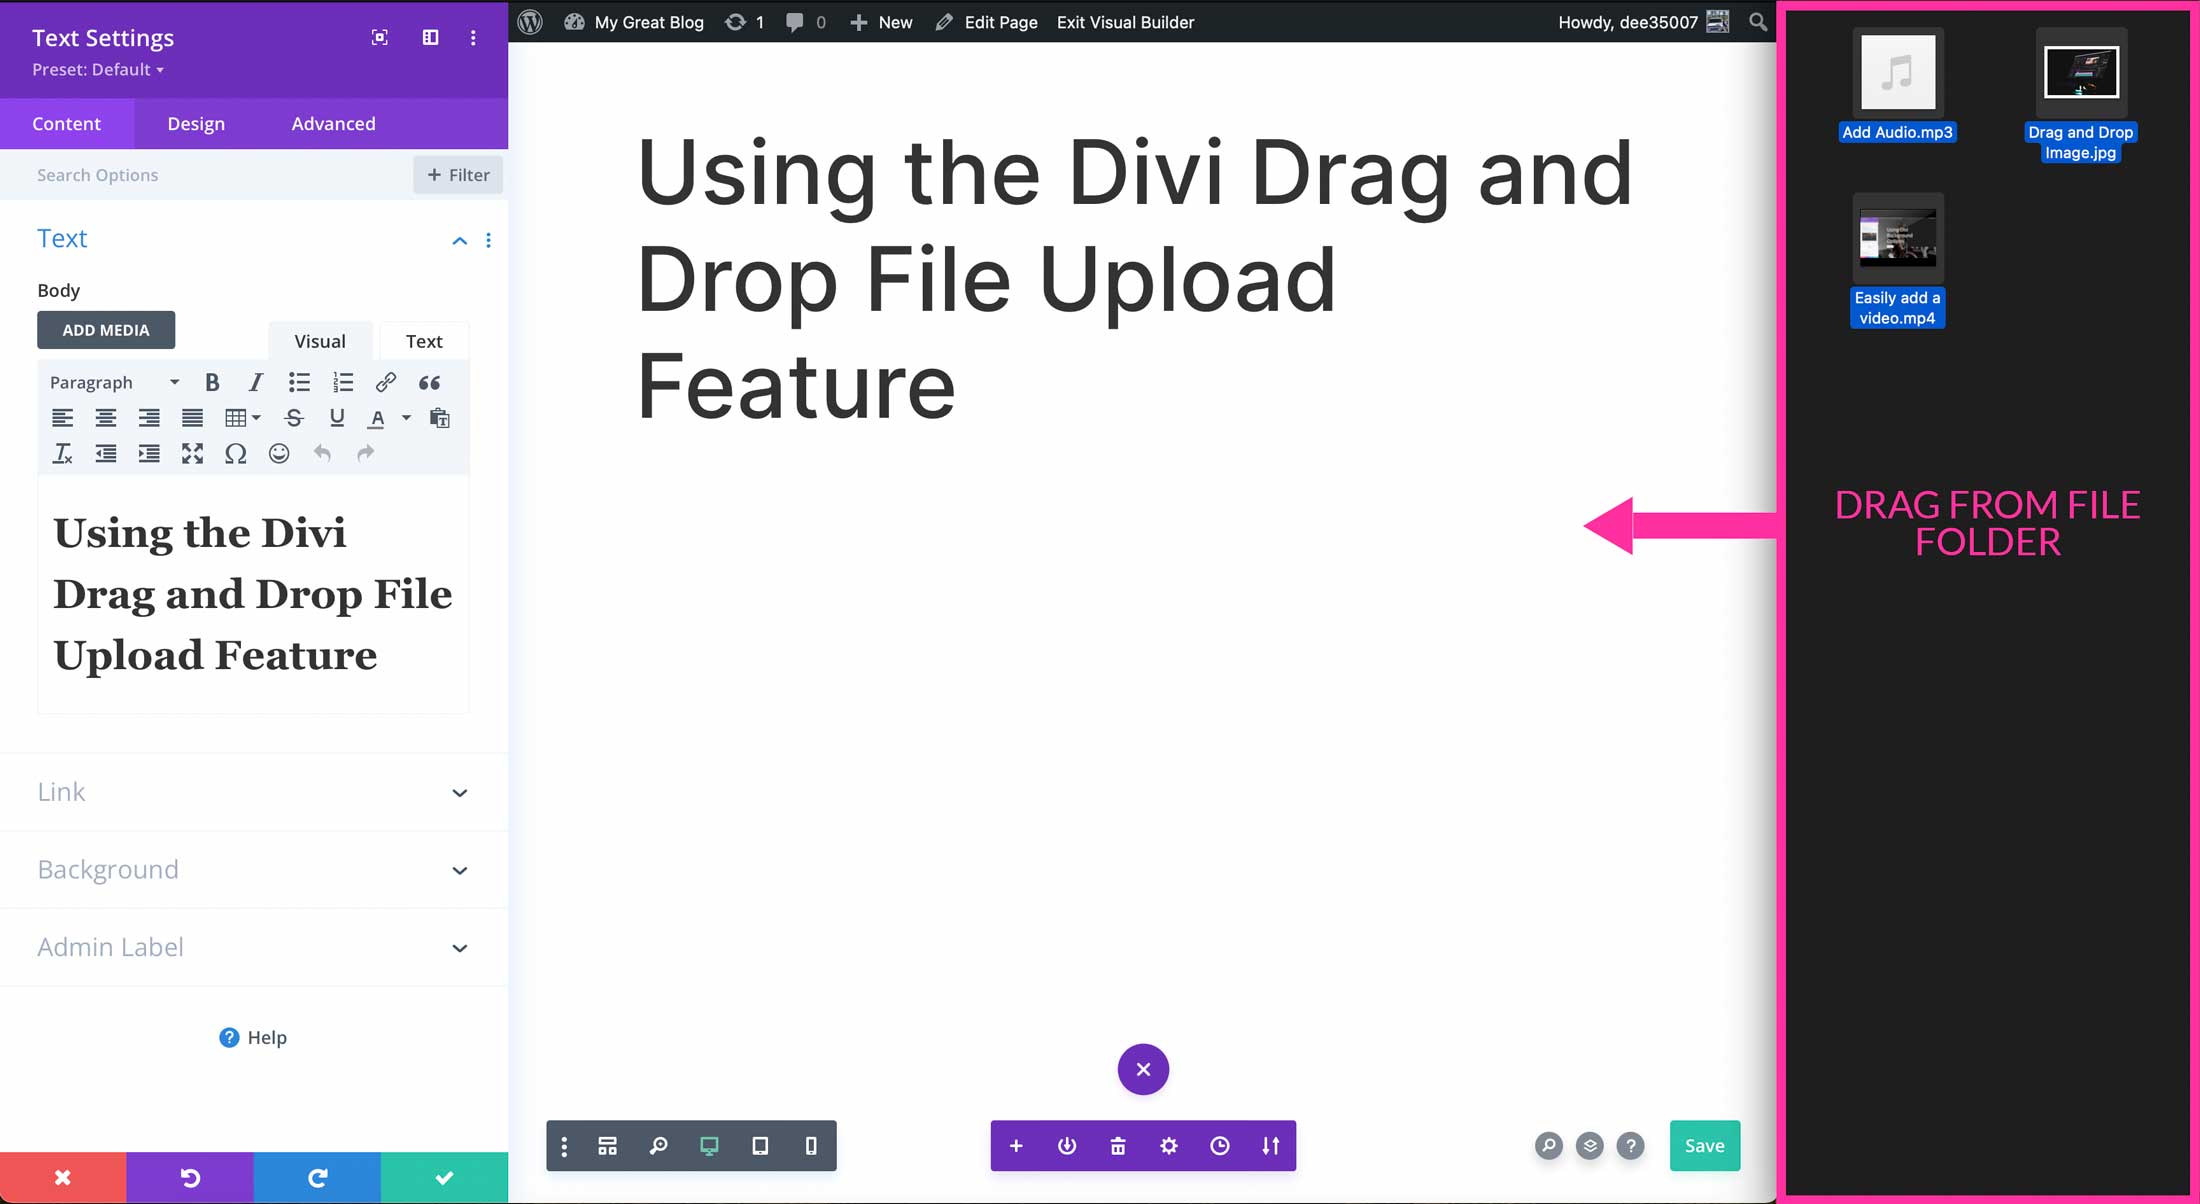
If you want to add a single image from your computer to your web page when using the Divi Builder, just drag the image from your computer to the browser screen using the Divi Builder.
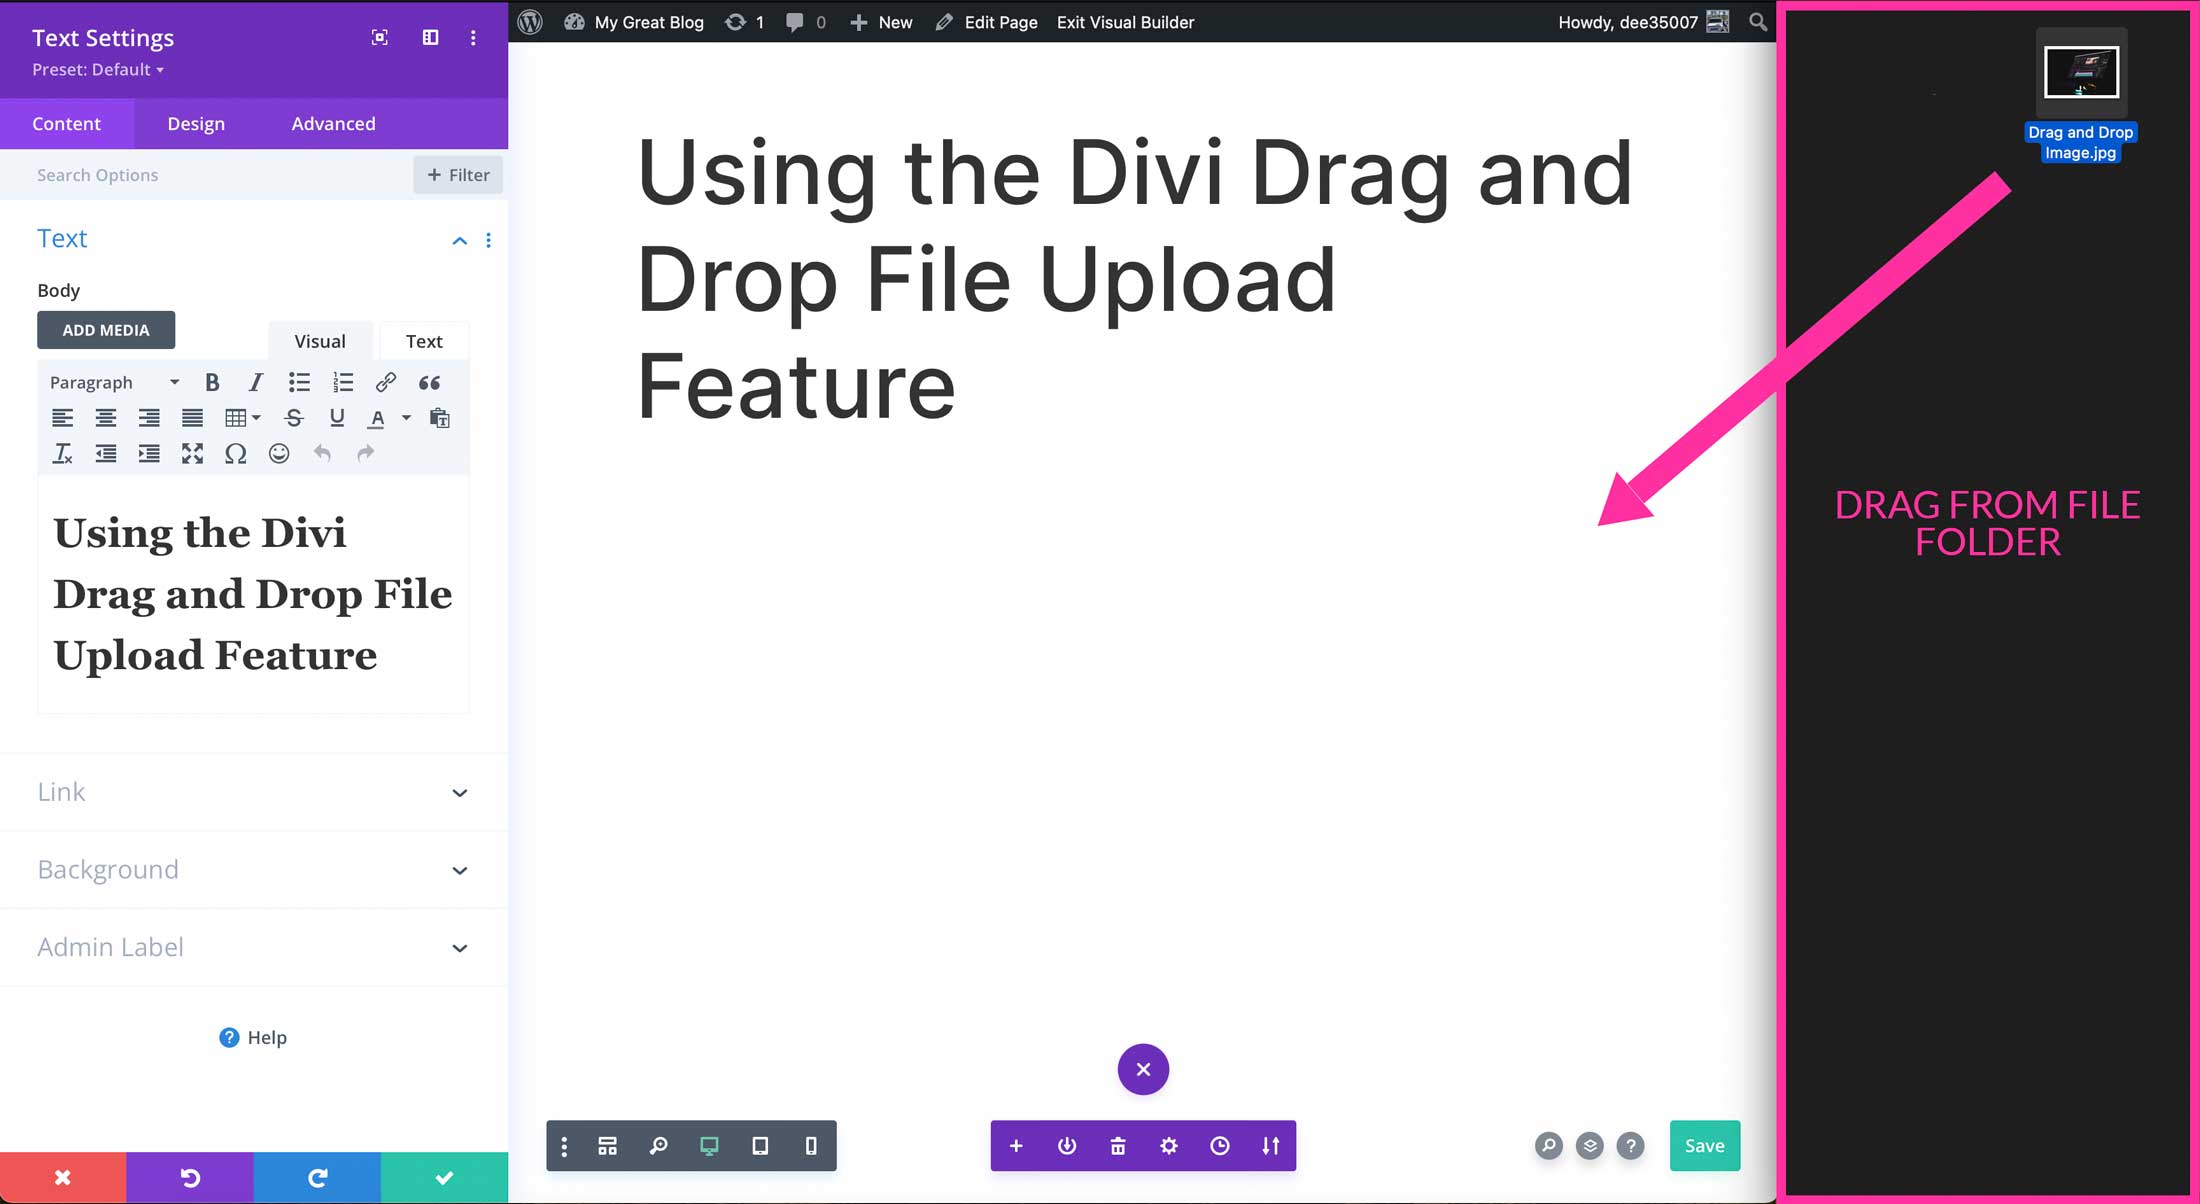
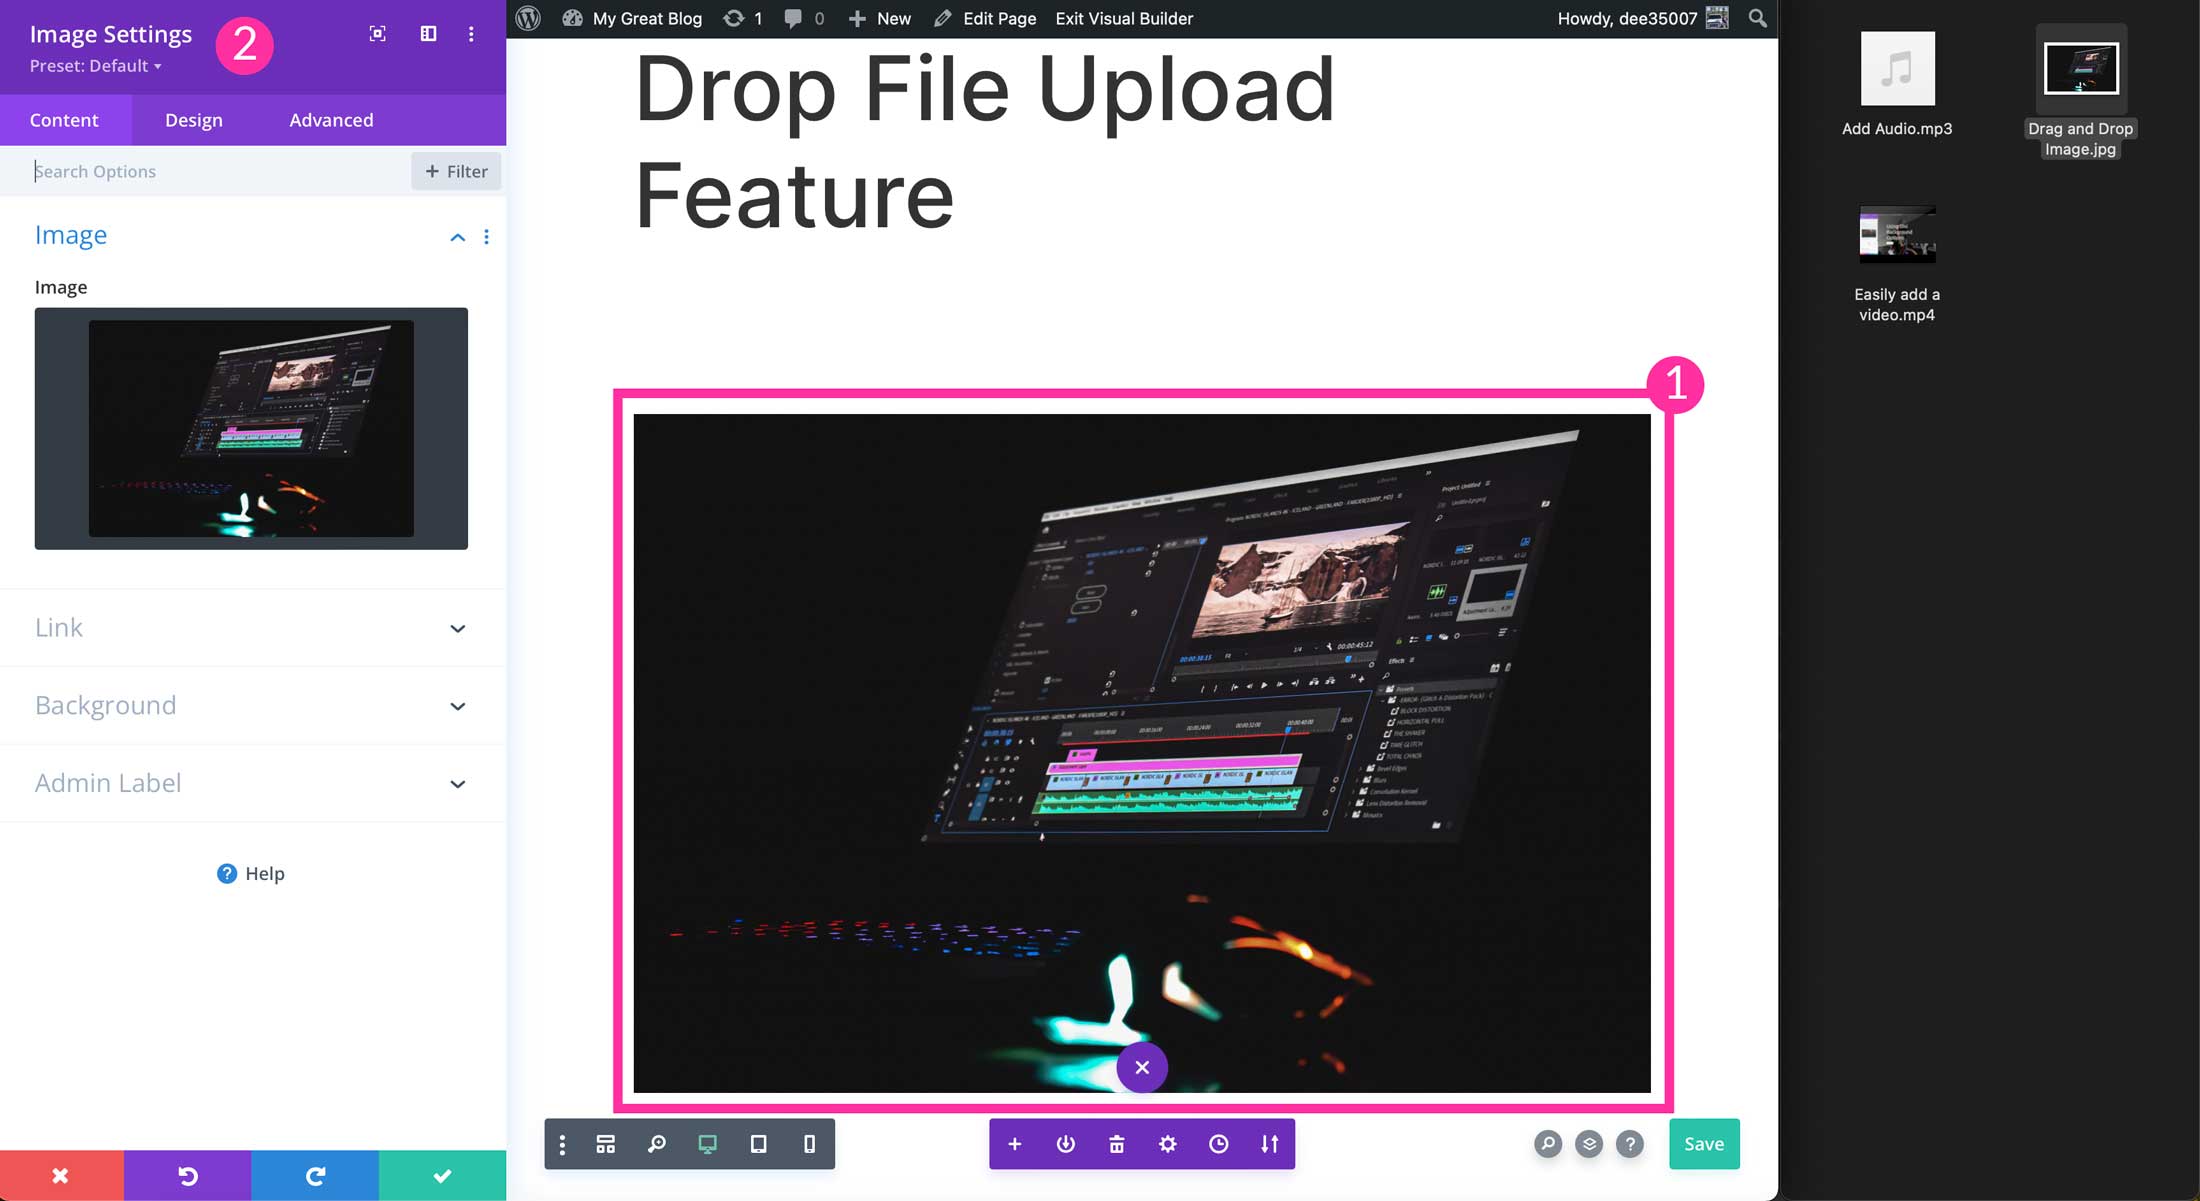
Divi will automatically upload the image to your media gallery and apply the image to an image module ready for you to use. For extra convenience, the image gallery settings modal will automatically pop up so you can make any changes to your new image.
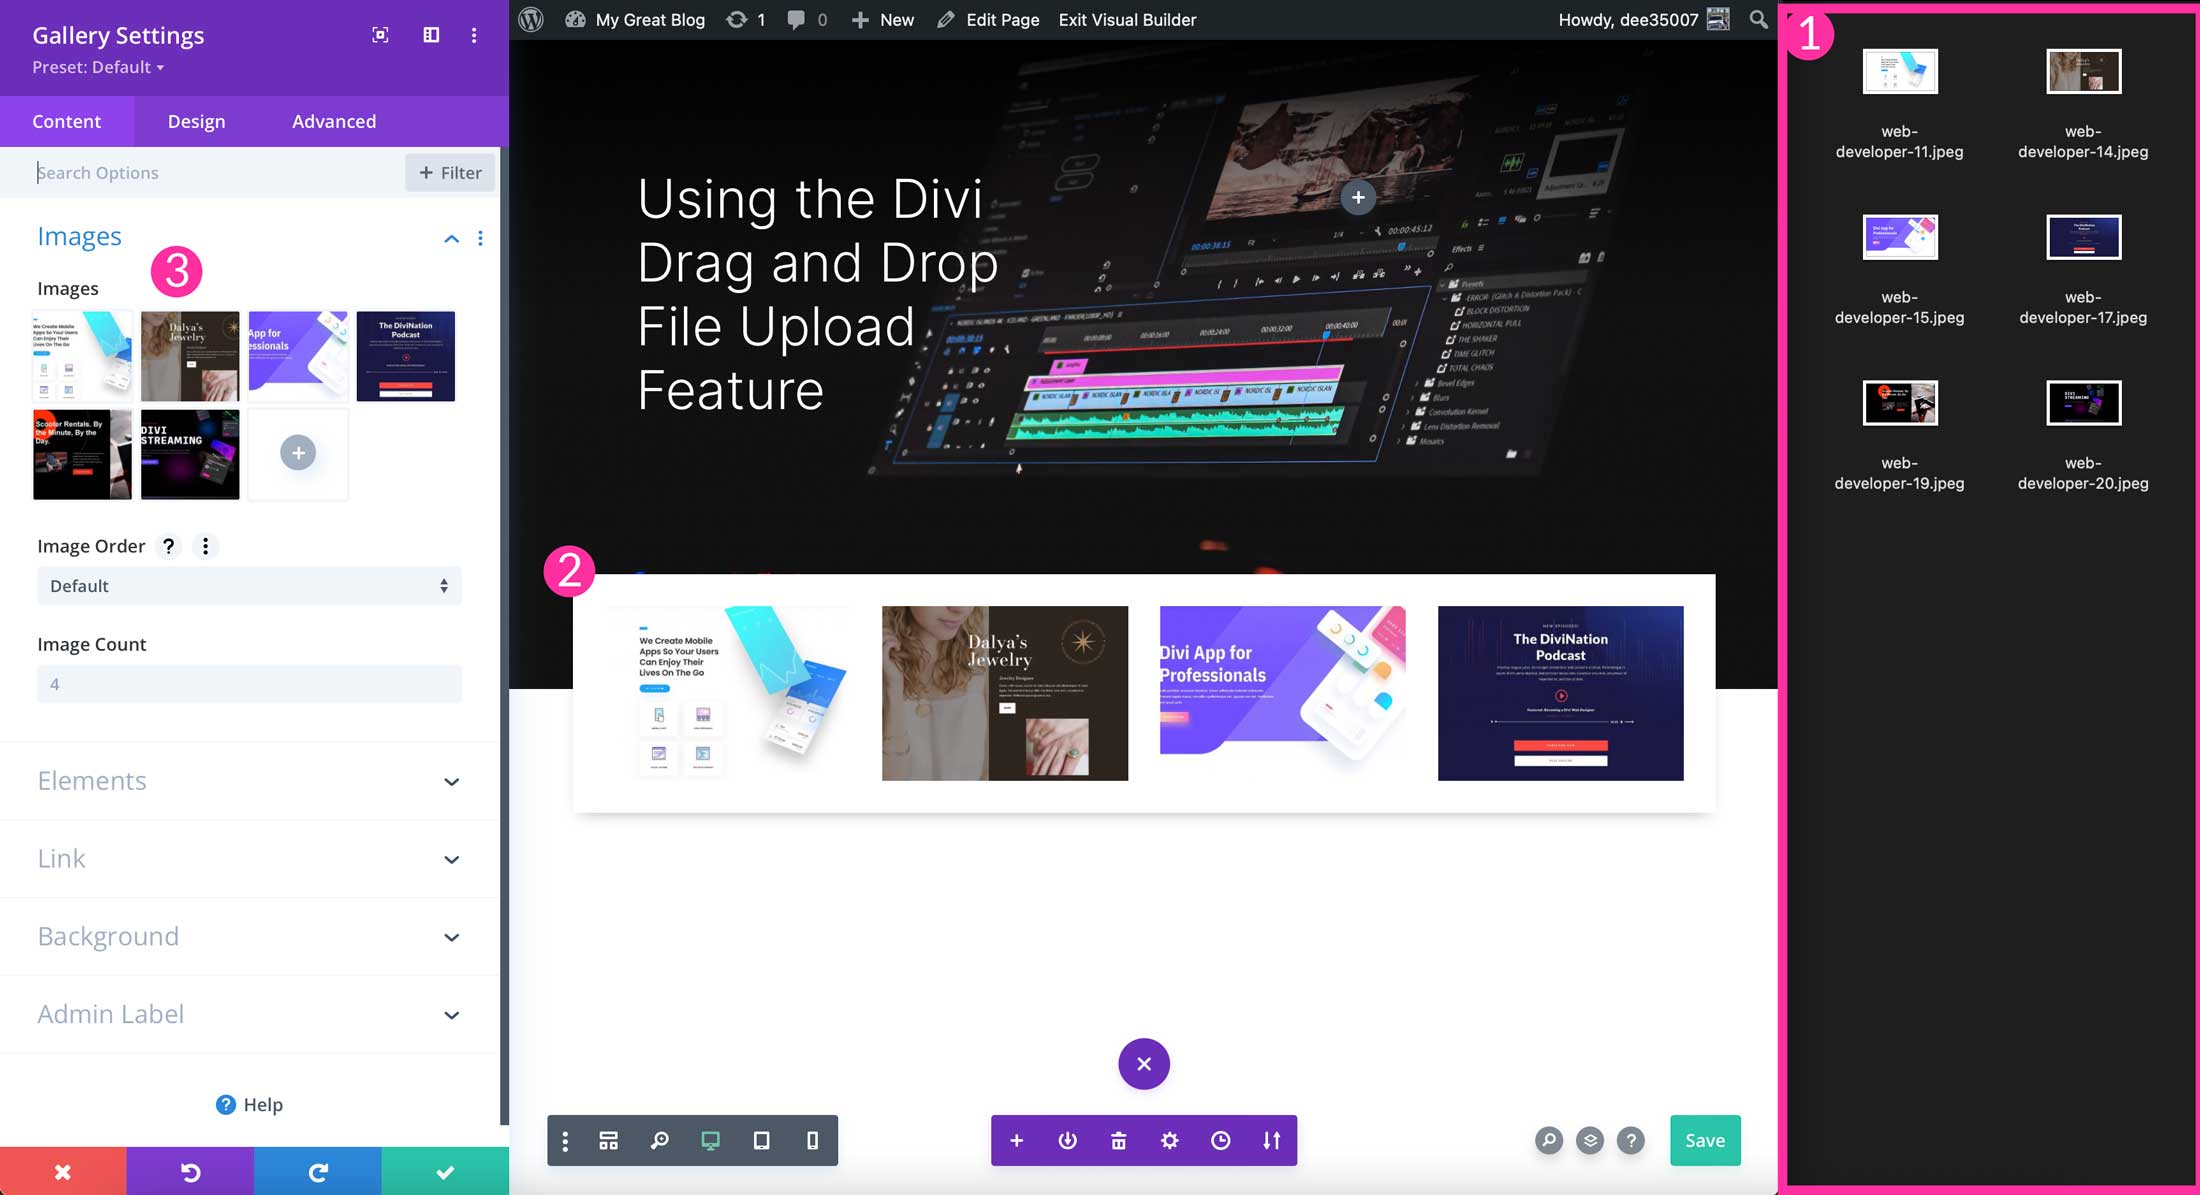
Multiple Images Drag and Drop Functionality
If you want to add multiple images from your computer at once to your Divi Builder page, simply select all the images you want to use on your computer and drag them over into the Divi Builder. Divi will automatically upload all the images, convert them into an image gallery module, and create a new section displaying your new image gallery. You can rename your files before dragging them into your page, in order for them to display custom titles.
Text File Uploads
Text files (with txt format) import with ease into Divi. To add a TXT file, drag it into the Visual Builder. Divi will add the TXT file into a text module within a new section.
Web File Uploads: Add Divi Layouts, HTML Code, or CSS
The drag and drop file upload feature can import several web file types. We’ll show you how to import them into Divi.
When using the Drag and Drop feature for web files, there are three supported file formats:
- JSON
- CSS
- HTML
JSON File Uploads: Importing Divi Layouts with Ease
The JSON file extension is used for dragging complete page layouts or sections into any Divi page. Dragging in a JSON file automatically loads the content into the page. When importing JSON files, you can choose to overwrite the content on an existing page, or start from scratch with a blank page.
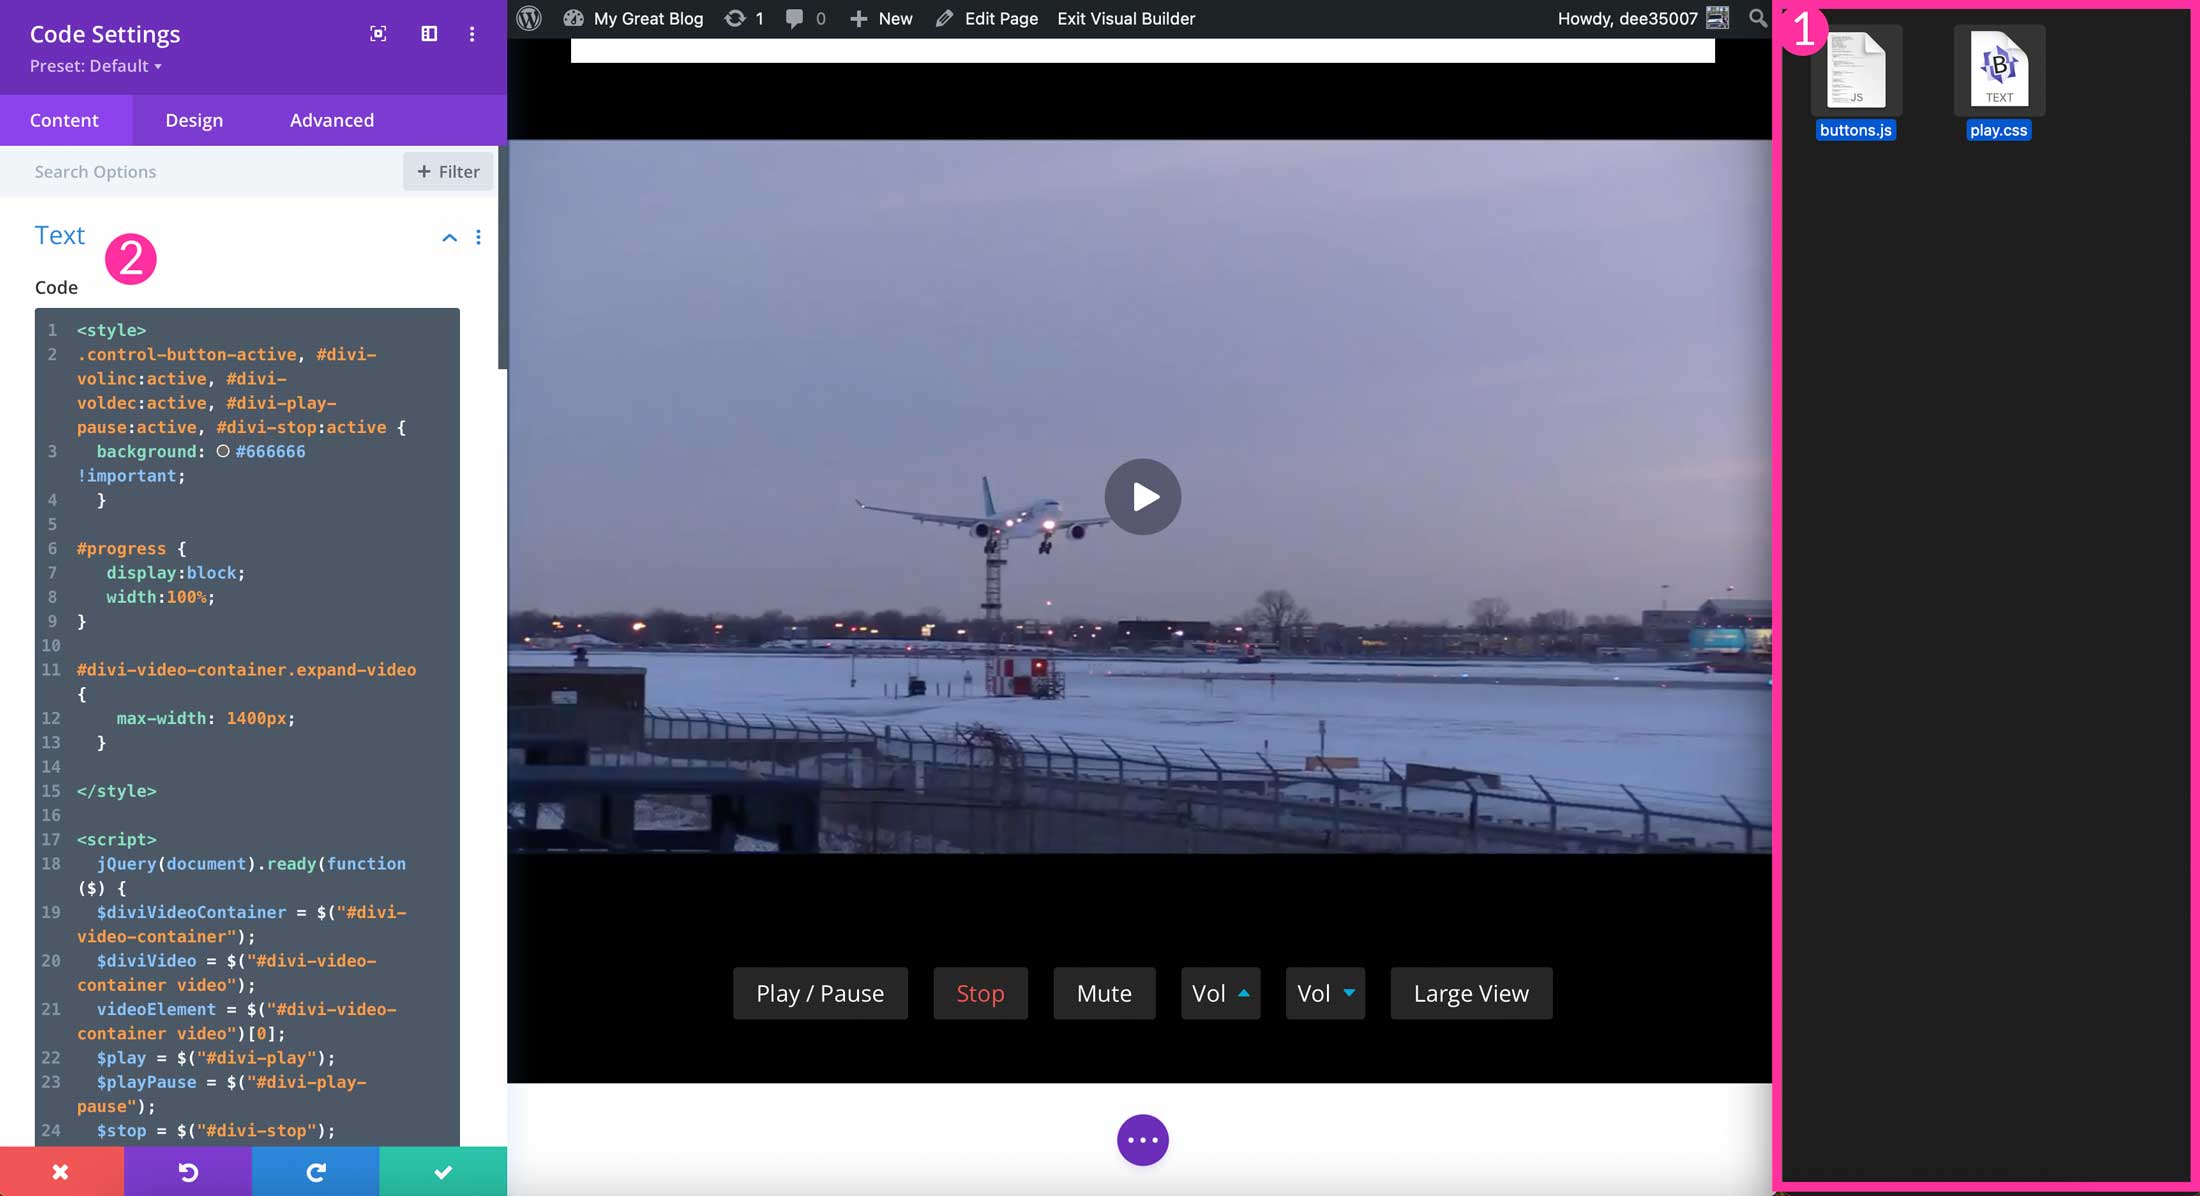
CSS File Uploads: Quickly Add Custom CSS Styles to Pages with Drag and Drop
Dragging CSS files into the Visual Builder adds custom CSS to your page. Once imported, it’s inserted into the custom CSS section of the page settings. It’s important to note that when adding custom CSS, be sure to add a class to the module or element that you wish to add CSS to. Basically, whatever you name the CSS file, that title will be used to comment out the block of CSS which is a cool feature.
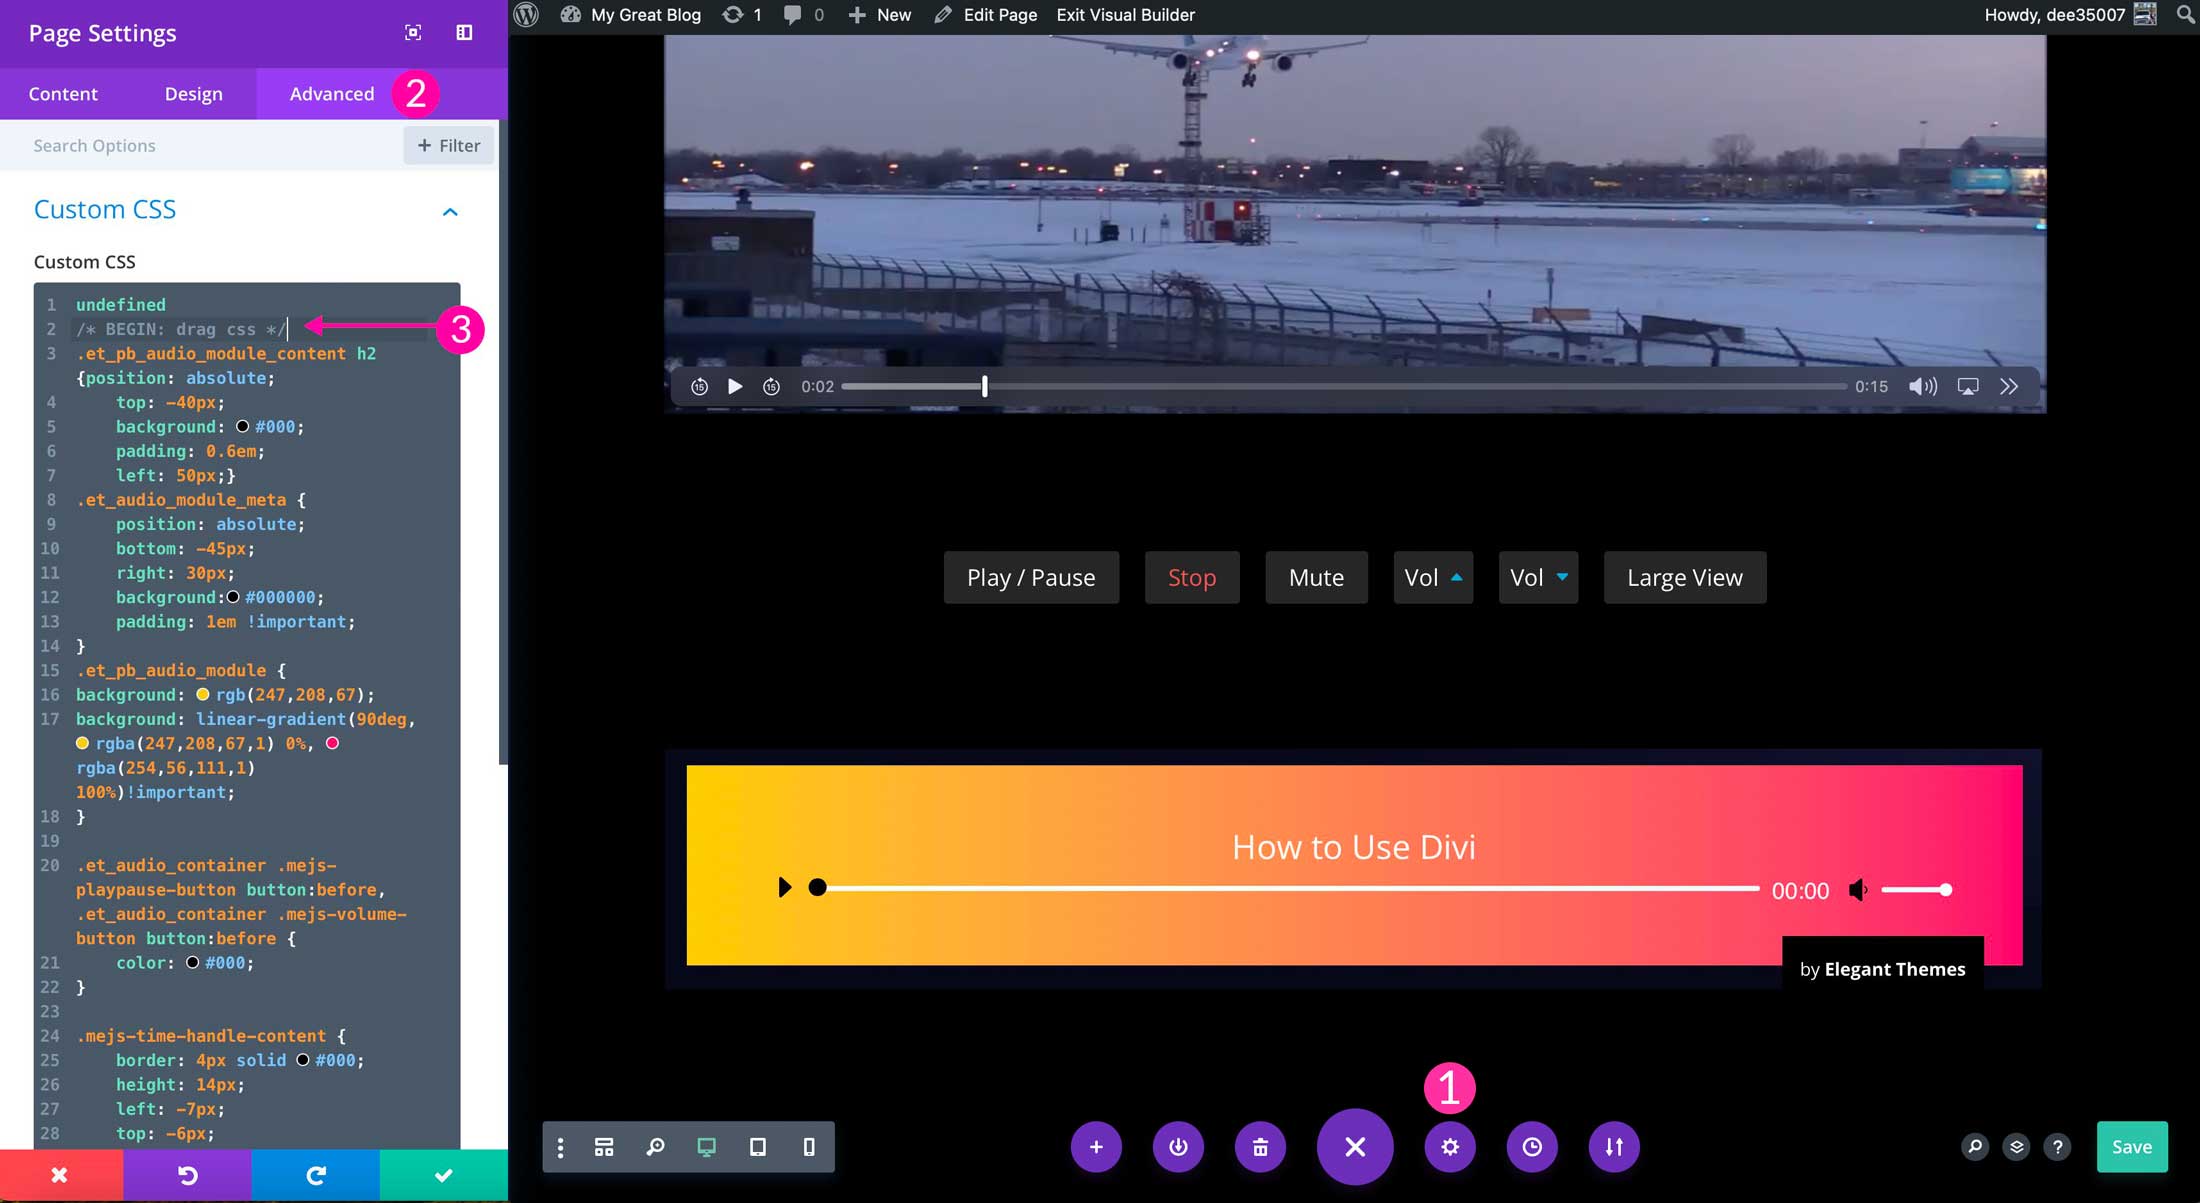
Divi Organizes CSS Code With Each Drop
When you drag CSS snippets into your page, they are automatically added into the page CSS. You can view it anytime from the page settings > advanced tab. Divi will organize your css snippet by wrapping it with comments. Comments are used within CSS code to identify or describe the blocks of code. Divi adds the comment before your code starts.
For instance, let’s say you have a CSS snippet for an audio module on your page. When you drag it into the builder, it gets applied to your page and automatically adds a begin and end comment to the CSS.
HTML File Uploads: Add Custom HTML Code to a Page with Drag and Drop
Divi users can drag and drop HTML directly into their pages. The HTML code is added into a code module in a new section. Adding HTML files to your page can be useful for adding new web design elements to your pages.
Font File Uploads: Add Custom Fonts to Divi with Drag and Drop
Importing new custom fonts to your Divi site is made easy with the drag and drop file upload feature. All you have to do is drag the font file from your computer into the Divi Builder when editing a page. There are two font files supported in the drag and drop file upload system:
- otf
- ttf
To import a font, drag the font file into your page with the Divi Builder active. Divi will launch the font upload modal with the font name already present. Be sure to confirm the font weights before clicking the upload button.
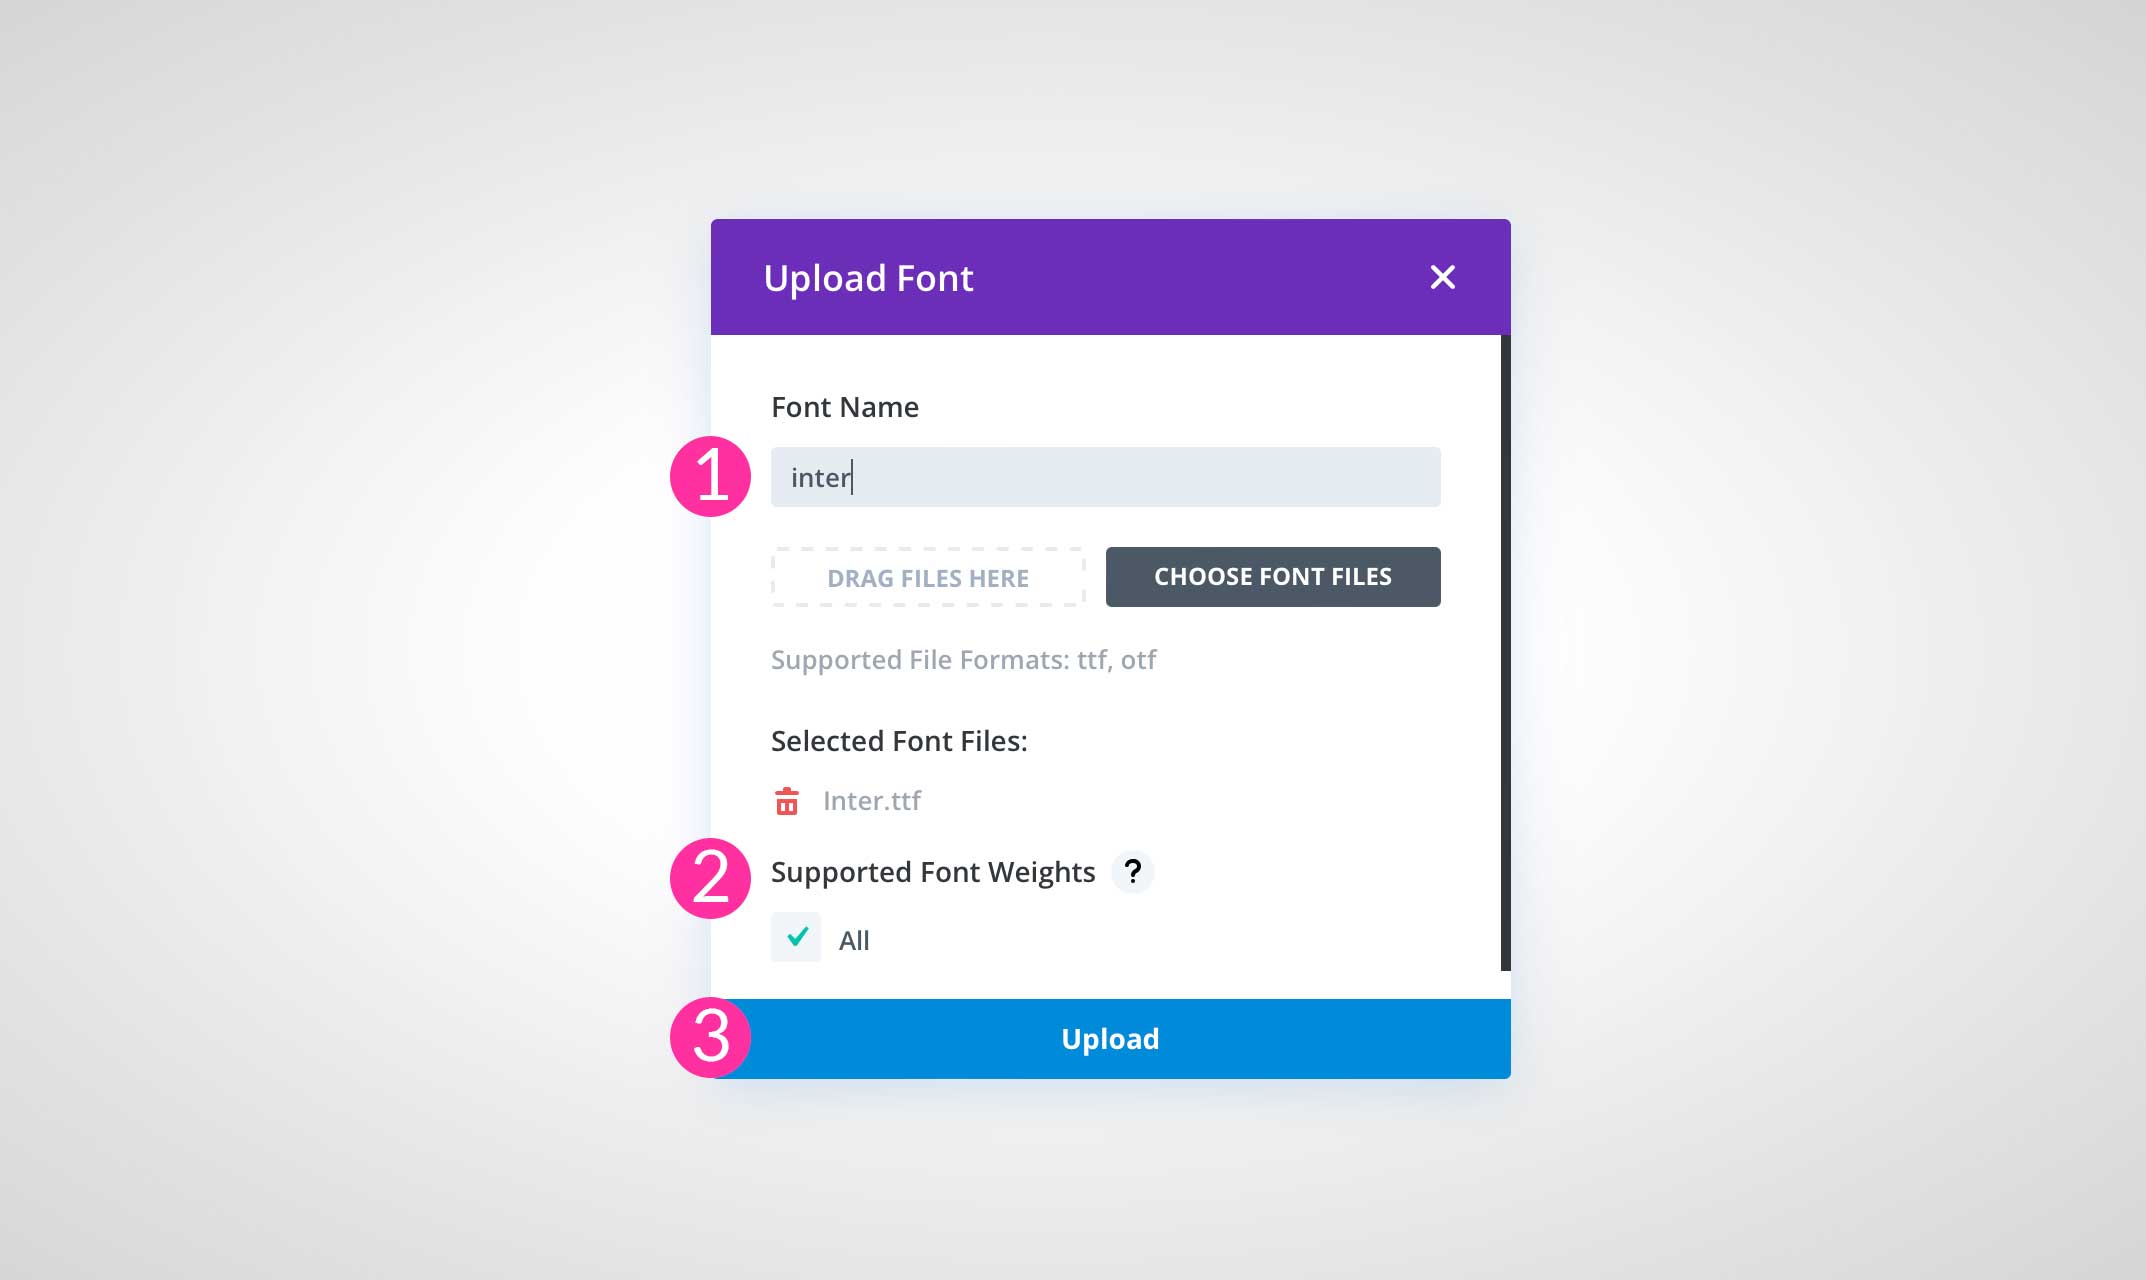
Once done, you will have a brand new custom font inside the Divi Builder that you can use when adding new content or modules to the page.
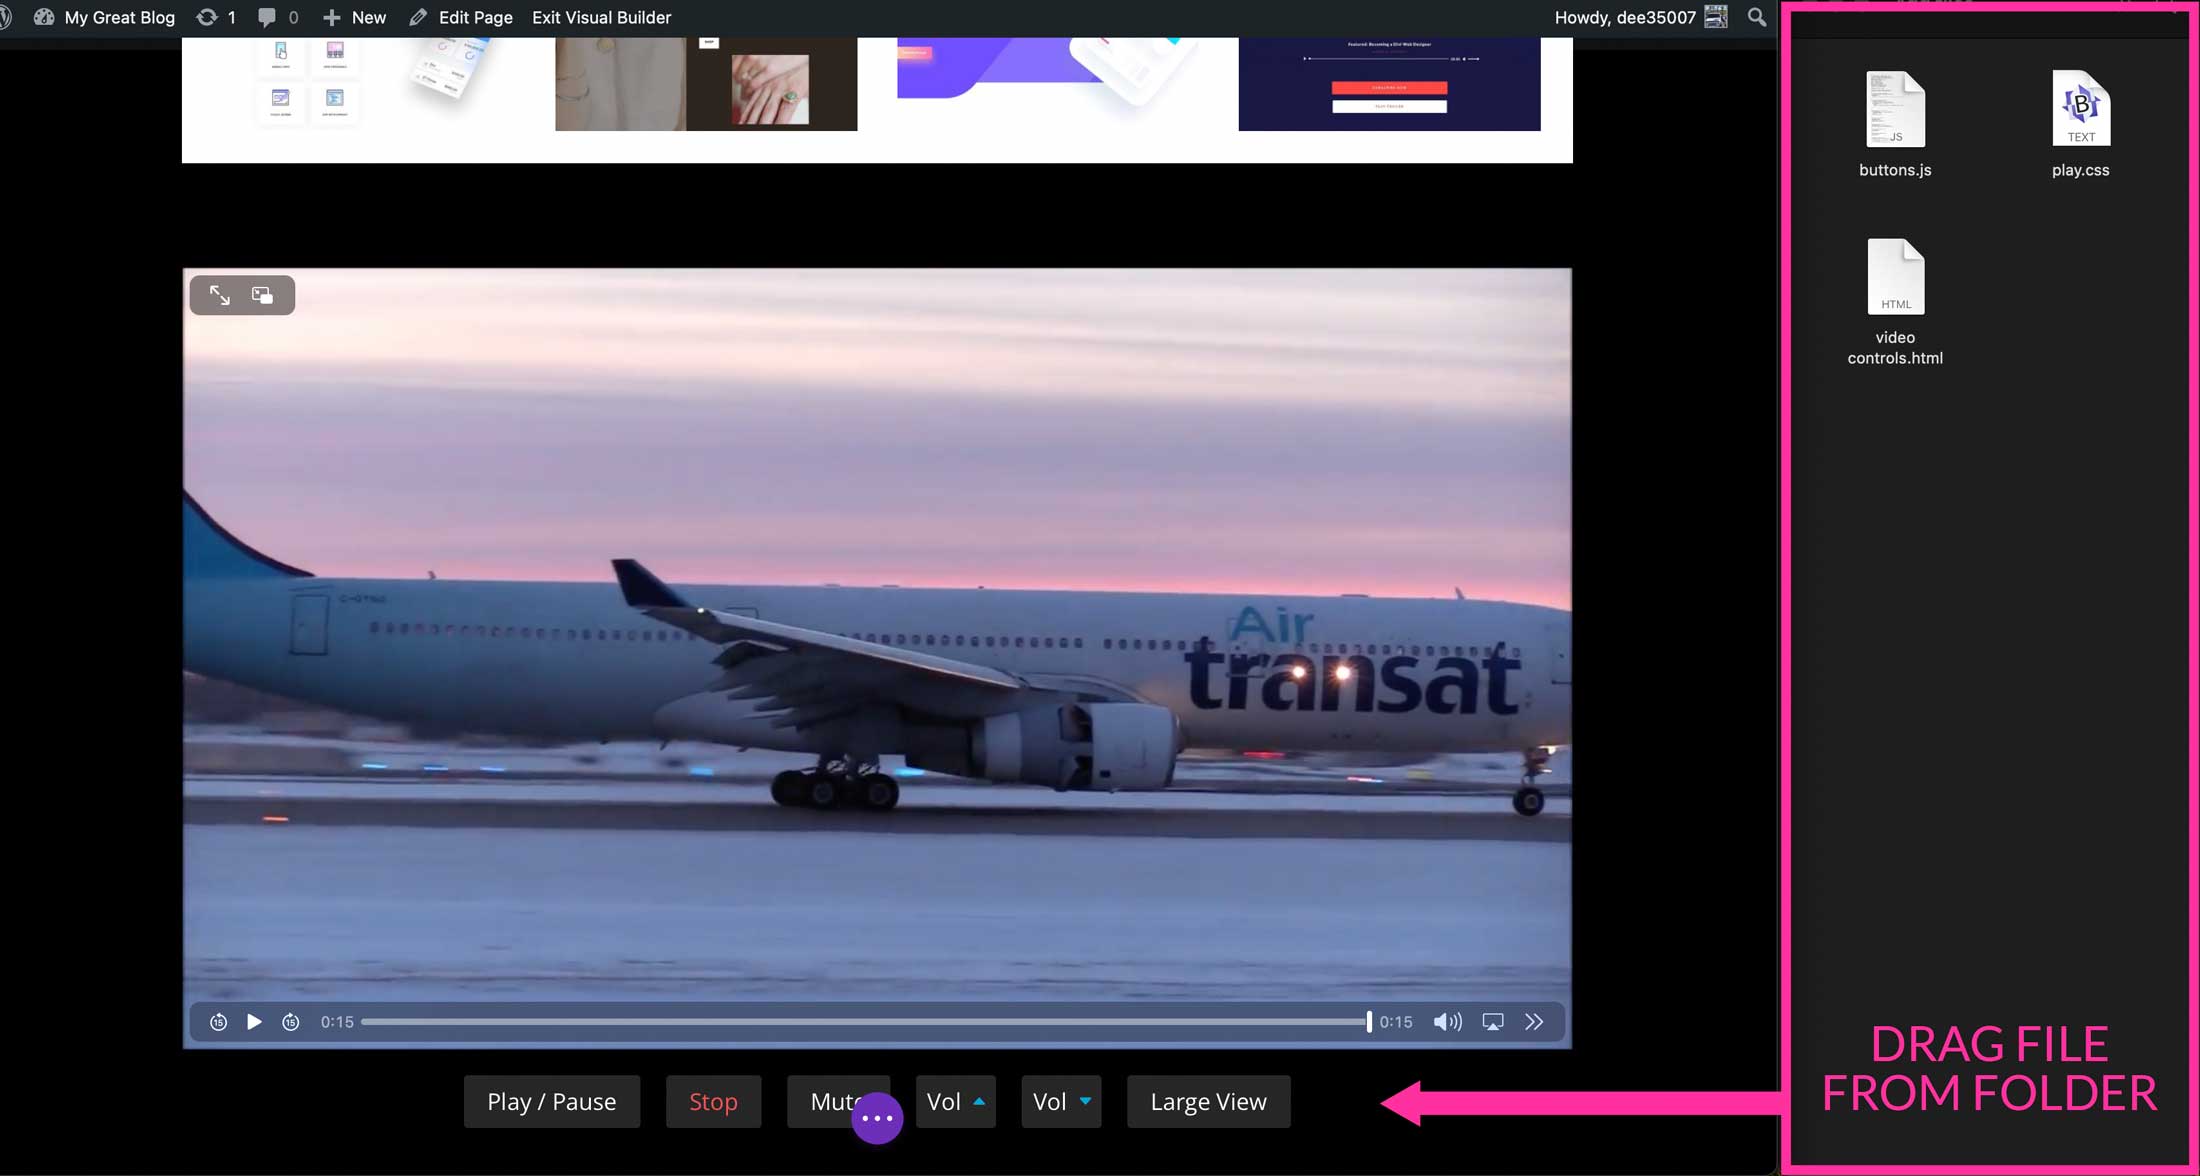
Video File Uploads: Add Videos to Your Page with Drag and Drop
Using the Drag and Drop feature for video files, you can easily add videos to your pages using the Divi Builder. The feature supports the following video file formats:
- mp4
- webm
- mov
- wmv
- m4v
Dropping any of these video file types into the builder creates a new video module in a new section. In seconds, your video is added to your page and ready for you to design using the Divi Builder. Adding multiple video files at once will create a new module and section for each.

Audio File Uploads: Convert Audio Files to Audio Modules with Drag and Drop
Adding new audio files to your page is only a drag and drop away with this feature. Currently, the following audio file formats are supported:
- mp3
- wav
When you drag and drop an audio file into the builder, the file is automatically converted to a new Divi Audio Module in a new section at the bottom of the page. With a single drop, you will have your new audio file embedded into a customizable audio player that is fully customizable with Divi’s built-in design options. You can drop in one or more audio files at one time.

Example Use Cases
There are a number of ways to benefit from Divi’s drag and drop upload file feature. Whether you want to upload multiple images at once, or combine code snippets to save time, there are plenty of uses for it. Let’s take a closer look at a couple of the best ways to use it.
Drag and Drop Multiple Images to Create Photo Galleries with Titles
Divi’s Drag and Drop functionality allows you to drag images to your site with ease. This really comes in handy when building websites with a lot of images. And since most people keep saved images in a folder on their computer, it is extremely convenient to be able to select those images and drag them into your page.
Combine Files and CSS Snippets in One Go
If you want to make design changes to sections of your page or extend the functionality of a Divi module, you can drag and drop supported file types along with CSS files to be uploaded at once. This is a great way to enhance the amazing capabilities of Divi with custom designs and functionality. This allows developers to add any supported file type and CSS combinations to Divi all in one single action.
This can be a great way to add custom image gallery grids, advanced HTML videos, audio, and so much more.
Check out our blog to view some of our amazing CSS tutorials to add features to Divi modules.
- Basic CSS That Every WordPress User Needs to Know
- How to Design CSS Text Backgrounds in Divi Using background-clip
- How to Create a CSS Grid Layout for Divi Modules
- Exploring How to Create and Animate CSS Shapes in Divi
- How to create custom HTML5 video controls for a video in Divi
Importing Lordicon Icon JSON Files
![]()
Lordicon icons are SVG’s that can be imported into your Divi website to create cool animation effects. Animation is an important element to consider because it can help keep your site’s visitors engaged. Lordicon uses JSON files that you can drag and drop into Divi. Check out our in-depth post on Lordicon icons and how to incorporate them into Divi.
Tips & Best Practices when Using Divi’s Drag and Drop File Upload Feature
When using Divi’s drag and drop file upload feature, there are a few best practices that you should follow. Doing so ensures that you save yourself the time that the feature is intended for. Things like optimizing images, adding titles to images before upload, and using clean codes are just a few ways to make the upload go smoothly.
Optimize Images Before Uploading into Drag and Drop File Upload

It’s always a good idea to make sure that you use optimized images on your website. Large images increase your page loading time. That can lead to your site’s visitors becoming frustrated. Additionally, images that aren’t optimized will take up a lot of space. Depending on the amount of storage you have on your hosting plan, this could be a huge issue. When using the drag and drop feature to upload multiple images to your website, the idea is to save time. If your images are large, you could have to wait a considerable amount of time to import your images.
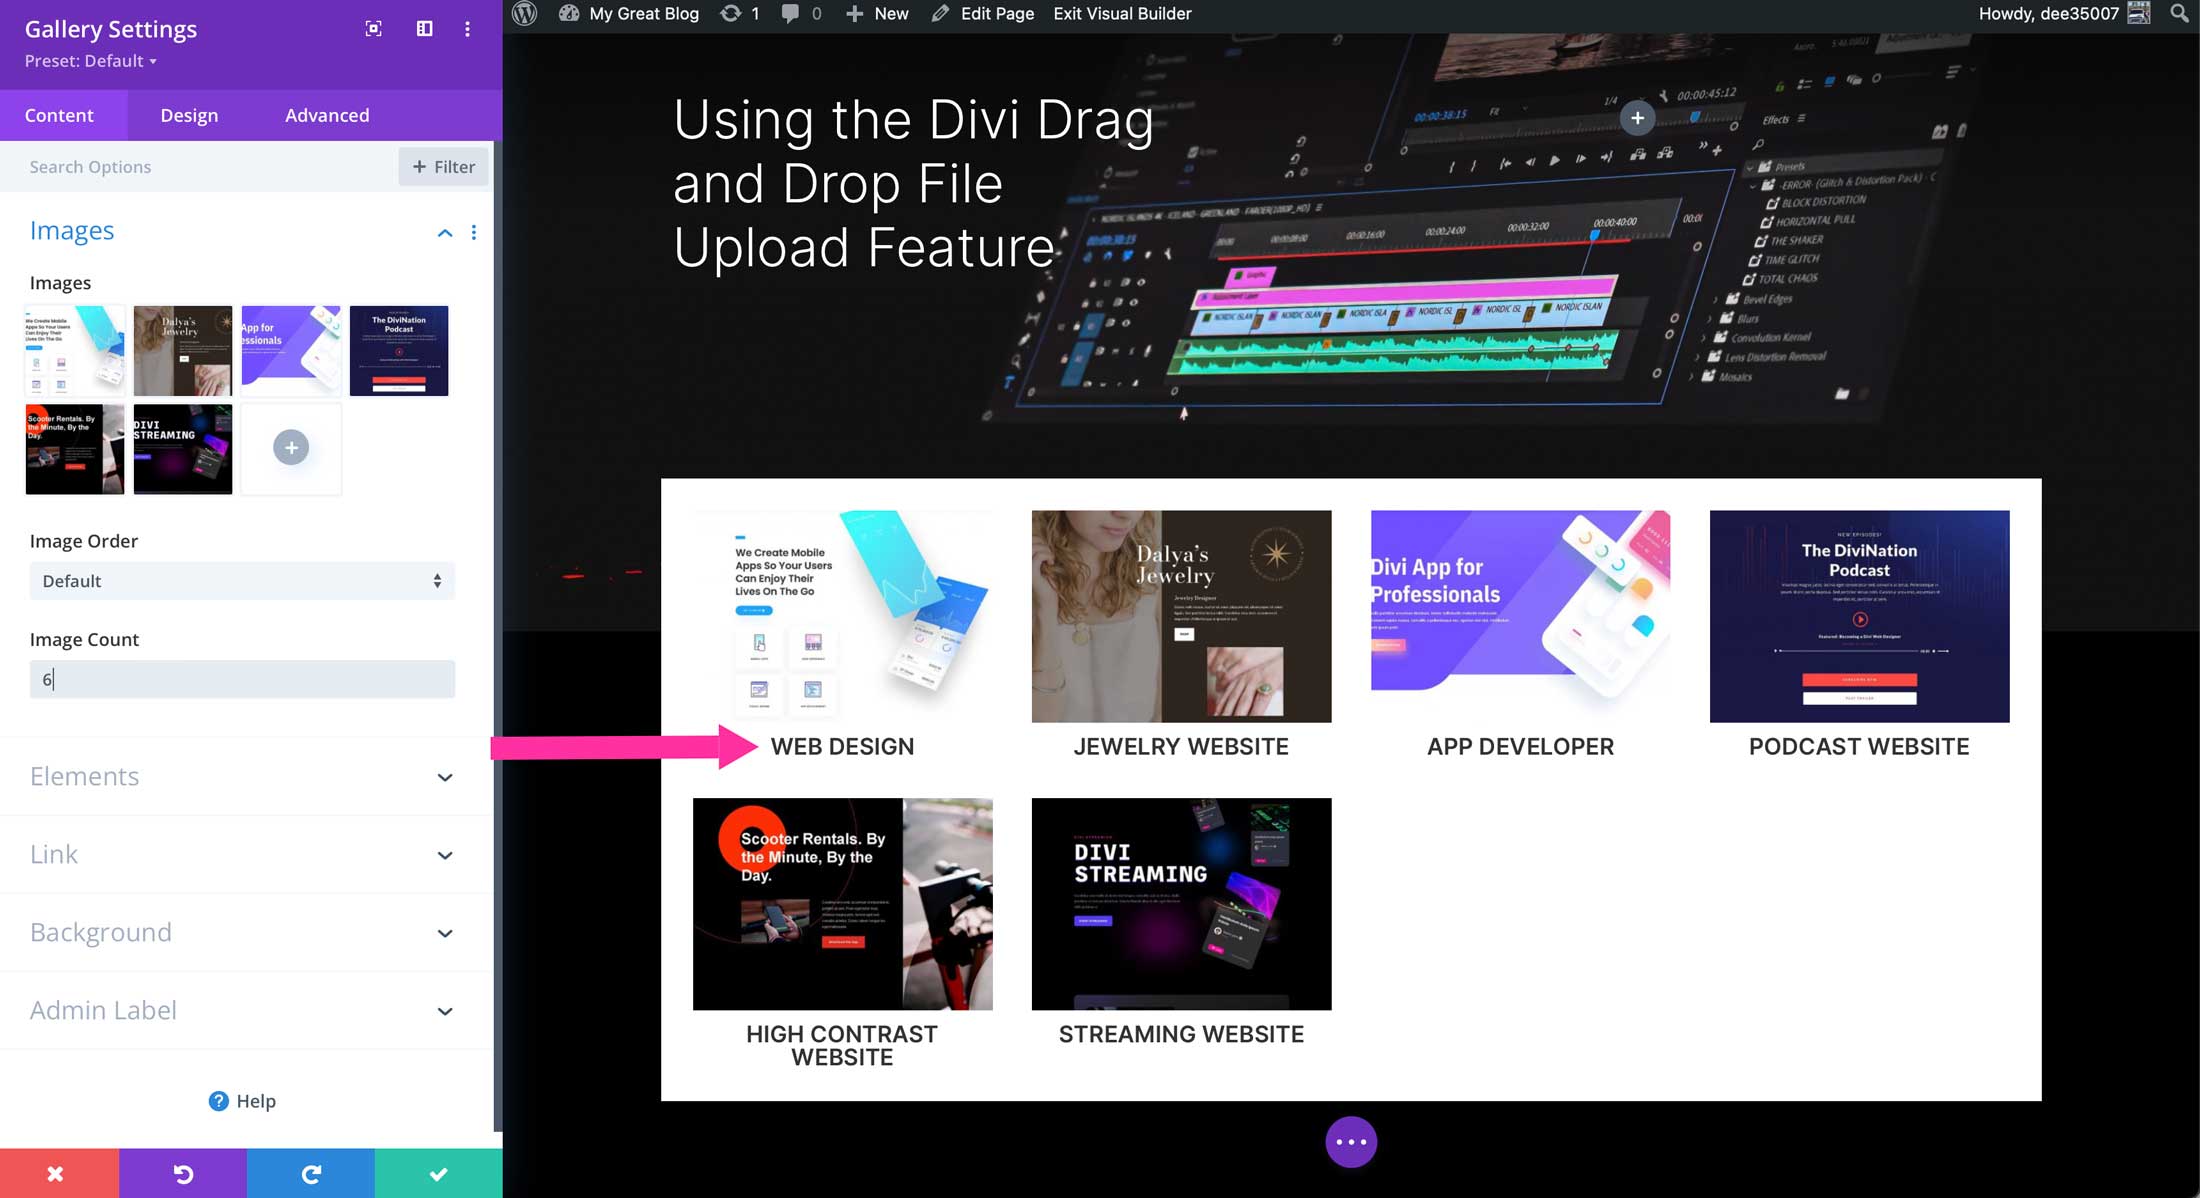
Rename Image Titles
Before dragging and dropping multiple images into a page, it’s a good idea to name them prior to dragging and dropping them in. Divi automatically displays the titles of your image files, so you’ll want to avoid titles such as image-1, image-2, etc.
Upload Web Files with Clean Code
It is important to clean up your HTML or CSS files before importing them into your Divi website. Importing poorly written HTML content can cause your Divi website to break, costing you valuable time. It’s a good idea to test your code and make any changes before you’re ready to drag it into your webpages. You can use code editors to test out your HTML code off-site to make sure it works properly.
Upload CSS with Unique CSS Classes
When adding custom CSS to you Divi page, it’s important to use CSS classes that won’t interfere with Divi’s internal components. Be sure to use unique classes like my-custom-blog or cool-blurb to ensure that your code doesn’t overwrite important system css classes.
Style your File Uploads with Divi Global Presets
Divi’s Global Presets allow you to control the design of your page elements site-wide.
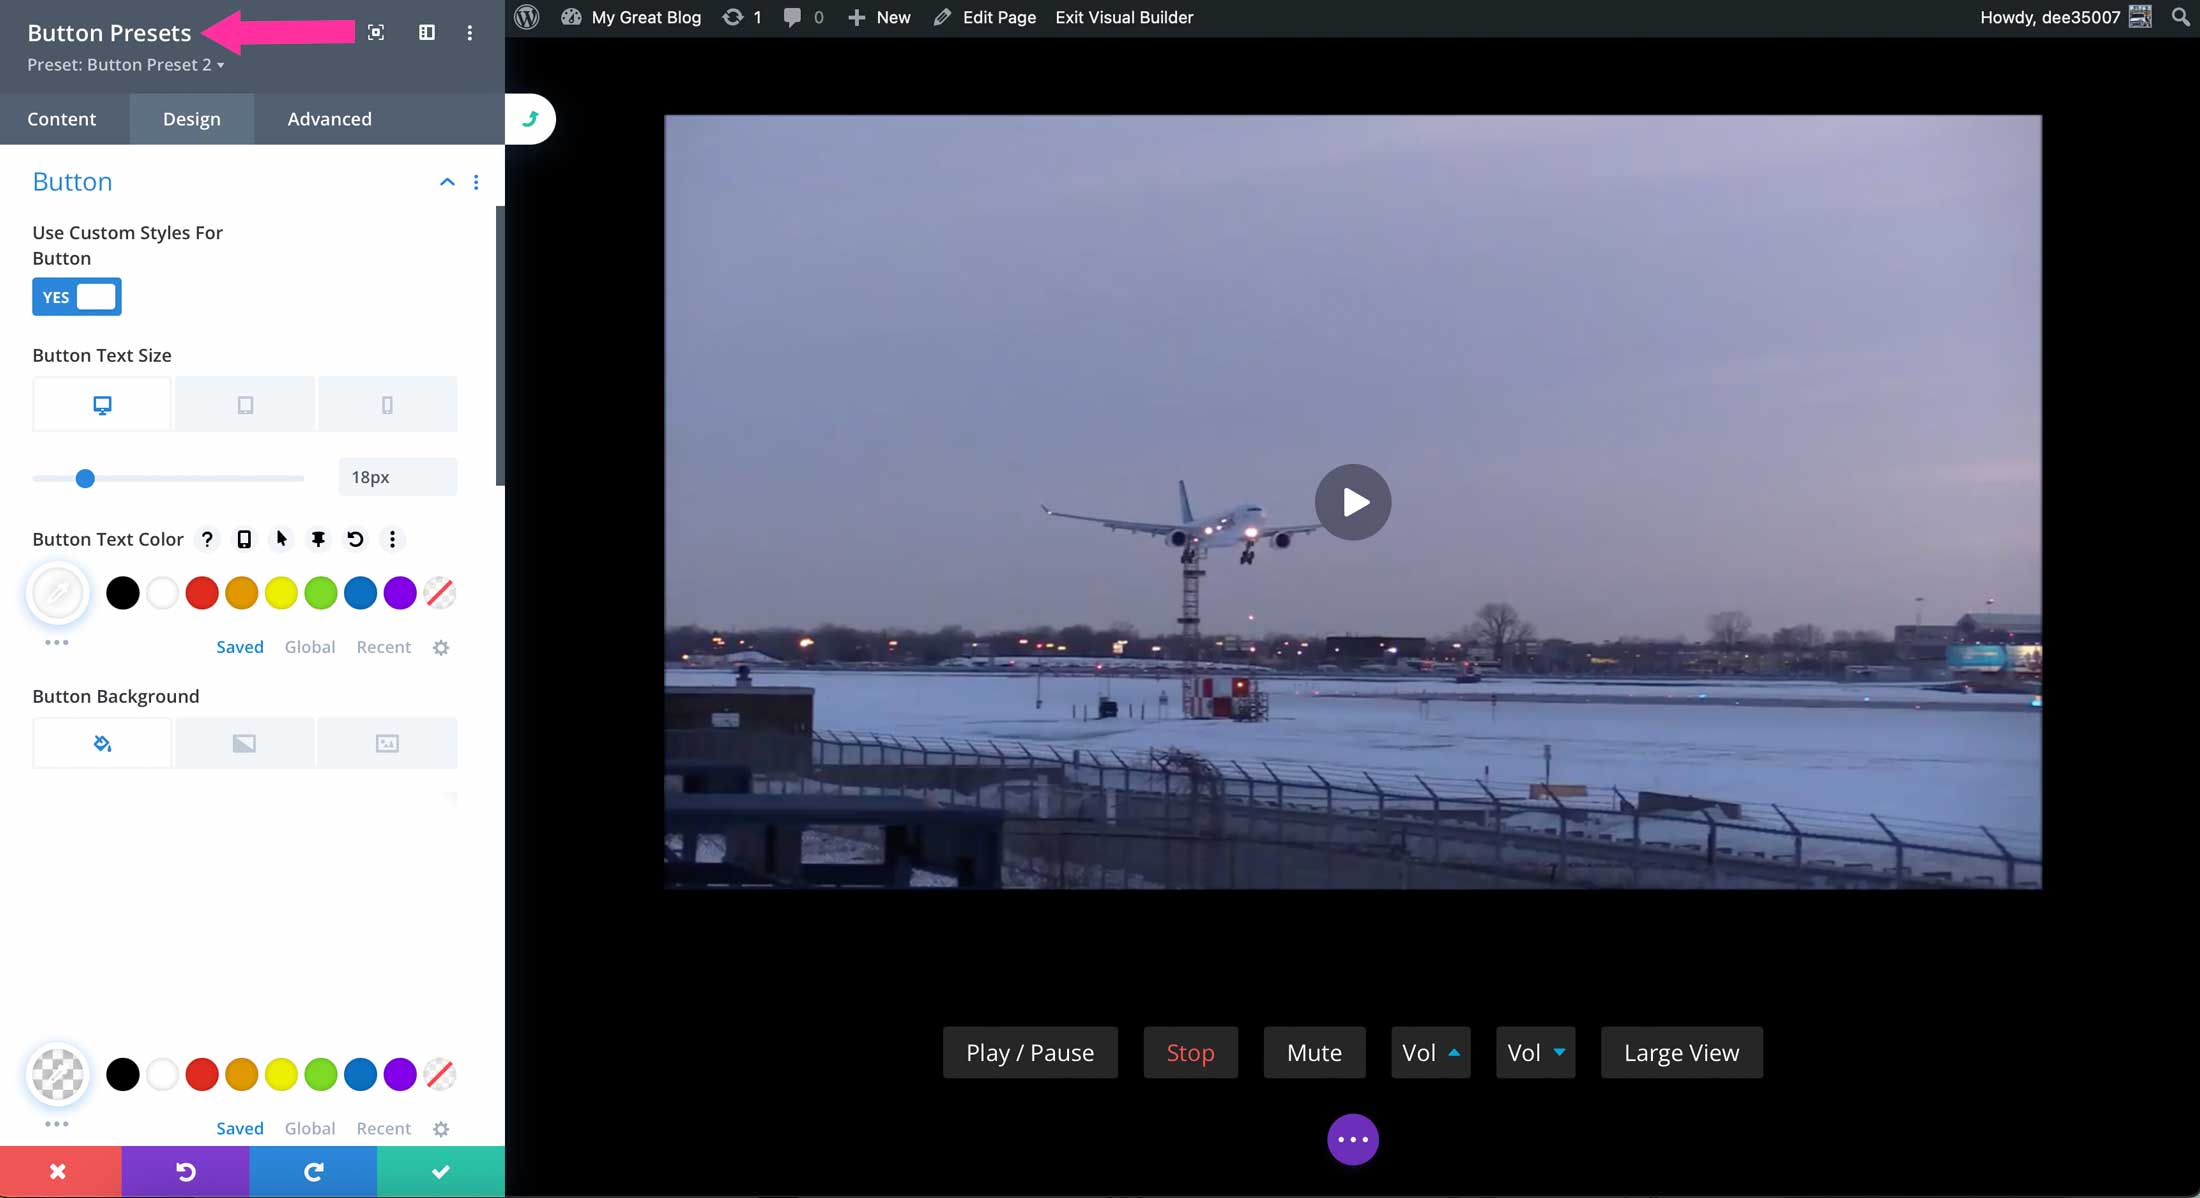
Having these Global Presets in place will make it easy to apply the same consistent design when using the divi drag and drop file upload feature. For example, if you have a default preset in place for images or image galleries, those styles will be added automatically when you drag and drop new images to your page. In addition, you can apply any saved global preset to the module displaying your new file upload content. This will change the design of the uploaded content to match your site in just a few clicks.
If you don’t have global presets in place, you can always use Divi’s Find & Replace feature to find instances of color, text, or modules and replace them with saved module settings, headings, or color presets.
Utilize Divi Cloud

With Divi Cloud, you can save JSON page layouts in the cloud to make them easier to access when reusing them in your Divi pages. Furthermore, Divi Cloud is great for storing all kinds of content. You can save modules, rows, sections, or entire layout packs which makes it fast and easy to import into your newly created Divi pages. Combining drag and drop with Divi Cloud is a fantastic way to save time and implement your favorite code snippets, modules, and pages on other Divi websites.