
HTML5 Videos are a convenient and effective way to display videos on any website. In fact, Divi uses the HTML5 video format to display videos in Divi using the Video Module. However, by default, these videos contain built-in controls (like play, mute, volume, etc.) that have a standard design that is dependant on your browser. But, if you want to enhance the design of these controls, you can actually build and style your own external controls for your HTLM5 video.
In this tutorial, we are going to show you how to create custom HTML5 video controls for a video in Divi. To do this, we will create and style the video and custom control buttons using the Divi Builder. Then we’ll add some custom Javascript to make it all work.
Let’s get started!
- 1 Sneak Peek
- 2 Download the Layout for FREE
- 3 Download For Free
- 4 What You Need to Get Started
- 5 Brief Overview of our Goal for this Tutorial
- 6 Part 1: Creating the HTML5 Video in Divi
- 7 Part 2: Creating the Progress Bar
- 8 Part 3: Creating the Video Control Buttons in Divi
- 9 Part 4: Adding the Custom CSS and JS Code
- 10 Final Result
- 11 Explore More
- 12 Final Thoughts
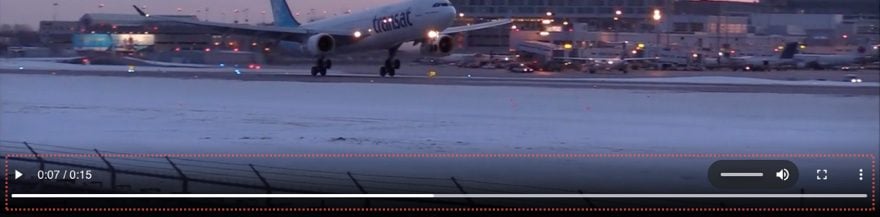
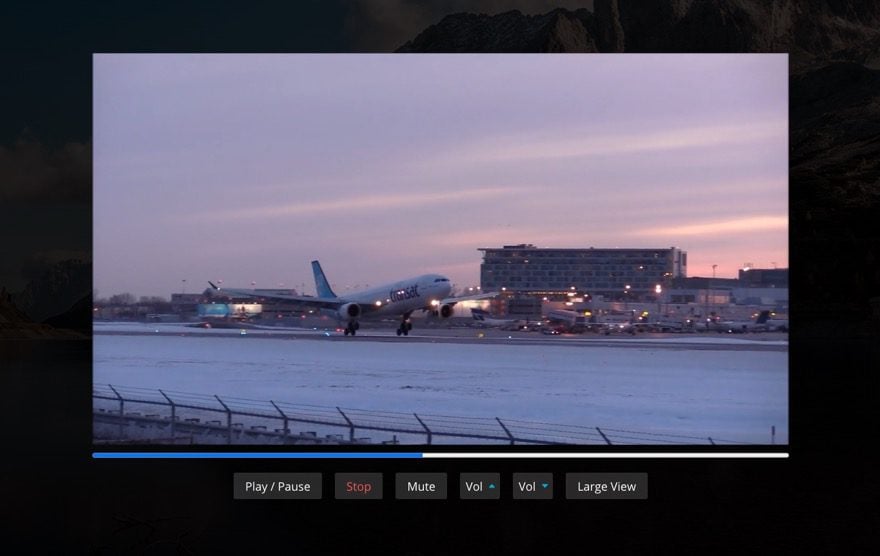
Sneak Peek
Here is a quick look at the design we’ll build in this tutorial.
You can also check out this codepen that demonstrates some of the same functionality featured in this tutorial.
Download the Layout for FREE
To lay your hands on the designs from this tutorial, you will first need to download it using the button below. To gain access to the download you will need to subscribe to our newsletter by using the form below. As a new subscriber, you will receive even more Divi goodness and a free Divi Layout pack every Monday! If you’re already on the list, simply enter your email address below and click download. You will not be “resubscribed” or receive extra emails.

To import the section layout to your Divi Library, navigate to the Divi Library.
Click the Import button.
In the portability popup, select the import tab and choose the download file from your computer.
Then click the import button.

Once done, the section layout will be available in the Divi Builder.
Let’s get to the tutorial, shall we?
What You Need to Get Started

To get started, you will need to do the following:
- If you haven’t yet, install and activate the Divi Theme.
- Create a new page in WordPress and use the Divi Builder to edit the page on the front end (visual builder).
- Choose the option “Build From Scratch”.
After that, you will have a blank canvas to start designing in Divi.
Brief Overview of our Goal for this Tutorial
The basic syntax for an HTML5 video would look something like this…
<video controls="">
  <source type="video/mp4" src="video.mp4">
  <source type="video/webm" src="video.webm">
</video>
Notice the controls attribute in the video element. That is what is used to display the standard controls we normally see in an HTML5 video.
Divi’s video module uses the same HTML5 video element structure to display self-hosted videos you upload within the module. So when we use a Video Module, we are using HTML5 Videos.
Our goal for this tutorial is to initially hide those default controls for a Divi video and build some of our own external custom controls using the Divi Builder and some custom code.
Part 1: Creating the HTML5 Video in Divi
In this first part of the tutorial, we are going to create an HTML5 Video using the Divi Video Module. But first, we need to update our section background.
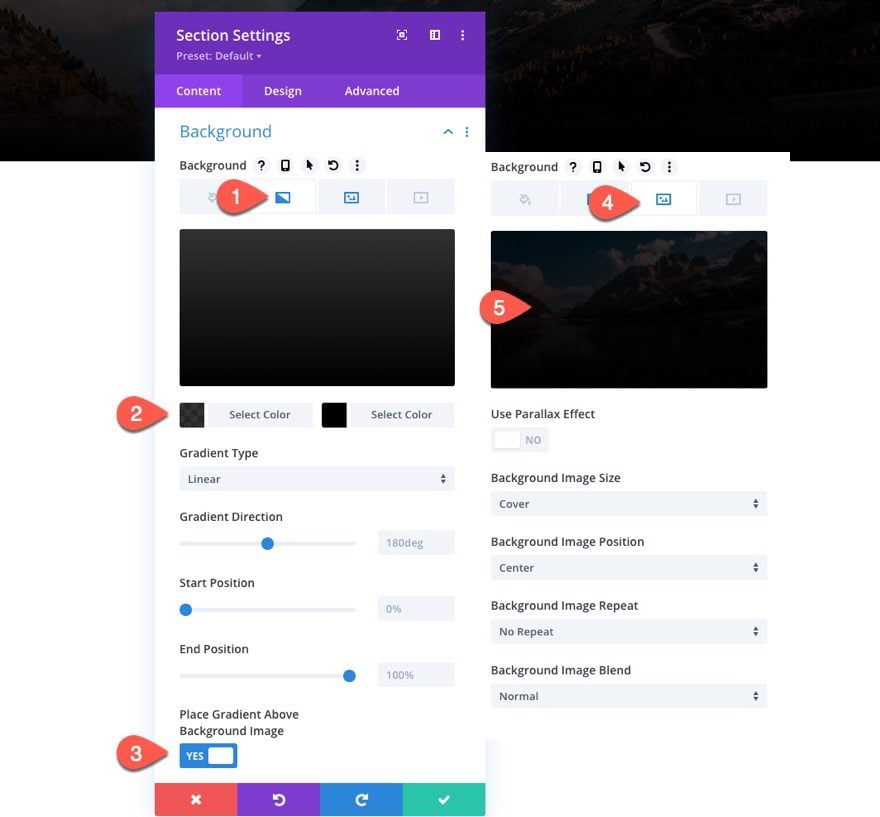
Section Background
Start by updating the section settings for the default section available by default as follows:
- Background Gradient Left Color: rgba(0,0,0,0.8)
- Background Gradient Right Color: #000000
- Place Gradient Above Background Image: YES
- Background Image: [upload image of choice]
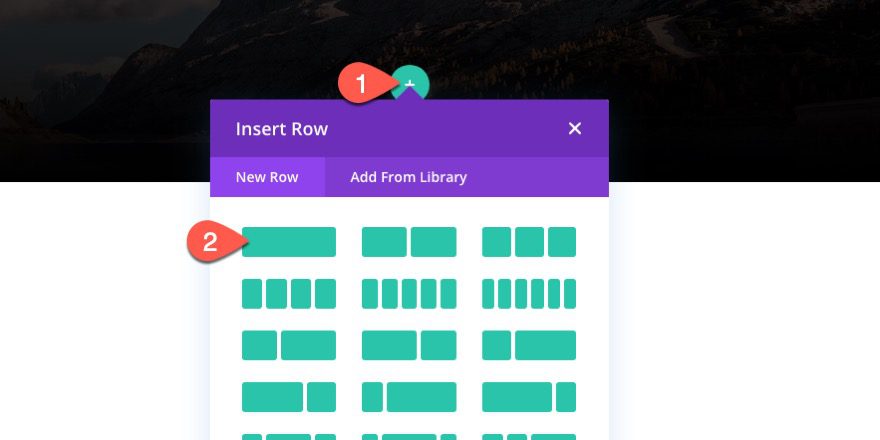
The Video Row
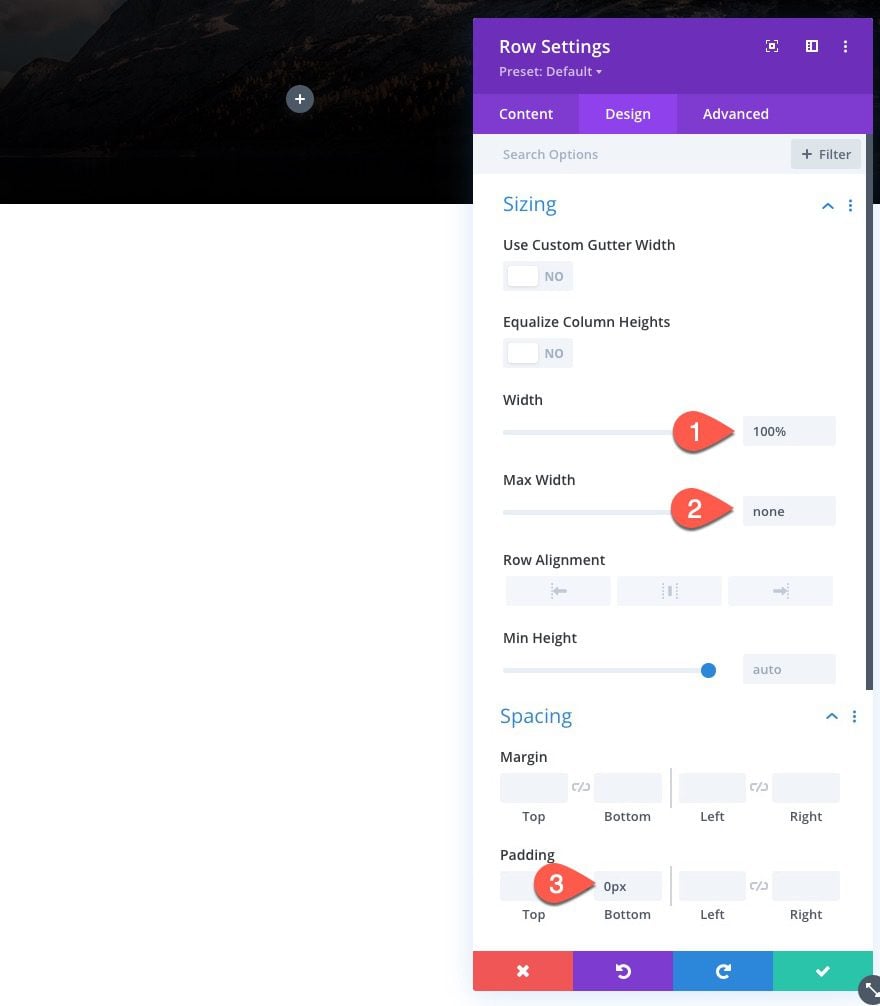
Next, we need to add the row that will contain our video. Add a new one-column row to the section.
Then update the row settings as follows:
- Width: 100%
- Max Width: none
- Padding: 0px bottom
Creating the Video
As mentioned earlier, Divi already uses the HTML5 video element within the Divi Video Module. So, to create the video, simply add a new video module to the row/column.
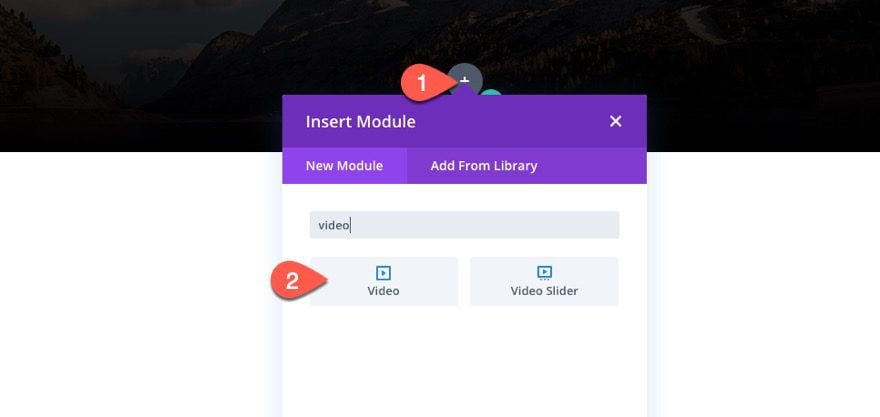
Upload Video Files to Video Module
For maximum performance, upload both an MP4 and a WEBM video file of your video to the media gallery.
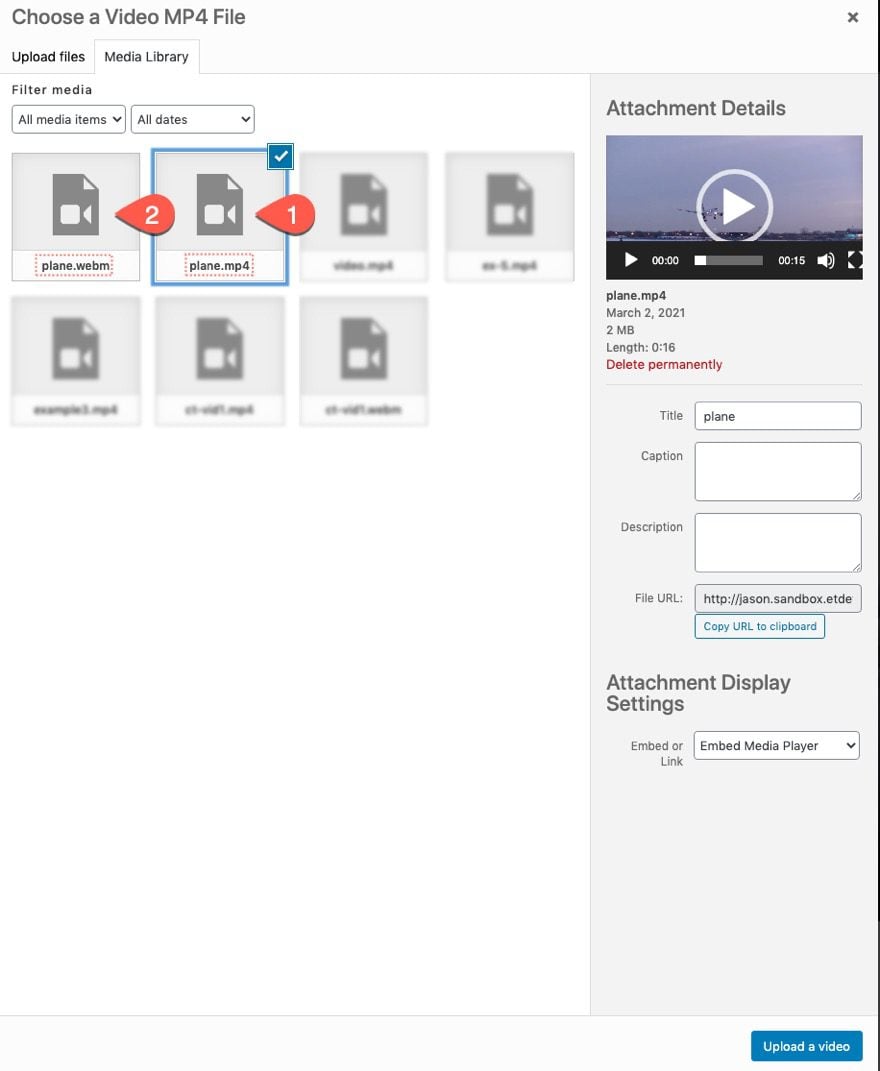
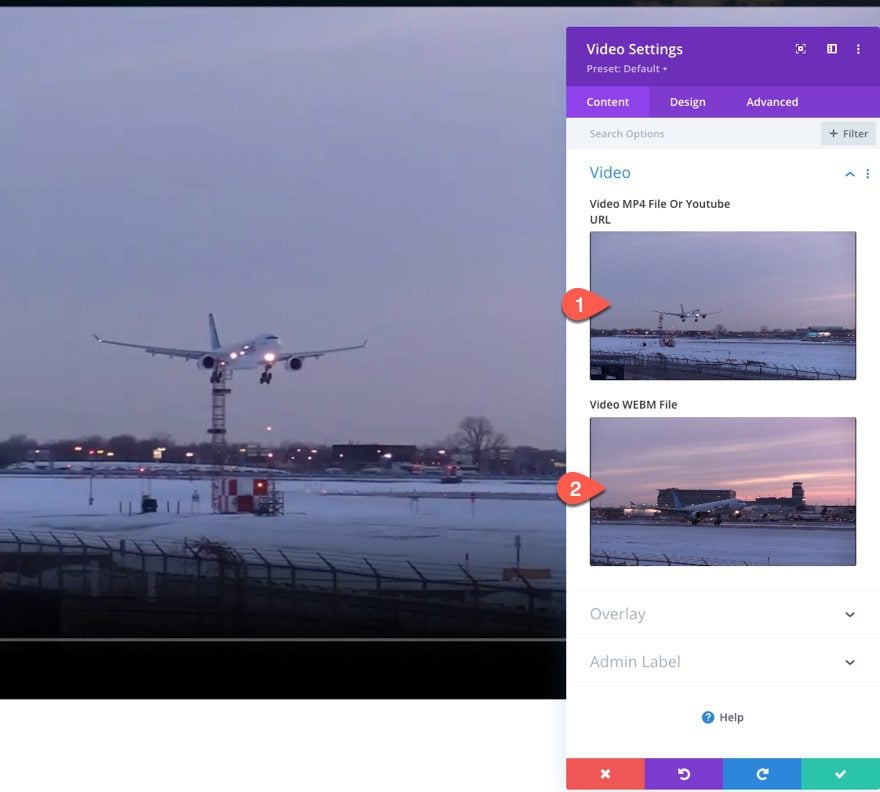
Next, add the MP4 and the WEBM video files to the video module under the content tab:
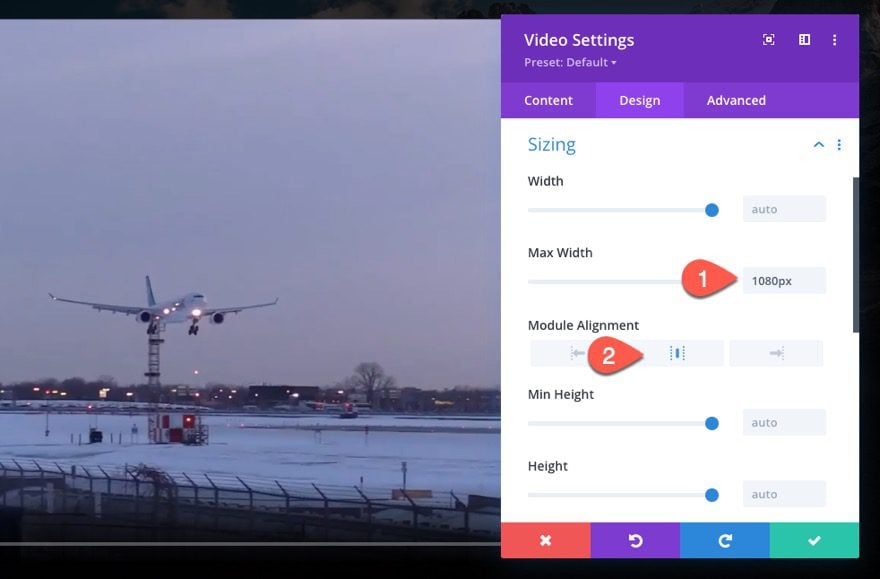
Update Video Settings
Under the design tab, update the following:
- Max Width: 1080px
- Module Alignment: center
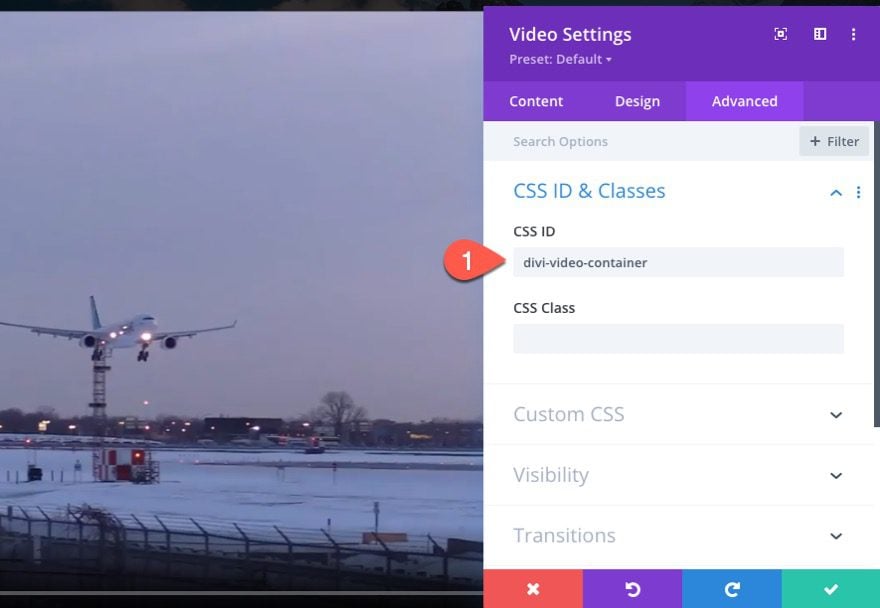
Under the advanced tab, add the following CSS ID:
- CSS ID: divi-video-container
Part 2: Creating the Progress Bar
HTML videos include built-in functionality to display a progress bar. We can use a bit of custom code to add our own progress bar for our video.
The Progress Bar Row
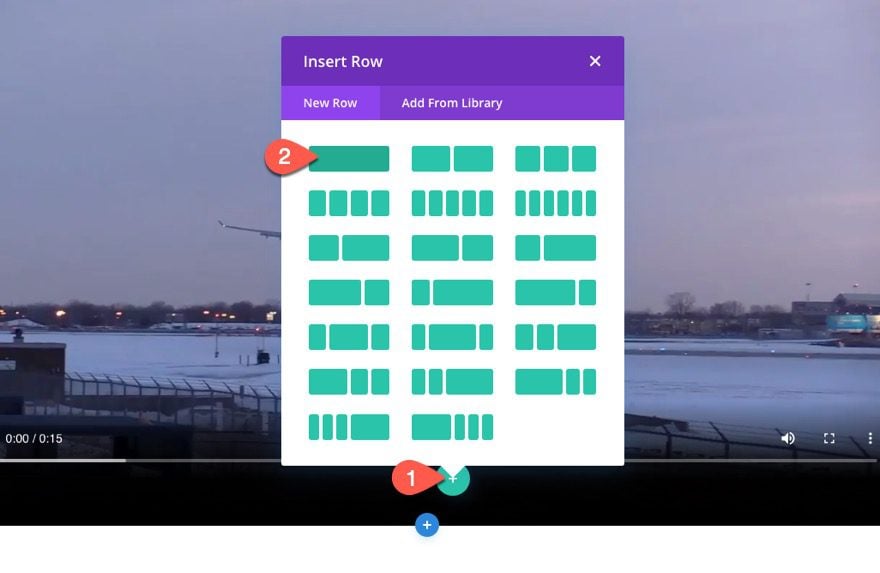
To display a custom progress bar for the video, first, create a new one-column row under the row containing the video.
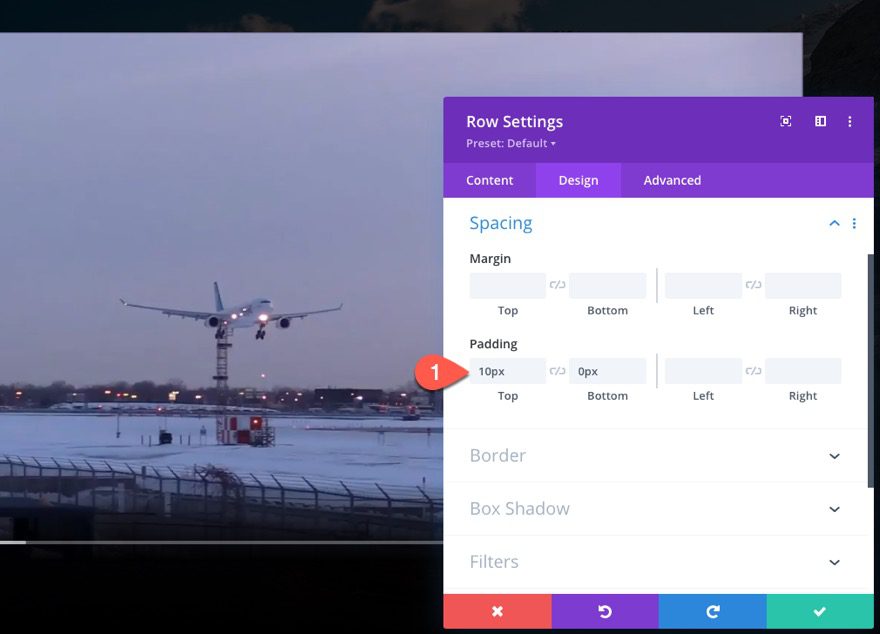
Open the row settings and update the padding as follows:
- Padding: 10px top, 0px bottom
Adding the Progress Bar HTML
To add our custom snippet of HTML to display the progress bar, we need to add a new code module to the row.
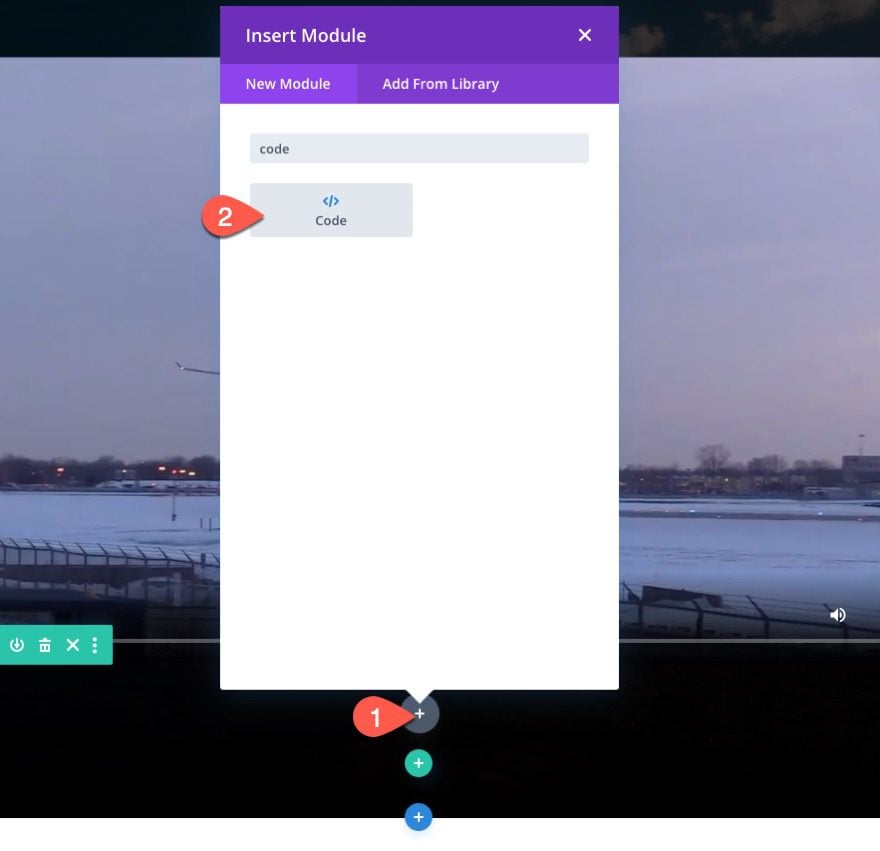
Inside the code box, paste the following HTML:
<progress id="progress" value="0" min="0">
  <span id="progress-bar"></span>
</progress>
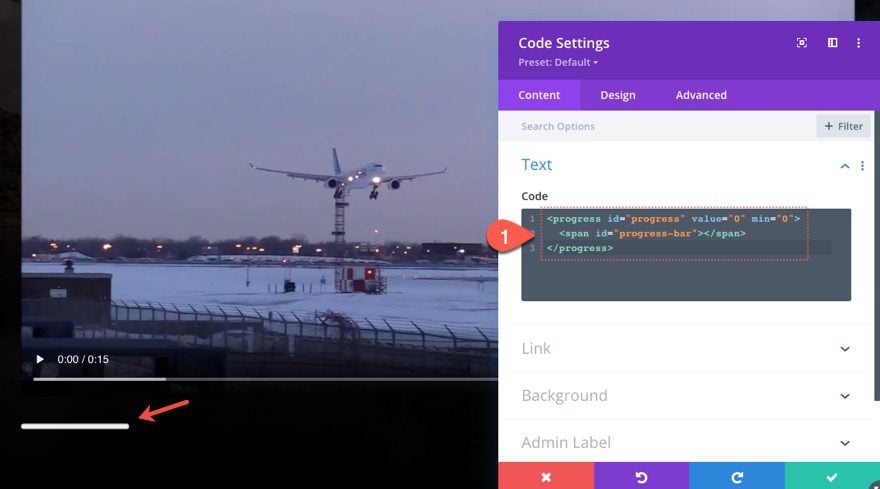
We will add the functionality we need to the progress bar with our custom Javascript later.
Now we are ready to start adding some custom video control buttons using a series of Divi button modules.
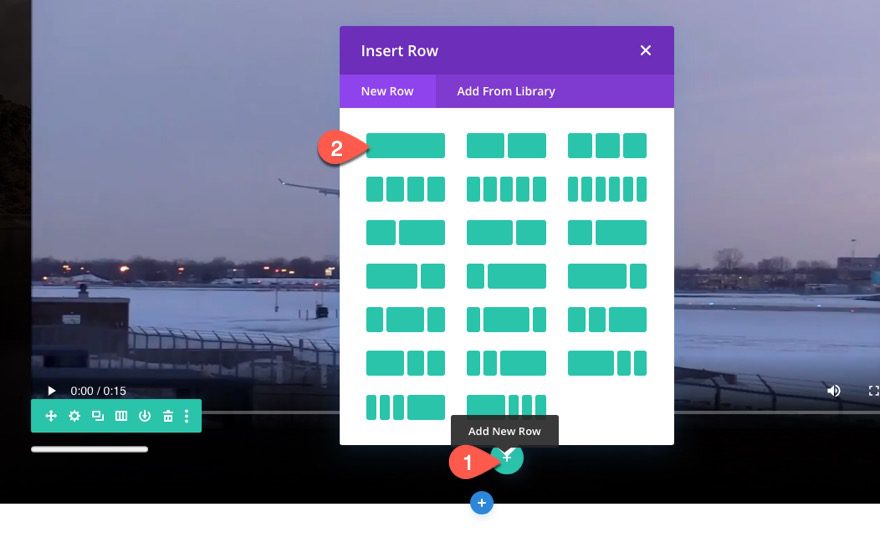
Creating the Row and Column
First, we need to set up our row and column which will serve as our button bar/container.
The Row
Add a new one-column row under the row containing the progress bar code.
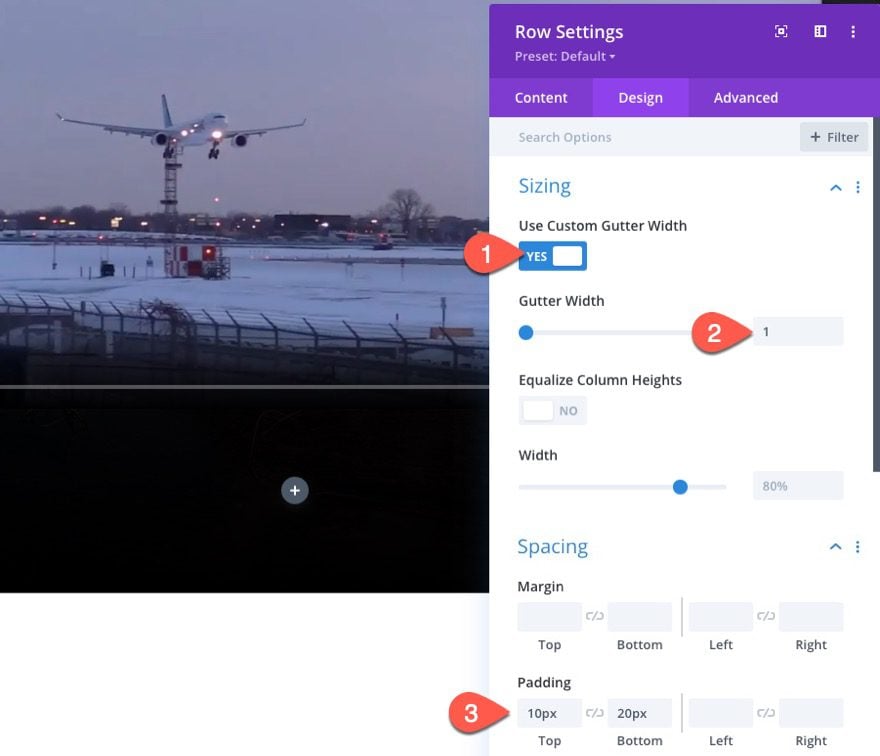
Open the row settings, and update the following:
- Gutter Width: 1
- Padding: 10px top, 20px bottom
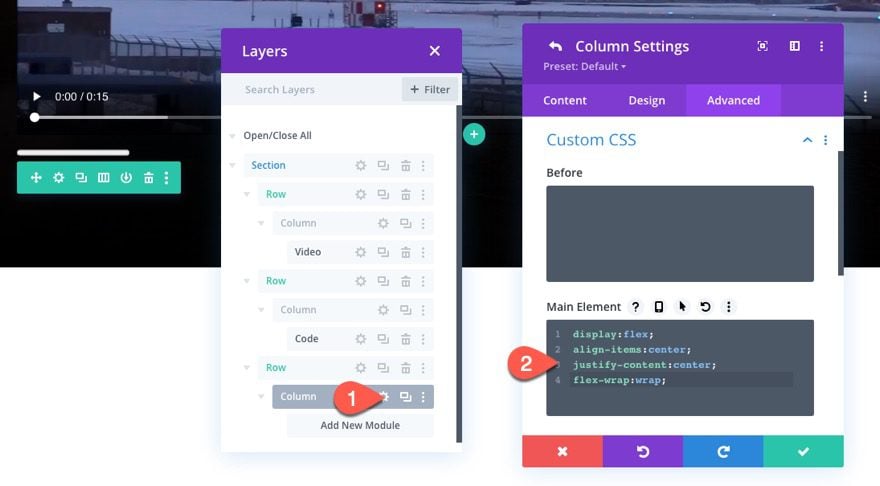
Adding Flex to the Column
A simple way to get the horizontal alignment for our buttons is to use display:flex on the column containing our buttons. To do this, open the settings for the column and add the following custom CSS to the main element:
display:flex;
align-items:center;
justify-content:center;
flex-wrap:wrap;
Now that our column is ready, we are ready to add our buttons.
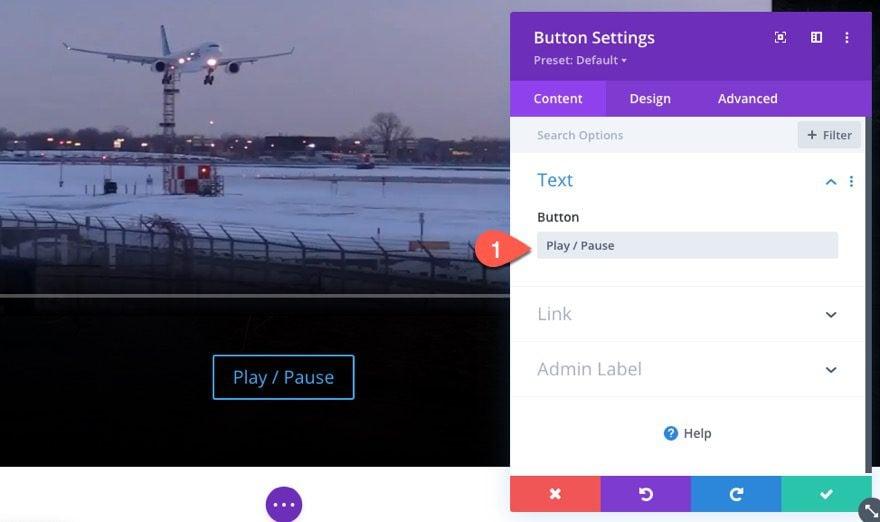
We’ll make this first button the “Play/Pause” button that will toggle the play and pause function for our video. To create the button, add a button module to the column.
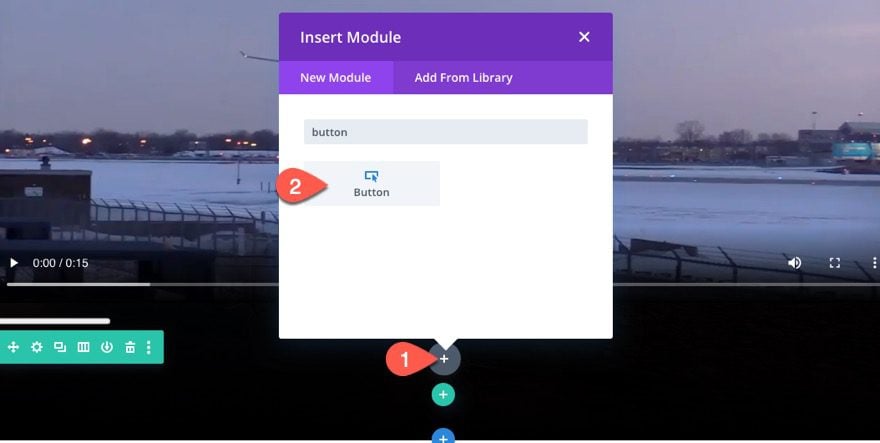
Open the button settings and update the button text:
- Button Text: Play / Pause
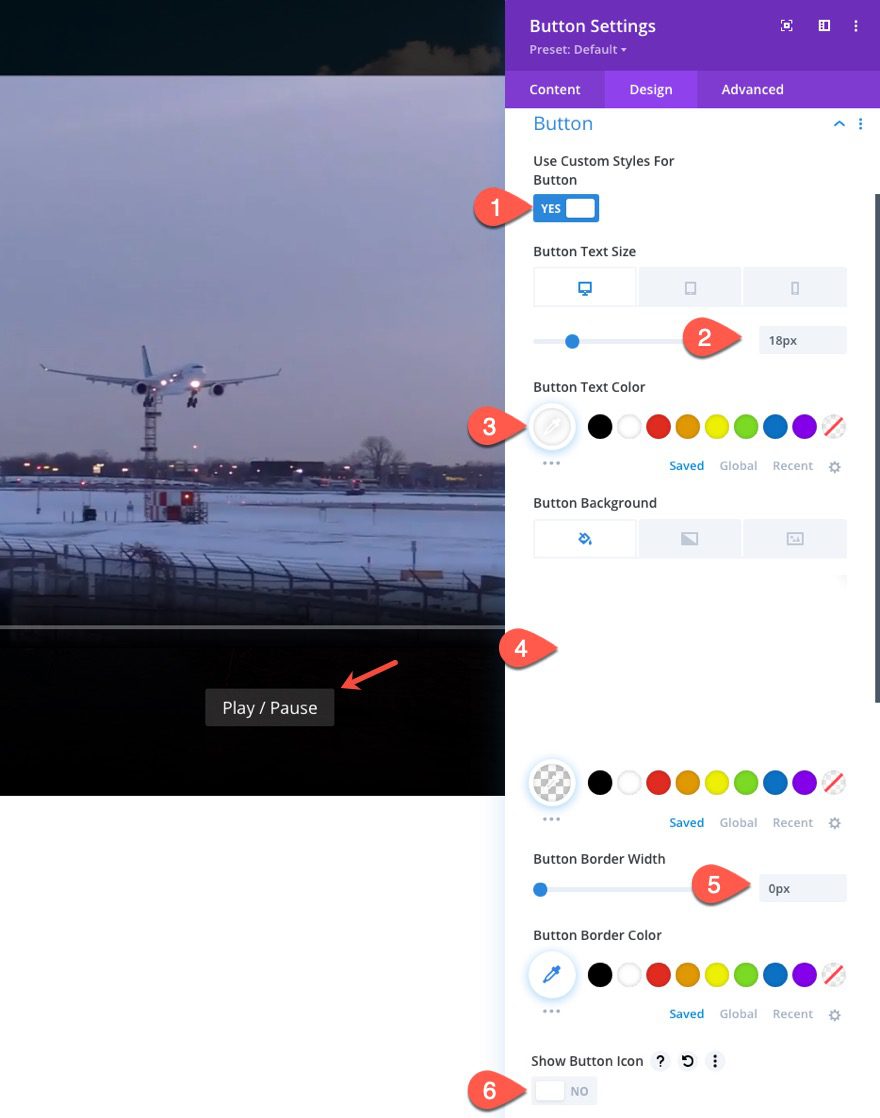
Under the design tab, style the button as follows:
- Use Custom Styles For Button: YES
- Button Text Size: 18px (desktop), 14px (tablet and phone)
- Button Text Color: #ffffff
- Button Background Color: rgba(255,255,255,0.15)
- Button Border Width: 0px
- Show Button Icon: NO
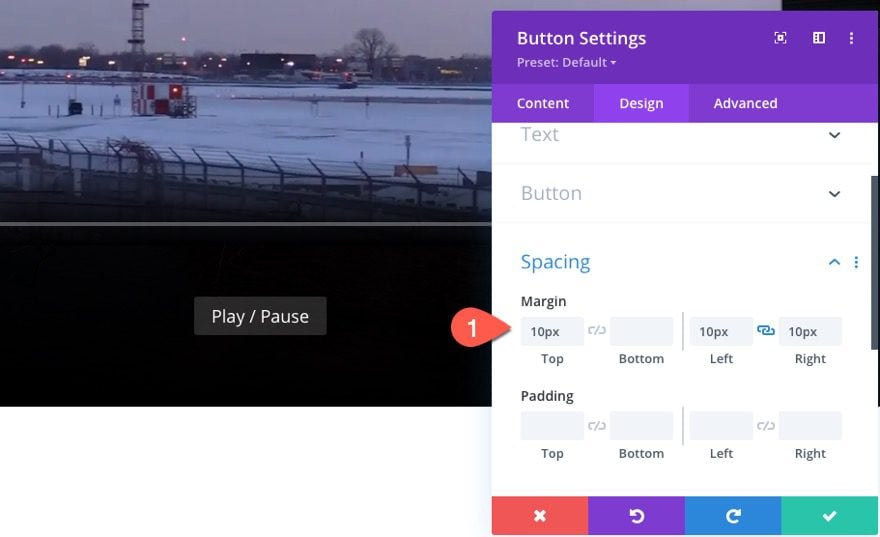
Update the margin for the button as follows:
- Margin: 10px top, 10px left, 10px right
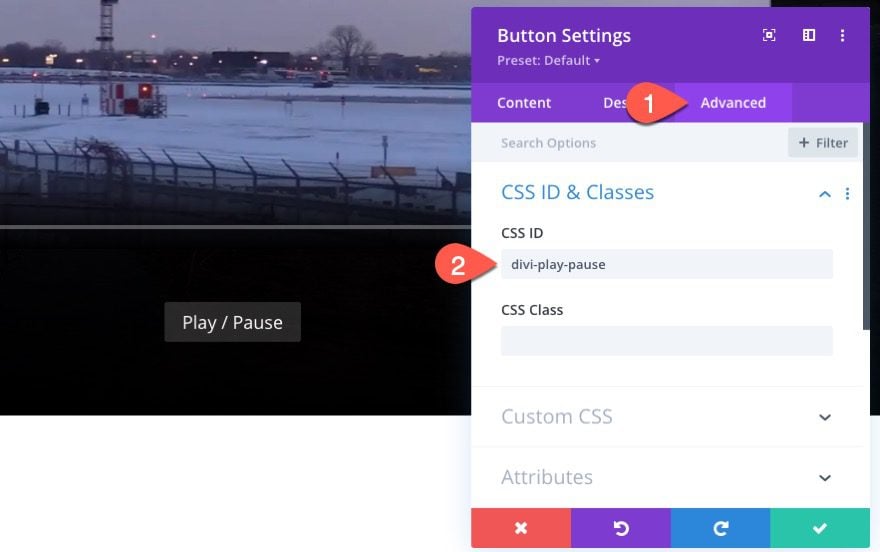
Under the advanced tab, add the following CSS ID:
- CSS ID: divi-play-pause
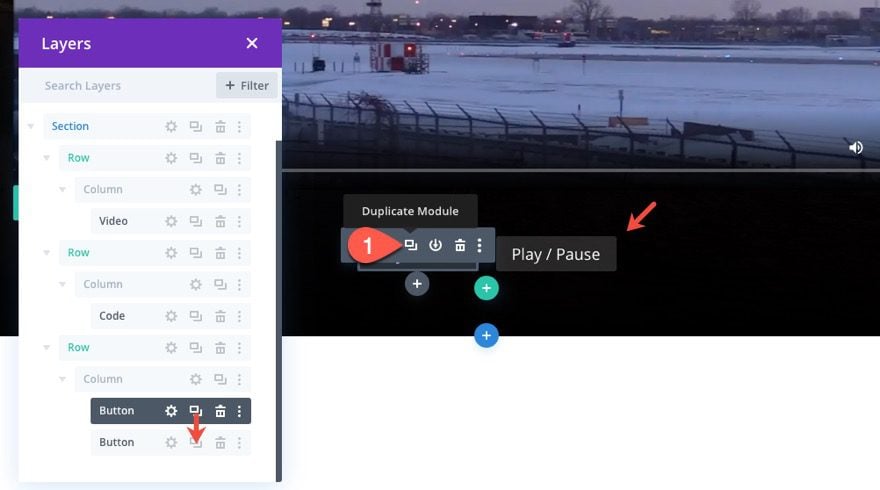
Next up is the Stop button. This button will stop the video and bring it back to the starting point.
To create the button, duplicate the “play/pause” button module.
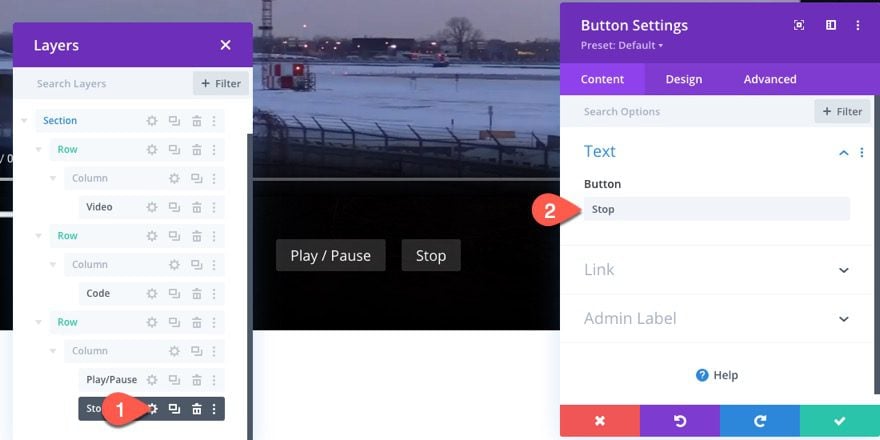
Then update the button text:
- Button Text: Stop
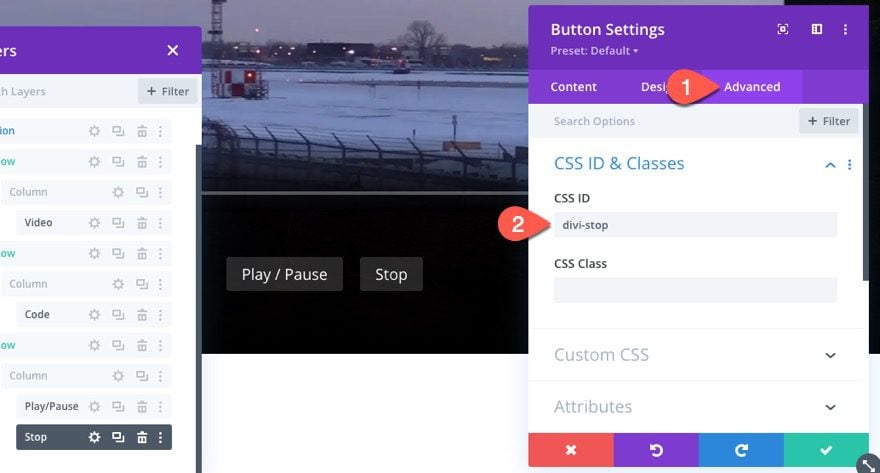
And give the button a custom CSS ID:
- CSS ID: divi-stop
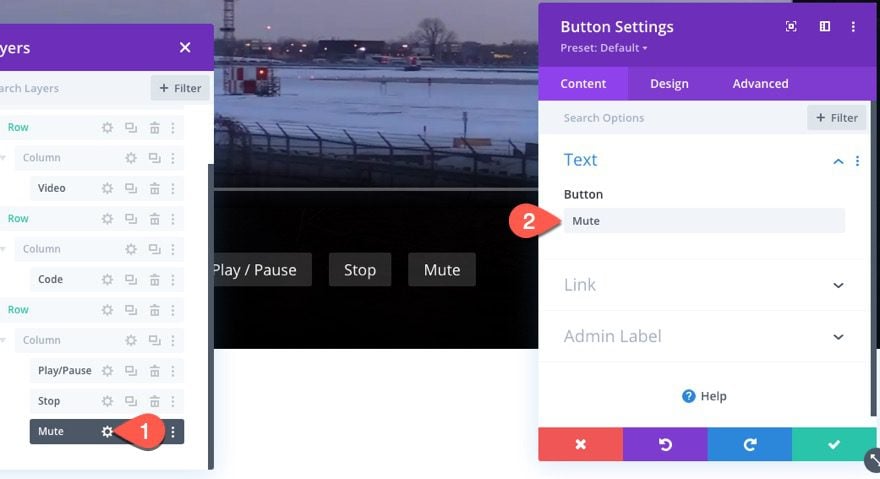
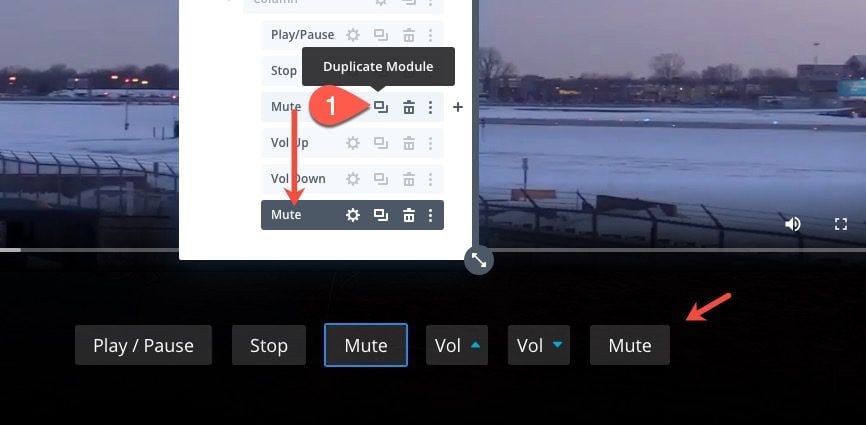
To create the Mute button that will mute the volume of the video, duplicate the “Stop” button we just created.
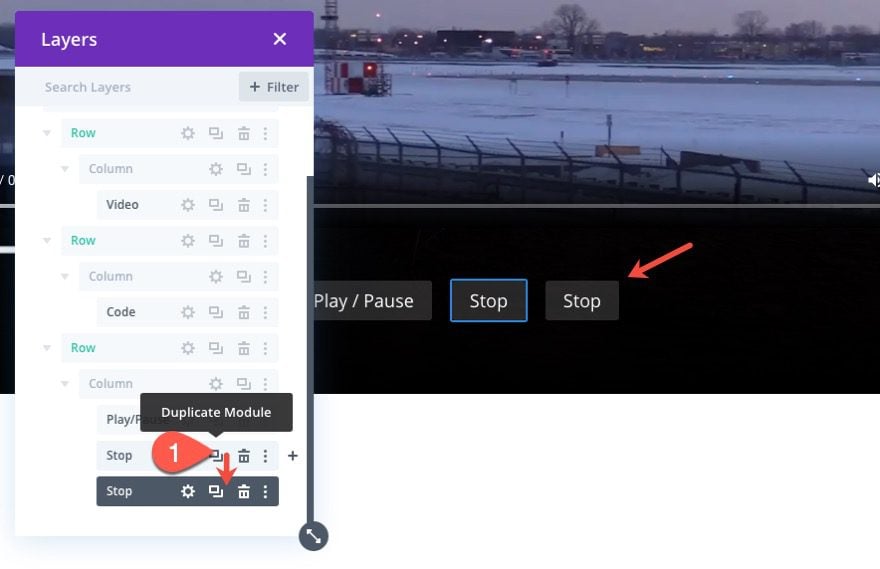
Update the button text:
- Button Text: Mute
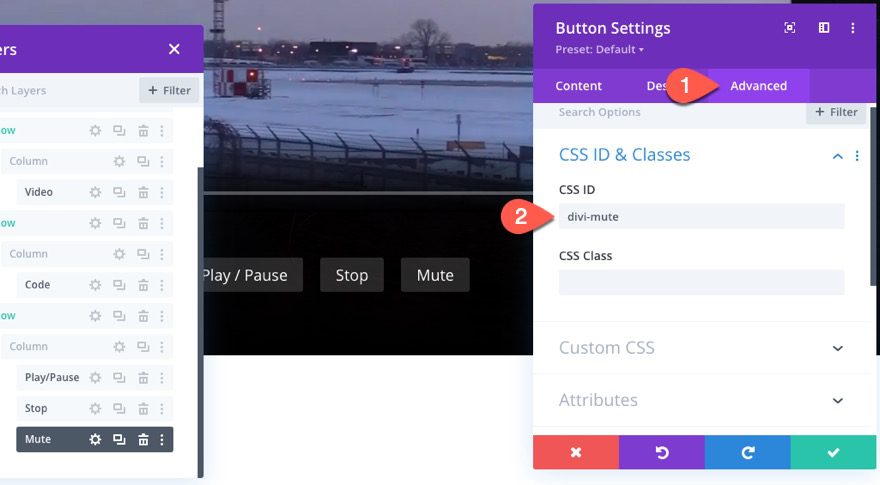
Then give it a custom CSS ID:
- CSS ID: divi-mute
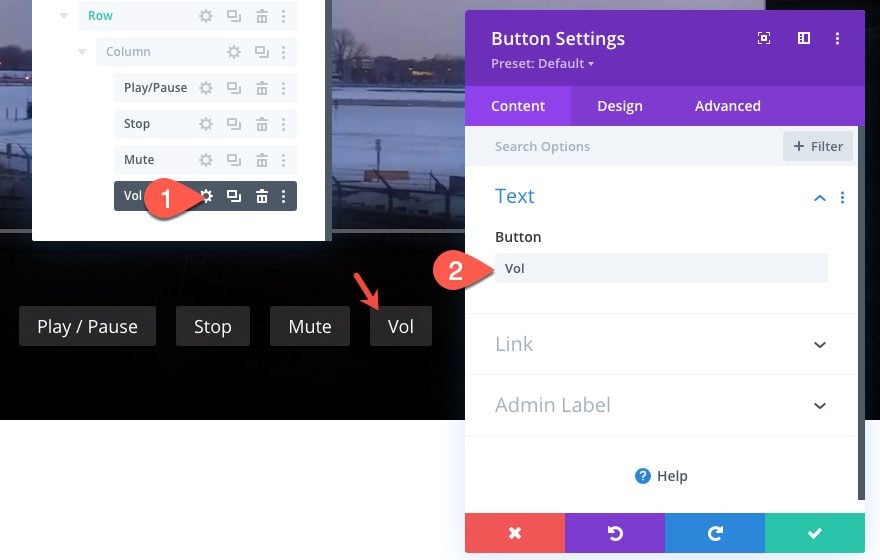
Our next button will increase the volume of the video incrementally each time you click it. We’ll call it the Volume Up button.
To create the button, duplicate the “Mute” button module.
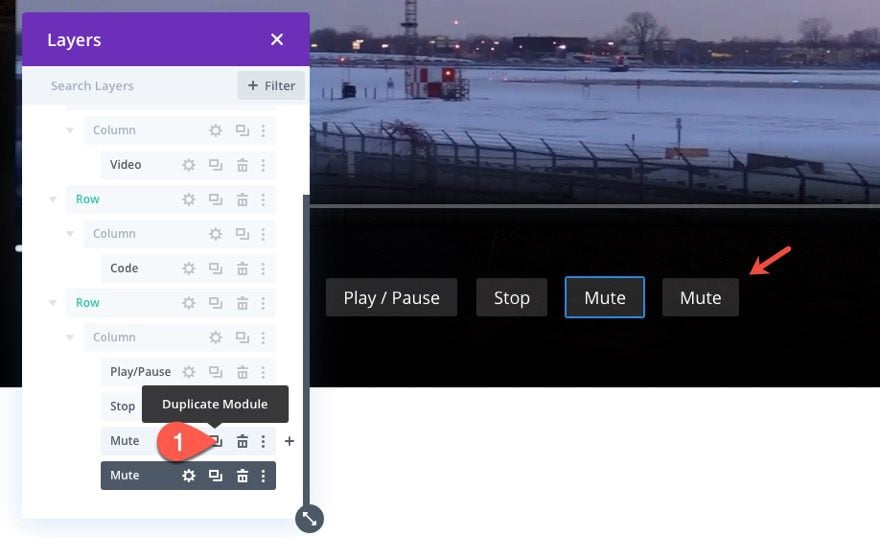
Then update the button text:
- Button Text: Vol
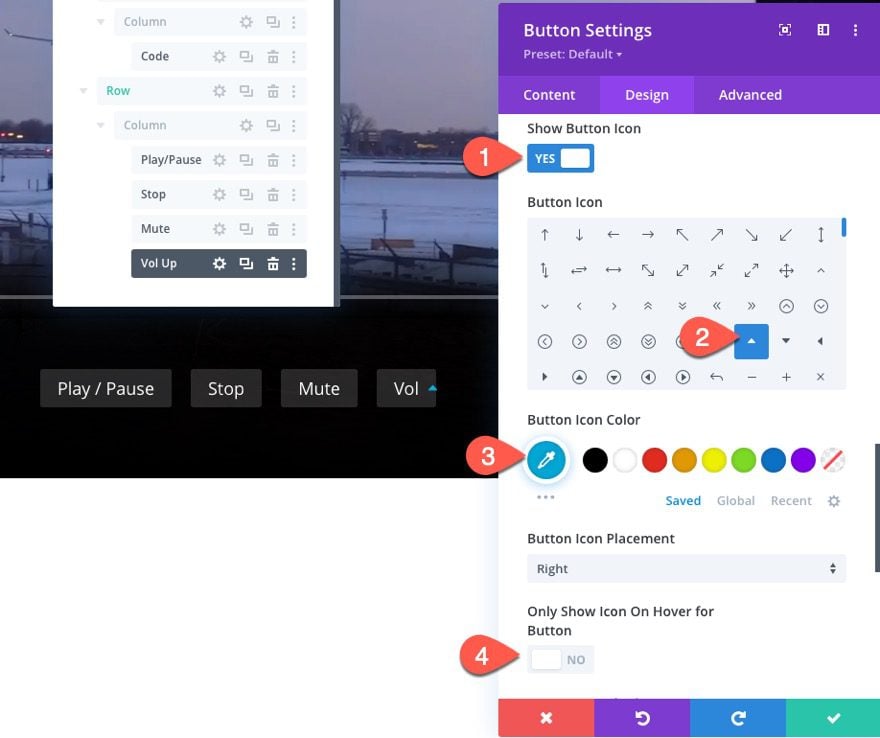
Under the design tab, add an up arrow next to the button text by updating the following:
- Show Button Icon: YES
- Button Icon: up arrow (see screenshot)
- Button Icon Color: #00a9d8
- Only Show Icon On Hover for Button: NO
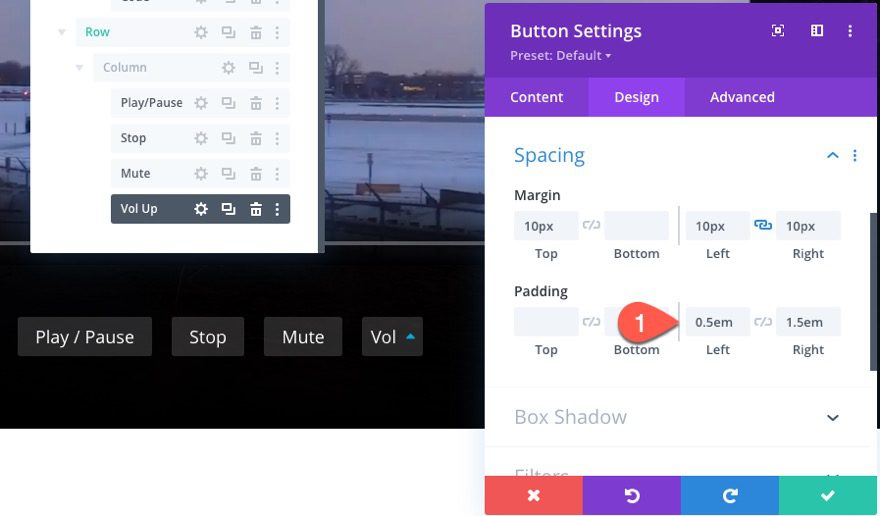
Then update the padding of the button as follows:
- Padding: 0.5em left, 1.5em right
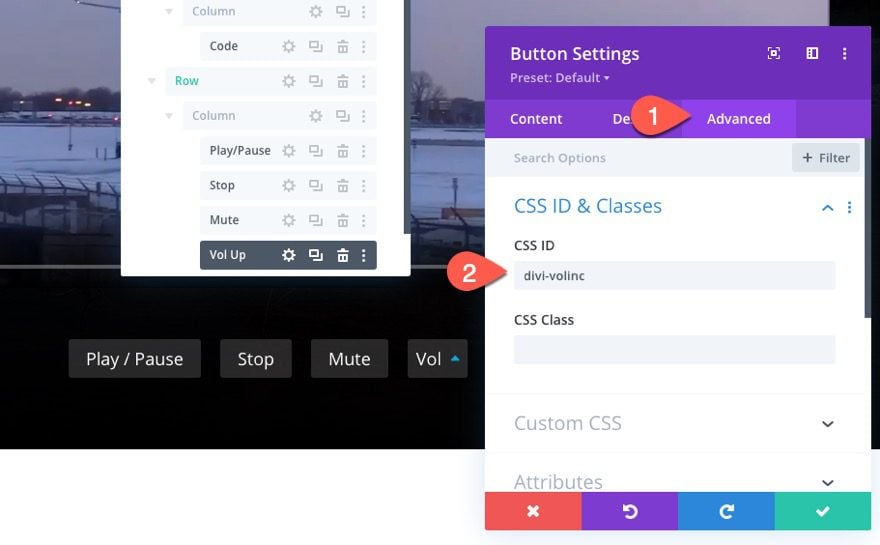
Then update the CSS ID:
- CSS ID: divi-volinc
We can’t have a “Volume Up” button with also having a “Volume Down” button to incrementally decrease the volume of the video with each click.
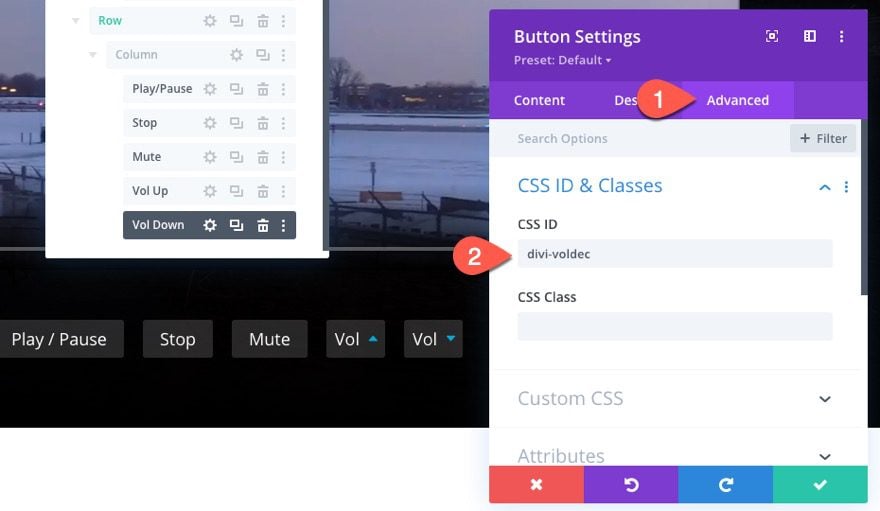
To create the “Volume Down” button, duplicate the “Volume Up” button we just created.
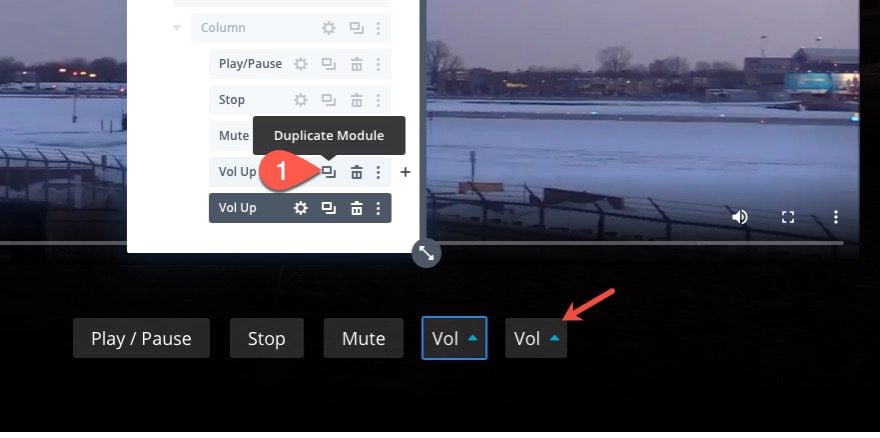
Then update the button icon to a “down arrow” icon.

Then update the CSS ID:
- CSS ID: divi-voldec
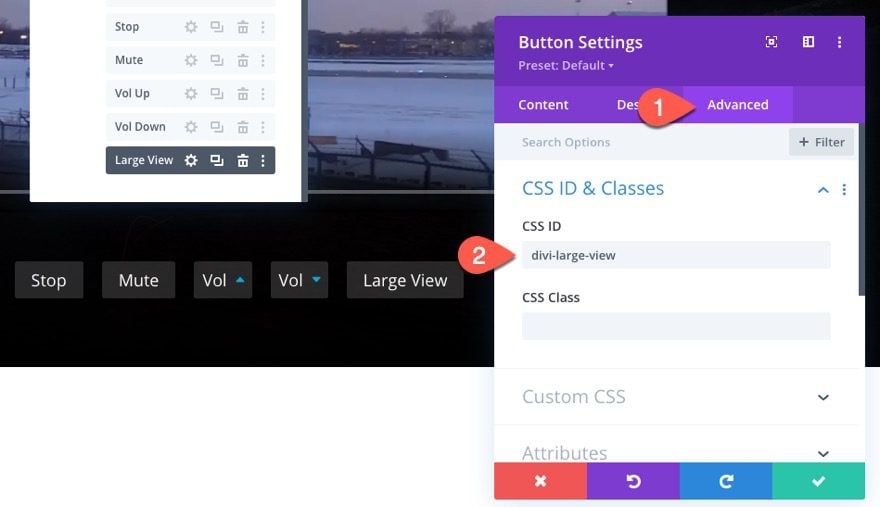
For our last button, we are going to create a “Large View” button that will increase the width of the video container on click.
To create the button, duplicate the “Mute” button. Then drag the duplicate button under the “Volume Down” button so that it sits to the far right of the button bar.
Open the settings for the duplicate button and update the button text:
- Button Text: Large View
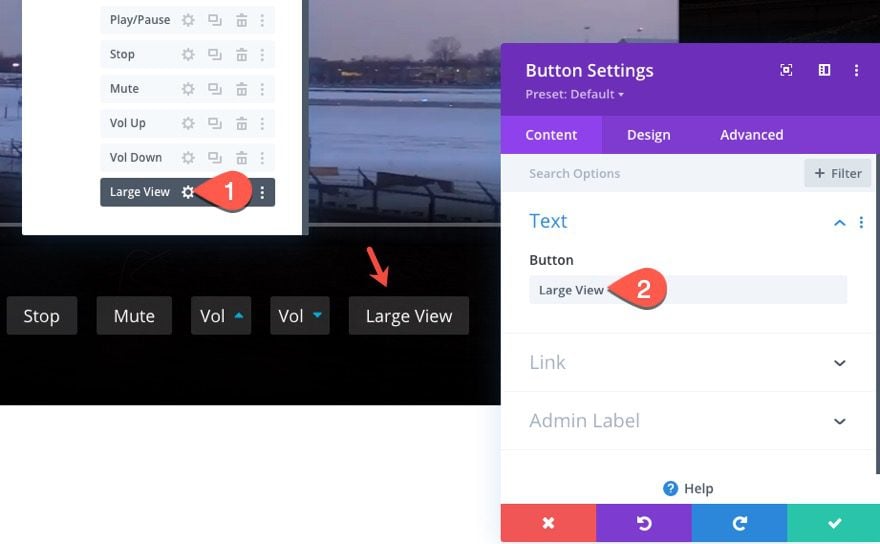
Then give the button a custom CSS ID:
- CSS ID: divi-large-view
Part 4: Adding the Custom CSS and JS Code
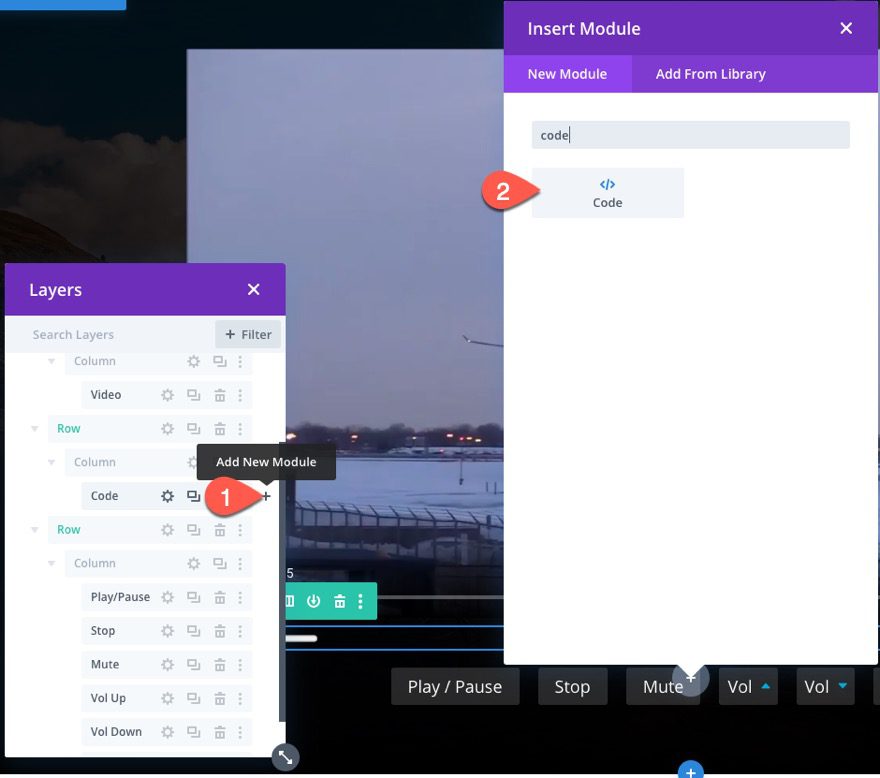
Now that all of our Divi elements are created, we are ready to bring in the custom code needed to make everything work.
Go ahead and add another code module under the code module containing the progress bar HTML in the second row of our section.
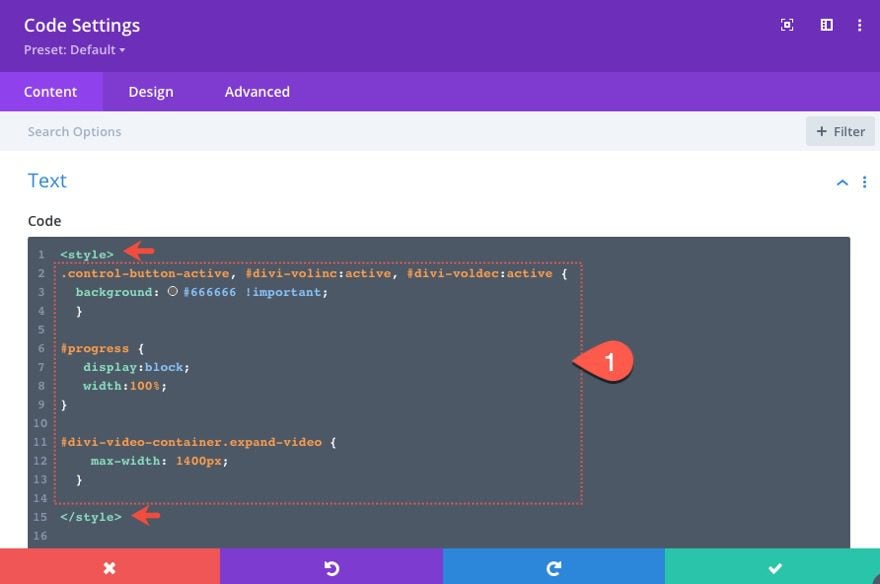
The CSS
In the code box, paste the following CSS making sure to wrap the CSS inside the necessary style tags.
.control-button-active,
#divi-volinc:active,
#divi-voldec:active,
#divi-play-pause:active,
#divi-stop:active {
  background: #666666 !important;
}

#progress {
  display: block;
  width: 100%;
}

#divi-video-container.expand-video {
  max-width: 1400px;
}
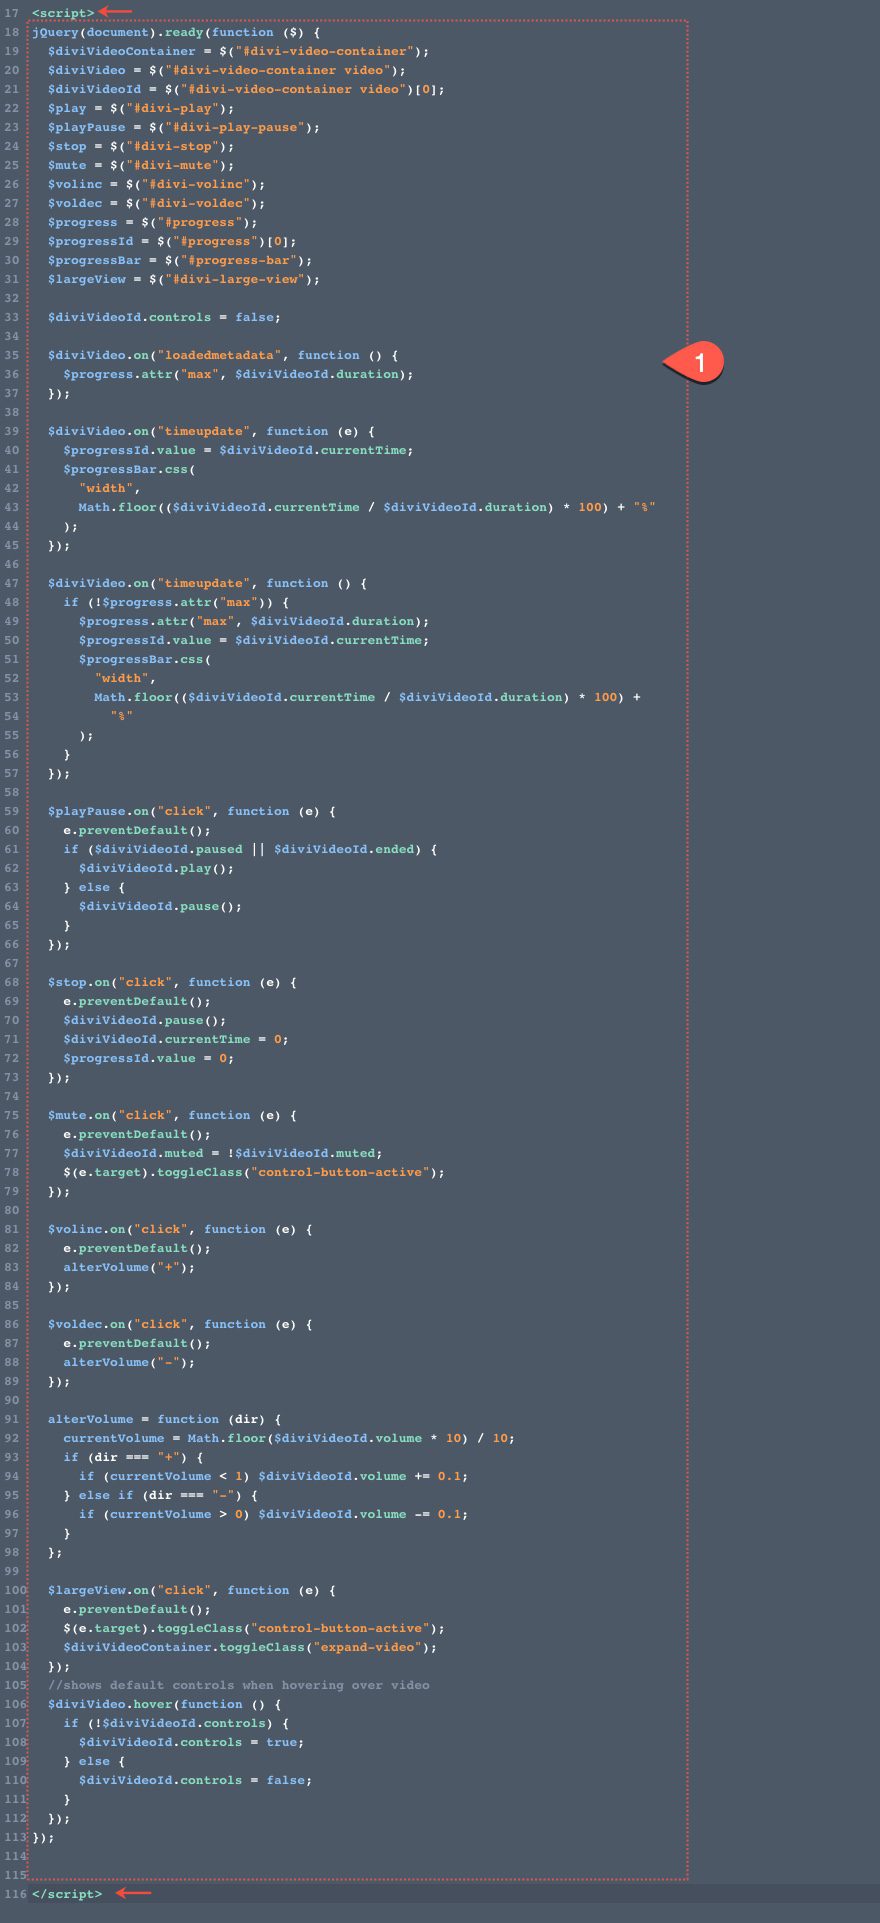
The JavaScript/JQuery
Under the CSS (the ending style tag), paste the following JS code making sure to wrap the code inside the necessary script tags.
jQuery(document).ready(function ($) {
  $diviVideoContainer = $("#divi-video-container");
  $diviVideo = $("#divi-video-container video");
  videoElement = $("#divi-video-container video")[0];
  $play = $("#divi-play");
  $playPause = $("#divi-play-pause");
  $stop = $("#divi-stop");
  $mute = $("#divi-mute");
  $volinc = $("#divi-volinc");
  $voldec = $("#divi-voldec");
  $progress = $("#progress");
  progressElement = $("#progress")[0];
  $progressBar = $("#progress-bar");
  $largeView = $("#divi-large-view");

  videoElement.controls = false;

  $diviVideo.on("loadedmetadata", function () {
    $progress.attr("max", videoElement.duration);
  });

  $diviVideo.on("timeupdate", function (e) {
    progressElement.value = videoElement.currentTime;
    $progressBar.css(
      "width",
      Math.floor((videoElement.currentTime / videoElement.duration) * 100) + "%"
    );
  });

  $diviVideo.on("timeupdate", function () {
    if (!$progress.attr("max")) {
      $progress.attr("max", videoElement.duration);
      progressElement.value = videoElement.currentTime;
      $progressBar.css(
        "width",
        Math.floor((videoElement.currentTime / videoElement.duration) * 100) +
          "%"
      );
    }
  });

  $playPause.on("click", function (e) {
    e.preventDefault();
    if (videoElement.paused || videoElement.ended) {
      videoElement.play();
    } else {
      videoElement.pause();
    }
  });

  $stop.on("click", function (e) {
    e.preventDefault();
    videoElement.pause();
    videoElement.currentTime = 0;
    progressElement.value = 0;
  });

  $mute.on("click", function (e) {
    e.preventDefault();
    videoElement.muted = !videoElement.muted;
    $(e.target).toggleClass("control-button-active");
  });

  $volinc.on("click", function (e) {
    e.preventDefault();
    alterVolume("+");
  });

  $voldec.on("click", function (e) {
    e.preventDefault();
    alterVolume("-");
  });

  alterVolume = function (dir) {
    currentVolume = Math.floor(videoElement.volume * 10) / 10;
    if (dir === "+") {
      if (currentVolume < 1) videoElement.volume += 0.1;
    } else if (dir === "-") {
      if (currentVolume > 0) videoElement.volume -= 0.1;
    }
  };

  $largeView.on("click", function (e) {
    e.preventDefault();
    $(e.target).toggleClass("control-button-active");
    $diviVideoContainer.toggleClass("expand-video");
  });
  //shows default controls when hovering over video
  $diviVideo.hover(function () {
    if (!videoElement.controls) {
      videoElement.controls = true;
    } else {
      videoElement.controls = false;
    }
  });
});
Breaking Down the Code
Variables Pointing to HTML elements and Divi Buttons
To start, we need to declare variables that point to each of the Divi elements that have our specified CSS ID. We also need two important variables that point to actual HTML elements (not jQuery objects). These include videoElement (which points to the HTML video element) and progressElement (which points to the HTML progress element).
$diviVideoContainer = $("#divi-video-container");
$diviVideo = $("#divi-video-container video");
videoElement = $("#divi-video-container video")[0];
$play = $("#divi-play");
$playPause = $("#divi-play-pause");
$stop = $("#divi-stop");
$mute = $("#divi-mute");
$volinc = $("#divi-volinc");
$voldec = $("#divi-voldec");
$progress = $("#progress");
progressElement = $("#progress")[0];
$progressBar = $("#progress-bar");
$largeView = $("#divi-large-view");
Once the variables are in place, we hide the default HTML video controls.
videoElement.controls = false;
Next, we need to make our progress bar grow in width relative to the current time and duration of the video.
Once the video loads the meta data (using the loadedmetadata event), on the progress element, we set a max attribute with a value equal to the duration of the video .
$diviVideo.on("loadedmetadata", function () {
  $progress.attr("max", videoElement.duration);
});
Then we use the timeupdate event to update the progress bar’s value and width to indicate the current playback position.
$diviVideo.on("timeupdate", function (e) {
  progressElement.value = videoElement.currentTime;
  $progressBar.css(
    "width",
    Math.floor((videoElement.currentTime / videoElement.duration) * 100) + "%"
  );
});
We also add a fallback for mobile browsers just in case the progress element’s max attribute isn’t set correctly at this point.
$diviVideo.on("timeupdate", function () {
  if (!$progress.attr("max")) {
    $progress.attr("max", videoElement.duration);
    progressElement.value = videoElement.currentTime;
    $progressBar.css(
      "width",
      Math.floor((videoElement.currentTime / videoElement.duration) * 100) +
        "%"
    );
  }
});
Next, we start creating functions that do things when clicking on our buttons.
For the play/pause button, we toggle the play() and pause() methods using the Media API’s paused and ended attributes with an if statement.
$playPause.on("click", function (e) {
  e.preventDefault();
  if (videoElement.paused || videoElement.ended) {
    videoElement.play();
  } else {
    videoElement.pause();
  }
});
For the stop button, we pause the video and bring the progress value and current time back to 0.
$stop.on("click", function (e) {
  e.preventDefault();
  videoElement.pause();
  videoElement.currentTime = 0;
  progressElement.value = 0;
});
For the mute button, we toggle the muted attribute and also toggle a class that will style the button with a lighter background when muted.
$mute.on("click", function (e) {
  e.preventDefault();
  videoElement.muted = !videoElement.muted;
  $(e.target).toggleClass("control-button-active");
});
For the Volume buttons, one is defined to increase volume on click ($volinc) and the other is defined to decrease the volume on click ($voldec). This is accomplished using the alterVolume() function which checks the dir parameter for a “+” or “-“ and increases or decreases the volume incrementally on each click.
$volinc.on("click", function (e) {
  e.preventDefault();
  alterVolume("+");
});

$voldec.on("click", function (e) {
  e.preventDefault();
  alterVolume("-");
});

alterVolume = function (dir) {
  currentVolume = Math.floor(videoElement.volume * 10) / 10;
  if (dir === "+") {
    if (currentVolume < 1) videoElement.volume += 0.1;
  } else if (dir === "-") {
    if (currentVolume > 0) videoElement.volume -= 0.1;
  }
};
The Large View button toggles a CSS class that adjusts the max-width of the video container on click.
$largeView.on("click", function (e) {
  e.preventDefault();
  $(e.target).toggleClass("control-button-active");
  $diviVideoContainer.toggleClass("expand-video");
});
And because this example doesn’t contain all of the controls and functionality available within the default video controls, here is a function that shows those controls attribute when hovering over the video.
$diviVideo.hover(function () {
  if (!videoElement.controls) {
    videoElement.controls = true;
  } else {
    videoElement.controls = false;
  }
});
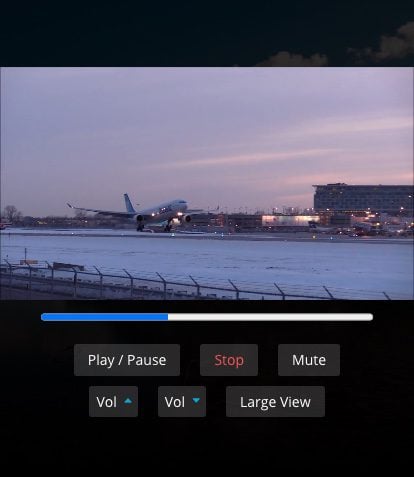
Final Result
Here is the final result.
And here is how the controls stack on mobile.
You can also check out this codepen that demonstrates the same functionality.
Explore More
If you are familiar with HTML and Javascript and are interested in adding more custom controls and functionality to your HTML5 Videos, you can check this guide on how to create a video player from scratch. You may also want to check out the HTMLMediaElement API to see the possibilities there.
I look forward to sharing more helpful ways to manipulate HTML5 videos and Divi in the near future.
Final Thoughts
Creating some external custom controls for your videos in Divi can open the doors for unique design and functionality. Granted, the example from this tutorial doesn’t explore all the options (or controls) that are available. And, the functionality is limited to one video on a page, not multiple. So it is ideal for customizing one of the main videos you want to feature. But hopefully, it will serve as a solid introduction to what is needed to create some custom HTML5 video controls of your own for your next project.
I look forward to hearing from you in the comments.
Cheers!


Nice tutorial Jason…Thanks! I assume this is only relevant to video that are uploaded to the media library and won’t work for Videos from URL like YouTube or Vimeo correct?
John,
Correct. This is strictly for HTML videos. For controlling YT videos, you would need to tap into their api… https://developers.google.com/youtube/iframe_api_reference
Thanks for giving the information tutorial
Hi Jason,
I’m Glad I bumped into this, I appreciate your effort for making such a comprehensive guide. Well-written and the Images you’ve provided really helped me follow the instructions easier. I bumped into other custom html5 video controls guide; and I’m telling you, yours are the best!!
Thank you so much & Regards
Chris
So glad it was helpful to you, Chris. Thanks for the support.
This is more helpful, I have one question about this: when I click on the video with the right button of the mouse, in the dropdown menu is active the function to download the video. What should I do to not permit the users to download the video?
Thank you
You can either try to disable the right click functionality on the video element or just hide the download button on the default controls.
For example, in this tutorial, you could add the following to disable right click:
  videoElement.oncontextmenu = function () {
   return false;
};
Or you can hide just the download button with this:
Ready to built a DiviTube 😀
Thanks Jason.
Nice! 🙂