
This post is part 2 of 5 in our mini series titled 5 Fun Ways to Style Divi’s Audio Module. Stay tuned this week for all five unique examples of Divi’s Audio Module, with a tutorial on how to achieve each one!
Today, we are going to customize the default module to create a retro-inspired audio player. We’ll also add a call to action module, encouraging users to download your music on their personal devices. Follow the tutorial below, and share your thoughts in the comments section. I’d love to know what you think!
- 1 Today’s Before & After: The Divi Audio Module
- 2 How to Make a Retro Record Inspired Divi Audio Module
- 3 The Concept & Inspiration
- 4 Preparing the Design Elements
- 5 Implementing the Design with Divi
- 6 Section Settings
- 7 Row Settings
- 8 Audio Module Settings
- 9 Call to Action Module Settings
- 10 Tomorrow: Part 3 – How to Make your Divi Audio Module Podcast-Ready
Today’s Before & After: The Divi Audio Module
The standard audio module is certainly functional: it includes fields for song title, artist name, and album name. However, the standard design is a little bland–especially if you are looking to communicate a specific brand or aesthetic.
Here is the default version of the Divi audio module:

And here is the concept we are going to be building today:
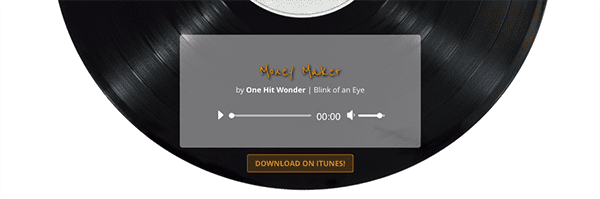
Simply follow my directions below to replicate this design. Of course, you are free to substitute your own image assets, but the holistic “look” is strongly dependant on the images I selected.
How to Make a Retro Record Inspired Divi Audio Module
Subscribe To Our Youtube Channel
The Concept & Inspiration
Lately, people have been embracing the past, whether through their wardrobe selection, music preferences, or Instagram filters. For this design, I took inspiration from this movement, incorporating, not only retro-imagery, but also a vintage-inspired color palette. I hope it serves you well–whether you are a Baby Boomer, a Millennial or someone in between!
Preparing the Design Elements
Thanks to the vast number of customization tools in the Divi theme, this design requires only one image asset: the section background image, which I downloaded from Pexels, a free stock photography website. You can get it here. Because this particular image is not as high resolution as some other photos found on the site, there is no need to downsize it; I left it at its default 890px by 593px.
Implementing the Design with Divi
The design we are creating today is the perfect UI solution for an indie rock band looking to showcase work on their website. For the less musically-talented, it works equally well to share your favorite beats–be them 70s disco tracks or the latest alternative chart-toppers.
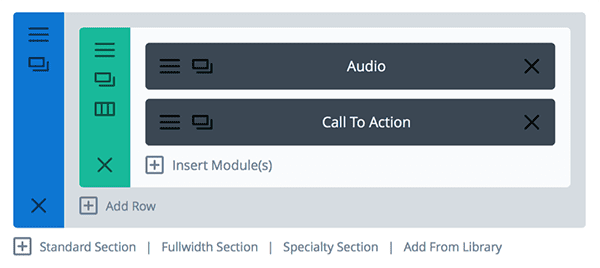
This design has a basic architecture: it is composed of a single section, which houses a single-column row containing the audio module stacked on top of a call to action module.
Section Settings
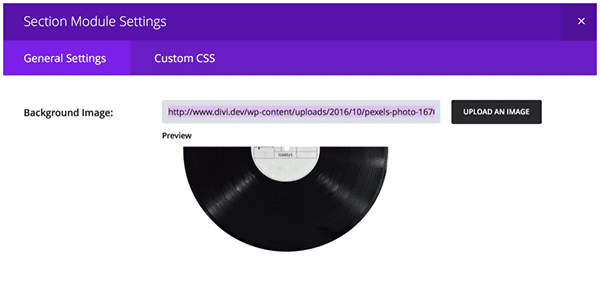
The section settings are straightforward and involve only the upload of a background image. (You can find the record photo I used here.)
In the General Tab of your Section Settings Window, select and upload the record photo from your local Downloads folder.
Row Settings
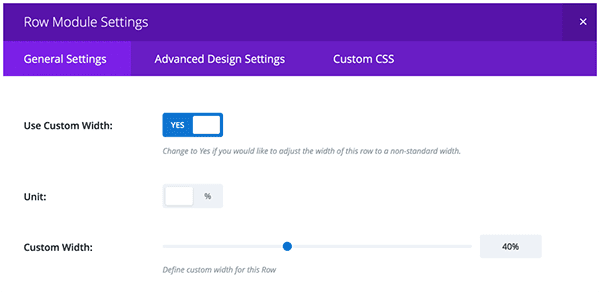
Now that we’ve set up our containing section, we can move onto the row settings. First, be sure to select the single-column structure option. Next, under the General Settings tab, select “Yes” for “Use Custom Width,” set the unit of measurement to percentage, and drag the the slider to 40%. This will ensure that the row’s width is only ever 40% the width of its containing element–in this case, the section.
Audio Module Settings
With our row properly sized, let’s begin adding modules. First, we will add the most important element of our design: the audio module. After inserting it into the row, open up the Audio Module Settings window, and under the General Settings tab, input the names of the song, artist, and album. Also be sure to upload the MP3 you want to showcase; without it, the play button and progress bar will not appear.
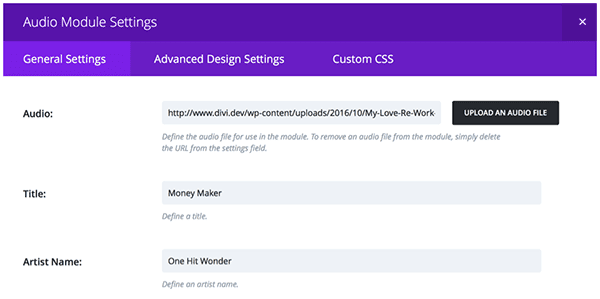
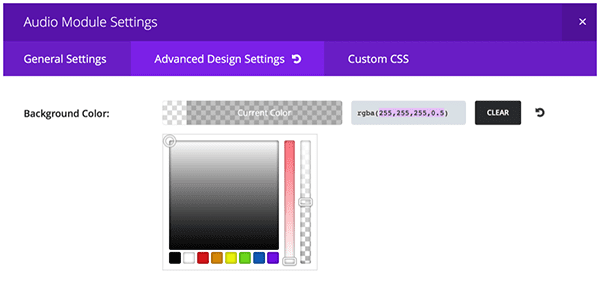
Now that we have input the basics, we can move onto styling the audio module. Select the Advanced Design Settings tab to adjust the background color and opacity of the box that houses your audio player. I used a rgba value of (255,255,255,0.5) to achieve a semi-transparent white. (Keep in mind that the final value refers to “alpha” and controls opacity.) Feel free to deviate from these values, using the hue and opacity sliders to select a custom background color of your own choosing.
Before we move forward with some custom CSS, let’s play with typography. The default font seemed a little dull for the title of a chart-topper, so I selected Reanie Beenie instead, setting the color to a bright orange. (The hex value I used was #e09900 if you want to use the same one.)
To achieve the rounded corners of our semi-transparent audio module box, we’ll need to add a line of custom CSS. Click the Custom CSS Tab of the Audio Module Settings Window and scroll down to the section titled Main Element. Code placed here will affect the entire audio box. Paste the following snippet into the text-field.
border-radius: 5px;
Next, we have to add a subtle drop-shadow to the song title. Staying within the Custom CSS tab, scroll down the the section titled Audio Title and paste the following CSS:
text-shadow: 2px 2px 5px #000;
This will add add a black shadow to our orange song title. If you would prefer to use a different shadow color, simply change the hex value at the end of the CSS snippet.
Call to Action Module Settings
As any good marketer knows, it’s important to provide a call to action if you want your users to do anything–like download your song on i-Tunes. In this tutorial, we are going to add a simple CTA download button below our audio player by inserting a call to action module in the same row.
First, open the Call to Action Module Settings window and, under the General Settings Tab, input the relevant information. Note that I’m choosing to leave the “Title” field blank so as not to clutter our design. (Most users will know what to do when they see a download button.) Be sure to paste in the appropriate destination URL; without one, the button won’t appear.
Once the fundamentals are finished, you can move to the Advanced Design Settings tab to add some pizazz to our button. The first setting you will want to adjust is the Top Margin; set that to -20px to move the button up closer to the audio player. This wouldn’t be necessary if we had chosen to include a Title in our call to action module, but without the title, there is too much white space.
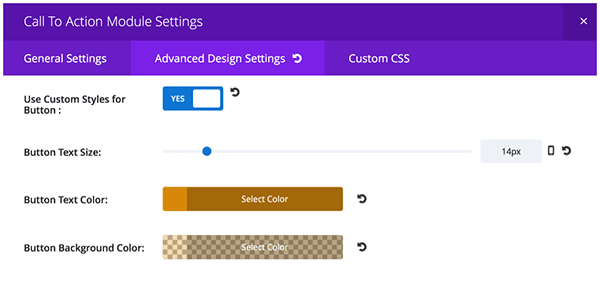
Next, we are going to style our download button by toggling the “Use Custom Styles for Button” to “Yes.” This will enable a number of additional customizations. Of course, you are again welcome to select your own color scheme, but I chose to stick with orange, using hex code #e09900 for the text, border, and icon colors. For the background, I also used the same orange, but reduced the opacity to .3. This adds a subtle contrast to the button and ensures readability even if the responsive nature of the design forces the button into white space.
Additionally, I reduced the font size to 14px and the border width to 1px, but again, these settings are optional.
Tomorrow: Part 3 – How to Make your Divi Audio Module Podcast-Ready
Join us tomorrow for the next installation of our series, in which I’ll show you how to design an audio player perfect for showcasing your latest podcast episodes.
Be sure to subscribe to our email newsletter and YouTube channel so that you never miss a big announcement, useful tip, or Divi freebie!


I completely agree . . . I love the concept of the audio module, but it would be helpful to be able to do similar things with playlists!
Beautiful! Excellent job!
Nice and informative post. thanks for sharing
Yeah..Actually stand with Eugene i think expanding the audio module will also be good.
Good to see this audio modules and details explanation with proper images
I think, we need to expand audio module so it can be used for playlists too…
You are right, sir. Also, adding custom buttons to each playing song would be nice too. Like buy it now, download, find on itunes etc.
Word!
Agreed!