
Designing an impressive grid layout can be tricky. Whether you are showcasing your portfolio or featuring products online, you want that grid layout to be distinct and catch the visitor’s eye. Because a grid has repetitive blocks of content, one small modification can drastically impact the overall design. That’s why it helps to have a design tool like Divi and its visual builder. With the power of global library items and selective sync, perfecting the design of your grid layout with the visual builder is suprisingly easy. And fun.
In this tutorial, I’m going to show you how to harness the power of selective sync to simplify the process of designing a grid layout. I’ll walk you through a setup that will have you creating beautiful grid layouts faster than ever before.
- 1 Sneak Peek
- 2 Reminder About Global Items and Selective Sync
- 3 Part 1: Create a Four Column Row for your Grid Layout
- 4 Part 2: Create Global Modules for Your Content Blocks
- 5 Part 3: Designing Your Global Modules
- 6 Part 4: Create Column Backgrounds
- 7 Part 5: Add Filtering Effects and Blending to the Global Image module
- 8 Final Thoughts
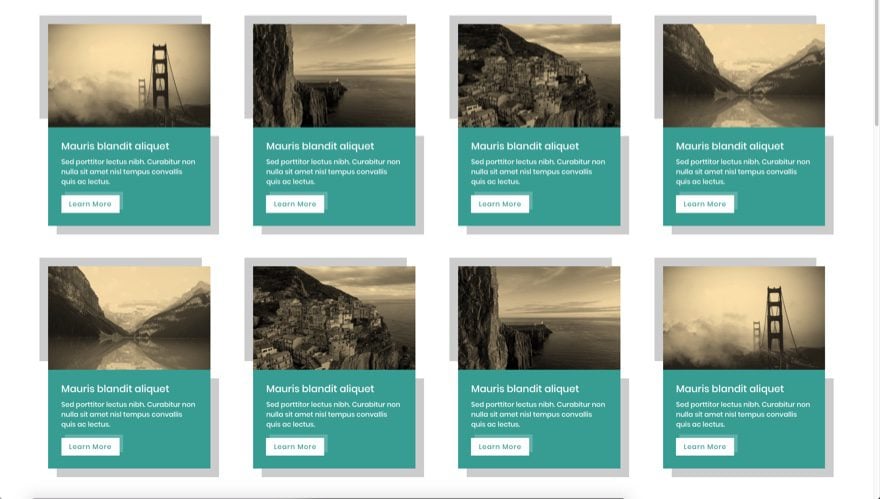
Sneak Peek
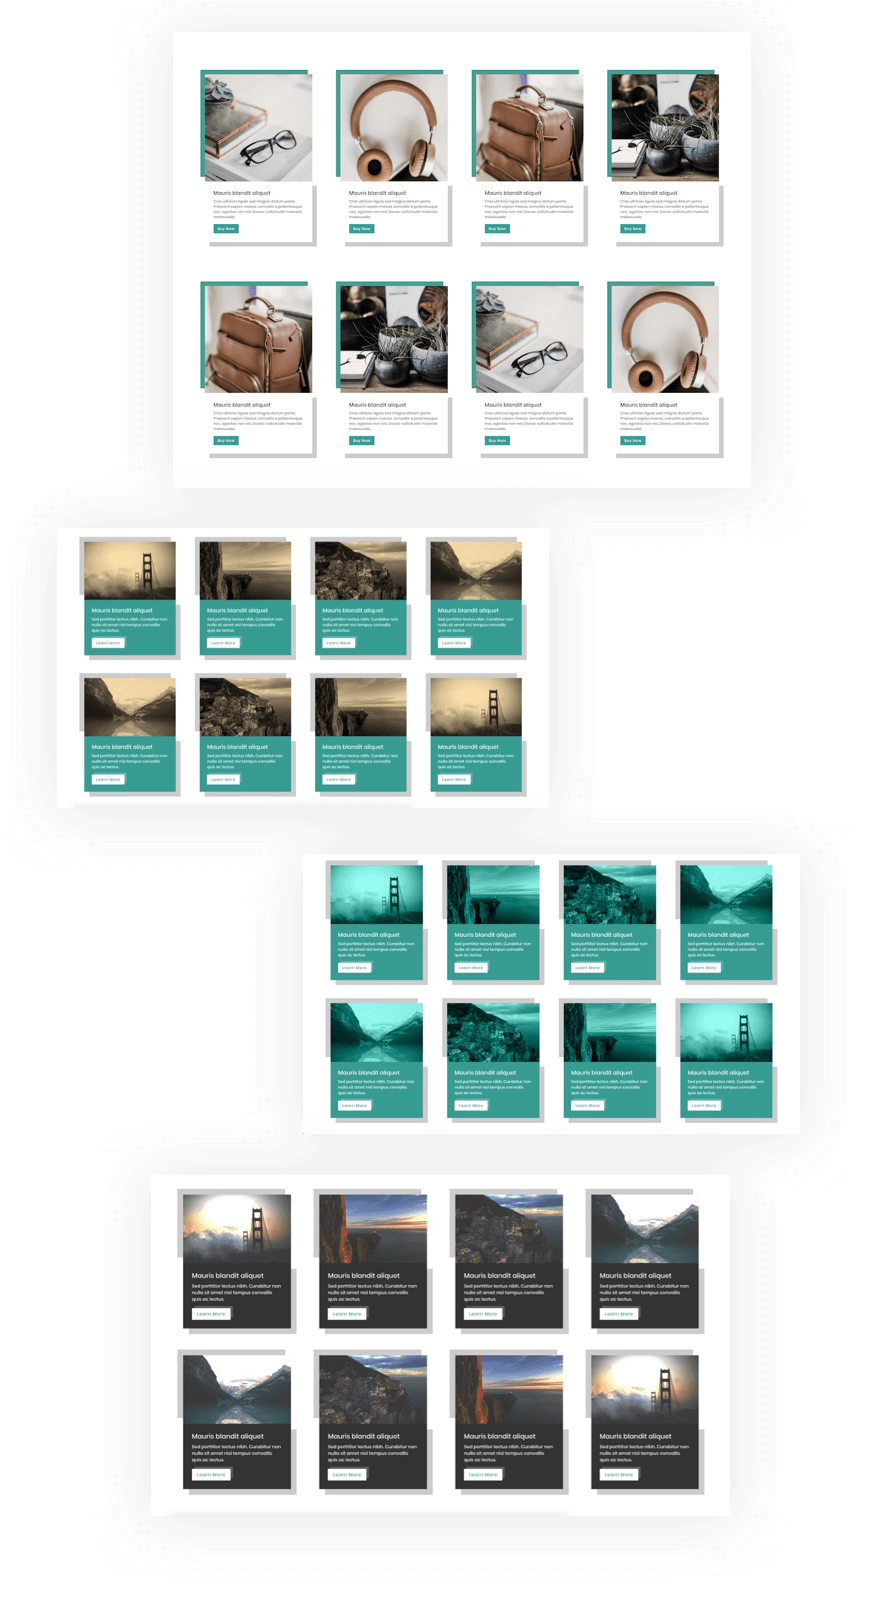
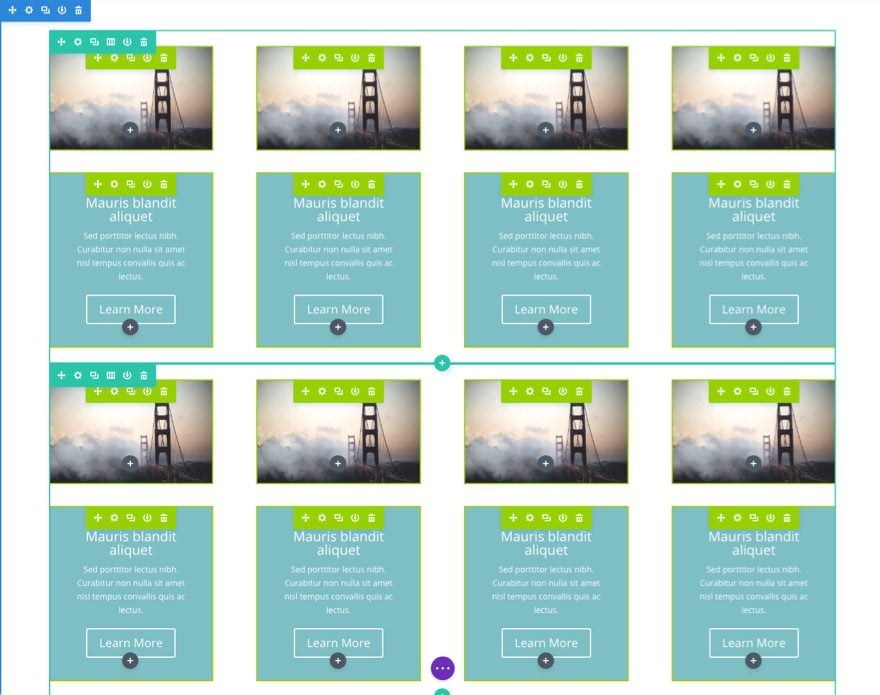
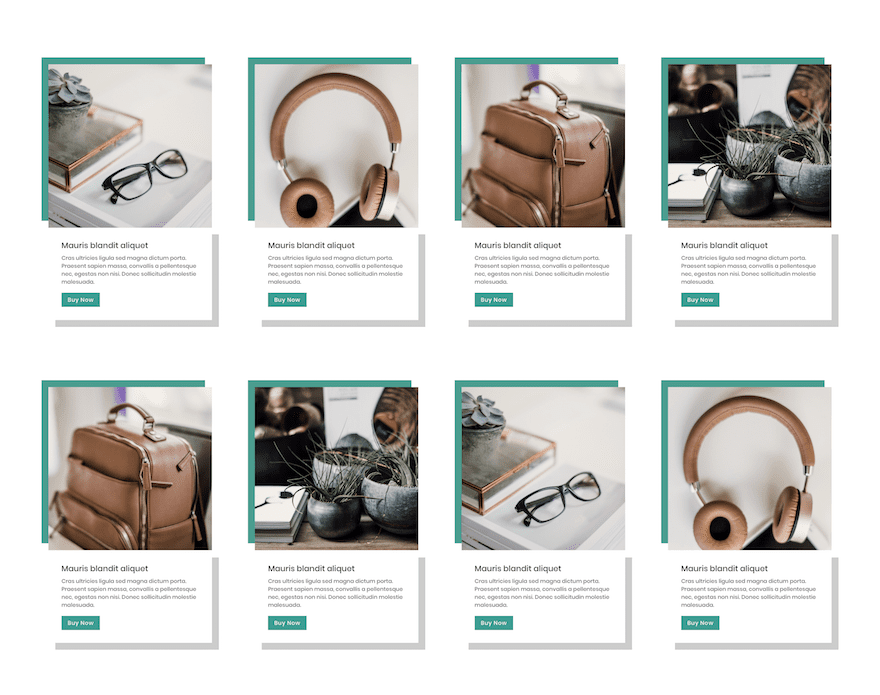
Here are a few example designs we will create. However, what is most impressive is how easy it is was to make changes to the entire grid!
Reminder About Global Items and Selective Sync
Divi allows you to save a module to your Divi Library as a global library item. Once the module is made global, you will have the option to select which of the module’s setting options you want to be synced (this is called selective sync). So if you add the global module multiple times throughout your page/site, any change you make to a synced option on one of the modules will be pushed to all instances of that module at once. This is a great time saver and a handy design tool. And it is perfect for designing a grid layout.
Since a grid layout usually contains a large number of modules, we can sync the design elements of all the modules so that you only have to update one to apply the change to all of them.
When you get a chance, go check the documentation on how to use selective sync for more info.
Let’s get started.
Part 1: Create a Four Column Row for your Grid Layout
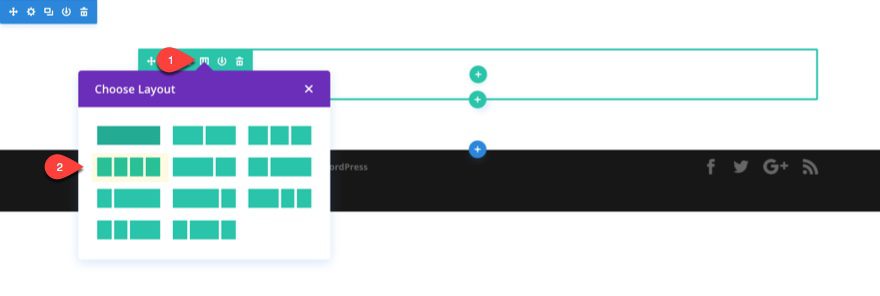
Our first part is simple enough. If you haven’t already, create a new page and deploy the visual builder. By default you will see a section and a row within the builder. Click the column layout icon on the row and change it to a four column layout.
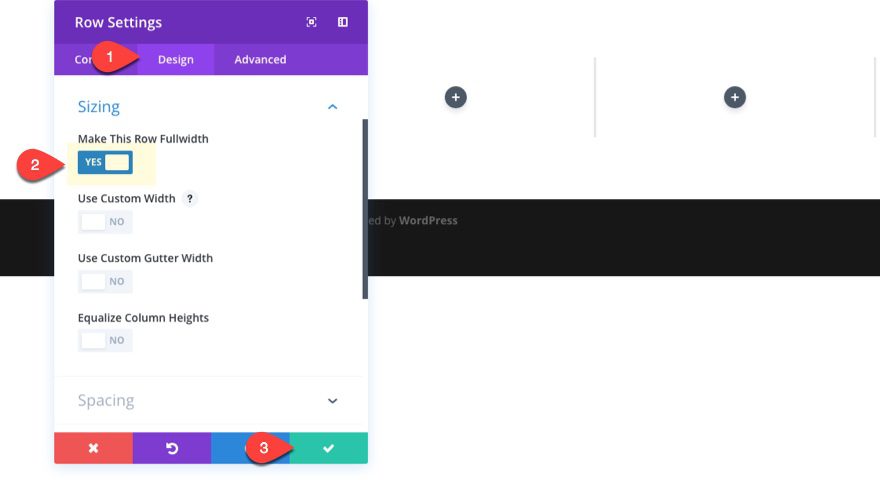
Before you add the first module, go to the row settings, under the design tab, and select “Make This Row Fullwidth”. Then save the settings.
Part 2: Create Global Modules for Your Content Blocks
For the next part, I’m going to add a series of featured content much like a blog post layout with an image module (to add the top image) and a call to action module (to add the header, body text, and button). This setup has a lot of different applications. Many portfolios and product pages are structured this way.
Create the Global Image Module
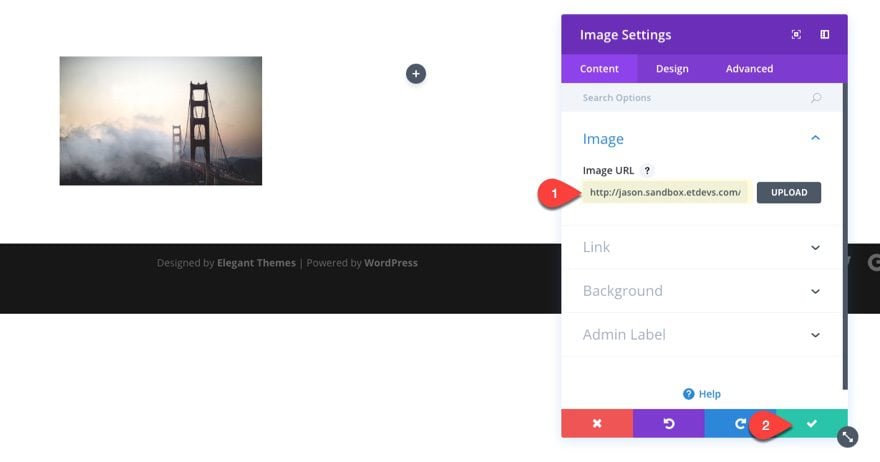
First, add an image module to the left column and upload an image that is at least 500px wide. Then save your settings.
A good tip is to try and make all of your images the same width and height throughout the grid so that your images line up evenly.
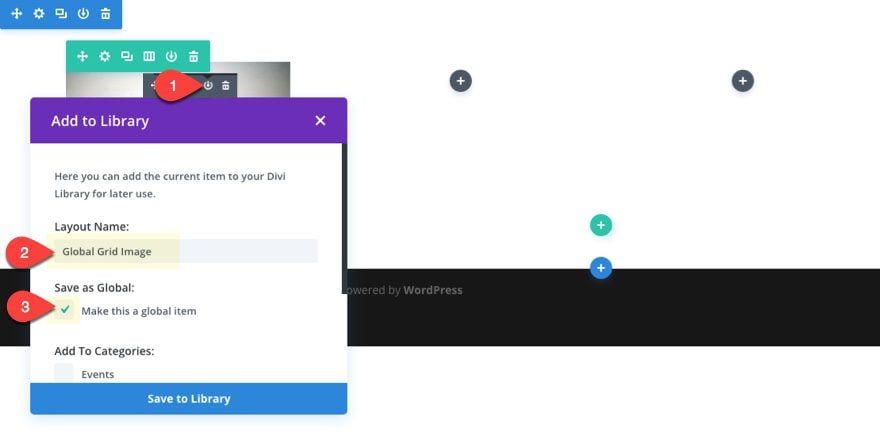
Now you can make your image module a global item. To do this, click the save to library icon on the gray menu that shows when hovering over your image module. Give the module a layout name like “Global Grid Image”. Then click the checkbox next to the option “Make this a global module” before saving it to the library.
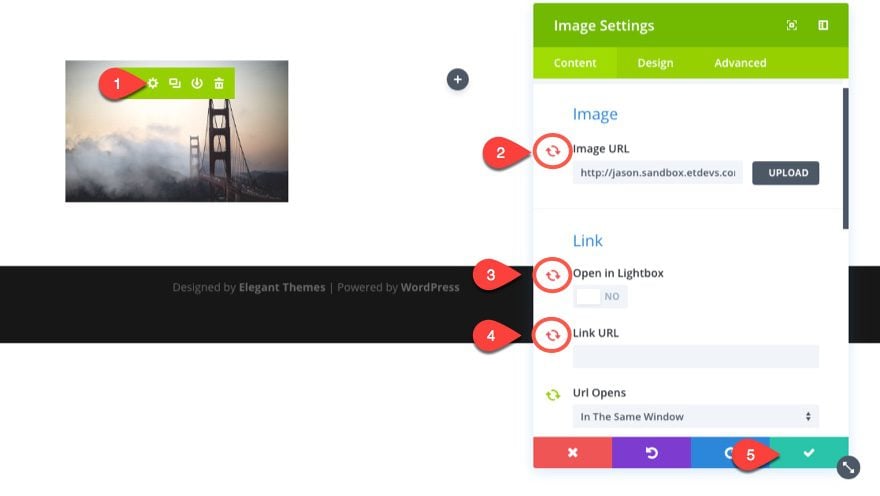
Now that the image module is a global item, it will be highlighted in green on hover as a helpful reminder. We can now update the image module settings to choose what options we want to sync. From the image settings modal that pops up, you should notice you now have green sync icons on the left of each option. To unsync an option, simply click the icon and it will change from green to red, letting you know it is no longer synced.
For the image module, we want to keep the option open to change the image throughout our grid (we don’t want the same image for each column) so we need to unsync the Image URL option.
You may also want to unsync the “Open in Lightbox” option just in case you want to choose this for some images and not others. But if you want to toggle this on and off for all images, you will need to keep this one synced.
And we definitely want to unsync the “Link URL” option so that we can create unique links for each of our images through the grid.
Create the Global Call To Action Module
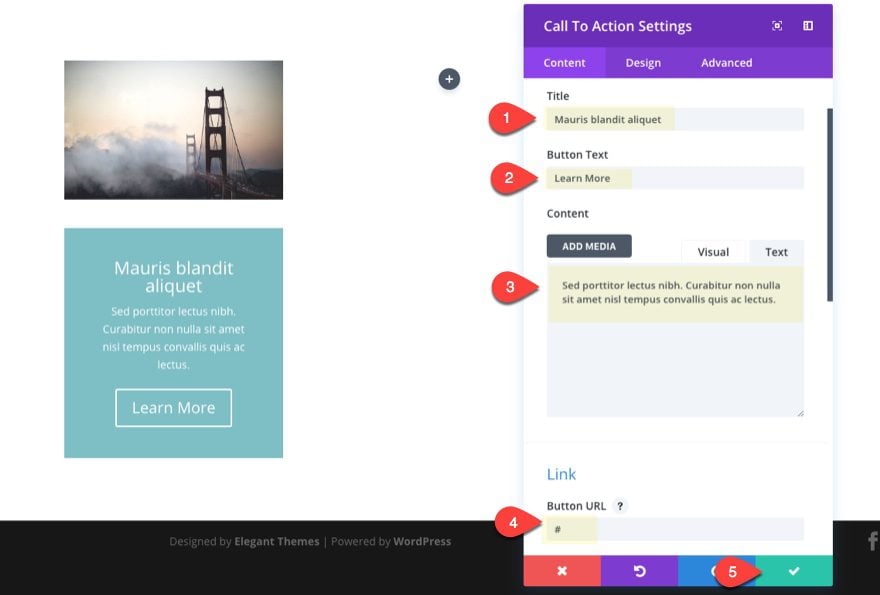
Under the image module, add a call to action module and enter some mock content as follows:
Title: Mauris blandit aliquet
Button Text: Learn More
Content: Sed porttitor lectus nibh. Curabitur non nulla sit amet nisl tempus convallis quis ac lectus.
Button URL: # (this is important because the button won’t display without a URL)
It is helpful to add this mock content as filler when designing your layout before you actually add your official content.
Save your settings.
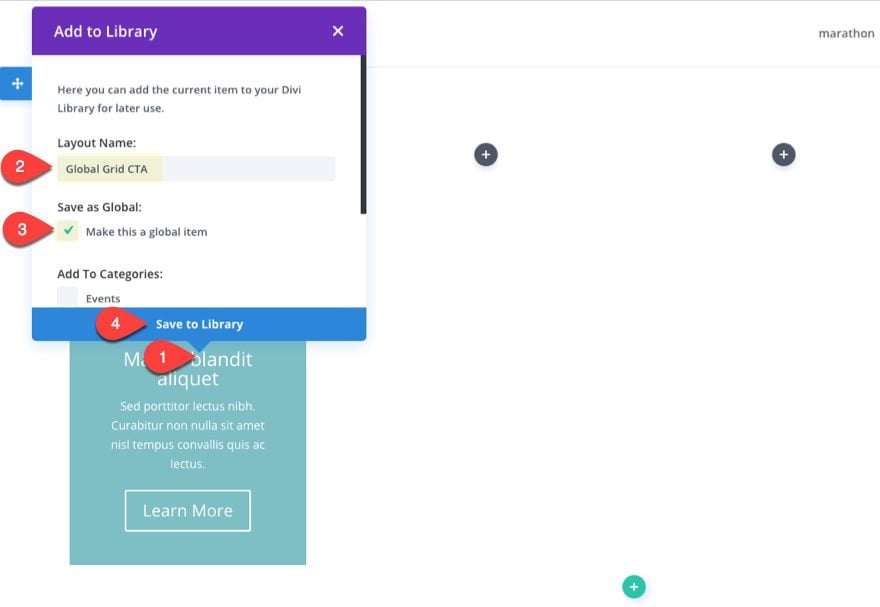
Just as we did with the image module, save the call to action module to your Divi library as a global item with the name “Global Grid CTA”.
Now go back to the call to action settings and unsync the following:
Title (unsync)
Button Text (unsync)
Content (unsync)
Button URL (unsync)
Save Settings.
We are now able to enter different content for each module throughout our grid. And because the rest of the options are synced, these can be used to update all modules at once.
Duplicate the Global Modules and Row
Our two modules that create our content element are set and ready to design. But first, let’s duplicate (or copy and paste) these modules to fill up all four columns of our row. Then duplicate the row to get a feel for what our grid will look like. That way once you start to make design changes to a global module, you will be able to see how the changes will look on the entire grid (not just one module). This is a great design tool!
Part 3: Designing Your Global Modules
It is now time for the fun part. The wonderful thing about this setup is that you can see all of your customizations in realtime and on all modules as you make adjustments to one module.
Let’s get started.
Adjust Image Module Settings
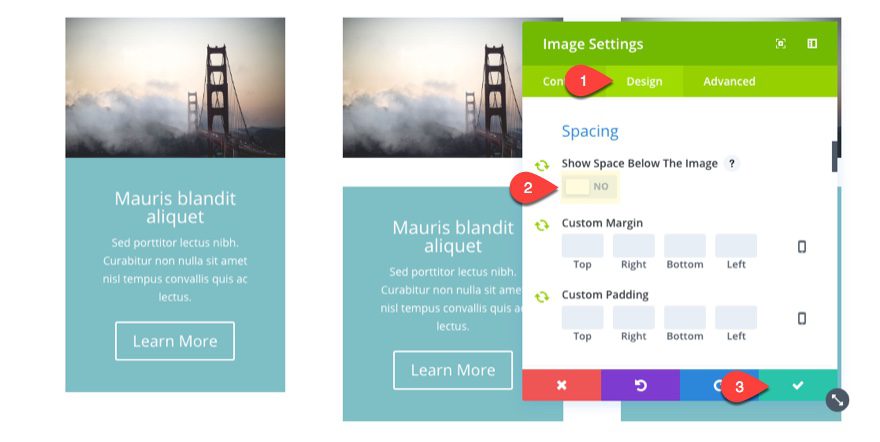
For the image module settings, select “NO” for the “Show Space Below the Image” option.
Note: you won’t see the changes to all the other modules until you save the module settings.
Under the design tab, update the following:
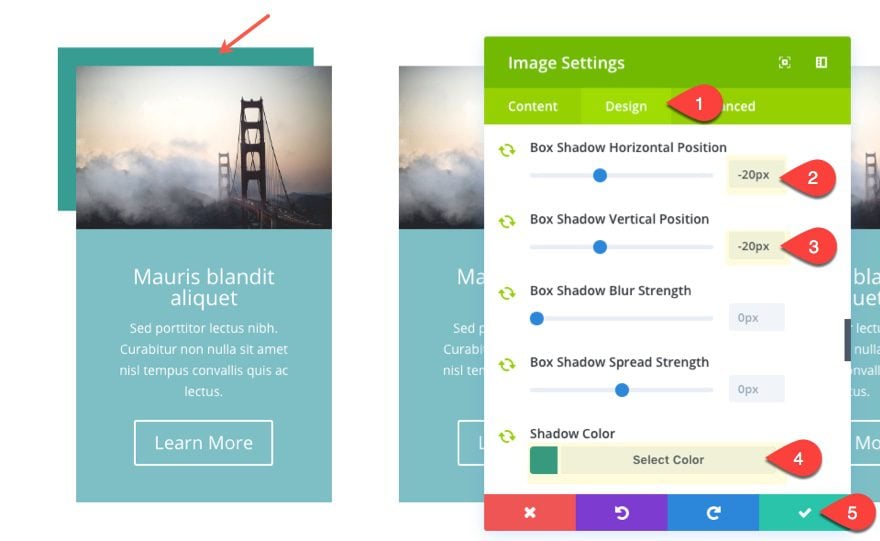
Box Shadow: see screenshot
Box Shadow Horizontal Position: -20px
Box Shadow Vertical Position: -20px
Shadow Color: #379e94
Save Settings.
This is all we are going to do for now but later we will be able to take advantage of those filter options to create some cool image effects.
Design the Call to Action Module
To design the call to action module, update the settings as follows:
Background Color: rgba(255,255,255,0)
Notice I set the background color to transparent (not white) because of something I want to do a little later on. Stay tuned.
Under the design tab…
Text Color: Dark
Text Orientation: Left
Title Font: Poppins
Title Line Height: 1.3em
Body Font: Poppins
Body Text Size: 16px
Use Custom Styles For Button: YES
Button Text Size: 16px
Button Text Color: #ffffff
Button Background Color: #379e94
Button Border Color: #379e94
Button Border Radius: 0px
Button Letter Spacing: 1px
Button Hover Background Color: rgba(0,0,0,0.3)
Button Hover Border Color: rgba(0,0,0,0.3)
Button Hover Border Radius: 0px
Button Hover Letter Spacing: 1px
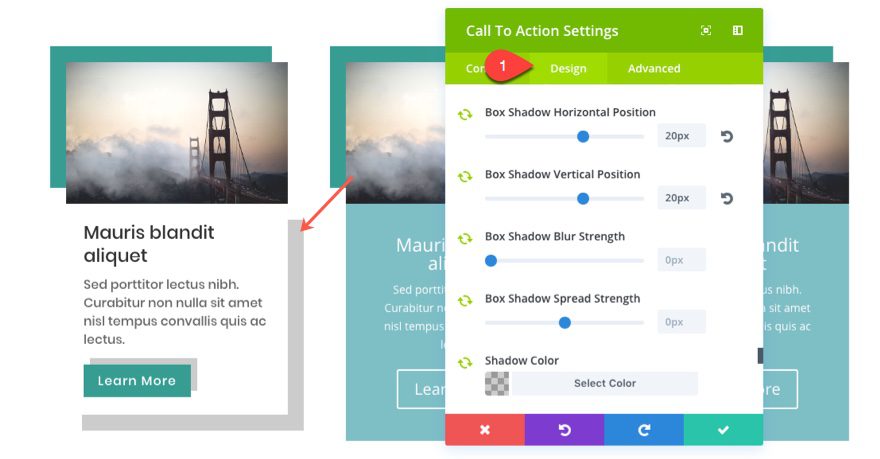
Button Box Shadow: see screenshot
Box Shadow Horizontal Position: 8px
Box Shadow Vertical Position: -8px
Shadow Color: rgba(0,0,0,0.2)
Button Font: Poppins
Custom Padding: 8% Top, 8% Right, 8% Bottom, 8% Left
Box Shadow: See Screenshot
Box Shadow Horizontal Position: 20px
Box Shadow Vertical Position: 20px
Shadow Color: rgba(0,0,0,0.2)
Here is what it looks like after I added product images and changed the button text to “Buy Now”.
Let’s continue with more design tweaks.
Part 4: Create Column Backgrounds
With this setup you can easily add a background to each of your content blocks by adding a background color to each of the row columns. This is possible because our call to action module background color is transparent, allowing the column background to show through. Additionally, with the column background behind the image, you can add blend modes to your image module to create even more colorful designs.
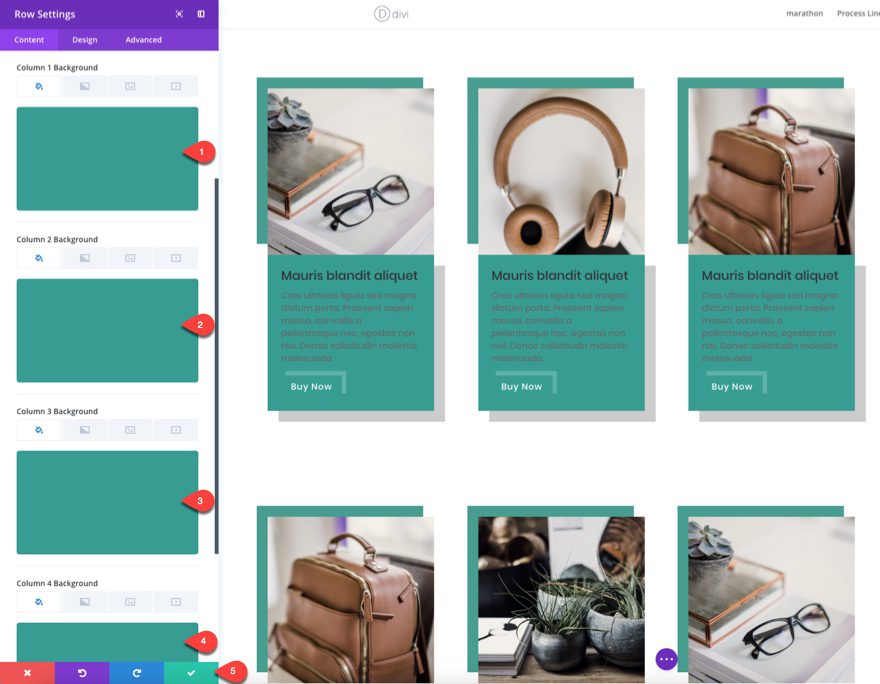
To add a background to your columns, go to the row settings in the top row and update the following:
Column 1 Background: #379e94
Column 2 Background: #379e94
Column 3 Background: #379e94
Column 4 Background: #379e94
Save Settings
Go ahead and use the right click options to copy the style of your row and add it to the second row below in order to transfer all of your new background colors.
Now we can make some minor adjustments to one of our global call to action module design settings to lighten the text and the button to work well with the darker background.
Go to the call to action module settings and update the following:
Text Color: Light
Button Text Color: #379e94
Button Background Color: #ffffff
Button Border Color: rgba(255,255,255,0)

Part 5: Add Filtering Effects and Blending to the Global Image module
With your column background colors in place, you now have a color to blend with your image. This is a great way to add color to your images that will match the color scheme of your page.
First Change Image Border Color
Since we are going to be blending our image module with our column background color, the image border color will also be blended and mess up the design. So, we need to change the image module border color from the green to match the light gray border color of the call to action module.
Shadow Color: rgba(0,0,0,0.2)

Use Luminosity Blend Mode
To blend the background color with your image, you can add the luminosity blend mode to your image module settings. Also, set the brightness filter to 88% to darken it a little.
Brightness: 88%
Blend Mode: Luminosity
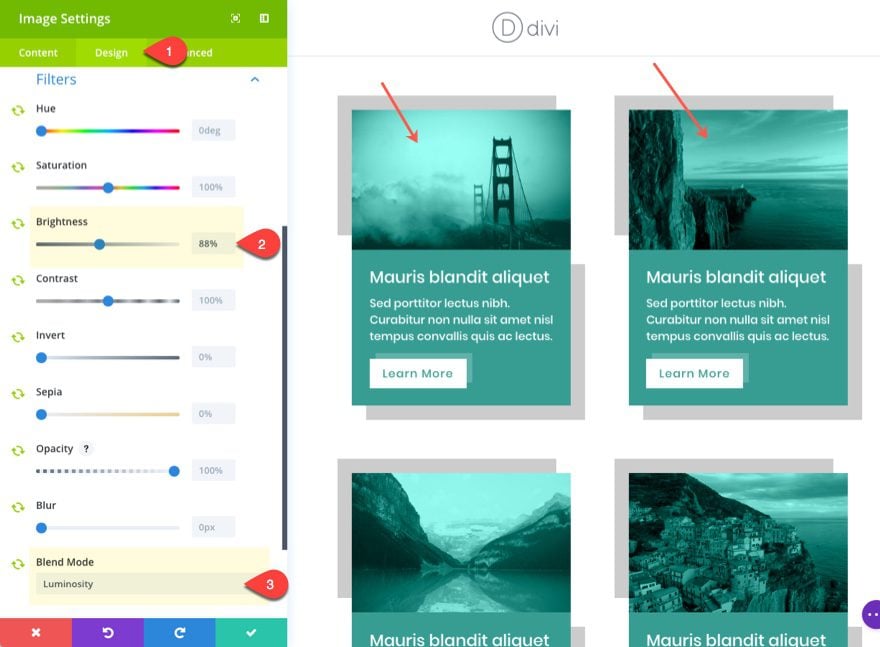
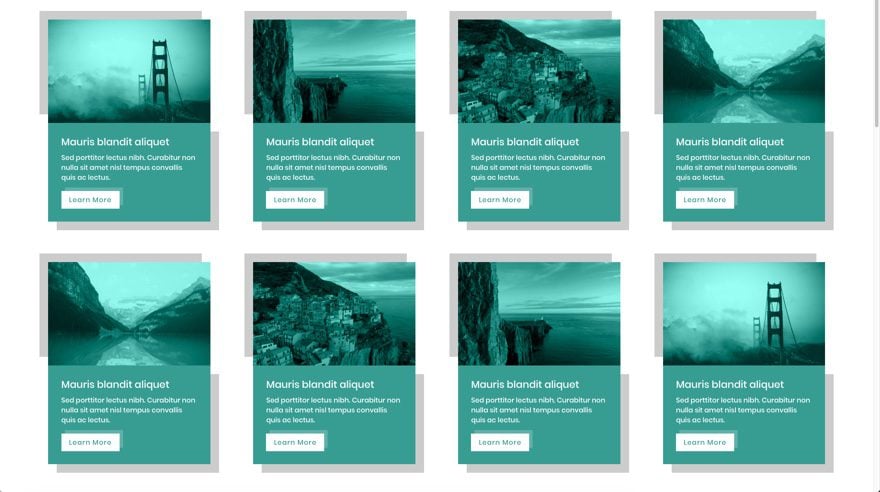
Since light product images don’t work as well with this effect, I used darker landscape images to show the power of this effect.
Adjust Column Background Color For New Colors!
Now look how easy it is to change the whole color of your content block by adjust the background color of your column.
Use Sepia Filter
Here is another example design created by adjusting just one of the global image module filter effects to the following:
Brightness: 73%
Sepia: 100%
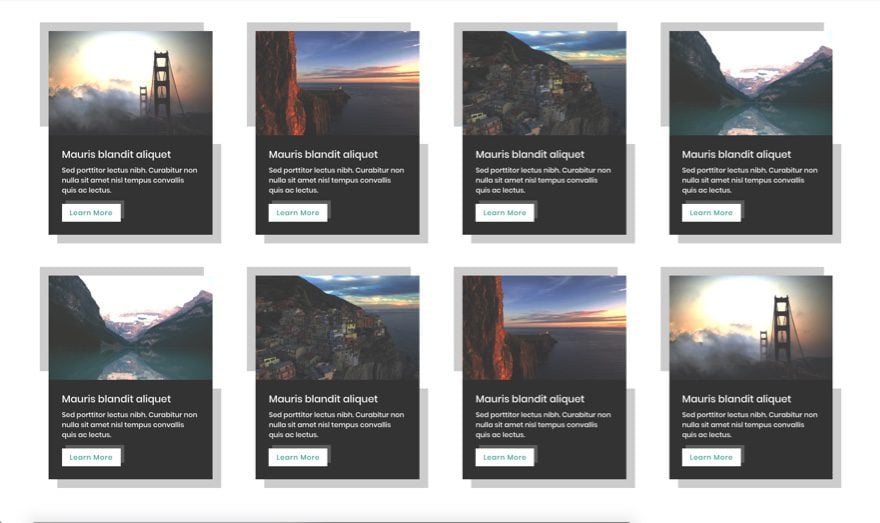
Use Color Dodge Filter with Dark Background
Here is an example design created simply by adding a dark gray (#333) background to the row columns and setting the Color Dodge blend mode on the image module.
Okay, I have to stop now, but I think you get the point.
Final Thoughts
It is extremely easy to make adjustments to your grid layouts using selective sync as a design tool. Once it is setup properly, you have the power to adjust the entire layout with just a few clicks. The grid layout designs created in this tutorial are meant to educate and inspire, so even if you don’t care for these examples, I hope you will leave with a newfound appreciation for selective sync as a design tool.
I look forward to hearing from you in the comments.
Cheers!


I’ve been trying to do this on my website following your step. It works great on desktops, but on tablets or smartphone, there’s the top left corner and the bottom right corner cut out. I’ve played with margins, full width row, but can’t seem to have it the right way.
I use this all the time but it does have several issues.
1) On some sites, when I save a page with global modules and then close it, Divi says that there are unsaved changes. I can save the page again multiple times, but it insists there are unsaved changes.
2) Sometimes when you edit a global module, there are selective sync options that are turned off or while they were turned on before editing the module and vise versa. This really concerns me!
3) I have a site with a global row on blog posts. It has 3 modules in it. If I use the visual builder, it removes all 3 modules from the global row, which means gone from all blog posts. That doesn’t happen when I edit in the backend.
And lastly, ET should give some love to the module customizer and add all settings that are available for each module. If all settings where available there, we wouldn’t have to use global modules with selective sync as much as we have to now.
+1 to all that… Global Modules and Seletive Sync, is an awesome unique feature to Divi, that ET’s should refine and exploit even more in my opinion. No other page builder (to my knowledge) offers this functionality, and even if its a bit flaky at times, I use it every day…
Selective sync only works for modules. What about rows and sections?
Yes, please. Or could you write something WHY selective sync is not working with rows? Major annoyance with an incredibly rich feature.
Yes will this be possible soon? I’m currently working on a web site and wish i could have this feature.
When will this be fix Divi?
Looks great. Any chance that the file can be attached to download so that I don’t have to create it? 🙂
Amazing designs. The color combination, design all are awesome. This is my first time on your website and really impressed. Thanks for sharing such kind of stuff. Thanks.
Is a helpful guide for an excellent design for using the Call to Action Module. Thank you for your great work and support. The story continues successfully …….
Thank you Jason.
It looks like a great idea.
Will it be apply also to shop page?
Selective sync is definitely one of my favorite features of the Divi library! Very powerful. I was just showing off the global item/library yesterday to my friends in the Drupal space. It’s too bad there’s currently a bug in the latest Divi version that breaks this feature. Its a little concerning that you guys would release this article highlighting this feature, all while this bug hasn’t been fixed.
I’ve noticed that on pages with a global section the page acts as if it isn’t saved even though it is.
Hey Bobby, Just curious, how do you know that there is a bug in this feature at present? I’ve been having major issues with my global modules in the last few days and I thought it was just me doing something stupid !! Is there a place on the ET site to notify us when there are issues like this rather than spending hours trying to fix/re-do something that should work?
I filed a ticket with support through the support forum, and the agent had confirmed that it was in fact a bug.
I recommend filing one too so this stays on top of their radar. https://www.elegantthemes.com/forum/
Given the nature of this specific feature, it becomes a headache very quickly when it doesn’t work as expected (I have dozens of module instances not displaying as they should).