
This post is part 1 of 5 in our mini series titled 5 Creative Ways to Style the Divi Post Slider Module. Stay tuned this week for all five unique examples of Divi’s Post Slider Module, with a tutorial on how to achieve each one!
Post sliders are a commonly used design element for online publications. They’re a great way to emphasize recent posts or specific post categories. Post sliders present your content to your audience rather that waiting for them to find it. The appearance of your post slider will often determine whether or not your audience is enticed to read a post.
The Divi Post Slider Module looks great even with it’s default settings, but there will be situations that require you to modify its appearance. This series will explore five different post slider designs found in some popular online publications, and how similar designs can be created using Divi’s Post Slider Module.
Let’s take a look at the design we’ll be doing today!
- 1 Today’s Before & After: The Divi Post Slider Module
- 2 How to Style Divi’s Post Slider like Design Milk’s Post Slider
- 3 The Concept & Inspiration
- 4 Preparing the Design Elements
- 5 Implementing the Design with Divi
- 6 Adding & Configuring the Divi Post Slider Module
- 7 Adding Custom CSS via the Divi Theme Options
- 8 Tomorrow: How to Style Divi’s Post Slider Module Like Bri + Co’s Post Slider
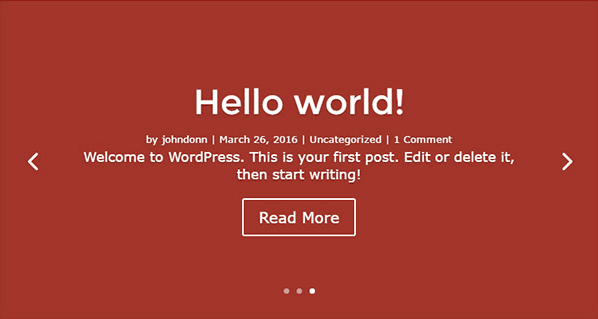
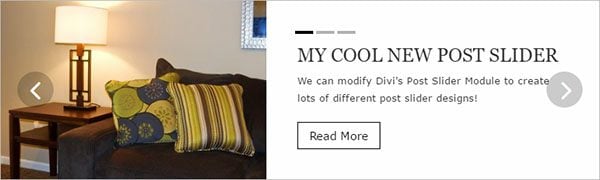
Today’s Before & After: The Divi Post Slider Module
The first image below shows the divi post slider module with it’s default settings and no featured image, while the second is a modification created with just a few tweaks in settings and some custom CSS.
Before
After
How to Style Divi’s Post Slider like Design Milk’s Post Slider
Subscribe To Our Youtube Channel
The Concept & Inspiration
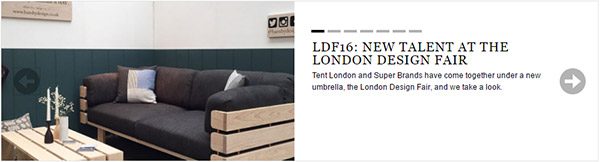
Inspiration for our first post slider style comes from Design Milk, an online magazine dedicated to trends in modern style. Design Milk is a popular publication among interior designers, architects, and artists, and has been featured in The San Francisco Chronicle, LA Times, Time Out New York, and others. The post slider on the Design Milk website is both simple and elegant and provides a nice starting point for this series.
Preparing the Design Elements
In preparation for this design, you’ll need to create a few blog posts. Ideally, you’ll already have some created but if you’re just doing this tutorial as an exercise you can create a few very simply with some lorem ipsum text.
You’ll also need to make sure you’ve selected a featured image for each of the posts that will appear in the slider. If you aren’t familiar with setting featured images, you can find the setting along the right side and toward the bottom of the post editor page.

Click the “Set featured image” link on the bottom of the right sidebar, then choose or upload a new image. This slider will look best if each of the featured images are equal in size. I chose 800px by 600px for mine, but the exact size isn’t critical.
You will also want to add an excerpt for each of your posts in the “Excerpt” input box found toward the bottom of the post editor page. This slider design will display your post excerpt like a sub-heading below the title, so you’ll want to keep it short and sweet.

Implementing the Design with Divi
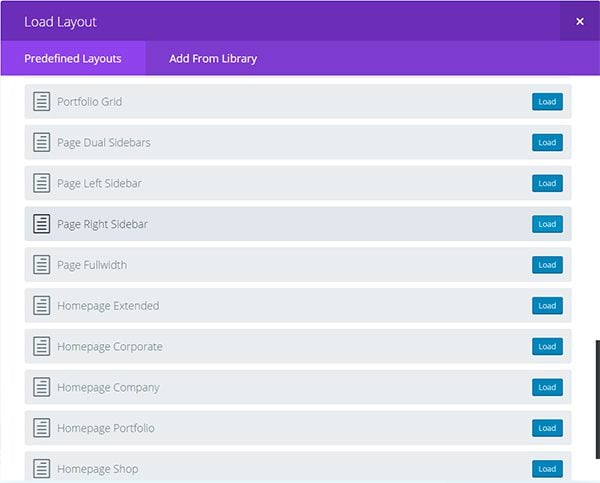
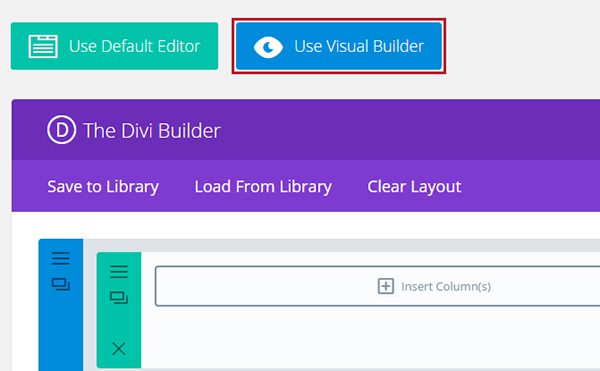
If you’re following along and don’t already have a page setup to display your post slider, simply create a new page by clicking “Pages” on the left sidebar of the WP Admin, then “Add New”. Now click the “Use the Divi Builder” button and then “Load From Library” and select Divi’s predefined layout “Page Right Sidebar”. This layout is closest to the general layout of the Design Milk page.
Once the layout is loaded, you can click on “Use Visual Builder” to start making the needed modifications.
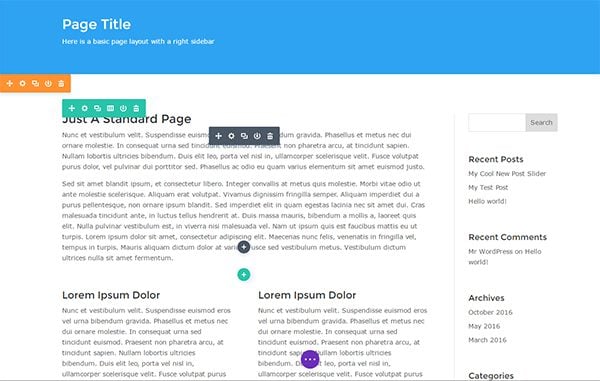
In case you’re new to Divi’s Visual Builder, let’s take a quick tour of this incredible new tool. Move your mouse around the screen and notice the borders and toolbars that appear as you hover over the various page elements.
The color coding is the same as that of the Divi Builder. Sections will be blue, orange, or purple depending on if they are regular, specialty, or full width respectively. Rows are always green, and Modules are always gray.
The toolbar icons are pretty much self-explanatory and include tooltips in case there’s any doubt of their function. There is also a main settings bar at the bottom of the screen with the save button on the right and various responsive views available on the left. It will also be helpful to note that cmd+z (ctrl+z) provides several levels of undo just in case.
Adding & Configuring the Divi Post Slider Module
Let’s begin by deleting the top text module just under the header and replacing it with a Post Slider Module.

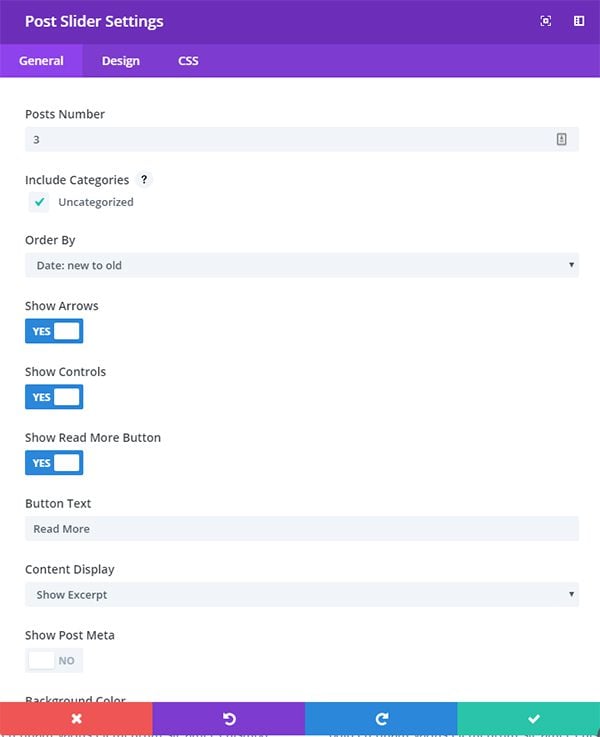
General Settings
Our modifications begin with “General” settings, which is where you are by default after adding any new module.
- Go ahead and set the number of posts and choose a category.
- Change “Show Post Meta” to “No”.
- Set text color to “Dark”.
- Change “Image Placement” to “Left”.
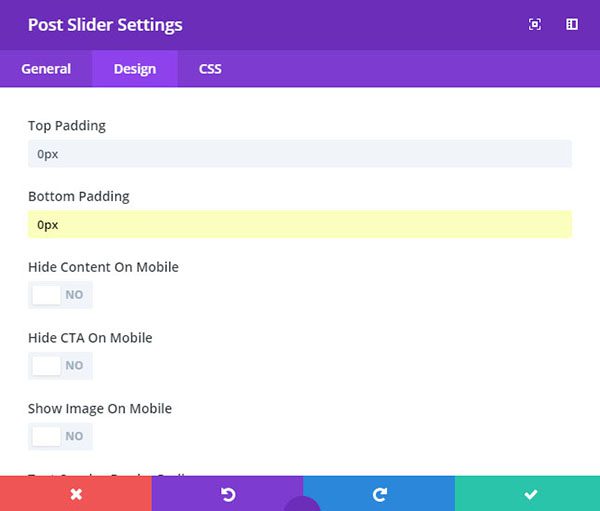
Design Settings
Now let’s move on to the settings under the Design tab.
- Set the top padding to 50px
- Set the bottom padding to 40px
- Change “Arrows Custom Color” to white (#FFFFFF)
- Change “Dot Nav Custom Colors” to black (#000000)
- Set the header font to all caps and the size to 25px
Now scroll to the bottom and make the following changes:
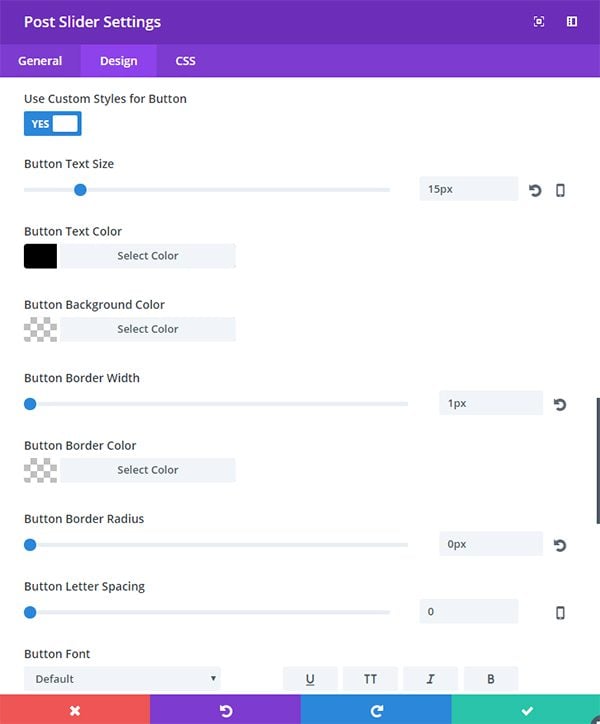
- Change “Use Custom Styles for Button” to yes
- Set the Button Text Size to 13px
- Set the Button Text Color to black
- Set the Button Border Width to 1px
- Set the Button Border Radius to 0
Custom CSS Tab
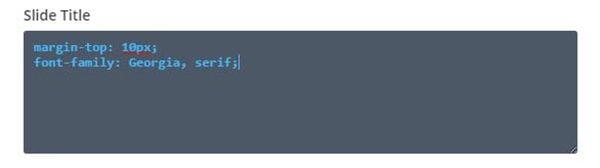
Now you’ll need to add some code to the CSS tab. Click the “CSS” tab at the top of the module settings box. Now give the slider an ID of “dm-slider” by typing it into the CSS ID input.

Now add CSS code into the sections as follows:
Main Element:
border: 1px solid gray;

Slide Title:
margin-top: 10px;
font-family: Georgia, serif !important;
Save your changes by clicking the check icon on the bottom right of the module settings box. Then save the page by clicking the “Save” button at the bottom right of the page.

You can see in the Visual Builder that our post module is beginning to take shape, but it isn’t quite there.
Adding Custom CSS via the Divi Theme Options
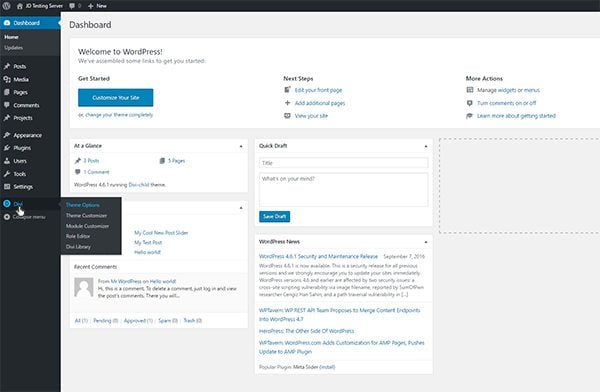
We still need to size and position our image, and change our navigation dots into rectangles. To accomplish these final details you’ll need to go the General settings of your Theme Options. To get there, exit the Visual Builder and return to your admin dashboard. Now on the left sidebar toward the bottom, click on “Divi”, which brings up your “Theme Options” settings.
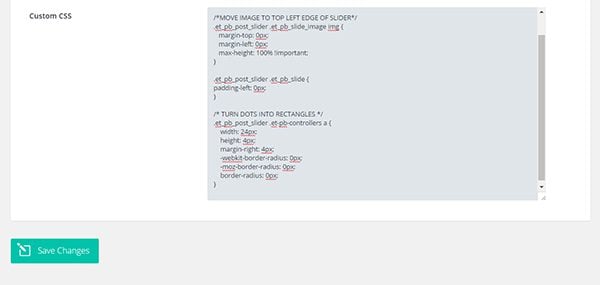
Scroll to the bottom of your screen and add the following code snippet into “Custom CSS” and then click “Save Changes”.
/*MOVE IMAGE TO TOP LEFT EDGE OF SLIDER*/


#dm-slider .et_pb_slide_image img {
    margin-top: 0px;
    margin-left: 0px;
    max-height: 100% !important;
}
#dm-slider .et_pb_slide {
    padding-left: 0px;
}
/* TURN DOTS INTO RECTANGLES */


#dm-slider .et-pb-controllers a {
    width: 24px;
    height: 4px;
    margin-right: 4px;
    -webkit-border-radius: 0px;
    -moz-border-radius: 0px;
    border-radius: 0px;
}
#dm-slider .et-pb-arrow-prev,
#dm-slider .et-pb-arrow-next {
    background-color: rgba(0, 0, 0, .25);
    -webkit-border-radius: 50%;
    -moz-border-radius: 50%;
    border-radius: 50% !important;
}
#dm-slider .et-pb-controllers {
    top: 30px !important;
    left: calc(47.25% + 20px)!important;
    width: 50%!important;
    height: 10px!important;
    text-align: left!important;
}
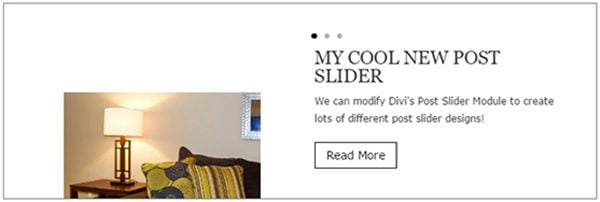
Now open the page with your post slider and there you have it, a fresh new look for your Divi post slider inspired by the one found on the Design Milk homepage.
Tomorrow: How to Style Divi’s Post Slider Module Like Bri + Co’s Post Slider
Well, whether you found this particular design useful or not, I hope it has provided a detailed look into some of the more advanced settings within Divi’s Post Slider Module, as well as piqued your imagination as to what is possible.
Don’t forget! This post is just 1 of 5 in the mini series “5 Creative Ways to Style the Divi Post Slider Module.” If you’d like to see what else I’ve come up with be sure to come back tomorrow where I will be showing you how to create a post slider like the one on Brit + Co’s website (brit.co).
Be sure to subscribe to our email newsletter and YouTube channel so that you never miss a big announcement, useful tip, or Divi freebie!


First, sorry for my english
In my website, its posible delete the gray sides (left of the image and right of the post.
Can you explain how to make this work for the FullWidth Post Slider module?
Great post – thanks. I have white space on the top and bottom. I’ve double checked my settings in Visual mode and image size is 800×600 – any ideas?
This tutorial, as with most of these, would require media queries with more CSS for a complete responsive solution. Actually, if you look at the design milk site you’ll notice that the mobile slider is a completely different design than the desktop slider. Another possibility would be to add another slider for mobile and hide it on desktop in the general settings.
Great but mine has extra white space above and below the image ? How can I fix this? Thanks!
I had this initially but once I got my images to be 800 x 600 in my posts it was sorted.
I changed the image in the media library, but found it only worked if I went into the post and updated the post.
Although gaps reappear when you look at on mobile devices!
Thanks Ron ! I will try this.
Thank you for a fantastic tutorial! One question, the image doesn’t display on mobile after adding the CSS even with the image enabled for mobile devices. Any way of fixing this?
I would appreciate a reply on this too. Looks great until you see it on a mobile
In 3 word very nice post. Complete knowledge It will helps us a tone.
Thank you
Aregb
Thanks. Very well written and some really useful steps.
I don’t however care much for the design inspiration of the article (design milk). It’s the 1st one I’ve not liked. It looks messy and unbalanced to me and unlike any of the other ‘inspirational’ sites we’ve been shown. Maybe you’ll all disagree, but it’s only my opinion. Don’t shoot me!
Thanks again.
Kind regards
Rob
I think it’s bound to happen that some concepts will not be for everyone. Hopefully we’ll continue to have more designs you enjoy than not!
Great post Nathan, looking forward to the rest of it…
It would have been nice to also have a series on Category page design and Tag page design, topics that for an unexplained reason to me do not have a response by Divi.
Thanks
Avi
Thanks for the tutorial.
The featured image you show under “Preparing the Design Elements” means that we need to create a featured image and write the excerpt beside it and then take a screenshot to the rectangle.
is this correct?
thanks
Thanks in advance. I love this.
Thank you! What did I wrong, when the padding is not working as you’ve shown? I paste the code, but nothing changed…
Again a very useful post! Thanks!
Thanks in advance. I love this.
It’s great to learn just how flexible divi actually is!
Thanks a lot,
Thanks! These step by step guides are excellent. I love the new emphasis on Divi-focused content on the blog.
These kind of posts are very nice to learn how to code and to get criative ideas for new projects. Thanks!
Will this work for video posts?
I am very disappointed to see so many layouts that don’t work with all post styles found on this theme.
Therefore making it very limited.
Hi David, I can understand how that would be frustrating. I think it’s important to keep in mind that in these tutorials, just as in web design in general, some solutions (most solutions) are not one size fits all. There are probably going to be Divi Daily pieces that do not apply to you and your ideal use cases all the time. However, if you have a request you can always leave them here in the comments and I will take note of them.
Anyway, you didn’t answer my question. Does it work with video posts or not?
Nathan, all I am asking is for blog layouts and sliders that take into account the fact that there isn’t just one post type.
And that is actually one of the strengths of the Divi Theme.
So please honor your full potential.