
In today’s tutorial, we’re going to show you how to remove the name fields of the Divi Email Optin Module. Deleting the name fields is not only about making sure the name and last name field, that are standard in the email optin module, don’t appear visually. It’s also about the functionality. By default, the first name and the email address are required for a subscription. That’s why just making the name fields invisible won’t help the process.
To help you get it done, we will, however, show you how to get rid of the name fields visually and make it work functionally as well
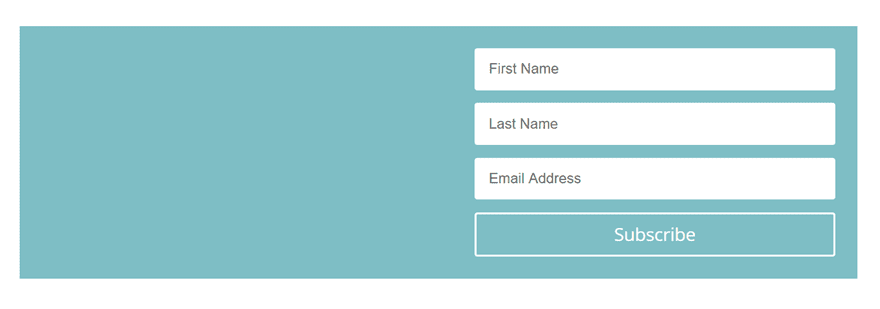
Result
If you follow this post step by step, you will obtain the following result:

Why You’d Want to Remove The Name Fields of The Email Optin Module
There are probably a few reasons why you’d want to remove the name fields. If you have no idea why; take a look at two reasons listed below.
To Save Your Visitor’s Time
The first reason keeps the user experience in mind. By asking for only a email field, your visitors will have the possibility to interact with you quickly. The only thing they’ll have to do is type down their email address and you’ll be providing them with the content they’re interested in.
To Make The Barrier Smaller/Rely Upon Quick Behavior
If people were to fill in all the optin modules they come across on the web, they’d probably run out of time. Optin forms are a part of all kinds of websites nowadays. The days when people were fascinated by them are over. If they see that they have to put in too much effort (read: they have to complete too many required fields) to get subscribed, they’ll probably just ignore it. If you, however, ask for the email address only, it’s more likely that they’ll be okay with that. It takes max 5 seconds to just type down an email address (which is less than the 7-second average attention span humans have).
How to Remove The Name Fields of The Divi Email Optin Module
Subscribe To Our Youtube Channel
Without any further delay, let’s make this work.
Add New Page
The first thing you’ll need to do is add a new page or open the page where you want to place the Email Optin Module with the email field only.
Add Email Optin Module
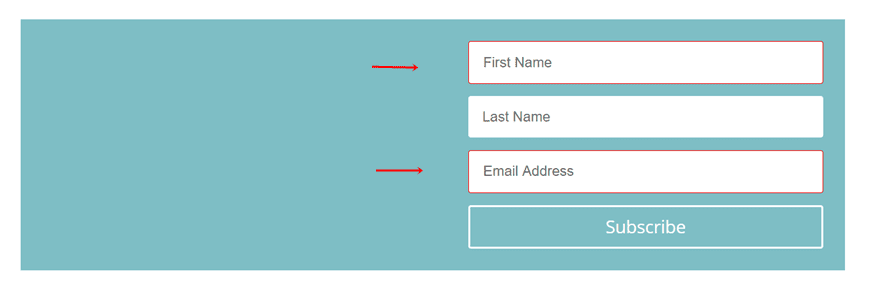
Once you’re on that page, add the Email Optin Module wherever you want it to fit. Once you preview the page with the Email Optin Module, you’ll see that it will look like this:
If you go ahead and click on the subscribe button, without completing any field, you’ll see that it won’t work. By default, the Email Optin Module requires a first name and email value for it to work. That’s why just making the fields disappear (but still exist) won’t work. Removing them won’t work either.
The thing you can do, however, is add a default value to the first name field. You could use something like ‘*’, which will just make sure the field has a value. Another thing we’ll need to do is delete the labels that are linked to the input fields. To achieve all of this, we’ll be using some jQuery code and CSS code.
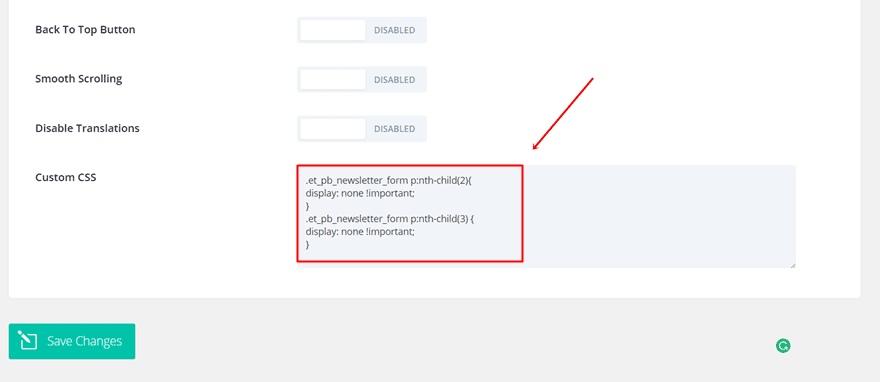
Add CSS Code
We’ll begin by adding the CSS code. The CSS code will solely make sure the two fields will not be displayed on the page. For the functional part, we’ll have to use some jQuery code lines.
You can make the CSS code apply to one page in particular or to the entire website. The method you’ll use will most likely depend on how often you want to use the code module with the email field only. If you want to use the Email Optin Module several times and throughout different pages, use the second method. If you want to make it count for only one page, use the first method.
Add CSS Code to One Page in Particular
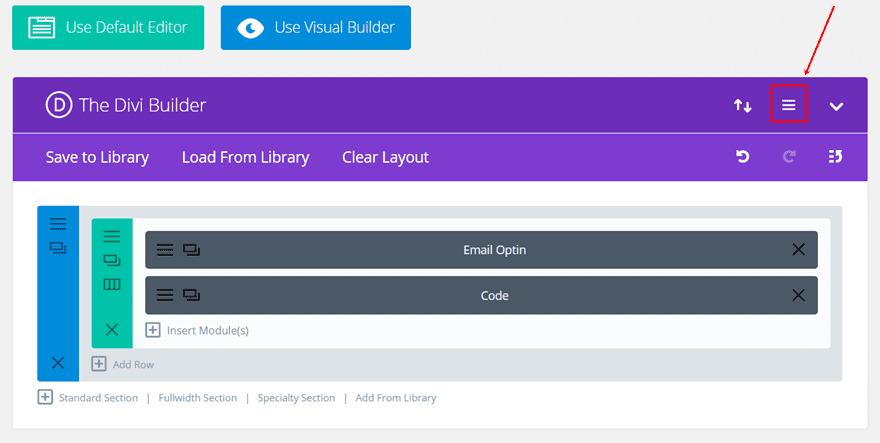
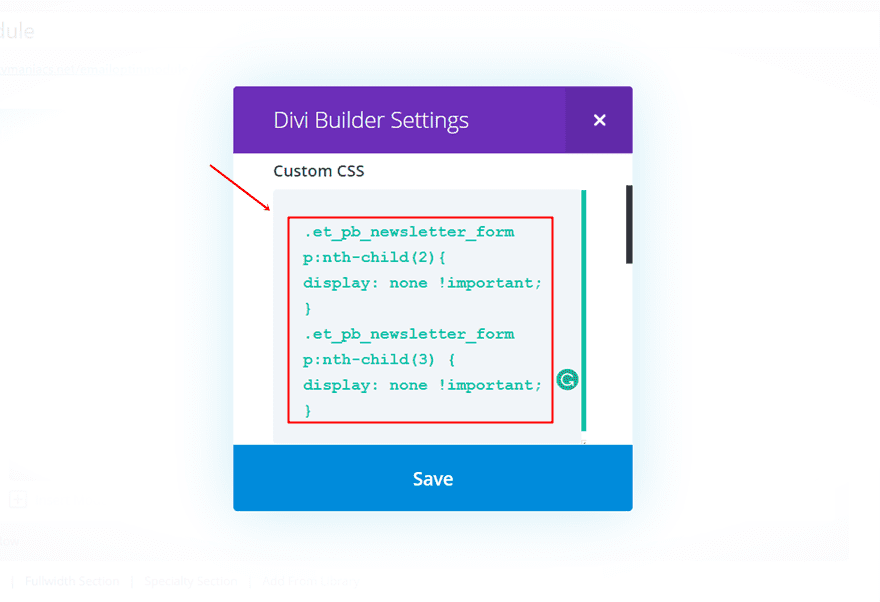
To add the CSS code to one page in particular, click on the following icon within the page you’re working on:
Within the screen that appears, copy and paste the following lines of CSS code:
.et_pb_newsletter_form p:nth-child(2){
display: none !important;
}
.et_pb_newsletter_form p:nth-child(3) {
display: none !important;
}
Add CSS Code to Theme Options
To add the CSS code to the entire website, go to your WordPress Dashboard > Divi > Theme Options > Scroll down the General tab and add the following lines of CSS code to the Custom CSS field:
.et_pb_newsletter_form p:nth-child(2){
display: none !important;
}
.et_pb_newsletter_form p:nth-child(3) {
display: none !important;
}
Add jQuery Code
Moving on, we’re going to add the jQuery code that’s needed. To add the jQuery code, you have two possibilities as well: add the code to make it apply to one page in particular or add the code to the entire website.
Add jQuery Code to One Page in Particular (Code Module)
To add the jQuery code to one page in particular, add a Code Module right below the Email Optin Module. Open the Code Module and place the following lines of jQuery code in it:
<script type="text/javascript">
jQuery(function($){
$(".et_pb_contact_form_label").remove();
$("#et_pb_signup_firstname").val("*");
$("#et_pb_signup_email").val("");
$("#et_pb_signup_email").attr("placeholder", "Email address");
});
</script>
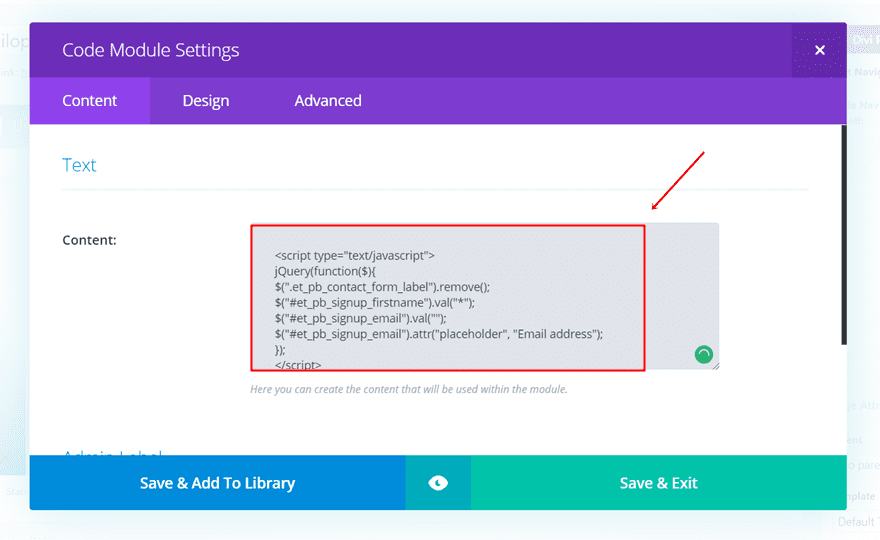
Since we’ve removed the label, we’re making sure the value of the email address field has nothing in it. To compensate the label, and to make sure people know what to type down, we’re using a placeholder instead. In this case, the placeholder is ’email address’ but feel free to turn this into anything else.
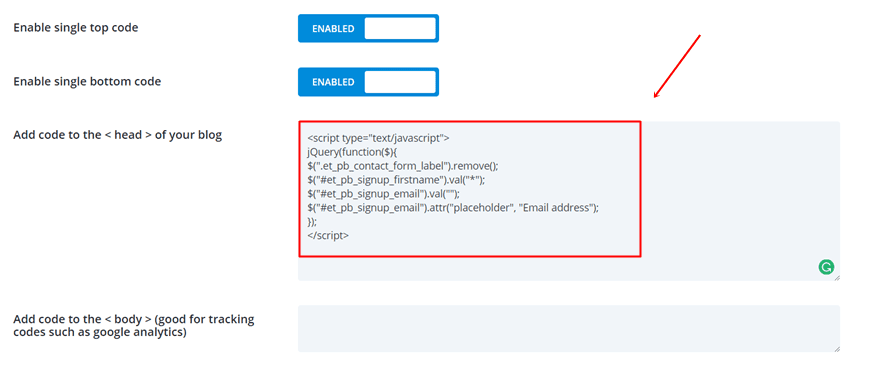
Add jQuery Code to Theme Options
To make the jQuery code apply to the entire website, you can place it in the Theme Options. To do that, go to your WordPress Dashboard > Divi > Theme Options > Integration and place the following lines of jQuery code in the head of your website:
<script type="text/javascript">
jQuery(function($){
$(".et_pb_contact_form_label").remove();
$("#et_pb_signup_firstname").val("*");
$("#et_pb_signup_email").val("");
$("#et_pb_signup_email").attr("placeholder", "Email address");
});
</script>
Result
If you follow every step in this post and apply the CSS and jQuery code to one page in particular or to all the pages of your website, you should achieve the following result:
Final Thoughts
In this post, we’ve shown you how to achieve an Email Optin Module that has only an email address field. The reason why you might want to achieve such result is that of the effectiveness. By asking for the email address only, your audience will have to put in less effort to get subscribed and you’ll be able to build your email list more quickly. If you have any questions or suggestions, make sure you leave a comment in the comment section below!
Be sure to subscribe to our email newsletter and YouTube channel so that you never miss a big announcement, useful tip, or Divi freebie!
Featured Image by adichrisworo / shutterstock.com


Hi,
Great tutorial.
Still have an issue with the jQuery Code added to Theme Options. I have a landing page with multiple optin on the page. The code only impact the first one not the others.
Could you please help me to do so with just 1 script for all optins on the page via Theme option – integration?
thank you
Why oh why do we still have to do this for such a simple function.
This should have been incorporated by now!
Hi,
Great tutorial! I managed to get everything working but I want to change the confirmation text “Subscribed – look for the confirmation email!”. Is that possible?
Regards,
Rasmus Andersson
I tried to do the same with javascript / jquery and don’t succeed to change the “Subscribed – look for the confirmation email!” I need it translated into french and I won’t communicate my new landing page until it’s well in French (don’t want a bad user experience) so please let us know how to update that message ! Thank you very much for your reply
Is posible add other field as a telephone Number??
I was just looking for a fix this. I managed to get the CSS part figured out but had no idea about the jQuery! Thanks so much for this. Will be trying on my site since I hate pop-ups and I’m sure my visitors do too!
This makes no sense.. This should really be included in Divi from the go.
– From a Divi lifetime member..
What if I want to only have First Name? How do you do it?
I would also like to know this.
Great, I have it implemented and working!! Thank you so much!!
Why not just add this basic functions to the module builder?
Another way to avoid the fuzz with custom coding (that’s a big reason for choosing Divi, right?) is to install the Bloom plugin where you easily can customize the email sign up form. However, Bloom does not inherit the fonts, button style and colors set in the Divi theme settings, so you have to do that twice. Not optimal but a feasable work-around.
How did you get the fancy animation on the button once clicked?
Im confused a bit. do I have to use custom css and jquery at the same time or I can use one of them?
Hi Karen,
You use both to make it work. The CSS removes the fields from view but they are still technically there. The JQuery removes the fields entirely so the form will still work.
OMG I looked for something like this a while back for one of my clients. My twist on this was to use contact form 7, put it on the place I wanted the email grabber and skin the form as email-optin-module :))
Your way is much more elegant and simpler!
This worked except that now the filler text that says “Email address” is gray when it used to be white. Do you know how I can correct this?
It is great! More and more CSS for a visual theme builder!!
Not only css but also Jquery!
All for something that should be a basic feature on the editor (add/delete fields to opt-in form)
This is awesome, thanks! Would love to learn the opposite too… How to add additional fields to have the option form require first name, last name, state and email address
use contact form 7, configure it as you need and skin it using css as close as you can to email-optin-module 🙂
Would be nice to integrate contact form with Mailchimp or Bloom database.