")
If you have been a Divi user for a while, the thought of inserting a Divi Module (or Row) inside of another Module may have crossed your mind. In most cases, if you know how to use Divi proficiently, this sort of thing isn’t really necessary. Divi Modules are already powerful elements packed with features and built-in design settings. But, sometimes it would be nice to enhance these features by designing two modules using Divi and then inserting one into the other. One good example of this would be inserting a module (like a contact form) into a toggle module so that the form will show when clicking the toggle.
In this tutorial, we are going to share how to insert Divi Modules or Rows into another Divi Module. To do this requires adding a few small snippets of JQuery. Once the code is in place, we can use the Divi Builder to add the appropriate CSS classes to target the elements we want to insert/move and the module we want to put them in.
Let’s get started!
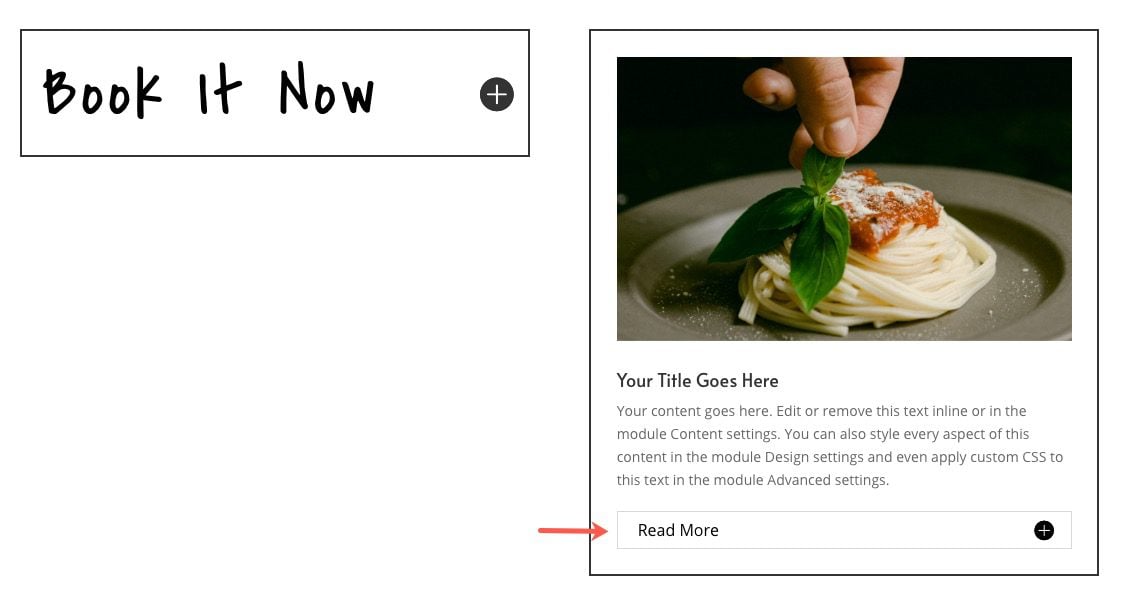
Sneak Peek
Here is a quick look at the examples we’ll build in this tutorial.
A Contact Form Inside a Toggle Module
A Toggle Module and Button Module Inside a Blurb Module (right column)
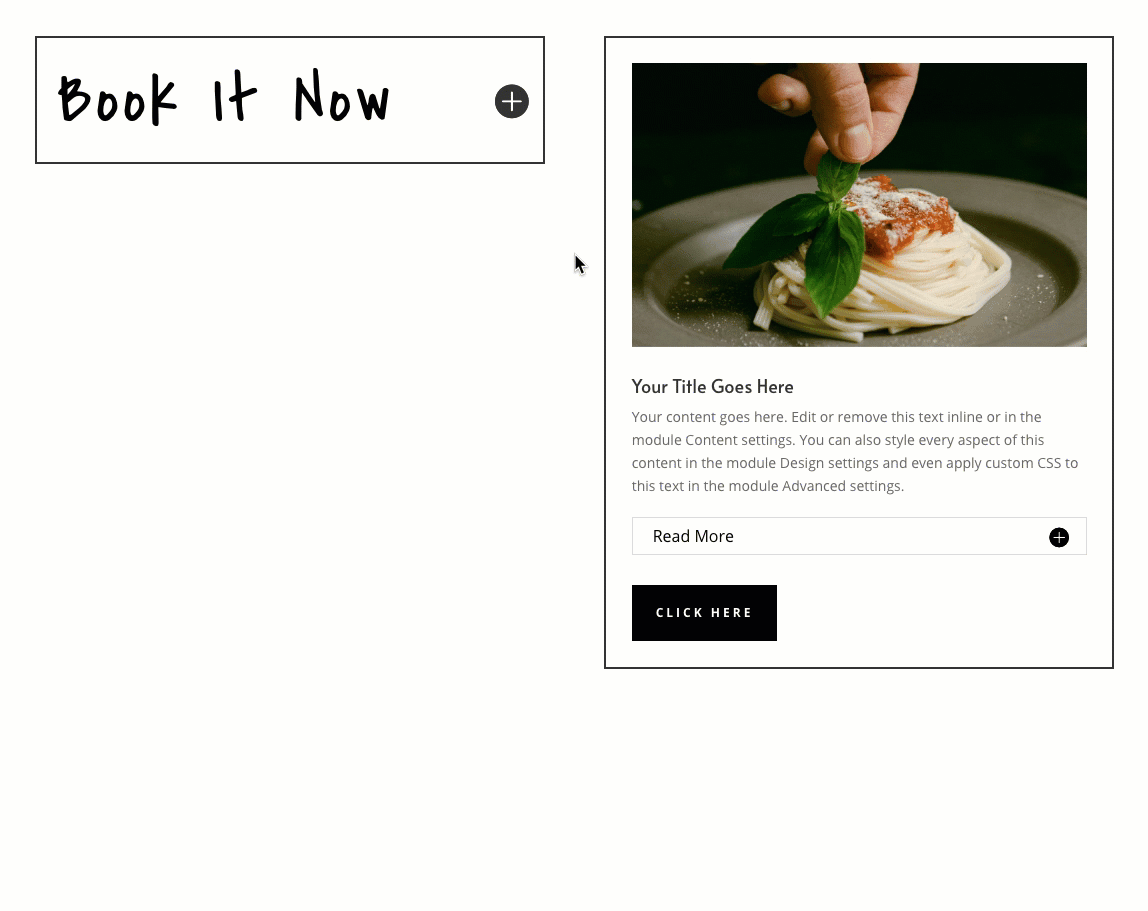
A Divi Row Inside a Toggle Module
Download the Layout for FREE
To lay your hands on the layout from this tutorial, you will first need to download it using the button below. To gain access to the download you will need to subscribe to our newsletter by using the form below. As a new subscriber, you will receive even more Divi goodness and a free Divi Layout pack every Monday! If you’re already on the list, simply enter your email address below and click download. You will not be “resubscribed” or receive extra emails.

Subscribe To Our Youtube Channel
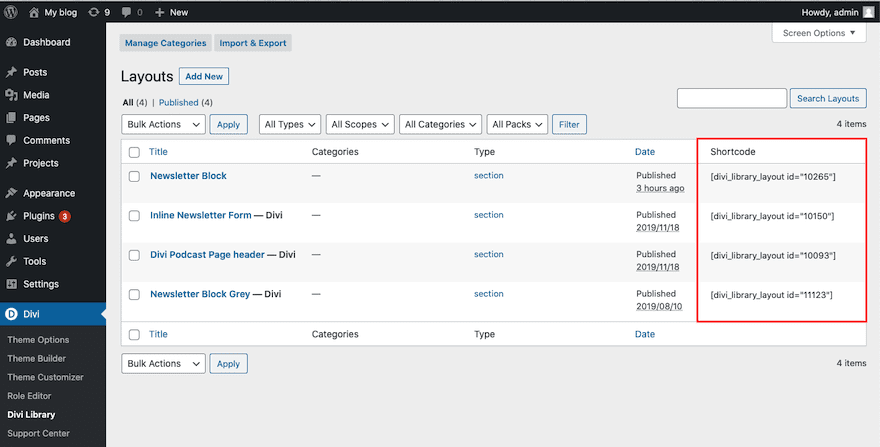
To import the section layout to your Divi Library, navigate to the Divi Library.
Click the Import button.
In the portability popup, select the import tab and choose the download file from your computer.
Then click the import button.

Once done, the section layout will be available in the Divi Builder.
Let’s get to the tutorial, shall we?
What You Need to Get Started

To get started, you will need to do the following:
- If you haven’t yet, install and activate the Divi Theme.
- Create a new page in WordPress and use the Divi Builder to edit the page on the front end (visual builder).
- Choose the option “Build From Scratch”.
After that, you will have a blank canvas to start designing in Divi.
Things to Keep in Mind
For this tutorial, the process of styling all modules you want to use in this process can still be done visually using the Divi Builder built-in settings, so we will leave that part to you. We are going to focus more on how to apply the right CSS Classes and HTML to each Divi element in order to insert the module(s)/row(s) inside another module.
Keep in mind that we will only be able to see the end result on a live page, not while editing from the visual Divi Builder. In other words, we can design the modules with Divi but they will remain separate in the builder until you view the live version of the page.
You can only insert modules or rows inside a module that has the ability to add text/html.
Also, as we’ll explain later, there are certain limits to the number of instances (modules or rows being inserted into another module) you can have within a column or section. When inserting modules into another module, you are limited to one “destination” module (the module the will hold the module(s) you want to insert) per column. And, when inserting rows into another module, you are limited to one “destination” module per section. Although this is a limitation in one sense, it does give you the option of having multiple instances on your page when needed.
Part 1: How to Insert Divi Modules into Another Module
For the first part of this tutorial, we are going to show you how to insert Divi Modules into another module. First, we’ll show you how to add a Contact Module inside of a Toggle Module. Then, we’ll show you how to add a Toggle Module and a Button Module inside of a Blurb Module.
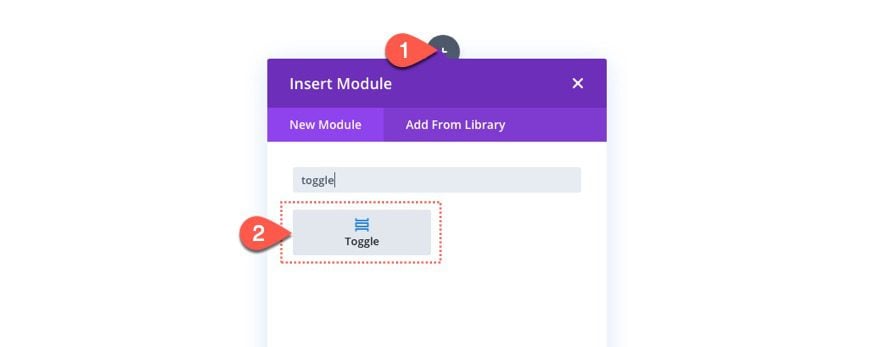
Example 1: Inserting a Contact Form Module Inside of a Toggle Module
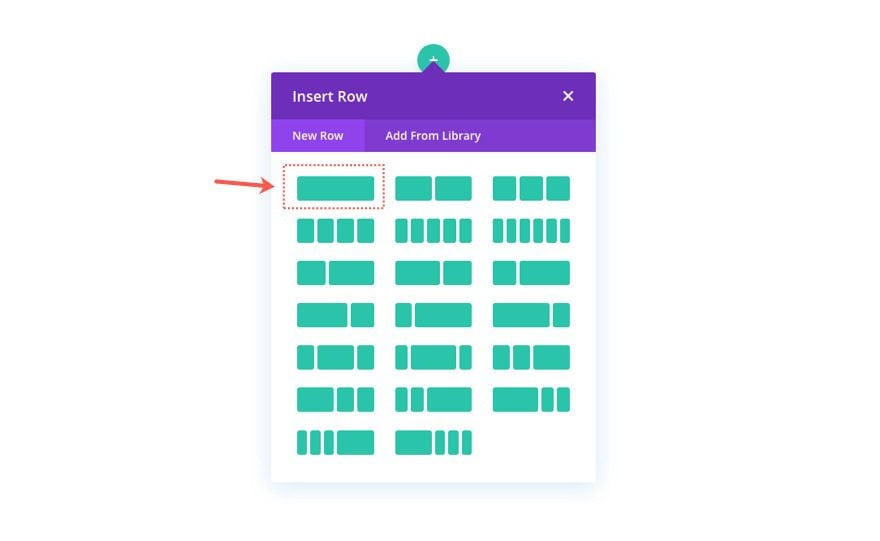
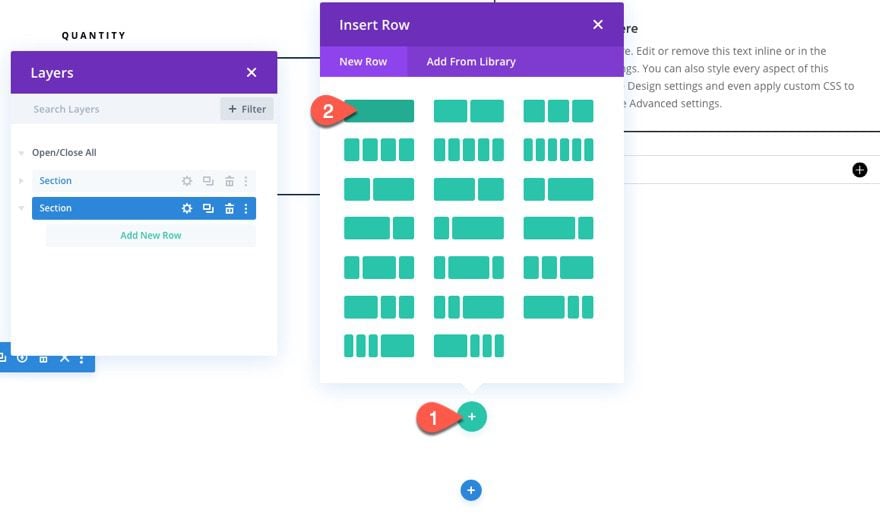
Add New Row
To start, add a new one-column row to the section.
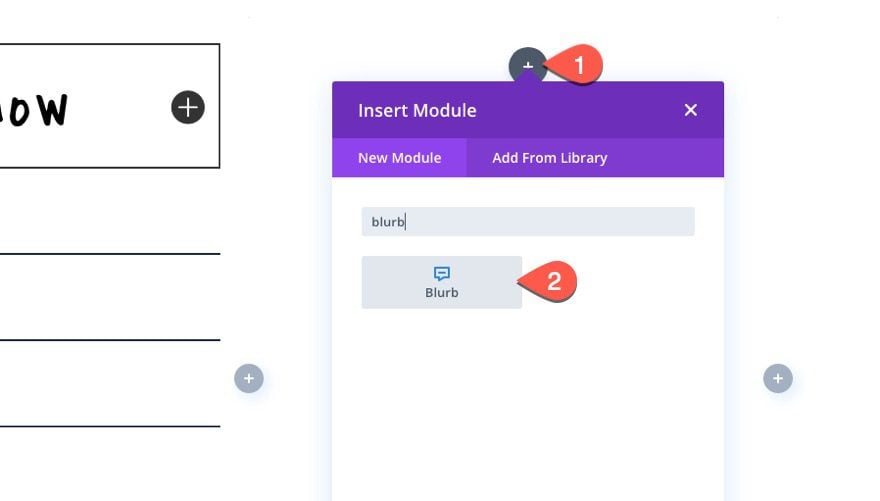
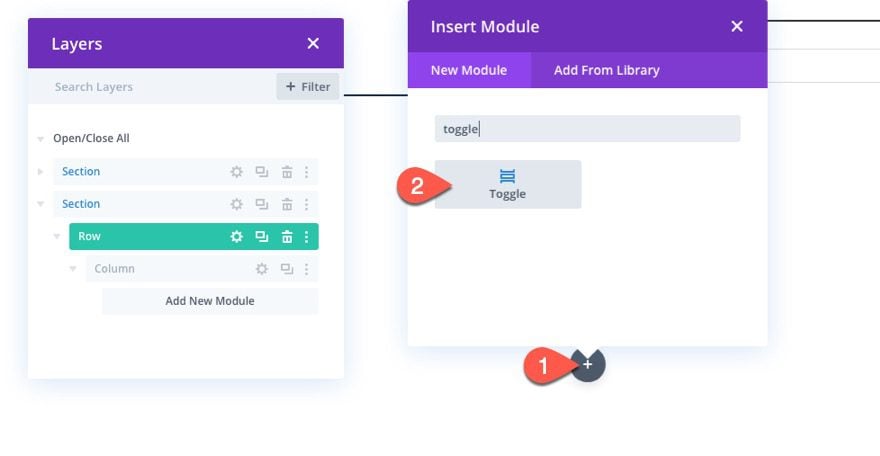
Add Toggle Module (the Destination Module)
Inside the column, add a toggle module.
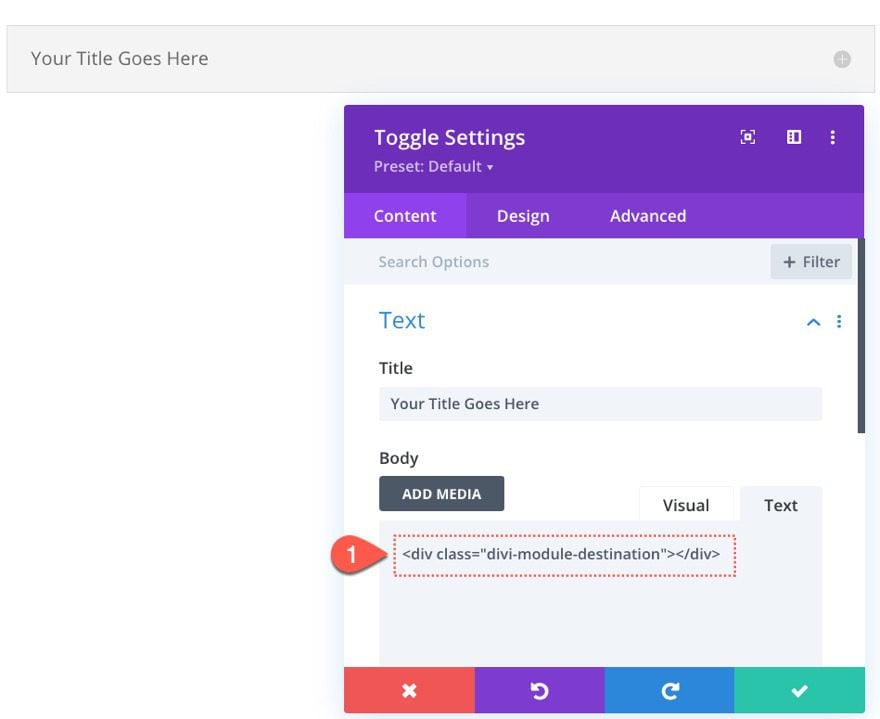
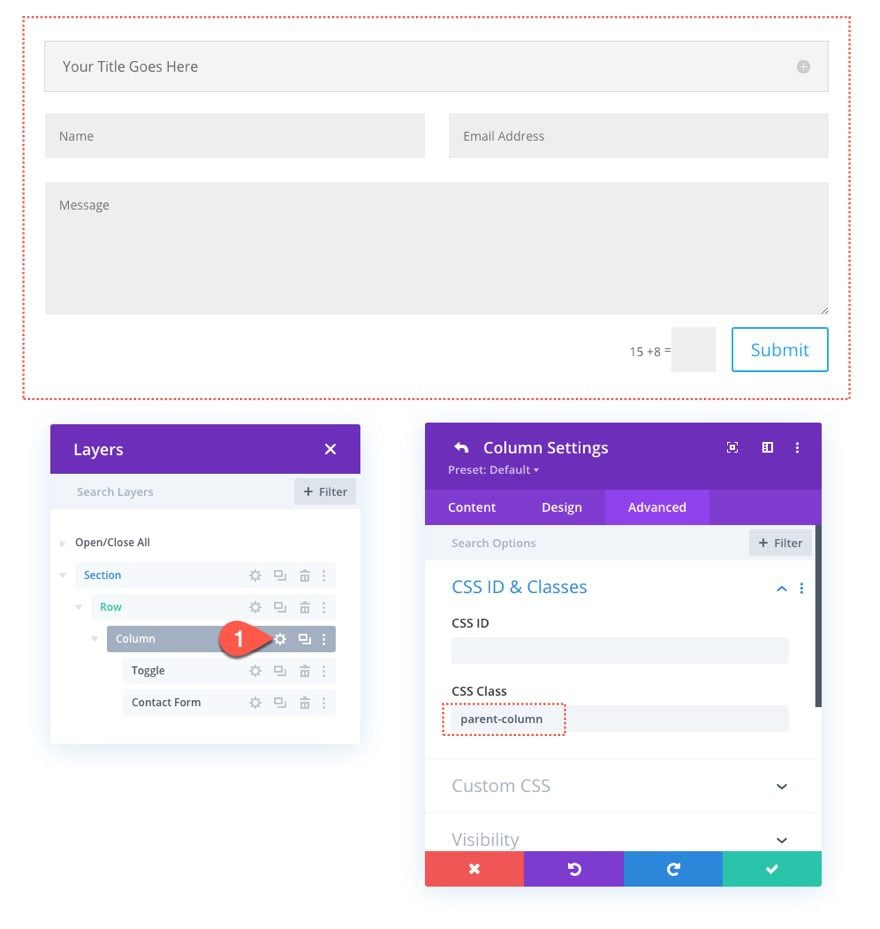
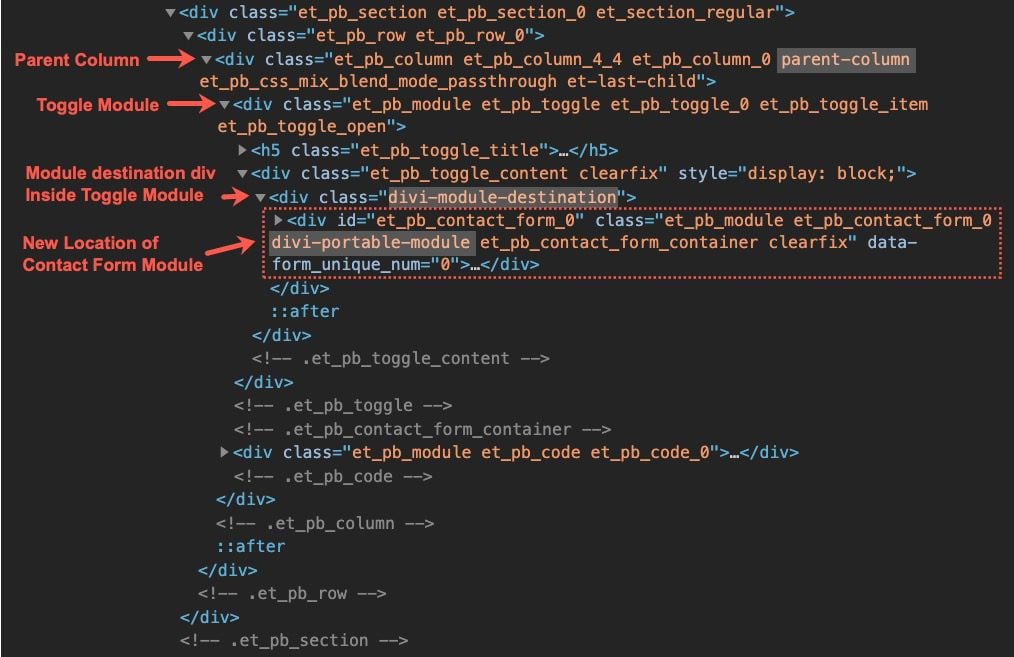
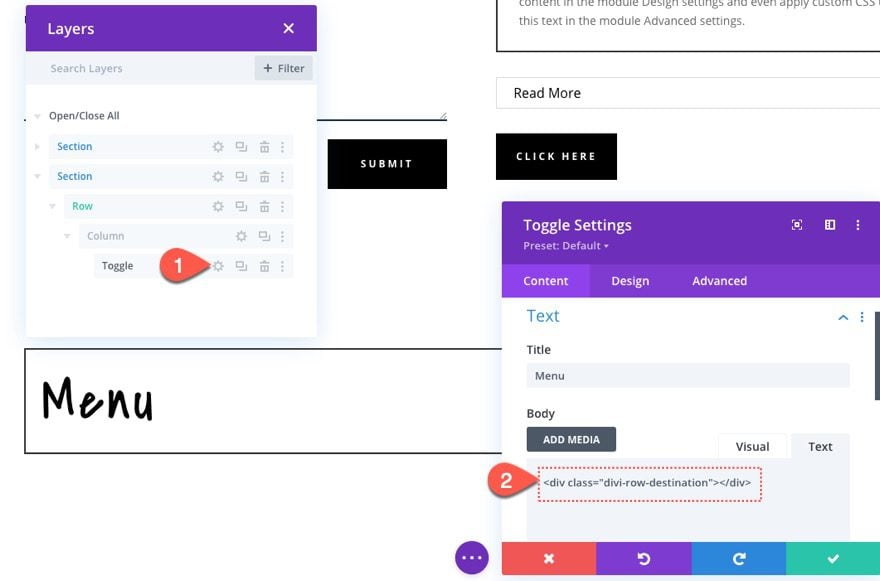
For this example, we want to insert a module inside this Toggle Module which we can refer to as our destination module. Technically, the actual destination will be inside the Toggle Module’s body content (where you can add text/HTML). To designate the destination location, we need to insert a new div with a necessary CSS class that will serve as the target location for our portable module (the module we want to insert).
Under the content tab of the toggle settings, add the following HTML to the body. Make sure to click the Text tab before inserting HTML.
<div class="divi-module-destination"></div>
Add the Contact Form Module (the Portable Module)
Next, we need to add the module we want to insert into the Toggle Module. In this example, we are going to insert a Contract Form Module into the body of the Toggle Module. It is important to add the new “portable” module within the same column as the destination module.
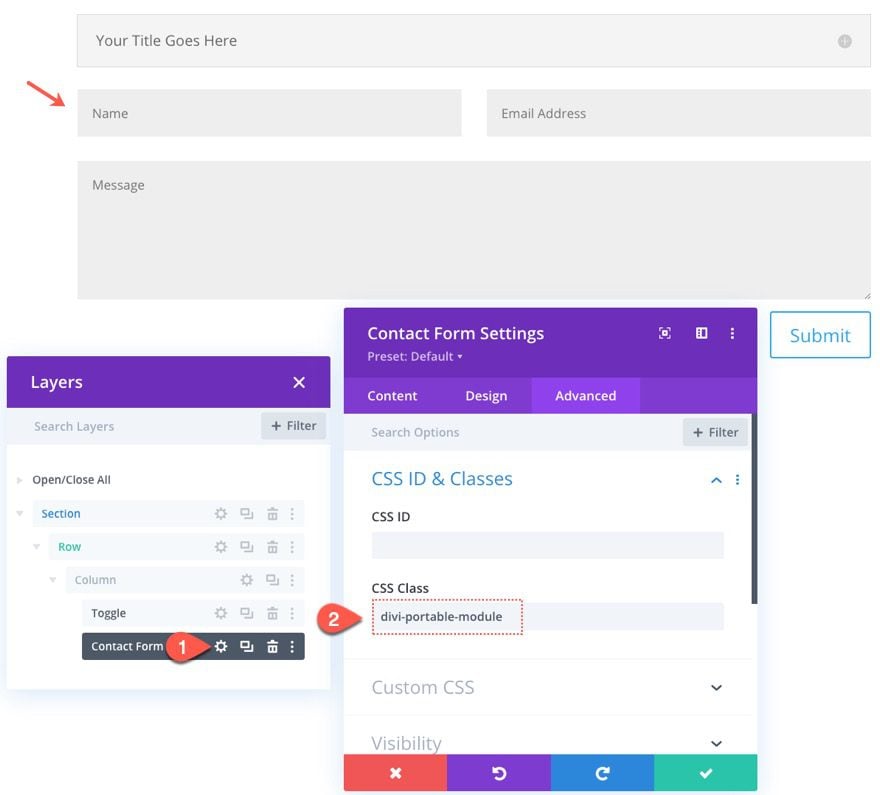
To do this, add a new contact form module directly under the toggle module.
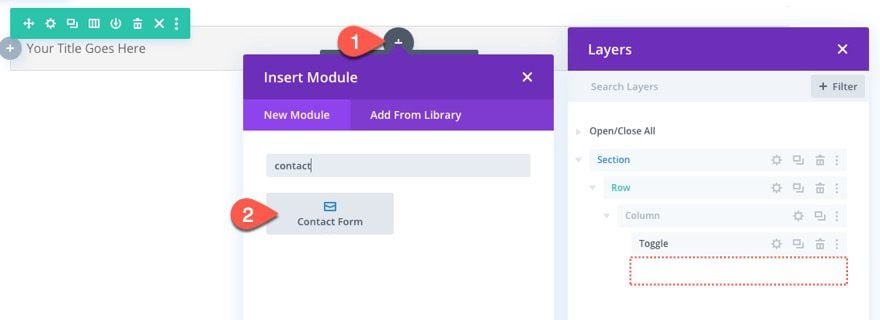
Click the Advanced tab under the settings of the Contact Form (of any module you want to insert) and add the following CSS Class:
- CSS Class: divi-portable-module
Add Column Class
Next we need to add a custom class to the column that holds both modules. Open the column settings and add the following CSS Class:
- CSS Class: parent-column
Add the Code
The code needed to make this work is pretty short and simple. Basically, we want to use JQuery to find each module with the class “divi-portable-module” with the parent column (the one with the class “parent-column”) and append each of those modules inside the div with the class “divi-module-destination”.
The code also includes a snippet to insert a button module to another module and a snippet to insert Divi rows into a module.
To add the code, add a new code module under the contact form module.
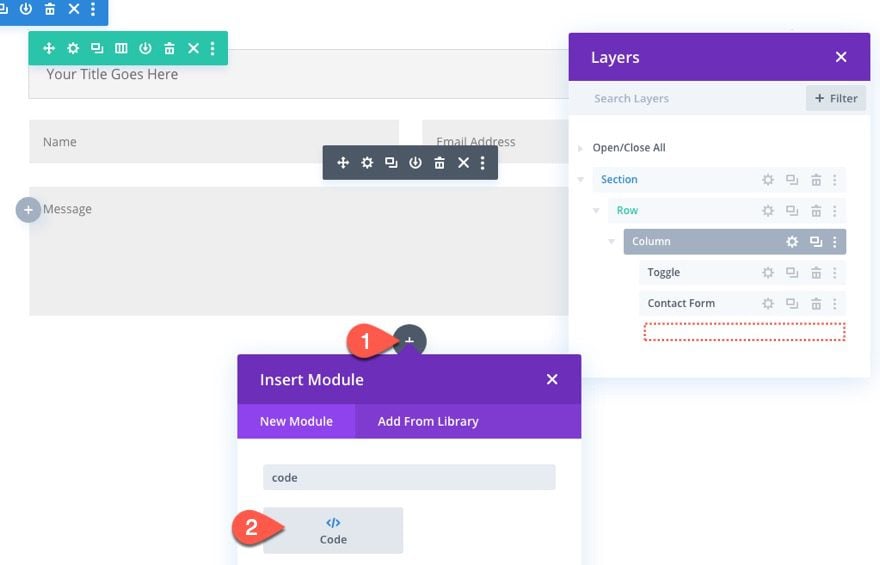
Before you paste the necessary code, add the script tags needed for embedding JS into HTML inside the Code box:
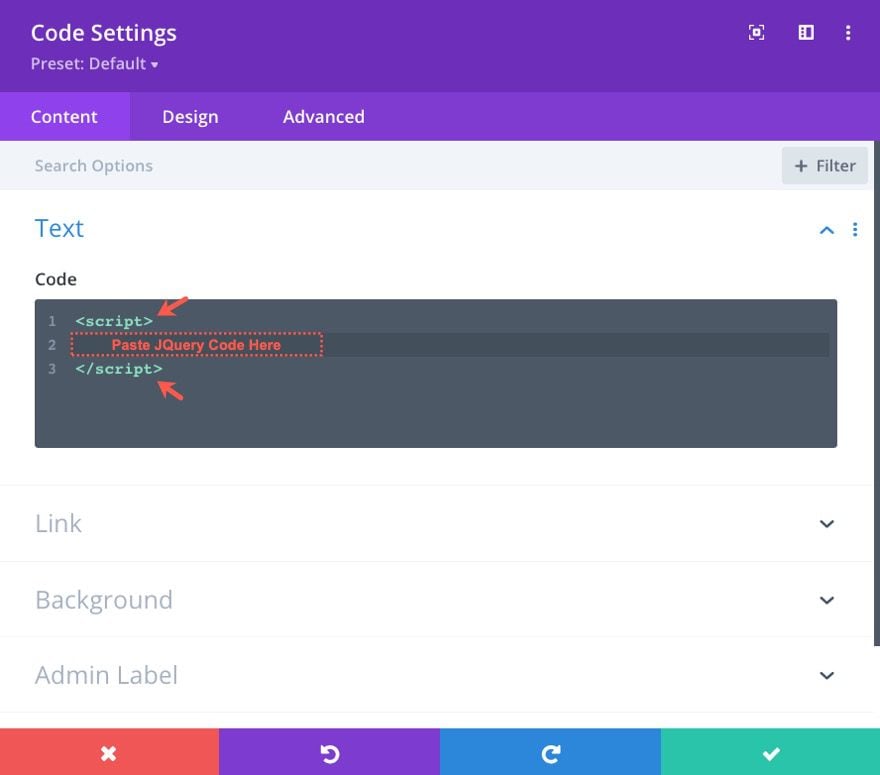
Then paste the following code between the script tags:
(function ($) {
$(document).ready(function () {
// Option #1: Move Divi Module(s) into a Module
// Limit: One Instance per Column
// Use following code if you want to move
// a module inside another module. Each column with the
// class 'parent-column' will append any module(s)
// with the class 'divi-portable-module' to the div
// with the class 'divi-module-destination'.
// Only one instance of 'divi-module-destination' should
// be added per column.
$('.divi-portable-module').each(function () {
$(this).closest('.parent-column').find('.divi-module-destination').append($(this));
});
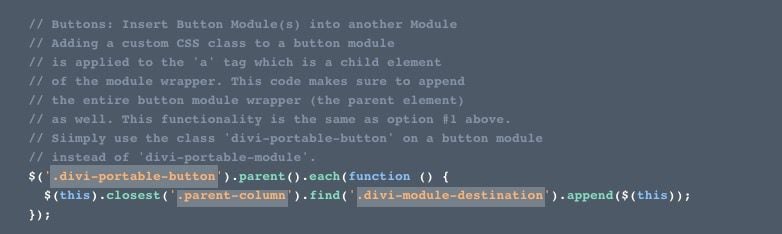
// Buttons: Insert Button Module(s) into a Module
// Adding a custom CSS class to a button module
// is applied to the 'a' tag which is a child element
// of the module wrapper. This code makes sure to append
// the entire button module wrapper (the parent element)
// as well. This functionality is the same as option #3 above.
// Siimply use the class 'divi-portable-button' on a button module
// instead of 'divi-portable-module'.
$('.divi-portable-button').parent().each(function () {
$(this).closest('.parent-column').find('.divi-module-destination').append($(this));
});
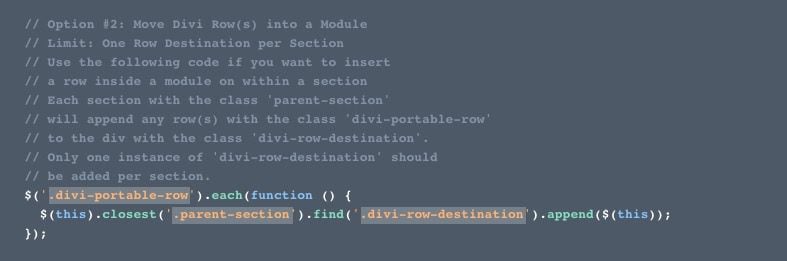
// Option #2: Move Divi Row(s) into a Module
// Limit: One Instance per Section
// Use the following code if you want to move
// a row inside a module on more than one section
// of a page. Each section with the
// class 'parent-section' will append any row(s)
// with the class 'divi-portable-row' to the div
// with the class 'divi-row-destination'.
// Only one instance of 'divi-row-destination' should
// be added per section.
$('.divi-portable-row').each(function () {
$(this).closest('.parent-section').find('.divi-row-destination').append($(this));
});
});
})(jQuery);

Understanding the Functionality
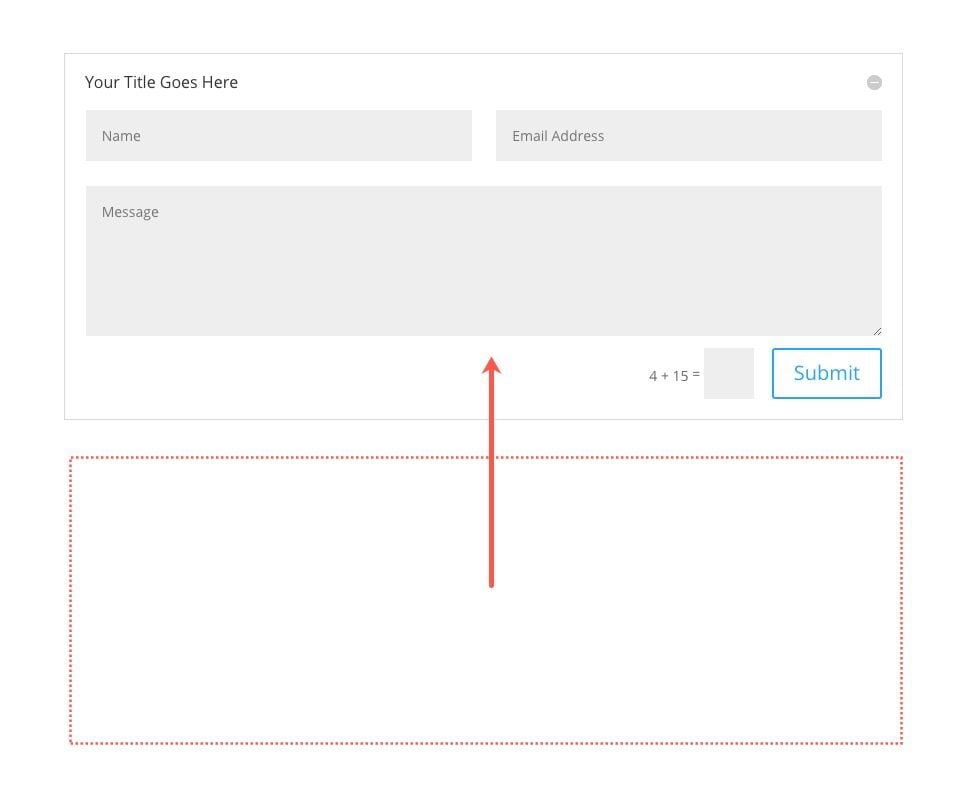
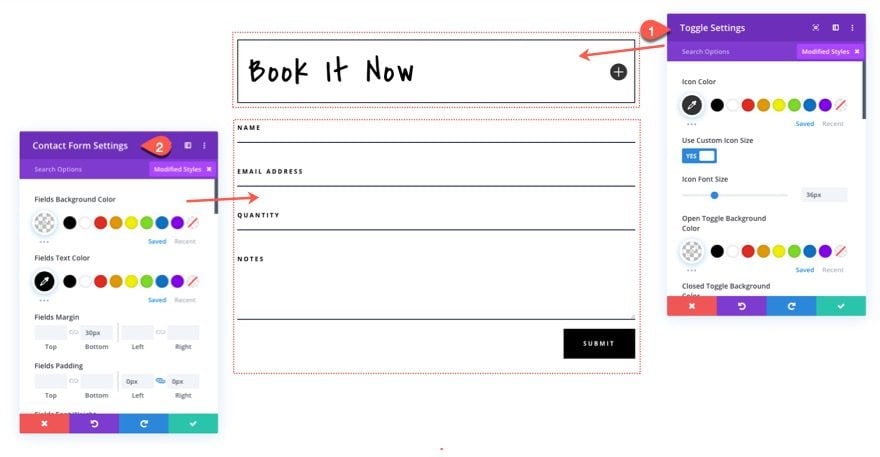
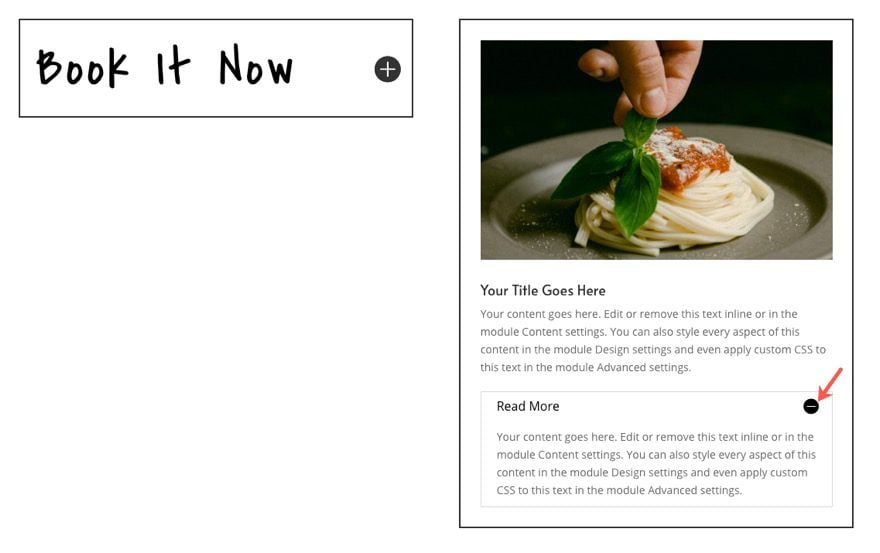
Inside the Divi Builder on the backend, the modules will remain separate. However, if you view the results on the live page on the frontend, you will see that the contact form has been inserted into the Toggle module.
If you inspect the code on the live page, you can see that the Contact Form Module has been successfully inserted inside the div with the class “divi-module-destination”.
Styling the Modules
Like we mentioned before, the modules will remain separate on the backend Divi Builder. However, the styles you add to each will still apply. So feel free to add update the styles of both the destination module and the portable module using the Divi Builder.
NOTE: In some cases, the styles of the destination module (now a parent module) may be applied to the inserted module. If this is the case, you should be able to override that style by updating the settings of the inserted module.
The Result
Here is the final result when viewing the live page.
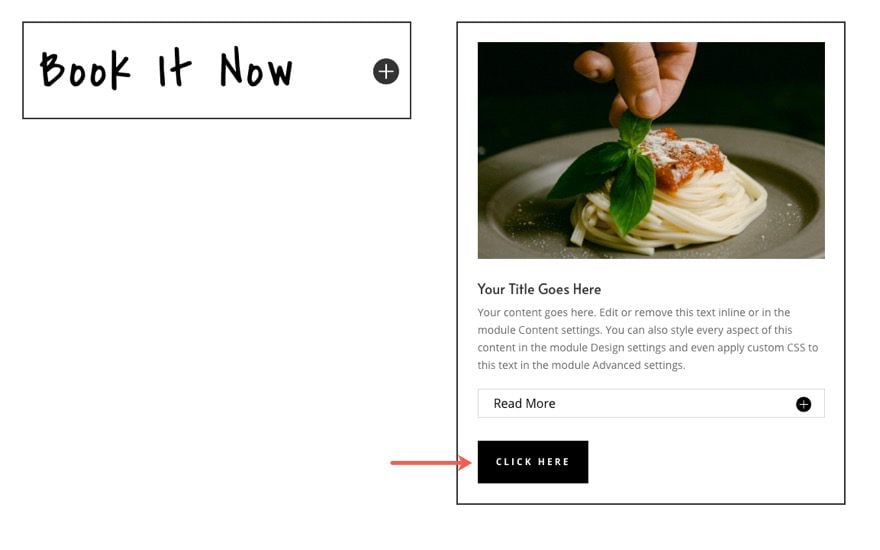
Example 2: Inserting a Toggle Module Inside of a Blurb Module
For our next example, we are going to insert a Toggle Module inside of a Blurb Module. The process is the same as before. The code snippet limits the usage of one destination module per column. In other words, you can have multiple portable modules with the class “divi-portable-module” that can be added to the destination module, but you can only have one instance of the div with the class “divi-module-destination” per column.
To demonstrate this, let’s repeat the same process with another group of modules in another column of the same row.
Add New Column to Row
First, add a new column to the existing row.
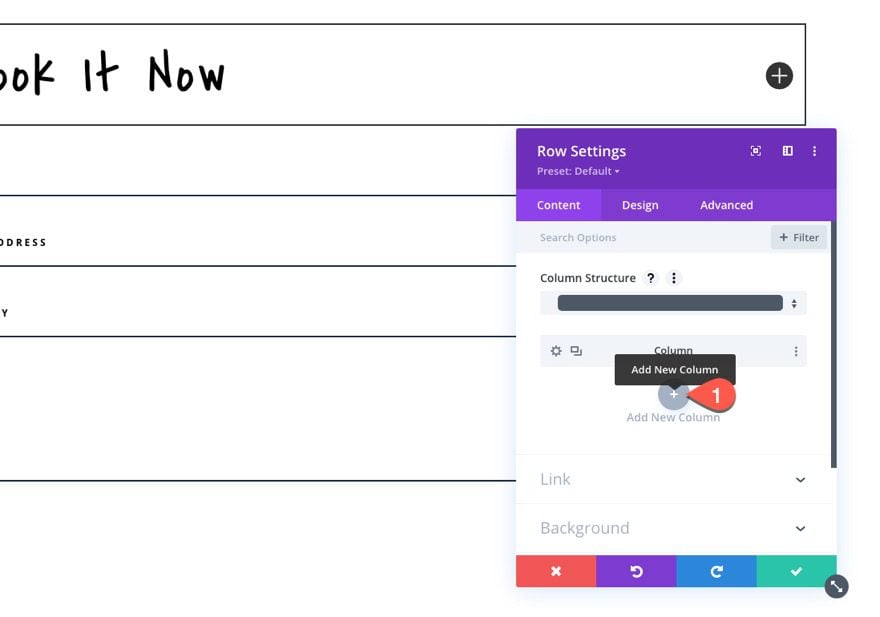
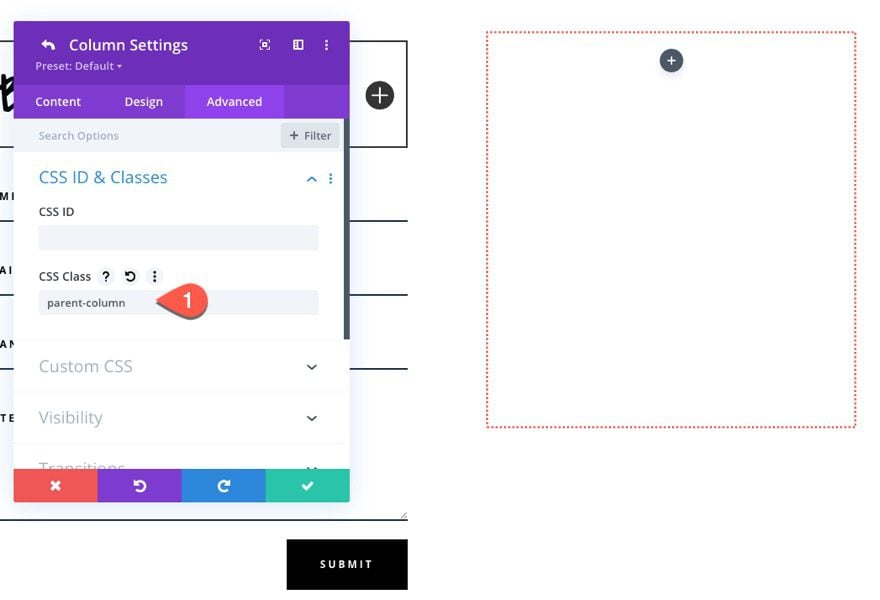
Add Column Class
Give the new column the following CSS Class like we did in the first column:
- CSS Class: parent-column
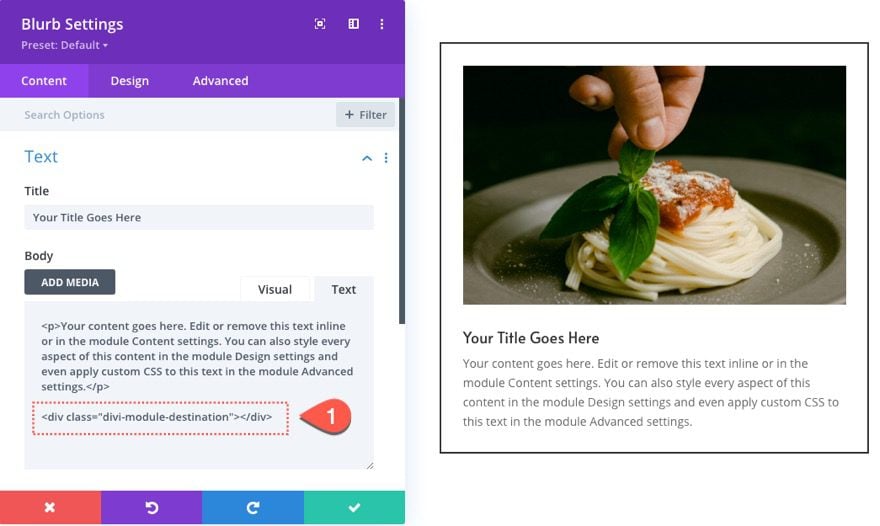
Add Blurb Module (the Destination Module)
Inside the new column, add a blurb module which will serve as our destination module.
Inside the body of the blurb, paste the following HTML that includes the same div with the class “divi-module-destination” where you want the portable module(s) to be inserted (in this case under the mock body text):
<div class="divi-module-destination"></div>
Add Toggle Module (Portable Module)
Since we want to add a toggle module to the blurb, create a new toggle module within the same column as the blurb.
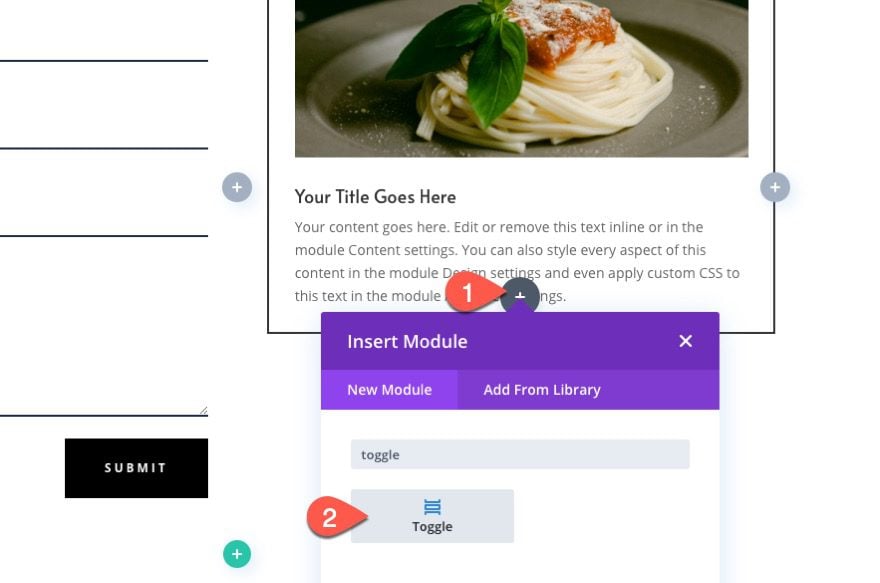
Then add the following CSS Class to the Toggle module to designate it as the module we want to move/insert into the blurb:
- CSS Class: divi-portable-module
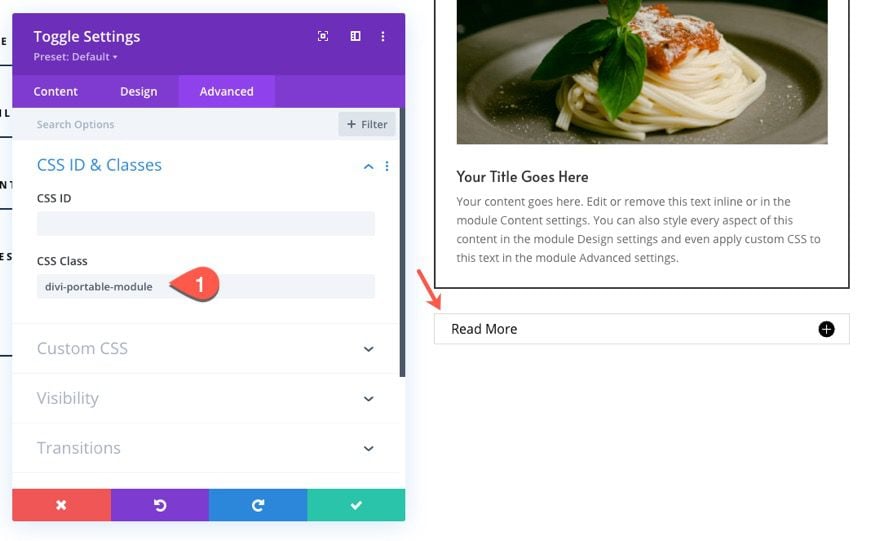
Result
Now check the live page to see the result. The toggle will now reside within the blurb module.
For this next example, we are going to insert a button module into the same blurb module from our previous example. Normally, for any other module, we would repeat the same process to add a new portable module to the blurb. But, because the button module is built a little differently on the backend, we need to add a different class to the button module.
Add Button Module (Portable Module #2)
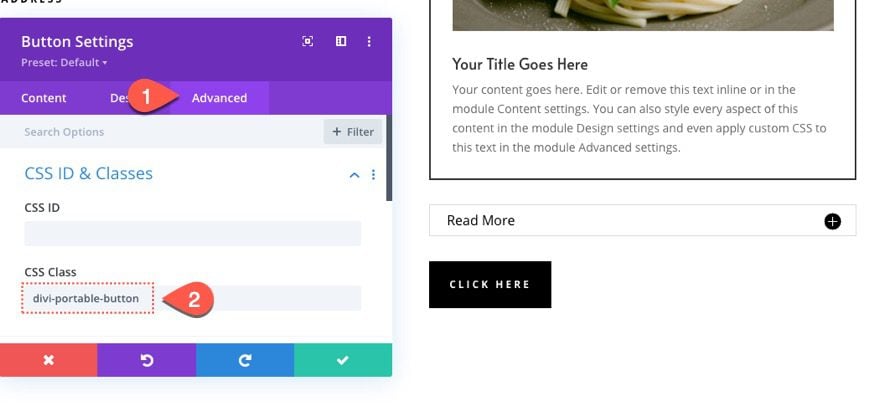
To do this, add a new button module under the toggle module already being inserted into the blurb.
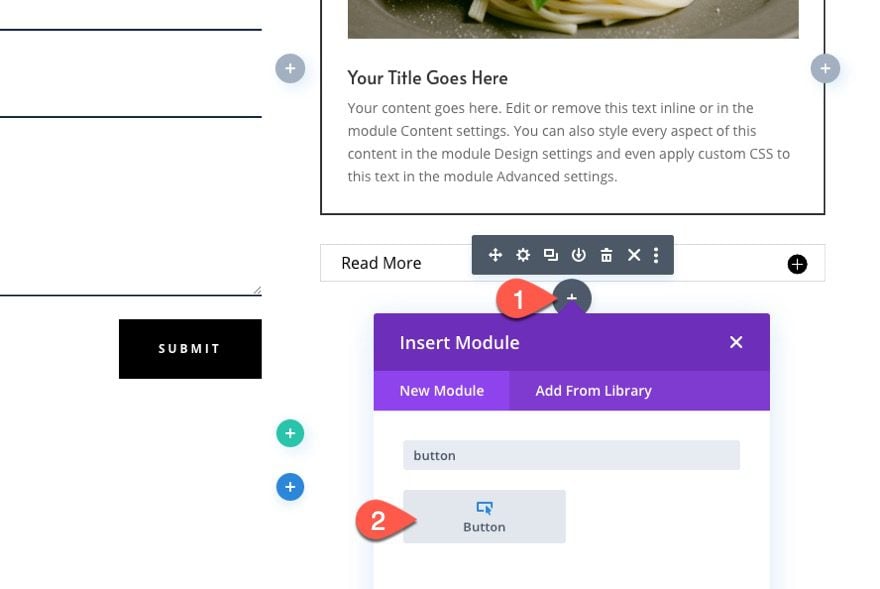
Then, add the following CSS Class to the button module:
- CSS Class: divi-portable-button
The Result
Now check out the result on the live page. The Blurb Module now contains the toggle module and the button module.
And here is the corresponding code snippet used to insert the button module inside the module with the “destination” div. The main difference with this code snippet is that we are targeting the parent element (the button wrapper div behind the scenes) of the button class “divi-portable-button”.
Part 2: How to Insert Divi Rows into a Module
If you want to insert an entire row (or rows) inside of a module, the process is very similar to inserting a module into another module. We need add class “parent-section” to the section containing the destination module and the portable rows we want to insert. We need to add the div with the class “divi-row-destination” to the destination module. And we need to add the class “divi-portable-row” to the row(s) we want to insert into the destination module.
Here’s how to do it.
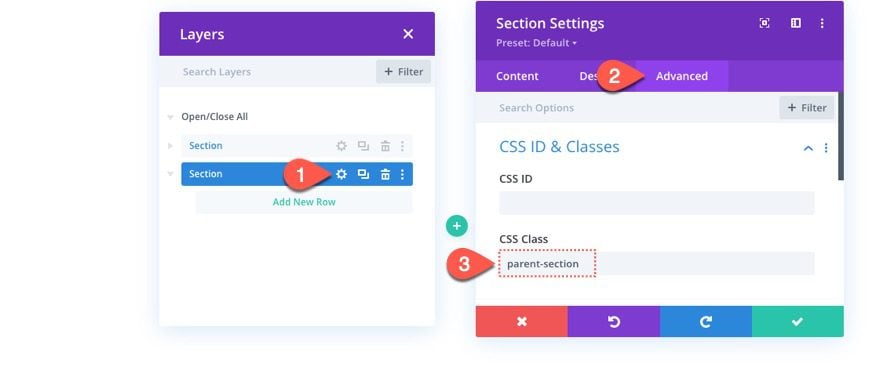
Add Section
First, add a new regular section to the page.
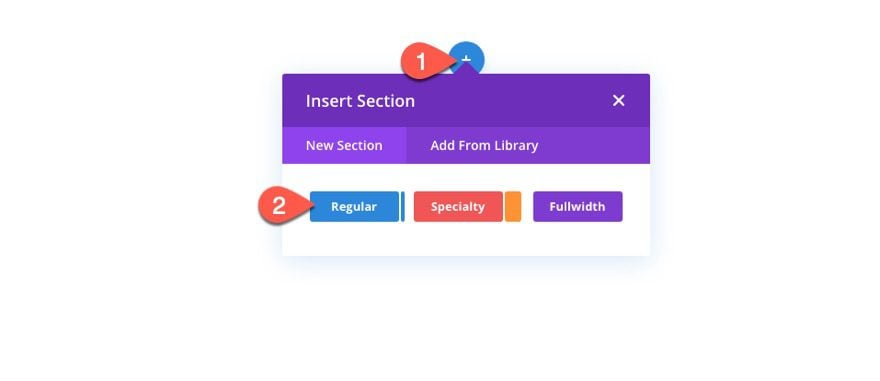
Under the advanced tab of the section settings, add the following CSS Class:
- CSS Class: parent-section
Add Row for Destination Module
Add a new one-column row to hold the destination module.
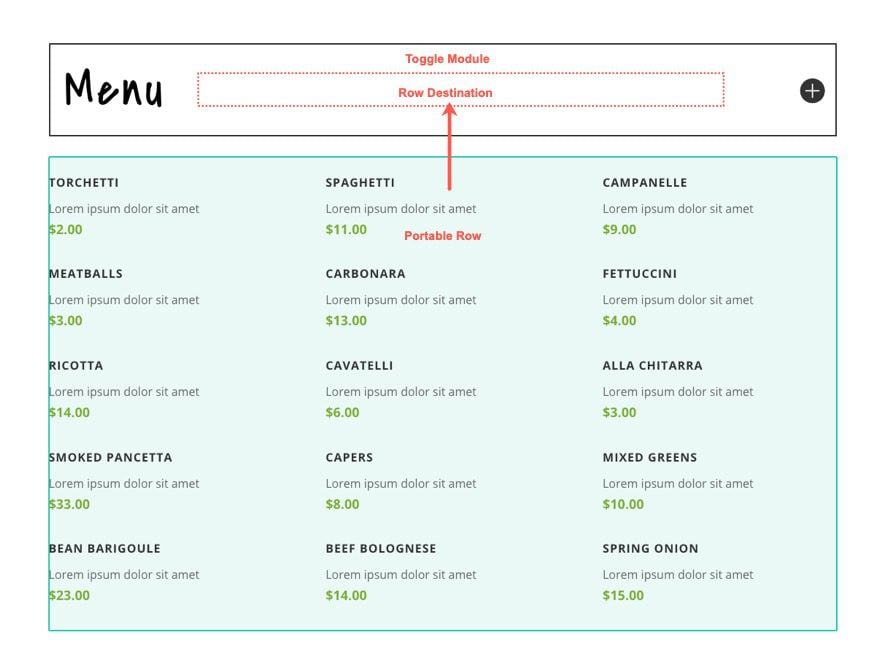
Add Toggle Module (the Row Destination Module)
For this example, we are going to insert a row inside of a Toggle module. Therefore, add a new Toggle Module to the row.
Since the Toggle Module is our destination module, open the settings for the toggle, and add the following HTML to the body content:
<div class="divi-row-destination"></div>
Create Portable Row
Now that the destination module is in place, add a new row under the previous row. This will serve as the portable row that we will insert into the Toggle Module.
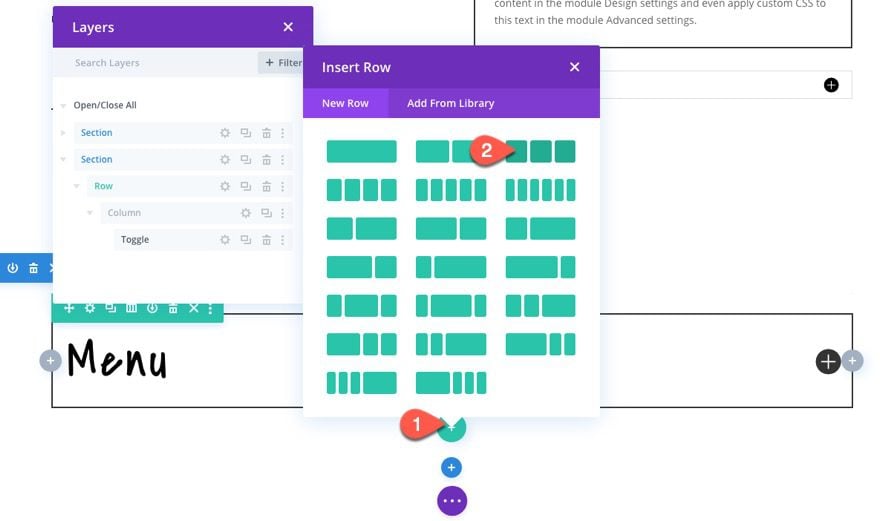
Fill Row with Content
At this point, you can fill the row with any content/modules you want using the Divi Builder. Keep in mind that everything within the row will eventually become inserted into the toggle module since it resides inside the row.
Add Class to Row
Then open the settings of the row and designate it as a row you want to insert into the Toggle Module by giving it the following CSS Class:
- CSS Class: divi-portable-row

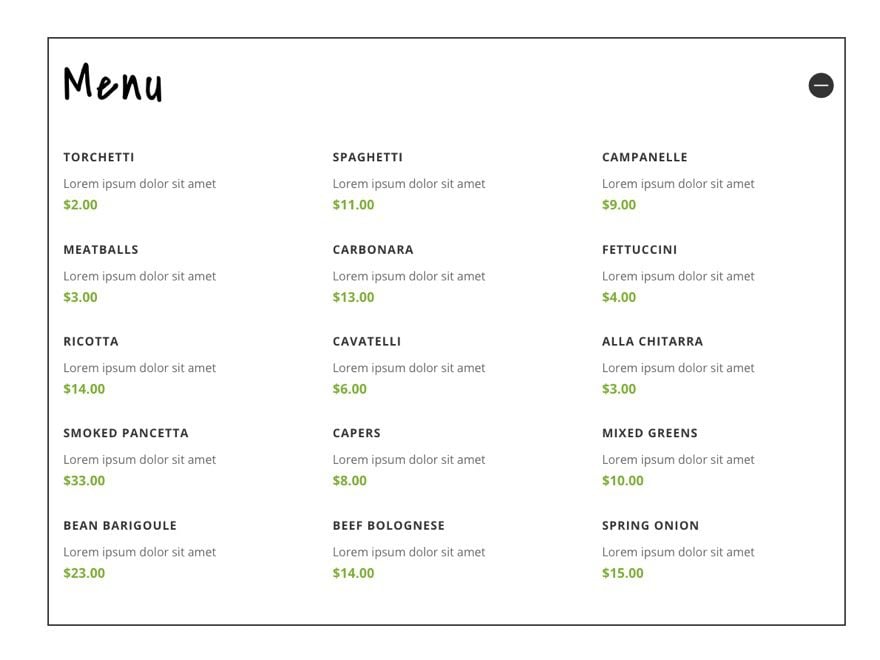
How it Works
As a reminder, the row will remain separate from the module when editing the layout using the Divi Builder on the backend. But the functionality is in place to insert the row inside the Toggle Module.
The Result
To see the result, check out the live page and open the toggle module. It now contains the entire row.
And here is the corresponding code snippet that makes this possible. Notice the corresponding classes being used.
Inserting Multiple Rows inside the Module
As long as you keep one instance of the destination module (i.e. the div with the class “divi-row-destination”) per section, you can insert multiple rows to that destination simply by giving it the same class “divi-portable-row”.
For example, you could add another row with a gallery module above the row with the menu items previously created. Then give the row the same class “divi-portable-row”
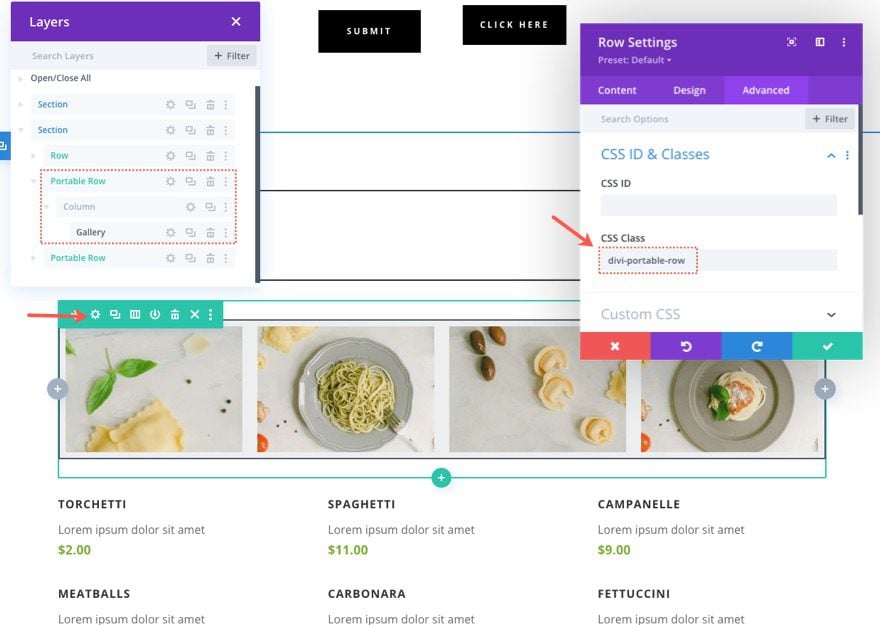
Both rows with the class “divi-portable-row” will be inserted into the Toggle Module.

Using a Plugin/Shortcode
If you are looking for a plugin that does something similar and provides more flexibility or options, you can check out the Shortcodes for Divi plugin from our marketplace which allows you to embed any Divi layout to your page using a shortcode. Once installed the plugin will generate a embedable shortcode for each layout you have saved to your Divi Library.
Final Thoughts
In most cases, there shouldn’t be a need to insert modules or rows into other modules unless there is a special need. Usually, you can get the layout/design you need without having to do this type of thing. However, for those of you looking for a simple way to do this without having to resort to a plugin, hopefully, this solution will come in handy.
Plus, think of all the possible applications!
I look forward to hearing from you in the comments.
Cheers!


Can this technique be used to put a grid of images with links in a tab as content? I only need 2 tabs, each with about 9 images with links.
Divi 5 has greatly improved nesting capabilities, making it easy for you to create image grids.
Hey, Bonny! Yes, that is a great way to use this technique. You can build your grid of images with links within a Divi row, and then follow the steps in the article to insert that row into a tab. However, it’s worth mentioning that using a third-party solution for insertion, like this one, remains a more user-friendly way to achieve this.
The module inside module version works great, but when trying to nest some rows within the same section into toggle module of the same section, I still see the content outside and the toggle empty.
I added parent-section to the section, then added div class=”divi-row-destination…to the toggle, then for every row underneath the toggle one I applied the divi-portable-row (I did not use the divi portable row for the first row where the toggle is placed)
The code module was placed in the last of those portable-row.
I tried to fix myself several times, doing different combinations such as puting the code module in another row on its own, with and without the divi-portable-row, nothing, I tried to add the portable row css one by one and check, also nothing…..for some reason I can’t make it to work.
To get a row to nest within a module I found I had to nest the given piece of Javascript inside a Document Ready wrapper – ie. after the page has loaded.
Divi 5 handles this natively now, wonder if it solves your needs.
I’ve used this code successfully on many occasions, thank you.
I am now look for a solution which you may be able to offer some insights into.
I would like to place a Tabs Module inside a Tabs Module.
Not only that, I would like a different Tabs Module in each tab.
As I only have 4 tabs i could rewrite the jscript 4 times with different classes, ie., divi-portable-module1, divi-portable-module2, divi-portable-module3, divi-portable-module4, however, as the class’ parent-column’ would not apply, and individual tabs do not have a CSS ID option, how might this be achieved.
Any ideas welcome.
Thanks again for a brilliant resource.
I’m late to this party, but this solution works just fine.
The one quirk I found is that when inserting multiple toggles within a parent toggle, on the live page when you open the parent toggle, all the child toggles open as well (when their initial state is to be closed). The children are inheriting the parent state.
If anyone sees this at some point, I’m sure there must be a css or code hack – and any suggestions or workarounds would be appreciated!
If you’re trying to nest toggle modules within other toggle modules, you can use the following jQuery code to fix the issue where opening / closing the outer toggle triggers an opening / closing of the inner toggle:
jQuery(function($) {
$(“.et_pb_toggle .et_pb_toggle_title”).click(function(e){
e.preventDefault();
var $module = $(this).parent();
$module.children(“.et_pb_toggle_content”).slideToggle(400, function() {
$module.toggleClass(“et_pb_toggle_open et_pb_toggle_close”);
});
});
});
It replaces the existing click handler on the toggle title with one that only affects the visibility of the toggle content element if it is a direct child of the clicked toggle.
I’ve tried your code and it’s not successful. Could you maybe expound on where exactly you place this code?
Hmm… that does not work. I implemented both scripts. Is that correct?
I totally appreciate the response!
I seem to be having trouble implementing it though – I’ve tried placing it within the original code module for the Divi supplied solution as well as trying it within its own code module with script tags added.
Always use Divi modules on my client’s websites. they are awesome my clients got satisfied with them. thanks, Jason
I appreciate the feedback, Paul. Very helpful. Thank you.
Brilliant Jason! Really expanded the possibilities here, I’ve done tabs and such before with modules inside, but the ideas you’ve shared here and simplified the process.. wow, minds exploding with usage ideas. Rows INSIDE a toggle… Brilliant!
Thank you so much for all your efforts to make us all better!
Awesome! Glad you like it.
nice, happy new year !!!
Thanks Jason much appreciated.
I will add, as per the comments above, there are many ways to skin a cat. I would suggest, regarding what can be done with other page builder, that over nesting can add unnecessary structure where it may not be needed. What we are doing here is really edge case territory and merits an elegant solution so I would hope that given the name that ET will do it in such a way. I will note that it seems that in relation to this that the Divi block is in some way over complicated where it you want to just add a module you need to add the section, row and column elements as well. This where you may be inserting into the column block, leading to something overdone.
This all highlights some of the painted into a corner scenario that we get with WordPress and much other tech, cross compatibilty and integration issues. Ideally with the block editor it should have been architected to provide a solid foundation of key blocks for content and layout and to this provided a very good API that third party themes and page builders could hook into to add extra bells and whistles and UI on the level of what we get with DIVI. Disable the theme or page builder and at least the content in its layout would to some degree be intact.
As it is what we get with the black editor is hundreds of vendors coming up with their own solution. Disable the related plugins and you lose control of the content. Turn off Divi and you get the detritus of content in a forest of short codes. Shortcodes should never be used for layout and structure, they should only be used for discrete features, functionality and to interpolate field data.
I know it may be a challenge to far but it would have been nice to see Divi build as an overlay to the block editor to circumvent the above issues.
Thanks for the insight, Stephen.
I really like doing such things without the need of installing another WP plugin.
Cant wait to see what next did resources/tutorials we have instore.
Keep them coming 🙂
Hey Jason,
Thanks heaps for the tutorial. It solves a problem I’ve been trying to address without the use of a plugin. I’m trying to avoid the typical wordpress plugin bloat. Love your tutorials because you are generally covering issues outide of the normal styling etc issues. All the best for the New Year to you and the elegant Themes team.
Cheer
denis
Another superb post by Jason – thank you very much – all the very best for the year ahead
Wow that’s quite a complicated way of doing something that can be done with a 4 line function that creates a shortcode to insert a divi library item. Not sure if I can post the code in here, so hove over my name to go to the tutorial that shares the code (not my code by the way).
John-Pierre,
I originally set out to show a quick one-off solution for someone who wanted to simply embed/append a module inside another module (like a toggle) without having to resort to modifying the child theme or using plugins. But yeah, if the shortcode solution is better for you, that’s awesome. Thanks!
Bon travail. It saves having the overhead of the Divi Supreme plugin. In the code it seems to target et_pb_section. Does this specify having to nest a whole section? Are there variants on this for rows, columns and just modules? I see the various plugin offerings so I will study further.
Stephen,
Thanks for the comment(s). The CSS Class that targets the section is there because I wanted to limit each instance of the module(s) being inserted into another module to the parent section. This allows you to perform multiple instances per page using the same selectors.
This is a really nice post! Informative also. Thank you for posting this and giving us ample of information.
This is complicated, with WPBakery or Elementor is so easy.
They should also correct the mobile menu, it is always shown extended.
You maybe can fix or upgrade your awesome theme.
Thanks for the feedback. We are definitely going to continue to improve Divi going forward.
There are multiple modules available that do this, some free.
I have used VRYN shortcodes plugin, this functionality is also built into Divi Supreme as well.
Thanks for the suggestions, ManagedWP. In addition to the Shortcodes for Divi plugin I mentioned in the article (and Divi Supreme), Divi Areas and DiviMenus also have this type of capability built-in as well. This post is mainly for those looking for a simple solution that doesn’t require an extra plugin.
Thank you Jason for sharing this as I have been contemplating using Divi in my blogs
and this information is coming at the right time when I am aligning my 2021 blogging goals and beyond.
Now I know what to do in regard to when I install Divi. Blessings
Very nice blog post, but could you maybe just add this as a feature? Even if it’s only for the toggle menu. Thanks!
Levi, I wonder if you would take a look at the last year alone, and how much the devs have added as included features that we were hard coding in 2019, they are working hard and steadily maintaining Divi as the Ultimate tool for both designers and the end-user to produce beautiful unique content.
Awesome, Duncan. Great to hear. Blessing to you as well.
Indeed!
Excellent Feature by an Excellent WordPress themes and plugins Provider.Elegantthemes are my best and most favourite themes.Thanks for this Well designed themes,Plugins and page builders.
Great!
Thanks, Albert! Appreciate the support.