One of the many advantages of Divi is the ability to import layouts to any Divi website. You can create pages on one site and import them into the Divi Library, specific pages and posts, and the Divi Theme Builder. As you may have guessed, you can also import your layouts directly to your Divi Cloud. In this post, we’ll see how to import a layout to your Divi Cloud. We’ll also see how to find it easily once it’s uploaded and how to add categories and tags to help keep your Divi Cloud organized.
Let’s get started!
How to Import a Layout to Your Divi Cloud
There are two methods to open the import option. You can import one layout or multiple layouts. We’ll see a combination of all the options.
Importing a Single Layout Using the Portability Icon
First, let’s see how to import the layouts to your Divi Cloud. For this process, it doesn’t matter which tab you have selected, and you don’t have to view your Divi Cloud. The button we’re using is outside of the tabs.
- Enable the Visual Builder by navigating to any page on the front end of your Divi website and clicking “Enable Visual Builder” in your toolbar at the top of the screen.
- Click the purple plus icon on the Divi toolbar at the bottom of the page to open the Divi Library.
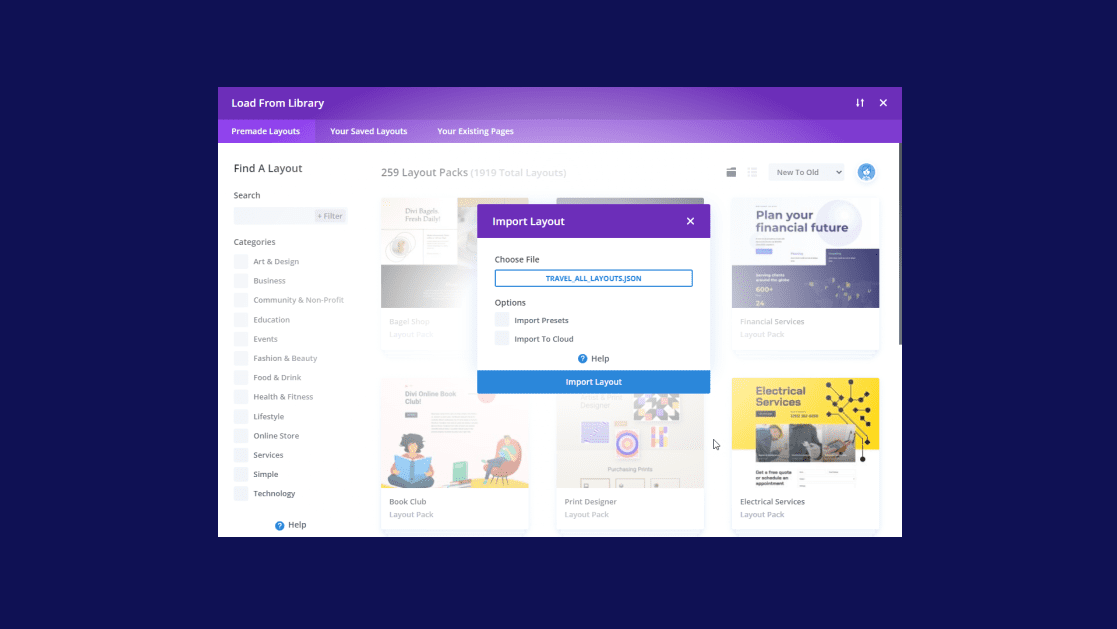
- Select the “Portability” icon in the upper right corner of the “Load from Library” window. This is the icon with up and down arrows next to the exit icon.
- Click the field labeled “Choose File” in the popup that appears. The field will show “No File Selected” until you’ve chosen a file to import.
- Navigate to the JSON file on your computer and select it. The field will then show the name of the file.
- Under Options, select “Import to Cloud”.
- Click “Import Layout” and wait for the import to complete.
- Alternatively, you can drag and drop the file onto the Load From Library window to open the Import Layout modal with the file already selected. We’ll see this option in the next section.
- Changes to your Divi Cloud are saved automatically, so you won’t need to save this page. Click the X in the upper right corner of the “Load from Library” modal to close it.
How to Bulk Import Multiple Layouts to Your Divi Cloud
Next, let’s see how to bulk import the layouts to your Divi Cloud. For this process, it doesn’t matter which tab you have selected, and you don’t have to view your Divi Cloud. The button we’re using is outside of the tabs. The bulk layouts will need to be a single file with all the layouts contained within it.
- Enable the Visual Builder by navigating to any page on the front end of your Divi website and clicking “Enable Visual Builder” in your toolbar at the top of the screen.
- Click the purple plus icon on the Divi toolbar at the bottom of the page to open the Divi Library.
- Open the folder that contains your JSON files.
- Drag and drop the file you want to import onto the Load From Library screen. It doesn’t matter which tab you have selected.
- Select “Import to Cloud” in the popup that appears. The popup will show the name of the file within the file name field.
- Click “Import Layout” and wait for the import to complete.
- Alternatively, you can select the “Portability” icon in the upper right corner and navigate to your file as we saw in the previous section.
- Changes to your Divi Cloud are saved automatically, so you won’t need to save this page. Click the X in the upper right corner of the “Load from Library” modal to close it.
What to Do After Importing a Layout to Your Divi Cloud
Once the layouts are imported into your Divi Cloud, you’ll need to do a few things to make them easier to find and use.
How to Find Your Imported Layout in Your Divi Cloud
Once you’ve imported the layout to your Divi Cloud, it won’t have tags or categories to help you find it. Fortunately, finding the layout is a simple process. This process is the same even if you upload a lot of Divi layouts before looking for them. You’ll just have to scroll a little further.
- Firstly, enable the Visual Builder by navigating to any page on the front end of your Divi website and clicking “Enable Visual Builder” in your toolbar at the top of the screen.
- Secondly, click the purple plus icon on the Divi toolbar at the bottom of the page to open the Divi Library.
- Click the tab at the top labeled “Your Saved Layouts”.
- Next, view your Divi Cloud items. Click the checkbox labeled “My Divi Cloud” under Locations in the left sidebar.
- Choose either Grid View or the List View. The Grid View, the grid icon above the layout thumbnails on the right, is easier to use because it shows thumbnails. For the List View, the List icon is above the layout thumbnails on the right, and only shows the names and publish date for imported layouts.
- Finally, locate your layout by searching for it by name or by sorting it from New to Old. Your new layout will appear at the top left for the Grid View and at of the list for List View.
Once you’ve imported a layout to your Divi Cloud, you’ll need to add tags and categories to help keep them organized.
- Enable the Visual Builder by navigating to any page on the front end of your Divi website and clicking “Enable Visual Builder” in your toolbar at the top of the screen.
- Click the purple plus icon on the Divi toolbar at the bottom of the page to open the Divi Library.
- Click the tab at the top labeled “Your Saved Layouts”.
- Next, view your Divi Cloud items. Click the checkbox labeled “My Divi Cloud” under Locations in the left sidebar.
- Locate the layout you want to edit by searching for it by name or sorting by New to Old.
- Right-click on the layout and select “Edit Tags and Categories” from the popup that appears.
- Alternatively, you can right-click on the layout in the Layout Details view and select “Edit Tags and Categories” from the popup.
- Choose the categories and select or add the tags you want to use for this layout. Click the green check icon when you’re finished.
- Changes to your Divi Cloud are saved automatically, so you won’t need to save this page. Click the X in the upper right corner of the “Load from Library” modal to close it.
Ending Thoughts
That’s our look at how to import a layout to your Divi Cloud. Importing layouts to your Divi Cloud is as simple as importing to a page or post, the Divi Library, or the Divi Theme Builder. Of course, importing them to Divi Cloud gives you the extra benefit of having them readily available at your fingertips for any Divi website you’re logged into. Import them one at a time or in bulk. Importing layouts to your Divi Cloud is one of the easiest ways to use Divi layouts.
We want to hear from you. Have you imported layouts to your Divi Cloud? Let us know about your experience in the comments.


There needs to be an interface for the cloud library. I would like to directly bulk-upload json files into the cloud library from a simple dashboard.
Thanks for the info