
A big part of your website’s success depends on whether or not you’re able to impress your visitors. Not only with your products or services, but also with the way you communicate and how well-designed your website is. Because let’s face it, websites are often first impressions. And similar to any other kind of first impression, you want it to leave a good aftertaste.
Now, if you’re looking for a unique way to put some of your content in the spotlight, creating subtle overlapping animations might be just what you are looking for. These subtle overlapping animations are kind of like a slideshow for your visitors. They don’t have to scroll or click on anything, the content just shows up in an elegant way.
Let’s get to it!
Preview
Before we dive into the tutorial, let’s take a quick look at the outcome across different screen sizes.
Desktop

Mobile

Approach
- We’ll start off by adding all the design elements we need in a vertical order, without the overlap
- As we’re adding all the design elements, we’ll also add custom animations with a certain animation delay
- These animation delays will only make sense once you’ve gone through the last part of the tutorial which focuses on overlaps
- An important part of this tutorial is using shaped Divider Modules with the same background color as the section to make row content ‘disappear’ on delay
- You can apply this technique to any kind of design you’re working on once you understand the different steps that are necessary to make the approach work
Let’s Start Creating!
Add New Section
Background Color
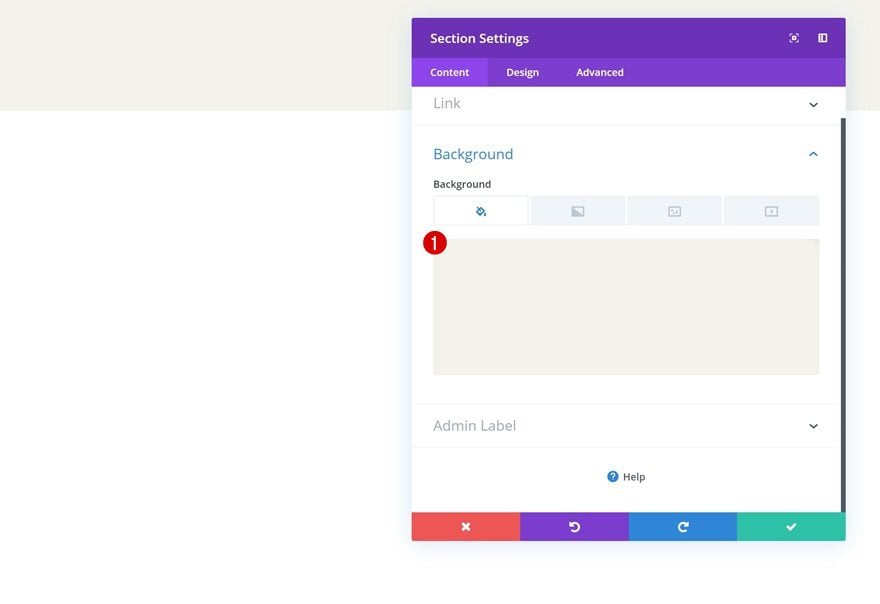
Start by creating a new page or opening an existing one and add a regular section to it. Open the section settings and add a background.
- Background Color: #f3f3ec
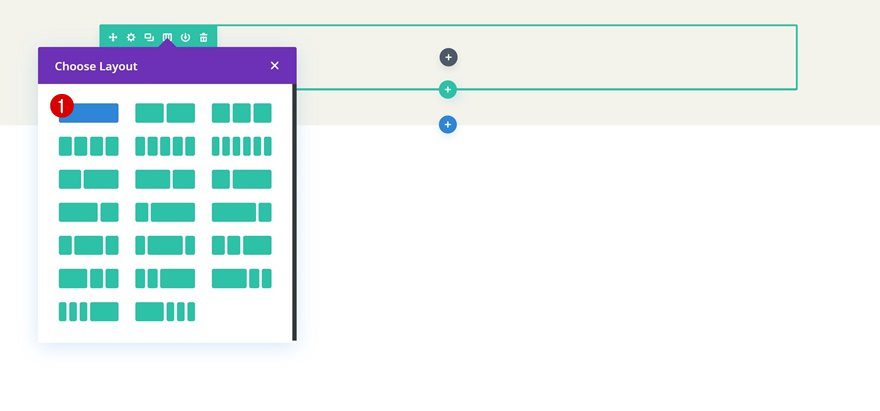
Add Row #1
Column Structure
Continue by adding a new row to your section using the following column structure:
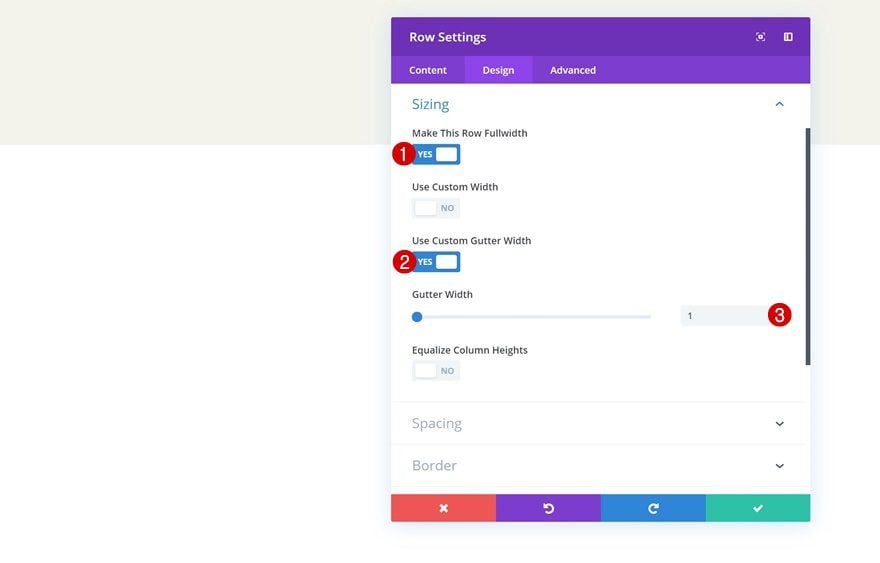
Sizing
Without adding any modules yet, open the row settings and allow the row to take up the entire width of the screen. The reason why we’re doing this is to get rid of all the default pixel spacing. In the upcoming steps, we’ll add all the space we need using a viewport unit instead.
- Make This Row Fullwidth: Yes
- Use Custom Gutter Width: Yes
- Gutter Width: 1
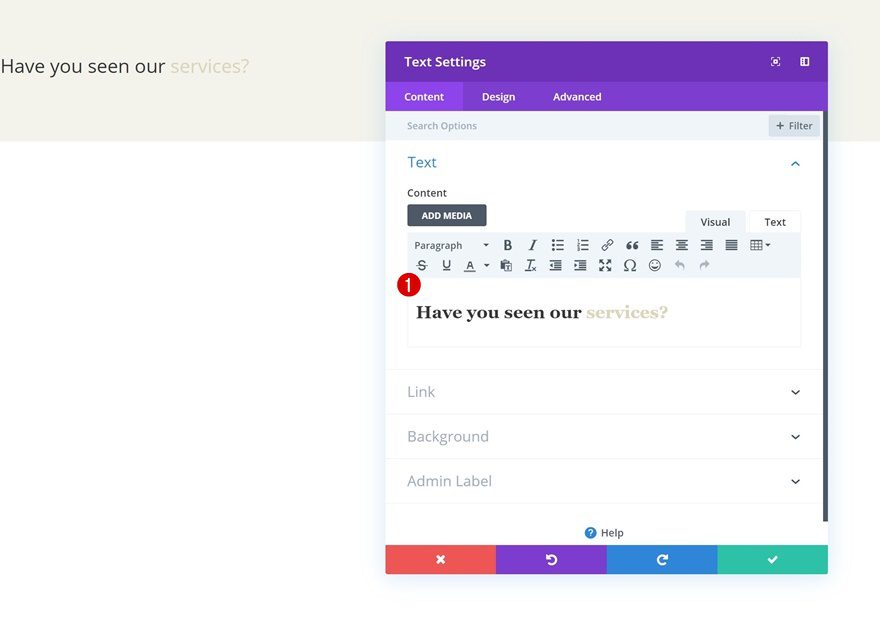
Add Text Module to Column
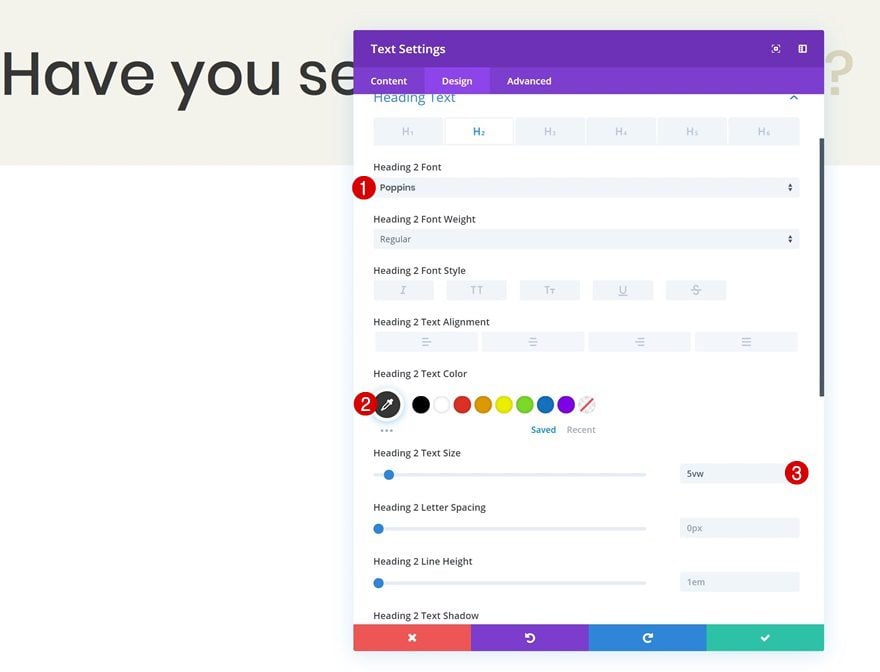
Add H2 Content
Let’s start adding modules! The first module we need is a Text Module with some H2 content. Remember that this module will ‘disappear’ after a few seconds, so you want to keep it short, relevant and rememberable.
H2 Text Settings
Then, go to the design tab and modify the H2 text settings.
- Heading 2 Font: Poppins
- Heading 2 Text Color: #333333
- Heading 2 Text Size: 5vw
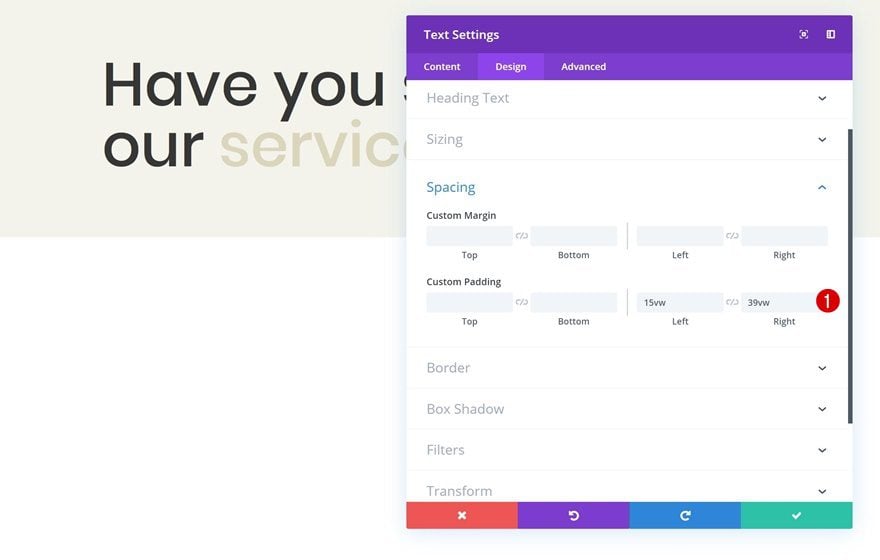
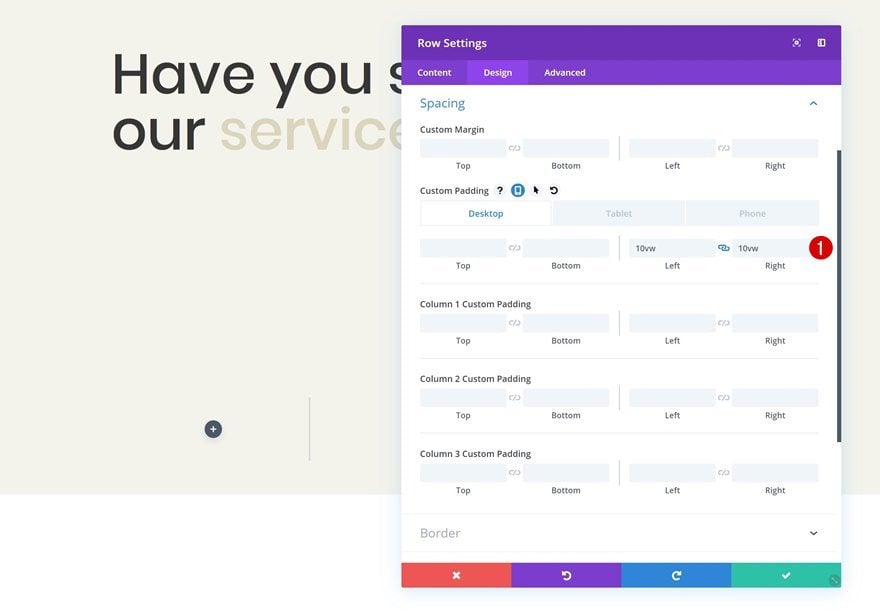
Spacing
Create the space you want using some left and right padding in the spacing settings.
- Left Padding: 15vw
- Right Padding: 39vw
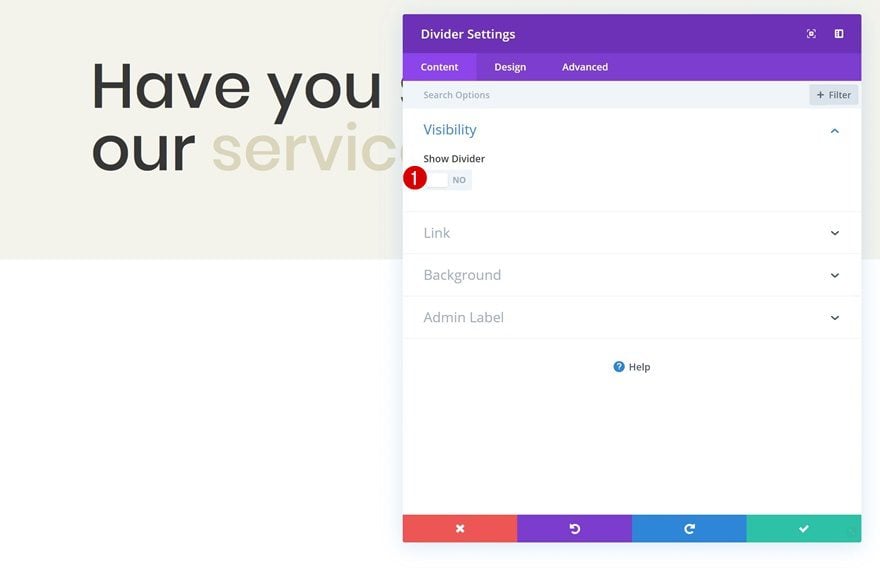
Add Divider Module to Column
Visibility
On to the next module, which is a Divider Module. We’re using this module to make the Text Module ‘disappear’. There are four things we’ll need for that; a background color (that is in the same color as the section so you can’t notice it), enough padding (to make sure you can overlap all the content in the previous module), a vertical overlap (to cover up the entire module area), and an animation delay (to give the first module time to have its shine before taking over). Once you add the Divider Module, make sure you disable the ‘Show Divider’ option.
- Show Divider: No
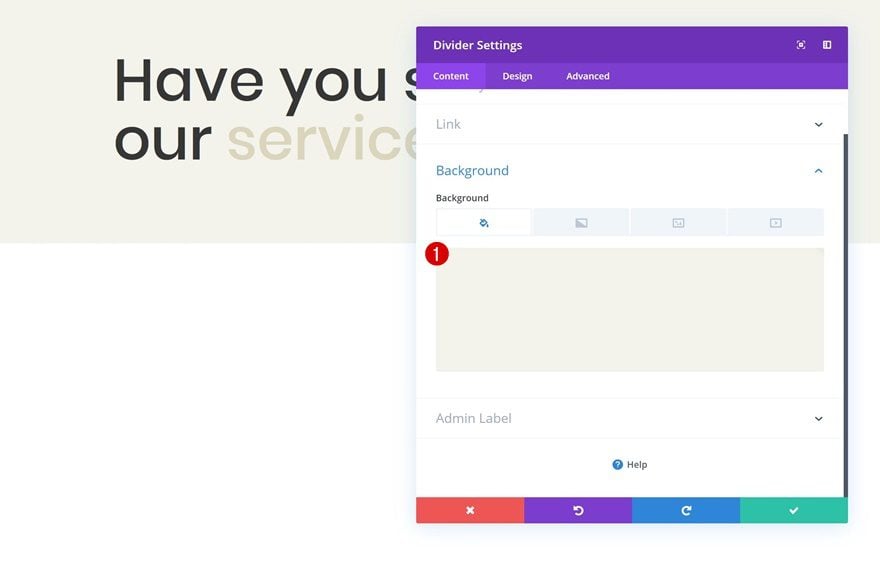
Background Color
Then, go to the background settings and add a background color. Make sure you’re using the same background color as you did for the section to create a smooth effect.
- Background Color: #f3f3ec
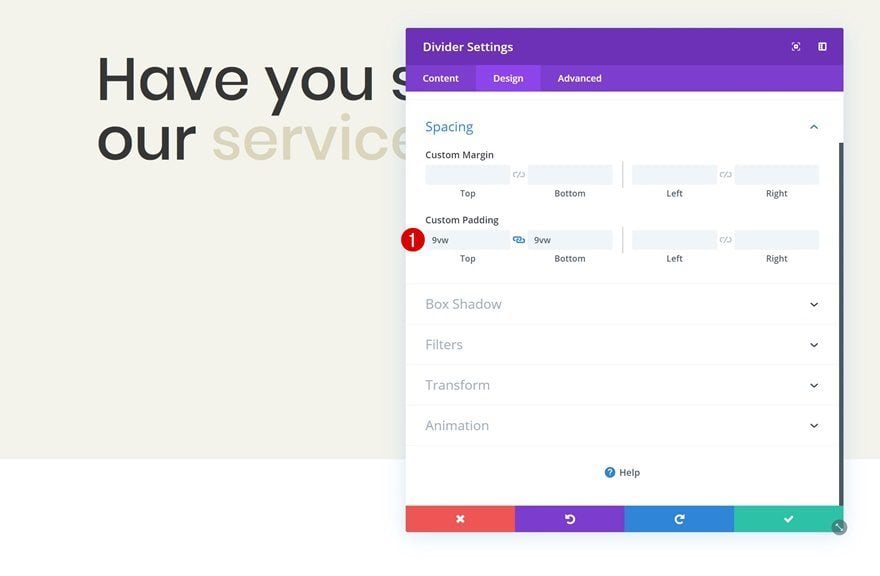
Spacing
Continue by giving the divider module a bigger size by adding some top and bottom padding in the spacing settings.
- Top Padding: 9vw
- Bottom Padding: 9vw
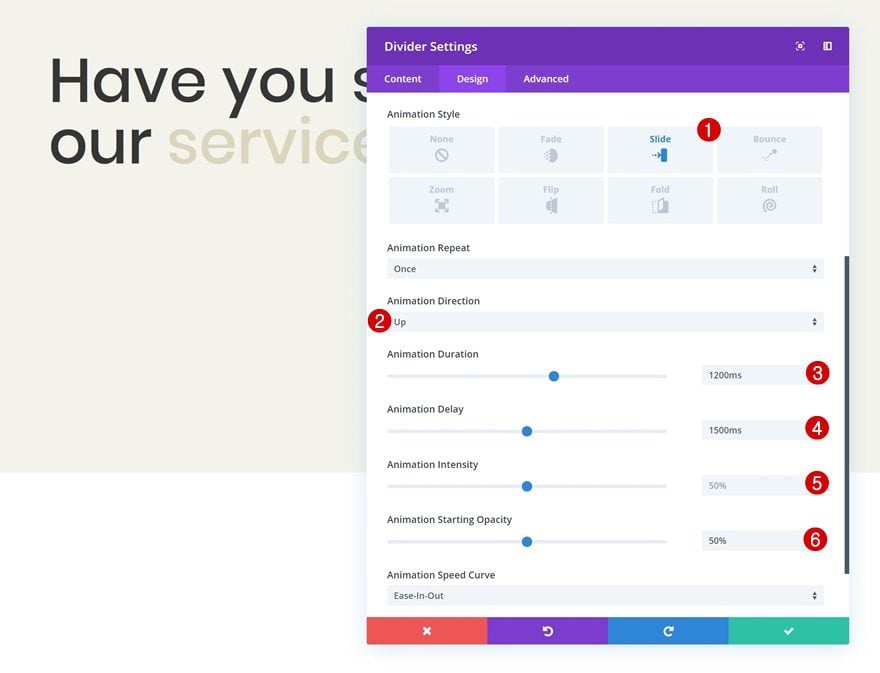
Animation
And complete the divider’s settings by adding a delayed animation.
- Animation Style: Slide
- Animation Direction: Up
- Animation Duration: 1200ms
- Animation Delay: 1500ms
- Animation Intensity: 50%
- Animation Starting Opacity: 50%
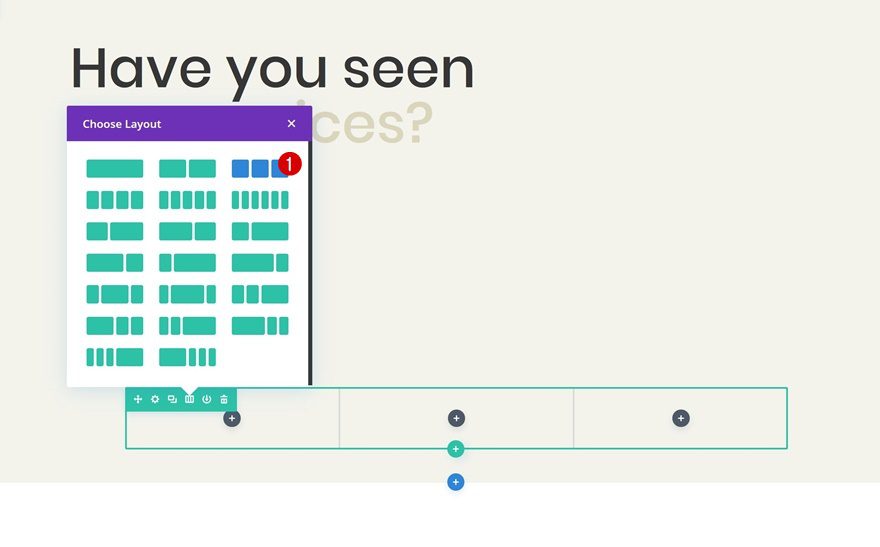
Add Row #2
Column Structure
On to the second row! Select the following column structure:
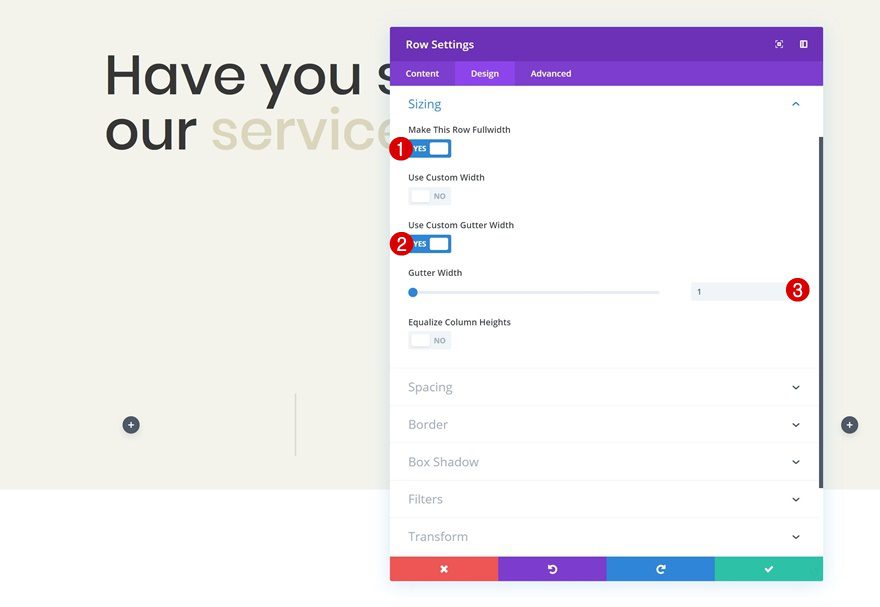
Sizing
Without adding any modules yet, open the row settings and allow the row to take up the entire width of the screen.
- Make This Row Fullwidth: Yes
- Use Custom Gutter Width: Yes
- Gutter Width: 1
Spacing
Then, add some padding to the left and right side of the row in the spacing settings.
- Left Padding: 10vw (Desktop), 2vw (Tablet & Phone)
- Right Padding: 10vw (Desktop), 2vw (Tablet & Phone)
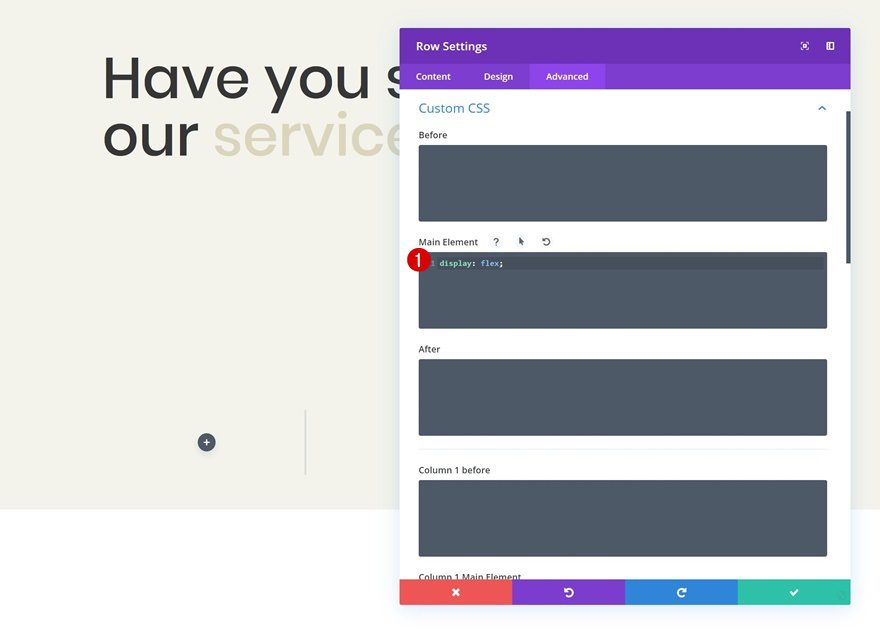
Display
We’re also making sure the columns appear next to each other on smaller screen sizes by adding one single line of CSS code to the main element of the row.
display: flex;
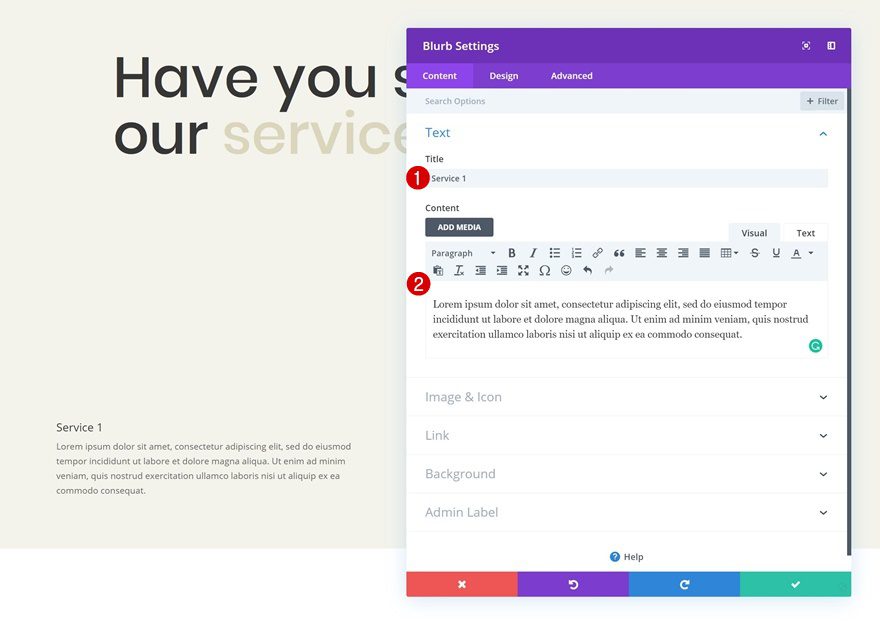
Add Blurb Module to Column 1
Add Content
Time to start adding modules! Add a Blurb Module to column 1 and enter some content of your choice.
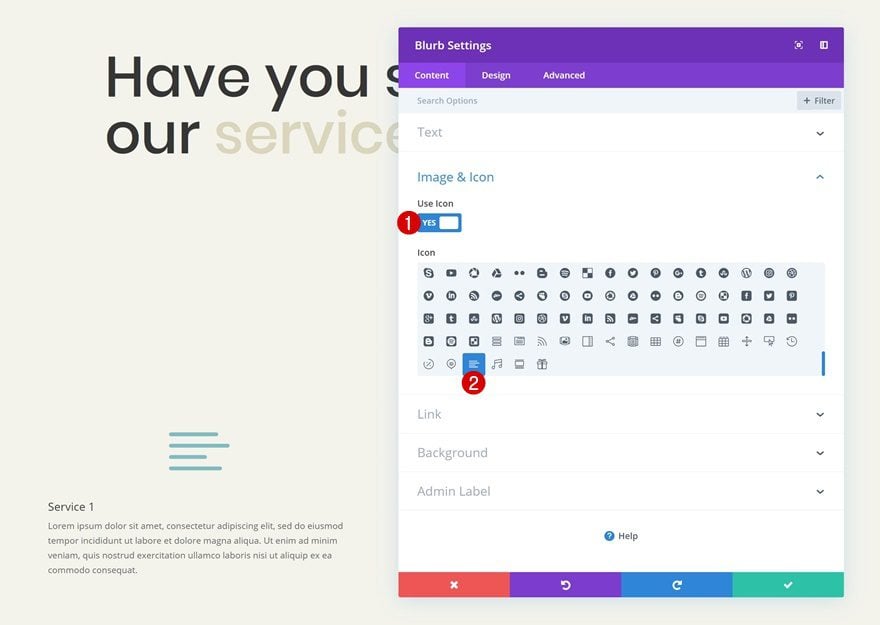
Select Icon
Continue by selecting an icon of your choice.
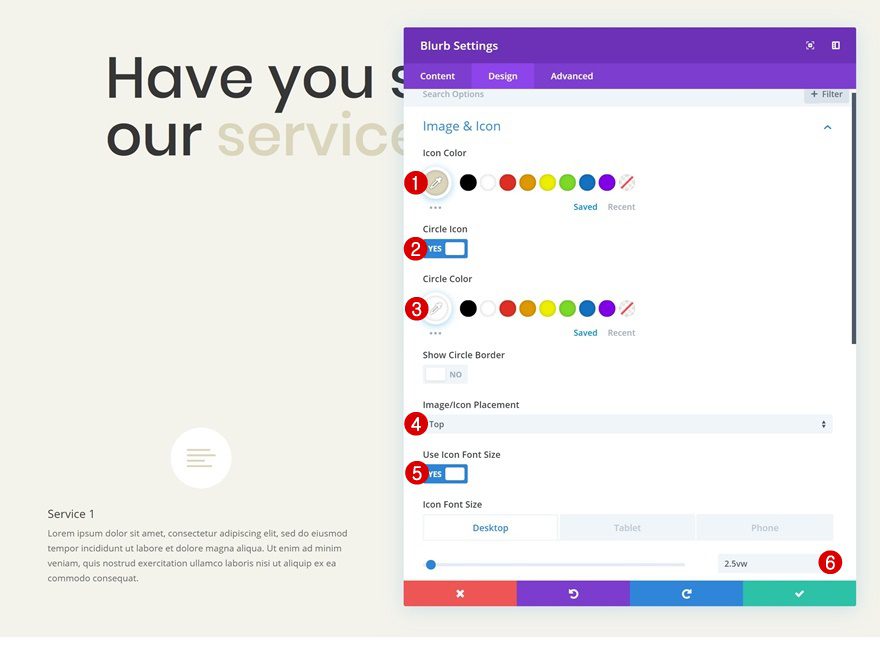
Icon Settings
Modify the appearance of your icon next.
- Icon Color: #dbd6bd
- Circle Icon: Yes
- Circle Icon: #ffffff
- Image/Icon Placement: Top
- Use Icon Font Size: Yes
- Icon Font Size: 2.5vw (Desktop), 1.7vw (Tablet), 1.9vw (Phone)
Title Text Settings
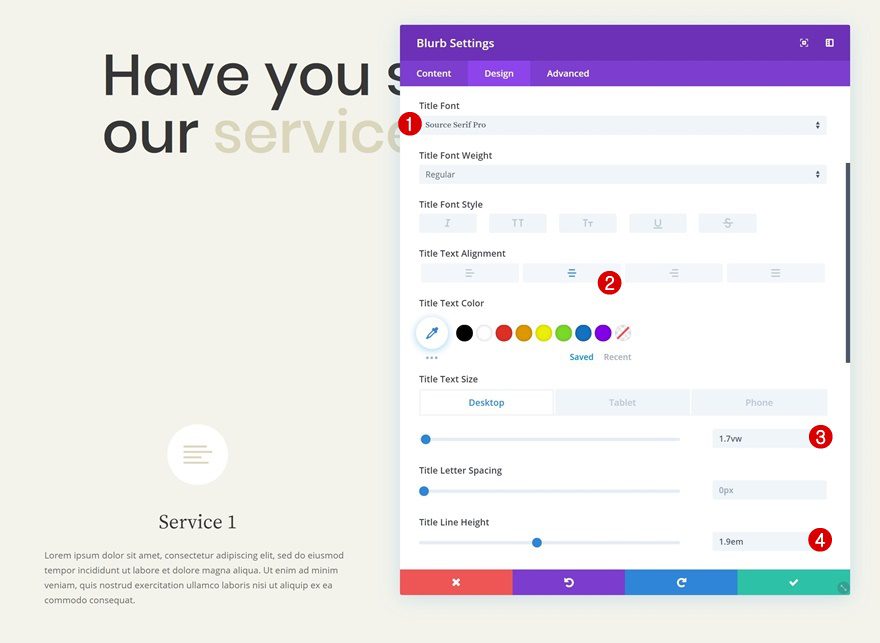
Change the title text settings as well.
- Title Font: Source Serif Pro
- Title Text Alignment: Center
- Title Text Size: 1.7vw (Desktop), 2.1vw (Tablet), 2.5vw (Phone)
- Title Line Height: 1.9em
Body Text Settings
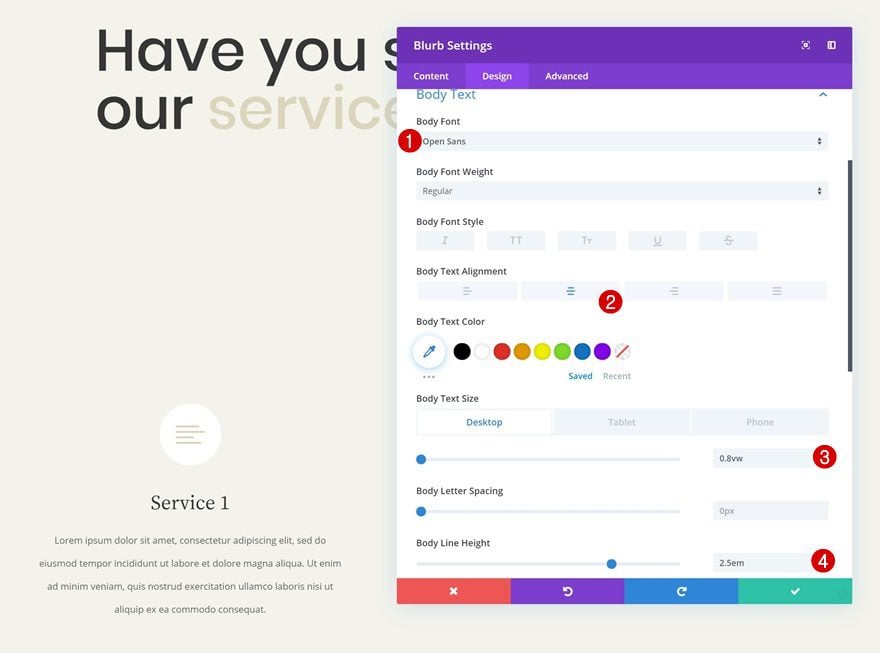
Along with the body text settings.
- Body Font: Open Sans
- Body Text Alignment: Center
- Body Text Size: 0.8vw (Desktop), 1.2vw (Tablet), 1.6vw (Phone)
- Body Line Height: 2.5em
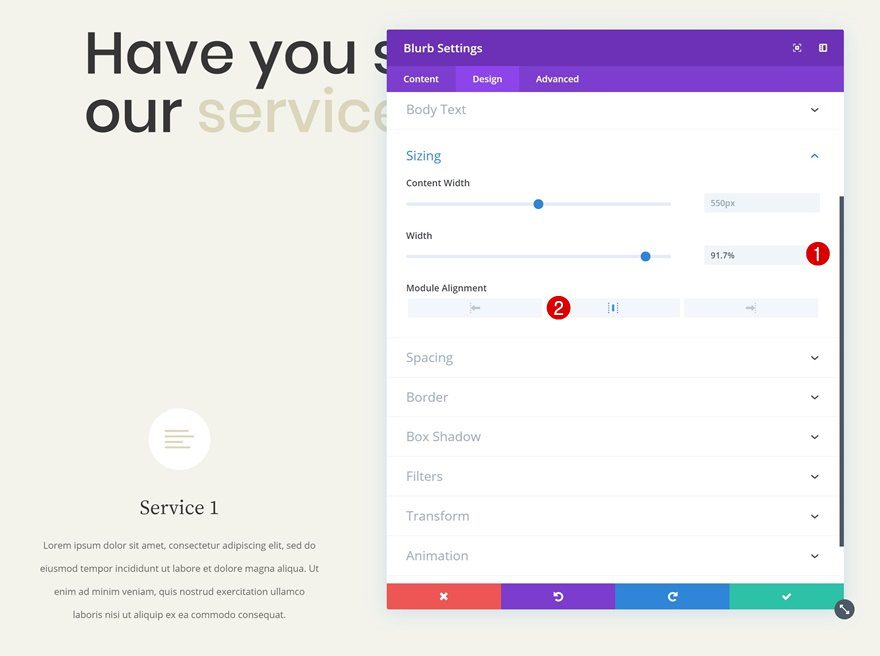
Sizing
We’re slightly shrinking the size of the module to make sure there’s enough space between this module and the modules we’ll add to the second and third columns.
- Width: 91.7%
- Module Alignment: Center
Spacing
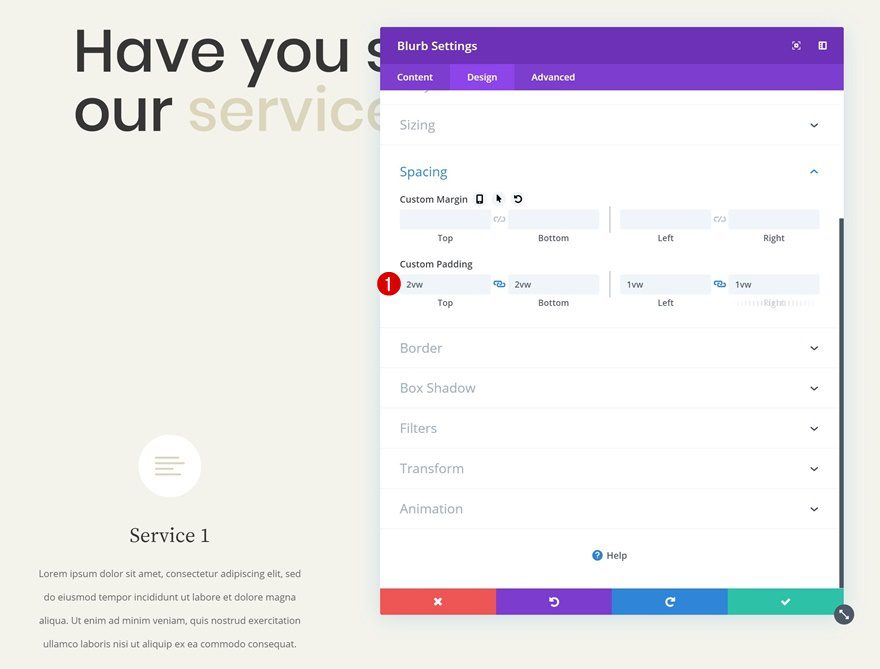
We’ll also add some extra space to the module using custom padding values.
- Top Padding: 2vw
- Bottom Padding: 2vw
- Left Padding: 1vw
- Right Padding: 1vw
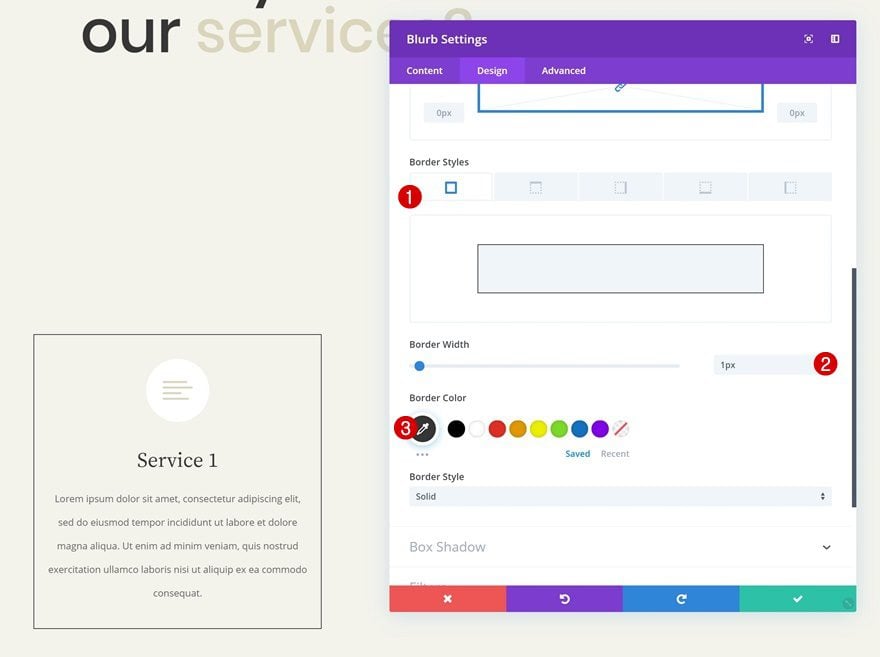
Border
Then, go to the border settings and add a subtle border to define the module.
- Border Width: 1px
- Border Color: #333333
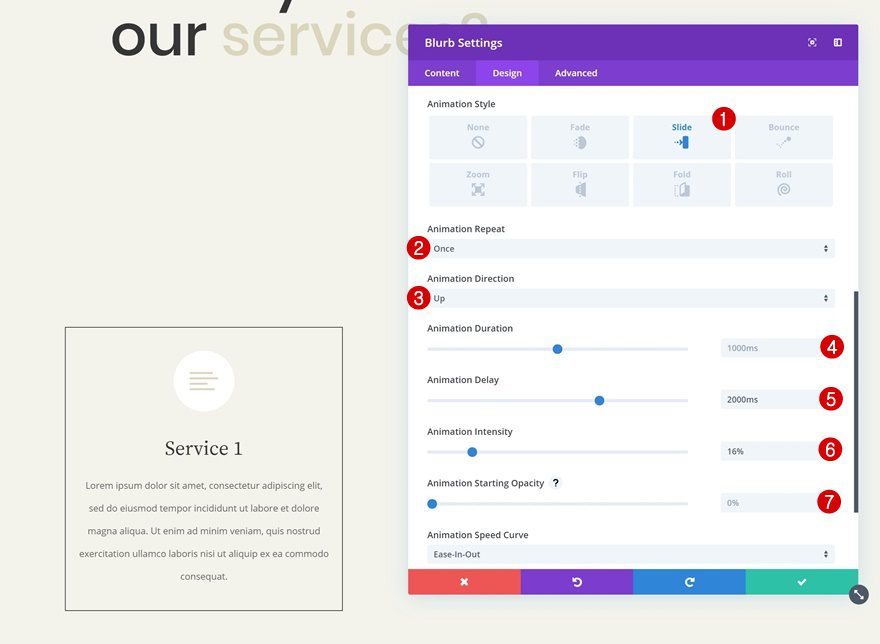
Animation
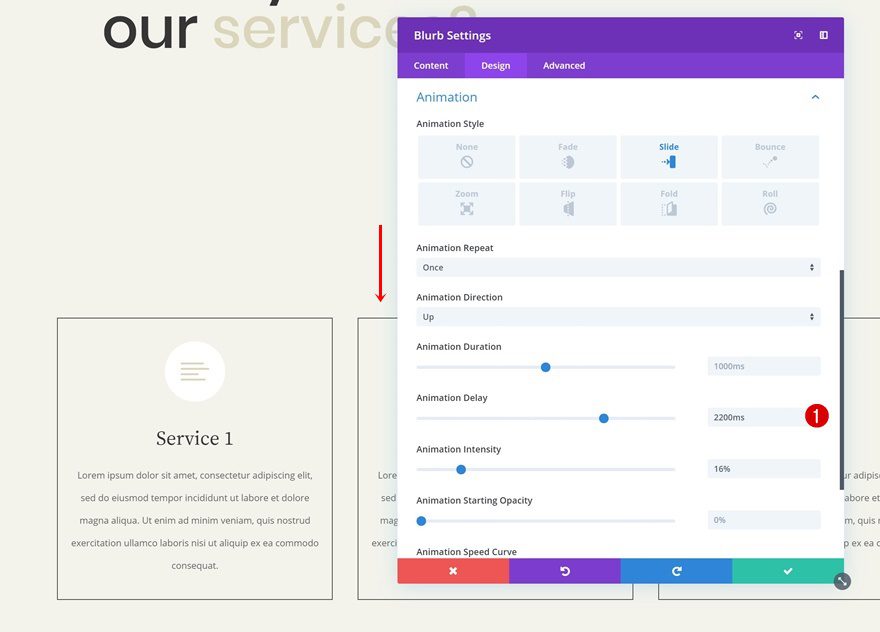
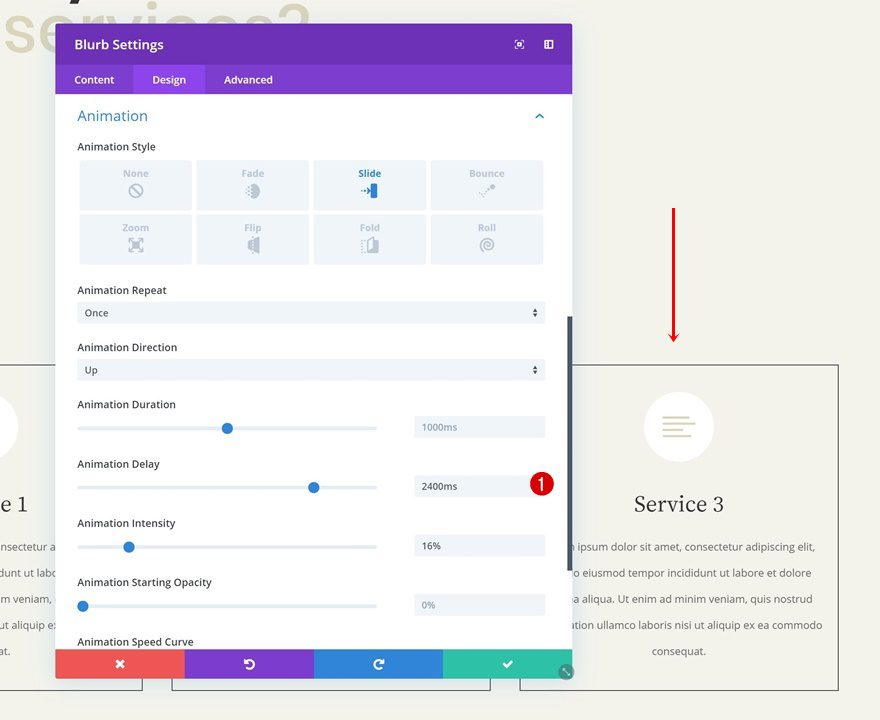
Complete the Blurb Module design by adding a delayed animation. As you can notice, the more design elements we add, the higher the animation delay.
- Animation Style: Slide
- Animation Repeat: Once
- Animation Direction: Up
- Animation Duration: 1000ms
- Animation Delay: 2000ms
- Animation Intensity: 16%
- Animation Starting Opacity: 0%
Clone Blurb Module Twice & Place Duplicates in Remaining Columns
Once you’ve completed the Blurb Module design, you can go ahead and clone it twice. Place the duplicates in the two remaining columns of the row.
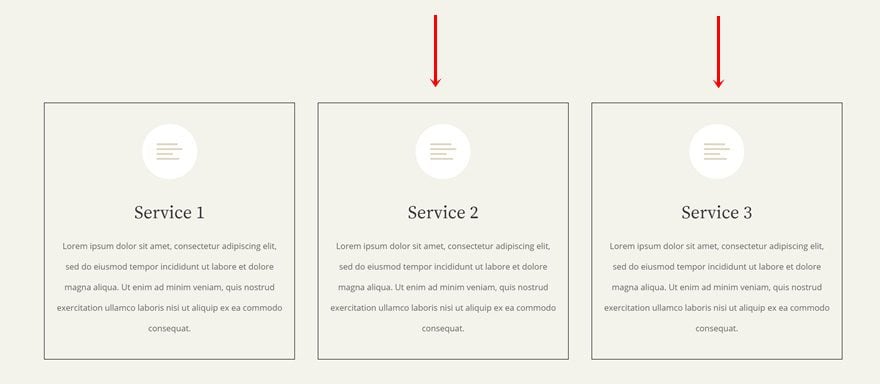
Change Animation of Duplicate #1
Change the animation delay of the first duplicate.
- Animation Delay: 2200ms
Change Animation of Duplicate #2
Then, open the second duplicate and change the animation delay there as well.
- Animation Delay: 2400ms
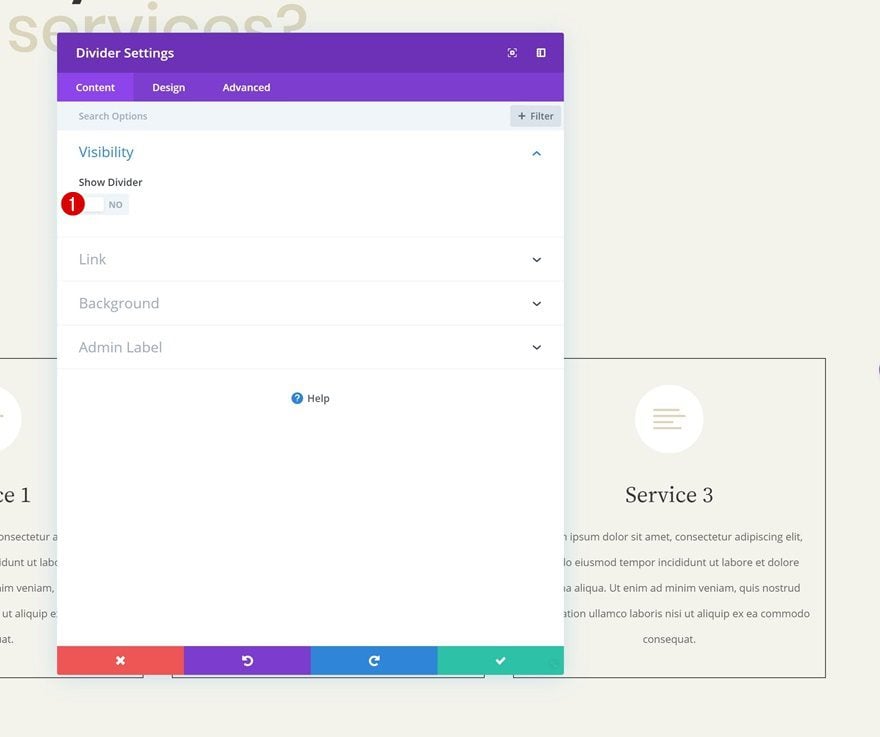
Add Divider Module to Column 3
Visibility
The next and last module we need in this row is a Divider Module. We’re, again, using this module to create the delayed overlap which will help make the Blurb Modules ‘disappear’. Once you’ve added the Divider Module to column 3, make sure the ‘Show Divider’ option is disabled.
- Show Divider: No
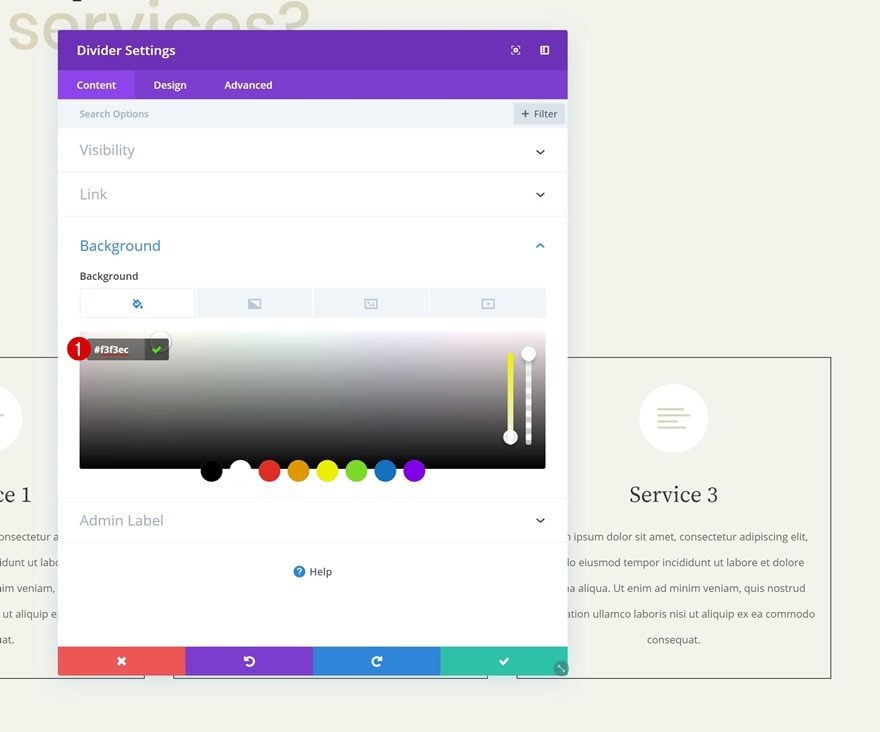
Background Color
Continue by adding a background color to the divider. Make sure you’re using the same color as you did for the section background.
- Background Color: #f3f3ec
Spacing
Then, we’ll go to the spacing settings and increase the size of the divider module so it can, later on this post, overlap all three of the Blurb Modules.
- Left Margin: -60vw (Desktop), -64vw (Tablet & Phone)
- Top Padding: 17vw (Desktop), 27vw (Tablet), 30vw (Phone)
- Bottom Padding: 17vw (Desktop), 27vw (Tablet), 34vw (Phone)
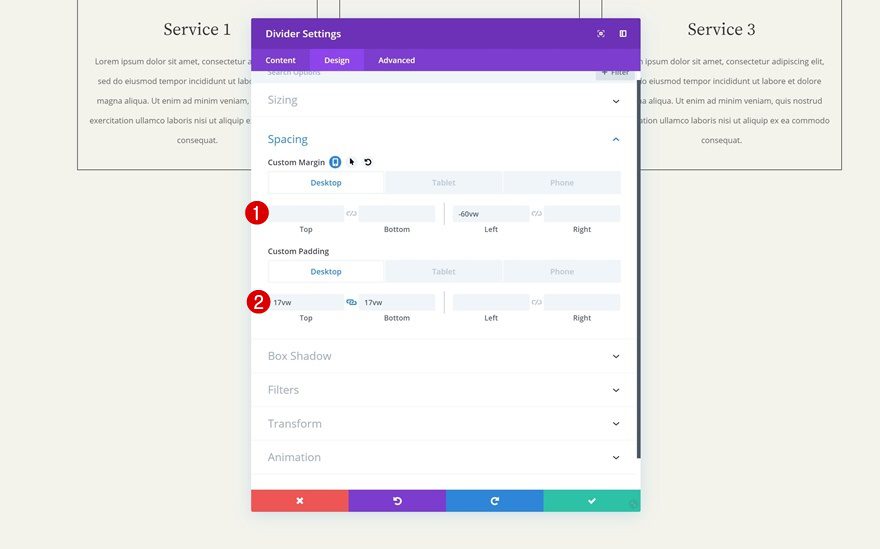
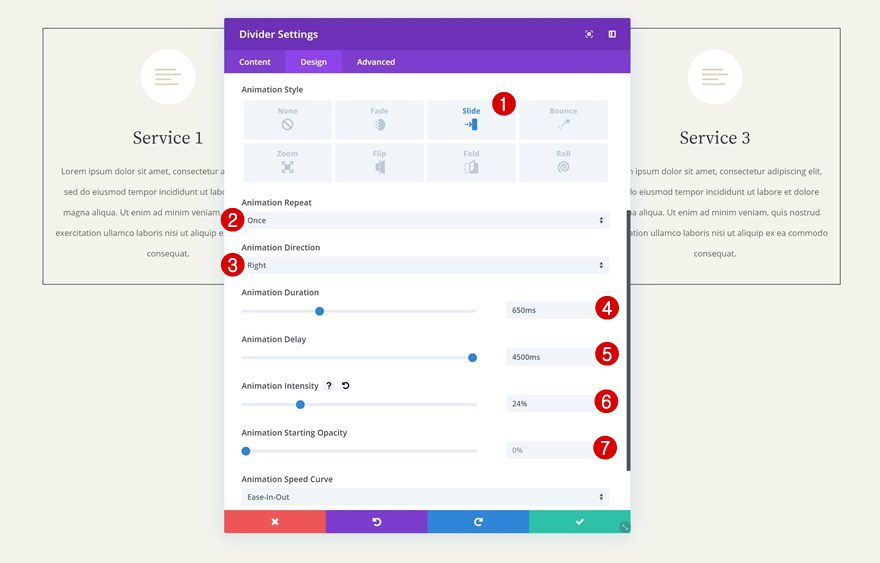
Animation
Last but not least, add a delayed animation.
- Animation Style: Slide
- Animation Repeat: Once
- Animation Direction: Right
- Animation Duration: 650ms
- Animation Delay: 4500ms
- Animation Intensity: 24%
- Animation Starting Opacity: 0%
Clone Row #2
Once you’ve completed the second row and all of its modules, you can go ahead and clone it.
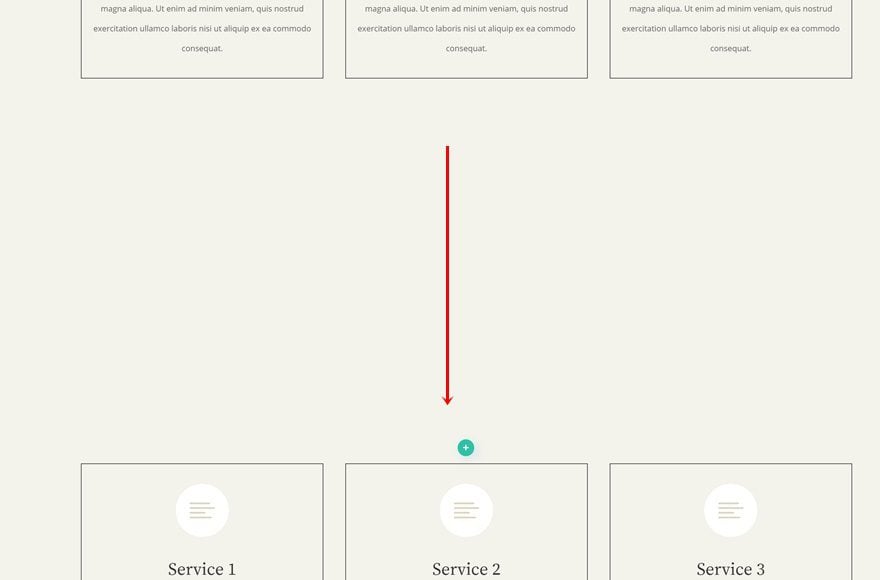
Remove Divider Module in New Row
Remove the Divider Module in the duplicate row.
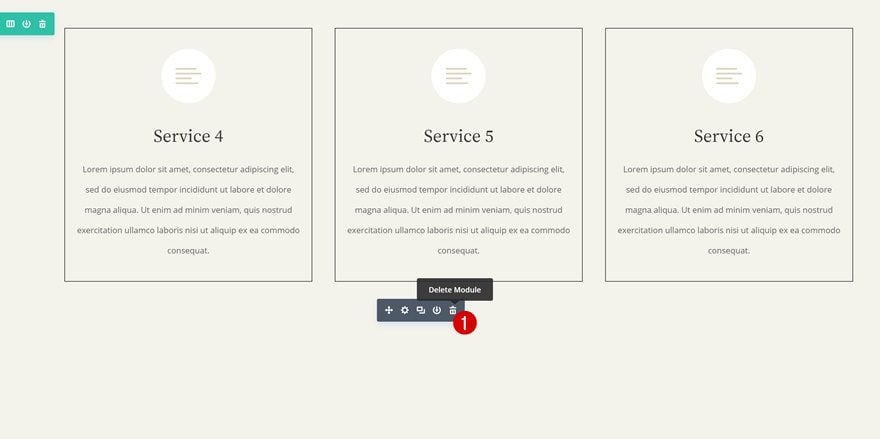
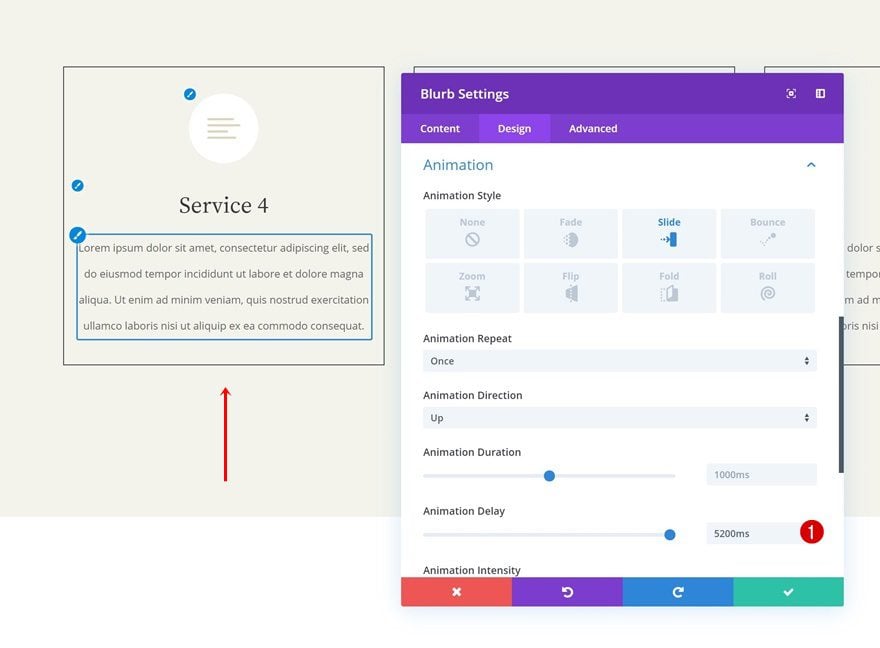
Change Animation Delay of Blurb Module #1
Then, open the first Blurb Module and change the animation delay.
- Animation Delay: 5200ms
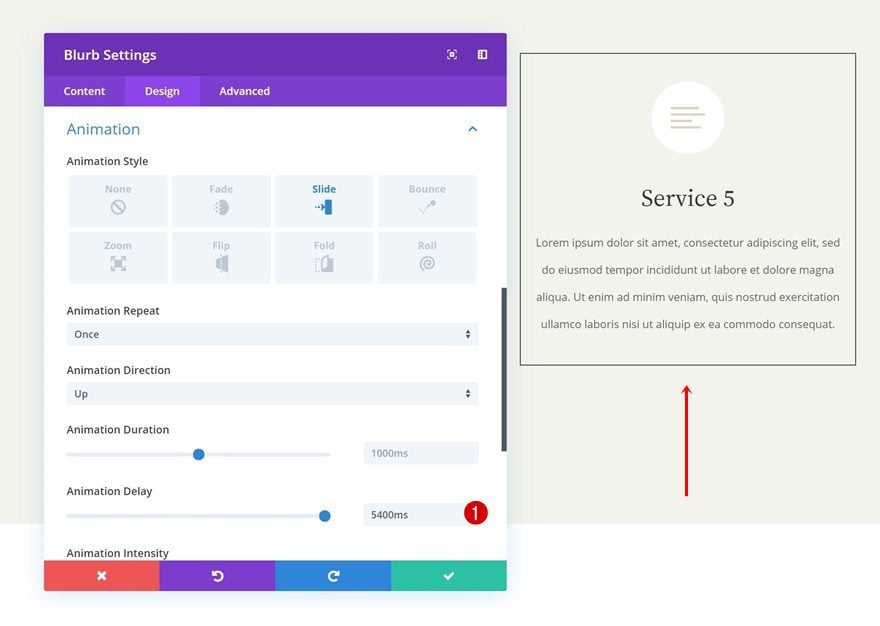
Change Animation Delay of Blurb Module #2
Do the same thing for the Blurb Module in column 2.
- Animation Delay: 5400ms
Change Animation Delay of Blurb Module #3
And modify the animation delay for the Blurb Module in column 3 as well.
- Animation Delay: 5600ms

Add Overlaps
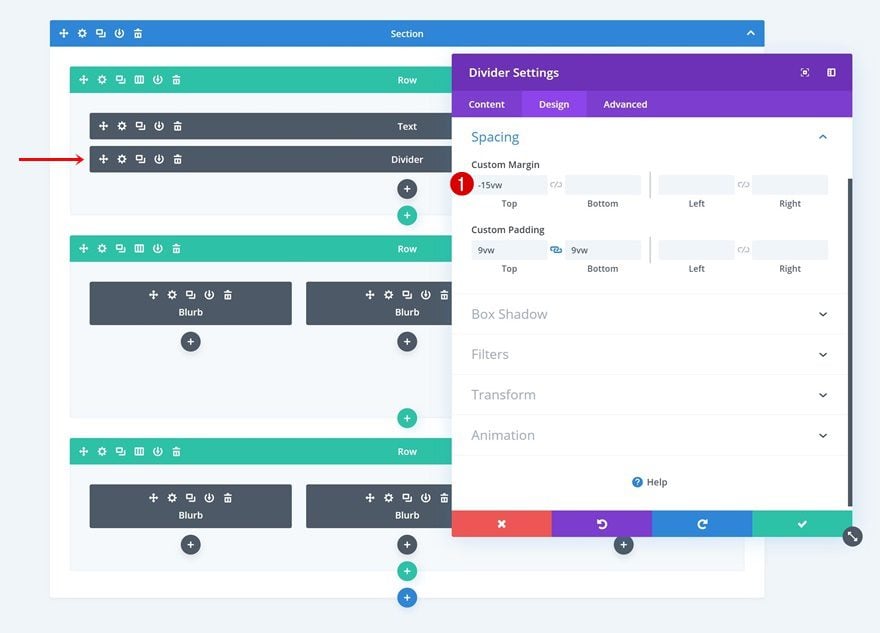
Add Overlap to Divider Module #1
Now that we have all the design elements we need, we can start creating the overlaps! These overlaps will give meaning to the animation delays we’ve added throughout the tutorial. Start with the Divider Module in the first row you’ve created.
- Top Margin: -15vw
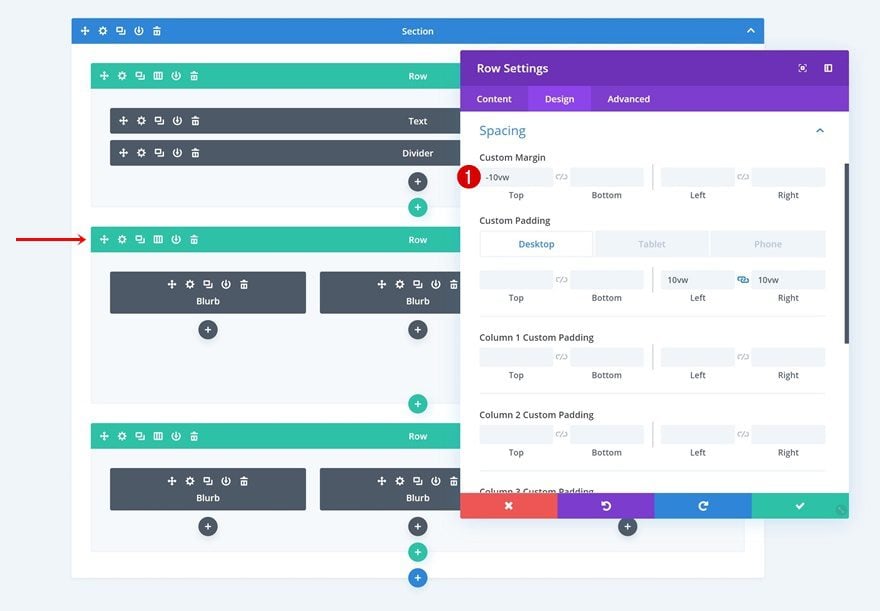
Add Overlap to Row #2
Then, open the second row and add some negative top margin to it.
- Top Margin: -10vw
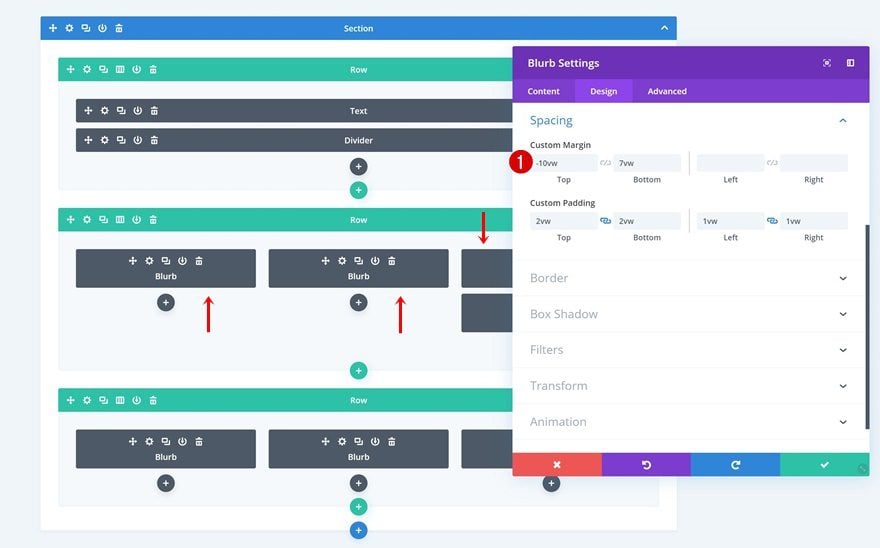
Add Overlap to Blurb Modules in Row #2
Open each one of the Blurb Modules in the second row and add some custom margin values to them.
- Top Margin: -10vw
- Bottom Margin: 7vw
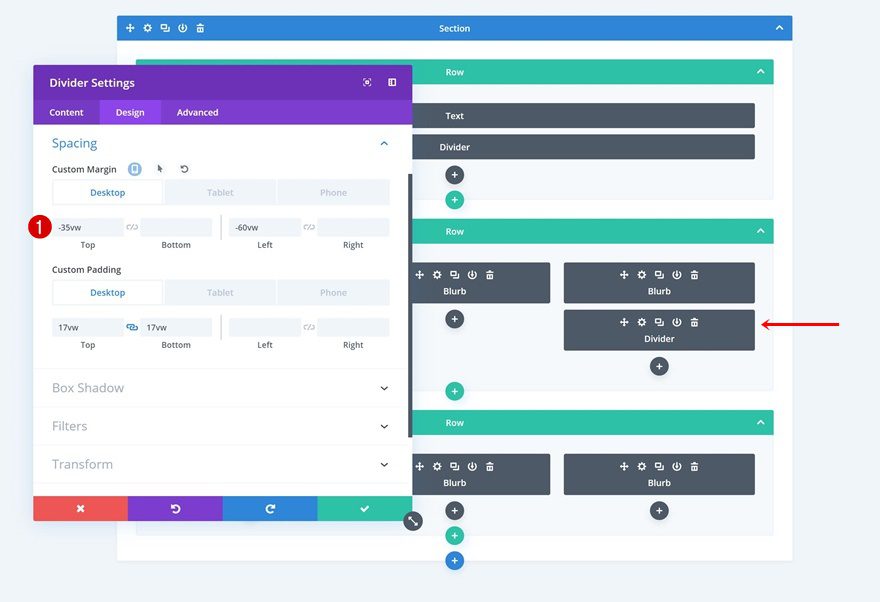
Add Overlap to Divider Module #2
Move on to the Divider Module which you can find in the third column of the second row and create the overlap.
- Top Margin: -35vw (Desktop), -47vw (Tablet), -72vw (Phone)
Add Overlap to Row #3
Continue by opening the third row’s settings and add some negative top margin.
- Top Margin: -10vw

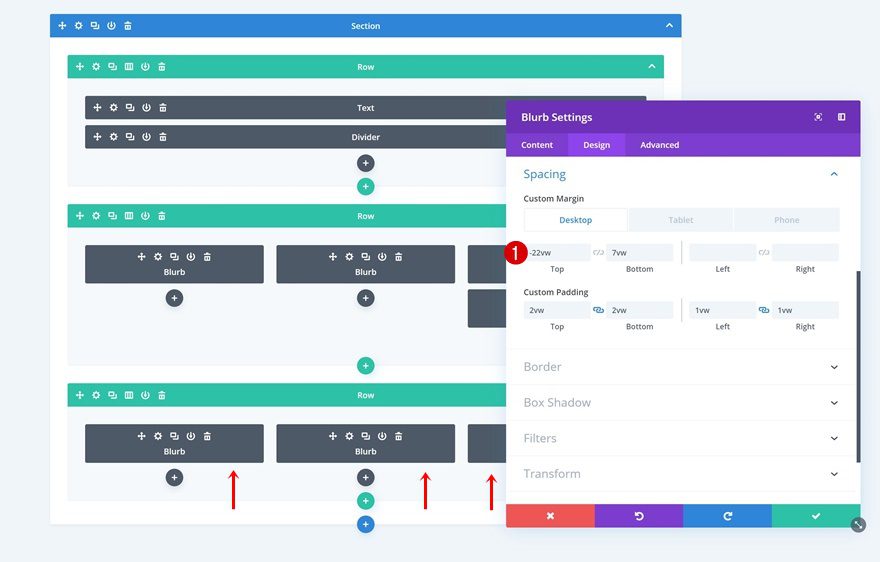
Add Overlap to Blurb Modules in Row #3
Last but not least, add some custom margin values to each one of the Blurb Modules in the third row. Once you exit the Visual Builder, you’ll be able to see the animation take place in real time!
- Top Margin: -22vw (Desktop), -46vw (Tablet), -70vw (Phone)
- Bottom Margin: 7vw
Final Thoughts
In this post, we’ve shown you how to create subtle overlapping animations. This is a great way to guide visitors through the content you’re sharing and give your website an elevated look and feel. If you have any questions or suggestions, make sure you leave a comment in the comment section below!


I can’t believe all the work you go through to show these detailed tutorials. Thanks for doing this.
Thanks for sharing this great tips about overlapping and wish to try it once!
It seems simple and beatiful. Thanks Donjete.
Hi,
Thanks Donjete for this nice tutorial!
I have a suggestion : It would be great if we could run the animation in a loop rather than once, so that the 1st row of Blurbs (‘Service 1’, ‘Service 2′ and ”Service 3’) is visible once again after the 2nd row of blurbs has been displayed.
The customer / website user might miss something at first glance and hence it makes sense to rather display all the Services in a loop.
It would be great if you can share the Keyframe css for the purpose.
Hello,
Super tutorial!
Thank you
The animations are just getting better and better. Great work