
One of the best ways to boost the design of your website is by using different section transitions. In a previous post, we’ve shown you how you can do that using the Divi built-in options only. However, if you’re looking to create something a little bit more advanced or personalized, you can create irregularly shaped section transitions as well. Because of their complexity, the best way to approach this is by using images with a transparent border.
In this post, we’ll show you how you can do that. We’re not only going to show you what to do within the Divi Builder, but we’re also going to show you how you can create these transparent borders on images with a few steps using Photoshop.
- 1 Example Result
- 2 How to Create Irregularly Shaped Section Transitions with Divi
-
3
Create Transparent Borders with Photoshop
- 3.1 Open Photoshop
- 3.2 Open Image
- 3.3 Double-Click on Image & Create Layer
- 3.4 Add Another Layer
- 3.5 Select Brush & Size
- 3.6 Start Using The Brush on The Borders
- 3.7 CTRL (Windows) or Command (Mac) + Select New Layer
- 3.8 Make New Layer Invisible
- 3.9 Select Image & Delete New Layer
- 3.10 Select Rectangular Marquee Tool & Click on Image
- 3.11 Save Image as PNG
- 4 Add Backgrounds to Divi
- 5 Example
- 6 Final Thoughts
Example Result
Let’s take a look at a layout sample with stunning irregularly shaped section transitions:
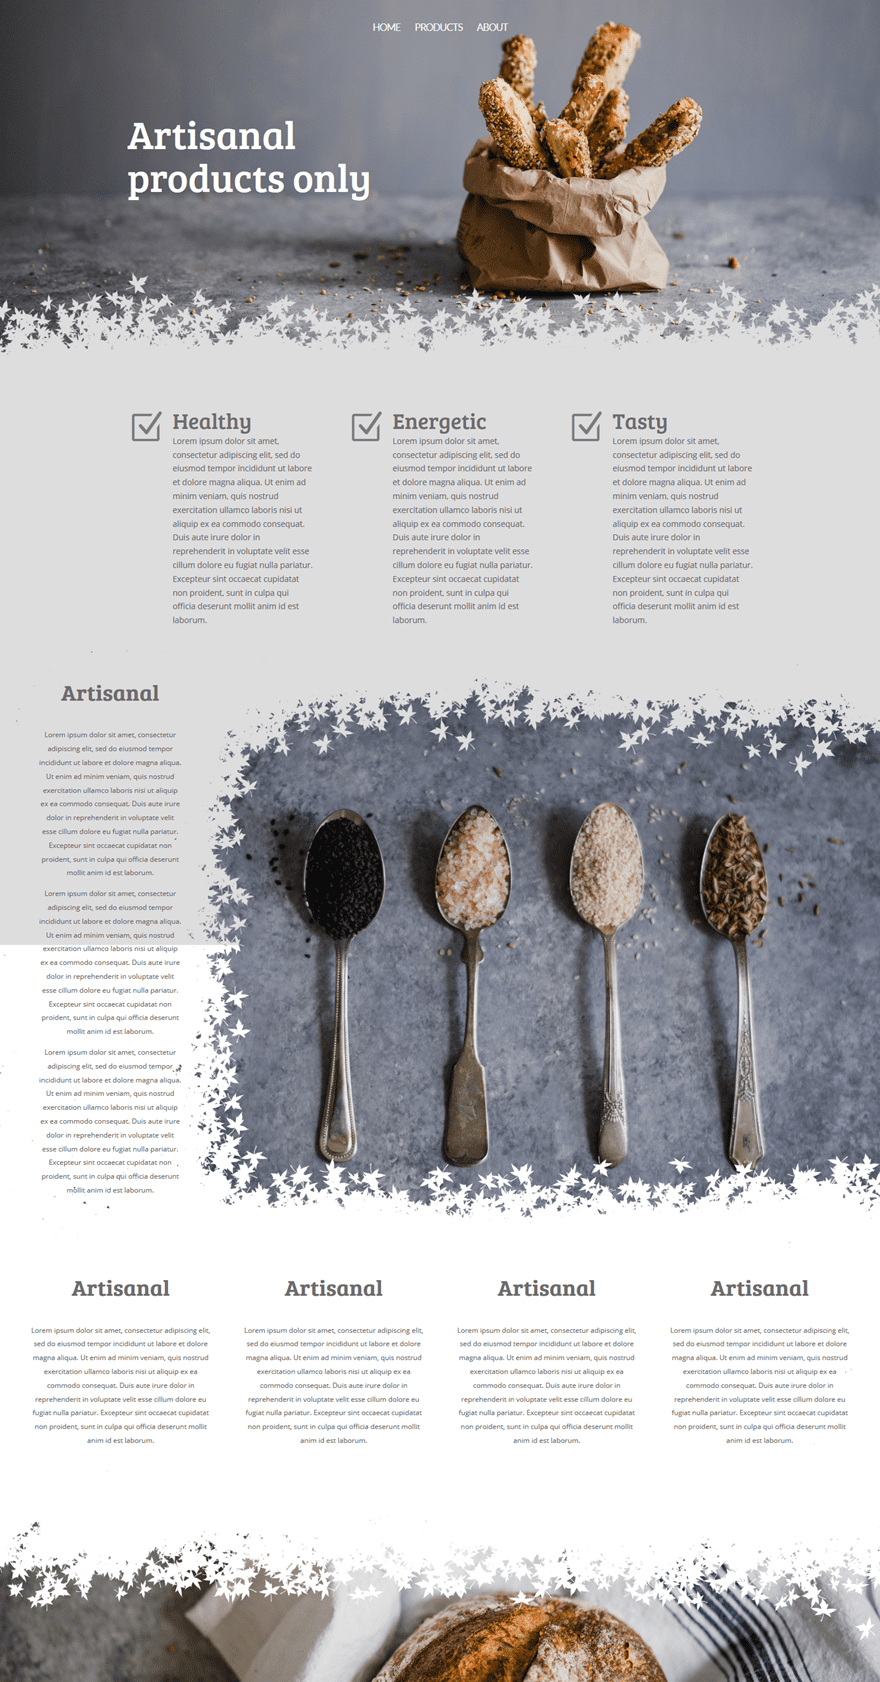
As you can notice, you can use these transparent borders throughout your whole site and within different sections. It’s important to remember that, depending on how large your transparent border is, you should have enough place left within the sections to fit the different content you’re trying to share. It’ll also create a nice balance between the various sections.
How to Create Irregularly Shaped Section Transitions with Divi
Subscribe To Our Youtube Channel
Create Transparent Borders with Photoshop
You can achieve as original shapes as you want with Photoshop. You could also opt for a free alternative called GimpShop. For this tutorial, we’ll be using Photoshop though.
Open Photoshop
Start by opening photoshop on your computer.
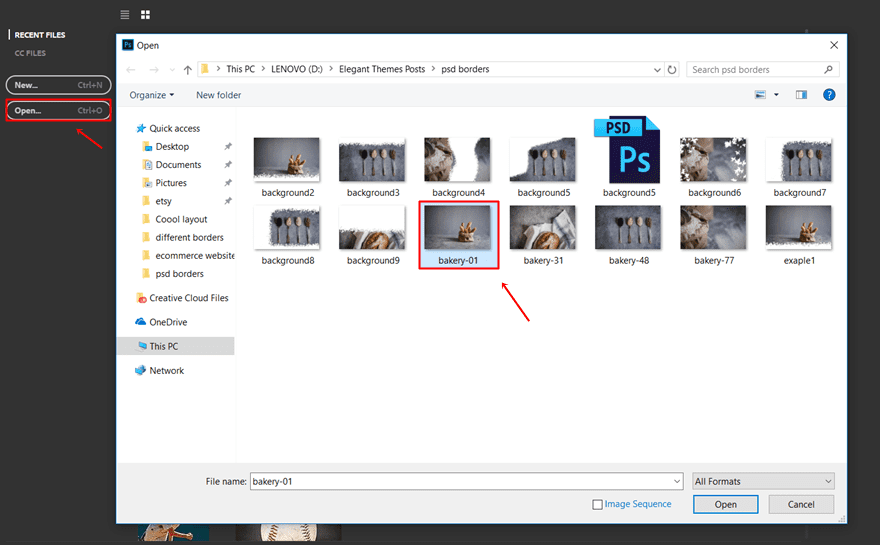
Open Image
Once you’ve done that, open the image you’d like to work on.
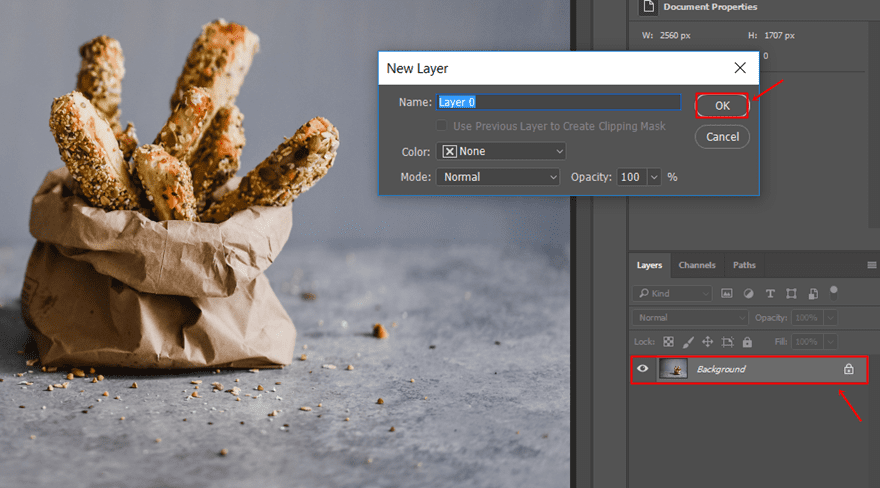
Double-Click on Image & Create Layer
Once your image is uploaded within Photoshop, double-click on the image layer and create a new layer for it (Layer 0).
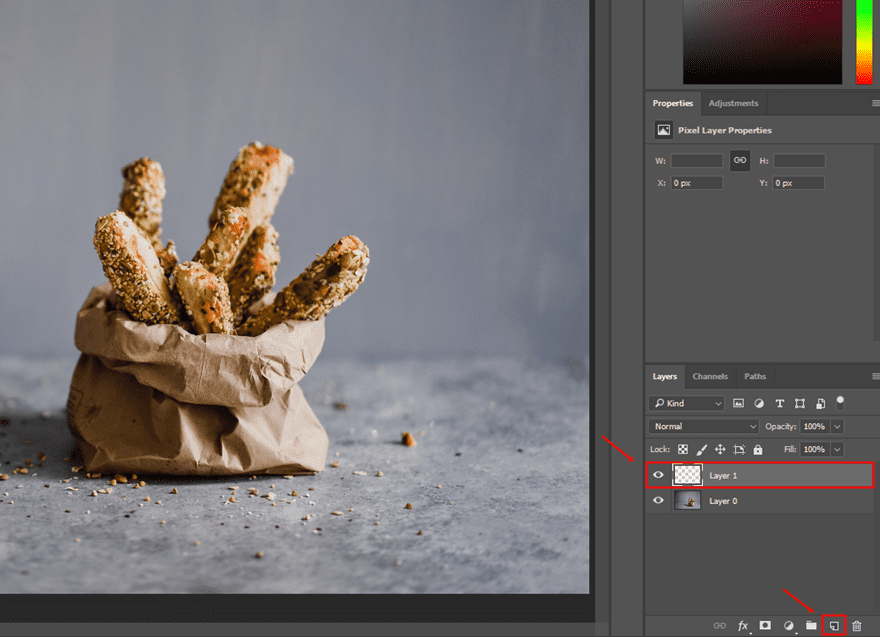
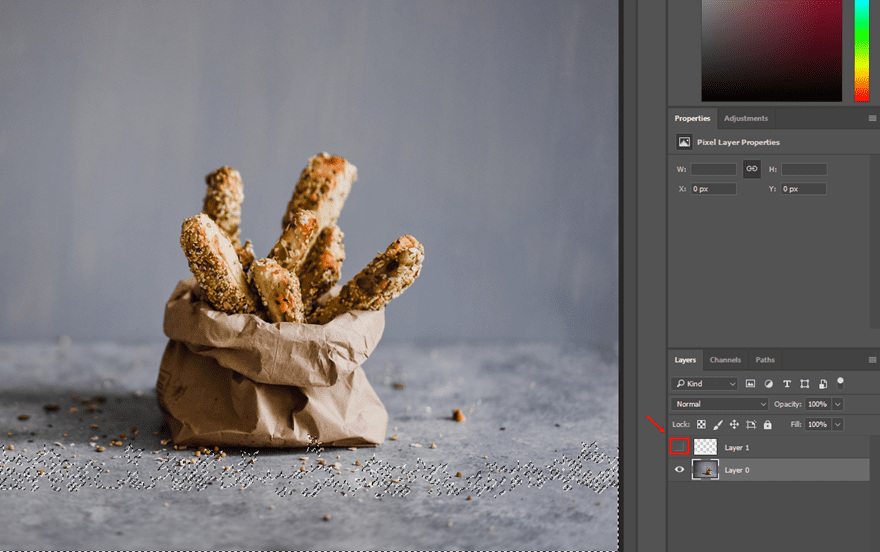
Add Another Layer
To add the transparent border, you’ll be needing another layer as well so go ahead and add it by clicking on the icon which we marked in the print screen below. Once you create the layer (Layer 1), make sure it’s placed above the layer that contains your image.
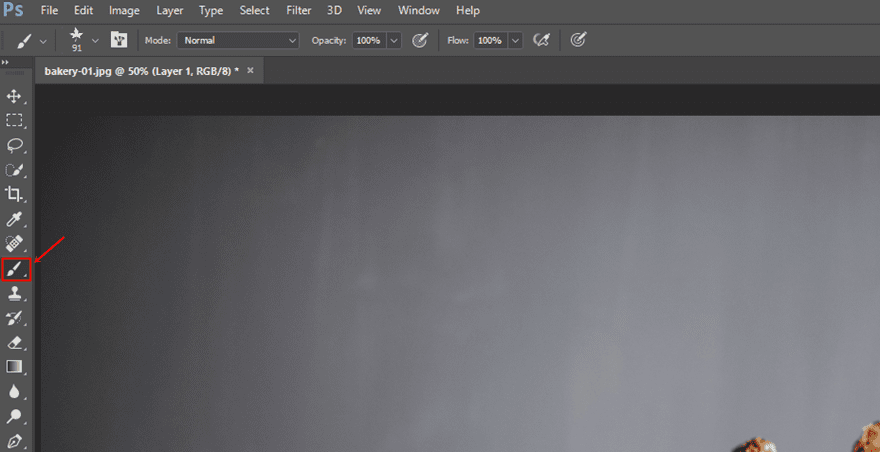
Select Brush & Size
While having the Layer 1 activated, go ahead and click on the brush icon.
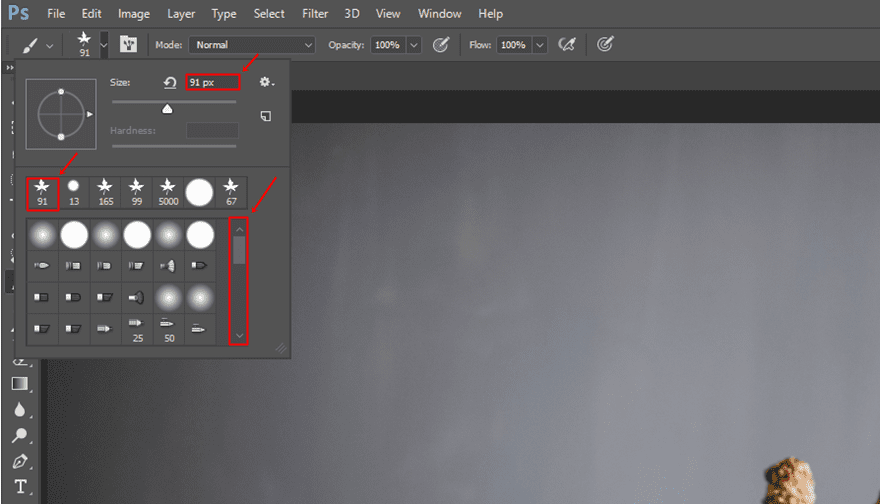
Once you do, you can adjust the size and pattern that’s being used for the brush to your own preference. There are tons of free Photoshop brushes on the internet so depending on what type of website you’re creating, choose a fitting one. Also, make sure that the opacity is set at a 100%.
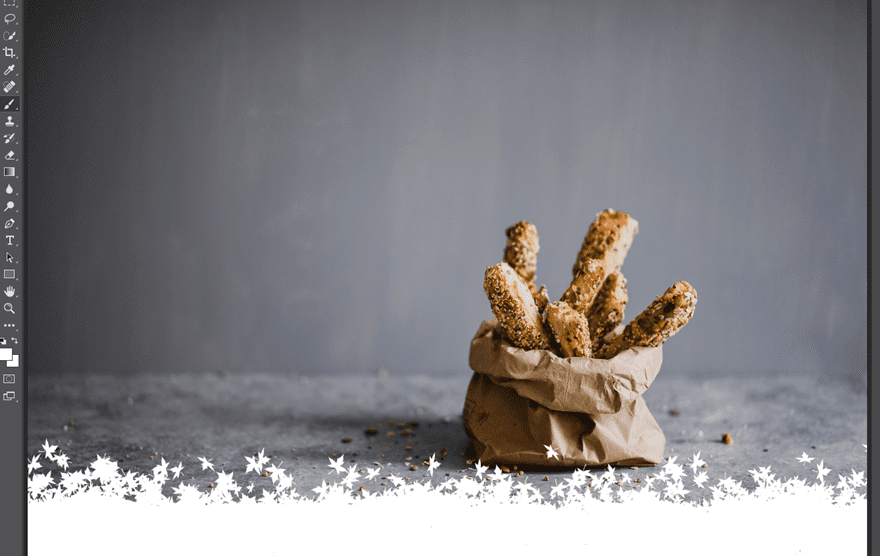
Start Using The Brush on The Borders
Once you have your brush in place, start using it on the side you want to be transparent. Make sure you cover the whole border with your brush so it’ll all become transparent afterwards.
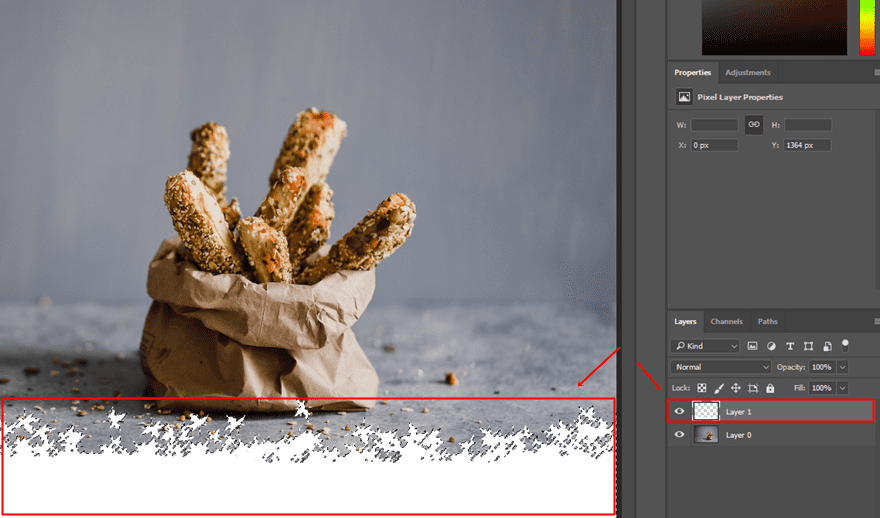
CTRL (Windows) or Command (Mac) + Select New Layer
Once done, you can press CTRL (for Windows) or Command (for Mac) on your keyboard and click on Layer 1 at the same time. You’ll see that Photoshop will select everything you’ve added to that layer, which is, in this case, the shaped border.
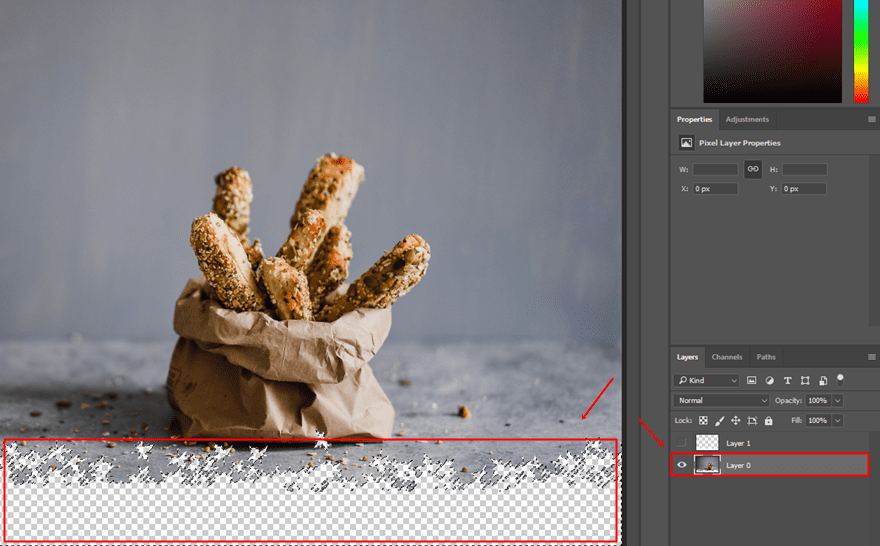
Make New Layer Invisible
Next, make Layer 1 invisible by removing the eye as marked in the print screen below.
Select Image & Delete New Layer
Then, click on the layer that contains your image and press the delete button on your keyboard. Once you do that, you’ll see that the border will become transparent.
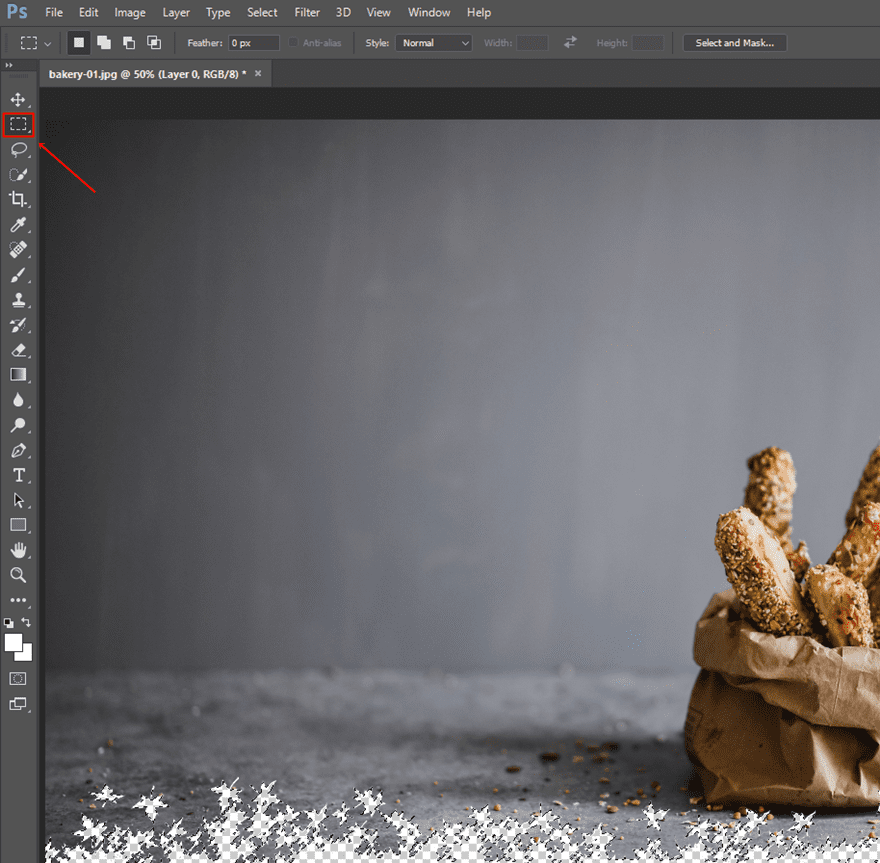
Select Rectangular Marquee Tool & Click on Image
Click on the Rectangular Marquee Tool and press somewhere randomly on the image.
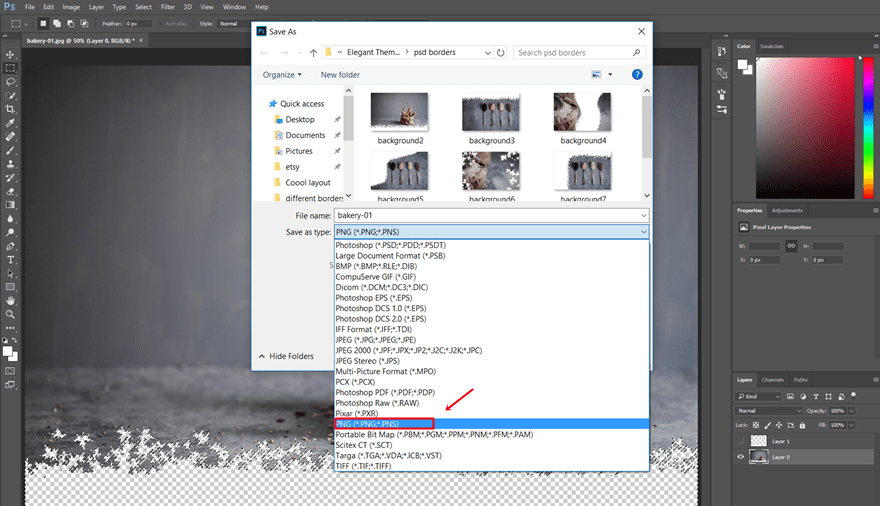
Save Image as PNG
Lastly, you’ll need to save the image as a PNG so you can use it on your website.
Add Backgrounds to Divi
Once you create the different images you want to use within your Divi website (by using the Photoshop technique above), the rest of it is straightforward. The images you’ve created serve as the background of a particular section. We’re only going to show you how to build the hero section of our example since the same method applies for the different sections as well.
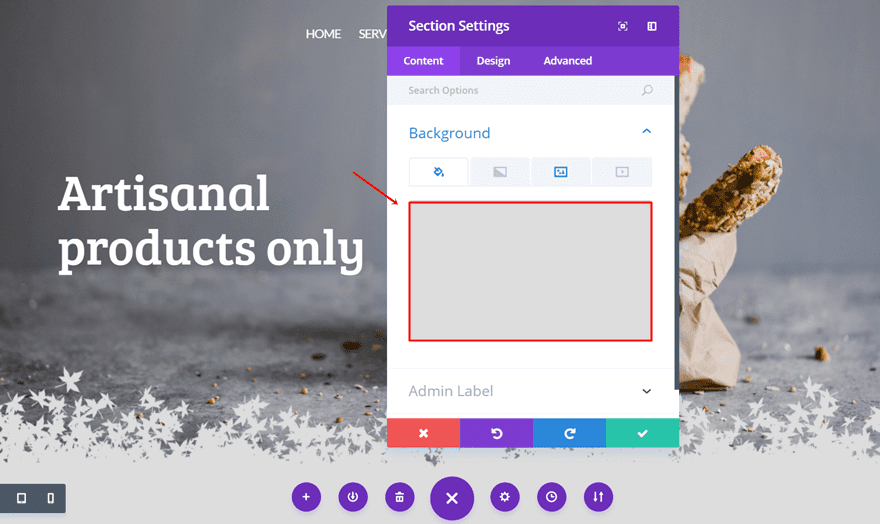
Add New Standard Section
Add a new page, switch over to Visual Builder and add a new standard section to that page.
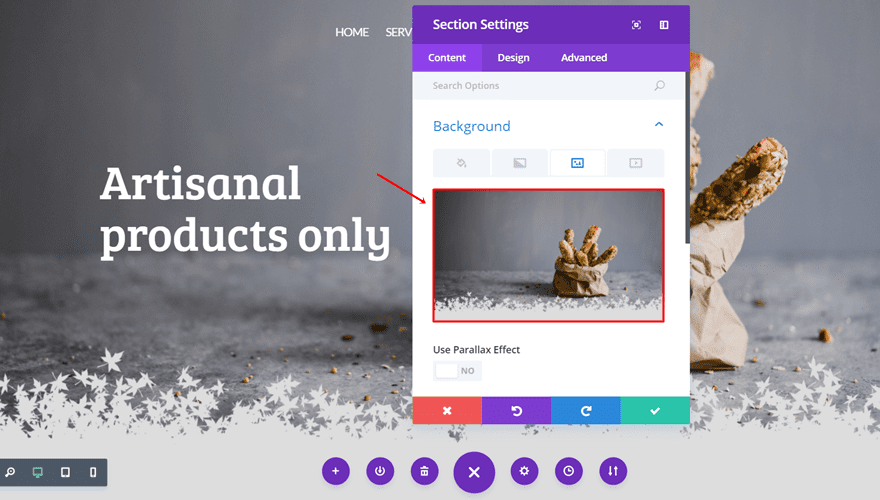
Upload Background Image
Once you’ve placed all the modules you want to appear in the hero section, you can go ahead and add the image you’ve created in the previous part of this post.
Add Background Color
Once you’ve done that, you can decide what color will appear in the transparent part of your image. In this example, we’ve used ‘#dddddd’ as the background color. You can immediately see that the color will appear right within the transparent part of the image.
Make Sure There’s Enough Padding
Depending on the number of modules and the size of your transparent border you’ve used in your hero section, you might have to add some custom padding. Play around with the different section padding values and see which one gives you the best result.

Add Same Background Color to Next Section
To make sure the different sections blend well with one another, use the same background color you’ve used in your hero section within your next section as well. That doesn’t necessarily mean that you have to use a one color background color for your next section, you can use a gradient background as well as long as the colors of both sections blend beautifully.
Example
As mentioned before, you can create as many image borders as you want and use them in a creative way throughout your website. To give you a taste of it, we’ve created the following example preview:
Final Thoughts
In this post, we’ve shown you how you can easily make use of irregularly shaped section transitions. By using this method, you can basically create any kind of section transition you desire. Besides showing you how to create these irregular shapes with a few steps in Photoshop, we’ve also shown you how you can then make it work within the Divi Builder. If you have any questions or suggestions; make sure you leave a comment in the comment section below!
Be sure to subscribe to our email newsletter and YouTube channel so that you never miss a big announcement, useful tip, or Divi freebie!


How did you get the middle section to be half grey on top and half white on bottom?
I don’t think this is good for user experience since adding transparent png that big would cost you big image file. I prefer use png transfparent on small image. If you look for this effect, i woul prefer using overlay div
Hi Donjete… amazing content. thanks for sharing
DIVI best choice for creative ideas
Great inspiration for being creative. Thank you for the inspiration 🙂
Thanks for the tutorial. I’ve been wanting to know how to do this for a while.
To be honest, I was a bit disappointed that it has to be done this way though. I was hoping it was something like a mask we could create once then use as an overlay or module in Divi. Divi has made me lazy. 😉
The creative ideas are racing though my mind.
Hi,
thank you very much for this tutorial. It’s indeed more a photoshop tutorial than a Divi tutorial, but it’s nevertheless very useful for webdesigners, as Photoshop is a daily instrument for all of us, who do not only work with premade solutions.
So, this solution of creating irregularly shaped section transitions is, in my eyes, a good option for small websites or landing pages that need individual weblayouts.
thanks to provoke to the immediate need of shape dividers in divi too for most of the divi users..
I just was wondering what GimpShop was because I never heard of it. Turns out somebody stole the work of a developer, stuffed it with spam- and bloatware and now makes money with it. Could you please recommend Gimp instead of GimpShop since GimpShop not only is stolen but also the development is on hold?
Rather it should be called “How to Create Irregularly Shaped Section Transitions with Photoshop” 😀
Merci, la vidéo est très bien faite, et le rendu est top!
Cool idea!
I hope some nice shape dividers are on the roadmap for Divi, I’d love to see those built in!
Hi,
Thanks for the trick, but it’s not a good solution. The day the client wants a design change, we’re obliged to re-create all the images.
What about a true solution fot dividing sections, like @ your challenger : https://elementor.com/v130-shape-divider/
It could be a great feature in divi.
Thanks 4 your work,
I agree that this would be a great addition to Divi. There are just a few small things that are missing now, this is one of them.
The Elementor solution is the way to go – so quick and it gives great results that can be changed easily
This is a very cool idea. Hope they take it and implement it.
+1 for this.
Slurrrrrrrp!
Does this page builder work alongside Divi? Meaning can you use both on the same site?
I wish that was a whole theme and not just a builder but looks very promising to fill in those times the Divi doesn’t.
Much better. I love Divi, but I remain a bit frustrated with the lack of features that seem pretty basic, especially in other themes, such as these transitions. Seems like there is just a lot of tweaking and hacking required to get some of these modules to really perform.
Not that’s how I was hoping this would work. Better even as you could edit the shapes live.
Please work on this feature for Divi.
+1 for shape dividers.
Also, as they are SVG graphics it would be great to have a Divi Options section/tab to upload extra designs.
That would allow for great customisations, instead of everyone using a very limited amount of designs.
I was looking shortly at the elementor already the other day. Looks as a mighty tool. LOTS to take over by DIVI in my eyes.
and they have 205 off!
+1000
Wow, nice way to do it, especially the zooming part to control aspect of the shape. This would be indeed really cool if implemented properly in Divi!
3.8mb background image? Any suggestions how to reduce the size of a .png file?
I run all my .png file thru imageAlpha/imgOptim combo, with results always great, and at times surprising even myself.
My jpgs are thwacked by jpgMini/Squash combo, with equally impressive results.
Both are #CBW apps without question.
The end results of this tute are quite nice, and I appreciate the effort of the author. Thanks for sharing.
My concern with this tute, and others, however, is there is seldom a sample image showing how the design translates on vertical mobile and/or tablet sizes.
Either way Donjete, thanks kindly for your effort and article.
That file was so big because of the image dimensions. It’s over 2500 x 1700 which is much larger than required (1980×1020 for full screen). Also, if the quality settings in the “Save For Web” dialog box were reduced from “max” to “high” you would be getting a much smaller file size.
Finally, that image had a number of layers that were not being used and of they were deleted the image size would get smaller again.
@Donal: JTC was talking about a PNG file, which doesn’t have layer support. There’s also no quality setting for PNG export in “Save for Web”.
Also, with more and more monitors being higher resolution that 1920×1080, there definitely *is* a good reason to use images of 2500px wide if your site is full-width.
@JTC: try using https://tinypng.com to compress the exported PNG. It generally gives very good results.
The only problem with doing this in a lot of places on the site is loading time. PNGs with transparencies tend to be pretty heavy files.
I was going to say the same thing. This tip seems just bad advice in that respect. I was hoping for a more elegant and lightweight solution rather than “open photoshop and do it by hand”
Unless you can make them 8 bit with a matte color, but even then the size can be fairly large. I think it’s better to wrap a jpg with divs that contain just the transparent portion.
i agree with James. Also, have you tried Imagify to help reduce the file sizes?