
In today’s tutorial, we’re going to show you how to create fullscreen, transparent and fullwidth opt-in forms with Bloom–a plugin that helps you add opt-in forms to your website. We’ll guide you, step by step, through the process of designing and setting up two example opt-in forms. By following this post carefully, you’ll be able to make the transparent opt-in forms yourself and use it on any website that has the Bloom plugin installed–whether it’s your own website or a client’s.
Having one or multiple opt-in forms on your website is something that doesn’t only help you stay in touch with your visitors, but engage with them as well. It’s hard to come across a website that doesn’t have an opt-in form nowadays because of the results-oriented data that it brings. By earning your visitors’ email address at the right time and place, you’ll get a step closer to getting to know them and making them loyal customers and/or visitors.
However, if you’d rather step aside from the standard opt-in forms, you may opt for a fullscreen, transparent or fullwidth opt-in form instead. We’ll show you the two examples in advance.
Example 1
Example 2

Creating a Fullscreen & Transparent Opt-In Form with Bloom: Tips
The Bloom plugin provides various possibilities to style your opt-in forms and attract your audience in the way that works best for both you and your visitors. In addition to the existing opt-in templates that Bloom offers, there are also built-in options that make it easy to create customized designs. You can also add custom CSS code to get more advanced results.
However, when trying to make some adjustments to the design through CSS code, there are some things you should bear in mind so you don’t lose time trying to make things work.
Activate the Opt-in Form First
When you’re designing your opt-in form, you have a preview button at the top of your Design tab. This helps you preview the results you’re making while designing. Although the built-in design changes automatically change in the preview as well, that doesn’t count for the CSS code. If you’re making certain changes through your Custom CSS field within your Design tab, it might be that some of those changes don’t apply to the preview form but do apply to the opt-in form on your website.
That’s why you’ll have to activate the opt-in form first, and make it apply to one of your pages. To make sure your visitors are not faced with the opt-in form while you’re still working on it, you can preview it on a new page that you haven’t shared with your visitors.
(Or, of course, on a staging/test site.)
Start by creating a new page and giving it a name. You don’t have to put anything into that page; it just has to exist. While you’re designing your opt-in form, go to the Display Settings tab. Set the delay time to 1 second so you won’t have to wait for the opt-in form everytime you want to check the result.
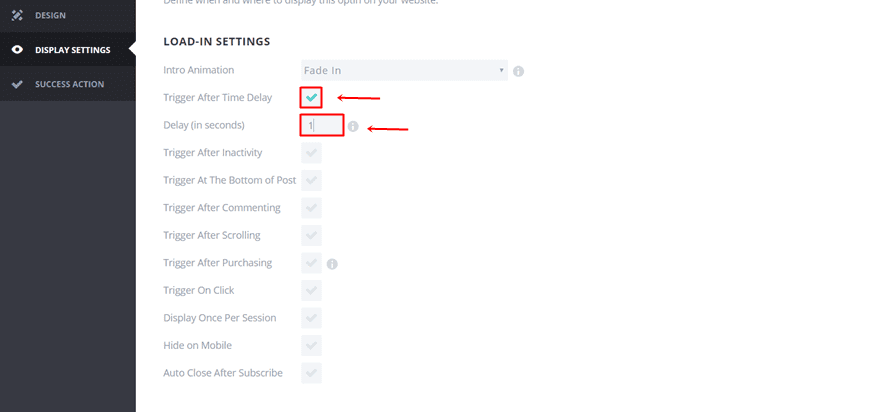
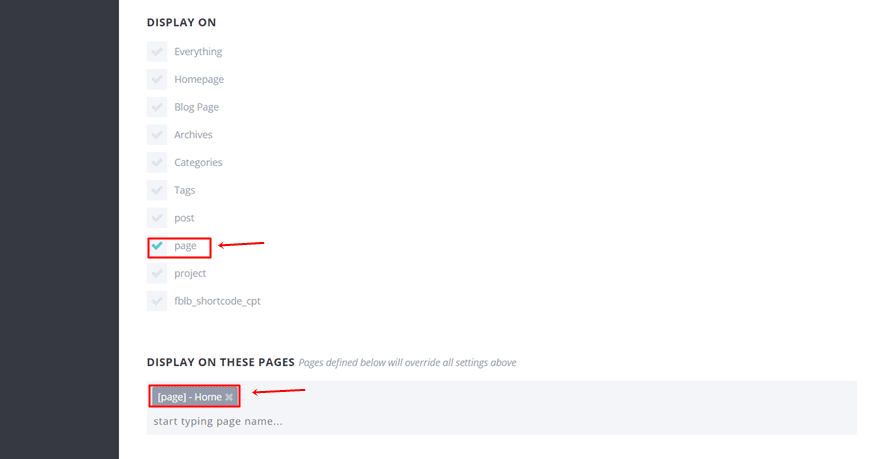
Scroll down that tab and when you come across the ‘Display On’ option, select ‘Page’. Once you’ve selected ‘Page’, you’ll see a list of pages that are active on your website appear. Choose the page that you’ve recently created. Make sure you display the opt-in form on that page only.
Make the Changes According to Your Activated Form
The changes that you make with the CSS code don’t apply to all the opt-in forms; they only apply to that opt-in form you’re working on specifically. That’s why some of the classes that we need will be unique.
Later on this post, we’ll show you how to do that for the examples we’re recreating.
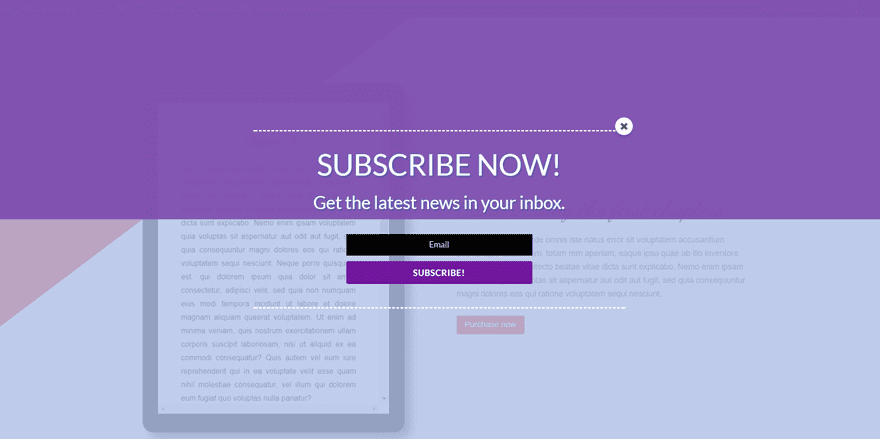
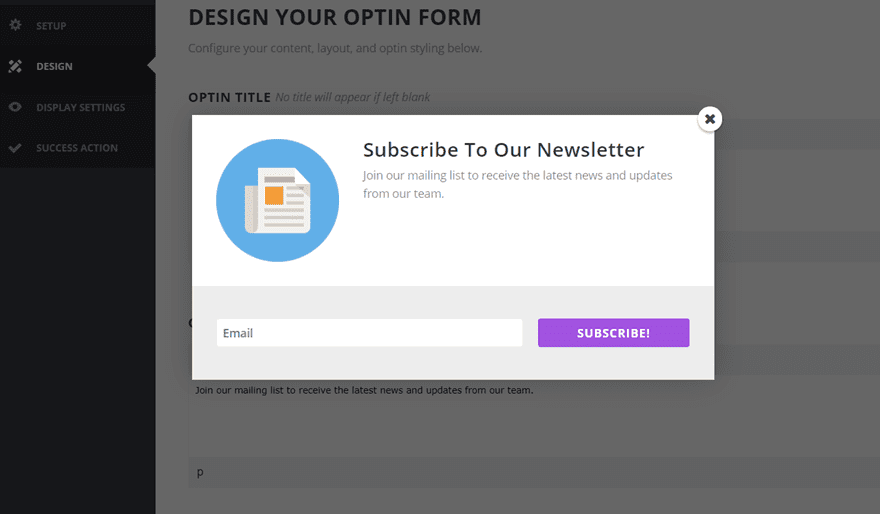
Start Creating The First Example

The first example we’re showing you how to recreate is the one in the print screen above. You can see that the opt-in form appears to be fullscreen. Although it might seem like that, we’ve only made a transparent opt-in form and changed the background colors.
Add The Opt-In Form
Let’s begin by adding a new opt-in form to your website by going to your WordPress dashboard > Bloom > Click on ‘New Optin’ in the right corner > Select ‘Pop up’.
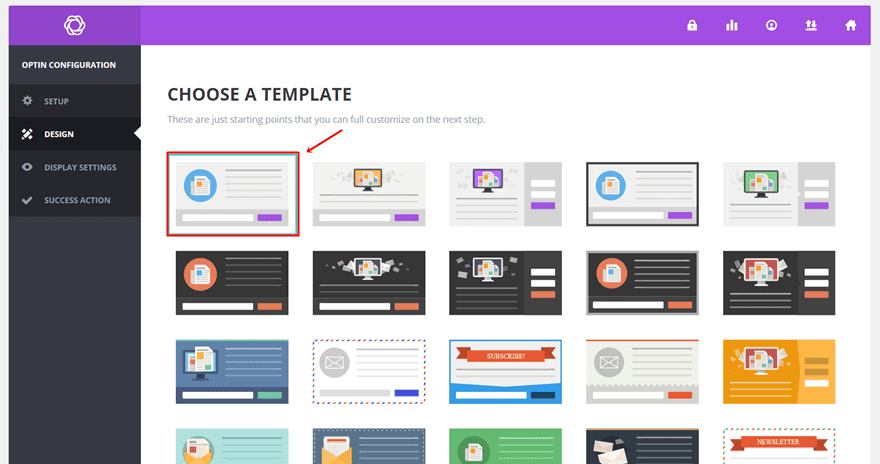
Type down a name for your form and select your email provider in the Setup tab. When that is done, you can go to the Design tab. That’s the main tab we’ll be focusing on in this post. Select one of the templates that are provided and continue. For the examples we’re making, we’re choosing the first one in the row.
Design Settings
When you preview the form in the Design tab without making any modifications, you’ll see the following opt-in form appear:
It looks quite different than what the result will look like but you can also notice that the foundation of the opt-in form is the same.
Opt-In Title & Message
Now, to get our opt-in form to look like the example we showed you above, start by making the following modifications to the standard design settings of the Optin Title and Optin Message within the Design tab:
- Text Color: #FFFFFF
- Text Style: Bold
- Text Orientation: Center

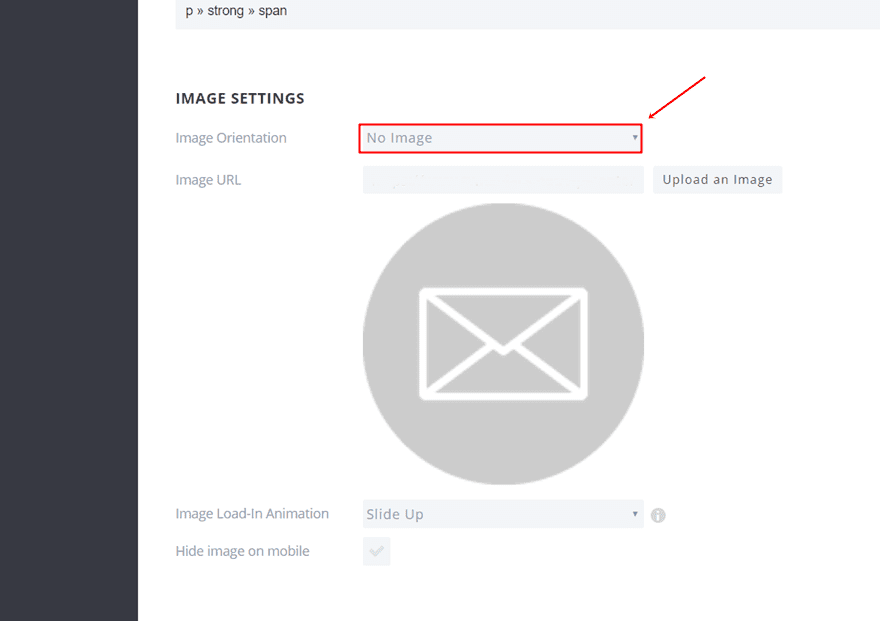
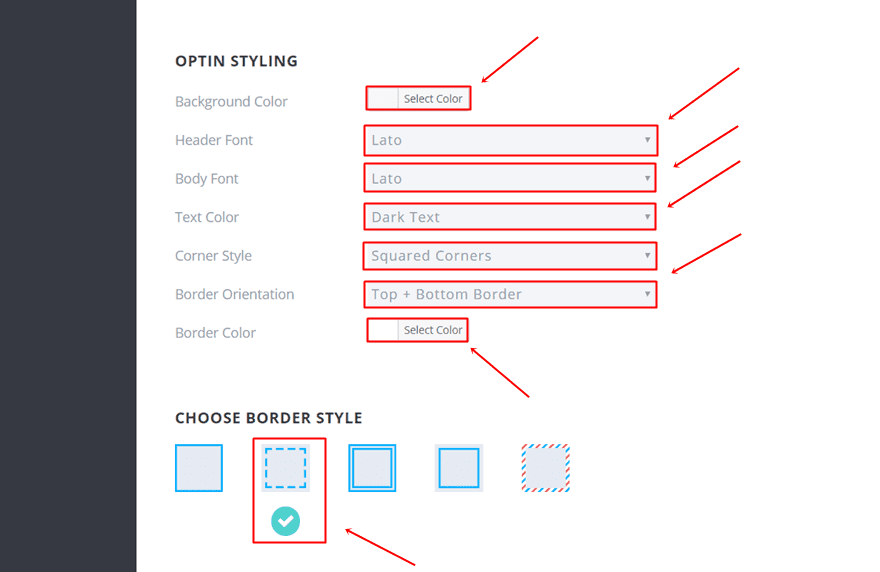
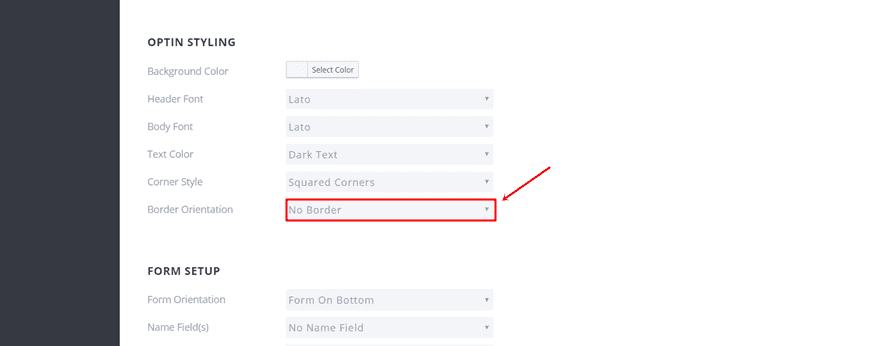
Image Settings & Optin Styling
Scroll down the same tab and make the following adjustments to the Image Settings, Optin Styling and Border Style:
- Image Orientation: No Image
- Background Color: Clear
- Header Font: Lato
- Body Font: Lato
- Text Color: Dark Text
- Corner Style: Squared Corners
- Border Orientation: Top + Bottom Border
- Border Color: #FFFFFF
- Border Style: Dashed Border
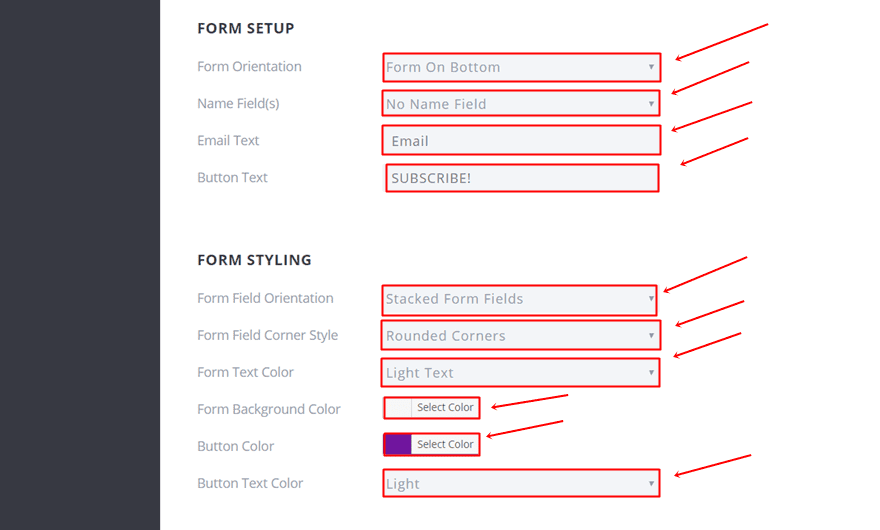
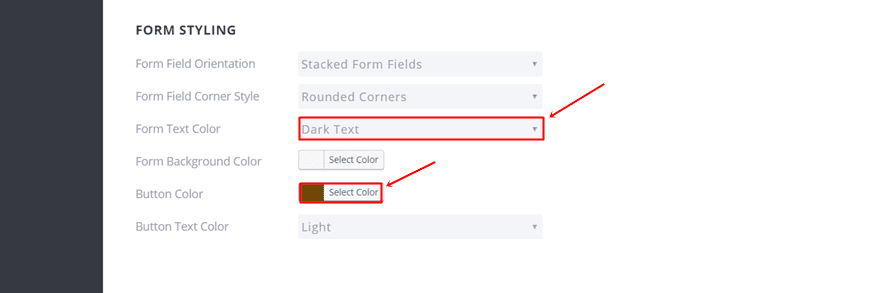
Border Style, Form Setup & Form Styling
Continue scrolling down and make the make the following modifications to the Form Setup and Form Styling as well:
- Form Orientation: Form On Bottom
- Name Field(s): No Name Field
- Email Text: Email
- Button Text: SUBSCRIBE!
- Form Field Orientation: Stacked Form Fields
- Form Field Corner Style: Rounded Corners
- Form Text Color: Light Text
- Form Background Color: Clear
- Button Color: #6a18a0
- Button Text Color: Light
Form Edge Style
The last manual change you’ll have to make the opt-in form is choosing the form edge style which is, in this case, a straight line.

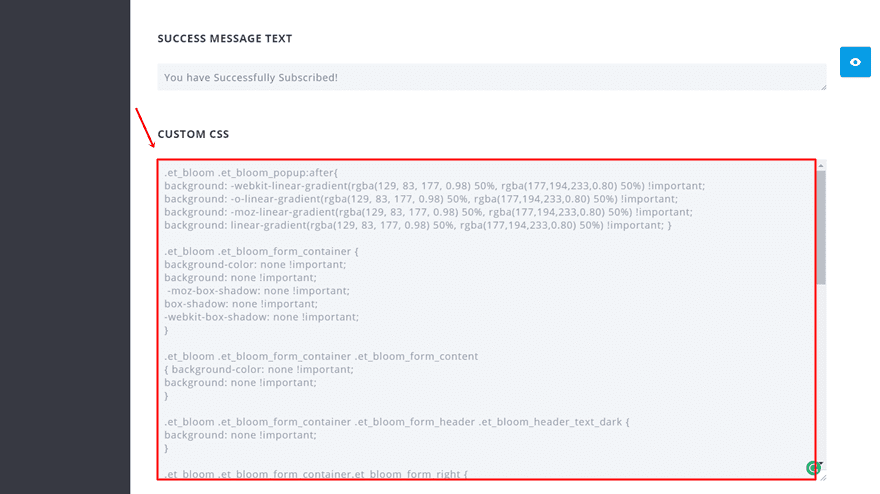
Custom CSS
Lastly, we need to make some CSS modifications to the form to set everything in place. Copy and paste the following lines of code into the Custom CSS field:
.et_bloom .et_bloom_popup:after{
background: -webkit-linear-gradient(rgba(129, 83, 177, 0.98) 50%, rgba(177,194,233,0.80) 50%) !important;
background: -o-linear-gradient(rgba(129, 83, 177, 0.98) 50%, rgba(177,194,233,0.80) 50%) !important;
background: -moz-linear-gradient(rgba(129, 83, 177, 0.98) 50%, rgba(177,194,233,0.80) 50%) !important;
background: linear-gradient(rgba(129, 83, 177, 0.98) 50%, rgba(177,194,233,0.80) 50%) !important; }

.et_bloom .et_bloom_form_container {
background-color: none !important;
background: none !important;
-moz-box-shadow: none !important;
box-shadow: none !important;
-webkit-box-shadow: none !important;
}

.et_bloom .et_bloom_form_container .et_bloom_form_content
{ background-color: none !important;
background: none !important;
}

.et_bloom .et_bloom_form_container .et_bloom_form_header .et_bloom_header_text_dark {
background: none !important;
}

.et_bloom .et_bloom_form_container.et_bloom_form_right {
background-color: none !important;
background: none !important;
}

.et_bloom .et_bloom_optin_6 .et_bloom_form_container .et_bloom_form_header {
background-color: none !important;
background: none !important;
}

.et_bloom .et_bloom_optin_6 .et_bloom_form_container h2 {
font-size: 50px !important;
text-shadow: -1px -1px 1px rgba(33,97,160,0.5), 2px 2px 1px rgba(33,97,160,0.5);
}

.et_bloom .et_bloom_optin_6 .et_bloom_form_container p {
font-size: 30px !important;
text-shadow: -1px -1px 1px rgba(33,97,160,0.5), 2px 2px 1px rgba(33,97,160,0.5);
}

.et_bloom .et_bloom_form_container.et_bloom_form_text_light .et_bloom_form_content input {
text-align: center !important;
color: #FFFFFF !important;
}

.et_bloom .et_bloom_bottom_stacked p.et_bloom_popup_input {
width: 50% !important;
margin-left: 25%;
}

.et_bloom .et_bloom_form_container.et_bloom_rounded button {
width: 50% !important;
margin-left: 25%;
}

.et_bloom .et_bloom_form_container .et_bloom_form_content {
padding: 0 0 40px 0 !important;
}
Change The Code According to Your Own Bloom Opt-in Form
In the code that we’ve shared with you, you’ll have to make three adjustments. Some CSS classes only apply to one opt-in form, that’s why we’ll need to know which opt-in form we’re working on. The only thing you’ll have to do is change one number three times:
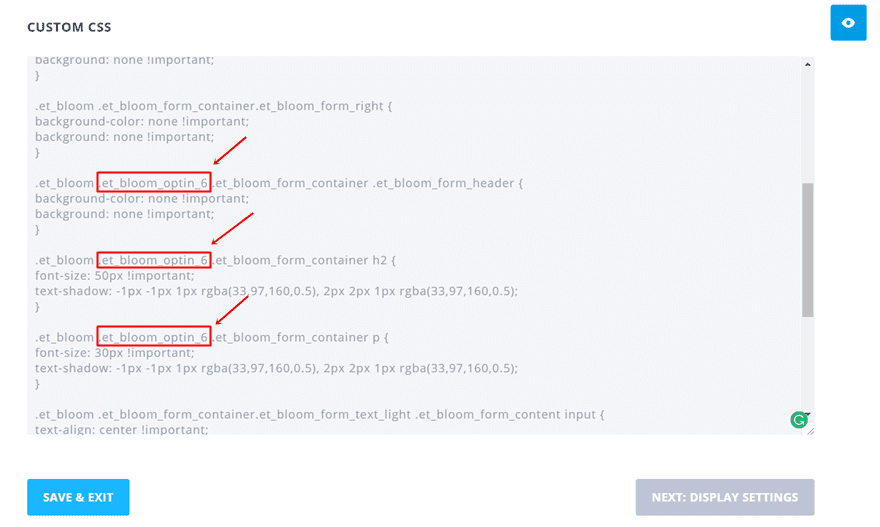
The number at the end of the highlighted part in the print screen above is 6 because it’s the 6th one in the row:
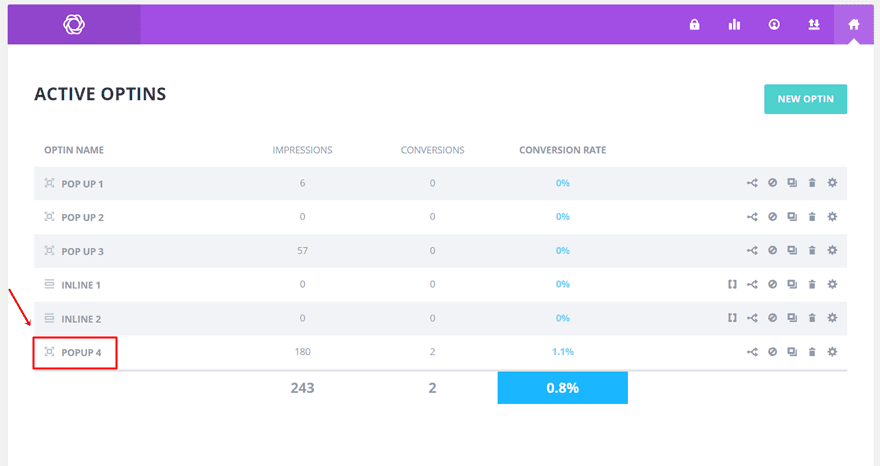
So, depending on what position it has within your list of forms, you’ll have to adjust the number.
Final Result
If you preview your opt-in form now, you’ll notice that all the modifications have been made and that your opt-in form looks like this:

Display Settings
You can now go over to the Display settings and make the needed modifications to set up your Bloom opt-in form. We’re not going to go into deeper details since this post will only handle the design part of these opt-in forms.
Start Creating The Second Example
The next example that we’re going to show you is not fullscreen but fullwidth instead. To demonstrate how we can achieve the result, we’re going to use the same opt-in form as in the previous example but make some small changes to it and add different CSS code.
Design Settings
There are only three things we’ll need to do differently within the built-in Design Settings. Remember; we’re using the opt-in form we’ve created in the previous example. Apart from the three things we’re going to mention, the same built-in settings as for the first example apply. The first thing you’ll have to do is put the Border Orientation to ‘No Border’.
Scroll down and select ‘Dark Text’ for the Form Text Color and use ‘#724501’ as the Button Color.
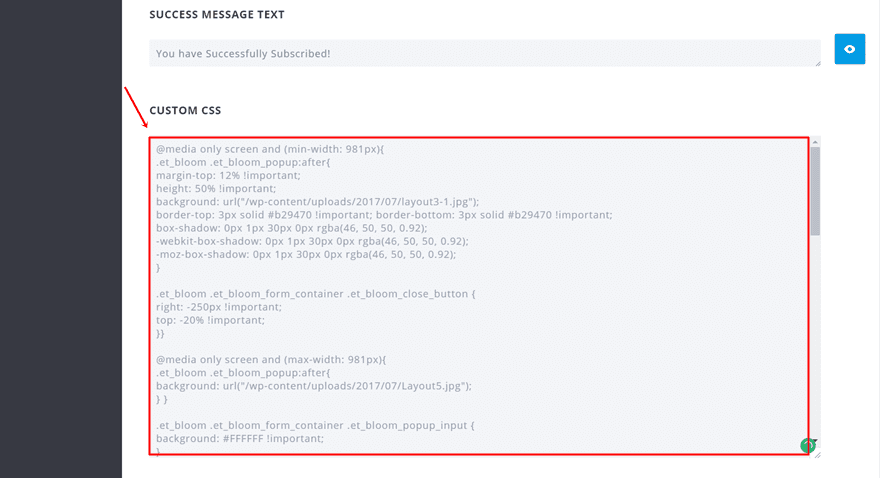
Custom CSS
Lastly, we’ll need to add some CSS code lines to the Custom CSS box:
@media only screen and (min-width: 981px){
.et_bloom .et_bloom_popup:after{
margin-top: 12% !important;
height: 50% !important;
background: url("");
border-top: 3px solid #b29470 !important; border-bottom: 3px solid #b29470 !important;
box-shadow: 0px 1px 30px 0px rgba(46, 50, 50, 0.92);
-webkit-box-shadow: 0px 1px 30px 0px rgba(46, 50, 50, 0.92);
-moz-box-shadow: 0px 1px 30px 0px rgba(46, 50, 50, 0.92);
}
.et_bloom .et_bloom_form_container .et_bloom_close_button {
right: -250px !important;
top: -20% !important;
}}

@media only screen and (max-width: 981px){
.et_bloom .et_bloom_popup:after{
background: url("");
} }

.et_bloom .et_bloom_form_container .et_bloom_popup_input {
background: #FFFFFF !important;
}

.et_bloom .et_bloom_form_container {
background-color: none !important;
background: none !important;
-moz-box-shadow: none !important;
box-shadow: none !important;
-webkit-box-shadow: none !important;
}

.et_bloom .et_bloom_form_container .et_bloom_form_content {
background-color: none !important;
background: none !important;
}

.et_bloom .et_bloom_form_container .et_bloom_form_header .et_bloom_header_text_dark {
background: none !important;
}

.et_bloom .et_bloom_form_container.et_bloom_form_right {
background-color: none !important;
background: none !important;
}

.et_bloom .et_bloom_optin_6 .et_bloom_form_container .et_bloom_form_header {
background-color: none !important;
background: none !important;
}

.et_bloom .et_bloom_optin_6 .et_bloom_form_container h2 {
font-size: 50px !important;
text-shadow: -1px -1px 1px rgba(114,69,1,0.5), 2px 2px 1px rgba(114,69,1,0.5);
}

.et_bloom .et_bloom_optin_6 .et_bloom_form_container p {
font-size: 30px !important;
text-shadow: -1px -1px 1px rgba(114,69,1,0.5), 2px 2px 1px rgba(114,69,1,0.5);
}

.et_bloom .et_bloom_form_container.et_bloom_form_text_dark .et_bloom_form_content input {
text-align: center !important;
color: #FFFFFF !important;
}

.et_bloom .et_bloom_bottom_stacked p.et_bloom_popup_input {
width: 50% !important; margin-left: 25%;
}

.et_bloom .et_bloom_form_container.et_bloom_rounded button {
width: 50% !important;
margin-left: 25%;
}

.et_bloom .et_bloom_form_container .et_bloom_form_content {
padding: 0 0 40px 0 !important;
}
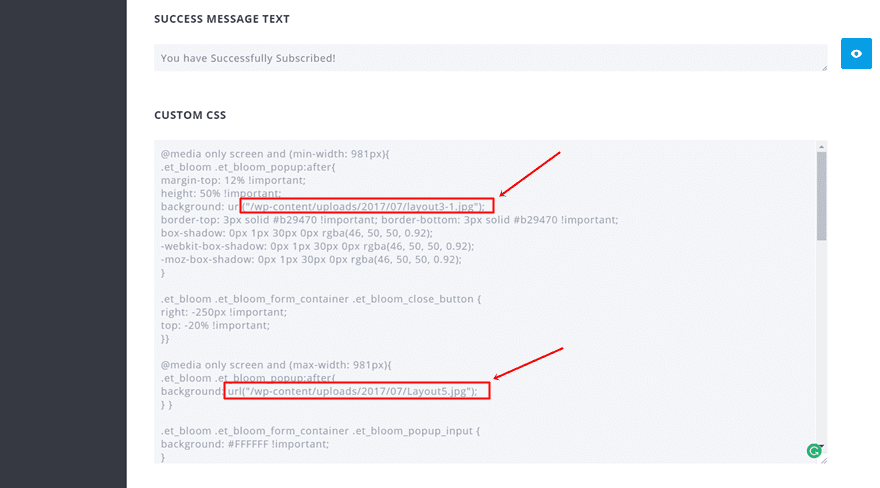
Replace Background Images
The last thing you’ll need to do is replace the background images that are being used by one of the URLs in your wp-content folder or elsewhere. The first URL that is marked in the printscreen below applies to desktop and the second one to tablet and phone.
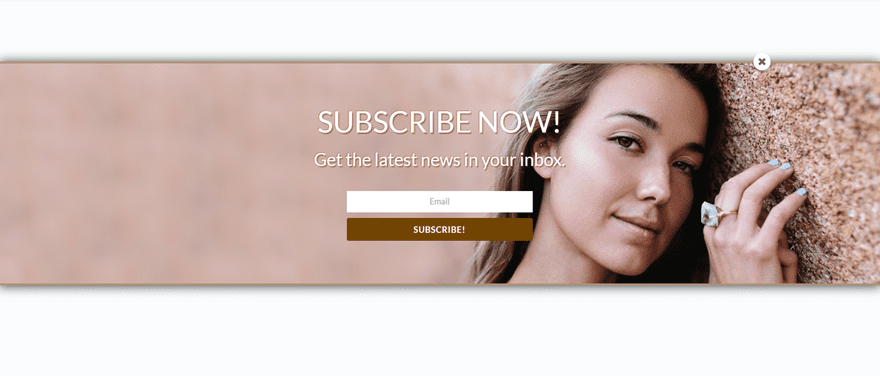
Final Result
And you’re done! Your second opt-in form should now look like this:
Final Thoughts
The possibilities you have with bloom to make beautiful opt-in forms your users will engage with are endless. The ones we showed you how to make in this post are just an example of how creative you can get. If you have any questions or suggestions, feel free to leave a comment in the comment section below!
Be sure to subscribe to our email newsletter and YouTube channel so that you never miss a big announcement, useful tip, or Divi freebie!


why not simply have the color fields accepting RGBA in Bloom? It’s everywhere on Divi now and doesn’t seem like a hard update for the “best popup plugin” from elegant themes…
In April, Nick said we would “soon” be able to create a field to line up with a list segmentation. This has not happened yet. I am hoping to do that in combination with this tutorial so customers can use a check box or even just type a word in a text field. Until then, Bloom isn’t very useful to those of us who need that. Nice tut though. I hope they also integrate your code so it’s one of the choices.
hey guys, it didn’t work for me. Opt-in title and message’s showing a white background, even tho I’ve set it up as CLEAR.
Thank you for that great article 🙂
Wow, lovely!!!
Thanks again.
Thanks for posting, I liked it so much. Very useful.
Thank you Donjete, very useful
This is a timely tutorial.. We need to use this to collect more leads for our land investment website built using divi..
I think the community would love these as layouts, por favor!
Or a much easier and quicker alternative that doesn’t involve so many steps or code, is to just use the Divi Overlays plugin and be able to use the Divi Builder to create the the full screen optin ???
No offence meant, but, after such an elaborate contribution by Donjete, to advertise your own commercial plugin in the very first comment, was not the nicest idea, though, IMHO. 🙂
I agree use a plugin instead, BUTTT some people are bit tooo anti plugin imo.