
Creating a Slashing Text Effect is a fun way to bring life to your content. The idea is to give the illusion that text is being slashed in half and breaking apart as the user scrolls down the page. In this tutorial, we’ll show you just how easy this design is to build in Divi!
Let’s get started.
Sneak Peek
Here is a quick look at the design we’ll build in this tutorial.
Download the Layout for FREE
To lay your hands on the designs from this tutorial, you will first need to download it using the button below. To gain access to the download you will need to subscribe to our newsletter by using the form below. As a new subscriber, you will receive even more Divi goodness and a free Divi Layout pack every Monday! If you’re already on the list, simply enter your email address below and click download. You will not be “resubscribed” or receive extra emails.

To import the section layout to your Divi Library, navigate to the Divi Library.
Click the Import button.
In the portability popup, select the import tab and choose the download file from your computer.
Then click the import button.

Once done, the section layout will be available in the Divi Builder.
Let’s get to the tutorial, shall we?
What You Need to Get Started

To get started, you will need to do the following:
- If you haven’t yet, install and activate the Divi Theme.
- Create a new page in WordPress and use the Divi Builder to edit the page on the front end (visual builder).
- Choose the option “Build From Scratch”.
After that, you will have a blank canvas to start designing in Divi.
Part 1: Designing the Section
In this first part, we are going to design the section background for our section layout.
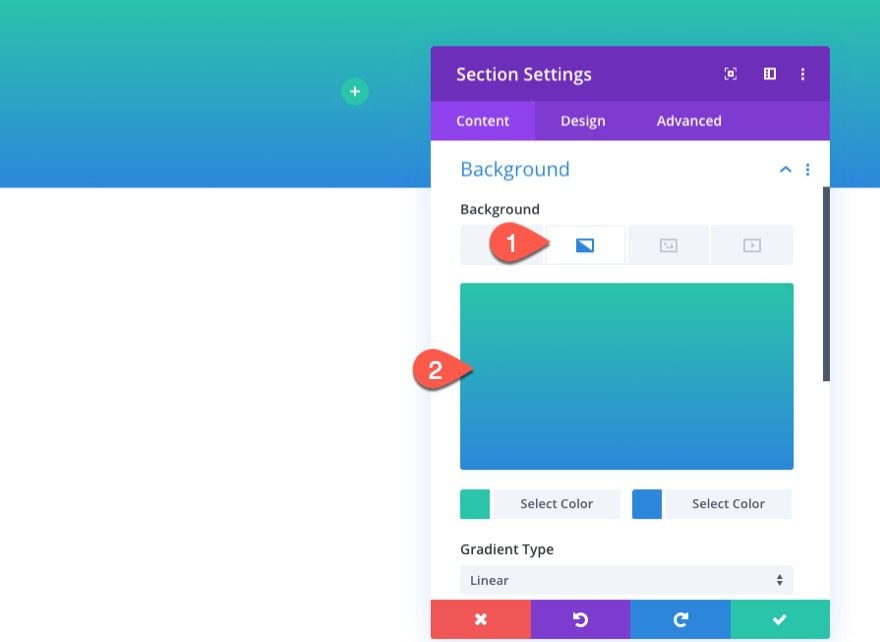
Background Color
To start, add a background color to the default section as follows:
- Gradient Background Left Color: #29c4a9
- Gradient Background Right Color: #2b87da
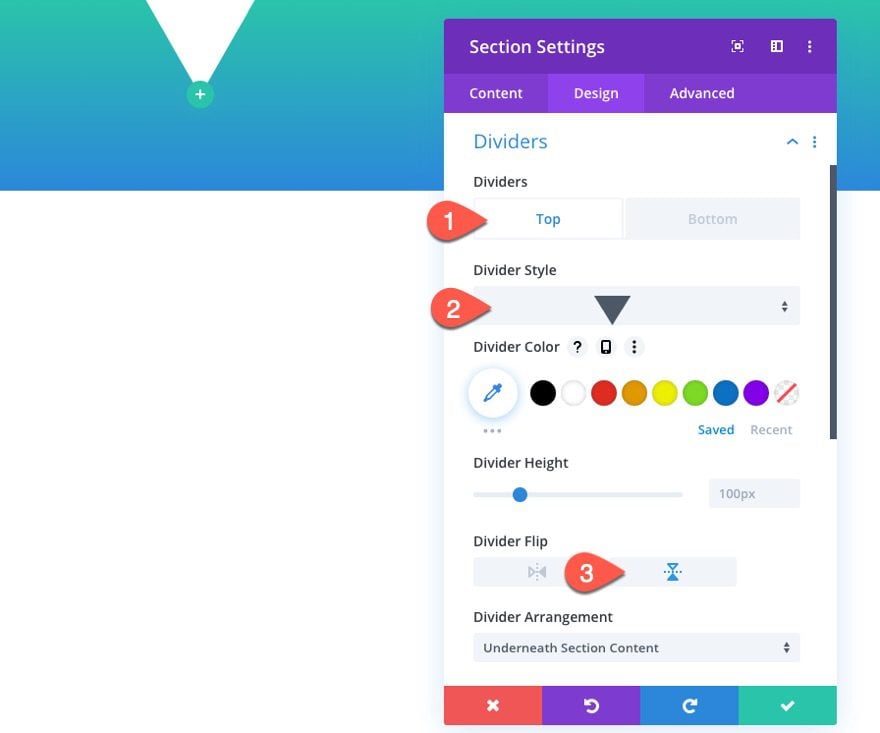
Divider
Under the design tab, add a top divider as follows:
- Top Divider Style: see screenshot
- Divider Color: white
- Divider Flip: vertical
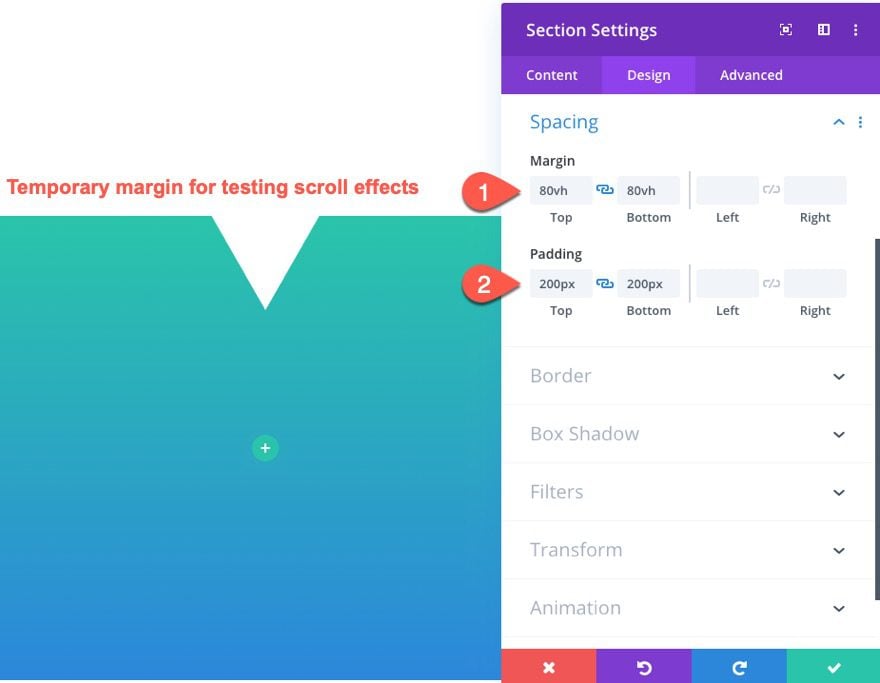
Spacing
To help test the scroll effects for the design, let’s add some temporary margin to the top and bottom of the section. We can always take it out when adding the section to another page. We also need to add equal amount of padding to the top and bottom.
- Margin: 80vh top, 80vh bottom
- Padding: 200px top, 200px bottom
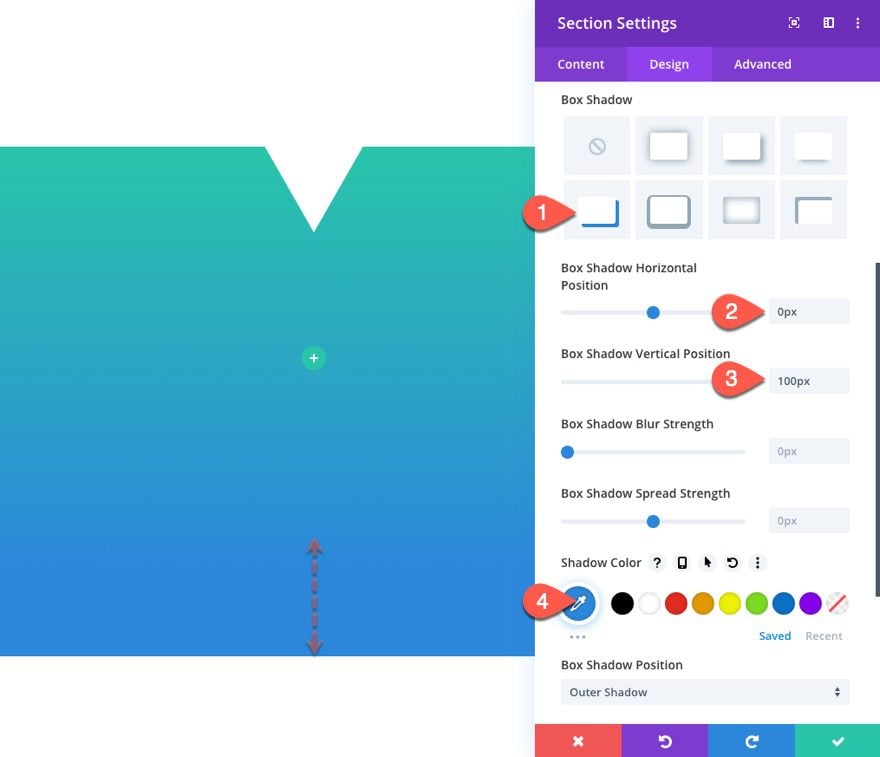
Box Shadow for Extra Bottom Space
In order to get some extra design color/space at the bottom of the section without compromising the actual space of the section, we can add a box shadow as follows:
- Box Shadow: see screenshot
- Box Shadow Horizontal Position: 0px
- Box Shadow Vertical Position: 100px
- Shadow Color: #2b87da
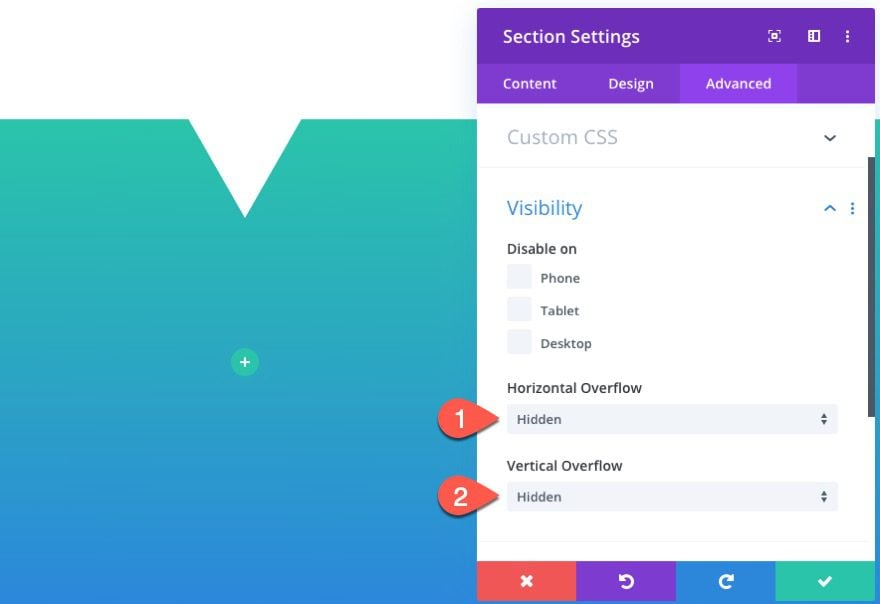
Then set the overflow to hidden so our scroll effects don’t become visible when moving outside of the section.
- Horizontal Overflow: Hidden
- Vertical Overflow: Hidden
Part 2: Creating the Slashing Text Effect
In this next part, we are going to create the slashing text effect. We are going to stack two rows on top of each other, each with a text module that holds the same text content. Then using a negative margin we will push the top text down, hiding the bottom half of the text. Then we will use a negative margin to push the bottom text up, hiding the top half of the text. Once done, we can move the top row/column using the scroll effect to create the illusion of the text being slashed.
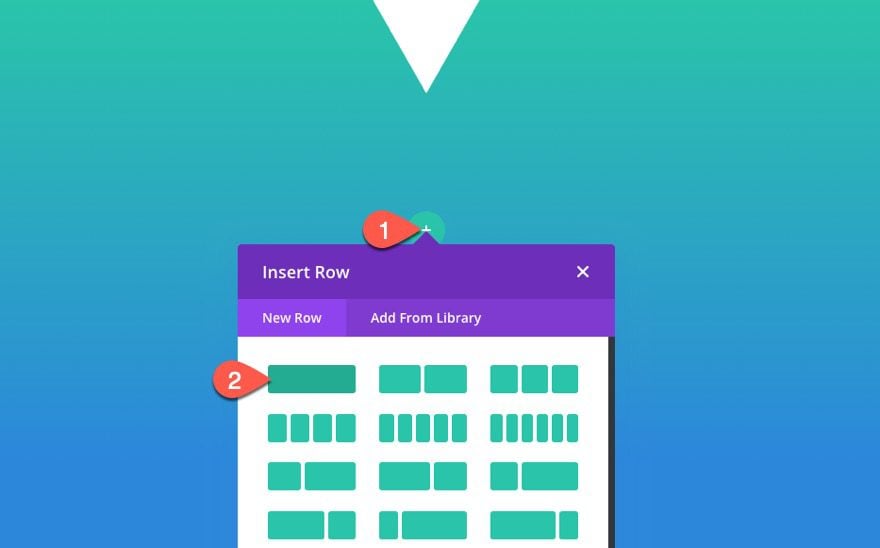
Add Row for Top Half of Text
First, let’s add a one-column row.
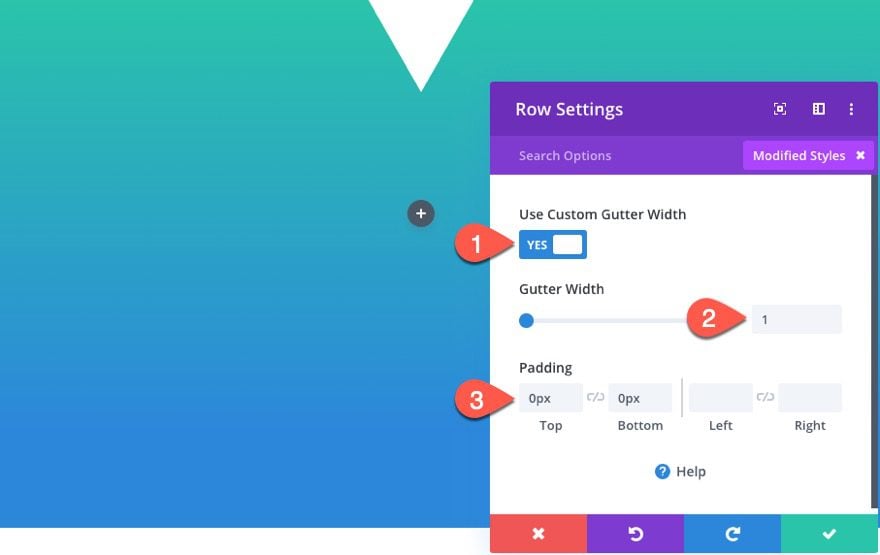
Then update the row settings as follows:
- Gutter Width: 1
- Padding: 0px top, 0px bottom
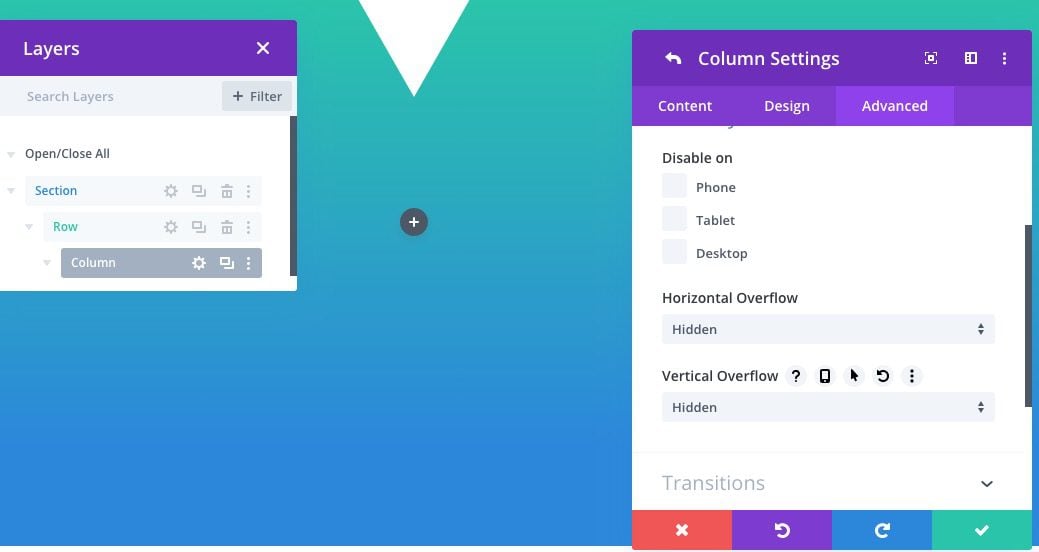
Next, open the column settings and update the overflow to hidden:
- Horizontal Overflow: Hidden
- Vertical Overflow: Hidden
Add Text Module
In the column add a new text module.
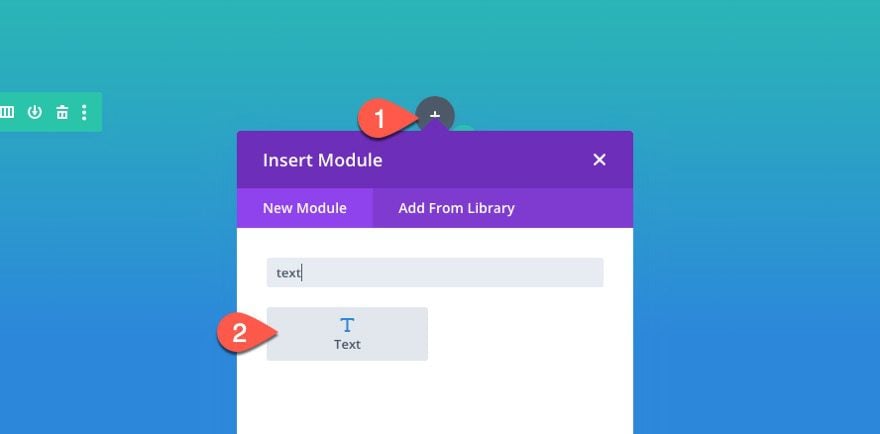
Text Content
In the content body area, add the word “Slash”.

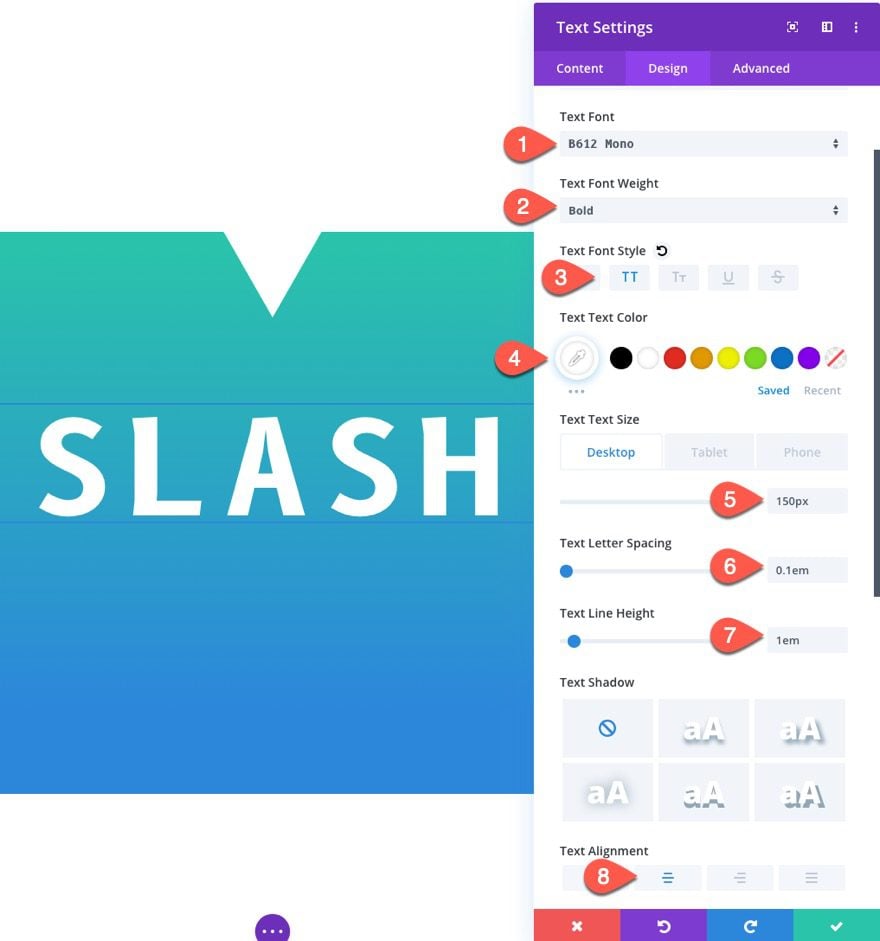
Text Design
Jump over to the design tab and update the text style as follows:
- Text Font: B612 Mono
- Text Font Weight: Bold
- Text Font Style: TT
- Text Text Color: #ffffff
- Text Text Size: 150px (desktop), 100px (tablet), 60px (phone)
- Text Letter Spacing: 0.1em
- Text Alignment: center
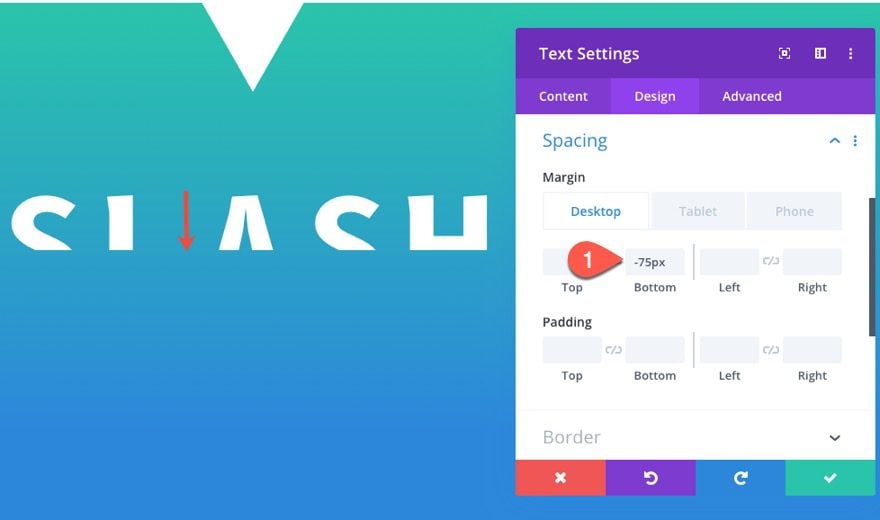
Text Margin
Here we need to make sure and add a bottom margin that is exactly half the size of the text.
- Margin: -75px bottom (desktop), -50px (tablet), -30px (phone)
Add Row for Bottom Half of Text
Duplicate Row
One the first row with the text is in place, duplicate the entire row to create the bottom row.

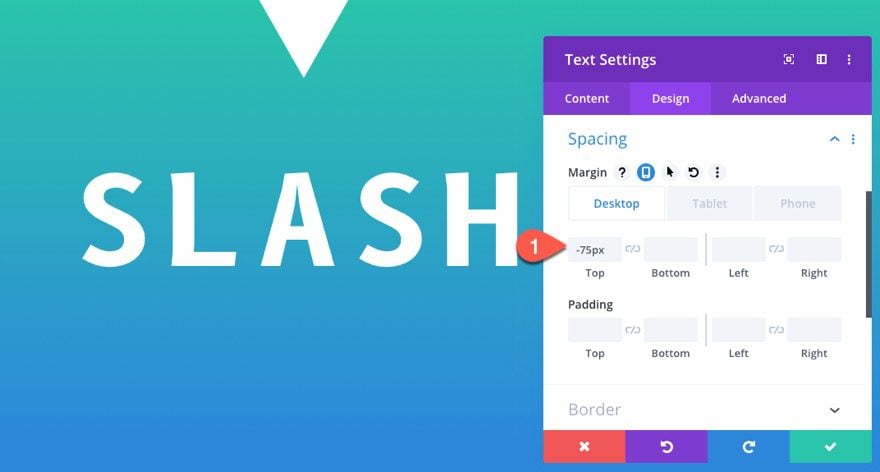
Update Text Module Margin
Then update the text module margin in the duplicate row with a negative top margin instead of a bottom margin to hide the top half of the text.
- Margin: -75px top (desktop), -50px top (tablet), -30px top (phone)
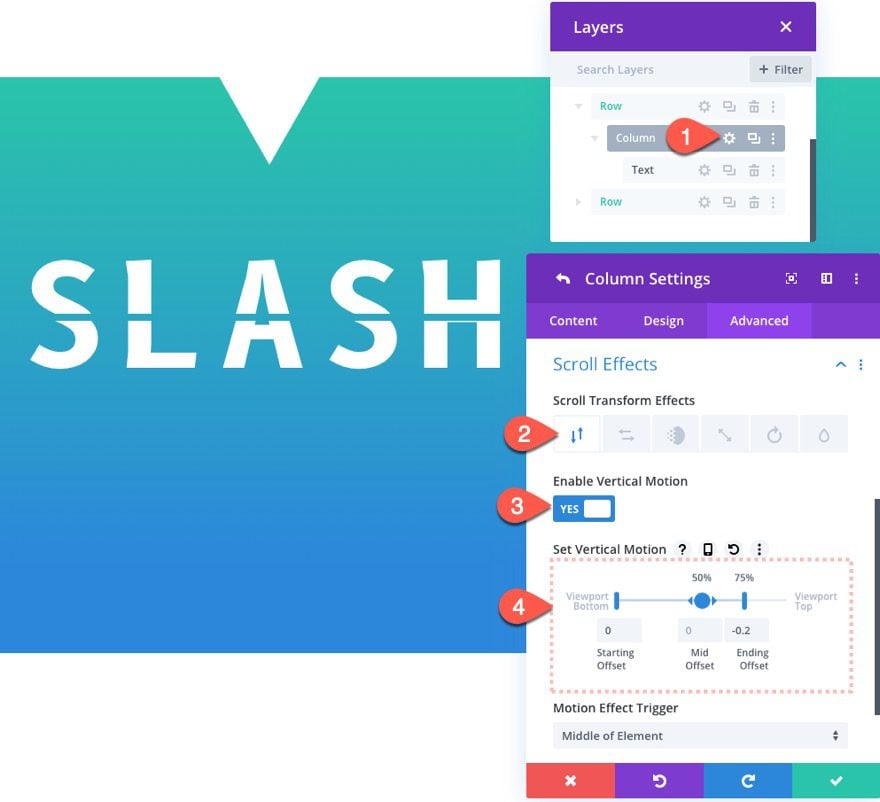
Add Scroll Effects to Top Row Column
Next, we are ready to add the scroll effect to the column in the top row. We can’t add the scroll effect to the text module because the text would become hidden due to the column’s overflow hidden value that hides the bottom portion of the text.
Open the column settings for the top row and update the following:
Under the vertical motion tab…
- Enable Vertical Motion: YES
- Starting Offset: 0 (at 0%)
- Mid Offset: 0 (at 50%)
- Ending Offset: -.02 (at 75%)
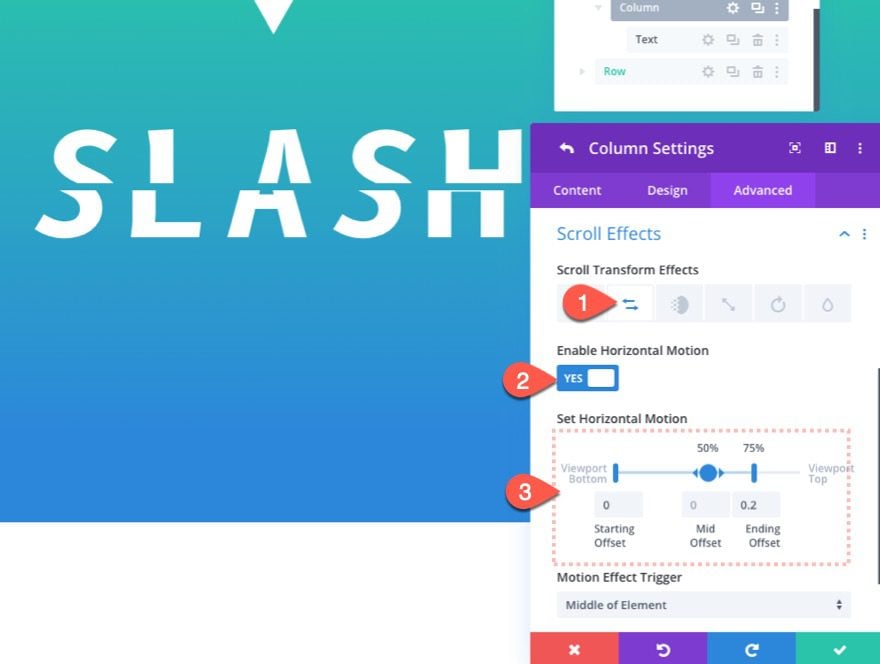
Under the Horizontal Motion tab…
- Enable Horizontal Motion: YES
- Starting Offset: 0 (at 0%)
- Mid Offset: 0 (at 50%)
- Ending Offset: 0.2 (at 75%)
Under the Rotation tab…
- Enable Rotating: YES
- Starting Rotation: 0 (at 0%)
- Mid Rotation: 0 (at 50%)
- Ending Rotation: 1deg (at 75%)
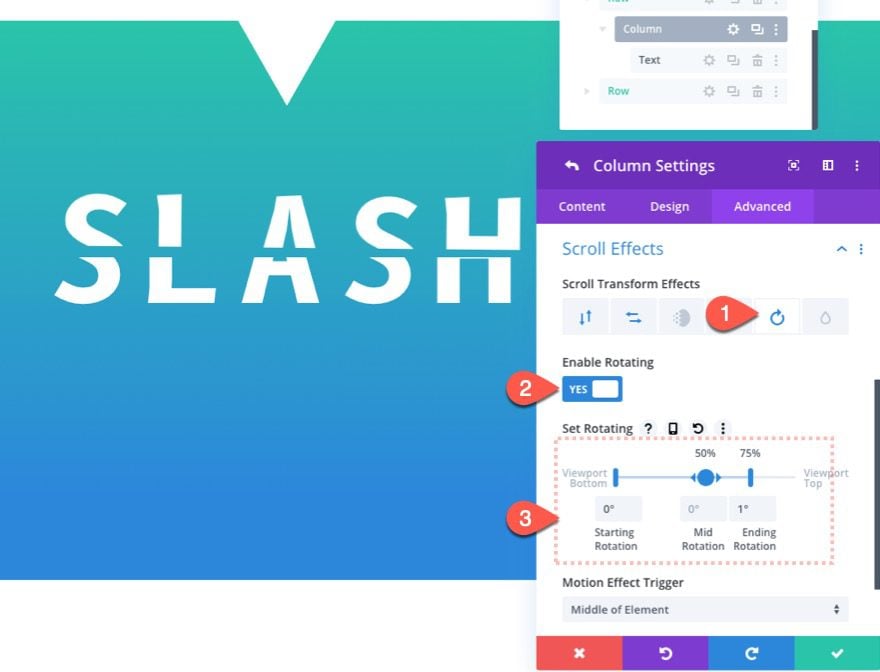
Now our slashing text effect is complete!
Part 3: Creating the Moving Divider
With our slashing text effect complete, we can add an additional fun element – a small flying divider that slashes through the text! To create this, we are going to use a divider module that moves across the page center of the section in the exact place the text module divide.
Here’s how to do it.
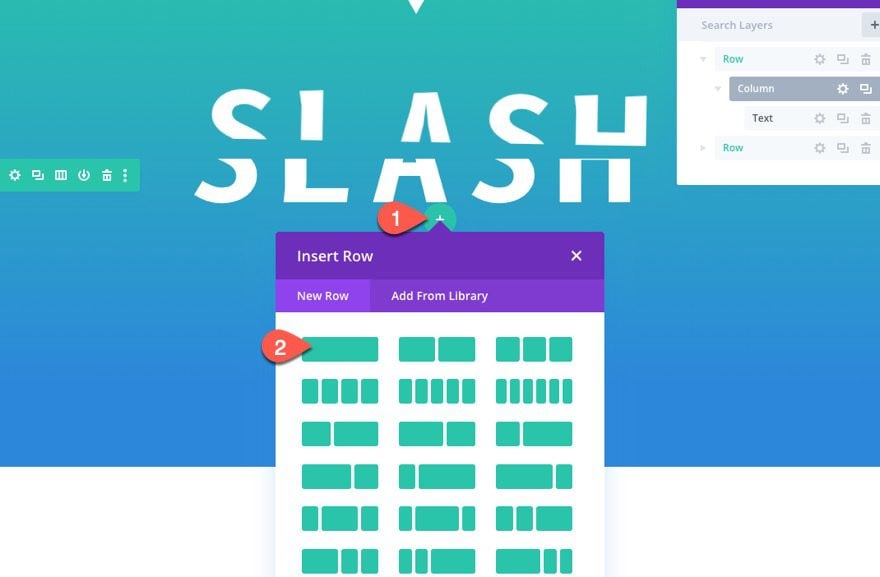
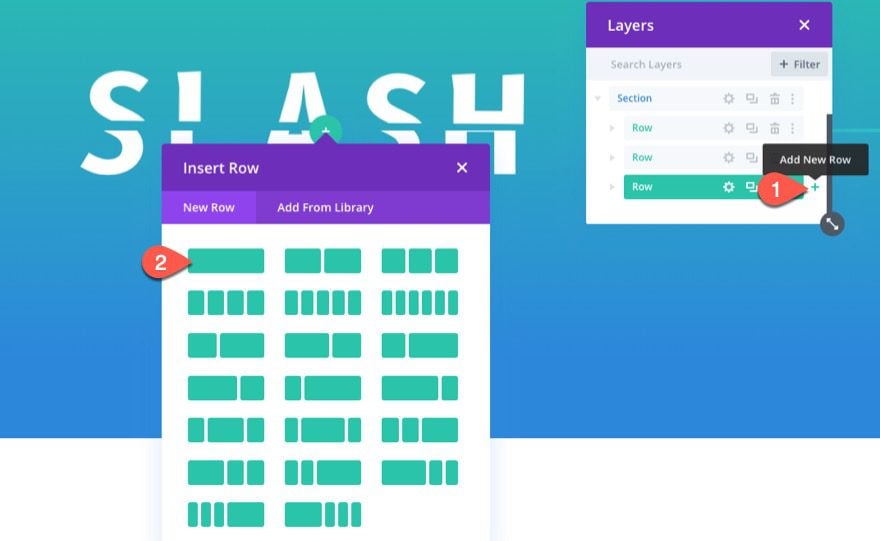
Add Row
Add a one-column row under the second row.
Add Divider Module
In the column, add a new divider module.
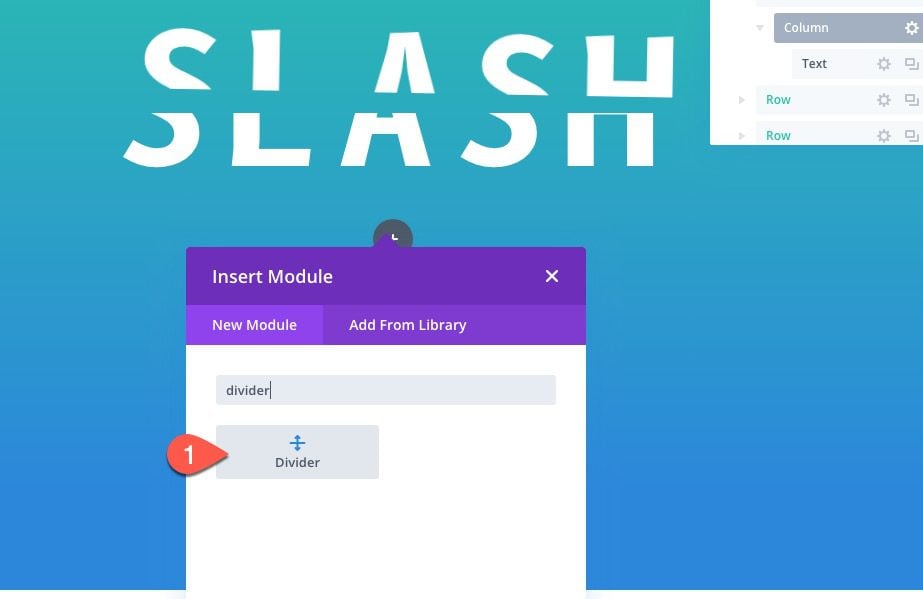
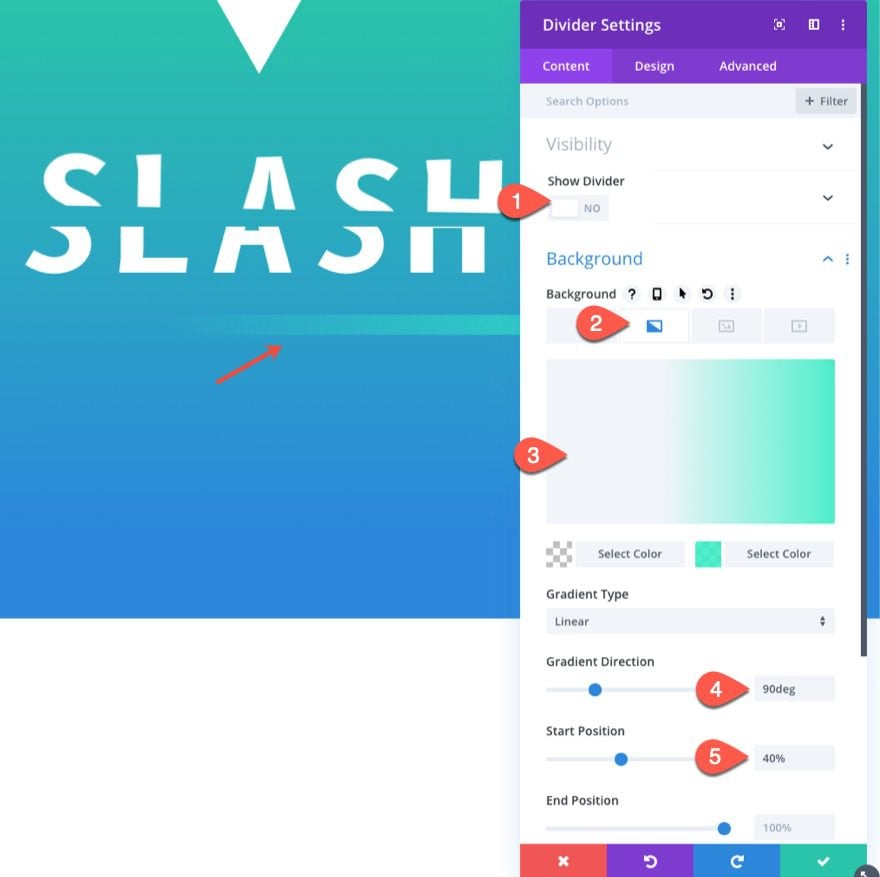
Divider Background
Then select NOT to show the divider. Instead, give the divider a background color as follows:
- Background Gradient Left Color: transparent
- Background Gradient Right Color: #29c4a9
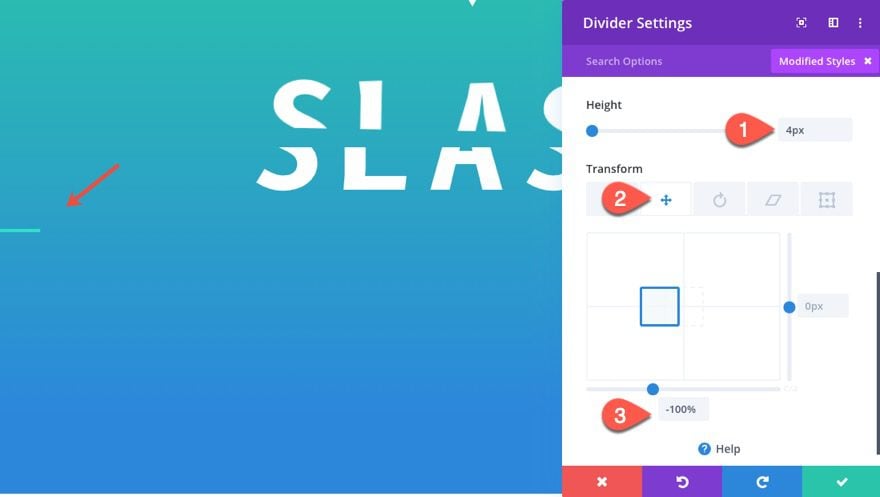
Transform Scale
Then update the height and move it to the left using the transform translate option.
- Height: 4px
- Transform Translate X Axis: -100%
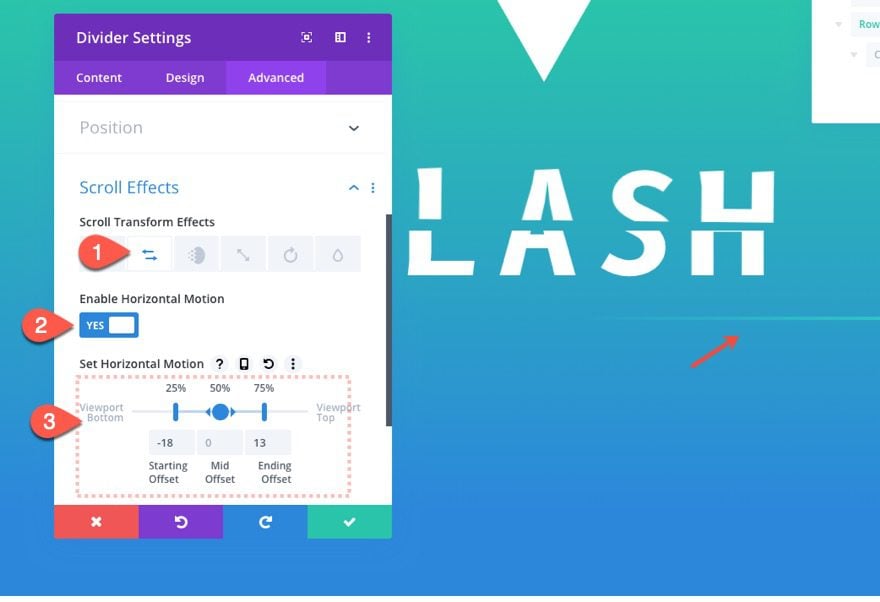
Scroll Effect
Now add the scroll effect to move the divider to the right.
Under the horizontal motion tab…
- Enable Horizontal Motion: YES
- Starting Offset: -18 (at 25%)
- Mid Offset: 0 (at 50%)
- Ending Offset: 13 (at 75%)
Row Settings
To make sure the divider “slashes” through the center of the text, we need to update the row settings as follows:
- Width: 100%
- Max Width: 100%
- Padding: 0px top, 0px bottom
- Position: Absolute
- Location: left center
- Z Index: 9
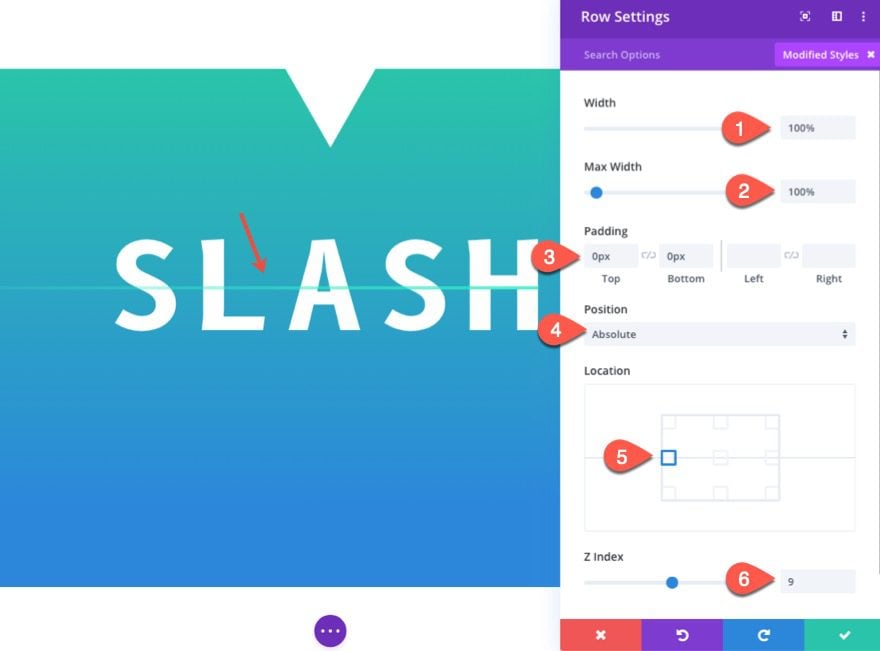
Now the divider will travel from left to right slashing through the middle of the text.
Part 4: Adding the Body Text
For this last part, we are going to add a block of text to complete the layout.
Add Row
Add a new one-column row under the row with the divider.
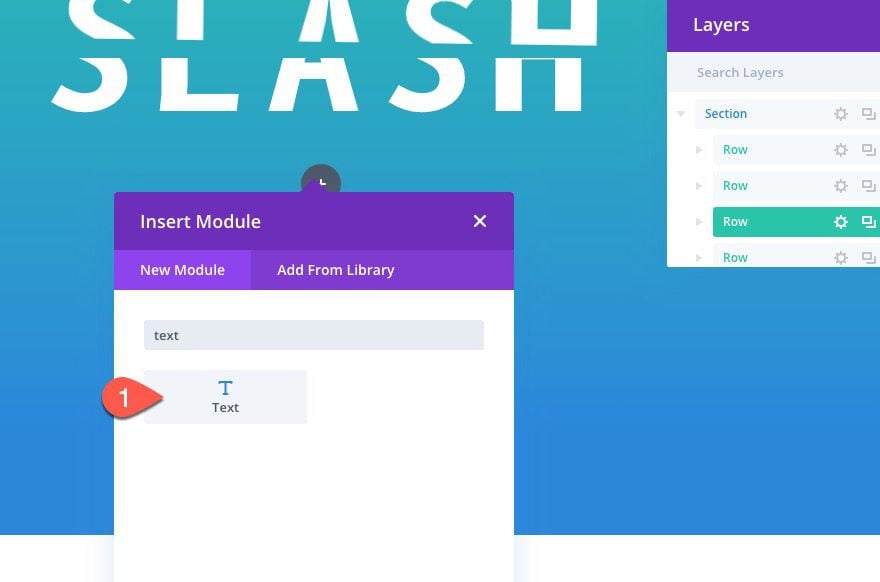
Add Text Module
Then add a new text module to the row.
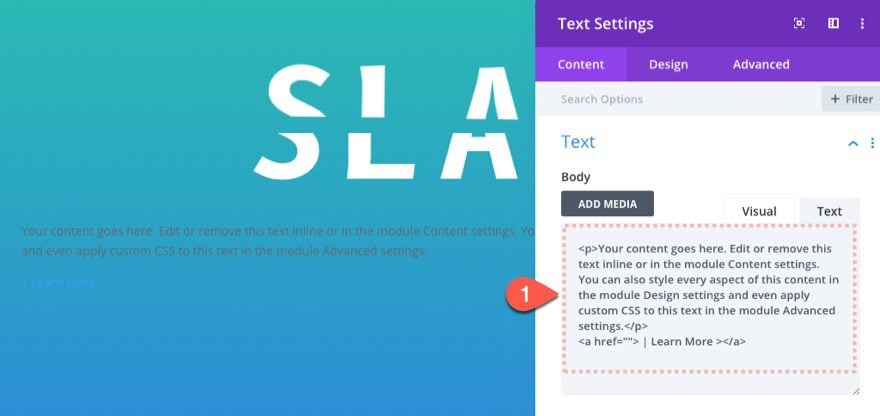
Text Content
Then paste in the following HTML to the body area:
<p>Your content goes here. Edit or remove this text inline or in the module Content settings. You can also style every aspect of this content in the module Design settings and even apply custom CSS to this text in the module Advanced settings.</p>
<a href=""> | Learn More ></a>
Text Design
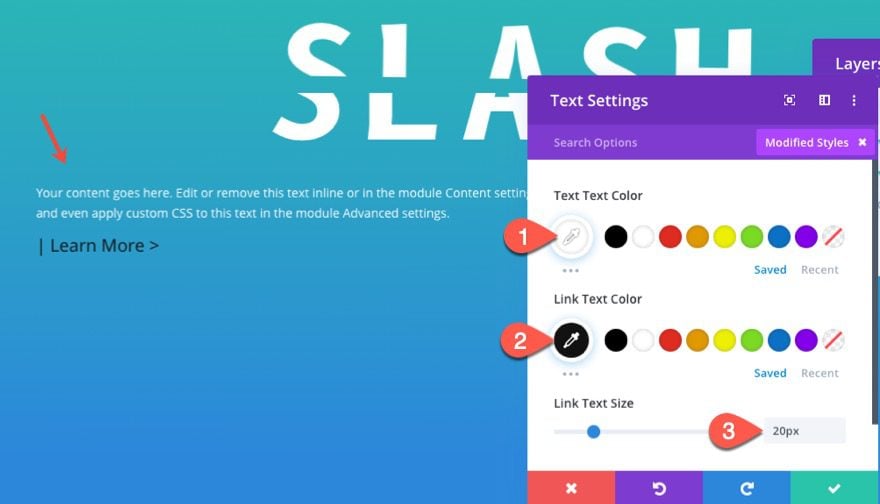
Under the design tab, update the following:
- Text Text Color: #ffffff
- Link Text Color: #121212
- Link Text Size: 20px
Row Settings
Open the settings for the parent row and update the following:
- Gutter Width: 1
- Max Width: 400px
- Position: Absolute
- Location: bottom center
- Vertical Offset: 20px (desktop and tablet), -25px (phone)

Final Result
Here is the final result.
Final Thoughts
For this design, it’s important to keep the text on one line on all devices so you are limited to the amount of text that will be slashed. But, this slashing scroll effect technique can be applied to more than just text. You can easily slash through images as well!
I look forward to hearing from you in the comments.
Cheers!


Hello,
I cannot import the file JSON
Very Excellent Article About Scrolling Effect
Very informative! I’ll give it a try!
awesome information sir thanks for sharing
Very informative article. I haven’t tried the Slashing Text Scroll Effect till now. Think i should give it a try
Awesome and informative article about the text scroll effect in DIVI. I will try this is on my project. Thanks for sharing this information with us.
Wrong JSON file uploaded by ET. Please upload the relevant JSON file.
Thanks for such a creative design.
Sorry, Zahid. I updated the JSON file download. Thanks for letting us know.
Very informative Blog to learn about DIVI. Thank you so much
You’re welcome, Naveed.
Coolest divi effect ever.
Awesome!
I don’t know more about DIVI, but it’s really easier, I will go for it