
Adding a frosted glass background for your website can be a fresh design element that makes your backgrounds and text stand out in a unique way. The trick to creating a frosted glass background effect is to blur the background behind the target element. In other words, we want to blend two elements in such a way that the target background looks like frosted glass that reveals a blurry version of the background behind the element.
In this tutorial, we are going to show you three methods for creating a frosted glass background design in Divi. First, we’ll introduce the powerful backdrop-filter CSS property that will create frosted backgrounds with a single line of CSS. Then we’ll show you two other methods that involve layering Divi elements (with background styles and filters) to create beautiful frosted background designs.
Let’s get started!
Sneak Peek
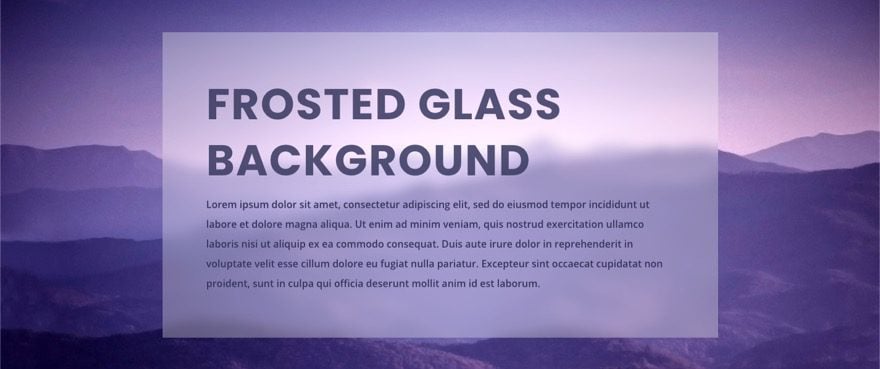
Here is a quick look at the design we’ll build in this tutorial.
Download the Layout for FREE
To lay your hands on the designs from this tutorial, you will first need to download them using the button below. To gain access to the download you will need to subscribe to our newsletter by using the form below. As a new subscriber, you will receive even more Divi goodness and a free Divi Layout pack every Monday! If you’re already on the list, simply enter your email address below and click download. You will not be “resubscribed” or receive extra emails.

Subscribe To Our Youtube Channel
To import the section layout to your Divi Library, navigate to the Divi Library.
Click the Import button.
In the portability popup, select the import tab and choose the download file from your computer.
Then click the import button.

Once done, the section layout will be available in the Divi Builder.
Let’s get to the tutorial, shall we?
What You Need to Get Started

To get started, you will need to do the following:
- If you haven’t yet, install and activate the Divi Theme.
- Create a new page in WordPress and use the Divi Builder to edit the page on the front end (visual builder).
- Choose the option “Build From Scratch”.
After that, you will have a blank canvas to start designing in Divi.
How to Create Frosted Glass Background Designs in Divi
Method 1: Creating a Frosted Glass Background Using the Backdrop-Filter CSS Property`
In this first example, we’ll demonstrate the easiest method for creating a frosted Glass Background design using the backdrop-filter CSS property. It’s easy because we only need a line of CSS to get the result we want. The downside is that currently there are a few browsers that don’t support backdrop-filter (IE and Firefox).
The goal of the frosted background design is not simply to blur the background of the target element but to blur the background behind the element. The backdrop-filter property can do this by applying a blur filter effect to the element below(or behind) the target element.
Here’s how to do it.
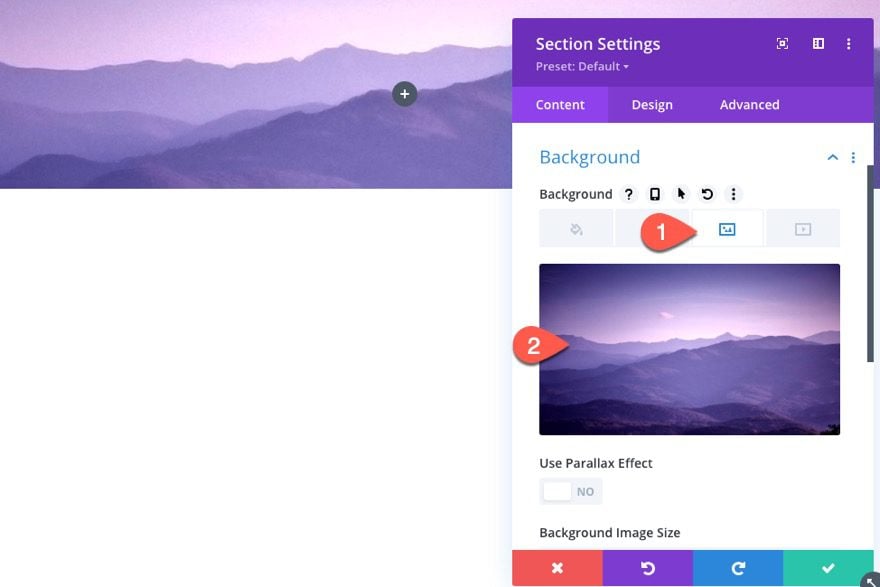
Adding the Section Background Image
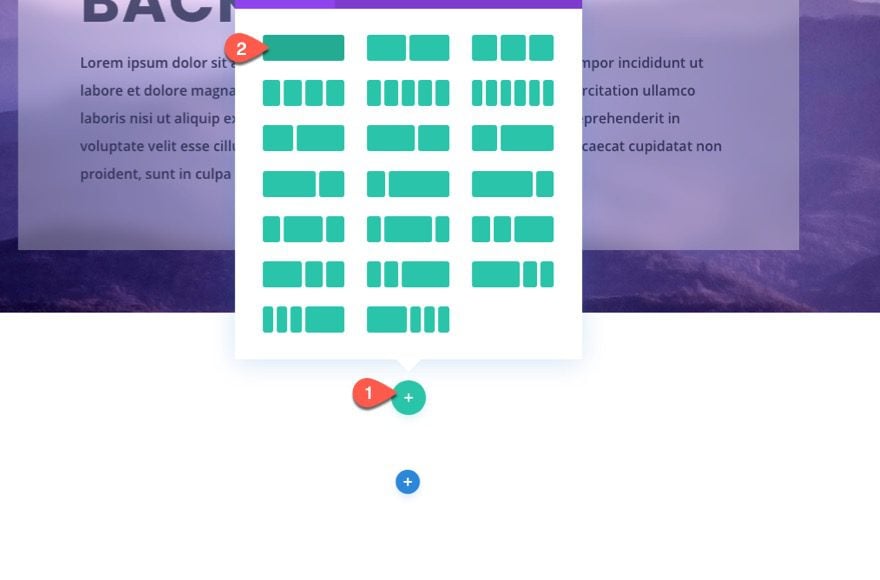
First, add a one-column row to the section.
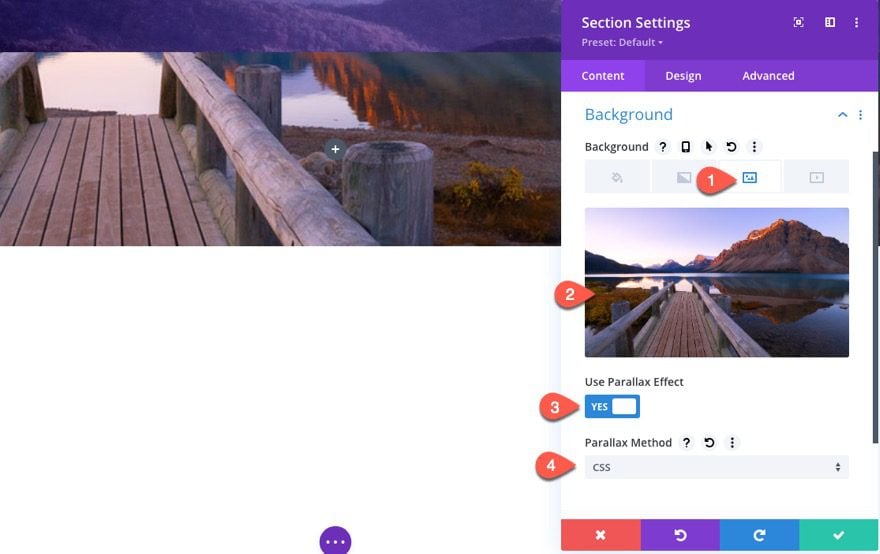
Open the section settings and give it a background image.
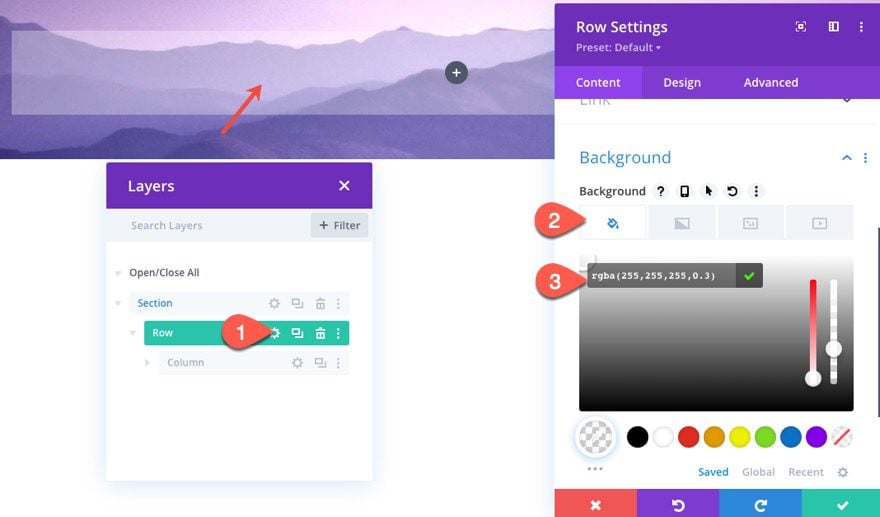
Adding the Row Background Color and Backdrop-filter
Next, open the row settings and add a semi-transparent white background color as follows:
- Background Color: rgba(255,255,255,0.3)
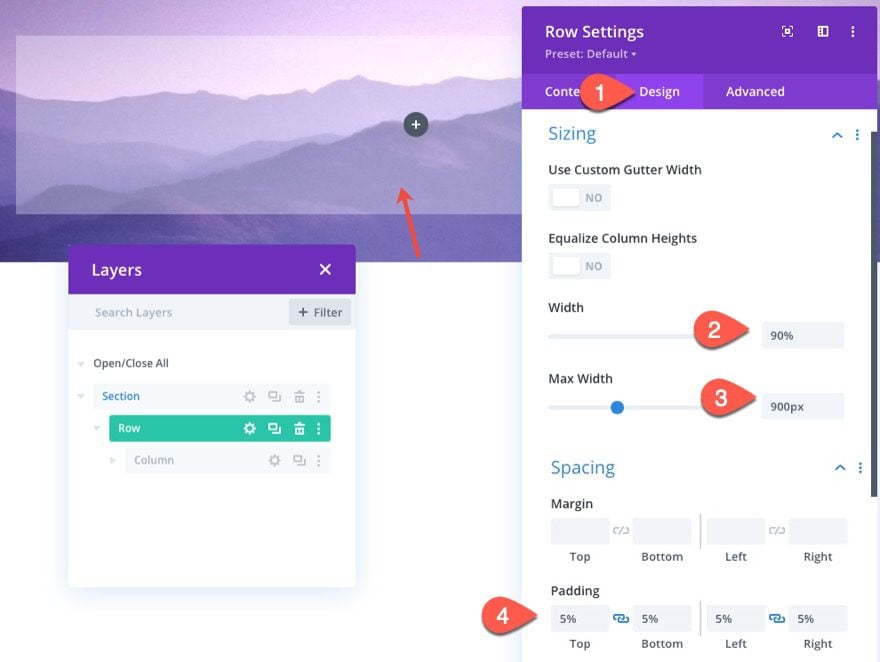
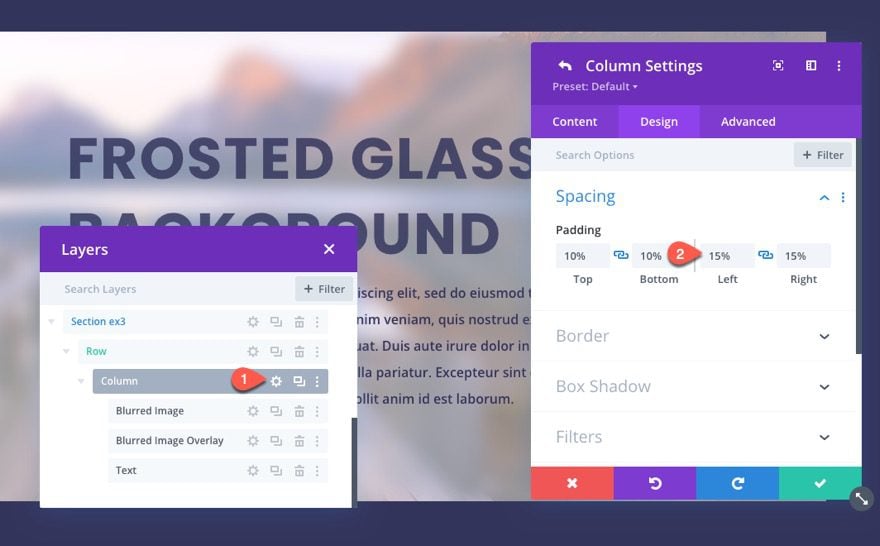
Under the design tab, update the size and spacing of the row as follows:
- Width: 90%
- Max Width: 900px
- Padding: 5% top, 5% bottom, 5% left, 5% right
Under the advanced tab, add the following CSS to the main element:
-webkit-backdrop-filter: blur(10px);
backdrop-filter: blur(10px);
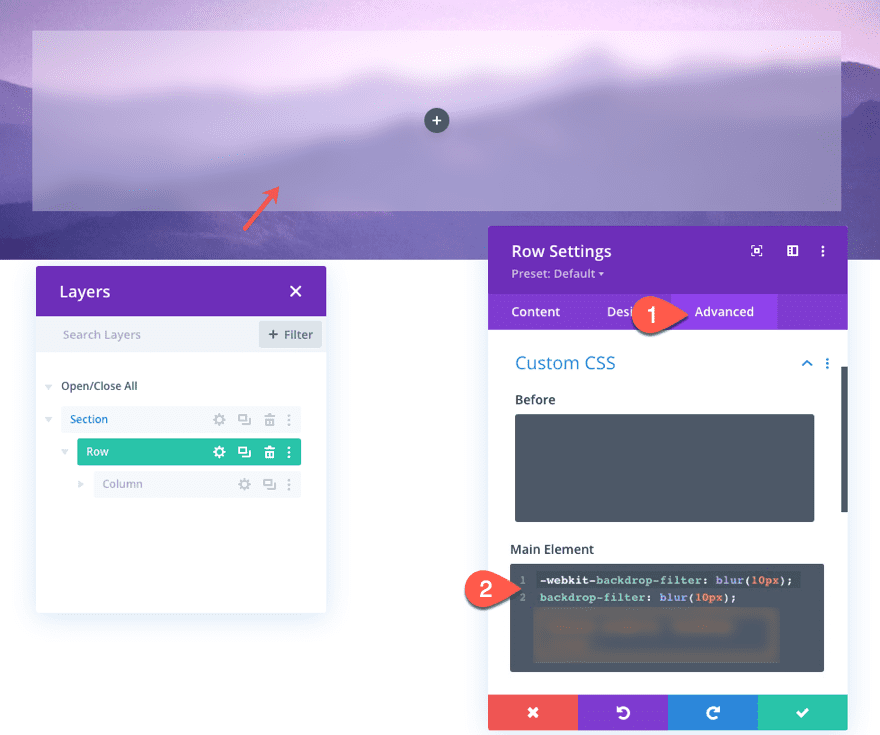
This will add a 10px blur filter to the backdrop of the element. Notice how the section background image is blurred by the effect even though the CSS is applied to the row. You can increase or decrease the amount of blur by changing the pixel value in the CSS.
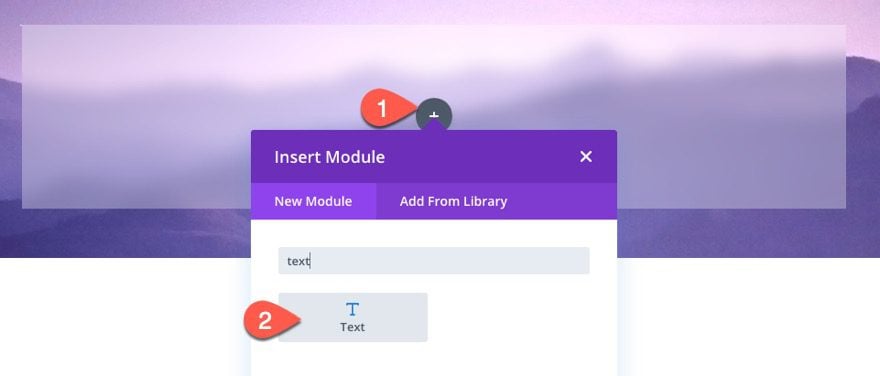
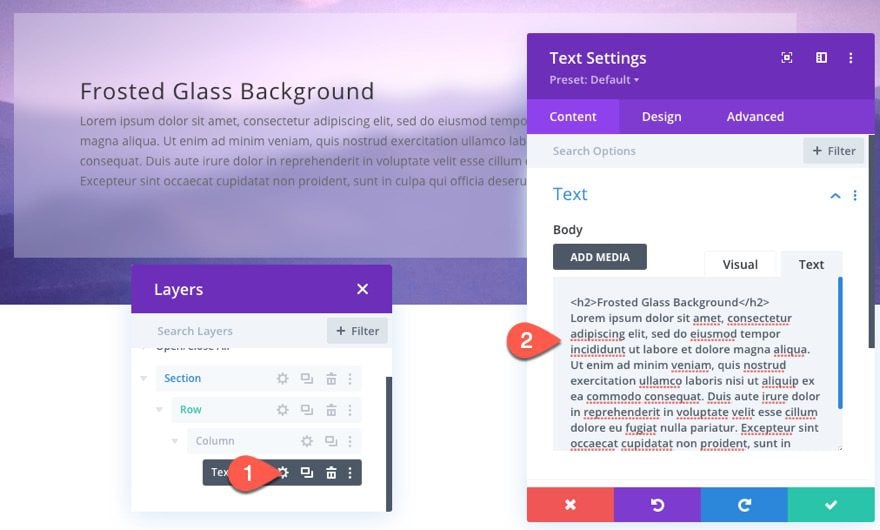
Adding Content with a Text Module
To provide some content for our frosted background, add a text module to the column of the row.
Then paste the following HTML to the body under the text tab:
<h2>Frosted Glass Background</h2>
<p>Lorem ipsum dolor sit amet, consectetur adipiscing elit, sed do eiusmod tempor incididunt ut labore et dolore magna aliqua. Ut enim ad minim veniam, quis nostrud exercitation ullamco laboris nisi ut aliquip ex ea commodo consequat. Duis aute irure dolor in reprehenderit in voluptate velit esse cillum dolore eu fugiat nulla pariatur. Excepteur sint occaecat cupidatat non proident, sunt in culpa qui officia deserunt mollit anim id est laborum.</p>
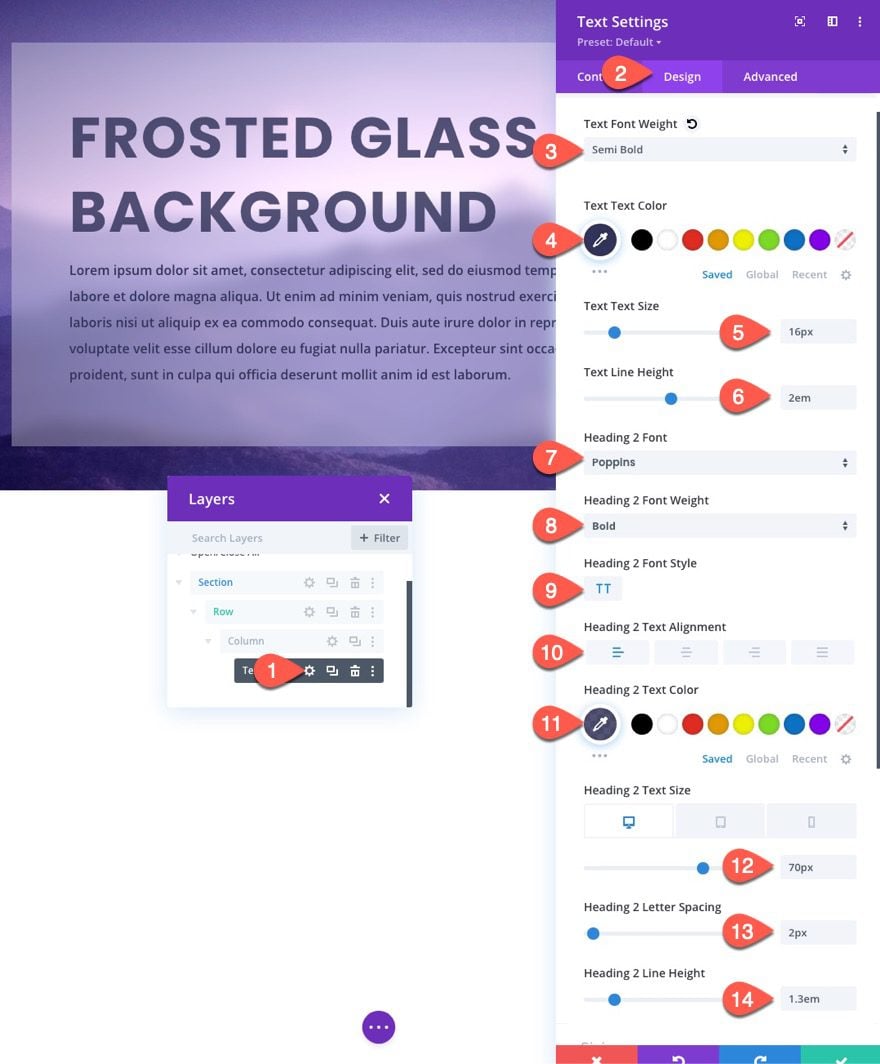
To polish off the design, let’s update the text styles as follows:
- Text Font Weight: Semi Bold
- Text Text Color: #33345b
- Text Text Size: 16px
- Text Line Height: 2em
- Heading 2 Font: Poppins
- Heading 2 Font Weight: Bold
- Heading 2 Font Style: TT
- Heading 2 Text Alignment: Left
- Heading 2 Text Color: #33345b
- Heading 2 Text Size: 70px (desktop), 40px (tablet), 25px (phone)
- Heading 2 Letter Spacing: 2px
- Heading 2 Line Height: 1.3em
Result
Here’s the final result. Told you that would be easy!
Method 2: Creating a Frosted Glass Background Using Parallax and Layered Modules
For this next method, we are going to get a little creative with how we create the frosted glass background effect in Divi. Although this is not as easy to create, the plus side is that the design is supported on all browsers. So, if you are looking for a trustworthy fallback for backdrop-filter, this should work.
Here’s how to do it.
Adding Section with Parallax Background Image
First, create a new regular section under the one we just created.
Then add a one-column row to the section.
Give the section a background image with a Parallax effect using the CSS method:
- Use Parallax Effect: YES
- Parallax Method: CSS
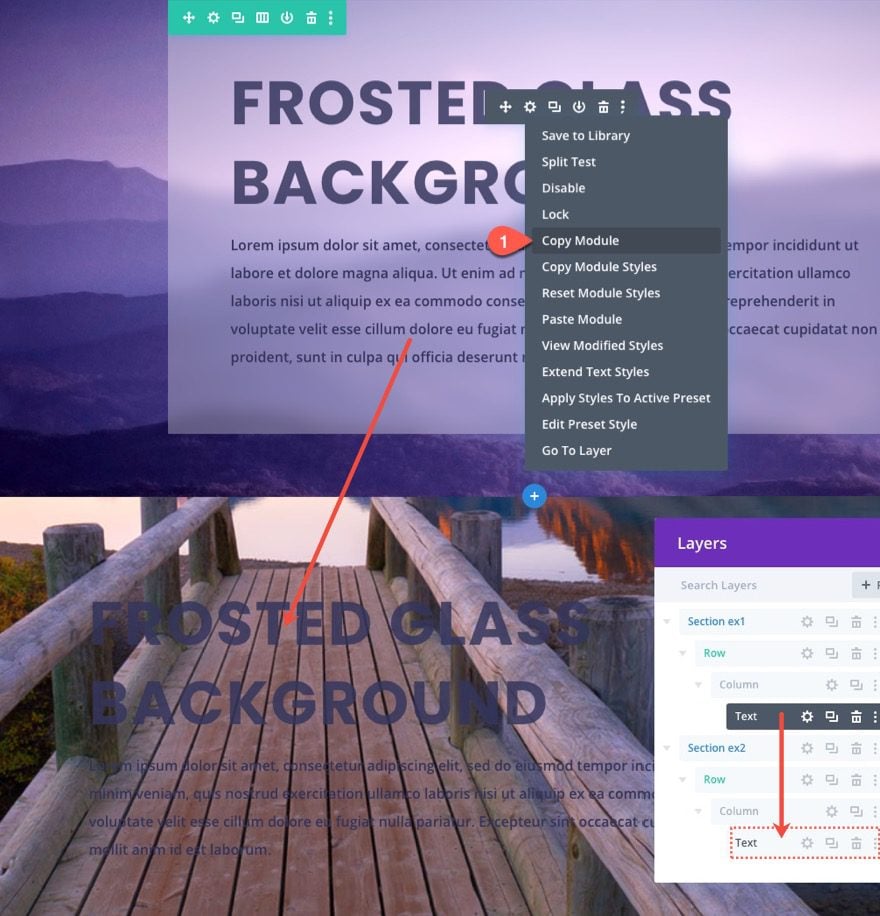
Adding Same Content as Previous Text Module
Next, copy the text module from the first section/example above and paste it into the row of the new section.
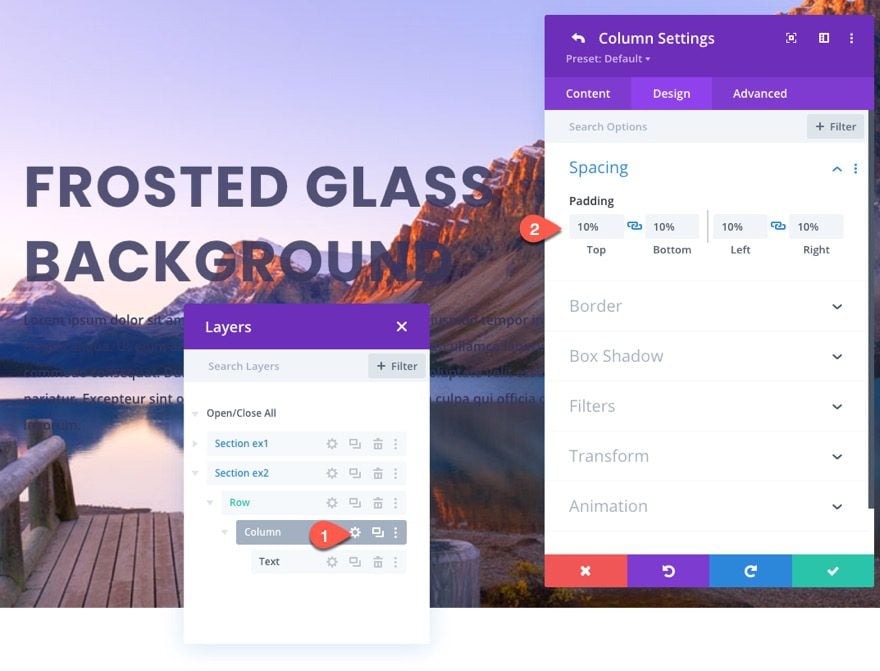
Column Settings
Next, open the settings for the column containing our duplicate text module and update the padding as follows:
- Padding: 10% top, 10% bottom, 10% left, 10% right
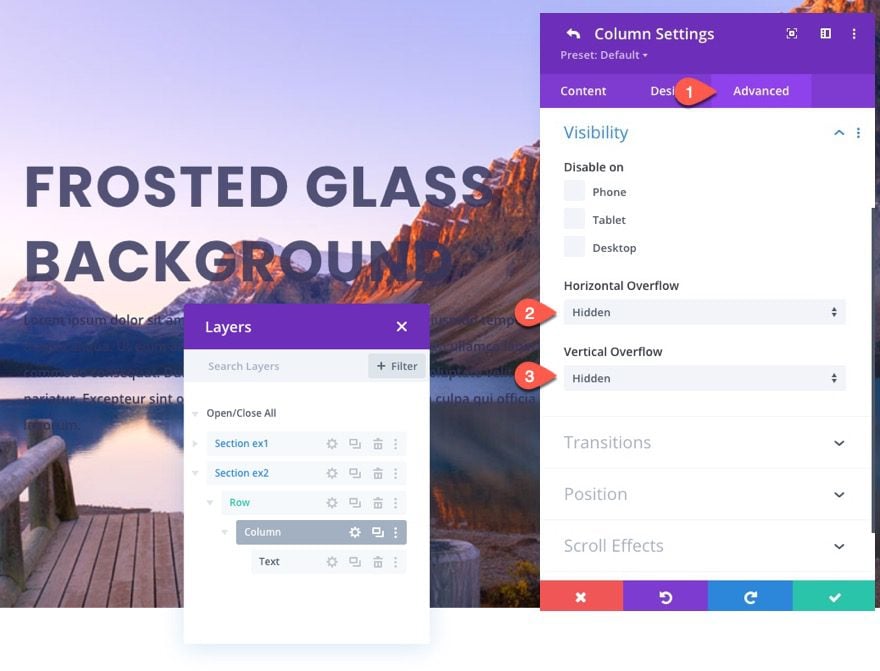
Under the Advanced tab, update the overflow visibility as follows:
- Horizontal Overflow: Hidden
- Vertical Overflow: Hidden
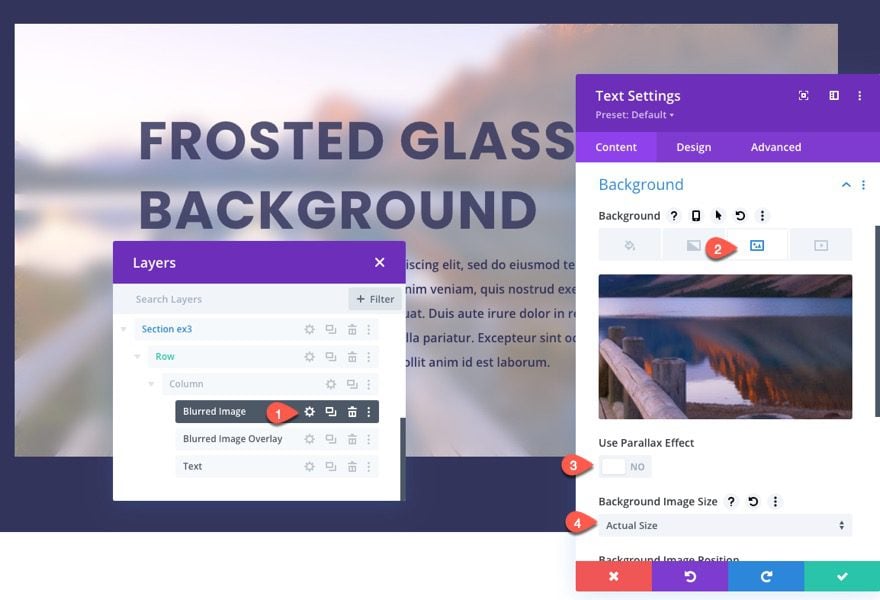
Add Blurred Background Image Layer with a Text Module
Now that we have our content and section background parallax image in place, we need to add our first of two text modules (or layers) that will make up the frosted background behind our content.
First, we will add a text module that will serve as a blurred image layer.
Go ahead and add a new text module under the existing text module.
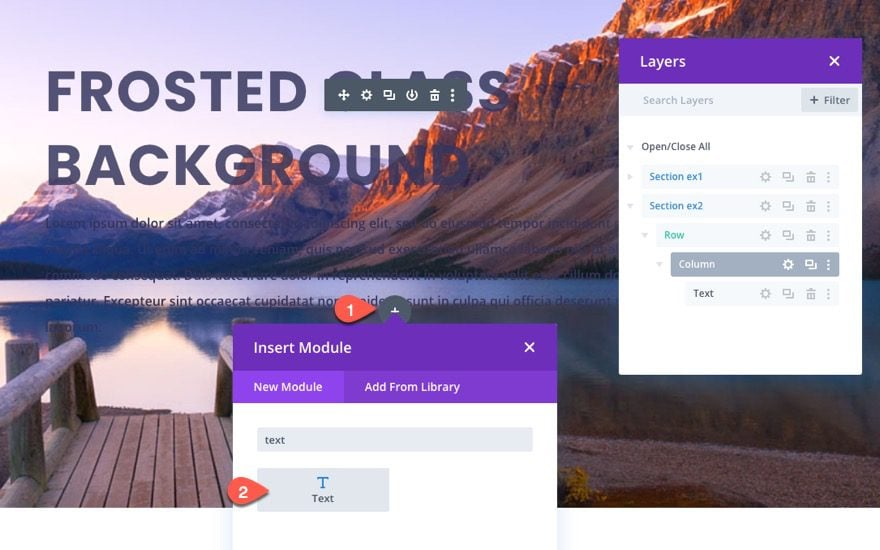
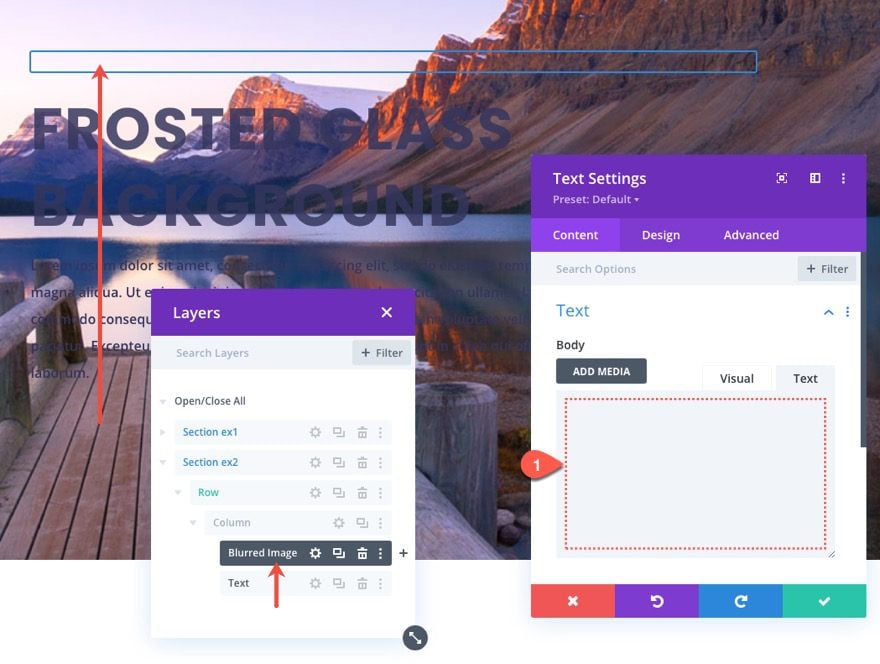
Move the text module above the text module containing the text content.
Then take out the body content so that it remains empty. We are only going to need this module for a background image.
Next, add the same background image to the text module using the same CSS parallax effect:
- Use Parallax Effect: YES
- Parallax Method: CSS
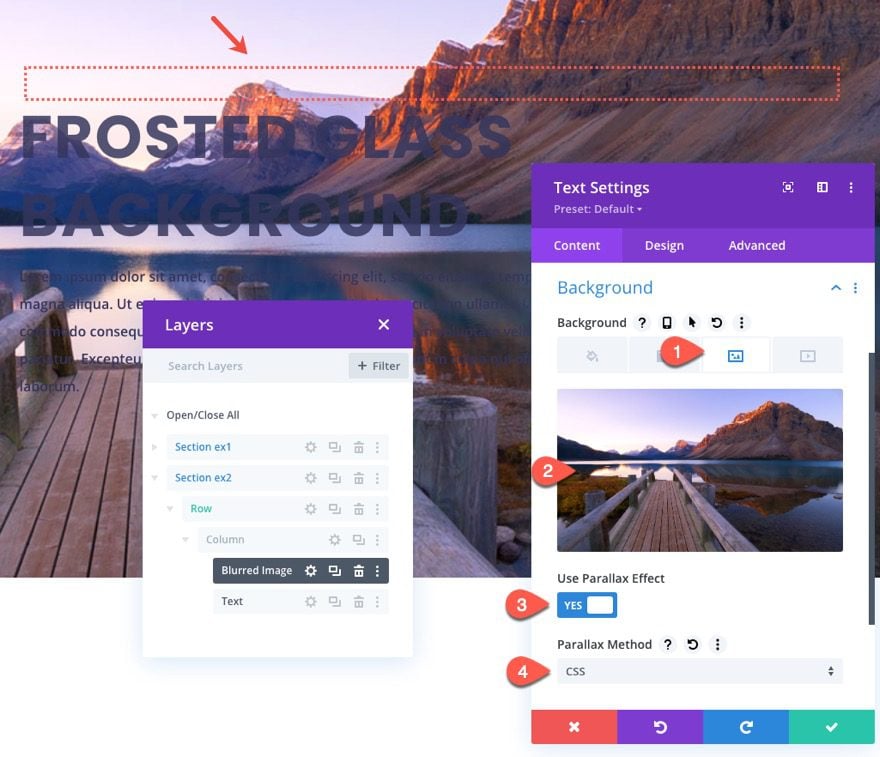
Because we are using the same CSS parallax effect on the background image, you won’t notice the image background because it shows the same image in the same fixed position of the section background.
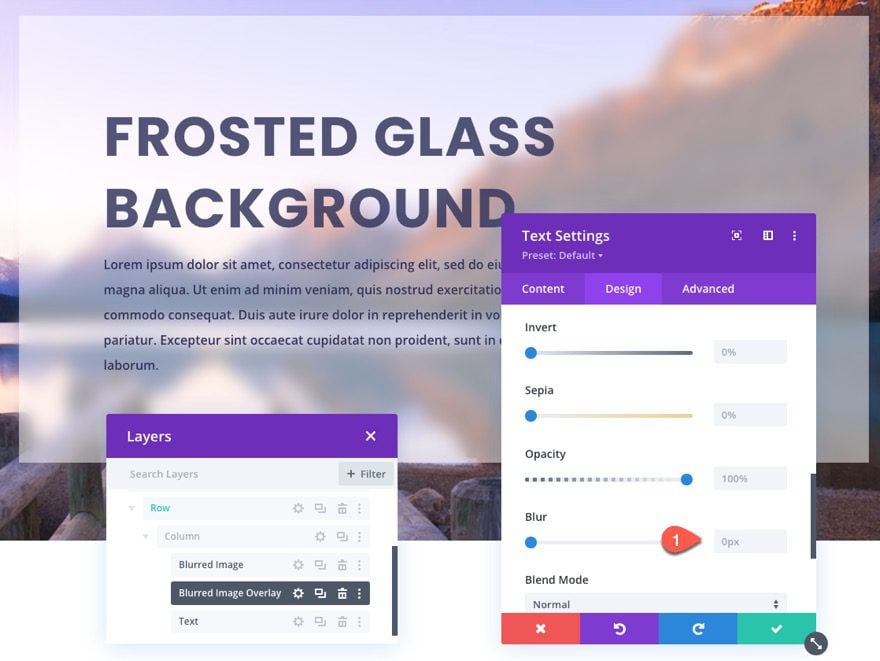
Under the design tab, add the following filter to the text module:
- Blur: 10px
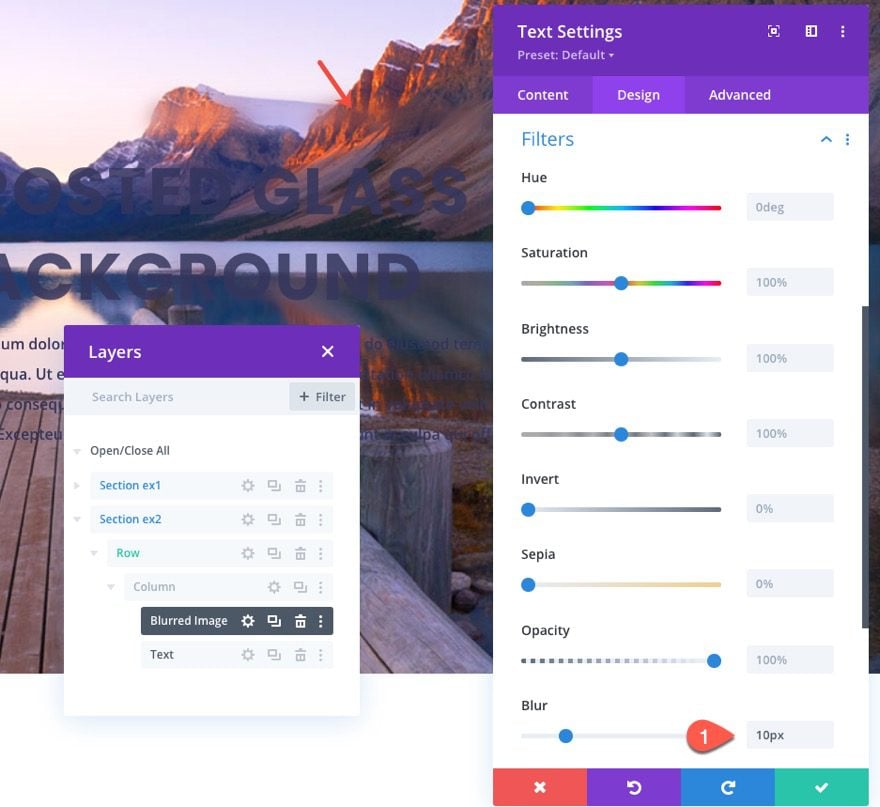
Now we have a blurred version of the parallax background image.
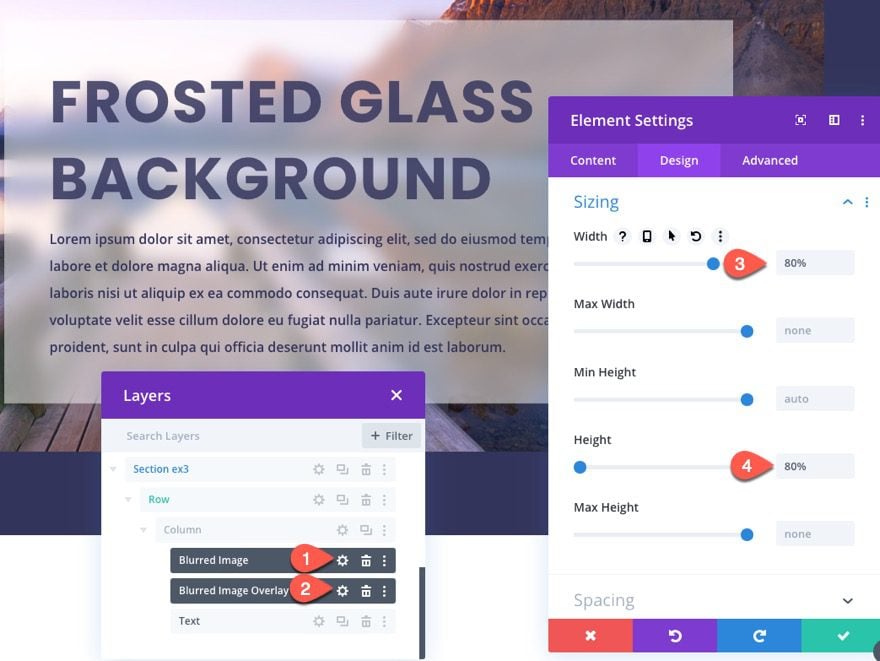
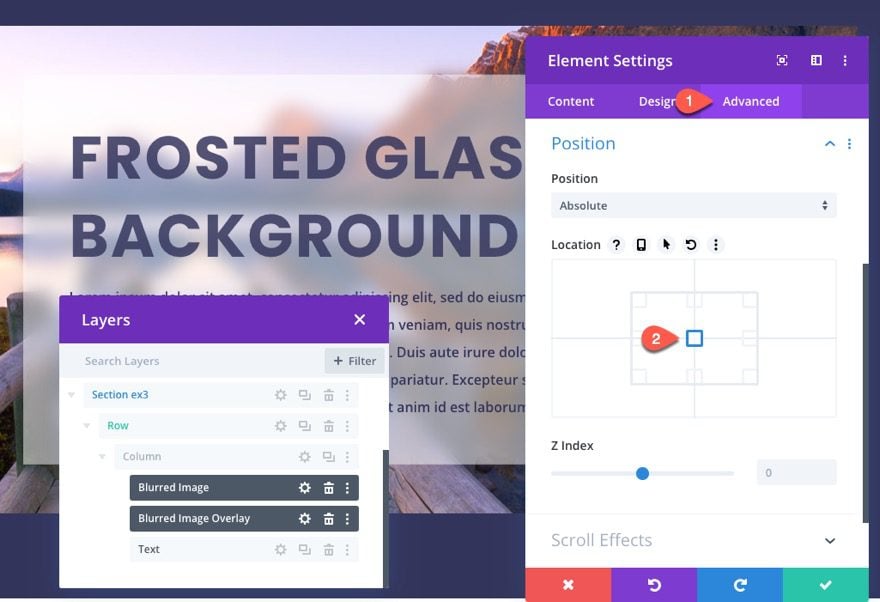
Next, give the text module an absolute position:
- Position: Absolute
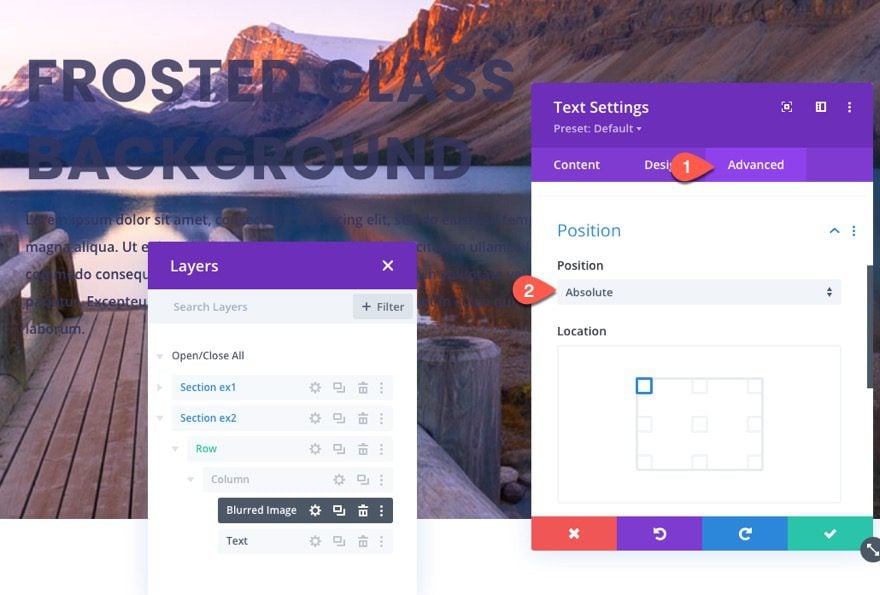
Now that the module is in an absolute position, we can update the size styling so that the module spans the full width and height of the column.
- Width: 100%
- Height: 100%
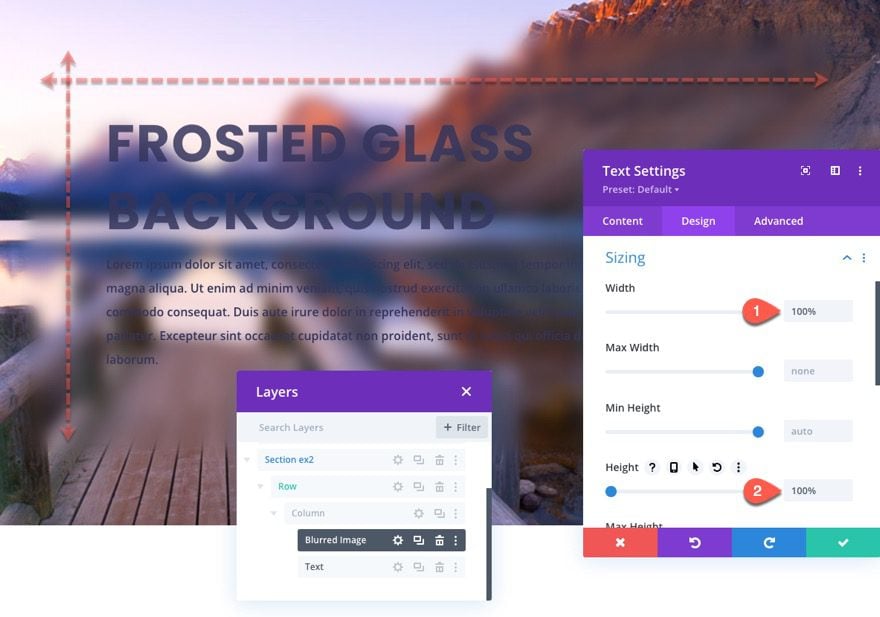
Now the blurred image is in place and we can see the frosted glass effect coming into effect.
Adding the Blurred Image Overlay with Another Text Module
The next step is to add another text module on top of the blurred image text module to serve as a light overlay to complete the design.
To create the overlay, duplicate the blurred image text module.
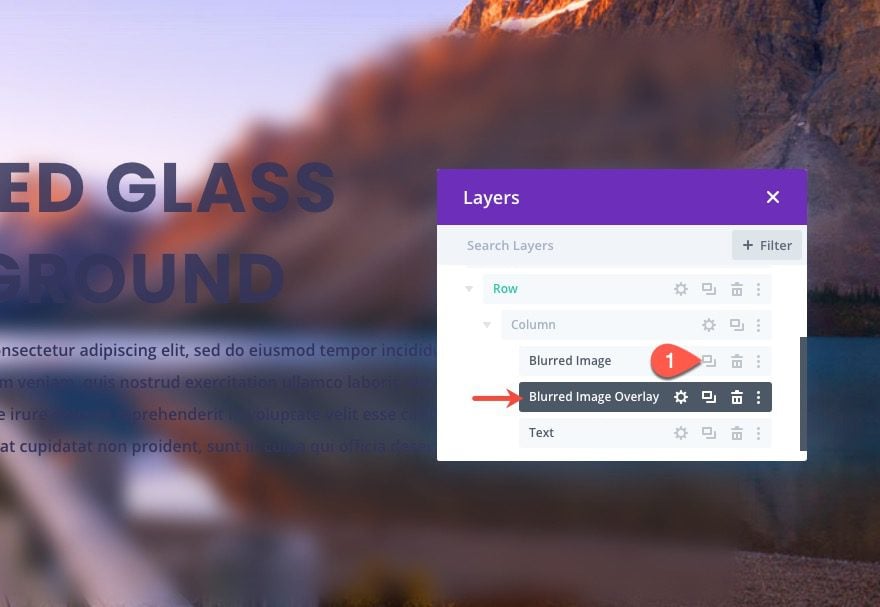
Open the settings for the duplicate text module and delete the background image.
Then add the following background color:
- Background Color: rgba(255,255,255,0.5)

Under the design tab, bring the blur filter back to 0px.
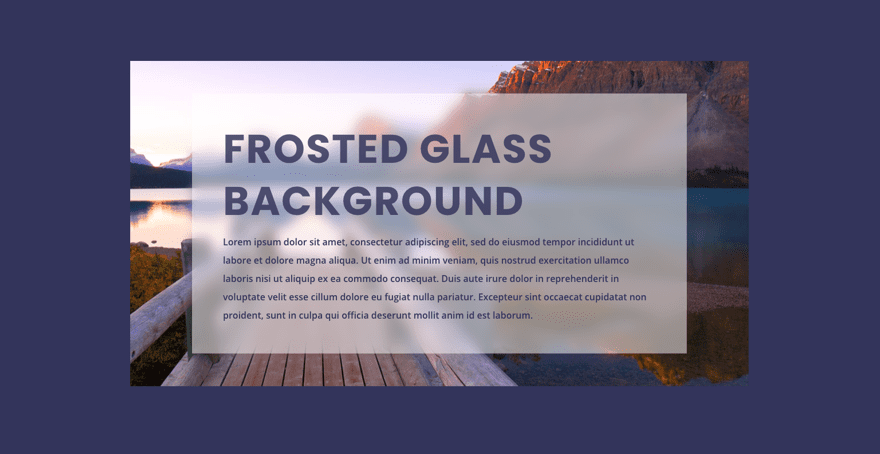
Now check out the final result.
Method 3: Creating a Frosted Glass Background Using Actual Image Sizes and Layered Modules
The parallax effect with the frosted background is cool, but you may not want to be limited to the parallax effect to created frosted backgrounds. The same effect can be done using background images in their actual size.
For this final method, we are going to create frosted background designs at the column level using images in their actual size. The process is similar to method 2 above. The advantage is that you can use this method to create frosted backgrounds on multiple columns of a Divi row.
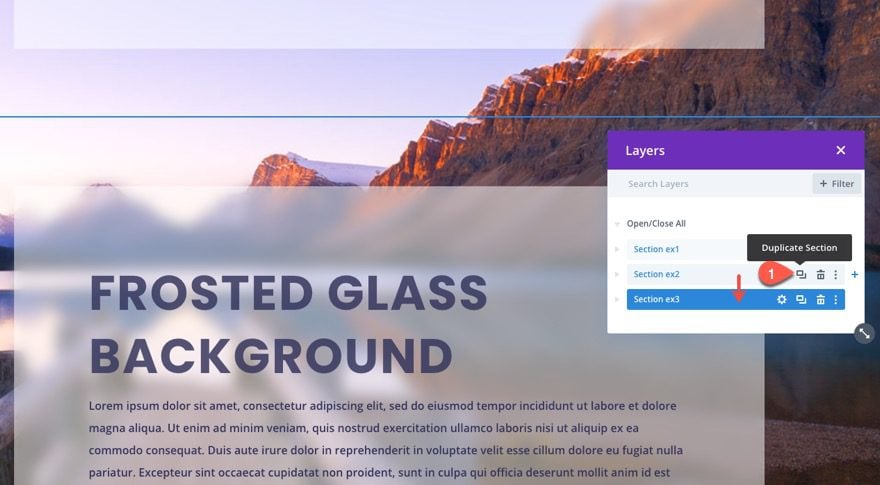
Duplicate Previous Section
To jumpstart the design, duplicate the second section containing our second example.
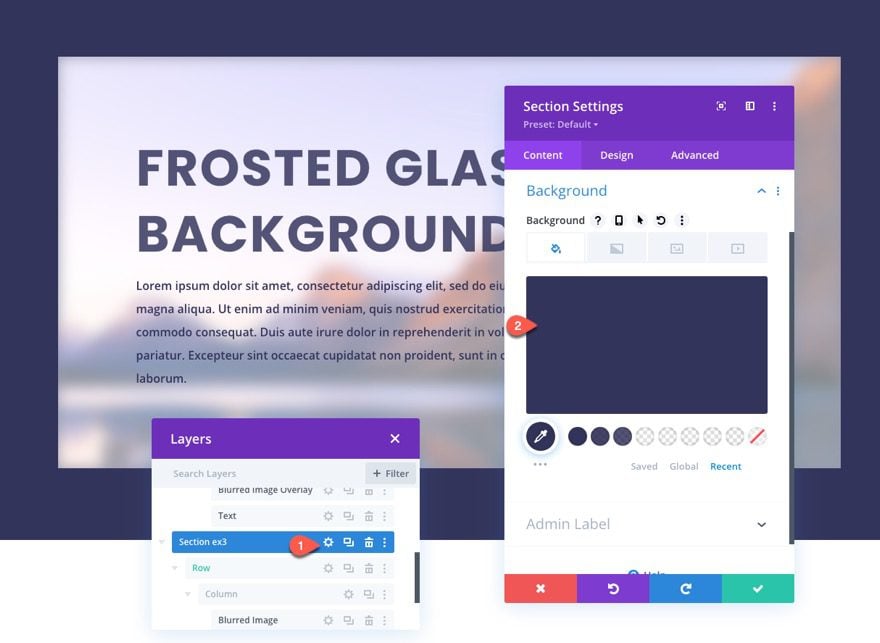
Update Section Background
Open the section settings, delete the background image and add the following background color:
- Background Color: #33345b
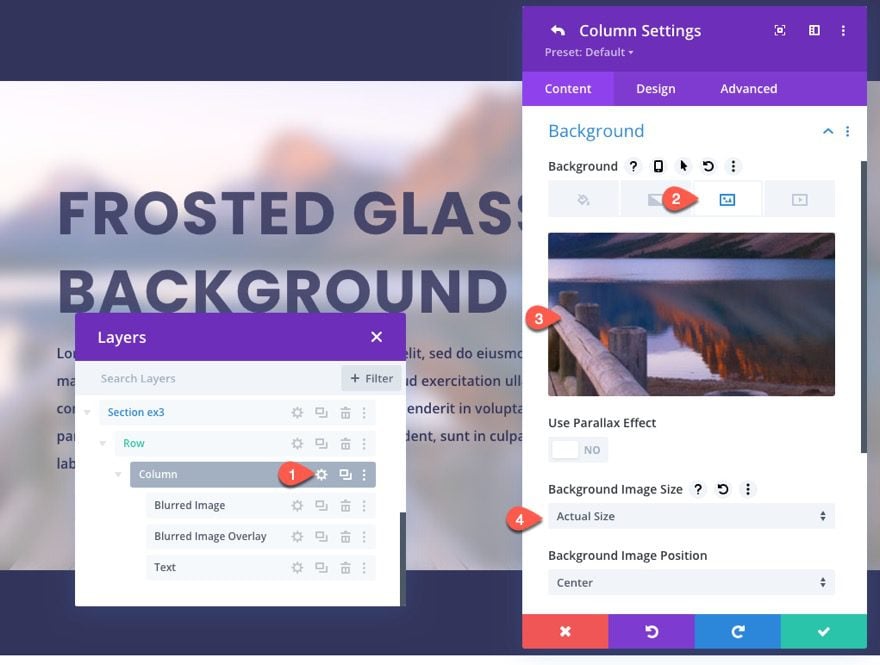
Update Column Background and Padding
Next, open the column settings and add the same background image used for the previous example. Only this time make sure the background image size is set to Actual Size:
- Background Image: Actual Size
Next, update the column settings with new padding as follows:
- Padding: 10% top, 10% bottom, 15% left, 15% right
Update Blurred Image Text Module Image
Next, open the settings for the blurred image text module and add the same image used for the column background making sure to set the background image size to actual size:
- Use Parallax Effect: NO
- Background Image Size: Actual Size
Change Size and Position Location of the Blurred Image and Overlay Text Modules
To create the spacing needed around the backround blurred image text module and the overlay text module, use multiselect to select both modules and update the sizing options as follows:
- Width: 80%
- Height: 80%
Then update the absolute position location to centered:
- Location: centered
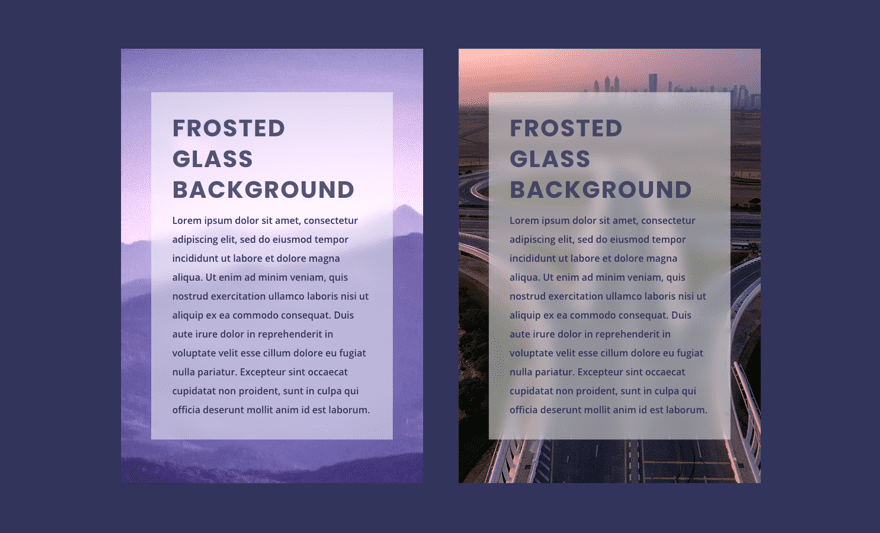
Here is the final result.
Create Multiple Column Layouts with Minor Adjustments
You can even duplicate the column for a two-column layout. You will need to adjust the heading text size and the column padding to make sure the frosted background sits behind the content. And you can switch the background images used for the column and the blurred image text module as needed.
Here is an example of the two-column layout.
Final Result
Here is the final result of all examples.
Final Thoughts
In this tutorial, we showed you three methods for creating frosted background designs in Divi. Some of you may find it easier to customize images in photoshop for this kind of thing first. But with Divi, that isn’t necessary. The first method takes advantage of the backdrop-filter CSS property and is by far the easiest and most powerful solution. But until this property is adopted by all browsers, you can use the other two methods in this tutorial that use the Divi builder. All in all, the frosted background effect can really look amazing.
I look forward to hearing from you in the comments.
Cheers!


Hey Jason !
Great tutorial that i wanted to use for my website. I chose the last exemple with the 2 cards with different images. i made 3 cards and i understood how to change the images add the third one pretty well, by using the .et_pb_column_1, _2 and _3 classes.
The thing is, now on all my column 1, 2 and 3 i have the images of my cards as a background.
How can i add a className or an id only on those columns (it doesn’t work by adding a class or id in the column settings and then change it in the additionnal CSS, we lose the blur effect…)
I don’t know if I´m very clear…
I am the only one who cant get this to work?
I get this error: Unknown property backdrop filter?
Even when I download the JSON file it does not work.
What is wrong? Am I missing out something?
Dennis,
Sorry, you are having issues. Keep in mind that the backdrop-filter property isn’t supported on IE and Firefox. So that may be the reason. That is why I included the other methods. Also, if you are referring to the error that appears in the Divi builder when adding the code, ignore that. It should still work.
Hi,
I really like the design but most of the times when you first load the page the background image in the frosted part is lower than the section background image. Only when I start scrolling it pops to the correct place.
Why is this and what can I do about it?
Thanks,
Nathan
Nathan,
Which method are you using? Make sure to give the row a gutter width of 1 to take out any margins that may be causing the issue. If that’s not it, you may be using the parallax method which may be causing that glitch. If so, try using Method #3. Hope that helps.
Beautiful
Hi Jason, thanks a lot for this tutorial. Sometimes you need to be a bit lucky… I was looking as an absolute beginner with divi for exactly this solution for my planned homepage. It is written in an easy style and with most helpful screenshots. Will try to implement it now on my website…
Really for me a. present given by you… thanks
That’s awesome to hear, Joachim. Thanks.
Excellent stuff. Will definately be useful.
Thanks! Glad it was helpful.
Thanks for sharing this
You’re welcome, Meditwitt.
An excellent information shared thank you
Really very interesting post. I am impress your writing…Thanks dear…
like to see your blog
nice
Wow, I loved the effect, it doesn’t seem difficult to do!
Thanks Jason for sharing this tutorial !!!!
You’re welcome, Andre. Glad you liked it.
Would love to know how to do this for navigation backgrounds and drop-down backgrounds!
You could add the CSS backdrop-filter to the header/navigation background the same way as described in method #1 in this tutorial.
Thanks a lot, Jason. This a very cool trick to have in one’s toolbox, and the effect is lovely!
Thanks, David!
Thanks for sharing this tip here. I will undoubtedly occupy on my Divi sites!
Very elegant! Thanks Jason.
Thanks, Ramon. Great to hear from you.