
Adding testimonials to your site is an effective way to boost the credibility of your business (or brand) and build trust with visitors. A testimonial slider is a convenient tool for showcasing testimonials all in one place. With this in mind, it makes sense to add a compact testimonial slider to your header so those testimonials are one of the first things the user sees when visiting your site.
In this tutorial, we are going to show you how to create a compact testimonial slider for showcasing short testimonials in the header of your website. To do this, we are going to modify Divi’s Slider Module in a fun and unique way.
Let’s get started!
Sneak Peek
Here is the compact testimonial slider we’ll build using the Divi Slider Module. This beats using a testimonial plugin for such a small visible area—Divi can easily handle it.
And here is that same testimonial slider added to a global header.
And here is what it looks like on mobile.
Download the Layout and Template for FREE
To lay your hands on the designs from this tutorial, you will first need to download it using the button below. To gain access to the download you will need to subscribe to our newsletter by using the form below. As a new subscriber, you will receive even more Divi goodness and a free Divi Layout pack every Monday! If you’re already on the list, simply enter your email address below and click download. You will not be “resubscribed” or receive extra emails.

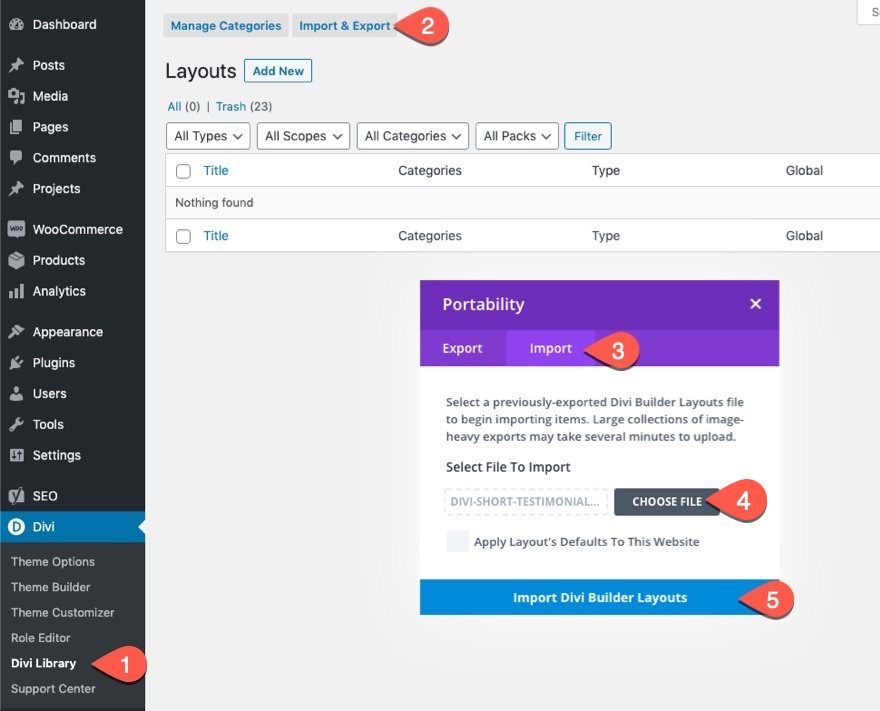
Import the Layout to the Divi Library
To import the section layout to your Divi Library, navigate to the Divi Library.
Click the Import button.
In the portability popup, select the import tab and choose the download file from your computer. It will be the JSON file named “divi-short-testimonial-slider-module-layout.json”.
Then click the import button.
Once done, the section layout will be available in the Divi Builder.
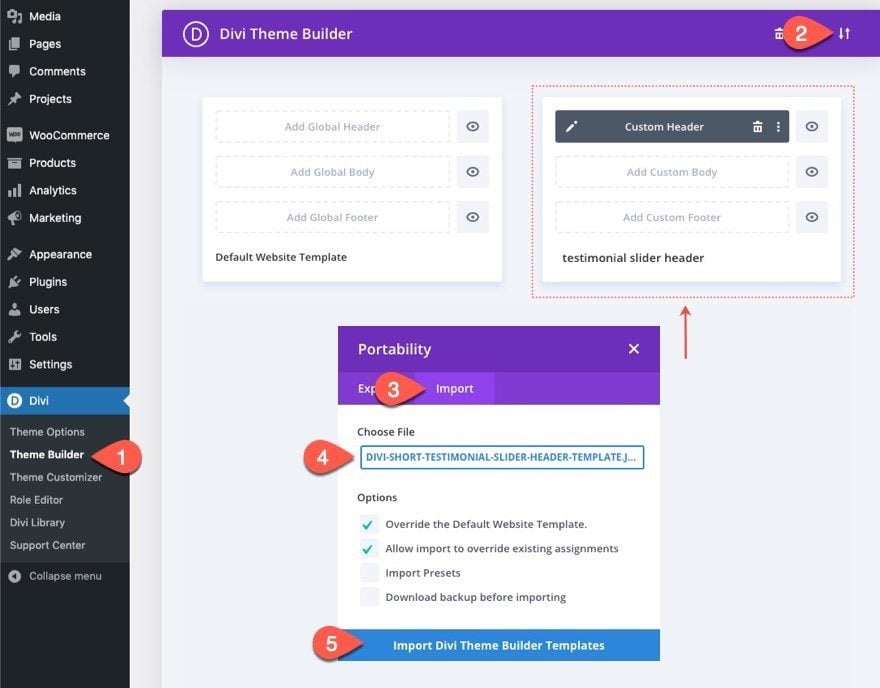
Import the Header Template to the Divi Theme Builder
If you want to import header template with the compact testimonial slider added to the header, you will need to navigate the Divi > Theme Builder.
Then use the portability icon at the top right of the page to import the JSON file. It will be the file named “divi-short-testimonial-slider-header-template.json”.
Let’s get to the tutorial, shall we?
What You Need to Get Started

To get started, you will need to do the following:
- If you haven’t yet, install and activate the Divi Theme.
- Create a new page in WordPress and use the Divi Builder to edit the page on the front end (visual builder).
- Choose the option “Build From Scratch”.
After that, you will have a blank canvas to start designing in Divi.
How to Create a Compact Testimonial Slider in Divi
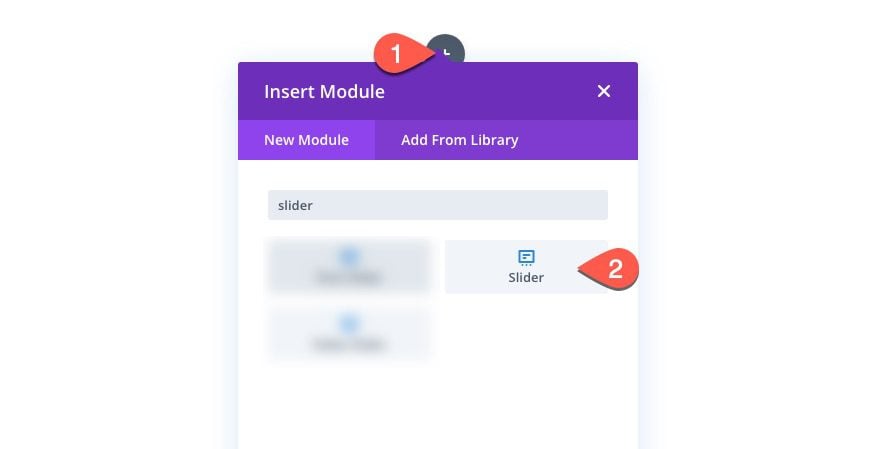
Add New Row and Slider Module
To start, add a one-column row to the section.
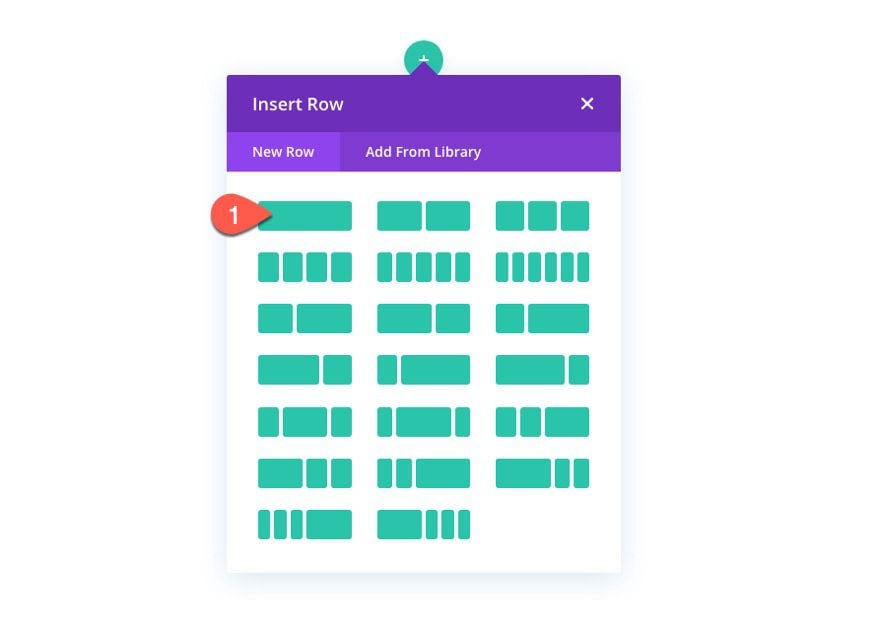
Then add a slider module to the row.
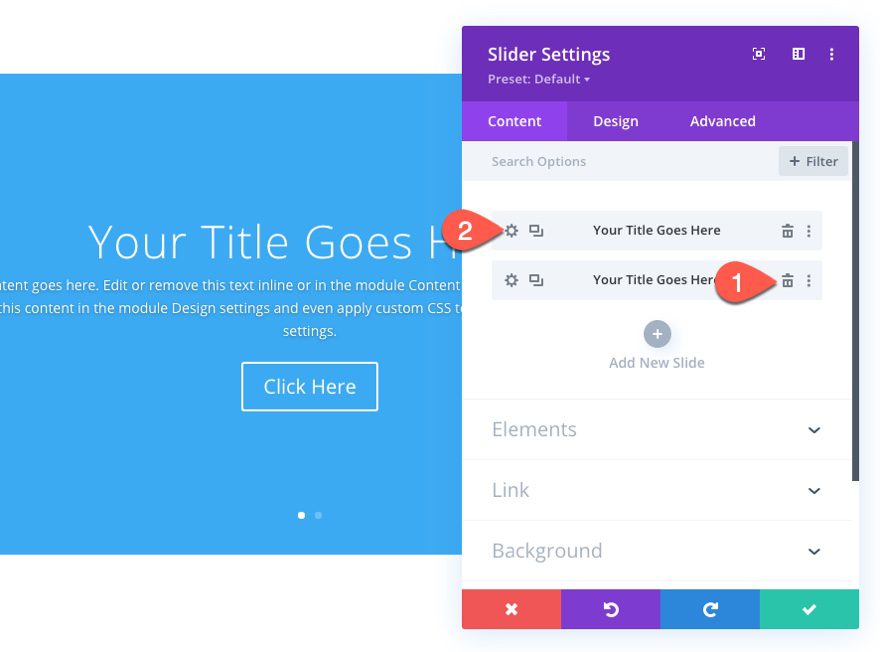
Edit Slide
Under the slider settings, delete the second default slide under the content tab and then click to edit the settings of the remaining slide.
Slide Content
Under the content tab of the slide settings, update the following:
- Title: “Donec sollicitudin molestie malesuada. Vivamus suscipit tortor eget.”
- Button Text: Read All
- Body: — Tatiana Gagelman
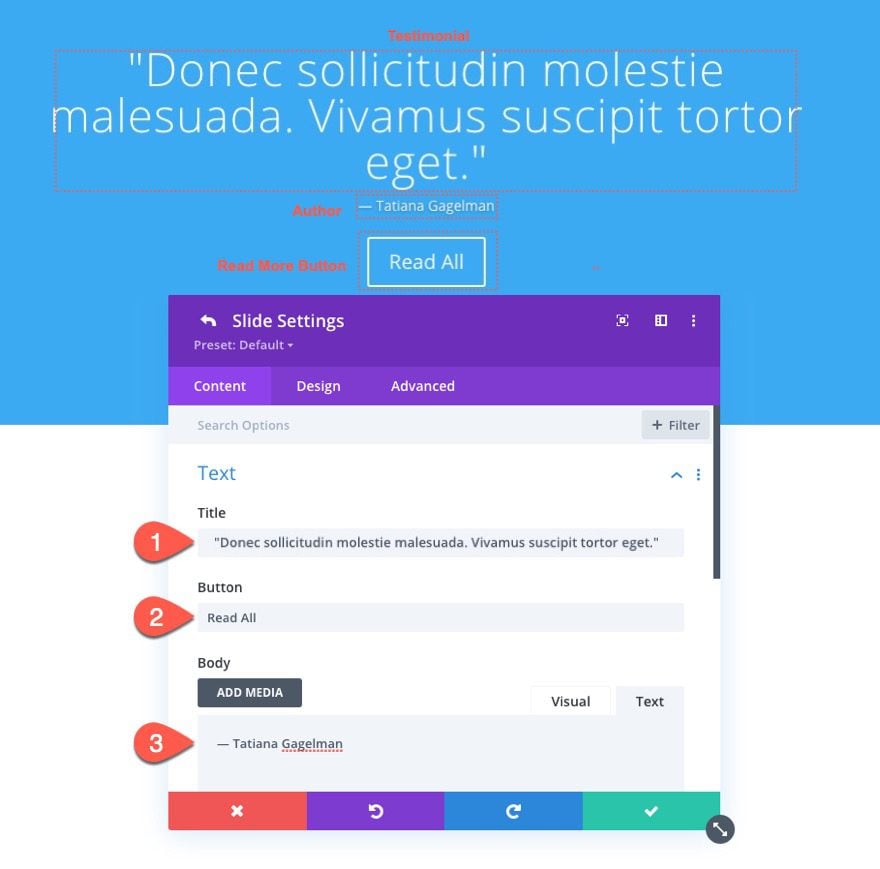
Once done, save the slide settings.
Update Slider Settings
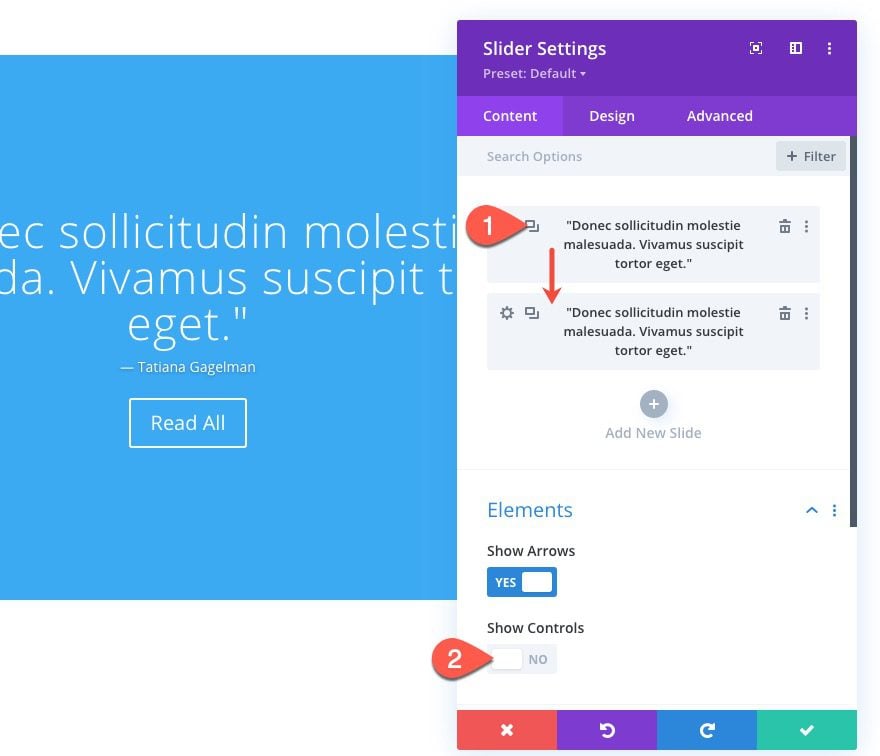
Duplicate Slide and Hide Controls
After updating the first slide with content, duplicate that slide to create one or more additional slides.
Then, under the Elements option group, hide the slider controls by updating the following:
- Show Controls: NO
Update Background for All Slides
Next, we are going to add a background that will be used for all slides. This background will include a background gradient and background image styling (for when/if you add an author background image to an individual slide).
To add the background, update the following:
- Background Gradient Left Color: #000000
- Background Gradient Right Color: #000000
- Background Image Size: Fit
- Background Image Position: Center Left
- Background Image Blend: Luminosity
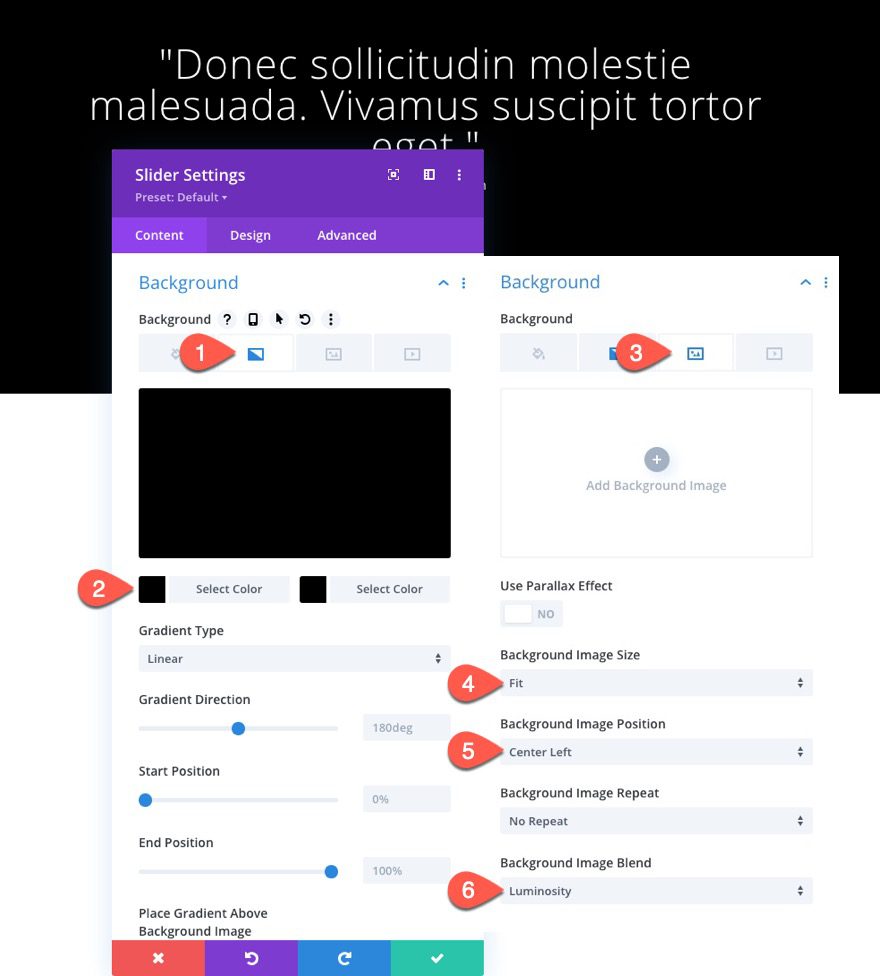
It is important to note that we are not adding a background image here. We are only adding the size, position, and blend mode for the image that will be used by an individual slide. It is easier to add it here rather that having to add the same styling to each slide separately. Later, we will show you how to add images to the individual slides.
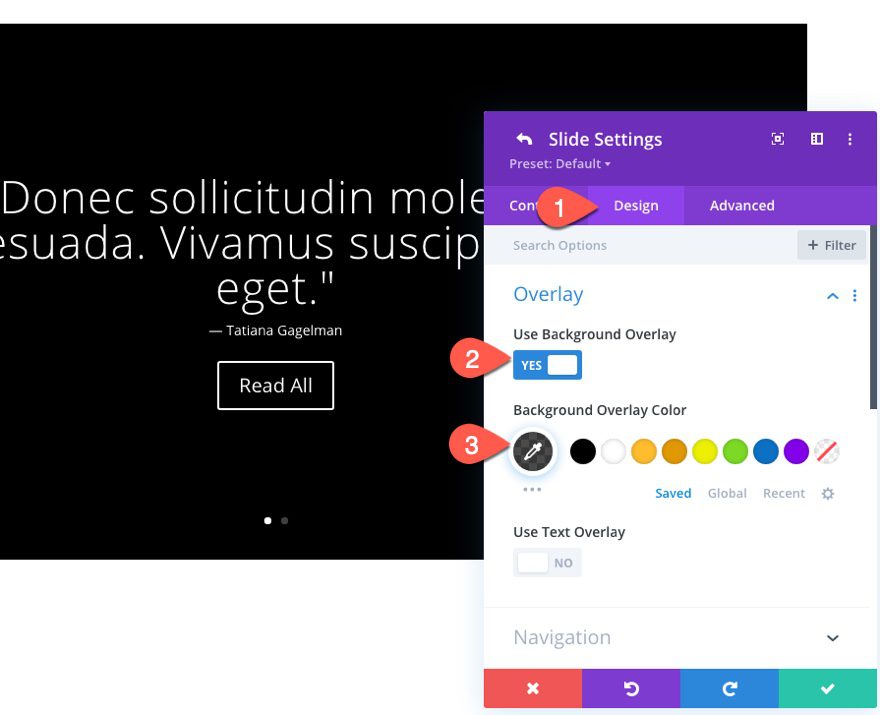
Slider Design Settings
Under the design tab, update the following:
Overlay
- Use Background Overlay: YES
- Background Overlay Color: rgba(0,0,0,0.7)
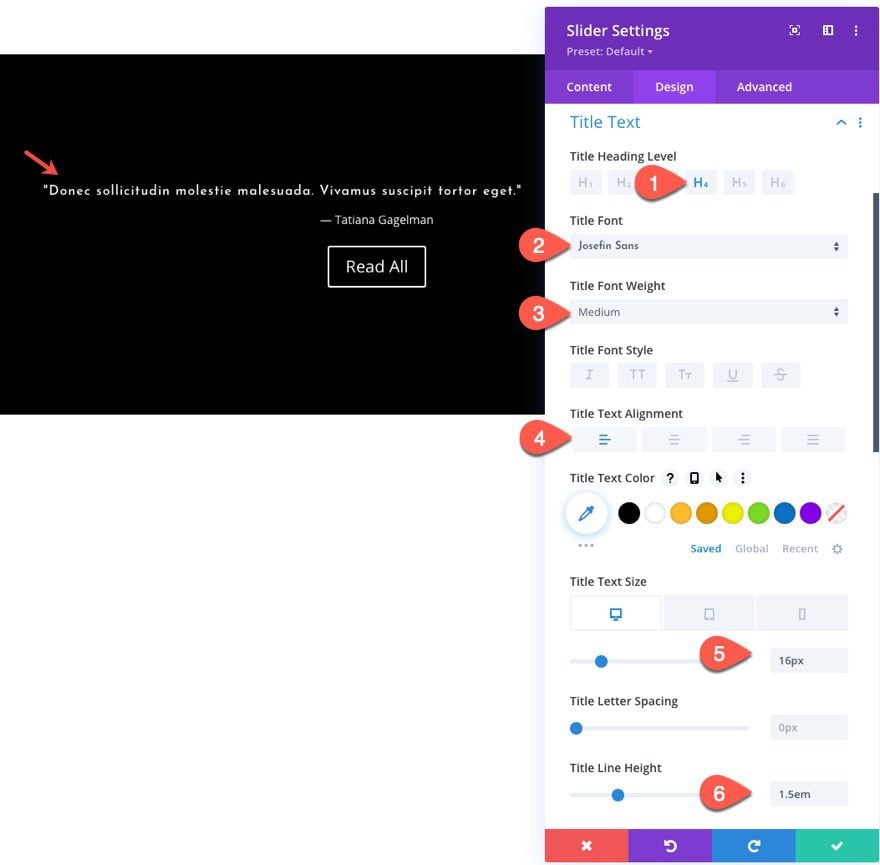
Title Text
- Title Heading Level: H4
- Title Font: Josefin Sans
- Title Font Weight: Medium
- Title Text Alignment: Left
- Title Text Size: 16px (desktop and tablet), 14px (phone)
- Title Line Height: 1.5em
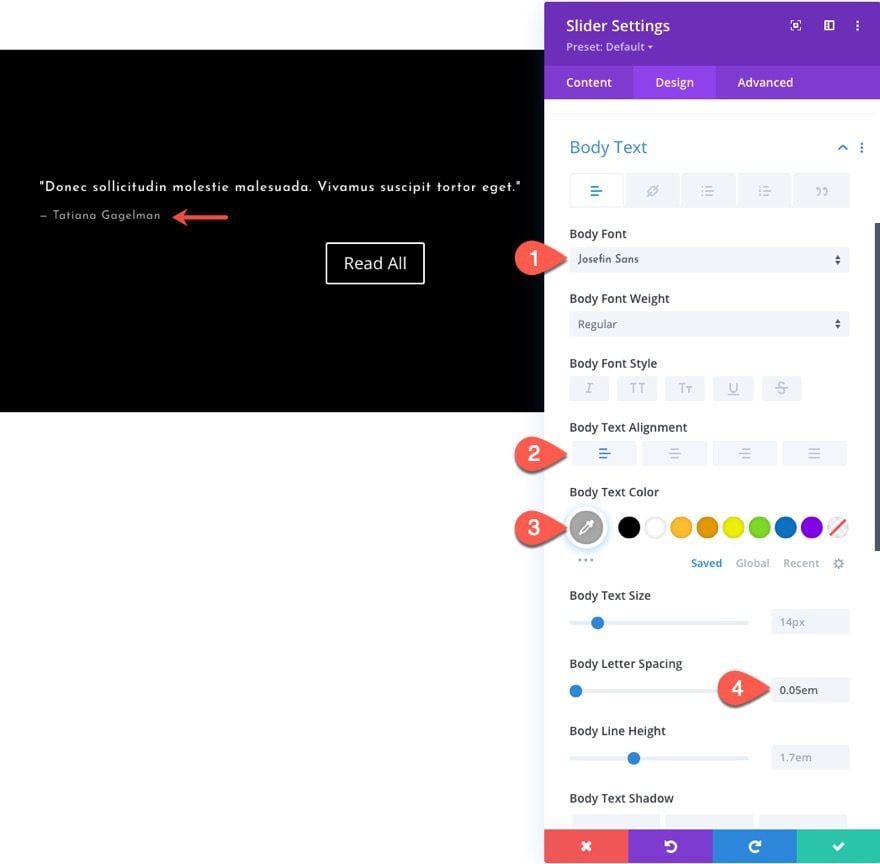
Body Text
- Body Font: Josefin Sans
- Body Text Alignment: Left
- Body Text Color: #aaaaaa
- Body Letter Spacing: 0.05em
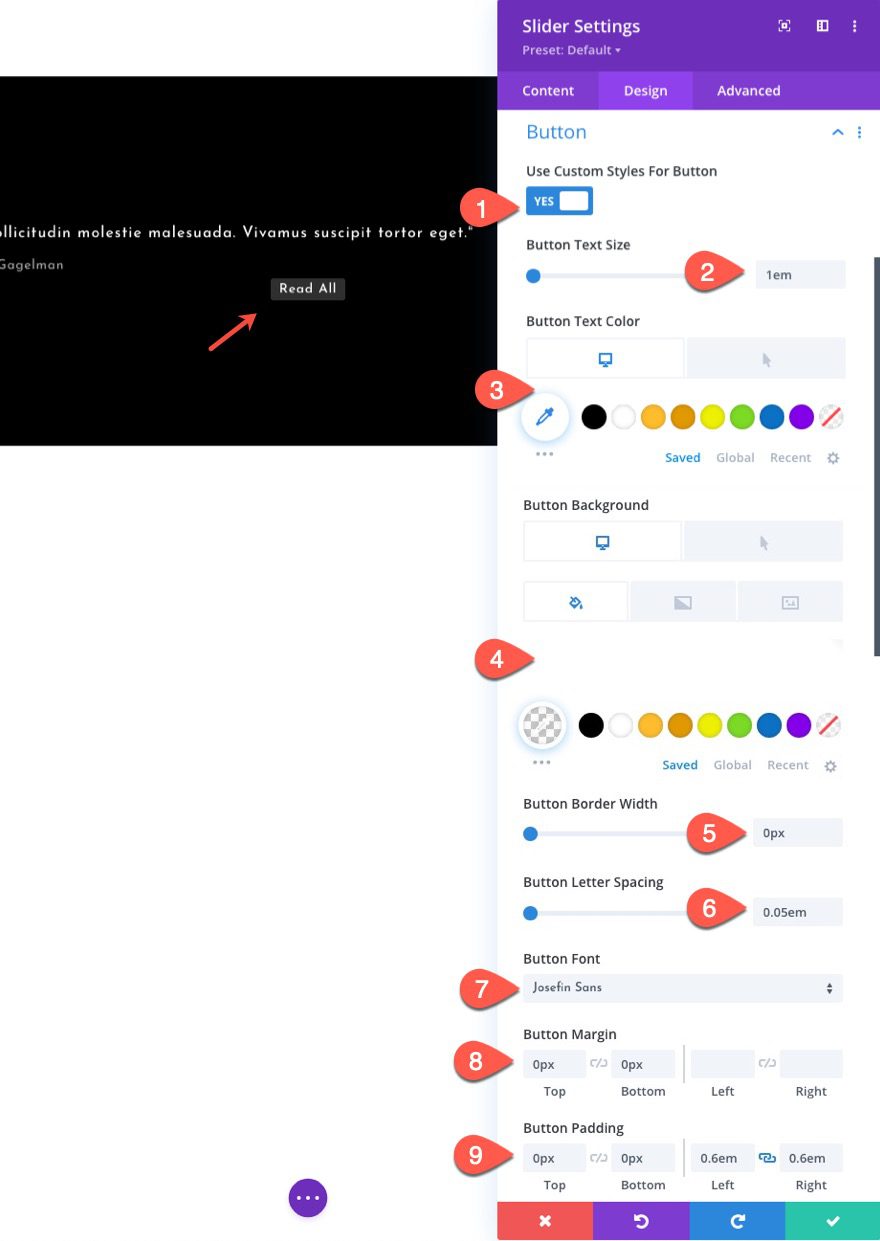
Button
- Use Custom Styles For Button: YES
- Button Text Size: 1em
- Button Text Color: default (desktop), #000 (hover)
- Button Background Color (desktop): rgba(255,255,255,0.19)
- Button Background Color (hover): #ffffff
- Button Border Width: 0px
- Button Letter Spacing: 0.05em
- Button Font: Josefin Sans
- Button Margin: 0px top, 0px bottom
- Button Padding: 0px top, 0px bottom, 0.6em left, 0.6em right
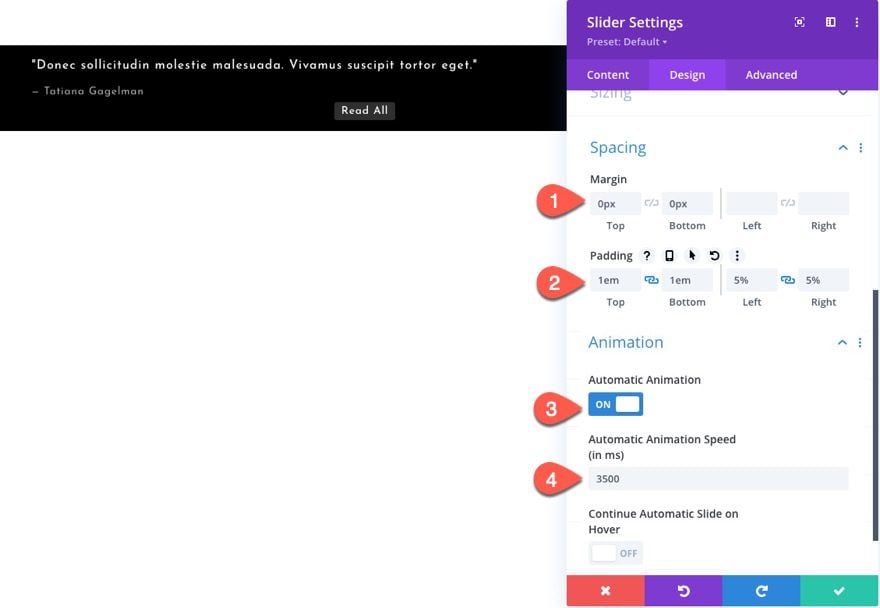
Padding and Automatic Animation
Then update the spacing of the slider so that it is compact and set the automatic animation speed that you want for the slider.
- Margin: 0px top, 0px bottom
- Padding: 1em top, 1em bottom, 5% left, 5% right
- Automatic Animation: ON
- Automatic Animation Speed: 3500
Custom CSS
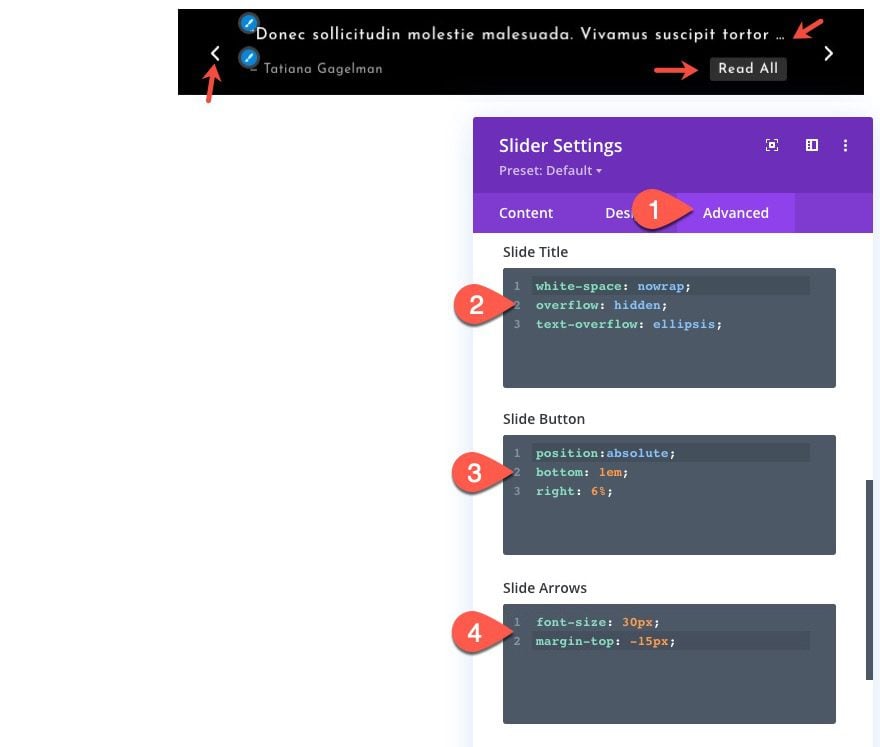
Under the advanced tab, add the following custom CSS to update the style of each slider element (Title, Button, and Arrows)
Slide Title
white-space: nowrap;
overflow: hidden;
text-overflow: ellipsis;
This will make sure the Slide Title won’t create a line break on smaller screens.
Slide Button
position:absolute;
bottom: 1em;
right: 6%;
This gives the button an absolute position so that it sits nicely under the Title and to the right of the slide, making the slider even more compact.
Slide Arrows
font-size: 30px;
margin-top: -15px;
This simply makes the slider navigation arrows smaller to fit the compact slider size.
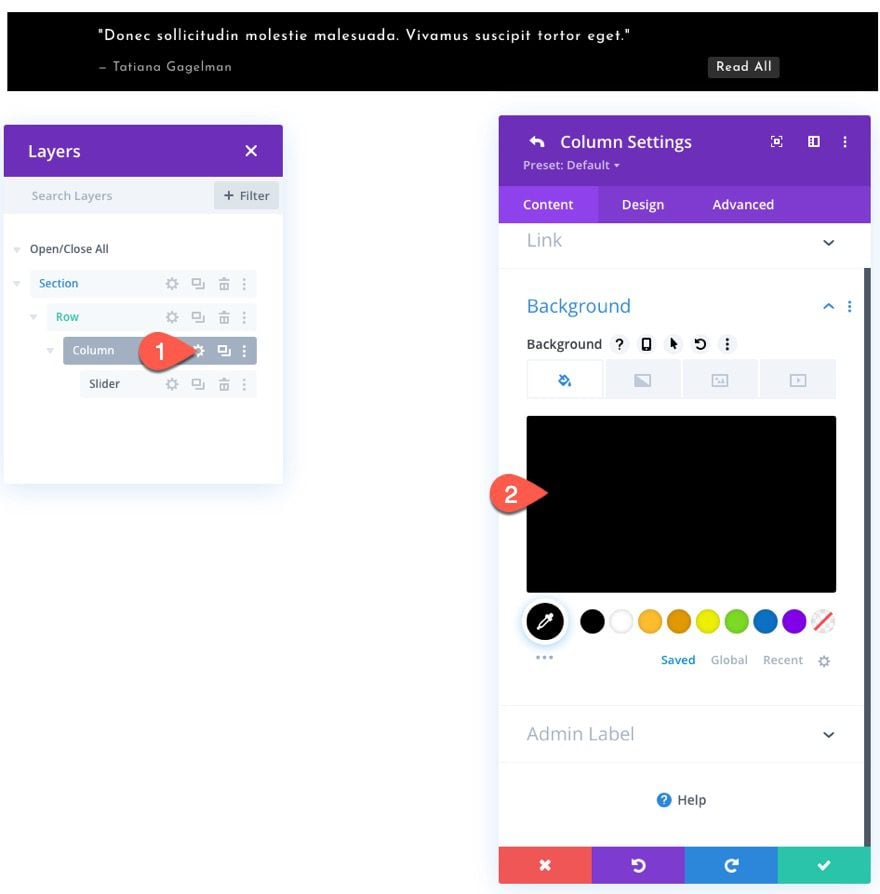
Tip: Add Same Background Color to Column For Smoother Slide Transitions
Currently, the animation of each slide will have animate the background color along with the slide content, to keep the background from showing this animation, we can give the same background color to the column so that the transition is smoother.
To do this, open the settings for the slider’s parent column and add the following background color:
- Background Color: #000000
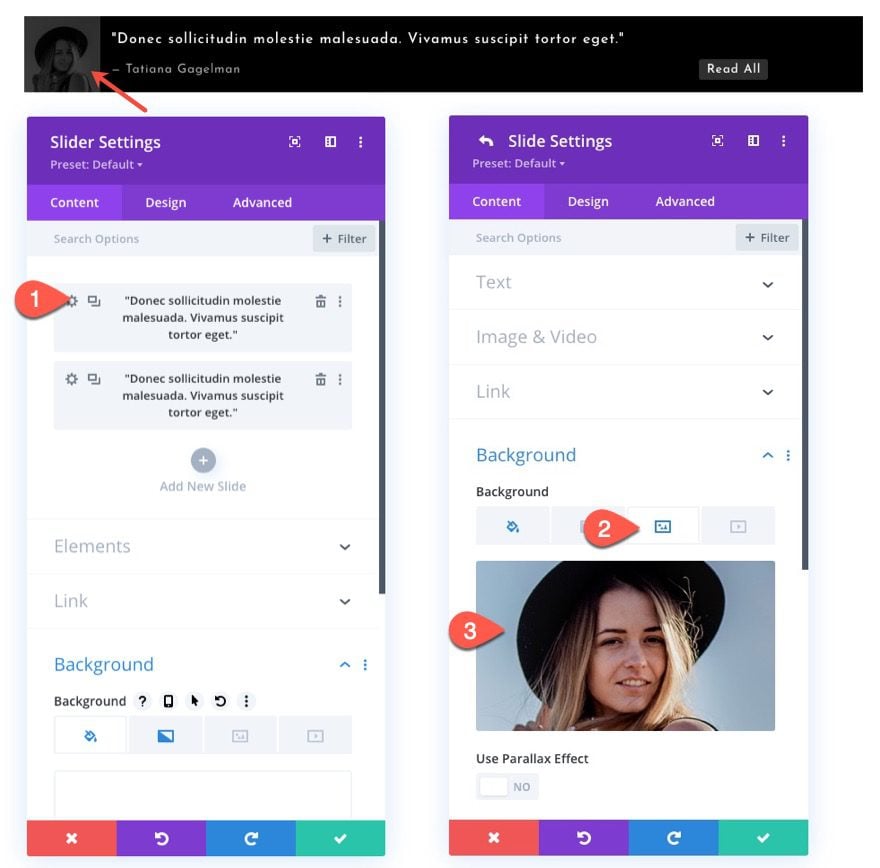
If you want to include an author background image for a slide, you can do this by adding a background image to each slide.
Once you add the background image to the slide, the background image will inherit the styles already in place under the slider (not slide) settings.
Result
Check out the final result.
Adding the Compact Testimonial Slider to a Header Template
Saving the Module to the Divi Library
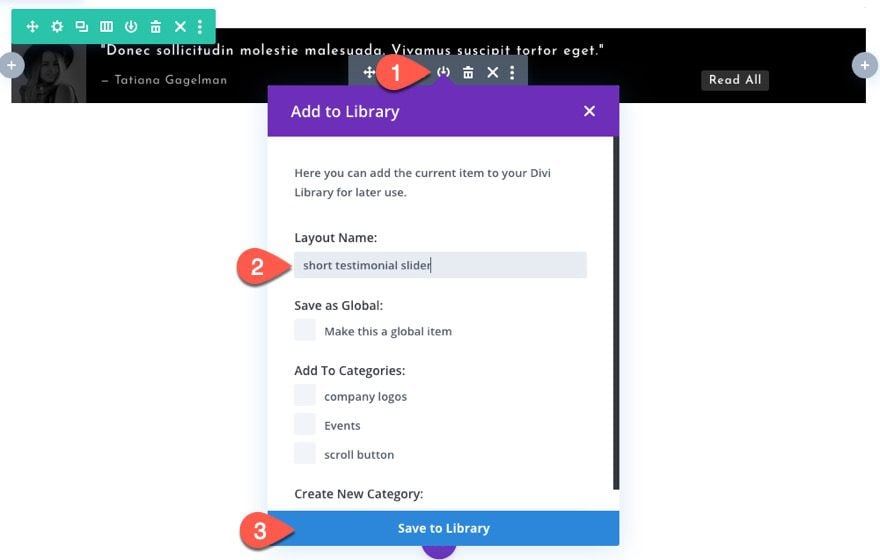
Before we can add the compact testimonial slider to a global header, we must first save the module to the Divi Library. You can do this by hovering over the slider module and clicking “Save to Library” icon. Then give the layout a name and click the “Save to Library” button.
Adding the Compact Testimonial Module Layout to a Header Template
Edit the Custom Header
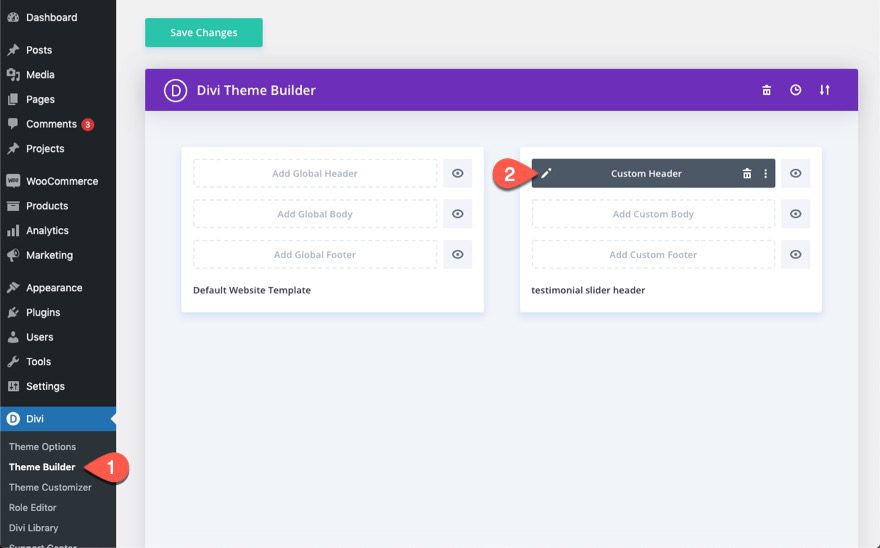
Once the new testimonial slider module has been saved to the library, we are ready to add it to a custom header.
Navigate to Divi > Theme Builder, then click to edit the custom header for the template.
Insert Saved Testimonial Slider Module Layout from Library
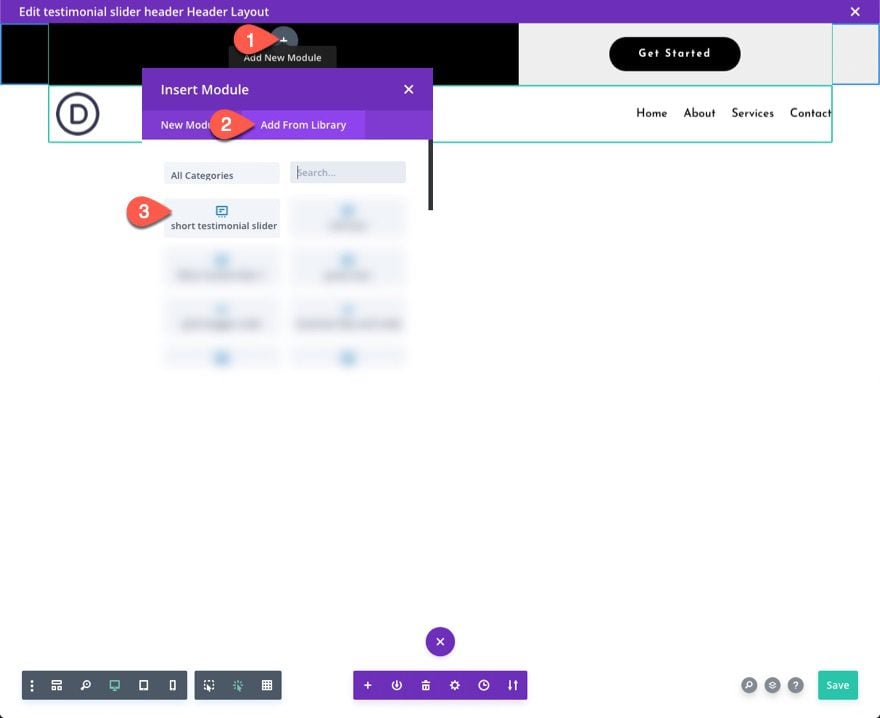
In the header layout editor, click to add the compact testimonial slider module where you want it to be displayed.
In the Insert Module modal, select the Add From Library tab. Find the compact testimonial slider you previously saved to the library and select it.
Once it is loaded, save the changes.
Final Result
And here is that same testimonial slider added to a global header.
And here is the same testimonial slider without the author background images.
And here is what it looks like on mobile.
Final Thoughts
The compact testimonial slider can be a fresh addition to the header of any website looking to boost the credibility of their services in the most visible place of their website. You can also use it to redirect visitors to a testimonial page or sales page increase conversions. Hopefully, it will come in handy for you.
I look forward to hearing from you in the comments.
Cheers!


Button in the right column is not displaying on my android phone in either Chrome or Firefox?
Cool idea! Not getting the Read All button. Is that a link to another page or does is reveal the hidden part of the title text. What am I missing?
Sorry for the confusion. The “Read All” button is an individual slide button so you can customize the button text and link URL to be whatever you want with each slide.
would like to add this to my new site, but need to see mobile phone view. Thanks
Donna,
I went ahead and added a mobile preview to the post. Hope that helps!
Sweet. Just added to my website.
Awesome, Phil! Great to hear from you.
This looks way cool. But do you have a live demo?
Thanks! Sorry no live demo for this one. You will need to download the layout and import it on your own site to give it a test drive.