
A dropdown menu button can really come in handy when designing a website. Aside from the main menu, there are areas on a site that may require a dropdown menu of sub items. We see them being used for things like blog post categories, lists, and form inputs. But they can even be used for a main call to action.
In this tutorial, we’ll show you how to create a dropdown menu button using Divi and its fullwidth menu module. To do this, we will first create a menu in WordPress. Then we will use Divi’s fullwidth menu module to display that menu with custom styles using the Divi builder and a little custom CSS. The result is a dropdown menu button that is both practical and elegant.
Let’s get started.
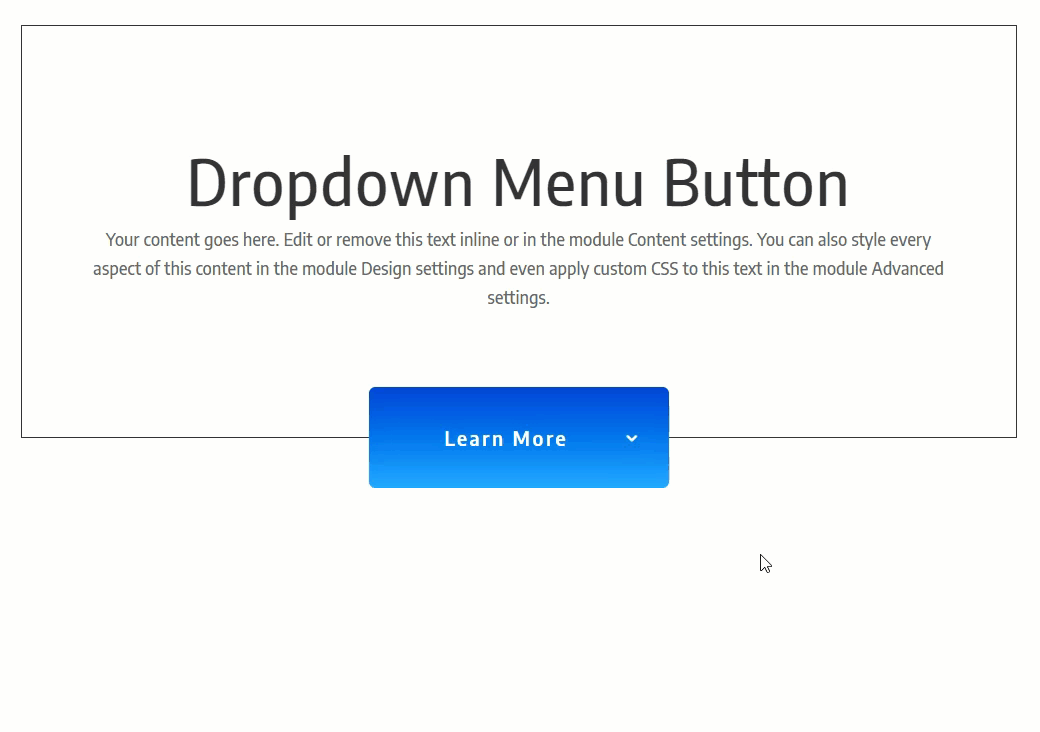
Sneak Peek
Here is a quick look at the dropdown menu button we will build in this tutorial.

Download the Layout for FREE
To lay your hands on the designs from this tutorial, you will first need to download it using the button below. To gain access to the download you will need to subscribe to our newsletter by using the form below. As a new subscriber, you will receive even more Divi goodness and a free Divi Layout pack every Monday! If you’re already on the list, simply enter your email address below and click download. You will not be “resubscribed” or receive extra emails.

Subscribe To Our Youtube Channel
To import the layout to your page, simply extract the zip file and drag the json file into the Divi Builder. The custom CSS has been added to a code module in a separate section at the bottom of the layout.
Let’s get to the tutorial shall we?
What You Need to Get Started
To get started, if you haven’t yet, install and activate the Divi Theme installed (or the Divi Builder Plugin if not using the Divi Theme). We will be using the Divi builder on the front end to design the dropdown menu button.
That’s it!
Before we start building the dropdown menu with the Divi Builder, we must first create a WordPress menu that we would like to use for the fullwidth menu module. To do this, go to the WordPress dashboard and navigate to Appearance > Menus. Then create a new menu by clicking the create a new menu link, entering a menu name, and clicking the “Create Menu” button.
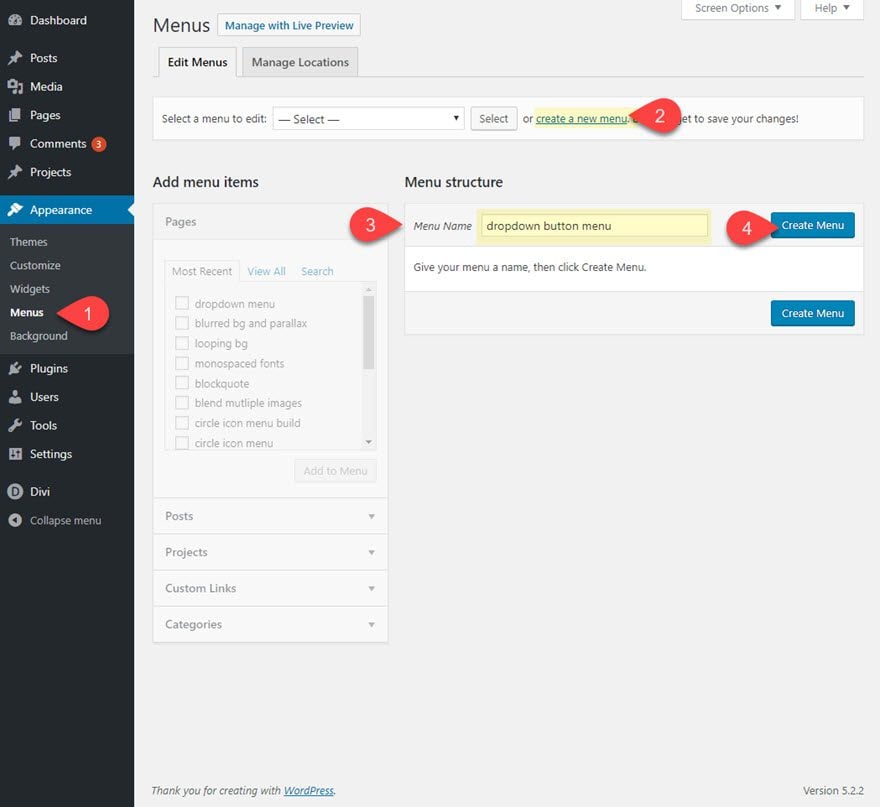
For now you can create some custom links with “#” as a url placeholder along with the link text.
Structure the menu items so that the top tier menu item has the link text “Learn More” with three sub menu items under it.
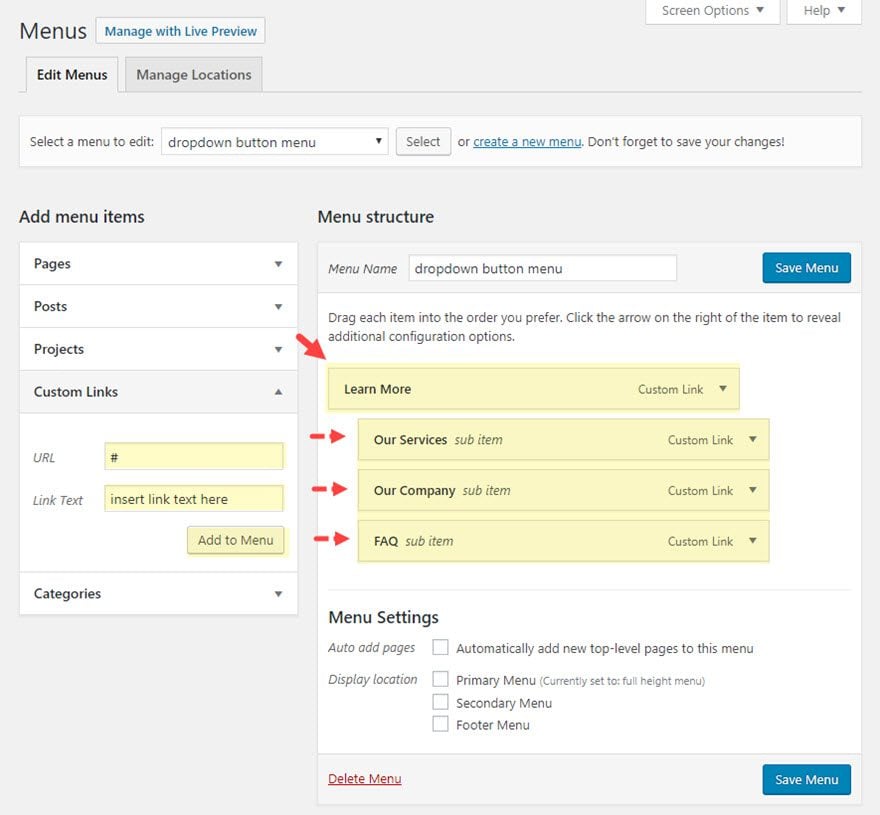
After that make sure you save the menu.
Once the menu is created, we can start designing the dropdown menu button with Divi. To get things kicked off, create a new page in WordPress and use the Divi Builder to edit the page on the front end (visual builder).
After that, you will have a blank canvas to start designing in Divi.
Creating the Mock Content
First, add a one column row to the default regular section.
Add Text Module
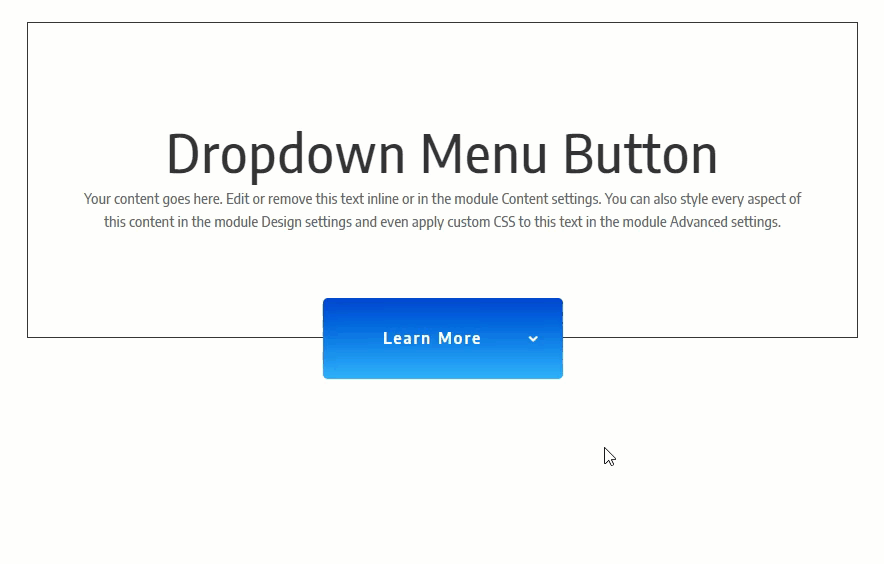
Then add a text module to the row with the following content:
<h1>Dropdown Menu Button</h1>
<p>Your content goes here. Edit or remove this text inline or in the module Content settings. You can also style every aspect of this content in the module Design settings and even apply custom CSS to this text in the module Advanced settings.</p>
After that, update the design settings as follows:
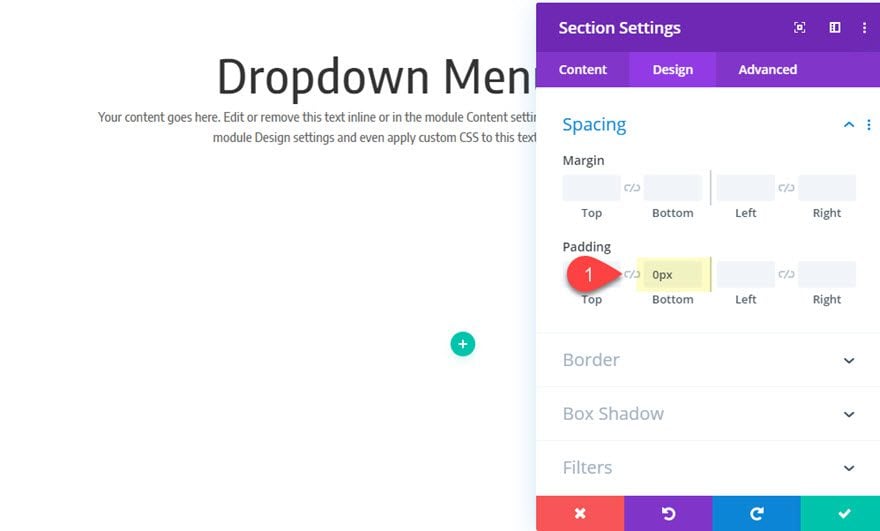
Section Padding
Next, update the section setting with the following:
- Padding: 0px bottom
Row Spacing and Border
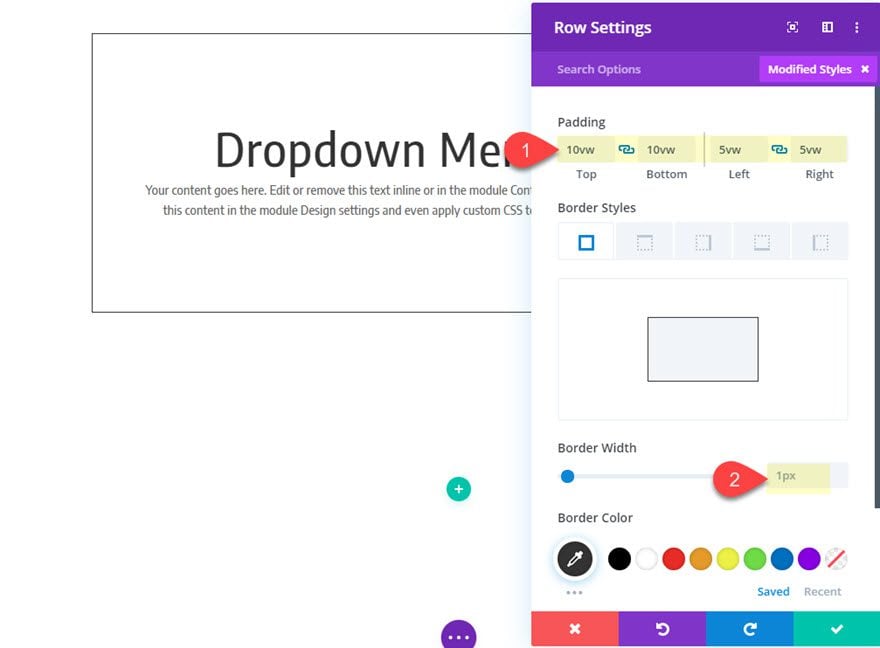
After the section padding is updated, open the row settings and give the row some padding and a slight border.
- Padding: 10vw top, 10vw bottom, 5vw left, 5vw right
- Border Width: 1px
In order to create the dropdown menu button, we will use a fullwidth menu module. This will allow us to add the menu we created earlier.
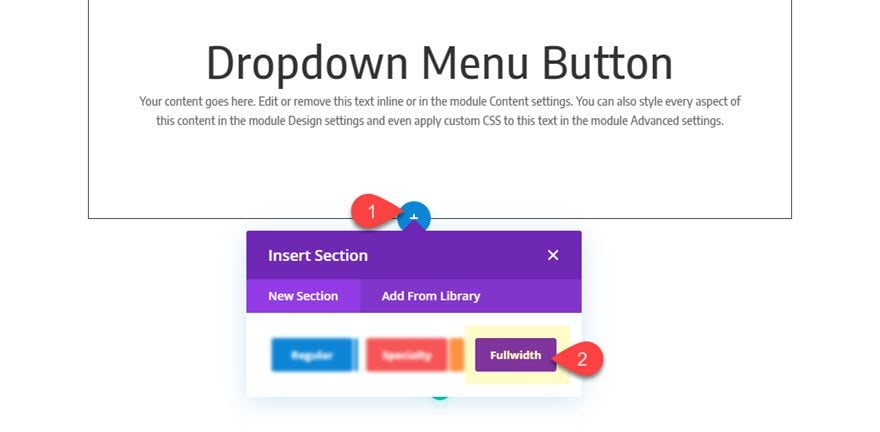
Adding the Fullwidth Menu
To create the fullwidth menu module, add a new fullwidth section under the current regular section.
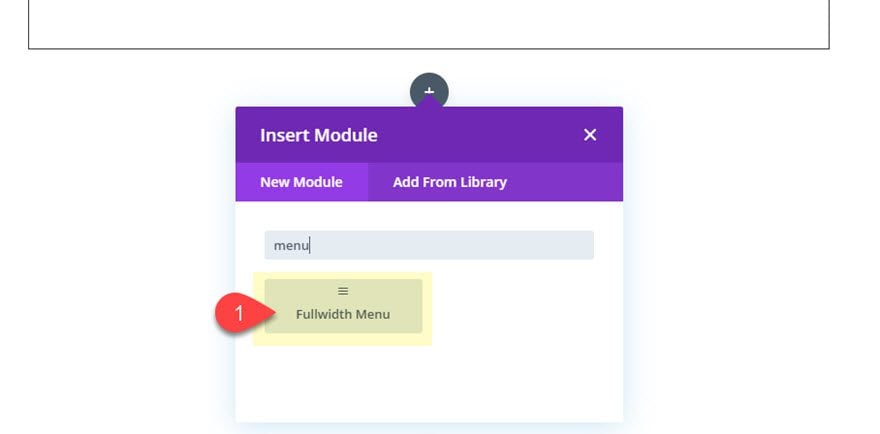
Then add a fullwidth menu module to the row.
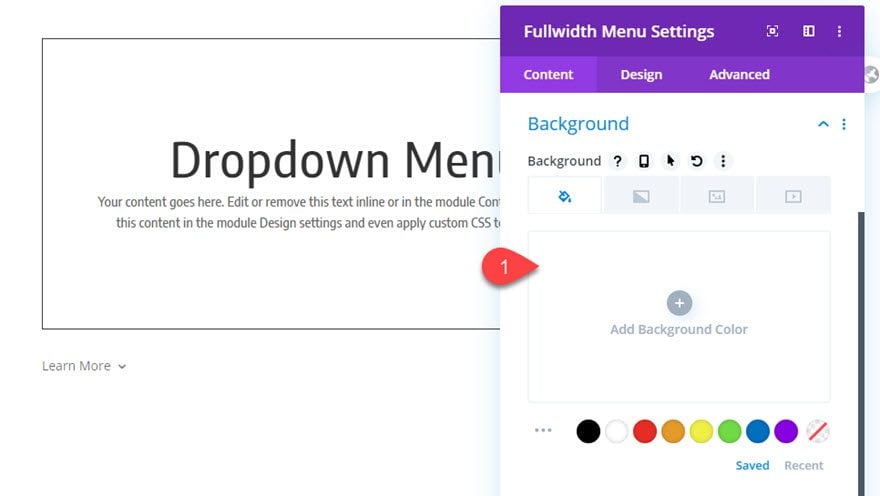
In the fullwidth menu settings popup (under content), use the dropdown to select the menu you want displayed. This should be the same menu we created earlier named “dropdown button menu”.
Then take out the default white background color for the menu.
Once you have the menu added to with the fullwidth menu module, save the settings. We are going to come back to this module in a bit to finish the design. But for now, we’ll add a background to the fullwidth section.
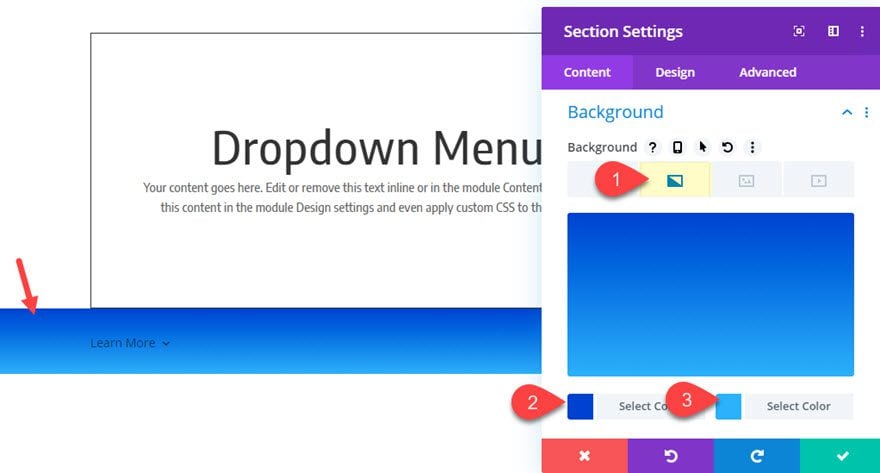
Update Fullwidth Section design
Open the fullwidth section settings and update the following:
- Background Gradient Left Color: #0047d6
- Background Gradient Right Color: #45b2ff
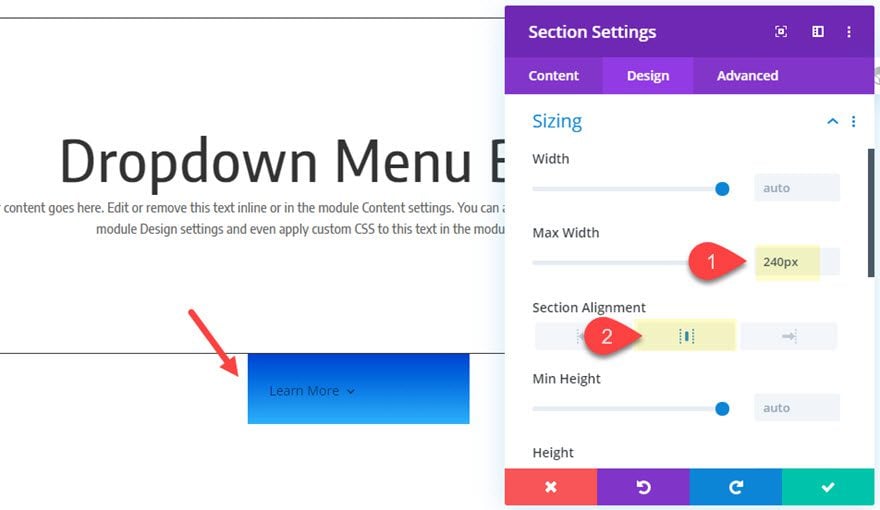
- Max Width: 240px
- Section Alignment: center
I’m setting the max width of the section to 240px because this will match the width of the default dropdown menu width in Divi. It is also a nice size for a button on desktop and mobile.
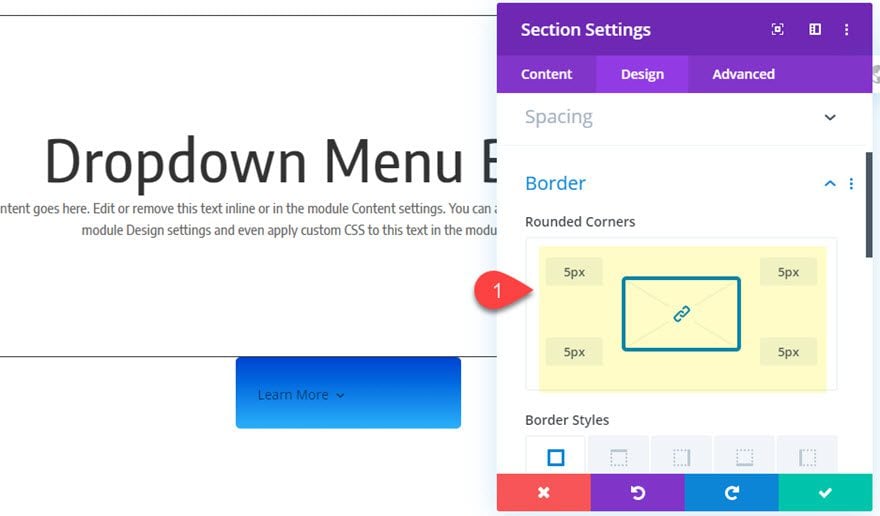
- Rounded Corners: 5px
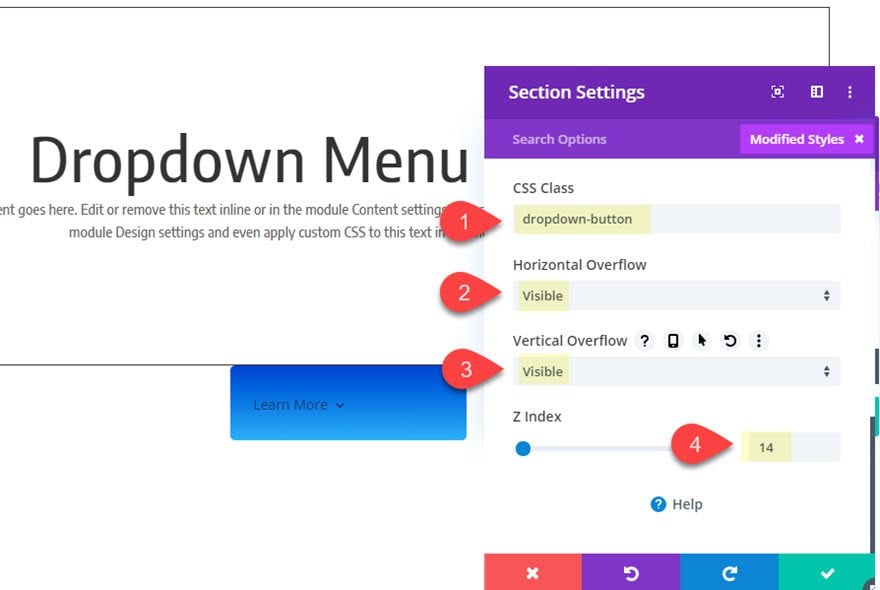
Under the advanced tab, add the following CSS Class, overflow, and Z Index.
- CSS Class: dropdown-button
- Horizontal Overflow: visible
- Vertical Overflow: visible
- Z Index: 14
The CSS Class is necessary so that we can target our external CSS to this section only later on. The overflow needs to be set to visible so that we can see the dropdown menu. And the Z Index will help keep the dropdown stay on top of any other content on the page.
Design the Fulwidth Menu
Now we are ready to design the fulwidth menu module. Open the fullwidth menu module settings and update the following:
- Make Menu Links Fullwidth: YES
- Dropdown Menu Text Color: #ffffff
- Mobile Menu Text Color: #ffffff
- Text Alignment: Center
- Dropdown Menu Background Color: #45b2ff
- Dropdown Menu Line Color: #ffffff
- Mobile Menu Background Color: #45b2ff
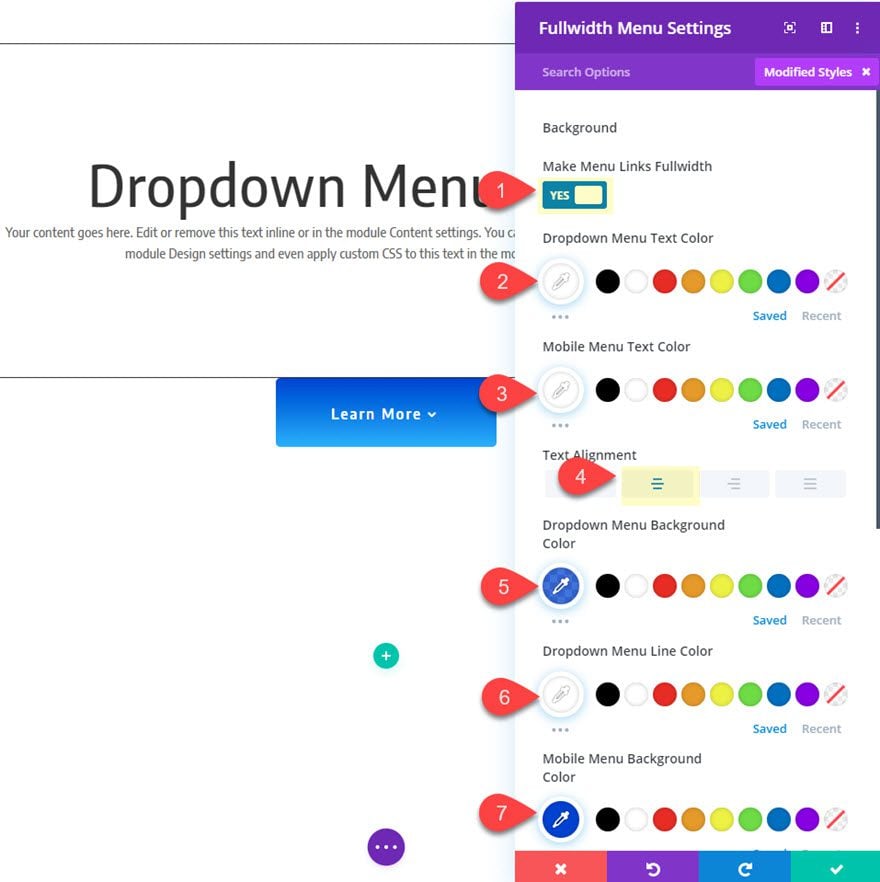
- Menu Font: Encode Sans Semi Condensed
- Menu Font Weight: Semi Bold
- Menu Text Color: #ffffff
- Menu Text Size: 16px
- Menu Letter Spacing: 2px
- Dropdown Menu Animation: Expand

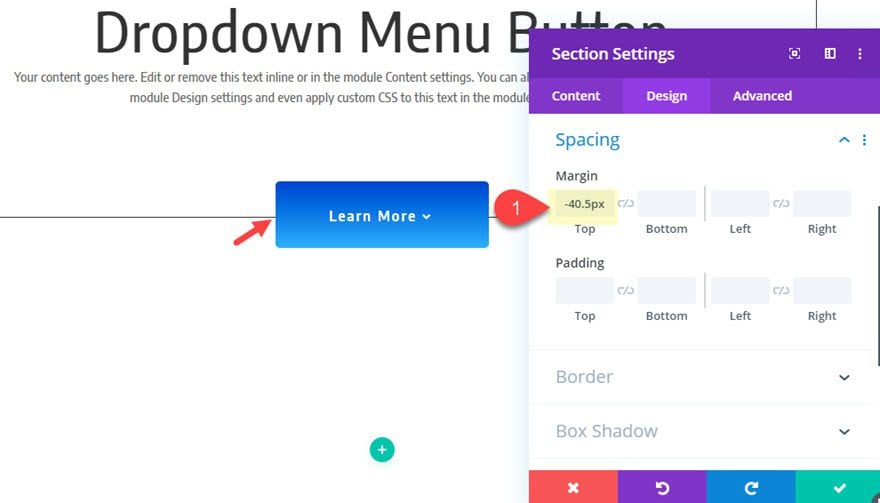
Positioning the Dropdown Button
In order to get the button to overlap the bottom border, we need to add a negative top margin exactly one half the height of the button.
- Margin: -40.5px top
Almost There
Here is the result so far…
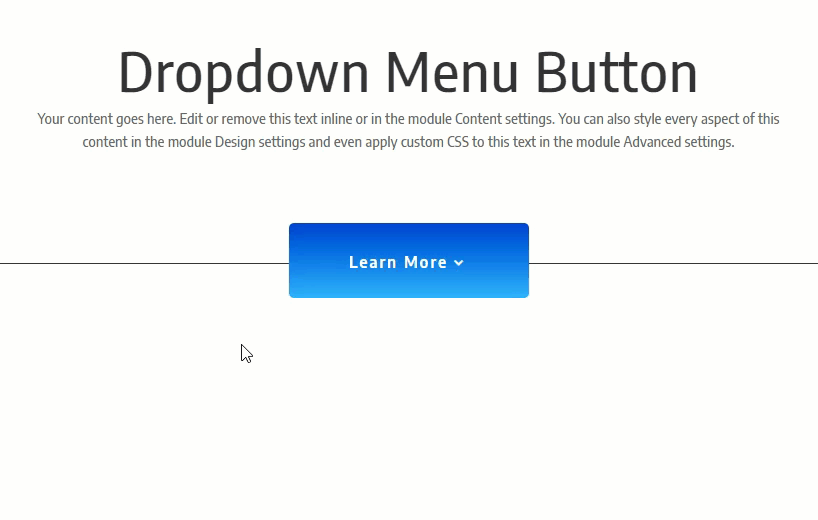
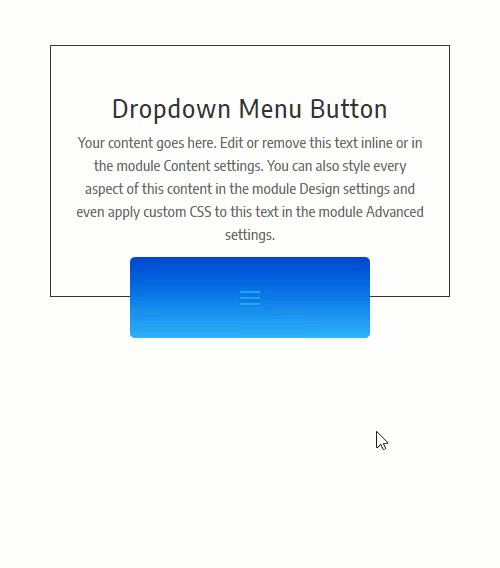
As you can see the hover space doesn’t occupy the entire button area yet and the drop down menu is still over to the right. To fix this we can add some custom CSS.
Adding Custom CSS
Before adding the custom CSS, make sure you have the CSS ID “dropdown-button” added to the fullwidth section (not the module).
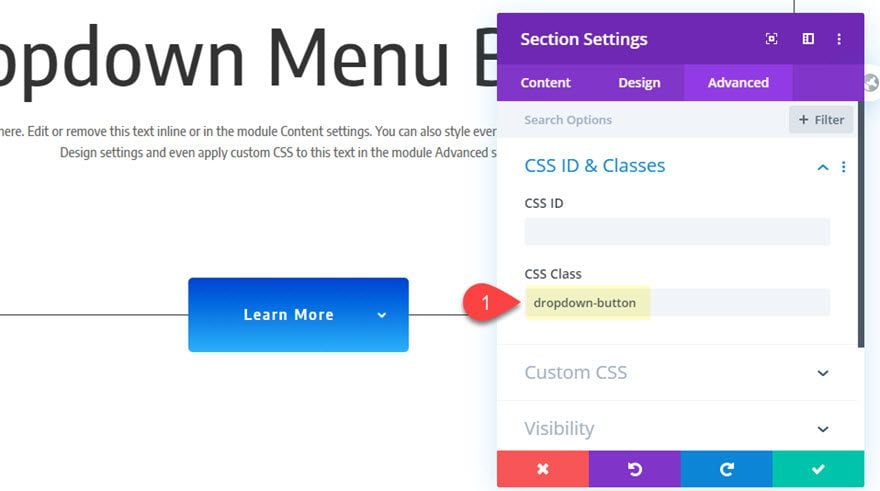
Without the CSS ID, the CSS below won’t work.
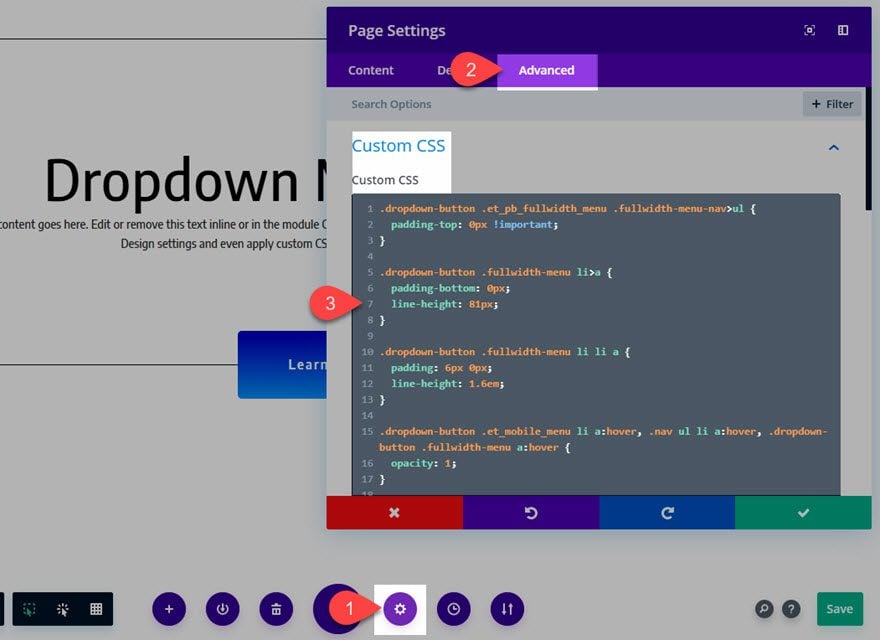
To add the custom CSS, open the page settings and paste the following code into the Custom CSS input area.
.dropdown-button .et_pb_fullwidth_menu .fullwidth-menu-nav > ul {
  padding-top: 0px !important;
}

.dropdown-button .fullwidth-menu li > a {
  padding-bottom: 0px;
  line-height: 81px;
}

.dropdown-button .fullwidth-menu li li a {
  padding: 6px 0px;
  line-height: 1.6em;
}

.dropdown-button .et_mobile_menu li a:hover, .nav ul li a:hover, .dropdown-button .fullwidth-menu a:hover {
  opacity: 1;
}

.dropdown-button .et_pb_fullwidth_menu_fullwidth .et_pb_row {
  padding: 0 0 !important;
}

.dropdown-button .fullwidth-menu li {
  display: block;
}

.dropdown-button .fullwidth-menu .menu-item-has-children > a:first-child:after {
  right: 20px;
}
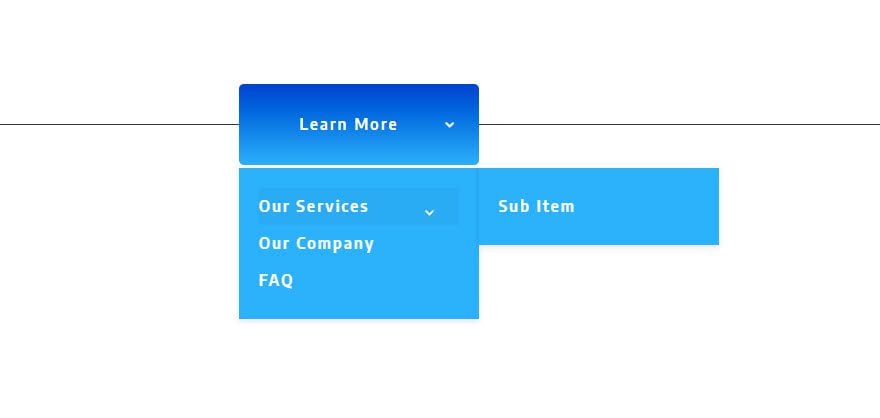
Here is the final result
Right now the menu will resort to the mobile version with the clickable hamburger icon that toggles the mobile menu open and closed. Here is what it looks like.
To fix the menu so that it matches the desktop version, we need to add some custom CSS. Open page settings and add the following custom CSS right under the css that we added currently.
@media (max-width: 981px){
  .dropdown-button .et_pb_fullwidth_menu .et_pb_row {
    width: 100%;
    }
  .dropdown-button .mobile_menu_bar {
    height: 81px;
  }
  .dropdown-button .mobile_menu_bar:before {
    font-family: inherit !important;
    font-weight: 600 !important;
    font-size: 16px !important;
    color: #ffffff!important;
    letter-spacing: 2px !important;
    content: "Learn More";
    line-height: 81px;
    top: 0px;
}
  .dropdown-button .mobile_menu_bar:after{
    position: absolute;
    line-height: 81px;
    font-family: ETmodules;
    font-size: 20px;
    font-weight: 800;
    content: "3";
    padding-left: 20px;
    color: #ffffff;
}
  .dropdown-button .et_first_mobile_item > a {
    display: none;
  }

}
The above CSS makes the clickable area span the fullwidth and height of the section/button. It also replaces the hamburger icon with some text and an arrow icon that matches the desktop version. This is done using the :before and :after pseudo-elements. This way we get to keep the default functionality of the mobile menu in place.
Right now, the text content for the mobile dropdown button reads “Learn More”. But we can change this by updating the following line of CSS under the :before pseudo-element for the mobile menu bar:
content: "Learn More";
For example, if you wanted it to read “Menu”, you would change the line of CSS to the following:
content: "Menu";

Final Result
Here is the final result.
Additional Sub Items
And you can even add sub menu items as well! Just update the menu on the menu editor page and you are all set.
Final Thoughts
Creating a dropdown menu button using Divi’s fullwidth menu module involves a few key steps. First, we create the menu in WordPress that we want to pull into the module. Then we use the Divi builder to and and style the fullwidth menu module to our liking. Then we add some custom CSS to polish off the design both on desktop and mobile. The result is a beautiful (and useful) dropdown menu that is deployed on hover for desktop and on click for mobile. Hopefully, you will find this to be a useful addition to your design toolbox.
I look forward to hearing from you in the comments.
Cheers!


Best theme builder forever
Hi, I am trying to read this blog post, but half of blog is bleeding off the right side of the screen, about right after Dropdown Menu (so everything after that is not showing up on my screen).
The CCS code provided is giving me several “unexpected tokens” and doesn’t work.
Please try again. We had to update the code to fix some elements that broke when we last saved the article.
gonna try it on my website!
Sweet! Hope it works out, Lakshmi.
Great! Is there a way to isolate the different menu items? For instance when you added the margin-bottom of 15px it added that to all 3, would you be able to change just the “Service 3” margin-bottom to say 10px so the bottom of the menu is closer to Service 3 but there is still 15px between the menu items. Hope that makes sense
Nice Post about drop-down menu button, this button is really helpful because with the help of this button we know about category of product. Thanks for sharing idea with us.
Pretty cool, Jason. Love you guys! Thank you!
Hi, Great tutorial, but the page is way too wide on my desktop, i.e. the right side is cut off.
Can you fix this so everything isn’t hanging halfway off the right side of the screen? Thanks!
Amazing article. It helps me to clear my confusion. Thank you .Keep posting.
Great! Thanks Shristi.
Great! Glad you liked it.