
The more you explore websites on the web, the more you come across some really customized on-page experiences. You might have been wondering how to achieve certain advanced functionality and the answer is often this: by using an animation JavaScript library. A popular animation library nowadays is GSAP. But just because you want to use a JavaScript Library for something, doesn’t mean you have to manually go through the HTML and CSS part as well. Divi can take over the larger part of your web design process; building and designing, which leaves you with more time to focus on custom functionality and animation. In today’s tutorial, for instance, we’re going to show you how to scroll horizontally when actually scrolling vertically using Divi and GSAP. This results in an advanced animation effect that you can customize however you want. You’ll be able to download the JSON file for free as well!
Let’s get to it.
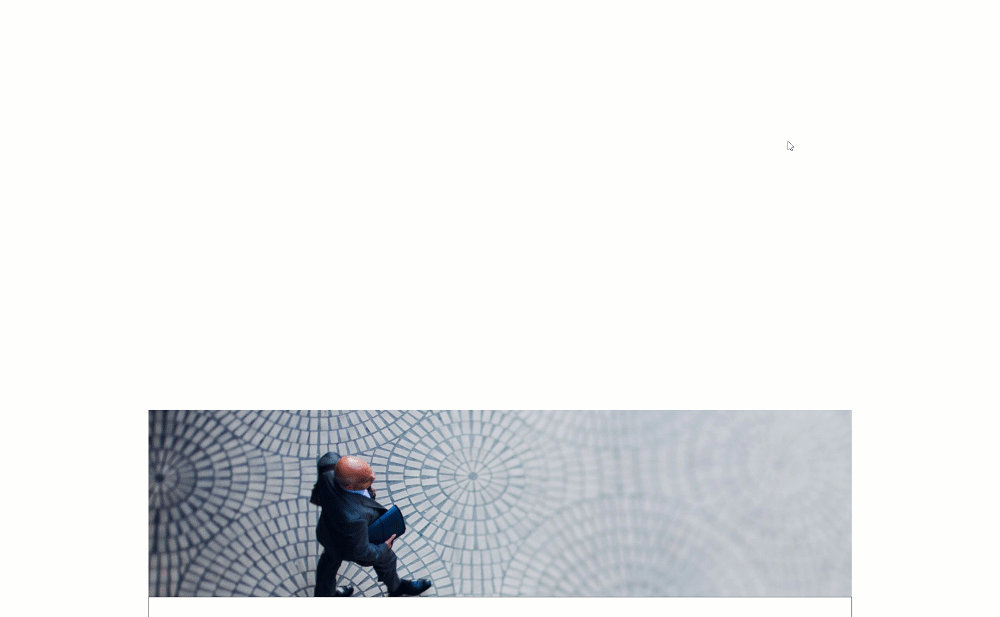
Preview
Before we dive into the tutorial, let’s take a quick look at the outcome across different screen sizes.
Desktop
Mobile

Download The Layout for FREE
To lay your hands on the free layout, you will first need to download them using the button below. To gain access to the download you will need to subscribe to our newsletter by using the form below. As a new subscriber, you will receive even more Divi goodness and a free Divi Layout pack every Monday! If you’re already on the list, simply enter your email address below and click download. You will not be “resubscribed” or receive extra emails.

Overview of Approach
What We’re Using
What We’re Creating
- Fake horizontal scrolling when scrolling vertically
- Pin effect
- Making the effect work on a number of sections of our choice (not necessarily the entire page)
- An effortless horizontal screen experience across all screen sizes
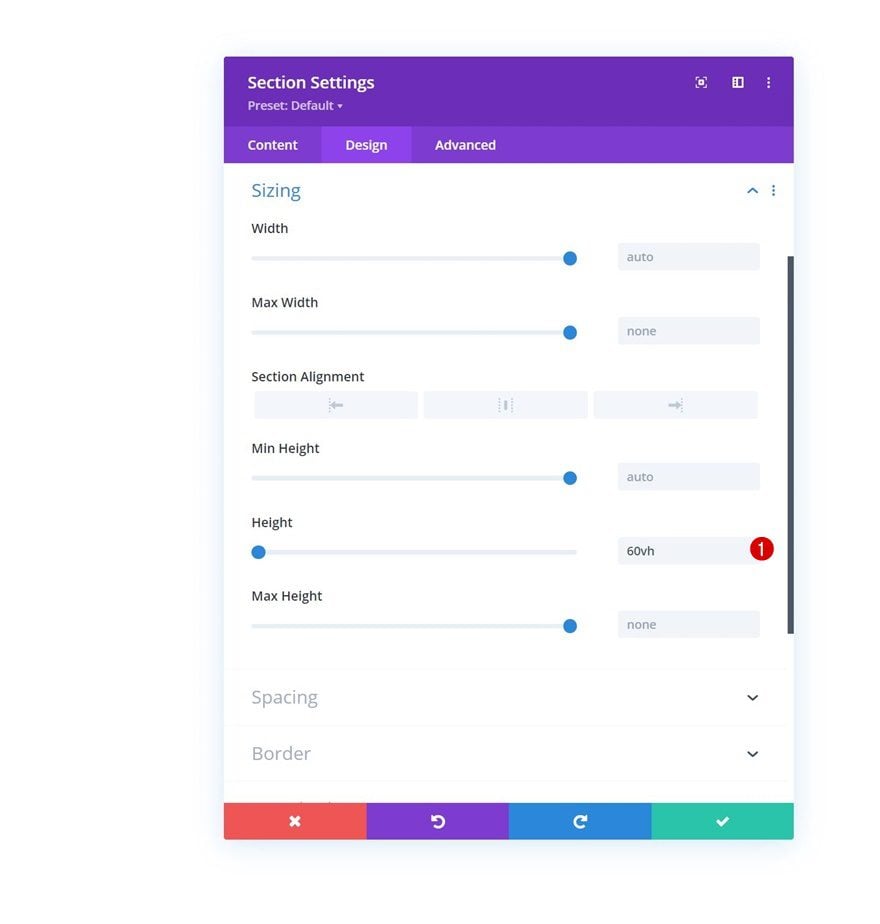
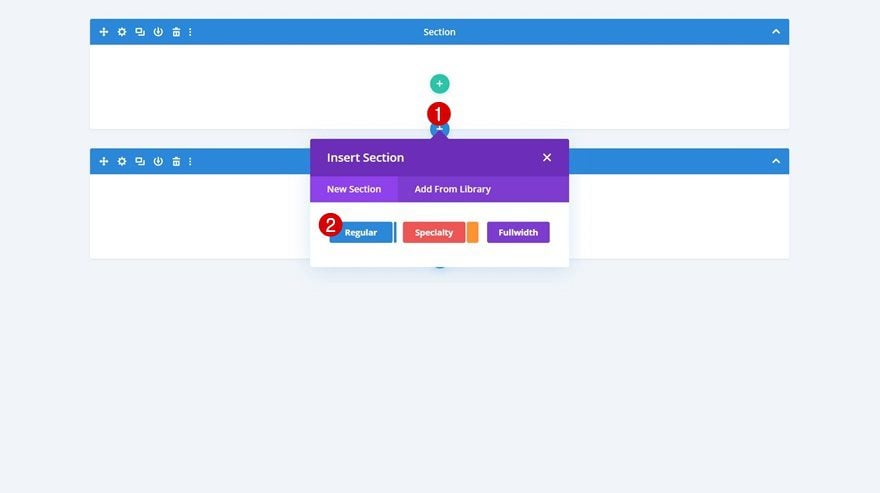
1. Add Placeholder Sections
Add Section #1
Start by adding a first section to the page you’re working on. This section will serve as a placeholder so we can watch the effect fall into place.
Sizing
Open the section settings and assign a height to the sizing settings.
- Height: 60vh
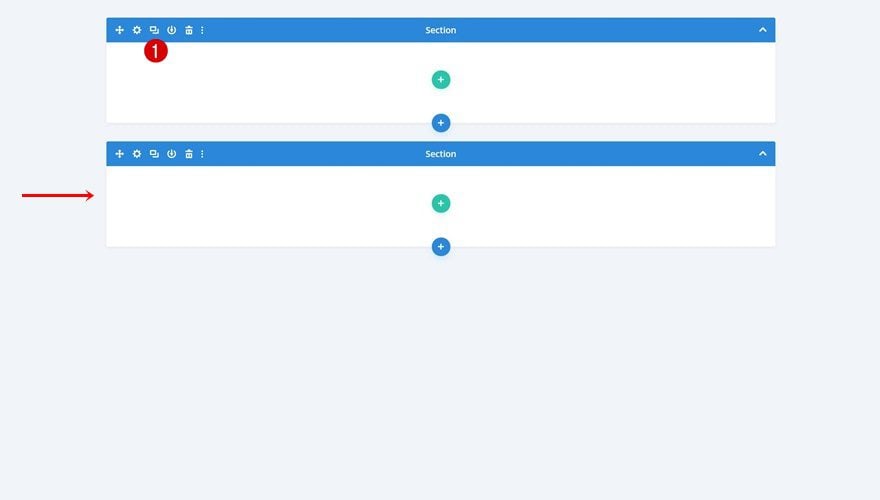
Clone Section #1
Then, clone the placeholder section once. This will help us generate some space at the top and bottom of our page, without it being part of the horizontal scrolling (see preview).
1. Build Section Design
Add New Section Between Sections
Now that we have the two placeholder sections in place, it’s time to create the first section that we’ll use inside our horizontal scrolling. Add this section right in between the two placeholder sections.
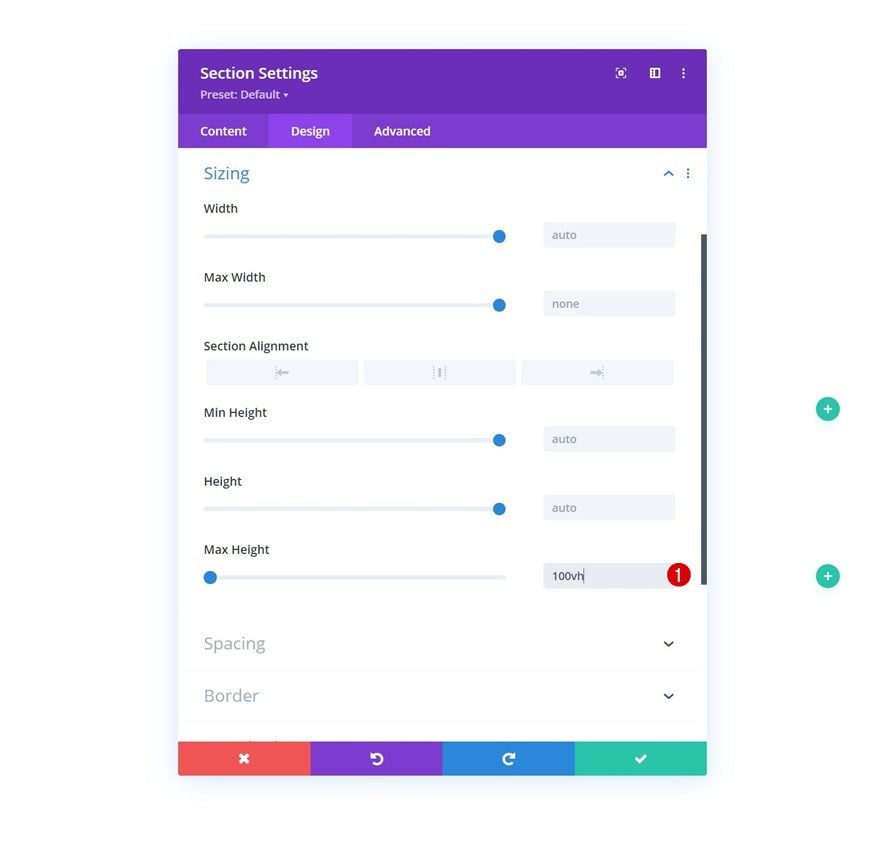
Sizing
Open the section settings and assign a max height in the sizing settings.
- Max Height: 100vh
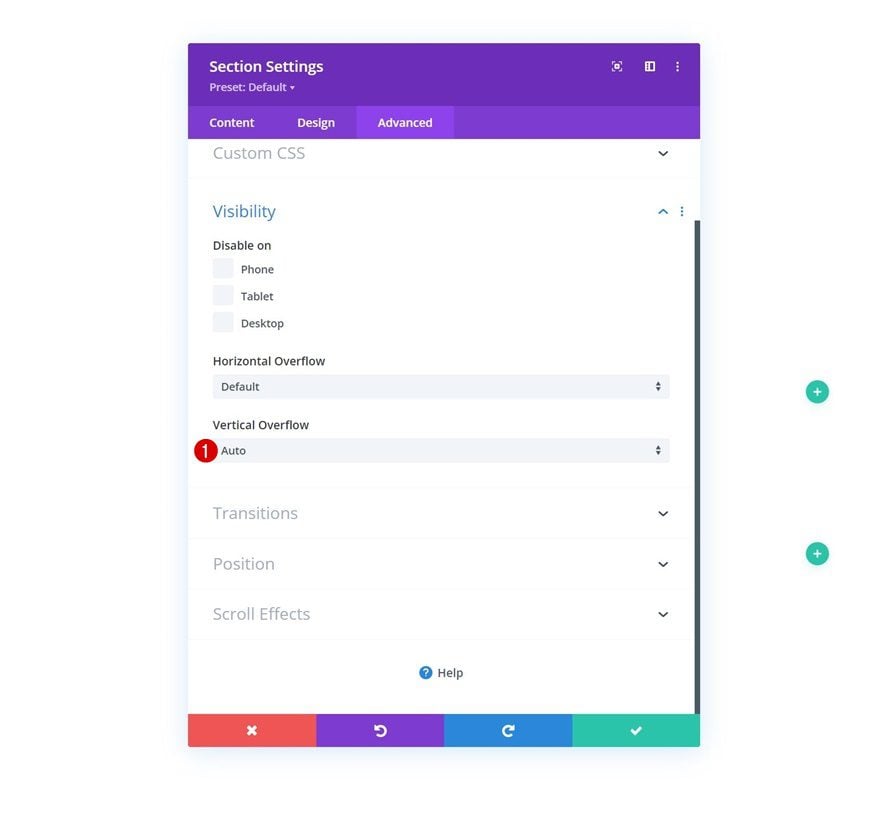
Overflows
We’re also setting the vertical overflow to auto. This, in combination with the max height in the previous step, will help us automatically generate a scrollbar on certain screen sizes where the section elements exceed the viewport height.
- Vertical Overflow: Auto
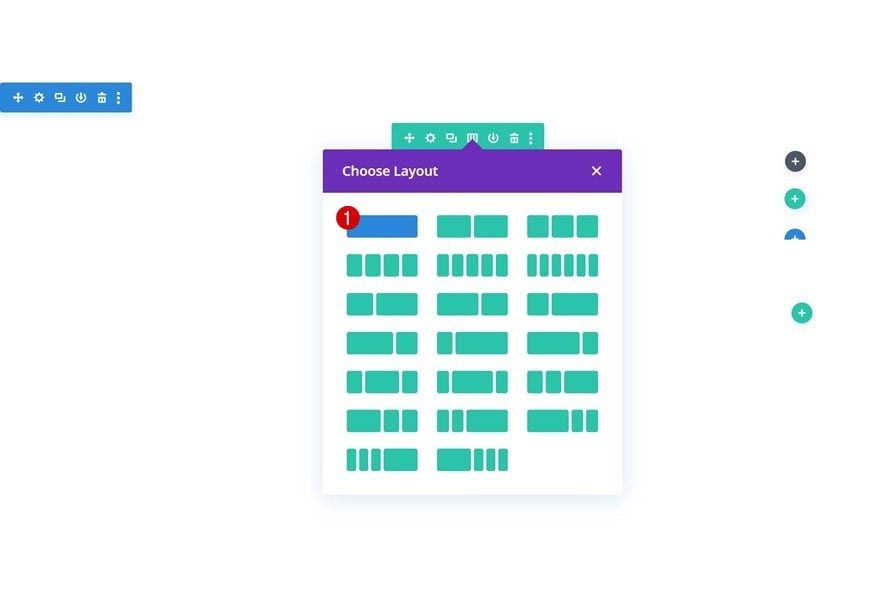
Add New Row
Column Structure
Continue by adding a new row to the section using the following column structure:
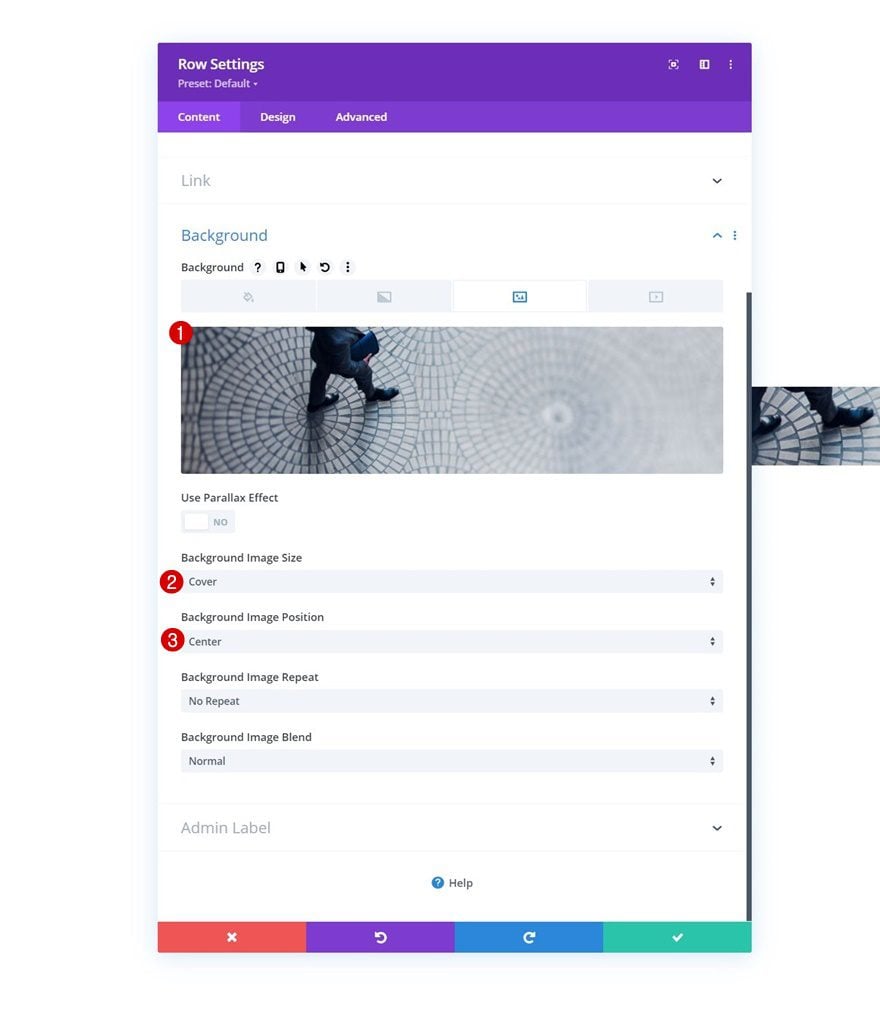
Background Image
Without adding modules yet, open the row settings and use a background image.
- Background Image Size: Cover
- Background Image Position: Center
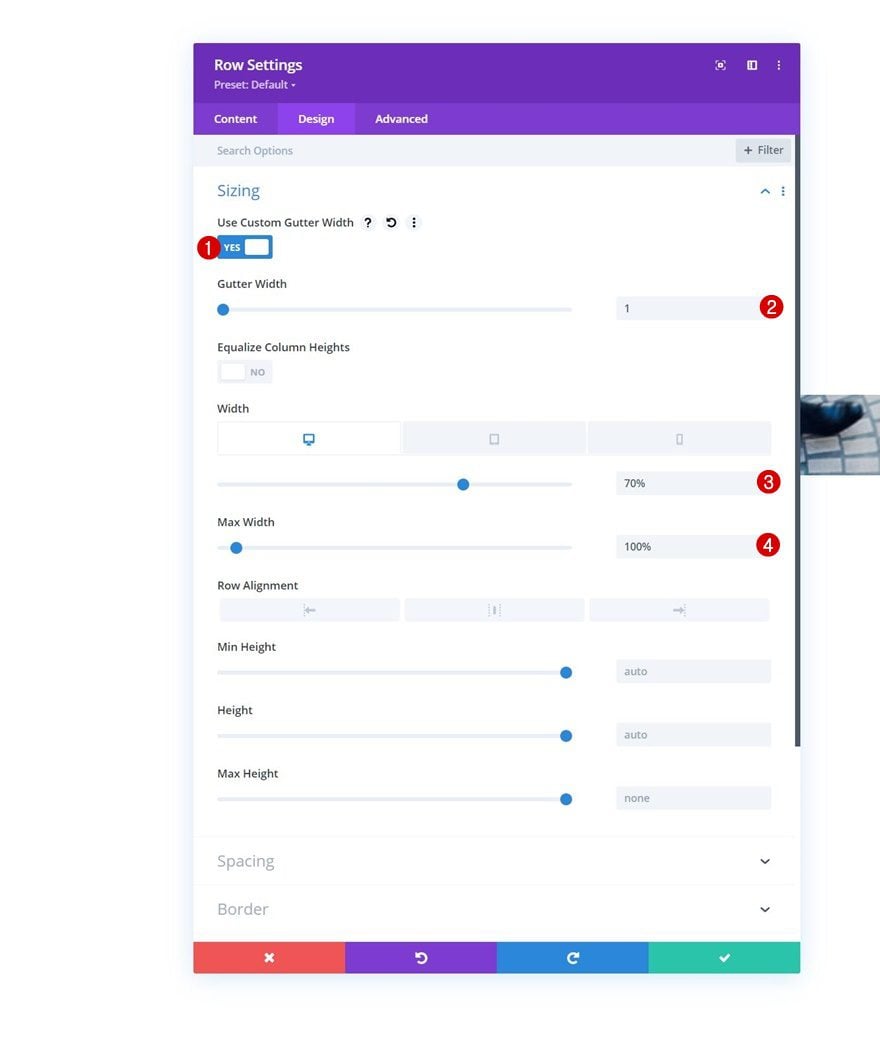
Sizing
Modify the sizing settings of the row next.
- Use Custom Gutter Width: Yes
- Gutter Width: 1
- Width:
- Desktop: 70%
- Tablet & Phone: 80%
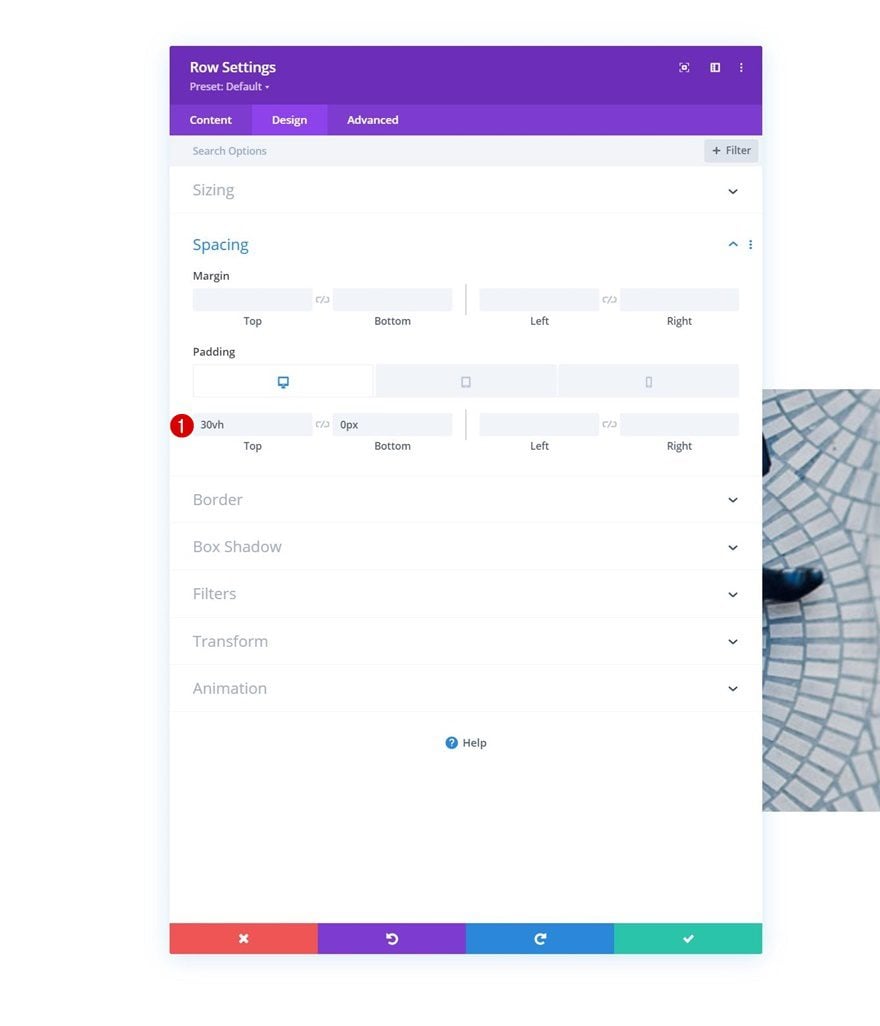
Spacing
Along with the spacing settings.
- Top Padding:
- Desktop: 30vh
- Tablet & Phone: 20vh
- Bottom Padding: 0px
Column Settings
Then, open the column settings.
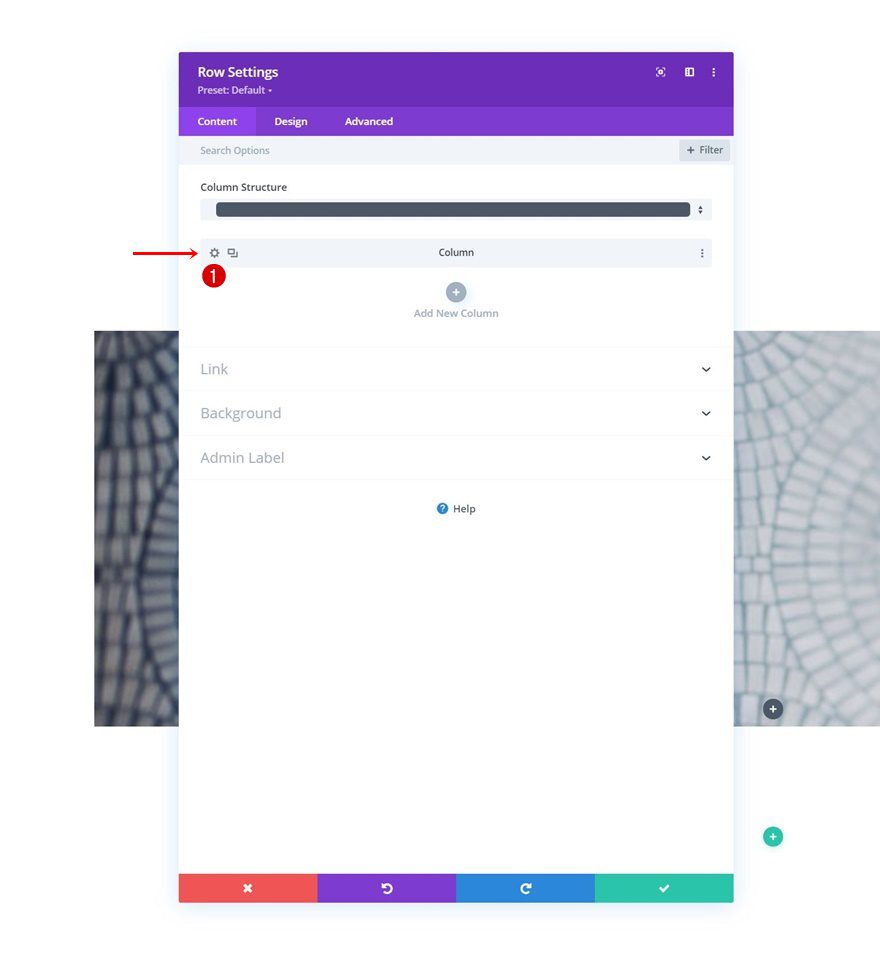
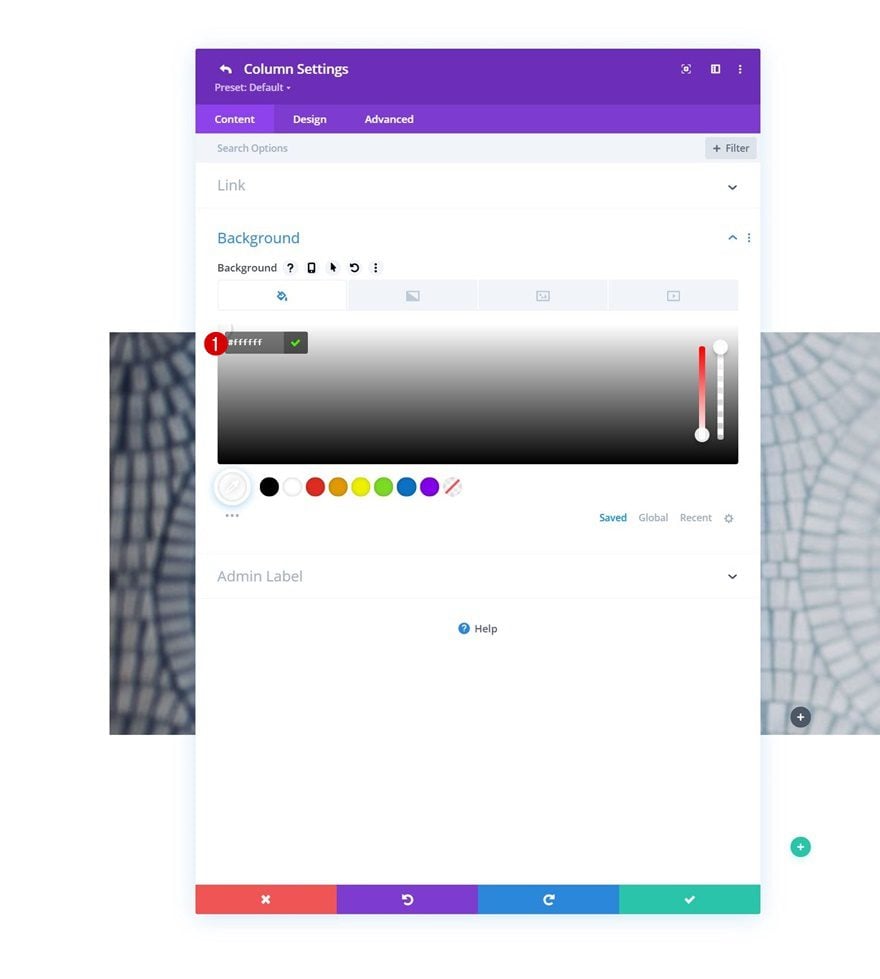
Background Color
Use a white background color for the column.
- Background Color: #ffffff
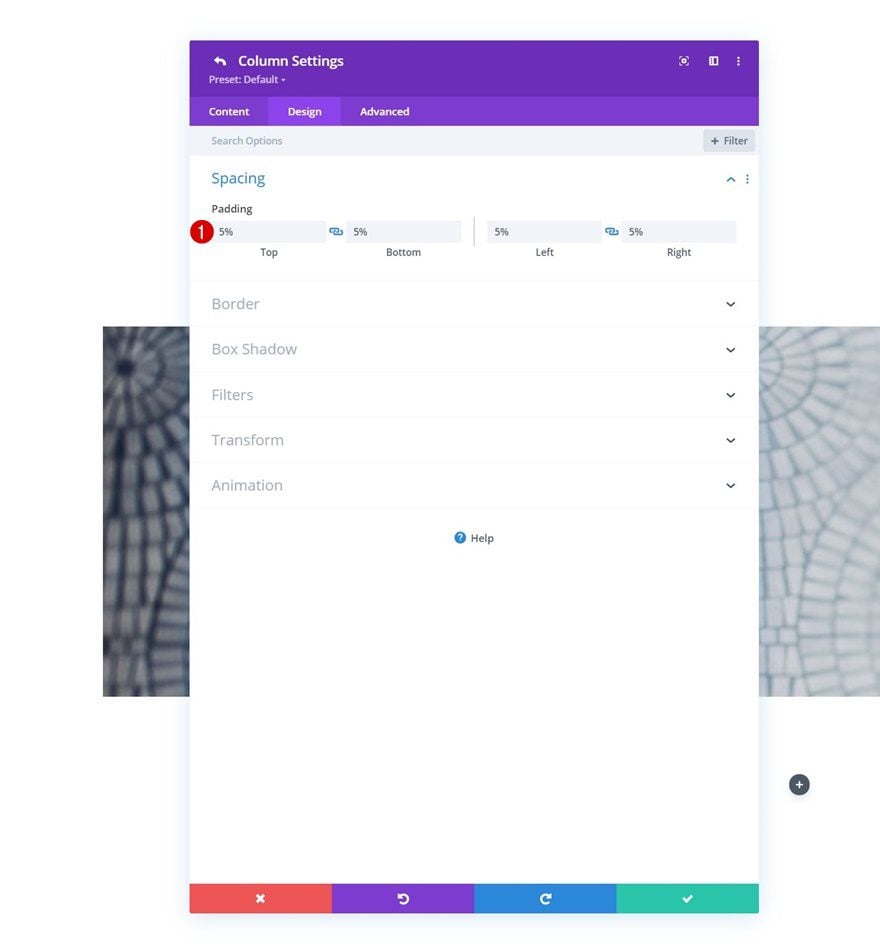
Spacing
Move on to the column’s design tab and apply some custom padding values.
- Top Padding: 5%
- Bottom Padding: 5%
- Left Padding: 5%
- Right Padding: 5%
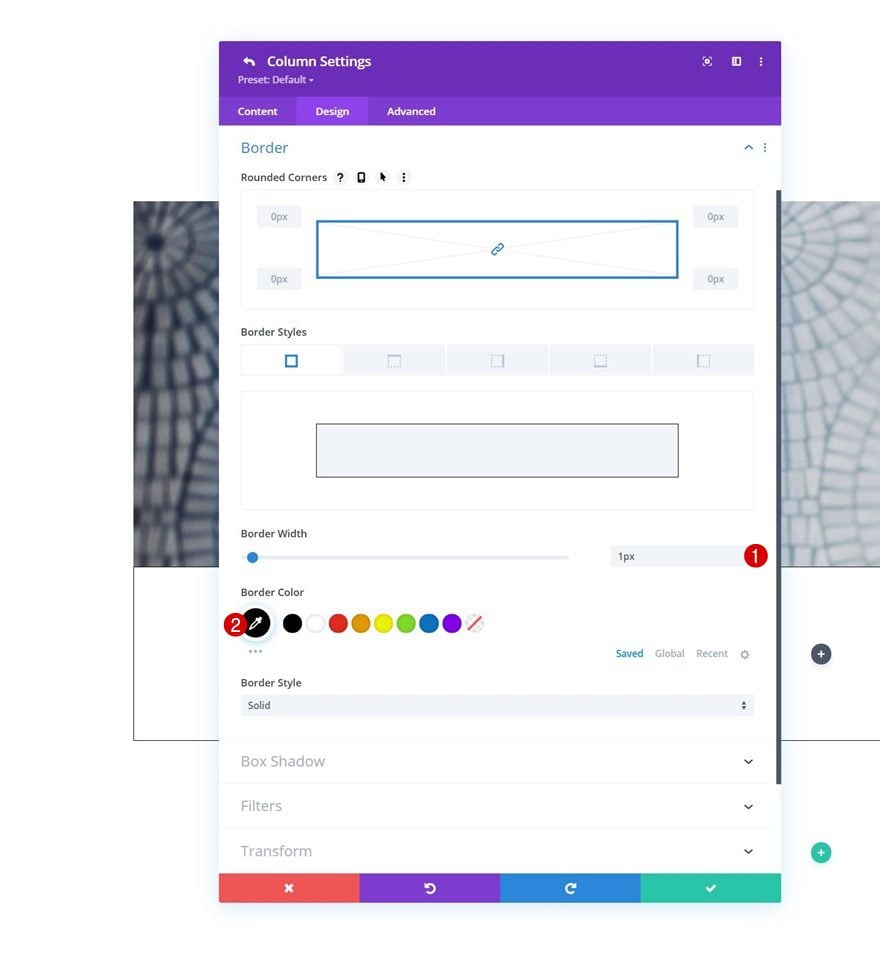
Border
Use a border too.
- Border Width: 1px
- Border Color: #000000
Add Text Module #1 to Column
Add H4 Content
Time to add modules, starting with a first Text Module containing some H4 content.

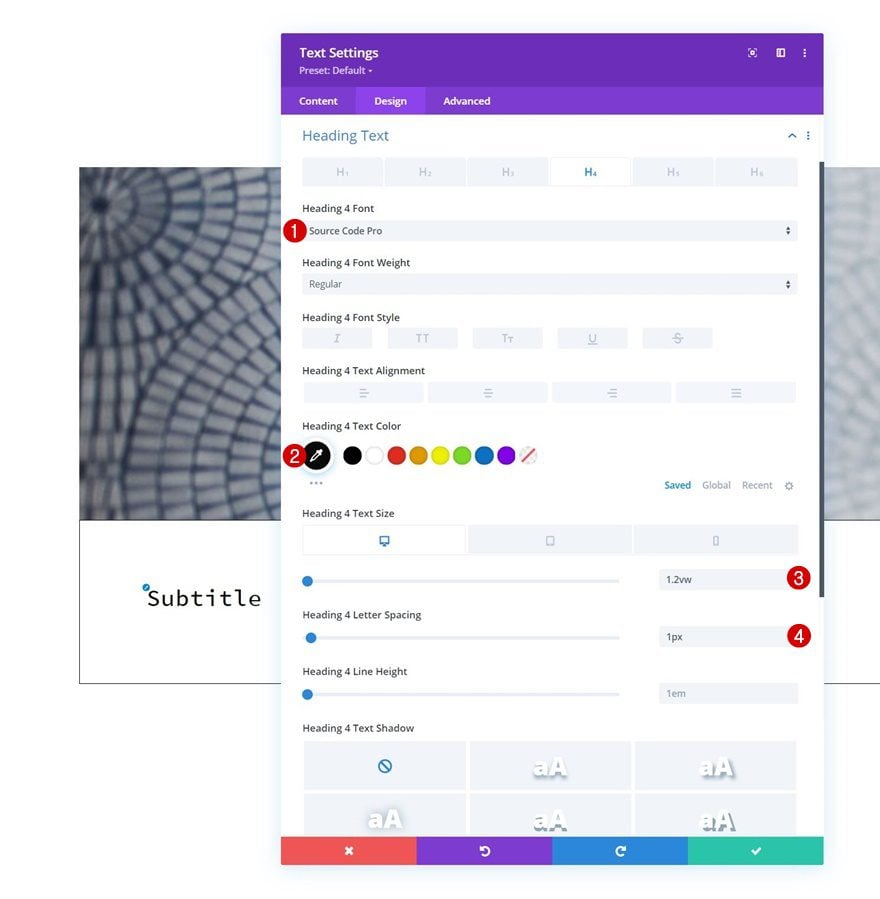
H4 Text Settings
Move on to the module’s design tab and change the H4 text settings as follows:
- Heading 4 Font: Source Code Pro
- Heading 4 Text Color: #000000
- Heading 4 Text Size:
- Desktop: 1.2vw
- Tablet: 2.5vw
- Phone: 3.5vw
- Heading 4 Letter Spacing: 1px
Add Text Module #2 to Column
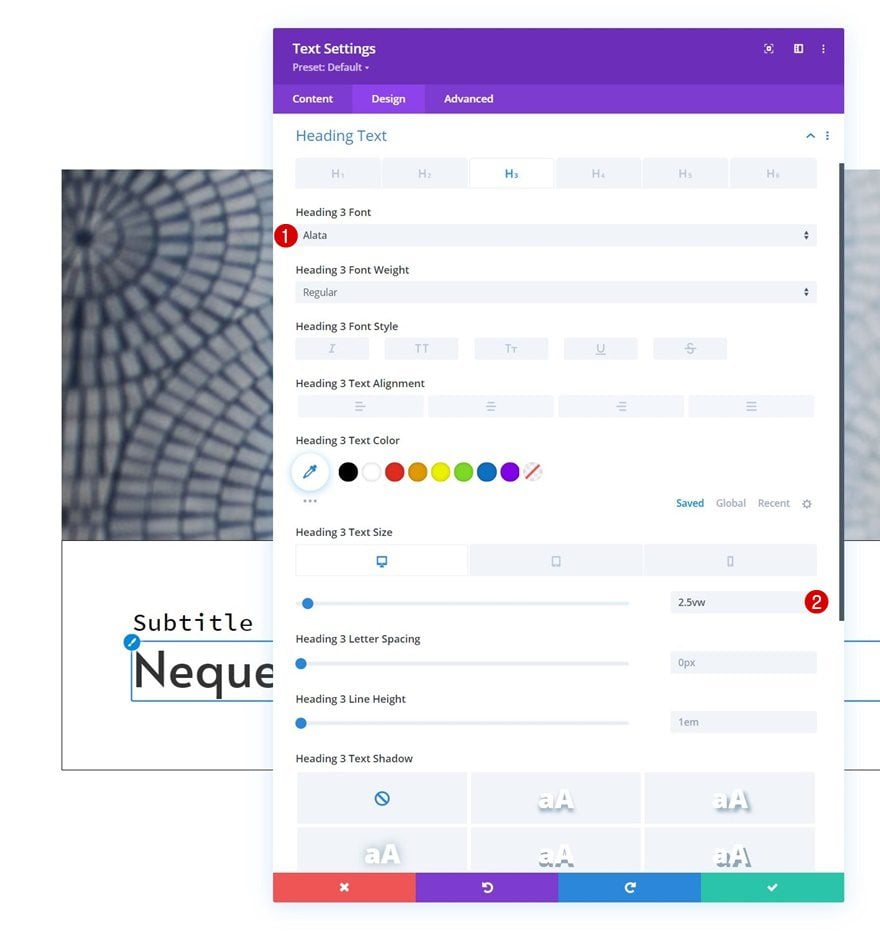
Add H3 Content
Add another Text Module right below the previous one and use some H3 content in the content box.
H3 Text Settings
Move on to the module’s design tab and change the H3 text settings accordingly:
- Heading 3 Font: Alata
- Heading 3 Text Size:
- Desktop: 2.5vw
- Tablet: 4vw
- Phone: 7vw
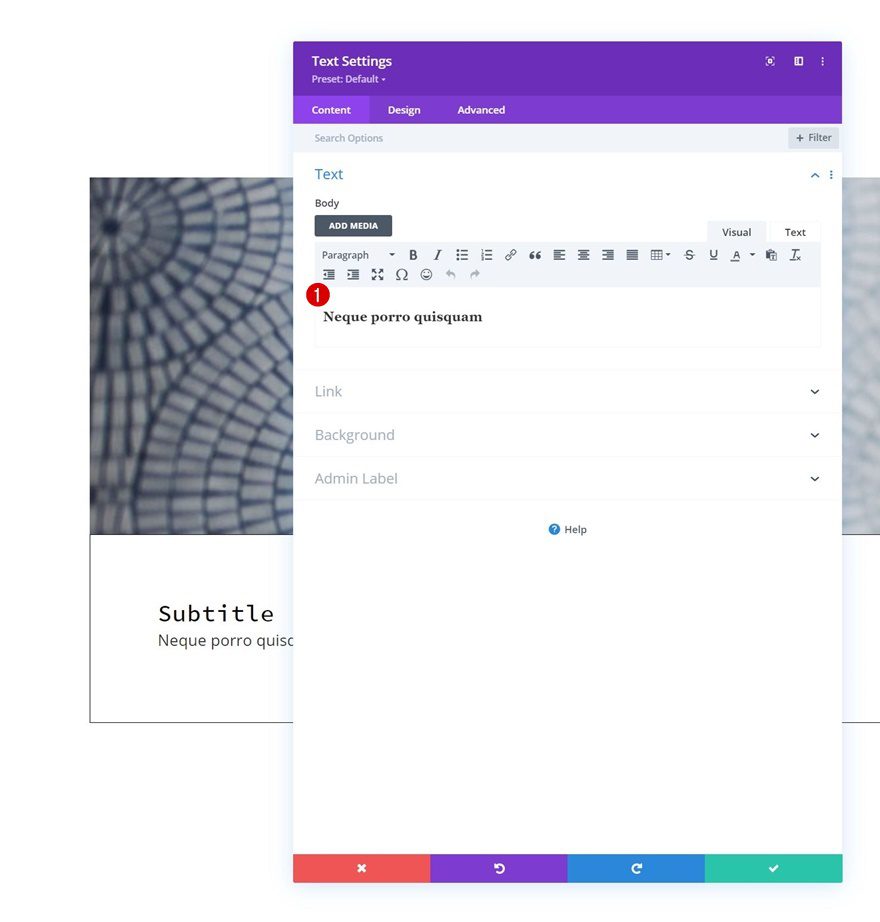
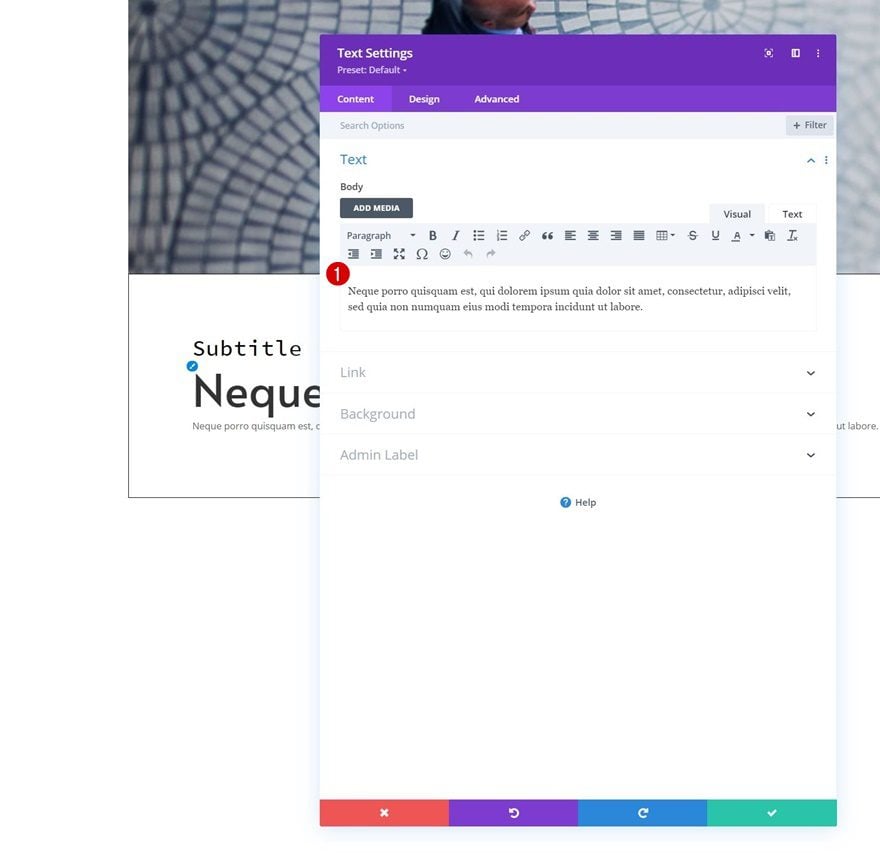
Add Text Module #3 to Column
Add Content
Add a last Text Module to the column with some description content of your choice.
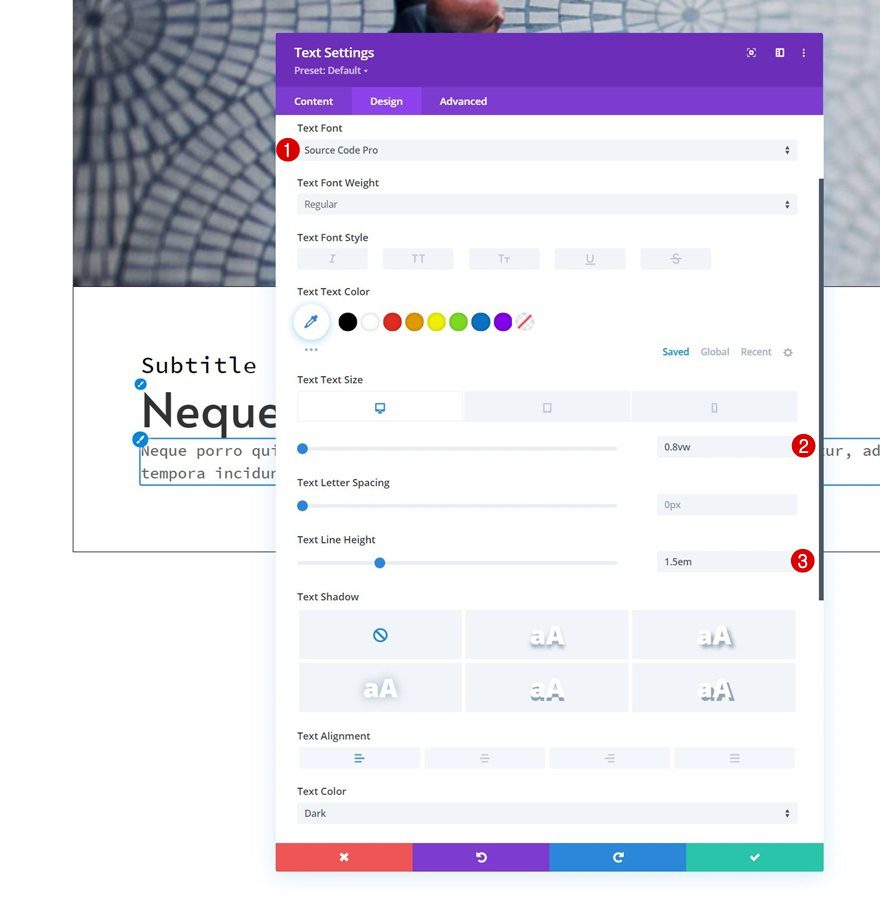
Text Settings
Change the module’s text settings accordingly:
- Text Font: Source Code Pro
- Text Size:
- Desktop: 0.8vw
- Tablet: 2vw
- Phone: 3vw
- Text Line Height: 1.5em
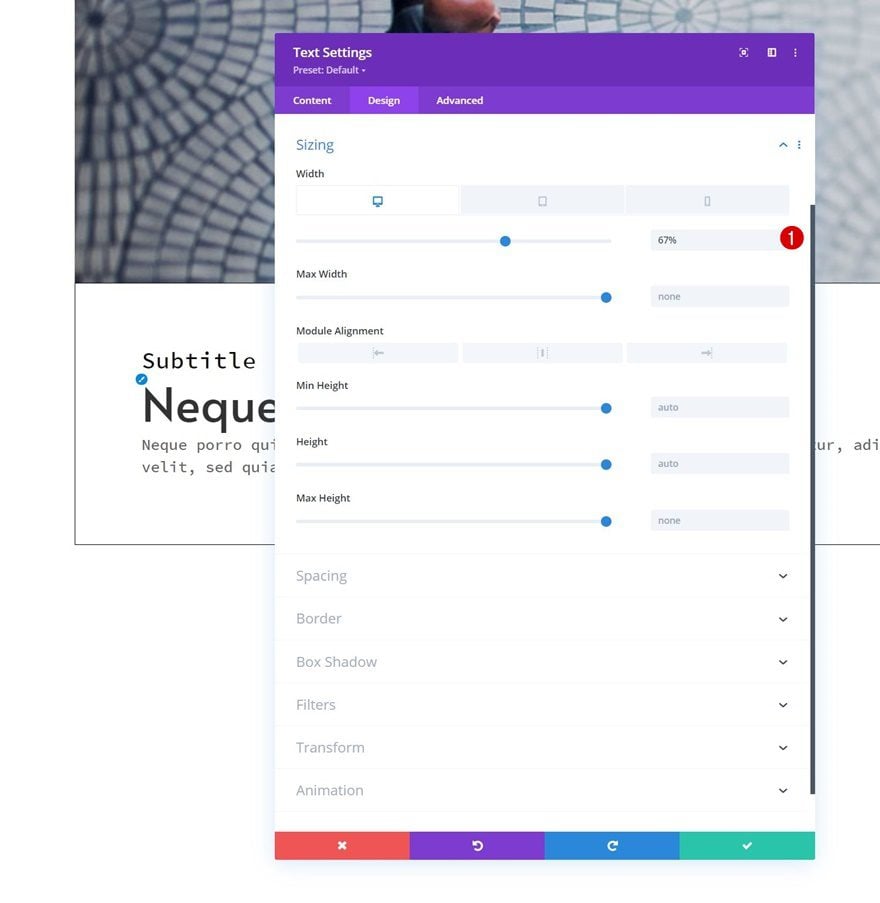
Sizing
Change the sizing settings next.
- Width:
- Desktop: 67%
- Tablet & Phone: 100%
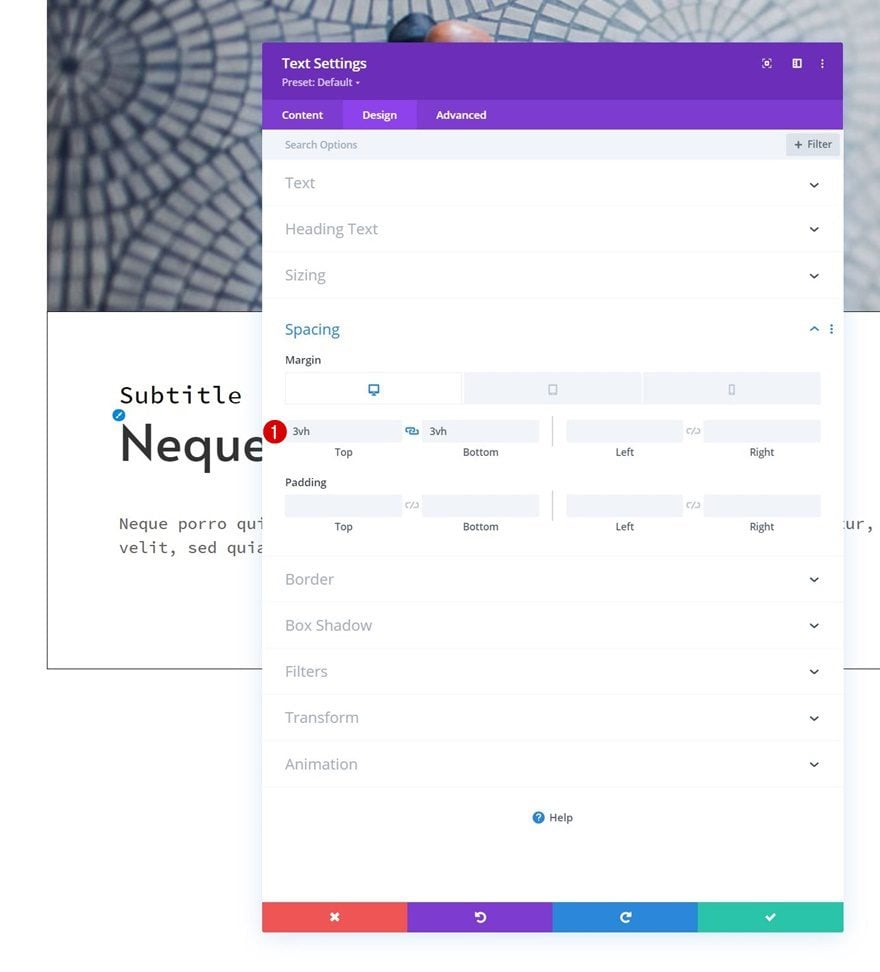
Spacing
And complete the module settings by applying some responsive padding values to the spacing settings.
- Top Padding:
- Desktop: 3vh
- Tablet & Phone: 5vh
- Bottom Padding:
- Desktop: 3vh
- Tablet & Phone: 5vh
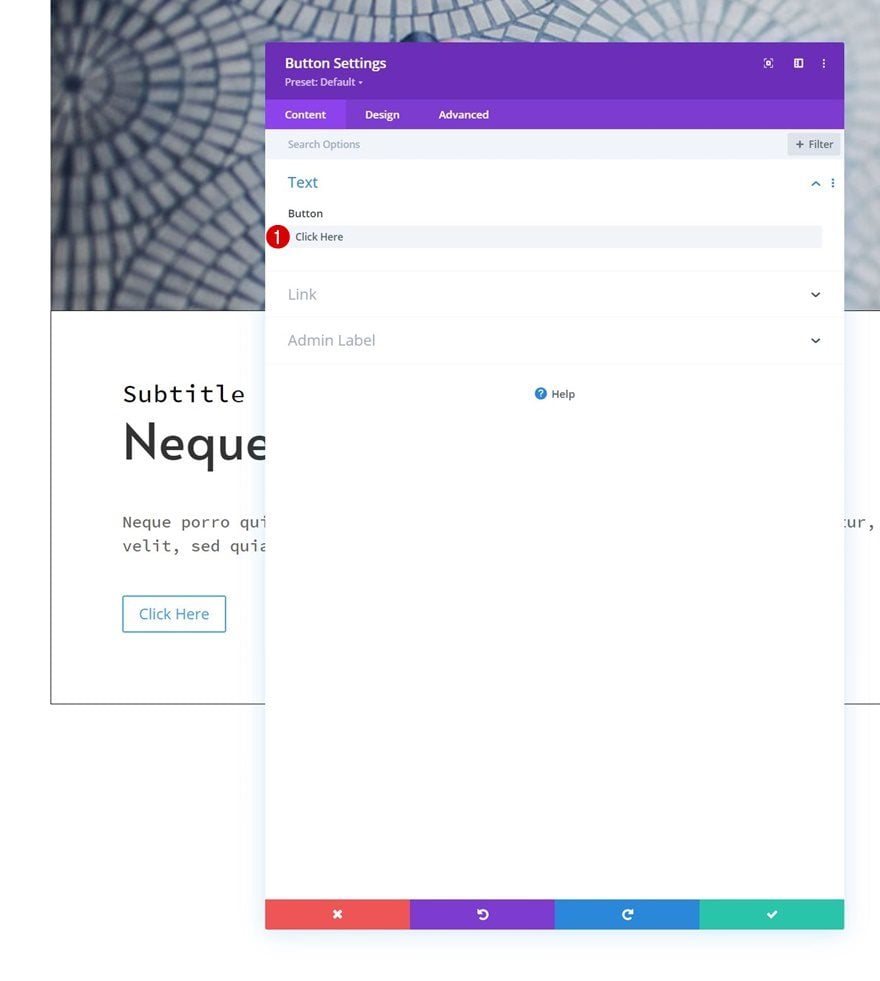
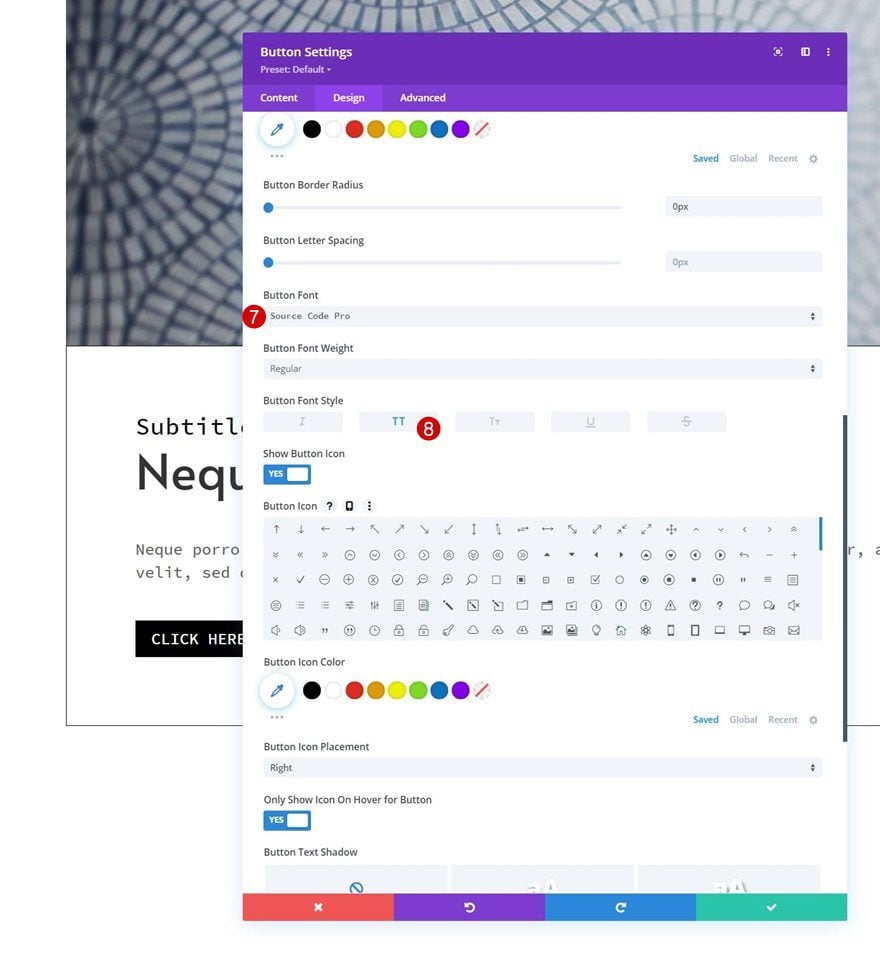
Add Copy
The last module we need to complete the row design is a Button Module. Add some copy of your choice.
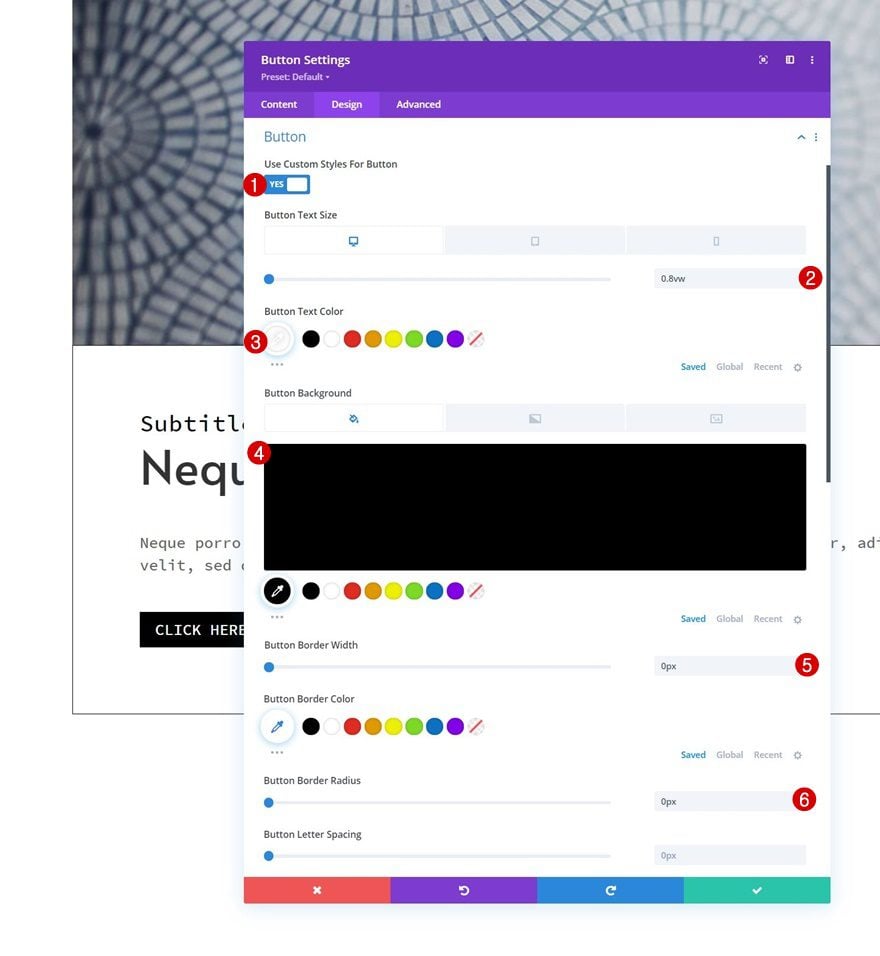
Button Settings
Move on to the module’s design tab and change the button settings accordingly:
- Use Custom Styles For Button: Yes
- Button Text Size:
- Desktop: 0.8vw
- Tablet: 2vw
- Phone: 3vw
- Button Text Color: #ffffff
- Button Background Color: #000000
- Button Border Width: 0px
- Button Border Radius: 0px
- Button Font: Source Code Pro
- Button Font Style: Uppercase
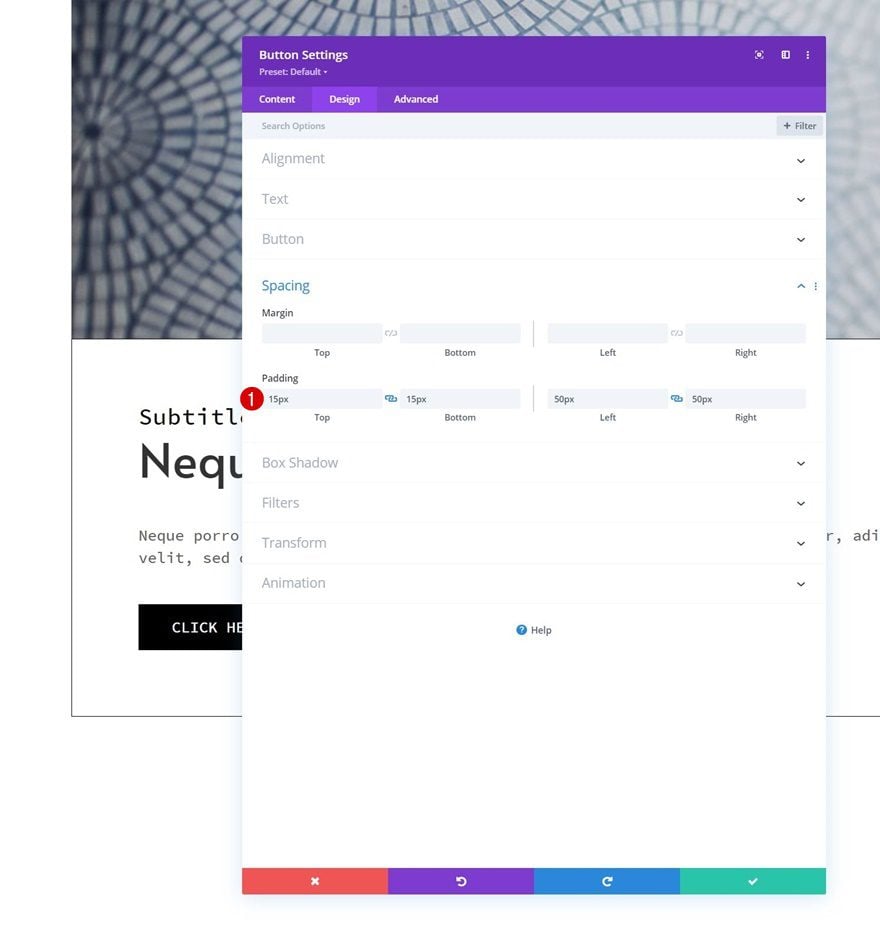
Spacing
Add some custom padding values next.
- Top Padding: 15px
- Bottom Padding: 15px
- Left Padding: 50px
- Right Padding: 50px
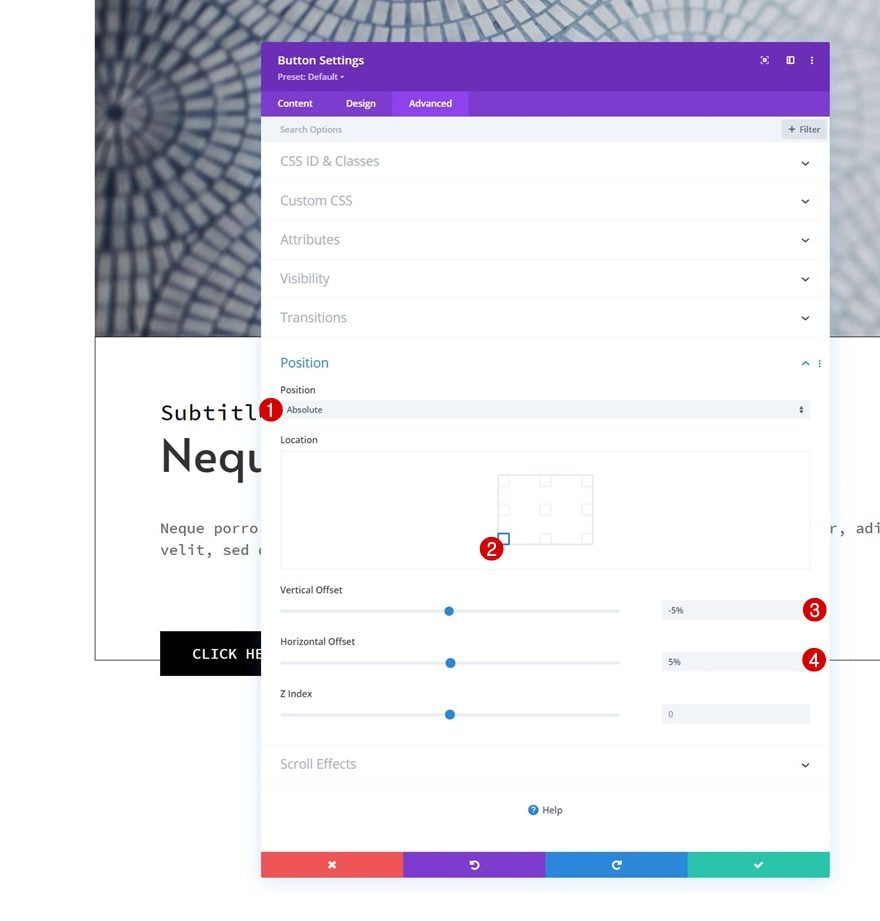
Position
And reposition the module in the advanced tab.
- Position: Absolute
- Location: Bottom Left Corner
- Vertical Offset: -5%
- Horizontal Offset: 5%
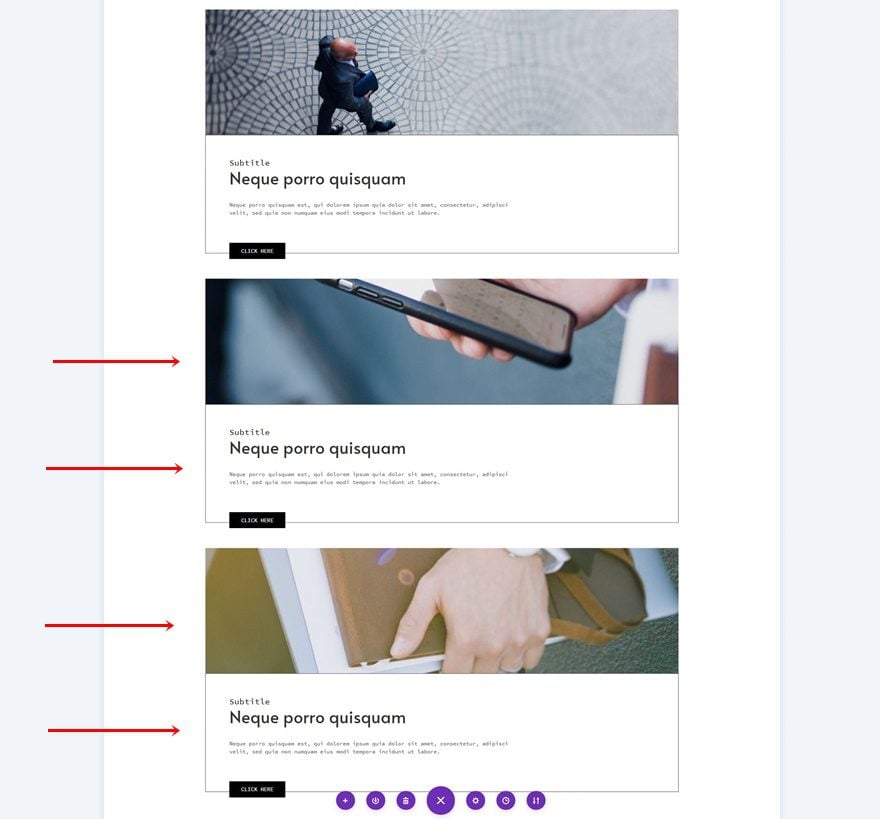
2. Reuse Section
Clone Section Twice
Once you’ve completed the first section, you can clone it twice.

Change Image & Copy & Link
Make sure you change the image, copy and link in each duplicate section.
2. Add Functionality
Add CSS Class to Each Section You Want to Include in Horizontal Scroll
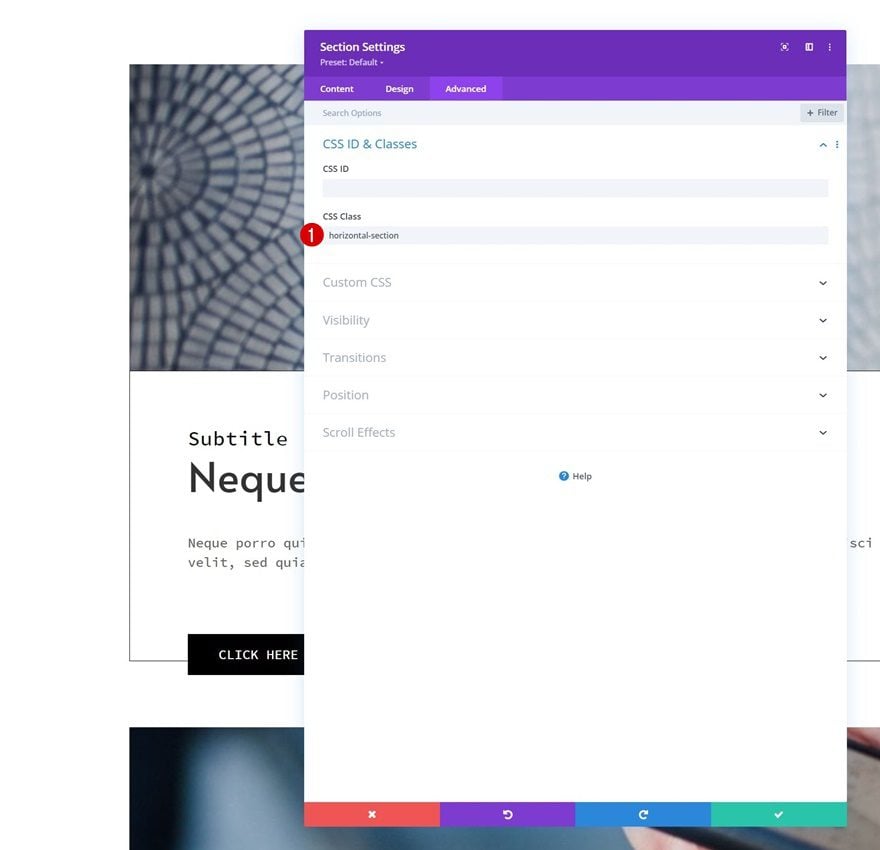
Now that we have all elements in place, we can start focusing on the functionality of it all. The first step to accomplishing the outcome is assigning a custom CSS class to each section that you want to be part of the horizontal scrolling. In this case, that means the three sections between placeholder sections.
- CSS Class: horizontal-section
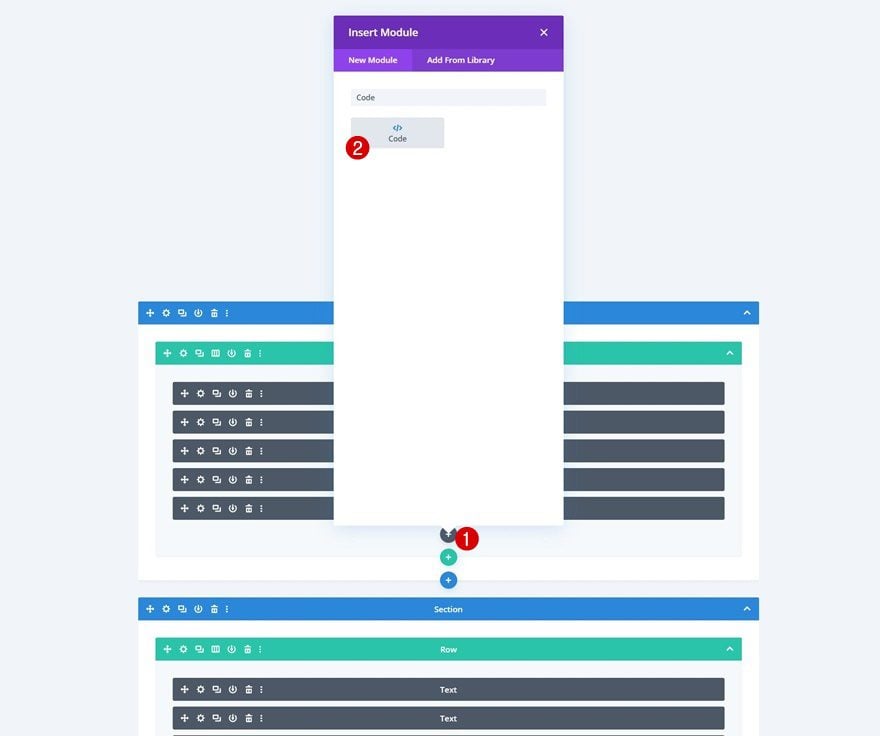
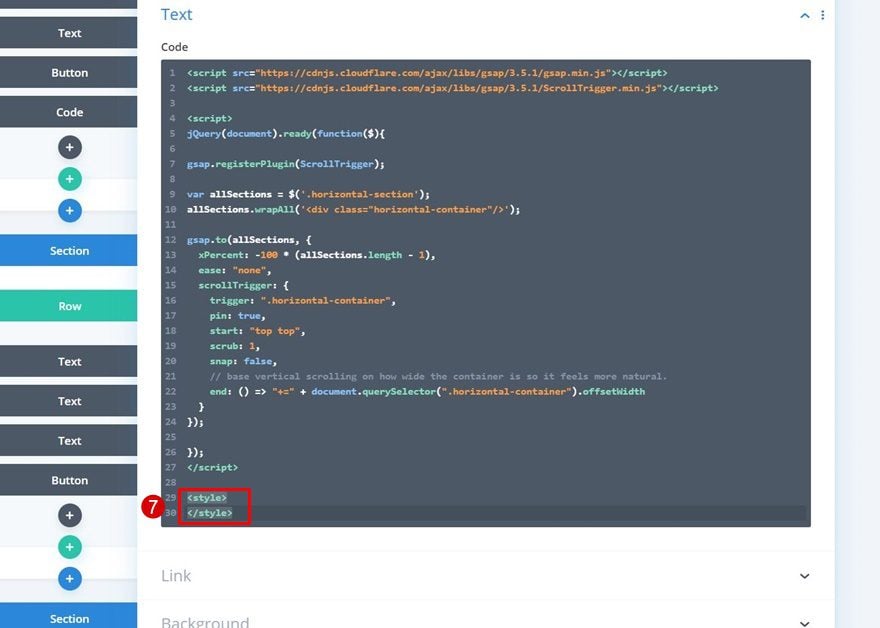
Add New Code Module Somewhere Inside Page
Next, add a Code Module to the page. This can be anywhere you want.
Add GSAP & ScrollTrigger Libraries First
Copy-paste the GSAP and ScrollTrigger libraries inside the Code Module. Use script tags for this with the following sources:
src="https://cdnjs.cloudflare.com/ajax/libs/gsap/3.5.1/gsap.min.js"
src="https://cdnjs.cloudflare.com/ajax/libs/gsap/3.5.1/ScrollTrigger.min.js"
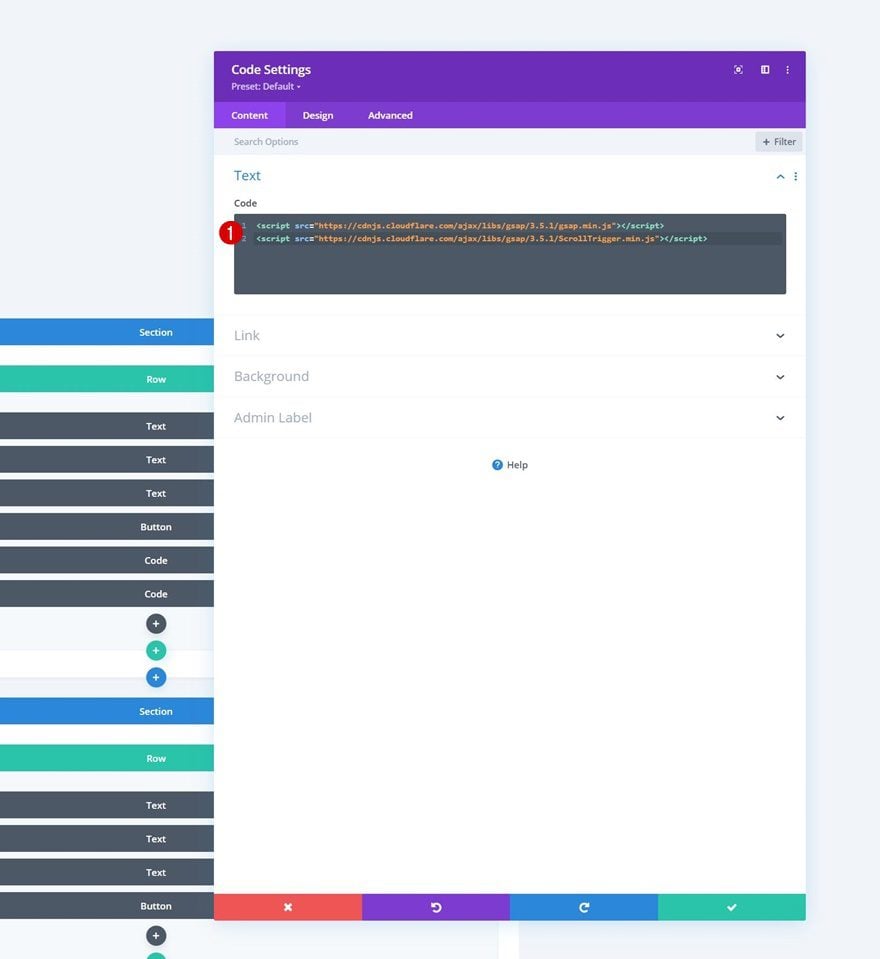
Right below the library script tags, we’ll add some new script tags.
Add JS Code
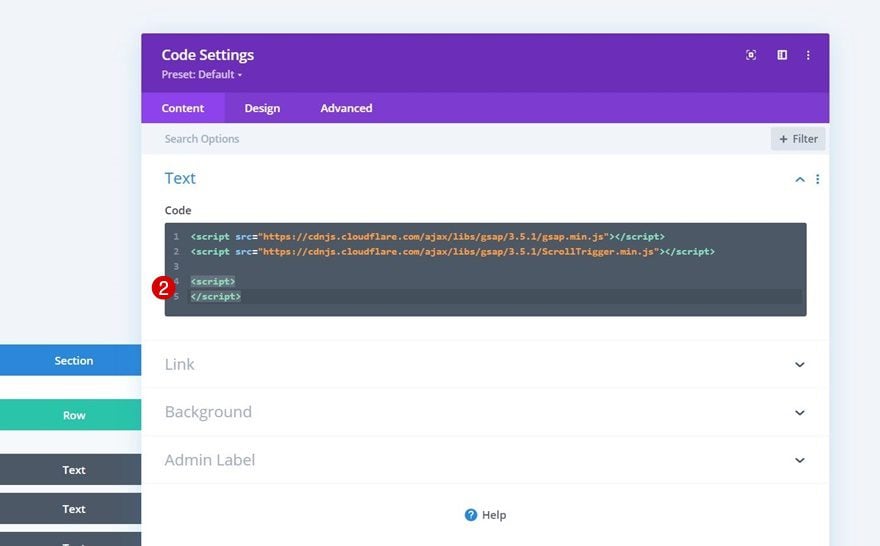
Prepare for JQuery Usage
Inside these script tags, we’ll start by loading JQuery.
jQuery(document).ready(function($){
});
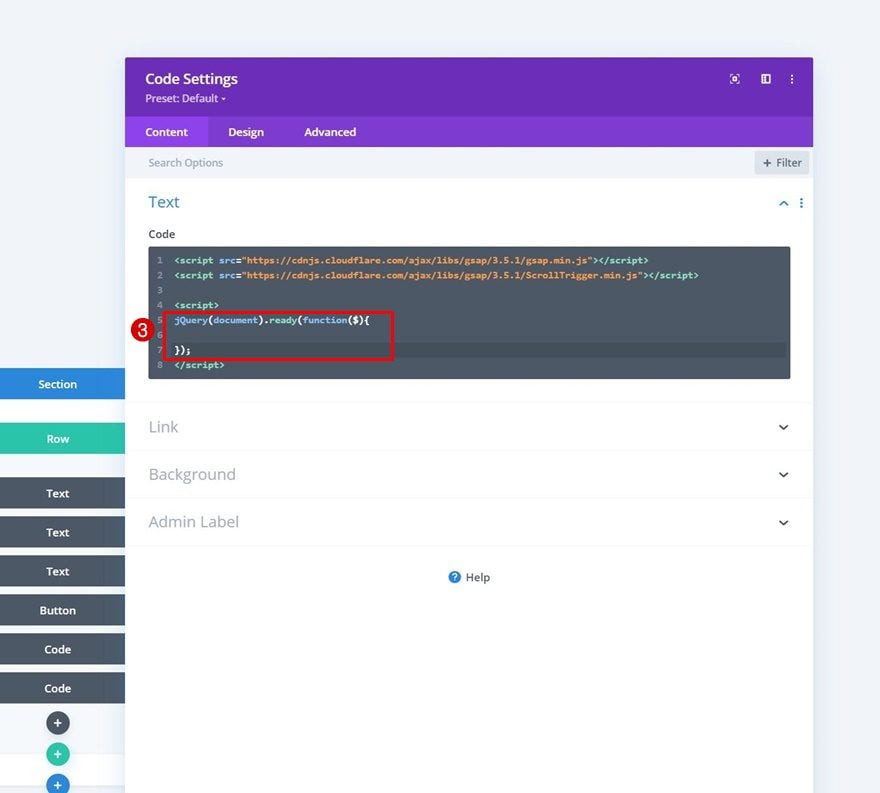
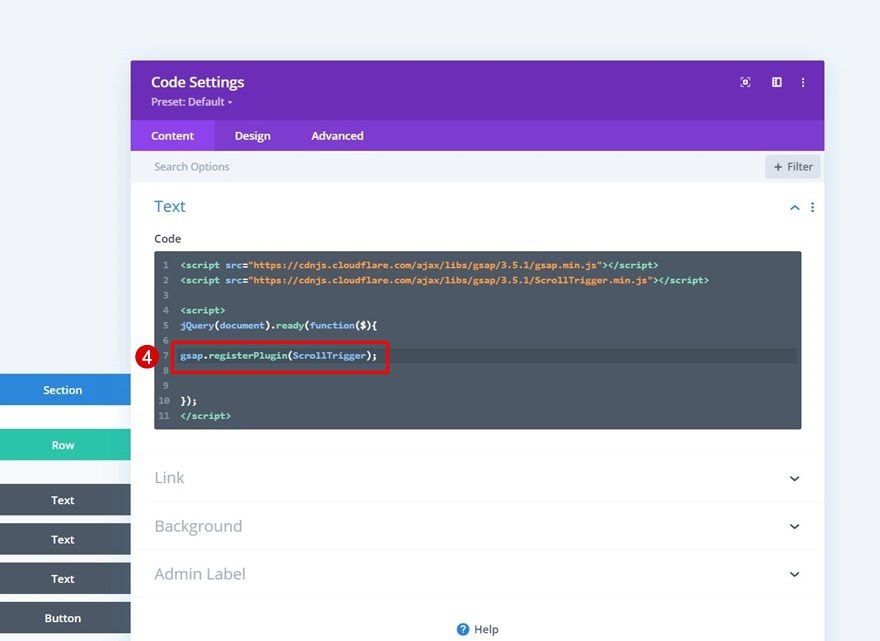
Register ScrollTrigger Plugin
Then, we’ll register the ScrollTrigger plugin.
gsap.registerPlugin(ScrollTrigger);
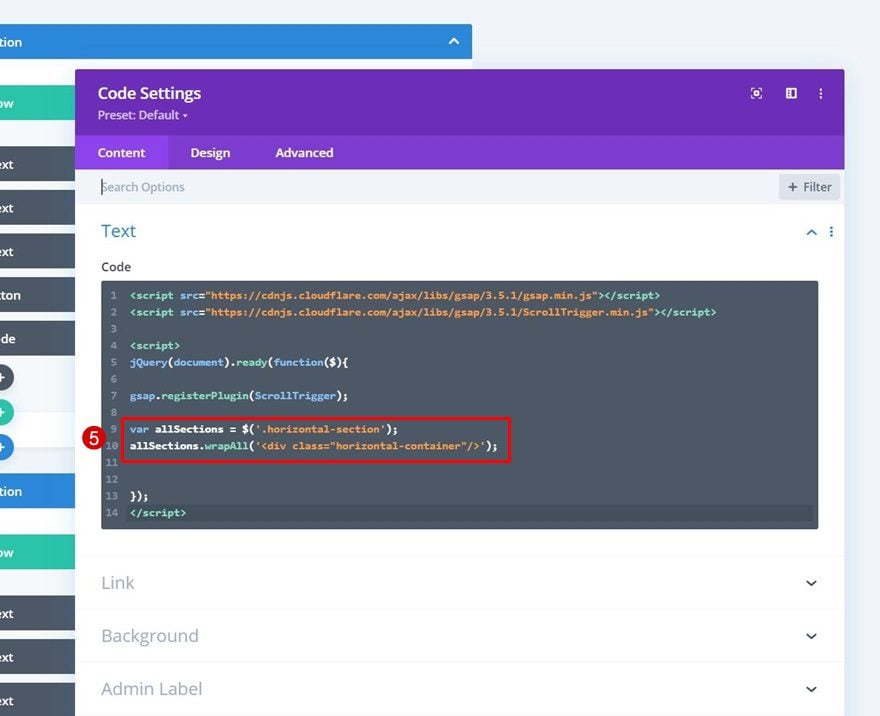
Wrap All Relevant Sections in a New Div
We’re also placing each one of the relevant sections inside a new div using the following code lines:
var allSections = $('.horizontal-section');
allSections.wrapAll('<div class="horizontal-container"/>');
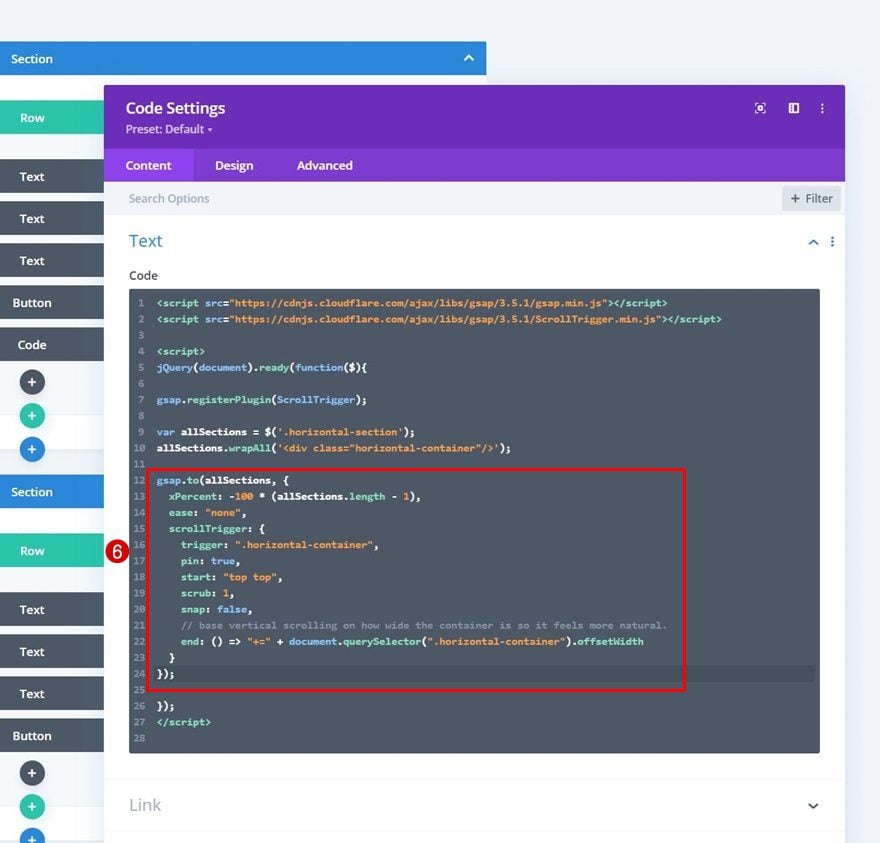
Create New GSAP Tween with ScrollTrigger
To make the fake horizontal scrolling work, we’re going to use a new tween with a scroll trigger. The code that makes this happen is the following:
gsap.to(allSections, {
  xPercent: -100 * (allSections.length - 1),
  ease: "none",
  scrollTrigger: {
    trigger: ".horizontal-container",
    pin: true,
    start: "top top",
    scrub: 1,
    snap: false,
    // base vertical scrolling on how wide the container is so it feels more natural.
    end: () => "+=" + document.querySelector(".horizontal-container").offsetWidth
  }
});
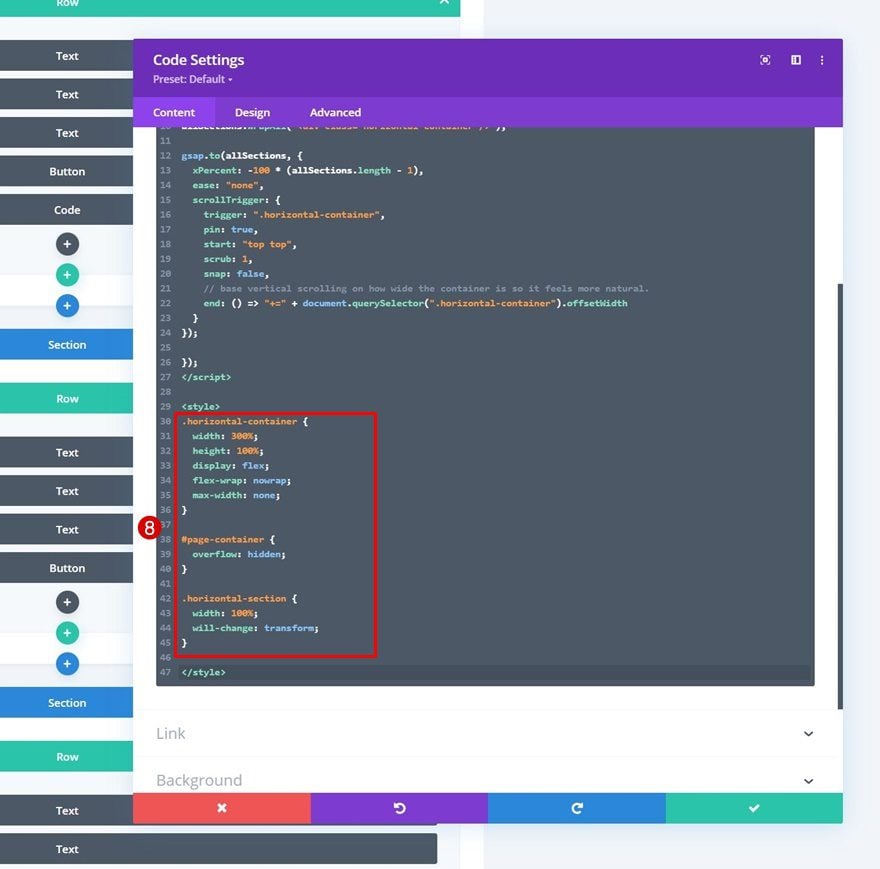
Next, we’ll add some style tags to our Code Module.
And we’ll complete the tutorial, and the functionality, by adding the following lines of CSS code between the style tags:
.horizontal-container {
width: 300%;
height: 100%;
display: flex;
flex-wrap: nowrap;
max-width: none;
}

#page-container {
overflow: hidden;
}

.horizontal-section {
width: 100%;
will-change: transform;
}
Preview
Now that we’ve gone through all the steps, let’s take a final look at the outcome across different screen sizes.
Desktop
Mobile
Final Thoughts
In this post, we’ve shown you how to go the extra mile for your website with Divi and GSAP. More specifically, we’ve shown you how to scroll horizontally when actually scrolling vertically on your page. This is a custom type of animation that you might have come across at a certain point and wondered how you could do it with DIvi. You were able to download the JSON file for free as well! If you have any questions or suggestions, feel free to leave a comment in the comment section below.
If you’re eager to learn more about Divi and get more Divi freebies, make sure you subscribe to our email newsletter and YouTube channel so you’ll always be one of the first people to know and get benefits from this free content.


THANK YOU 1000X FOR THIS.
I’ve always wondered if this was possible because sometimes we don’t show the functionality overlays and users don’t know they can scroll side to side on items.
This is wonderful!
HEY HAPPY ANIVVERSARY TO YOU DIVI.
Loved your theme code and already purchase a new theme from you for a blog. your themes are really awesome and user friendly.
and your page builder is better than any other builder
thanks for best support.
The effect is nice, but it does not work properly on mobile. It is impossible to stay on one section – specially the middle one – and actually read the content. Too bad. Would be good to have an update on this possibility though.
Fantastic effect. Extremely useful 🙂 Thank you for the help. I have a technical question:
When you start scrolling, the scroll goes to vertical and then horizontally. Even if i erase the top placeholder, the scroll starts for a moment going vertically and then horizontally. My question is: how can i make a straight horizontal scrolling without the glitch of going vertically at the beginning?
Hi, this is awesome! However on mobile there’s a big gap at the bottom. Which part should I adjust? I really appreciate your help. Thanks!
Thanks for this tutorial – looking forward to this challenge.
One piece of feedback about this article; it would have been really cool to try a working demo of this effect to help conceptualize the process from a learning perspective. I searched top and bottom on this page for a link a to try a demo of this project in its completion.
Thank you for the content!
the wrap in a new div doesn’t work in my case..
all my sections stay in block, I’ve tried to remove all the script for the scrolling to have only the function to wrap but same, it doesn’t work.
Please help me figure it out.
Hi Gasha!
I don’t know if this may help, but I have used this code a few times and discovered that to scroll smoothly I do this setup:
The first section (-when the horizontal scrolling starts):
visibility:
horizontal overflow: Scroll
vertical overflow: Hidden
Other sections (that are set to horizontal scrolling):
horizontal overflow: Hidden
vertical overflow: Hidden
This setup helps with the scrolling not getting block and smooths transitions.
Hope this helps!
Have a great day!
Hi there, this effect works in my site, but the anchor links doesn’t works, I need help please
Hiya, Joel! I suggest that you reach out to the Support Team directly by opening a chat using the pink circle button floating at the bottom.
This is cool. Is there a way to have columns scroll inside one section instead? i’m trying to have some testimonial cards scroll horizontally but on top a background that should stay fixed as they scroll. Or if you have a better suggestion? I am having a helluva time getting a horizontal row of cards to scroll horizontally. I’d be happy with a slideshow (doesn’t necessarily have to scroll while mouse scrolling), but your slider module is not customizable enough to do this. I want 3 side by side slides to show at at time.
Hello,
Thanks so much for this tutorial. Is one of my favourite features.
I am trying right now to apply it but I am finding some issues when doing scroll effects and also when using Lottie files with the target scroll.
The animations don’t load exactly on the section but before getting there.
Is there a way to improve this? I will really appreciate any help with this topic.
Thanks again!
Have a great day!
A lot of thanks Donjete for this tutorial. I want to use this twice in my similar blog post. How to do it. Please help me.