
This post is part 3 of 5 in our mini series titled 5 Impressive Divi Gallery Layouts and How to Create Them. Stay tuned for all five unique examples of the gallery module and tutorials on how to achieve them!
In this third example, we’re going to be using a CSS “clipping mask” to create a nifty little border around our gallery images. If you’re not too familiar with CSS, don’t worry, I’ll provide the code and explain what it’s for and how to use it. If you’re new to CSS, my goal is to make it a little less daunting and for you to see how just a few lines of code can take your designs to the next level.
- 1 Today’s Before & After: The Divi Gallery Module
- 2 How to Create Unique Image Borders with the Divi Gallery Module
- 3 Concept & Inspiration for the Unique Border Images Gallery Module
- 4 Preparing Your Design Elements
- 5 Implementing the Tiled Gallery with Custom Padding Module Design in Divi
- 6 Gallery Module Settings
- 7 Tomorrow: Changing the Number of Columns in the Divi Gallery Module
Today’s Before & After: The Divi Gallery Module
The image below represents our starting point. All I’ve done is added twelve images to the Divi Gallery Module without making any other changes.
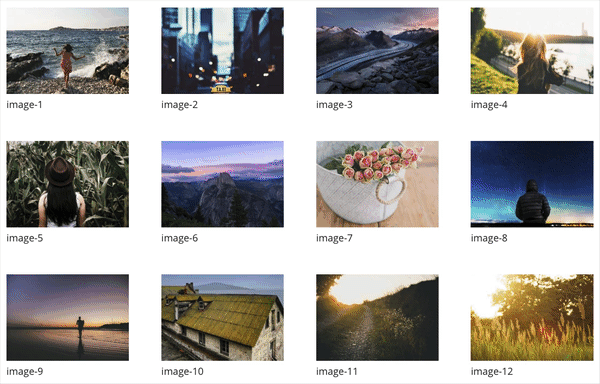
Default Gallery Module Hover Over
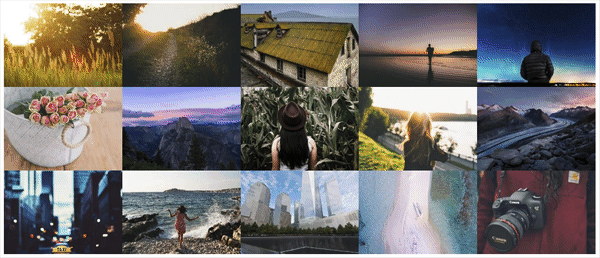
By the end of our tutorial today we’re going to get a cleaner gallery (with less text) and images that have a CSS clipping mask that provides bespoke detail.
Example 3 – Hover Over
How to Create Unique Image Borders with the Divi Gallery Module
Subscribe To Our Youtube Channel
Concept & Inspiration for the Unique Border Images Gallery Module
There are many circumstances where you’ll be able to utilize unique borders for your gallery images. I often use custom borders on gallery images in order to tie in the look with other graphic elements around the site. Say you have several images and graphics with rounded edges, wouldn’t it be nice to have your galleries mirror that look and have a streamlined feel across the site? With some simple CSS adjustments, we can do just that!
Preparing Your Design Elements
To follow along with today’s tutorial you’ll need twelve royalty free images sized 1200px wide with a height of 1000px. As the other two posts in this miniseries have mentioned it would be a good ideas to compress these images for smaller file sizes too. To learn how to both resize your images and compress them, check out this tutorial we’ve created to help you get the most out of your image assets.
To achieve our clipping mask I used http://bennettfeely.com/clippy/ to create the border in this example. This is a very handy (and free) tool you can use to create whatever border shape you’d like for your image. It can be used to create a circle, rounded edges, a variety of shapes and more.
Implementing the Tiled Gallery with Custom Padding Module Design in Divi
For this example, we’ll use the Divi Gallery Module and make adjustments in these 3 areas:
– General Settings
– Advanced Design Settings
– Custom CSS Settings
Setting’s we’ll change.
To begin, create a single section with a single row and single gallery module.
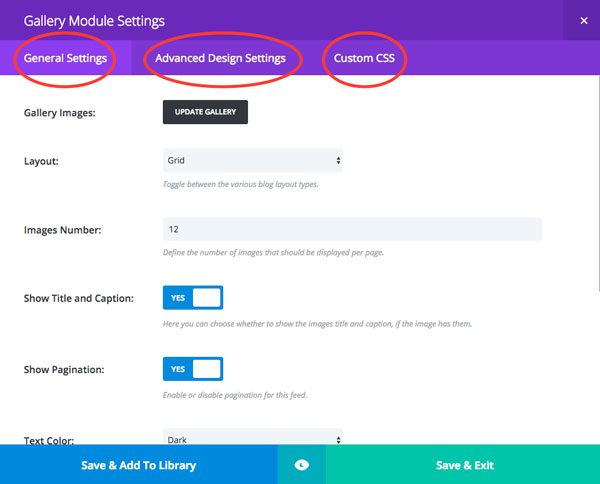
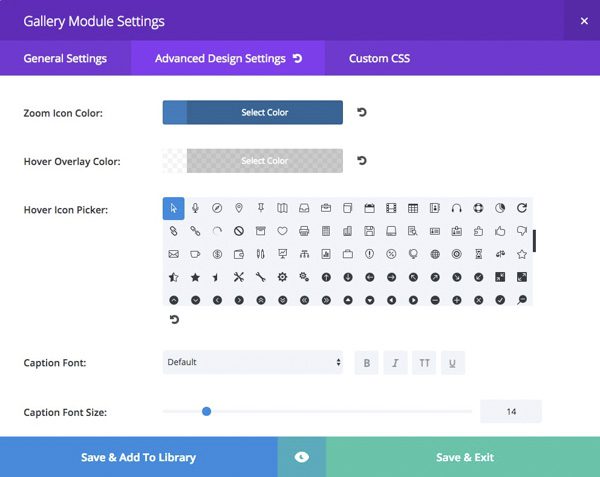
Gallery Module Settings
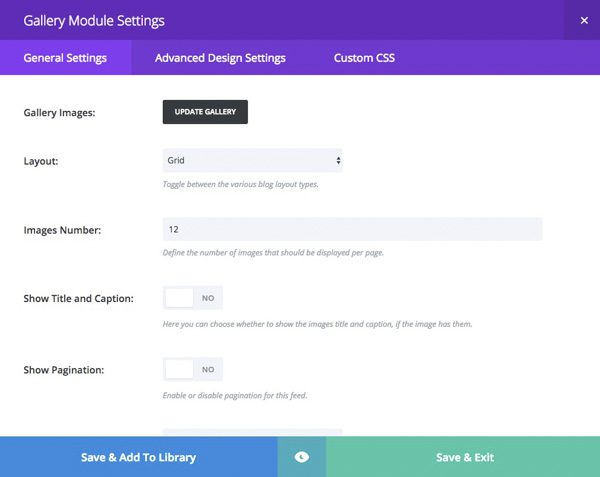
General Settings:
Gallery Images: Added the images to the gallery
Layout: Grid
Images Number: 12
Show Title and Caption: NO
Show Pagination: NO
Example 3 General Settings
Advanced General Settings:
Zoom Icon Color: #1f7cba
Hover Overlay Color: rgba(255,255,255,0.82)
Hover Icon Picker: Computer mouse pointer
One of my favorite parts about the Divi Gallery Module is that it gives us the ability to change the hover over icon. For this example, I’m using the mouse pointer to give the user a Call-To-Action. A little web psychology here – when someone see’s a mouse clicker, the nature instinct is to “click.” So this can be very useful for galleries when you want the website user to click open an image.
I’m going with a blue icon over a transparent white overlay but you can use whatever color will match the site you’re working on.
Example 3 Advanced Design Settings
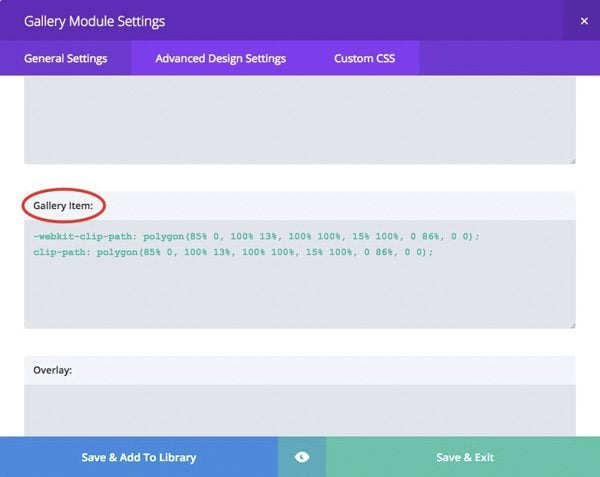
Custom CSS:
Gallery Item:
-webkit-clip-path: polygon(85% 0, 100% 13%, 100% 100%, 15% 100%, 0 86%, 0 0);
clip-path: polygon(85% 0, 100% 13%, 100% 100%, 15% 100%, 0 86%, 0 0);
The gallery item section here singles out each image in the gallery so whatever adjustments you make here will effect every image. This CSS code tells the image where the clipping should occur and you can see that by the percentages on the clip path. Good news is, if you use the tool I mentioned above, you don’t have to code any of that by hand 😉 Just create your shape and copy the code.
Example 3 Custom CSS
Save & Exit
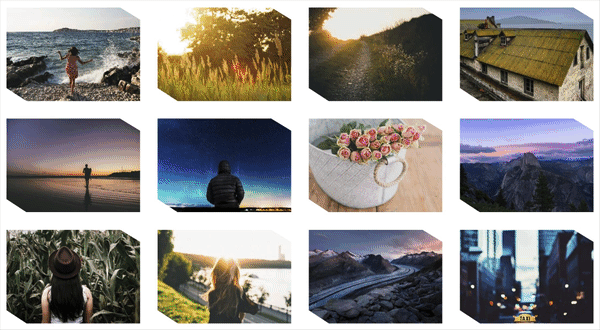
Your final design, unique border images with the Divi Gallery Module!
And that’s it! With some adjustments to the basic Divi Gallery Module settings and just a couple lines of CSS, we’ve created a very unique looking border to our gallery images. Again, you can play around with the clipping mask and create whatever shape or border style you’d like for your images!
Tomorrow: Changing the Number of Columns in the Divi Gallery Module
Have you ever wanted more or less columns in your Divi gallery? Check back tomorrow for example 4 – where I’ll show you how to increase the number of columns and will give you the code to create a 2, 3, 5 or 6 column gallery!
Example 4 – Adding Columns
Be sure to subscribe to our email newsletter and YouTube channel so that you never miss a big announcement, useful tip, or Divi freebie!


Hi guys, I have the same question as Richard. Is it possible to disable the overlay effect as I would not like the images clicked on in grid view.
Many thanx, Tomas
This does not work in Firefox even if you get the CSS using Chrome. Any suggestions?
I was wondering if it was possible to have more than 4 images in the row and if we could disable the overlay effect as I would not like the images clicked on
Hi,
Let me share what I did now with these: I did this one a bit different:
You have to add this under the general custom css, not on the gallery plugin.
GALLERY IMAGES
.et_pb_gallery_grid .et_pb_gallery_image{
-webkit-clip-path: polygon(85% 0, 100% 13%, 100% 100%, 15% 100%, 0 86%, 0 0);
clip-path: polygon(85% 0, 100% 13%, 100% 100%, 15% 100%, 0 86%, 0 0);
}
LIGHTBOX IMAGES CONTAINER
.mfp-figure:after{
-webkit-clip-path: polygon(85% 0, 100% 13%, 100% 100%, 15% 100%, 0 86%, 0 0);
clip-path: polygon(85% 0, 100% 13%, 100% 100%, 15% 100%, 0 86%, 0 0);
}
LIGHTBOX IMAGES
img.mfp-img{
-webkit-clip-path: polygon(85% 0, 100% 13%, 100% 100%, 15% 100%, 0 86%, 0 0);
clip-path: polygon(85% 0, 100% 13%, 100% 100%, 15% 100%, 0 86%, 0 0);
}
Rounded Corners:
GALLERY IMAGES
.et_pb_gallery_grid .et_pb_gallery_image{
border-top-right-radius: 15px;
-moz-border-radius-topright: 15px;
-webkit-border-top-right-radius: 15px;
border-bottom-left-radius: 15px;
-moz-border-radius-bottomleft: 15px;
-webkit-border-bottom-left-radius: 15px;
}
LIGHTBOX IMAGES CONTAINER
.mfp-figure:after{
border-top-right-radius: 150px;
-moz-border-radius-topright: 150px;
-webkit-border-top-right-radius: 150px;
border-bottom-left-radius: 150px;
-moz-border-radius-bottomleft: 150px;
-webkit-border-bottom-left-radius: 150px;
}
LIGHTBOX IMAGES
img.mfp-img{
border-top-right-radius: 150px;
-moz-border-radius-topright: 150px;
-webkit-border-top-right-radius: 150px;
border-bottom-left-radius: 150px;
-moz-border-radius-bottomleft: 150px;
-webkit-border-bottom-left-radius: 150px;
}
This way when the image opens up in the Lightbox then it also is rounded, I just increased the size of the rounding on these images.
Nice one! It’s working in Chrome. but not in Firefox or Edge?
Hey Frank, yea I know FF and Edge can sometimes have issues with clipping masks. Hopefully they address that in their next browser update…I’ll start putting a disclaimer on anything I use with a clipping mask moving forward. I don’t know of a workaround just yet…
The problem with the Divi Gallery is that if you do a speed test with Google, the rating will be super low. I usually get around 35/100 because Google says to optimize the images (my images are all optimized)
So I had to switch back to the classic WordPress Gallery and got 100/100!
Can you fix this? And for some reason if I use the Divi Gallery sometimes the pages are so slow that won’t even load all the content. Please do note that my website is optimized and it loads really fast. I use a CDN and get a score of 100/100 pretty much on every single page. So it IS a problem of the plugin not of my website.
Thanks
Once again I am in love with Gallery module. I was trying to switch my clients from gallery module to custom layout for images, as it allowed me to input more data. Anyways, Josh, its a wonderful tutorial. I am going to try it.
Thanks, Hamza! Yep, sometimes a little refresher or new ideas can bring you right back to all the standard Divi modules!
Thanks Josh, so far I’ve avoided using the divi gallery module, but your tutorial series this week has re-inspired me to try again!
Tomorrow’s tut on having more or less columns is the one I’m so looking forward to!
Keep up the awesome tutorials, they really do add value.
Awesome to hear, Hurri! That is much appreciated. Yes I think the next two tutorials will have you excited to use the Divi Gallery again 🙂
That tool is a godsend and opens up tons of unique possibilities for web design. Thank you for sharing it!
Great to hear! Thanks for the feedback!
“No support
Sorry but the CSS clip-path property does not support basic shapes in Firefox 50. Please try opening this page in another browser.”
Is there a way to around this aside from using another browser?
Thanks
Thank you Josh, this is very nice! I notice that this doesn’t seem to work however, if there is a custom gutter width assigned to the row. Not sure why that should affect it but it does. Any work around?
I see what you mean, John. Seems to work fine if the gutter is above 1. I’ll look into that!
Big applause to you Josh,
wow, great work and very clear tutorial!
Hope to learn and see much more from you.
Thanks, Jeroen! Couple more Gallery tutorials coming your way this week!