
Category pages are an important part of any eCommerce site. Clients browse product categories to find what they need. That’s why your category pages need to look just as good as your product pages. With Divi’s Theme Builder, creating category page templates is easier than ever. In this tutorial, we’ll show you how to create a category page template step by step and style it using Divi and its built-in options. Furthermore, we’ll show you how to make it filterable with help from the Themify WooCommerce Product Filters plugin.
Open two browser tabs side by side. Use the first tab for the theme builder and the second tab for the live preview of a category page. Work this way to see the progress as you go. For your convenience, we’ve also added the template as a free download.
Let’s get to it!
Preview
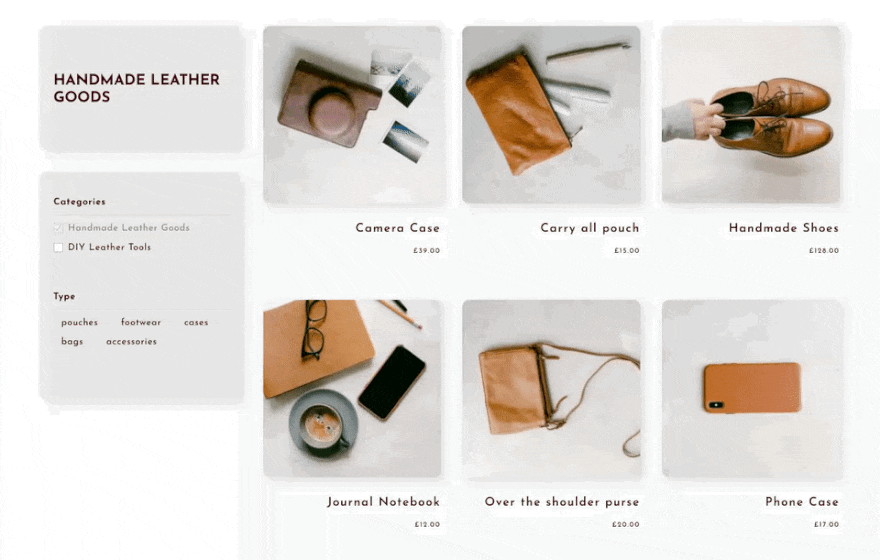
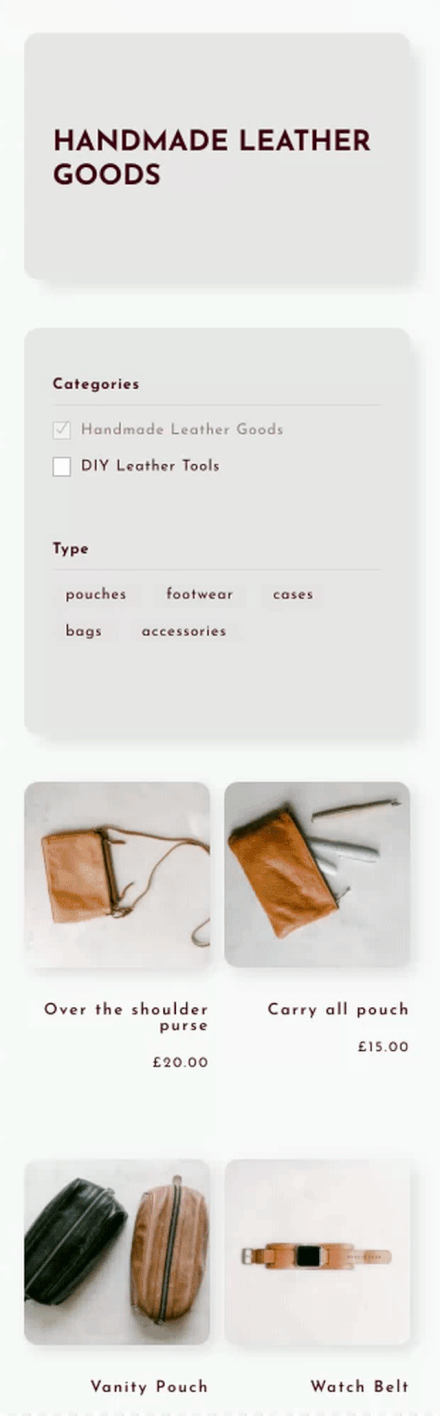
Before we start recreating the template, let’s take a look at what the category page template looks like on different screen sizes.
Desktop
Mobile
Download The Woo Category Page Template for FREE
To lay your hands on the free Woo category page template, you will first need to download it using the button below. To gain access to the download you will need to subscribe to our newsletter by using the form below. As a new subscriber, you will receive even more Divi goodness and a free Divi Layout pack every Monday! If you’re already on the list, simply enter your email address below and click download. You will not be “resubscribed” or receive extra emails.

1. Update Your Products And Categories
Before building the template, make sure your products are organized in the correct categories. Check if they are tagged properly as well. These will be important when setting up the product filter plug-in.

2. Set-Up Plugin
Download and Install
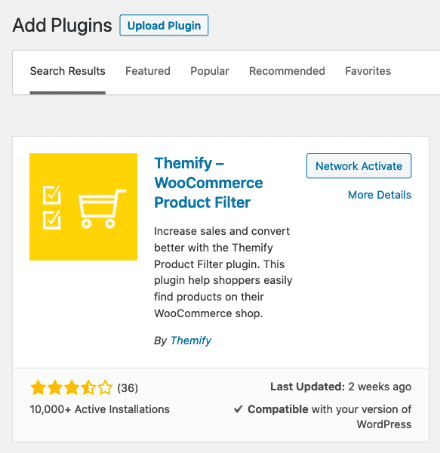
Download the WooCommerce Product Filters. Navigate to your plugin dashboard and upload the plugin’s .zip file to install it. Alternatively, search for the plugin in the directory. The plugin will add a new tab in your dashboard menu. Make sure you activate the plugin as well.
Add New Filter Form
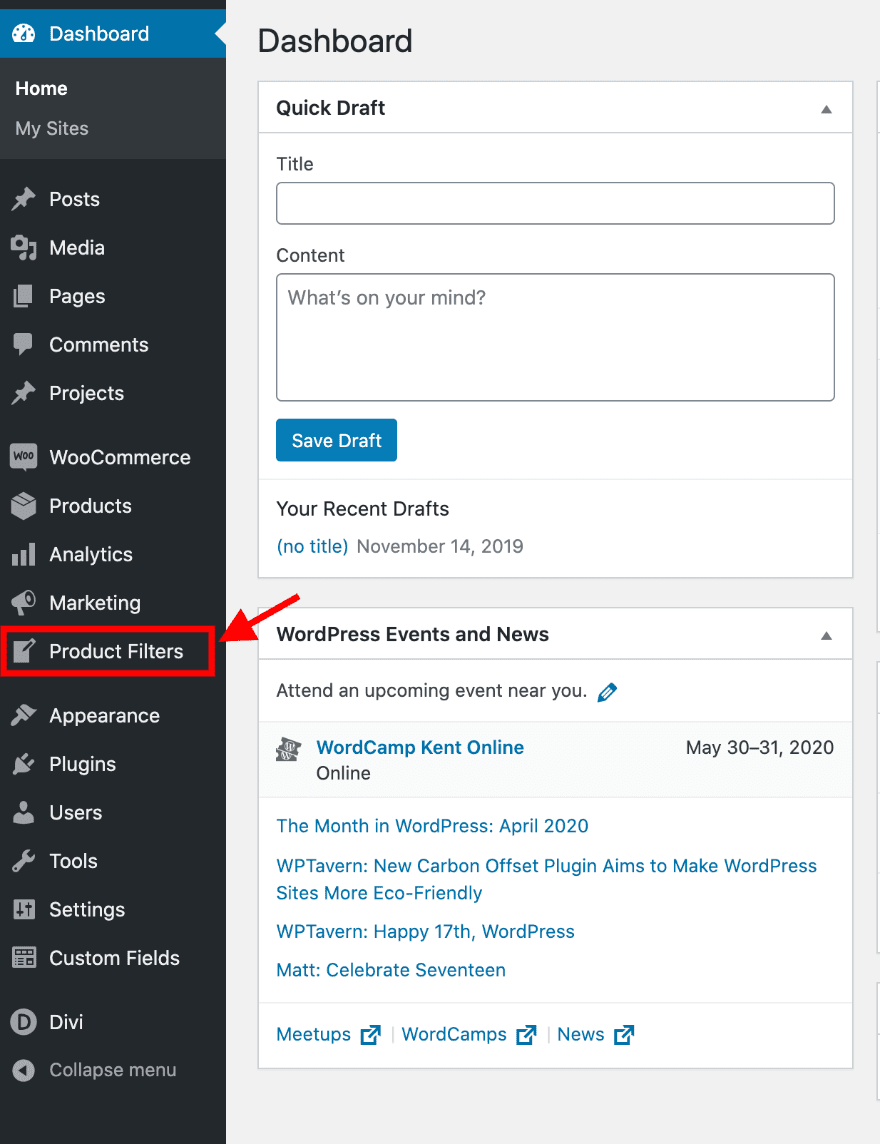
Click on the plugin tab in your dashboard. Inside the plugin settings, click on the button to add a new filter form.

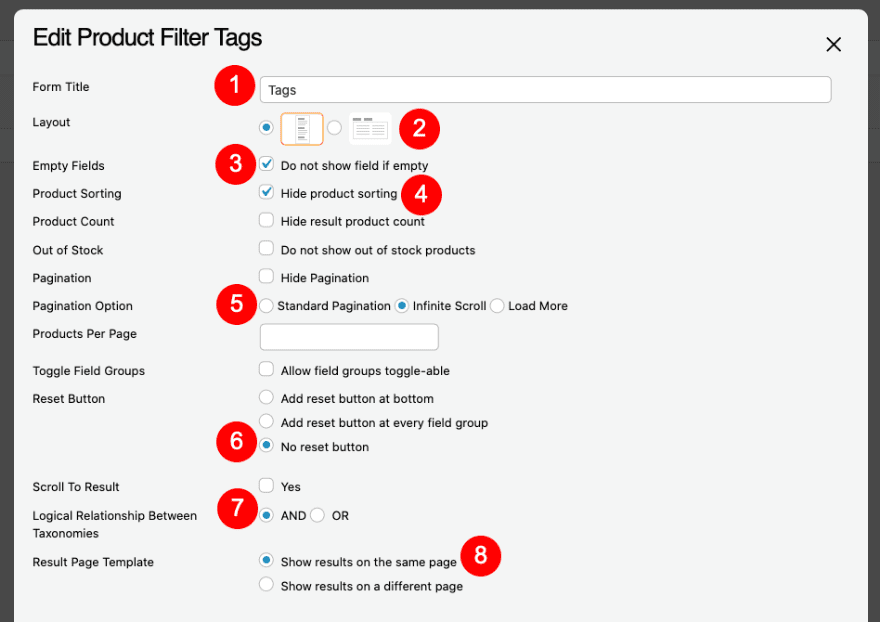
Set Up Filter Form
To make your filterable sidebar look exactly like the one in the preview of this post, use the settings mentioned below. You can always adjust these settings afterward.
- Layout: Vertical
- Empty Fields: Do not show field if empty
- Product Sorting: Hide product sorting
- Pagination Option: Infinite Scroll
- Reset Button: No reset button
- Logical Relationship Between Taxonomies: AND
- Result Page Template: Show results on the same page
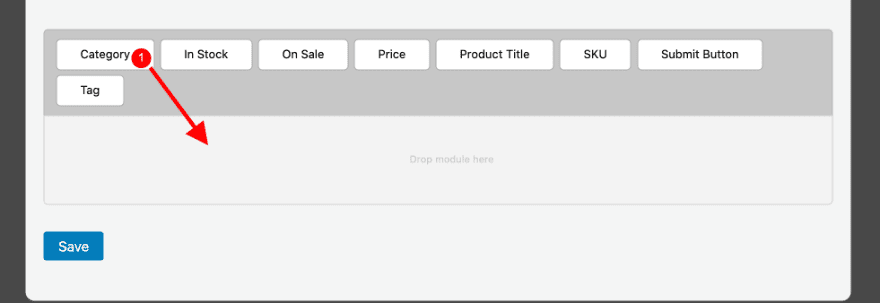
Create Category Field
In the menu bar below the main area, you’ll see a selection of tabs. Drag and drop the ‘Category’ tab into the builder below it. Then adjust the settings as follows:
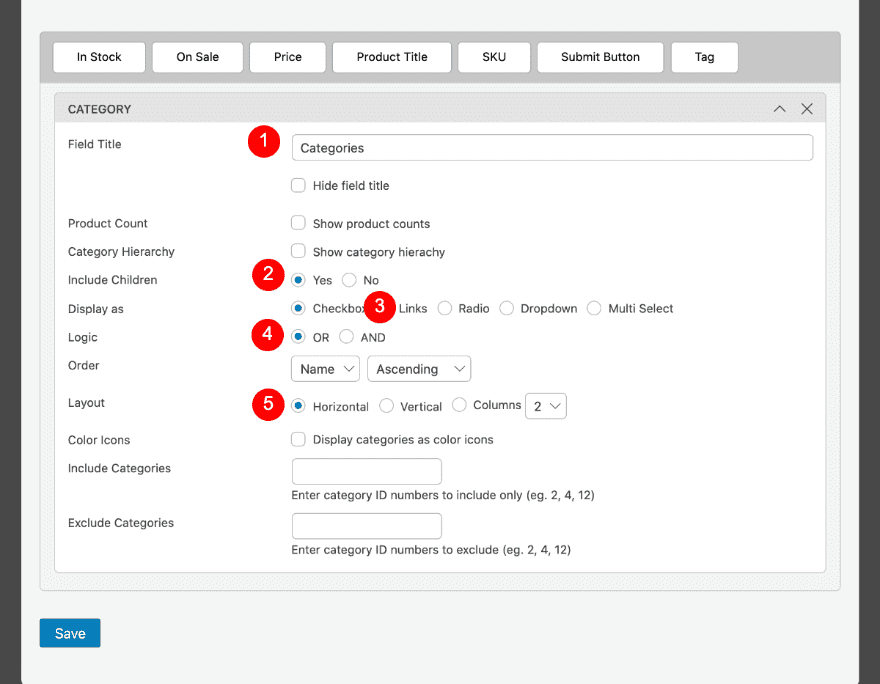
- Field Title: Categories
- Include Children: Yes
- Display as: Checkbox
- Logic: OR
- Order: Name, Descending
- Layout: Horizontal, 2 columns
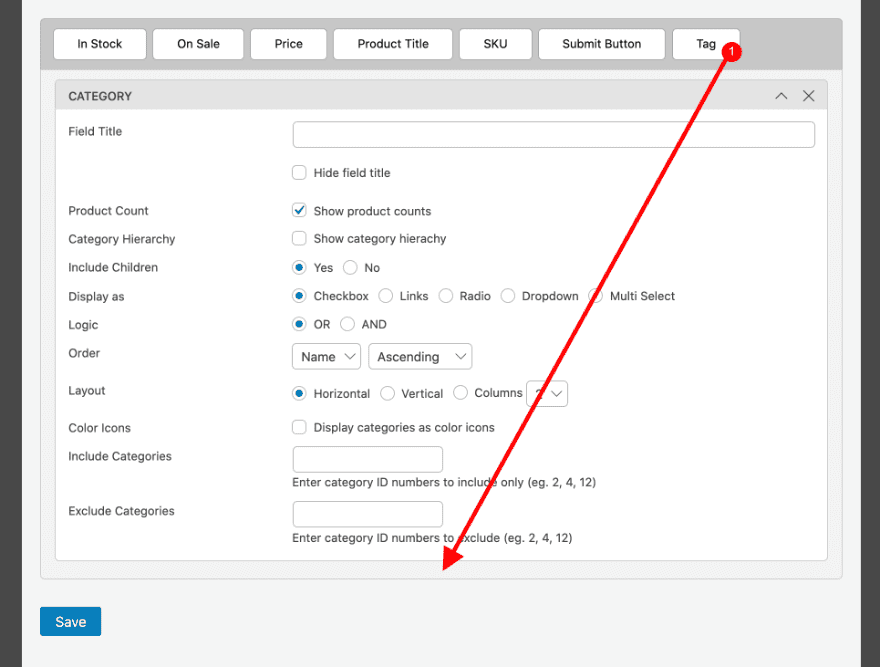
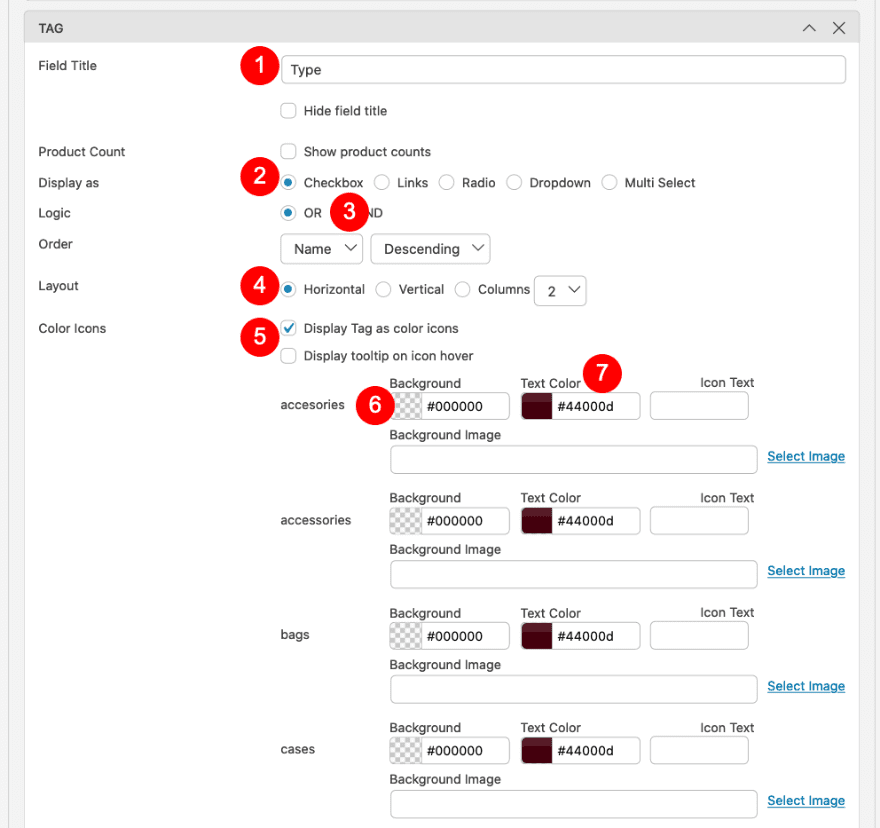
Create Tag Field
Now drag and drop the ‘Tag’ tab into the builder. Make sure it’s placed below the ‘Category’ tab. Adjust the settings as follows:
- Field Title: Type
- Display as: Checkbox
- Order: Name, Descending
- Layout: Horizontal, 2 columns
- Color Icons
- Background: Transparent
- Text Color: Deep Brown #44000d
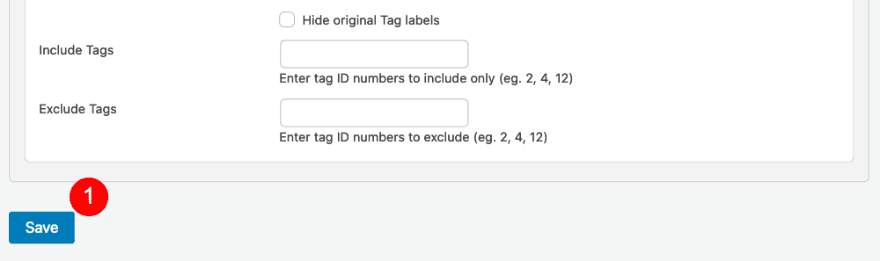
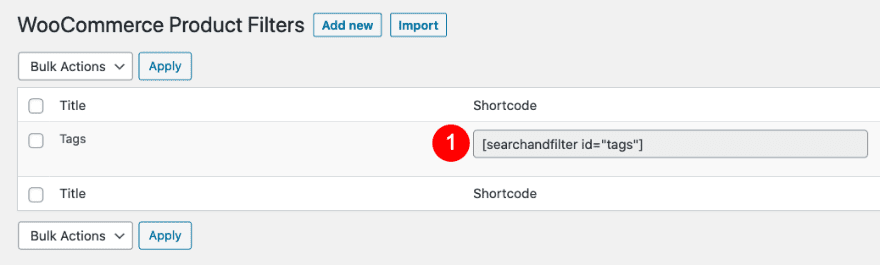
Click Save to Generate Shortcode
Save your work and close the builder. You’ll see the shortcode in the plugin’s main menu. Copy it, you’ll need it later.
3. Recreate Product Category Page Template in Theme Builder
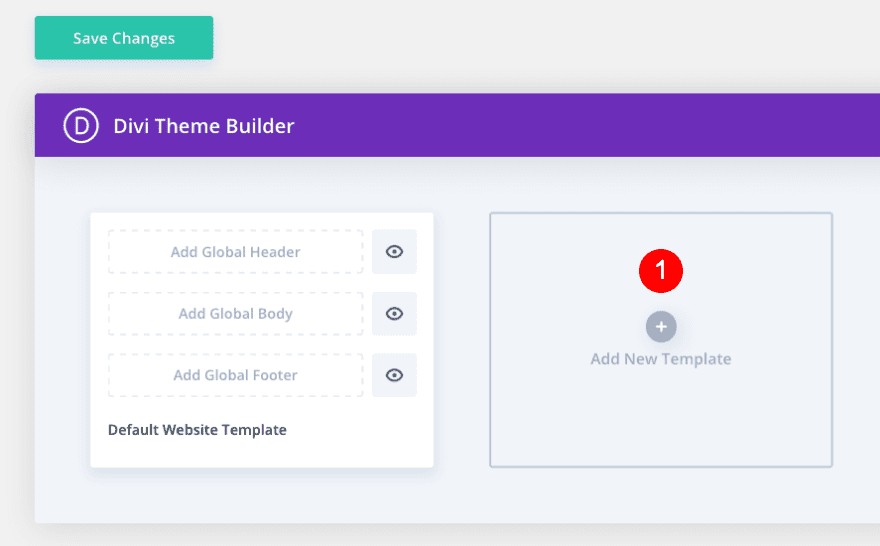
Open Theme Builder / Add New Template
It’s time to start recreating the template! Open your theme builder and add a new template.
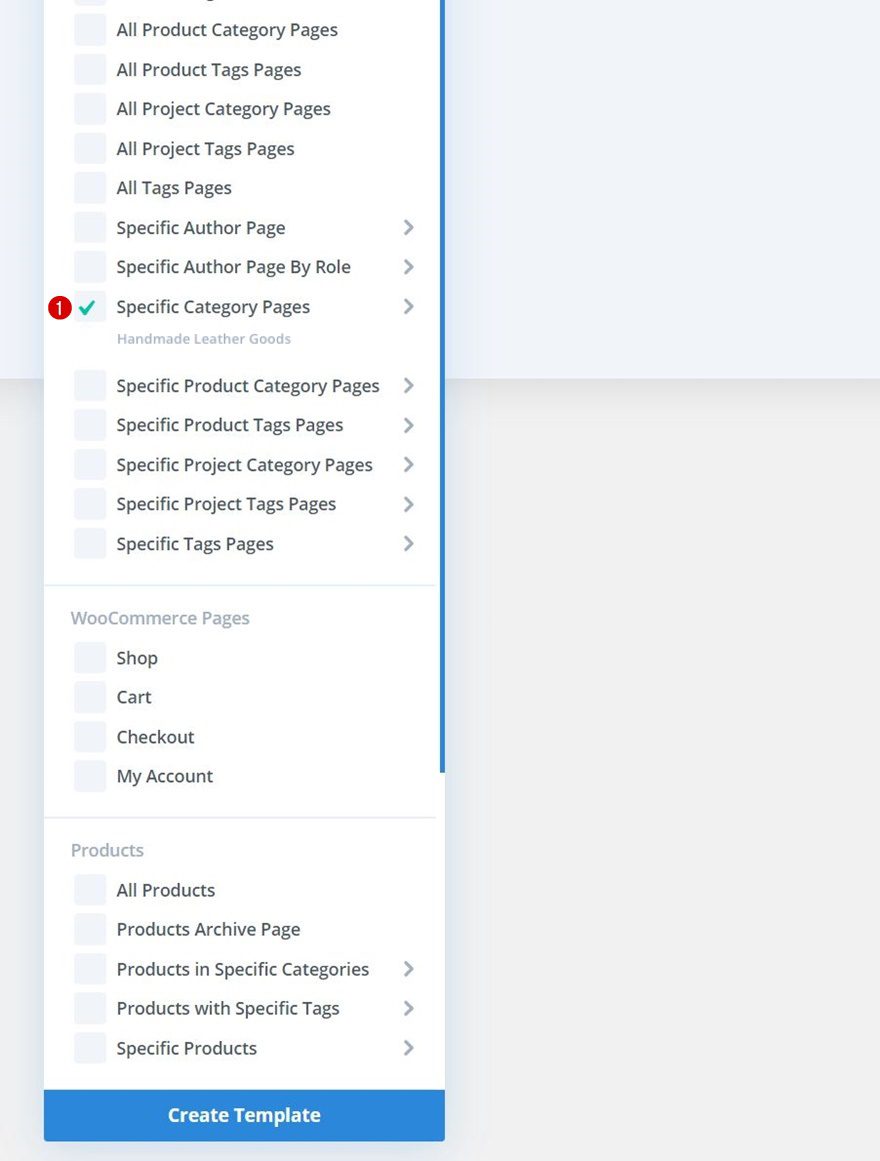
Set Template Settings
In the template settings, select ‘Specific Product Category Pages’. Click on the categories you want to assign this template to. We’ll select Handmade Leather Goods.
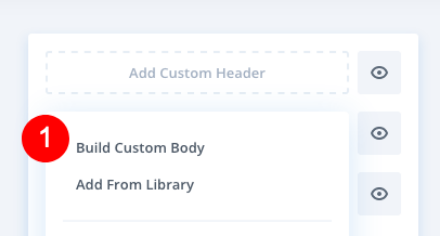
Add Custom Body
Then, click on ‘Add Custom Body’.

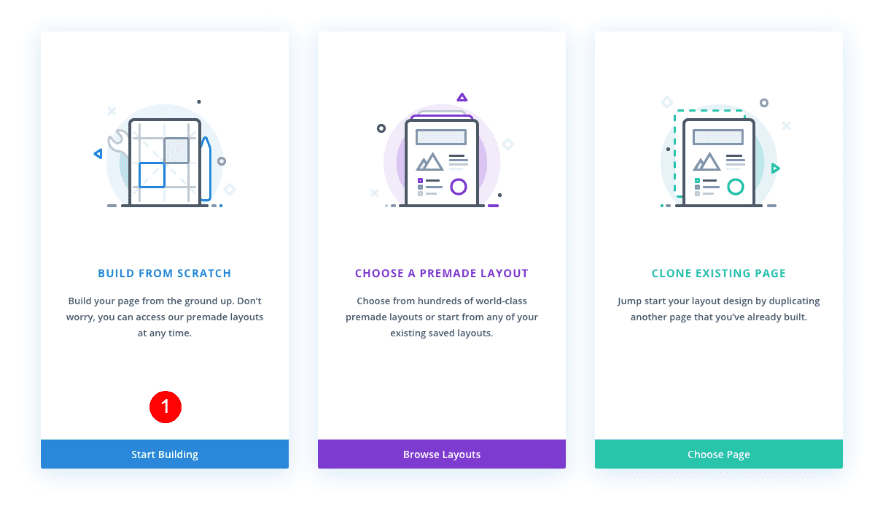
Select Build Custom Body
We’ll recreate this template from scratch, so go ahead and pick ‘Build Custom Body’.
Build From Scratch
Once inside the visual builder, select the option to build from scratch once more.
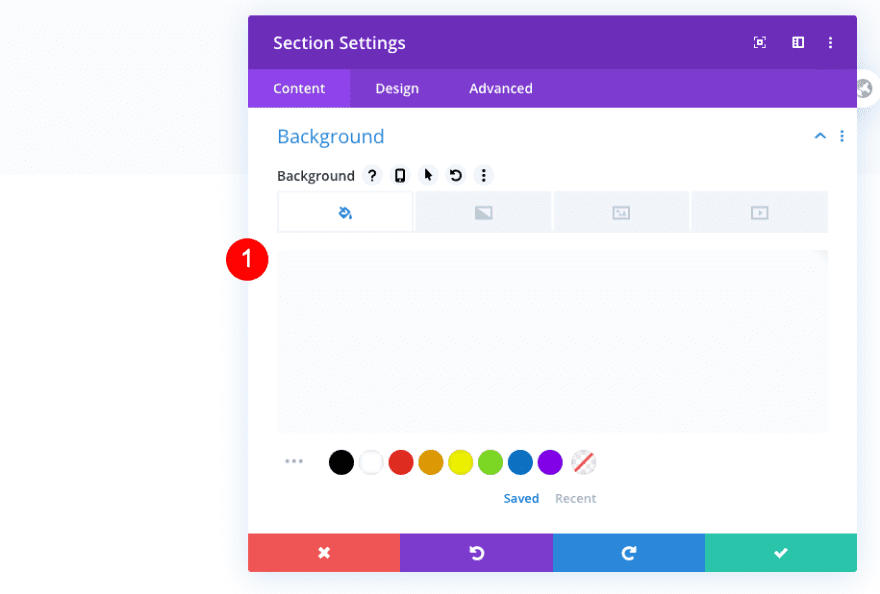
Section 1 Settings
Background
Once inside the template editor, you’ll notice a section. Open that section and add a background color.
- Background Color: Transparent blueish grey – rgba(68,66,109,0.02)
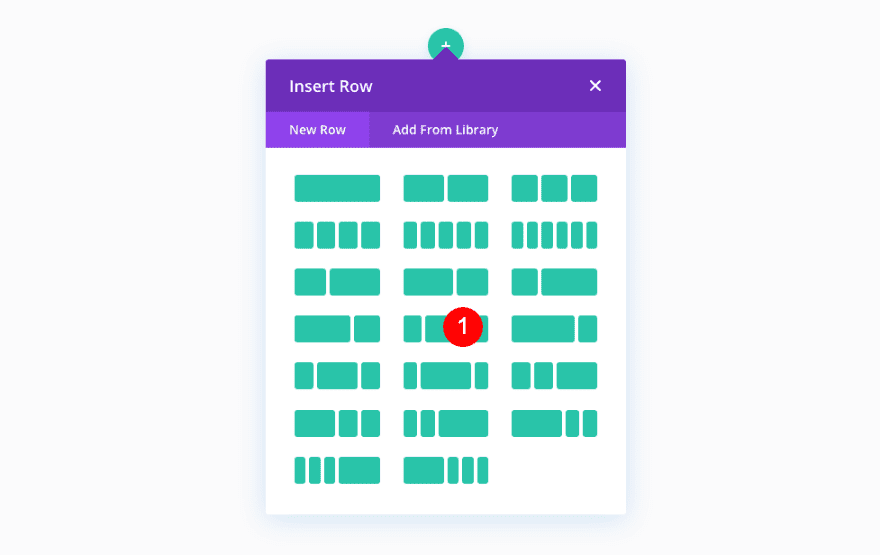
Add Row
Column Structure
Now add a new row with the following column structure:
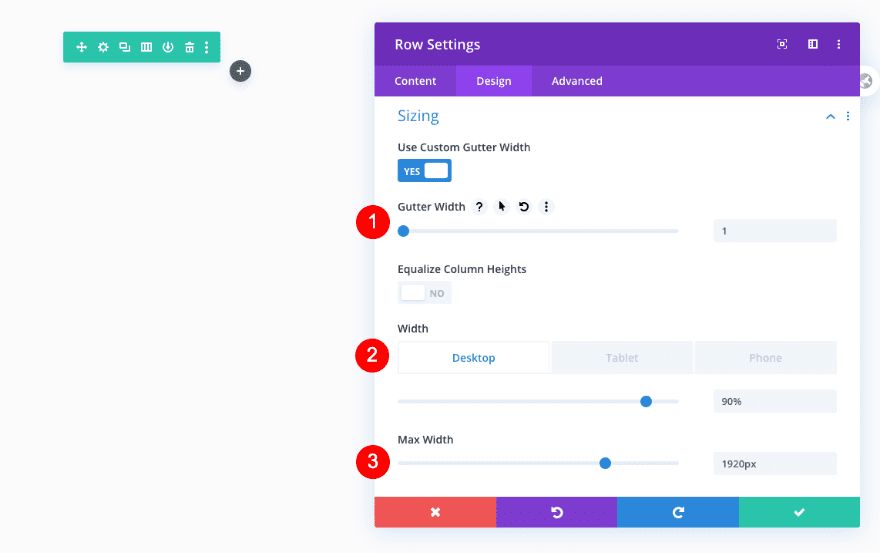
Sizing
Adjust the sizing settings of the row next.
- Gutter Width: 1
- Width
- Desktop: 90%
- Tablet and Phone: 85%
- Max Width: 1920px
Spacing
Then, apply some different spacing values across different screen sizes.
- Left and Right Margin
- Desktop: auto
- Tablet: 55px
- Phone: 30px
- Top Padding: 100px

Add Post Title Module To 1st Column
Elements
Time to add modules, starting with a Post Title Module in column 1. Enable the title only.
- Show Title: Yes

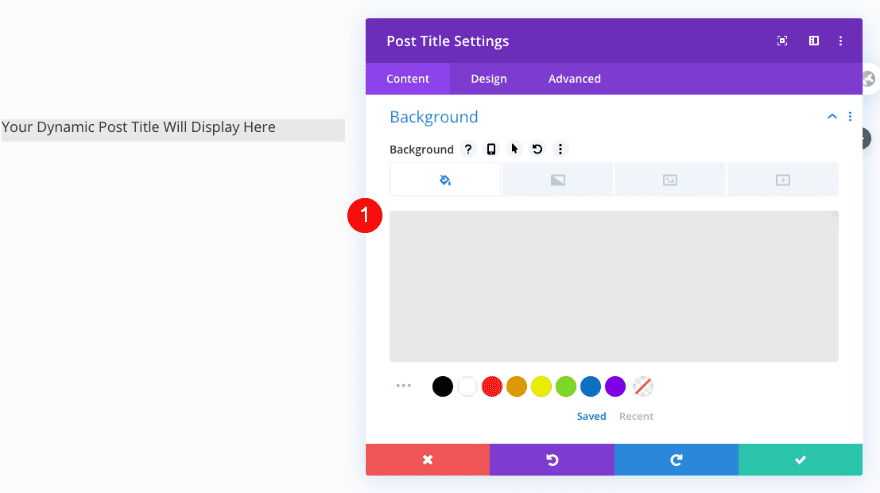
Background
Add a background color next.
- Color: #e8e8e8
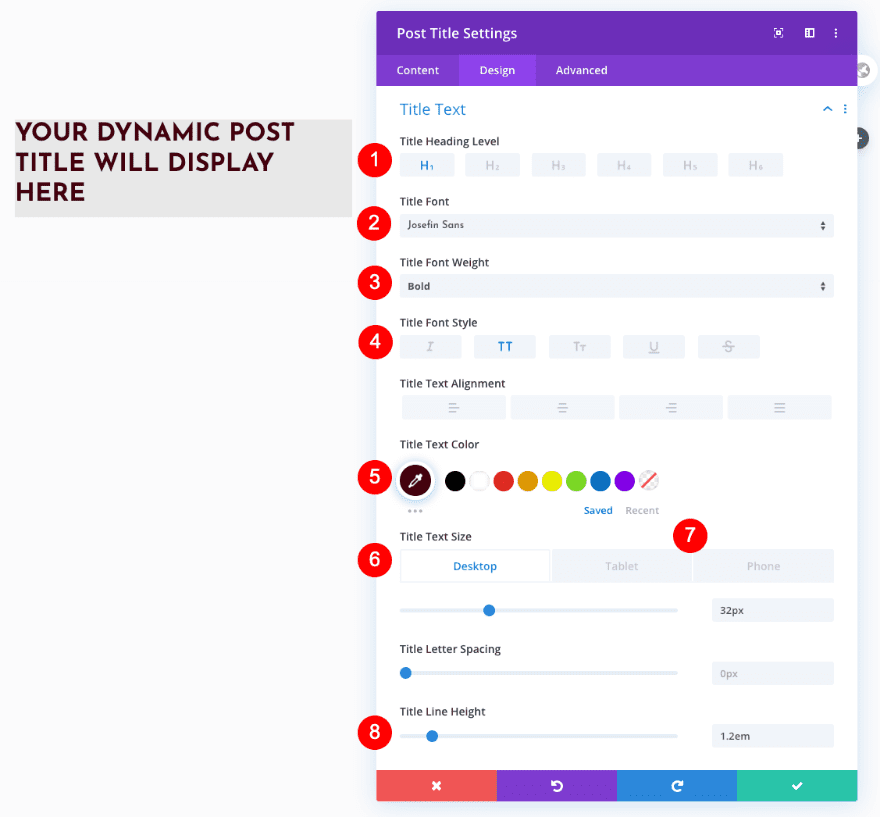
Title Text
Move over to the design tab and style the title text.
- Title Level: H1
- Font: Josefin Sans
- Weight: Bold
- Style: TT
- Color: #44000d
- Size
- Desktop: 32px
- Tablet: 28px
- Phone: 30px
- Line Height: 1.2 em
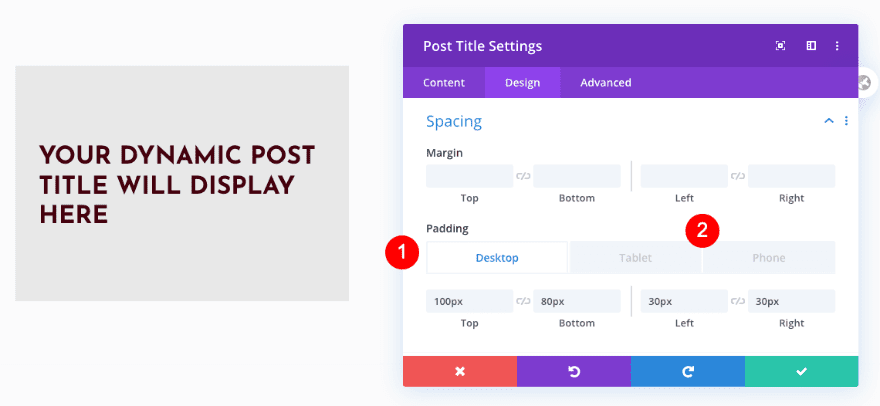
Spacing
Adjust the spacing too.
- Top Padding
- Desktop and Tablet: 100px
- Bottom Padding: 80px
- Left Padding
- Desktop and Tablet: 30px
- Right Padding
- Desktop and Tablet: 30px
- Phone: 10px
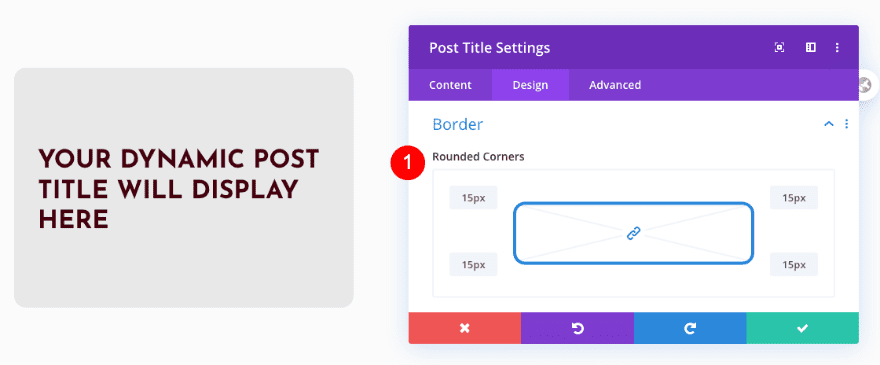
Border
Give the module some rounded corners.
- Rounded Corners: 15px all four
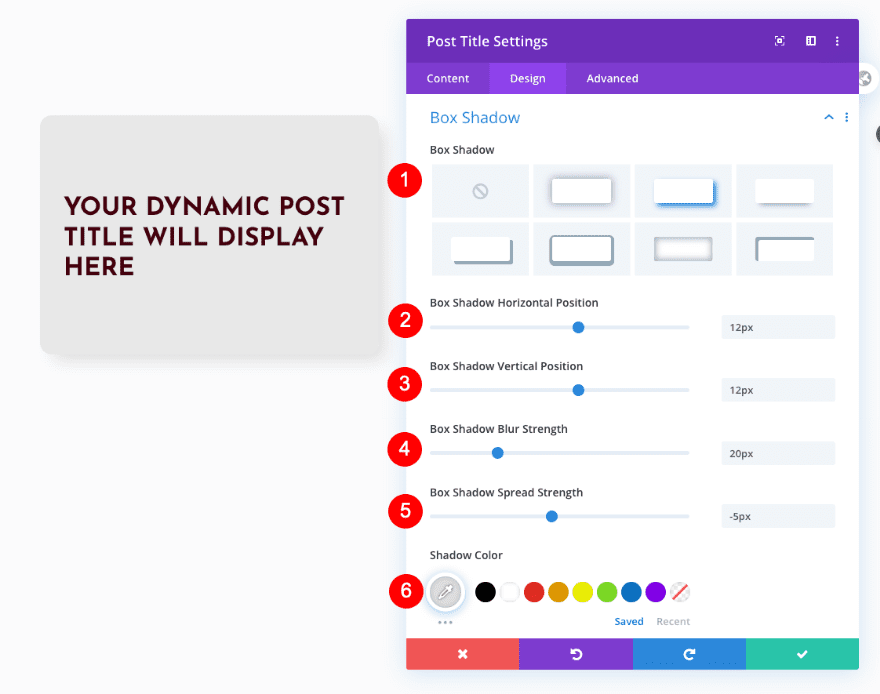
Box Shadow
And add a subtle box shadow.
- Box Shadow: 2nd Option
- Horizontal Position: 12px
- Vertical Position: 12px
- Blur Strength: 20px
- Spread Strength: -5px
- Shadow Color: #dddddd
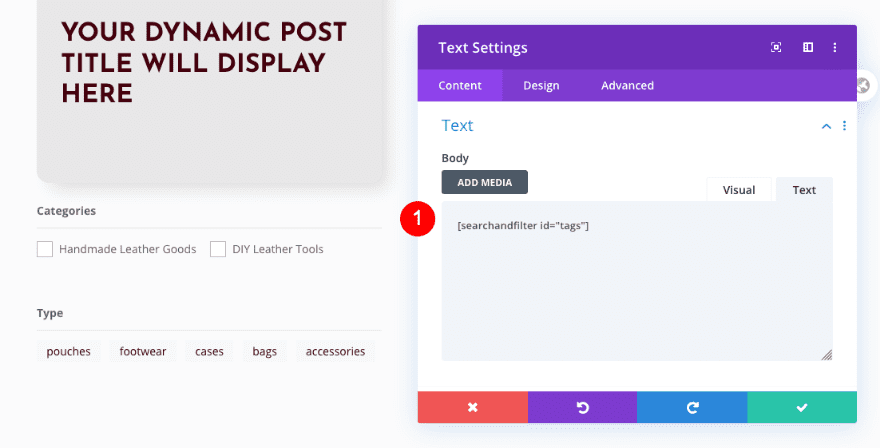
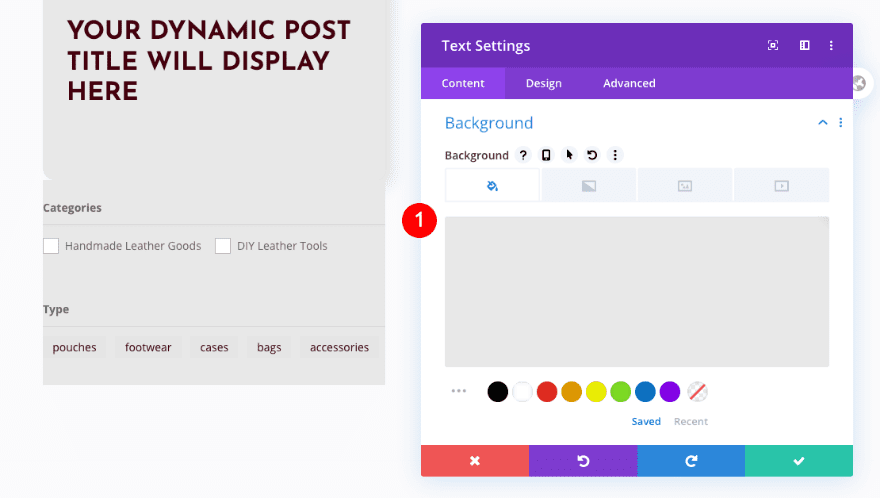
Add Text Module to 1st Column
Content
Add a Text Module right below the previous module. In the content box, add the shortcode you copied from the plugin.
- Body: Plugin Shortcode
Background
Add a background color next.
- Color: #e8e8e8
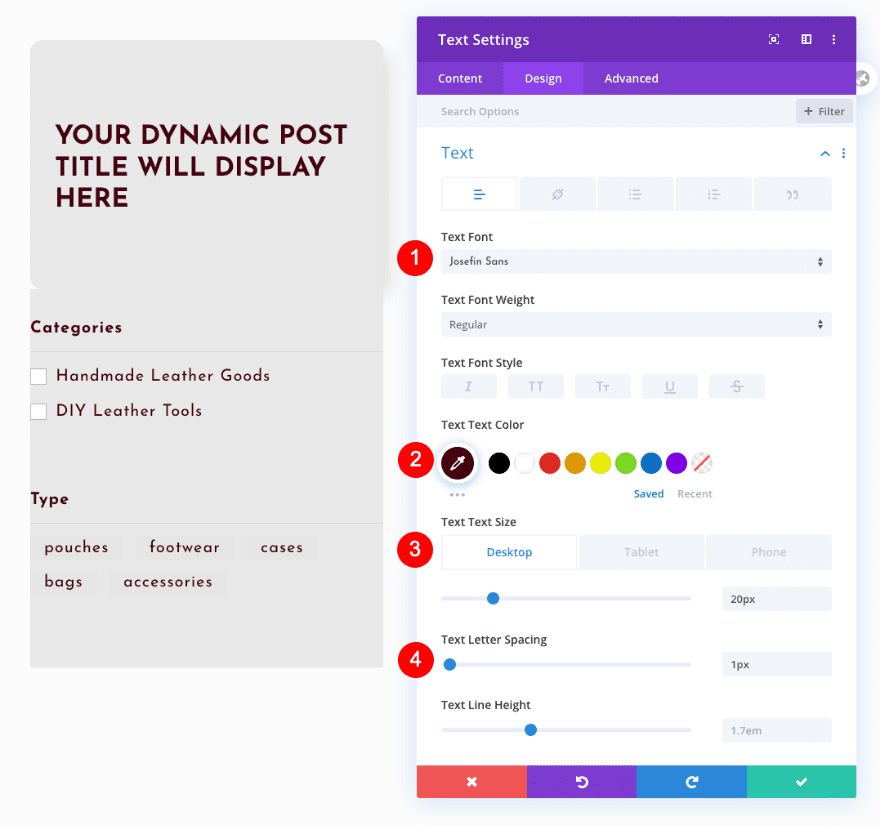
Text
Style the text.
- Font: Josefin Sans
- Color: #44000d
- Size
- Desktop: 20px
- Tablet: 18px
- Phone: 16px
- Spacing: 1px
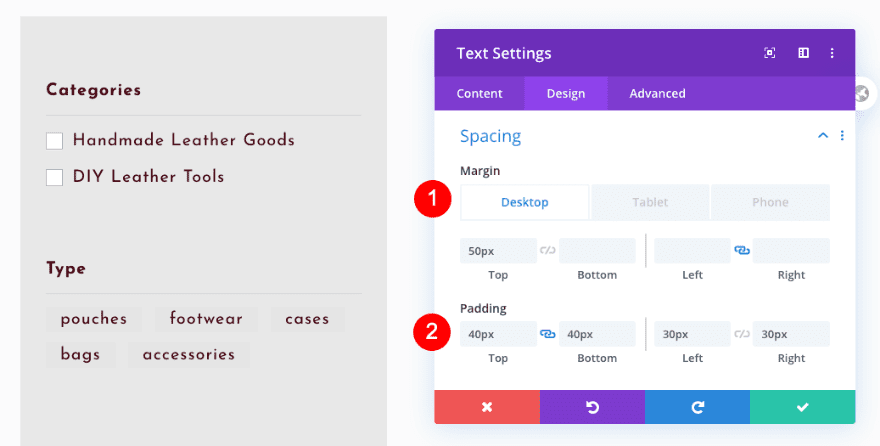
Spacing
Adjust the spacing settings as well.
- Top Margin: 50px
- Top and Bottom Padding: 40px
- Left and Right Padding: 30px
Border
Then, add some rounded corners.
- Rounded Corners: 15px all four

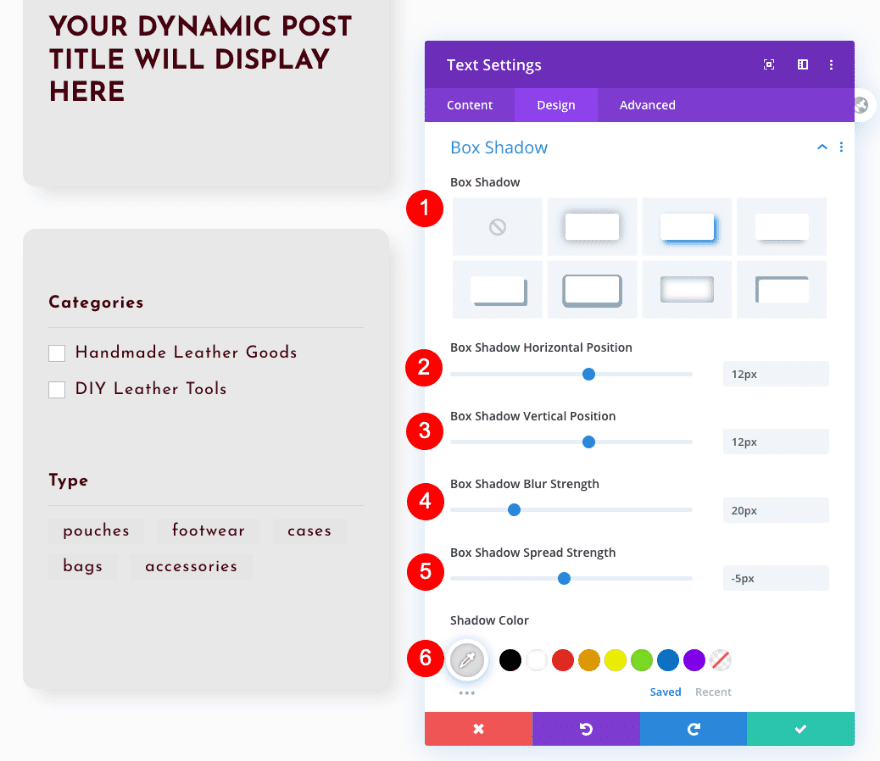
Box Shadow
And complete the module settings by adding a subtle box shadow.
- Box Shadow: 2nd Option
- Horizontal Position: 12px
- Vertical Position: 12px
- Blur Strength: 20px
- Spread Strength: -5px
- Shadow Color: #dddddd
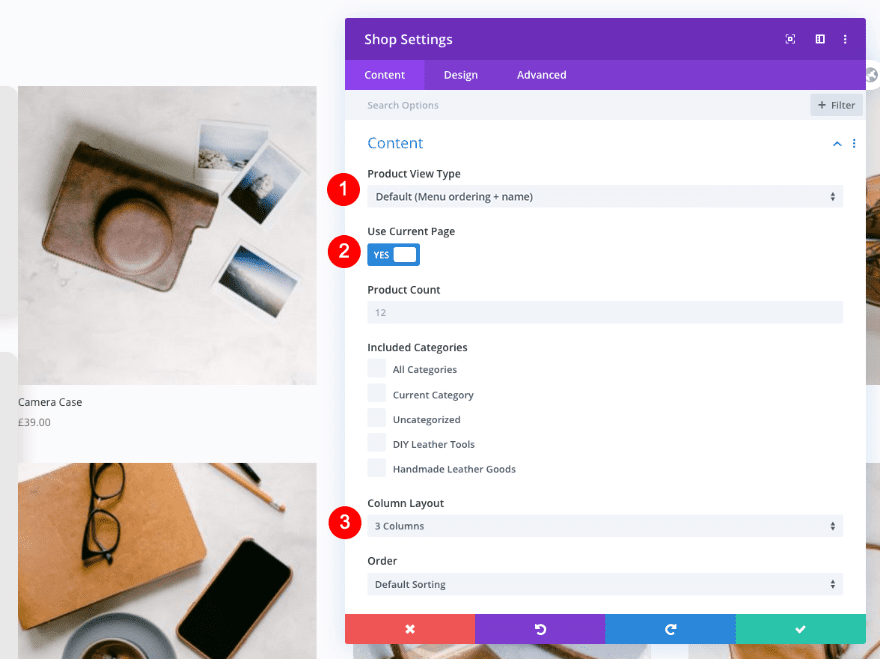
Add Shop Module to 2nd Column
Content
On to the next column! Add a shop module and adjust the main settings as follows:
- Product View Type: Default
- Use Current Page: Yes
- Column Layout: 3 Columns
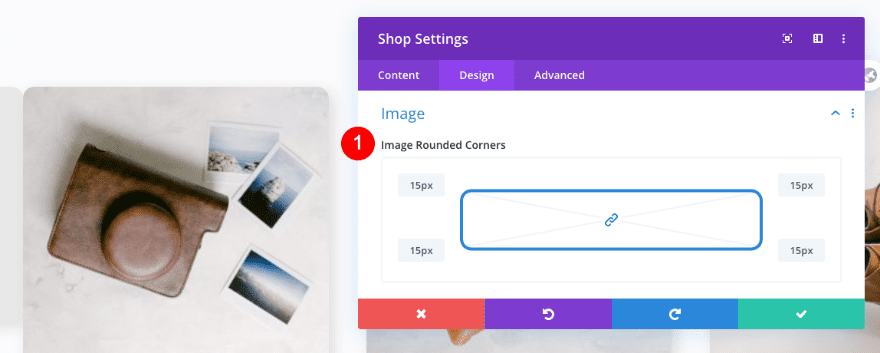
Image
Move on to the design tab and style the image accordingly:
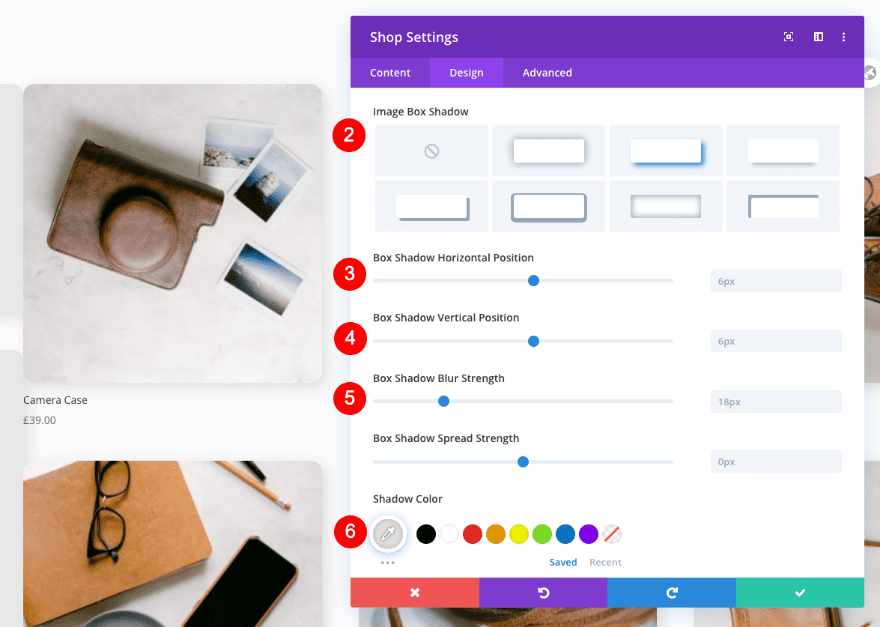
- Image Rounded Corners: 15px all four
- Image Box Shadow: 2nd Option
- Horizontal Position: 6px
- Vertical Position: 6px
- Blur Strength: 18px
- Shadow Color: #dddddd
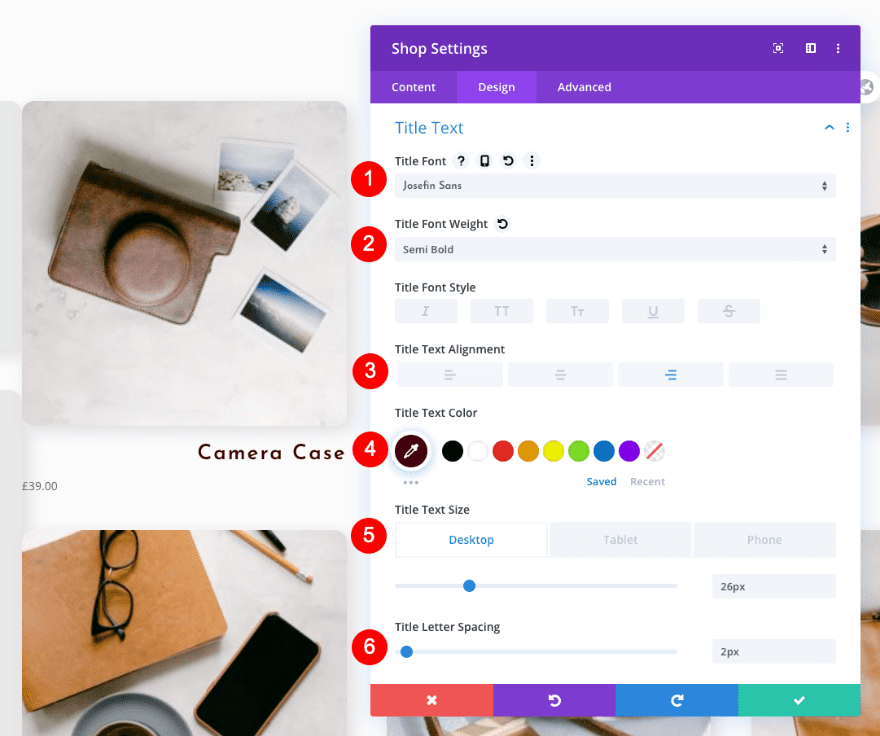
Title Text
Style the title text next.
- Font: Josefin Sans
- Weight: Semi Bold
- Alignment: Right
- Color: #44000d
- Size
- Desktop: 26px
- Tablet: 24px
- Phone: 17px
- Spacing: 2px
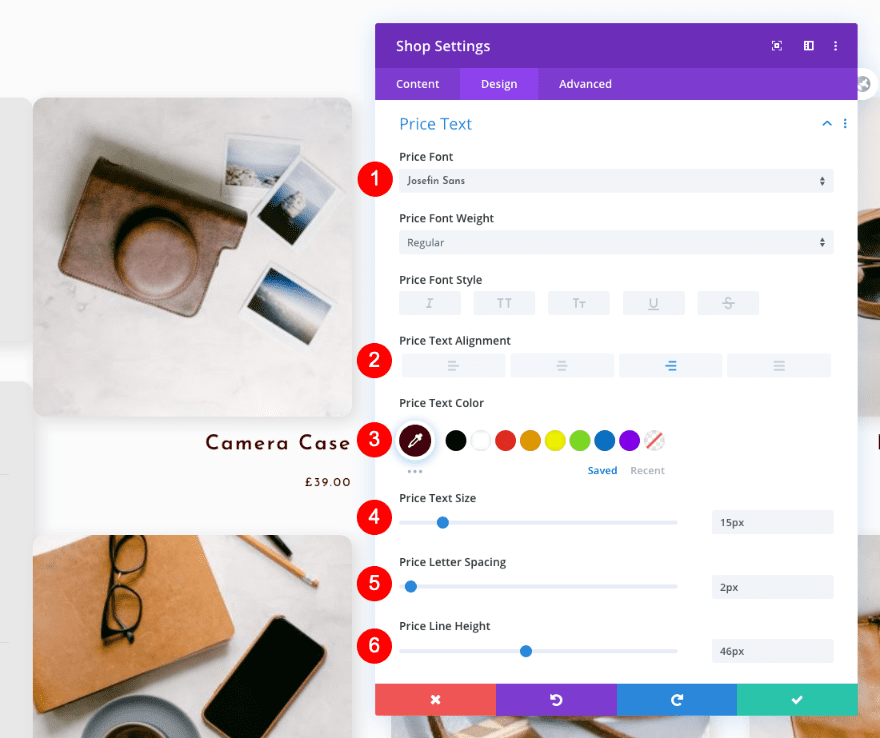
Price Text
Don’t forget to style the price text as well.
- Font: Josefin Sans
- Alignment: Right
- Color: #44000d
- Size: 15px
- Letter Spacing: 2px
- line Height: 46px
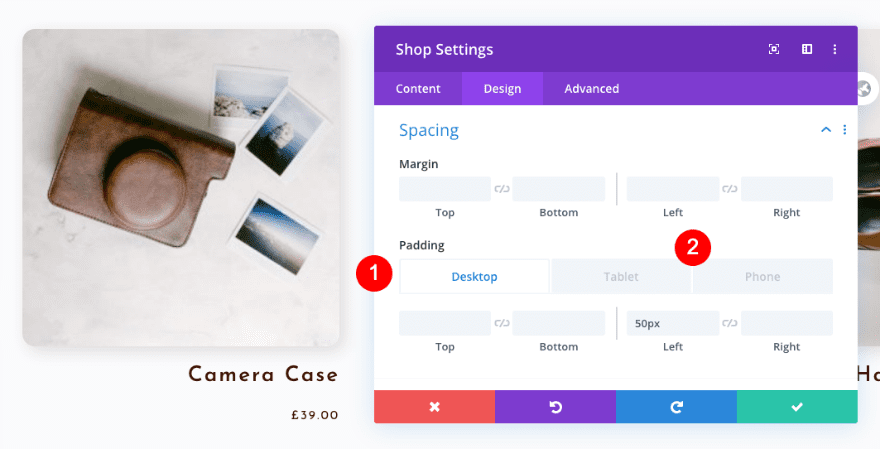
Spacing
Adjust the spacing settings too.
- Top Padding
- Tablet and Phone: 50px
- Left Padding
- Desktop: 50px
- Tablet and Phone: 0px
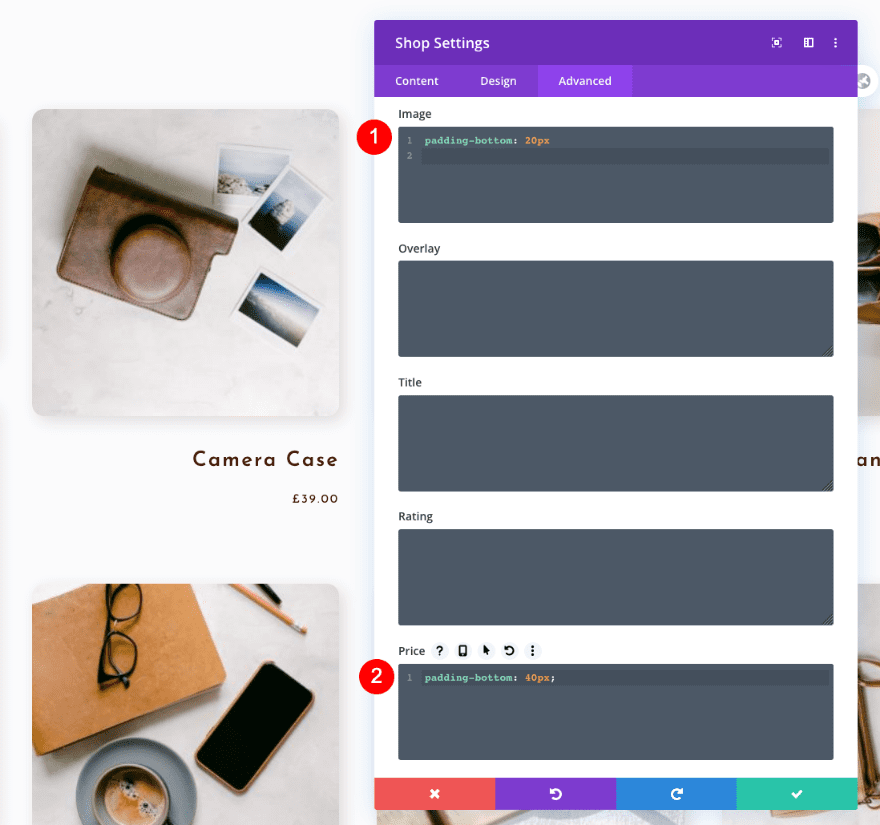
Custom CSS
And last but not least, add custom two lines of CSS code in the advanced tab to generate some space between the different elements in the shop module. That’s it!
- Image: padding-bottom: 20px
- Price: padding-bottom: 40px
padding-bottom: 20px;
padding-bottom: 40px;
Preview
We’re done recreating the WooCommerce product category page template. Let’s take a look again at the finished design on different screen sizes.
Desktop
Mobile
Final Thoughts
This product category page template can be applied to all the categories and tags in your WooCommerce store. With help from the product filter plugin, you can add the filter settings that suit your own store and products. You can use any of the Divi woo modules to personalize your shop any way you want. We hope this template will help you add a personalized look to your designs. Let us know in the comments if you have any questions or suggestions!


Is there an updated version of this? Shop doesn’t exist, woo products doesn’t even seem to exist.
I’m trying to make a template for the woo commerce category pages.
This would be a good SHOP page but not a CATEGORY page as it always shows all the categoris in the filter – we would need to create a unique filter and template for every different category. In your example your site only has one category with multiple tags.
hi Sharon , Your comment is exacty my problem . I can’t find a solution. Even if I create a unigue filter and template for every category . It fails . Only Price filter works well .
Is the shop module called something else now? I can’t find this module
It’s now called “Woo Products”. Check this screenshot, https://share.cleanshot.com/Yp2Pnt69
If this is a template shouldn’t it be capable of displaying different categories? A template just for ‘handmade leather good’ and another for ‘shoes’ doesn’t really make much sense. A page would do as well surely?
Once I’m done how do I view the page I built?
Hi there – is there any other way of setting up the category page to function more like my Shop page? For my site I need Add to Cart on the Shop page and not sure that is possible with the Shop module?
Also, when I am on the category page and tick and untick the category or tag options nothing happens – they are not dynamic from the look of things? So each time you want to see a category you have to use the link in the menu? Is that how it is supposed to work?
I am finding the same issue as Elsa, you cannot ‘add to cart’
Hello,
My web site is developing with Divi theme builder and I can not to use Exclude Categories. I put the correct categories number but it show me all the caterogies.
Percy Llanos
The filter doesn’t work properly, you have to manually change it for every category. Is there a way around this?
The plugin has only one settings window for categories in general. What do you mean?
Hello! Thank you very much for the tutorial. I have a problem, when filter keeps showing me all the filtering options. Example, if I choose a category, it keeps showing me colors that that category doesn’t have. Any solution for this? I hope you understand my query from Argentina. Thank you
Hello! I would like to apply this tutorial on my site, but I still see labels or attributes that category does not contain any value. How could I solve this? Thank you
Hi Jonas, Make sure that the plugin settings are showing things how you want them to There are so many options, your best shot is to try different settings to match how your store is set up.
Hi Orana! What a beautiful design, thank you!
I have installed the plugin – and have assigned categories to my products. However, when I add a text module and the code snippet to it – the category and price filters do not appear? I have carefully followed your settings.. Do you maybe know what might cause this conflict or what I can try to do to have the filters show up?
Thank you!
Check the setup on the plugin. There might be a toggle in the wrong place.
Hi Azza, There could be a number of things. In my tutorial, I didn’t add a price filter so you’d have to add that one yourself.
Also, are you checking how the design looks out of the visual builder in the actual category and not in the theme builder? Also, don’t forget to clear your cache once in a while.