
Portfolio pages are the perfect excuse to get creative with your web design. In this tutorial, we’ll show you how to put together an eye-catching scrollable portfolio navigation list to spice up any portfolio page. Using Divi and its scroll effects, the menu items come to life as they reach the middle of the screen. Buttons with anchor links help the user navigate to the corresponding sections.
Keep reading to recreate the design or download the JSON file for free.
- 1 Preview
- 2 Download The Hero Sections for FREE
- 3 Download For Free
- 4 1. Create New Section
- 5 2. Create Scrollable Portfolio Navigation List
-
6
3. Create Portfolio Items
- 6.1 Add Row 6
- 6.2 Add Divider Module to Row 6
- 6.3 Duplicate Row 6
- 6.4 Adjust Row 8
- 6.5 Adjust Row 10
- 6.6 Adjust Row 12
- 6.7 Add Row 7
- 6.8 Add Call to Action Module to Row 7
- 6.9 Duplicate Row 7
- 6.10 Adjust Row 9
- 6.11 Adjust Call to Action Module in Row 9
- 6.12 Adjust Row 11
- 6.13 Adjust Call to Action Module in Row 11
- 6.14 Adjust Row 13
- 6.15 Adjust Call to Action Module in Row 13
- 6.16 Rearrange Rows
- 7 Compare Your Wireframe
- 8 Preview
- 9 Final Thoughts
Preview
Before we get started with the tutorial, let’s take a look at the design on different screen sizes.
Desktop

Mobile

Wireframe
This responsive scrollable portfolio navigation list is created with a series of repeated and alternating rows. For that reason, we’ve included a screenshot of the wireframe view. This will help you follow the order of the rows and their respective modules. We suggest you label every row accordingly to keep track. We’ve added those instructions in the tutorial steps as well.

Download The Hero Sections for FREE
To lay your hands on the free scrollable portfolio navigation list layout, you will first need to download it using the button below. To gain access to the download you will need to subscribe to our newsletter by using the form below. As a new subscriber, you will receive even more Divi goodness and a free Divi Layout pack every Monday! If you’re already on the list, simply enter your email address below and click download. You will not be “resubscribed” or receive extra emails.

1. Create New Section
Add Section
Background
Start with a regular section inside a new or existing page. Before adding any rows or modules, add a background color to the section.
- Background Color: #222831
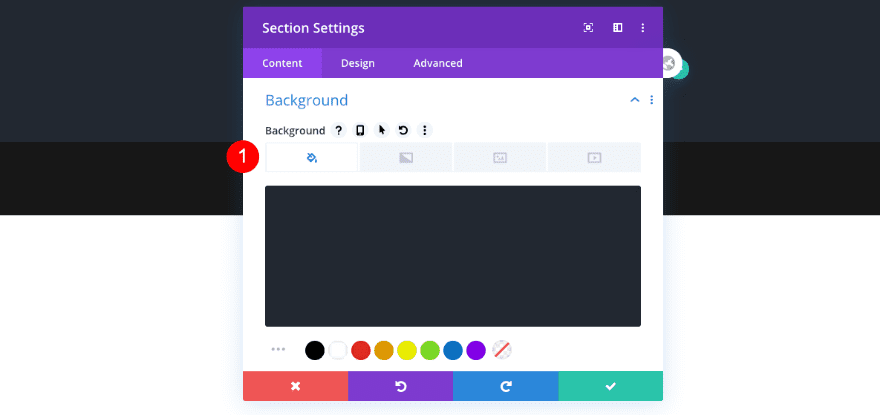
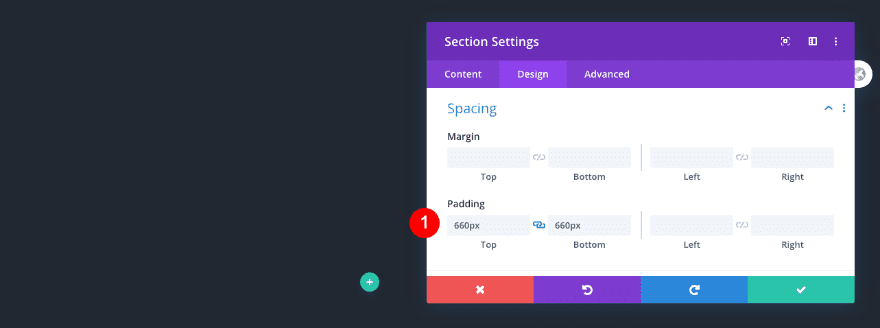
Spacing
Add enough spacing to the section for the scroll effects to do their magic as well.
- Top and Bottom Padding: 660px
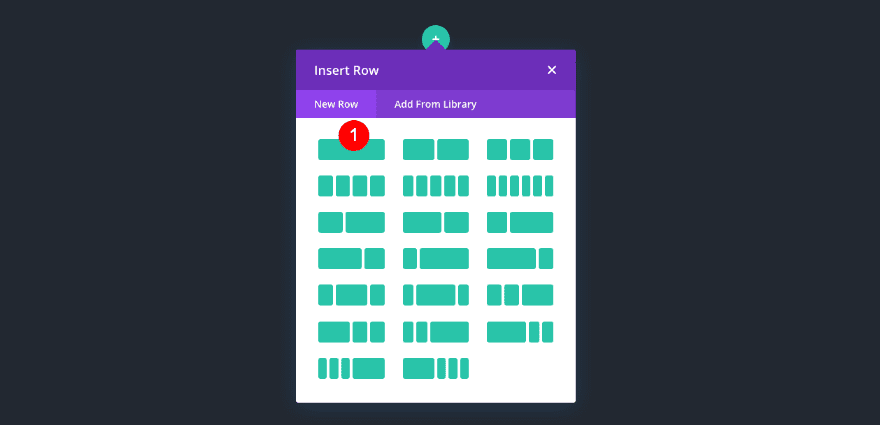
Add Row 1
Column Structure
Add the first row and choose the following column structure:
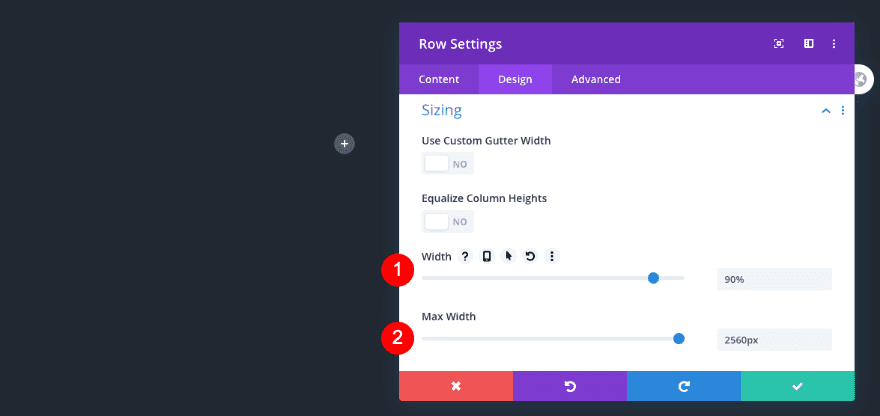
Sizing
Adjust the width of the row next.
- Width: 90%
- Max Width: 2560px
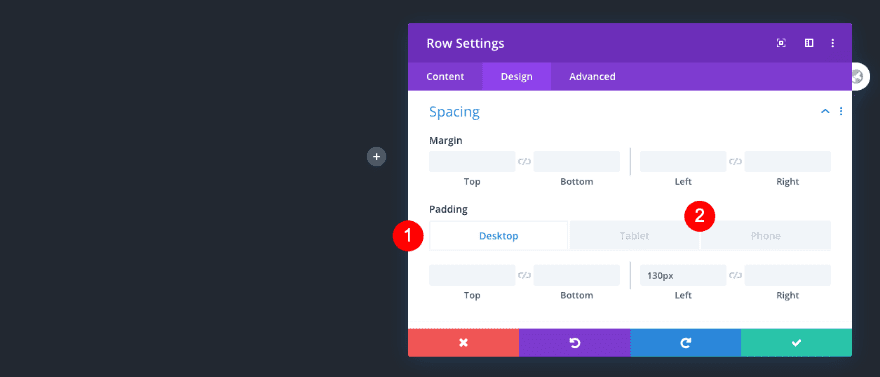
Spacing
Then, adjust the spacing settings.
- Left Padding
- Desktop: 130px
- Tablet and Phone: 50px
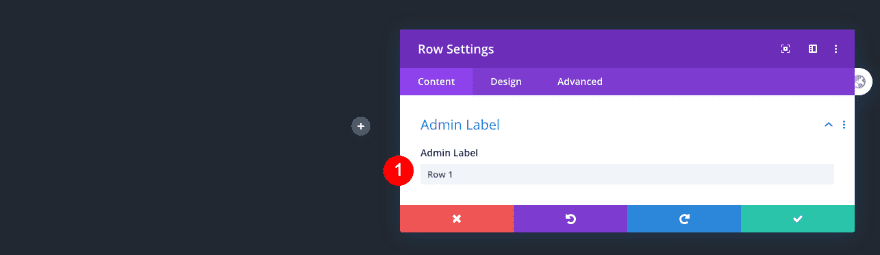
Admin Label
And label the row.
- Admin Label: Row 1
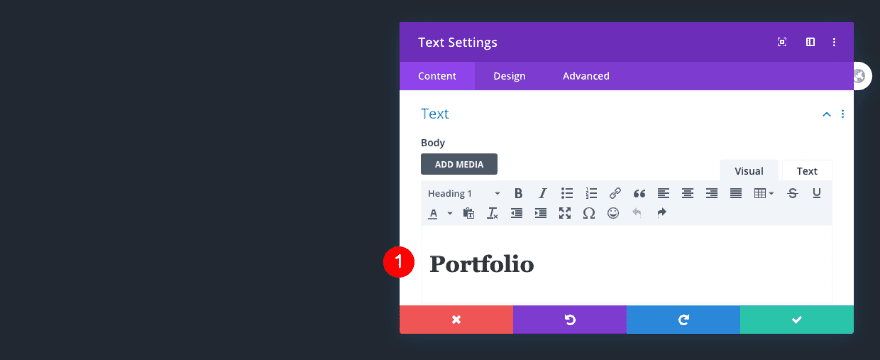
Add Text Module to Column
Content
Add a text module for the title. Insert some H1 content of your choice.
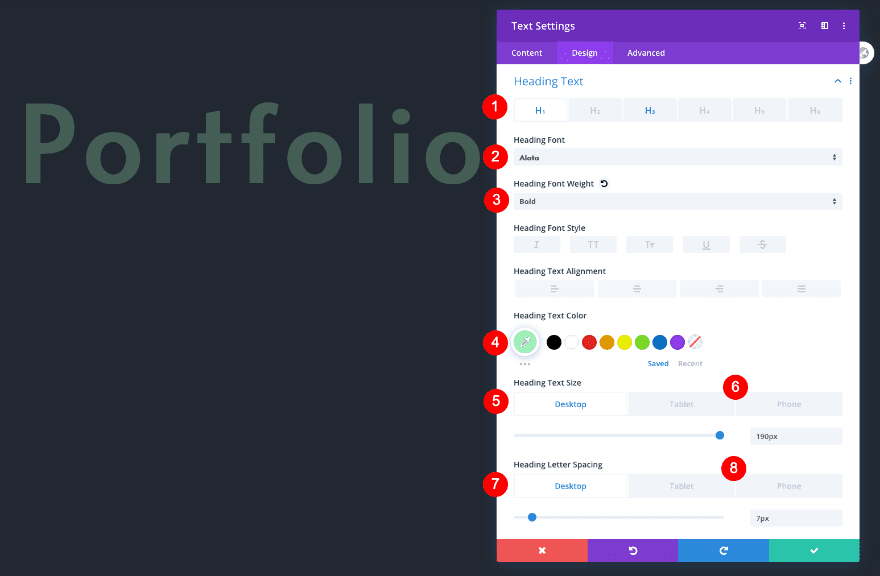
Heading Text
Move on to the design tab and style the title text as follows:
- Heading Level: H1
- Font: Alata
- Weight: Bold
- Color: #a3f7bf
- Size
- Desktop: 190px
- Tablet: 120px
- Phone: 50px
- Letter Spacing
- Desktop and Tablet: 7px
- Phone: 8px
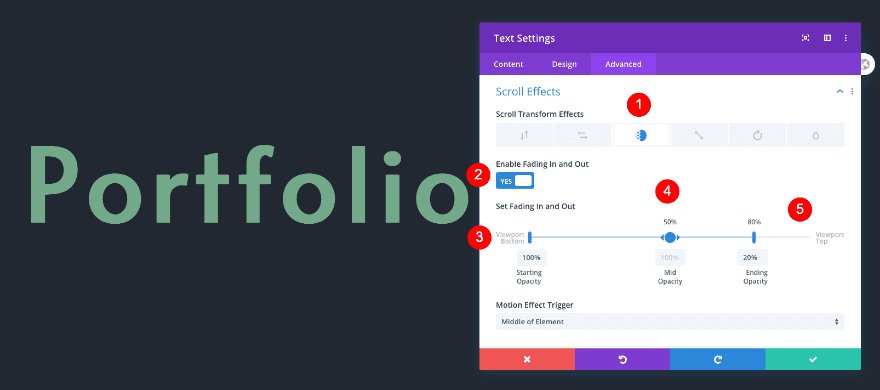
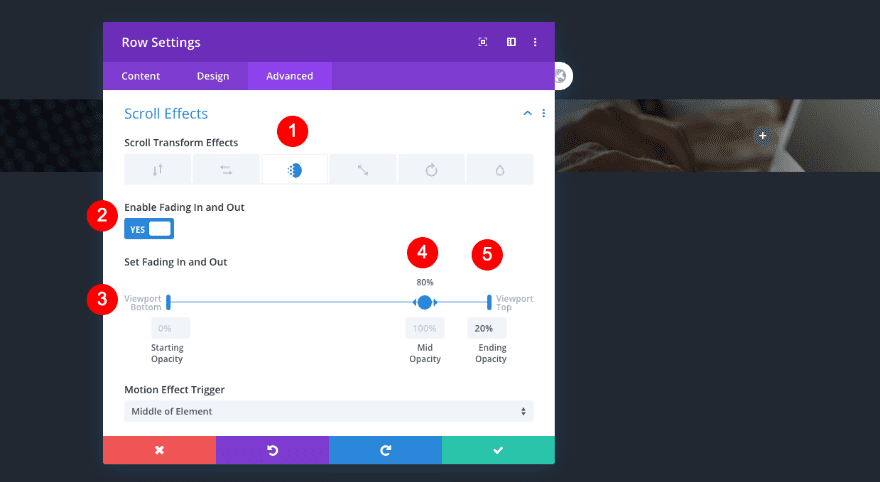
Scroll Effects
Last but not least, add a fading in and out scroll effect to the advanced tab.
- Enable Effect: Fading In and Out
- Viewport Bottom
- Position: 100%
- Starting Opacity:100%
- Mid Opacity
- Position: 50%
- Mid: 100%
- Viewport Top
- Position: 80%
- Ending Opacity: 20%
Add Row 2
Column Structure
Now it’s time to add the navigation items. Add a new row with two equally-sized columns.
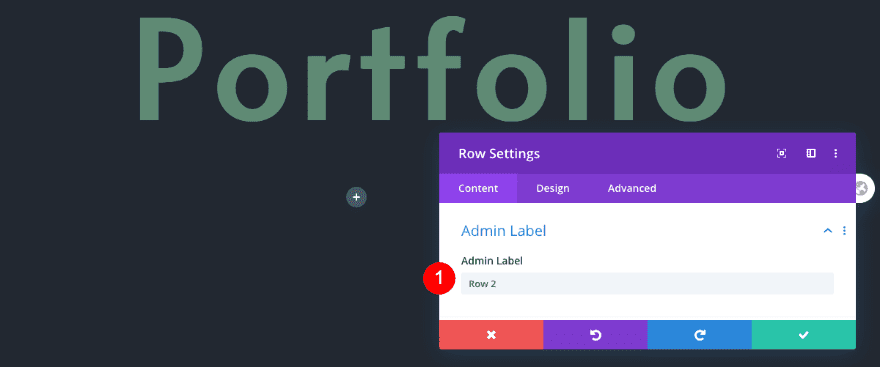
Admin Label
Label the row.
- Admin Label: Row 2
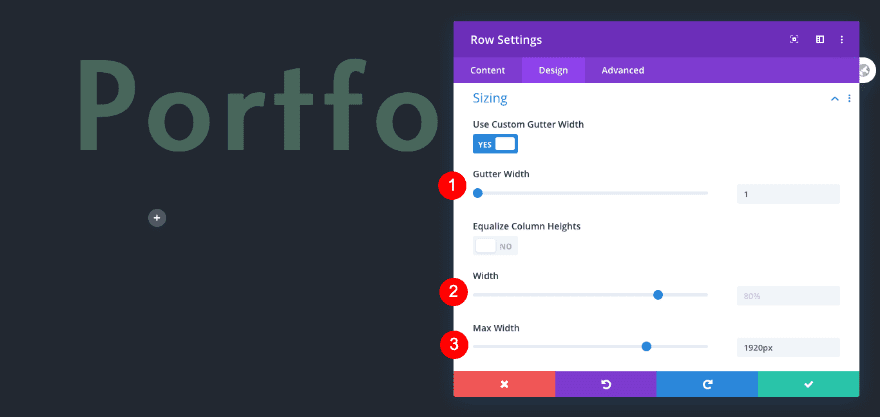
Sizing
Adjust the sizing settings too.
- Gutter Width: 1
- Width: 80%
- Max Width: 1920px
Column 1 Settings
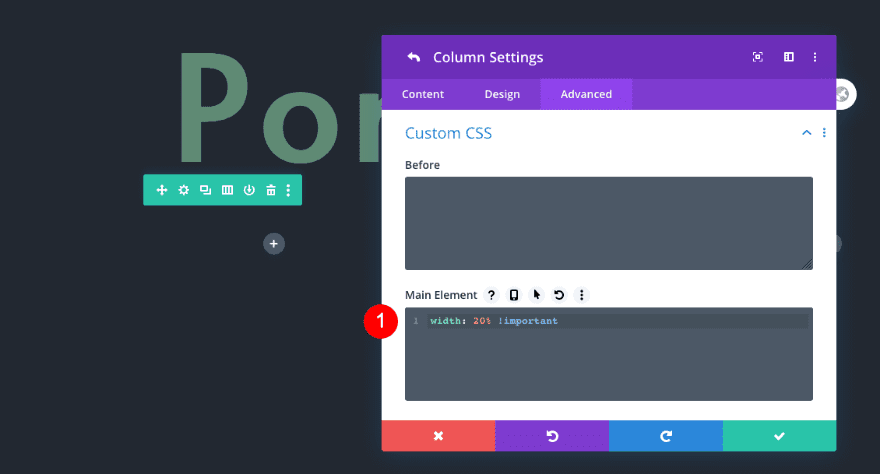
Custom CSS
Before adding modules, add one line of CSS code to the columns’ main elements to make sure the proportions remain the same across smaller screen sizes. Start with column 1:
- Main Element: width: 20% !important
width: 20% !important }
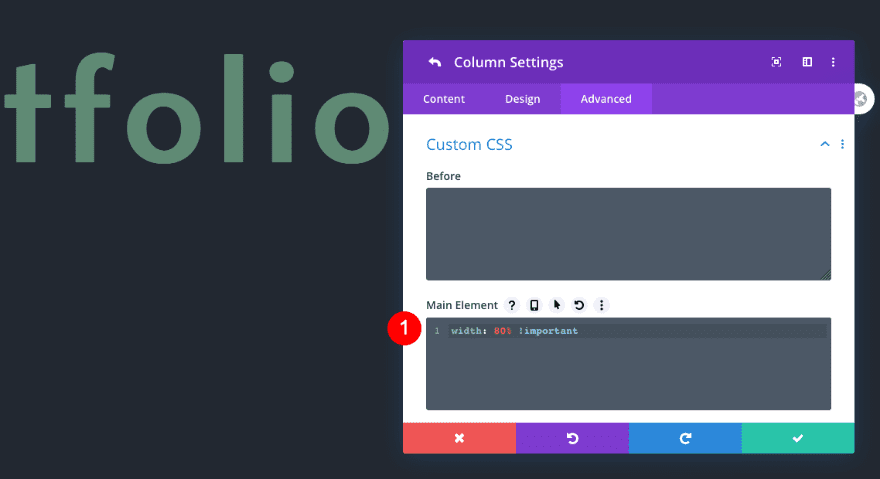
Column 2 Settings
Custom CSS
Do the same for the second column.
- Main Element: width: 80% !important
width: 80% !important }
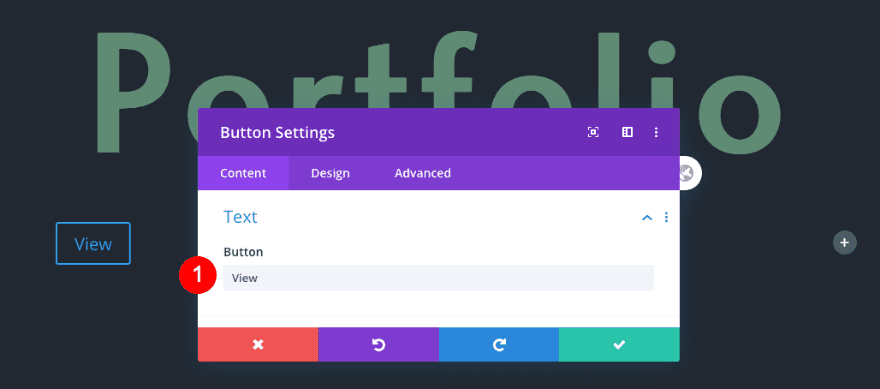
Content
Now, add a button module to column 1 with some copy of your choice.
- Button Text: View
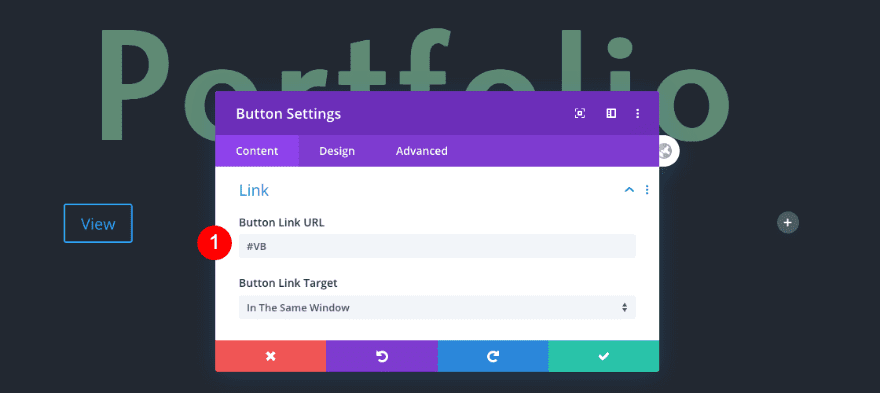
Link
Add an anchor link to the module next. We’ll add a matching CSS ID for this anchor link later on the tutorial.
- Button Link URL: #VB
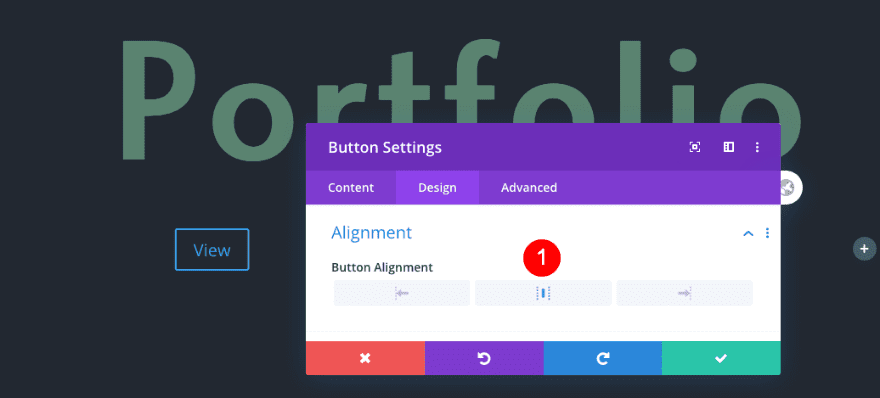
Alignment
Move on to the design tab and change the button alignment.
- Button Alignment: Center
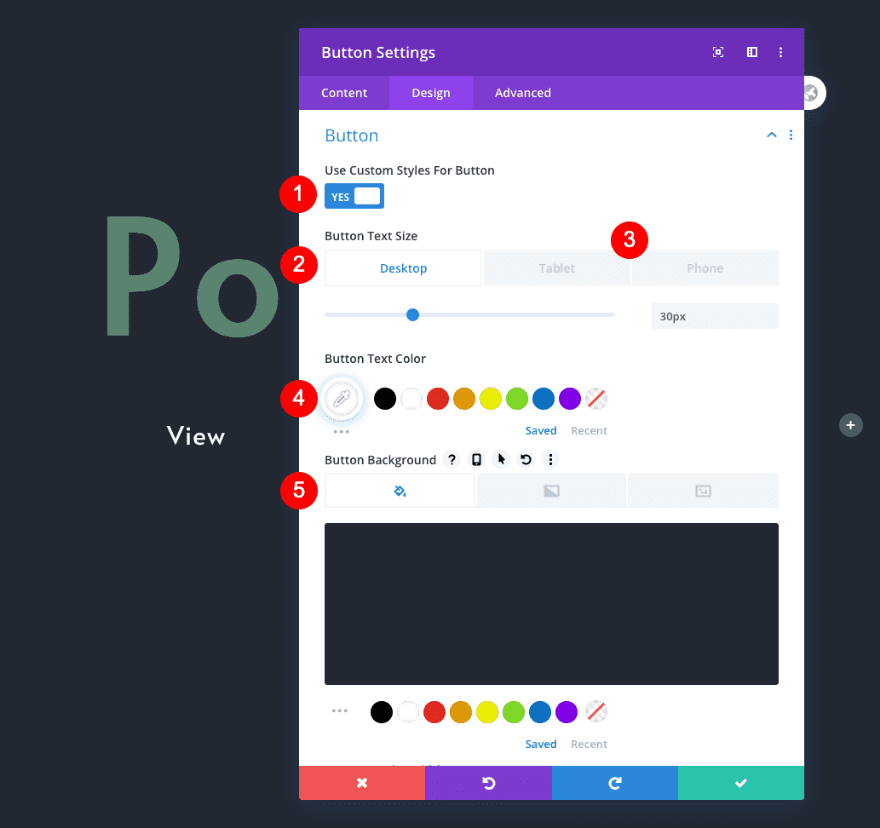
Button
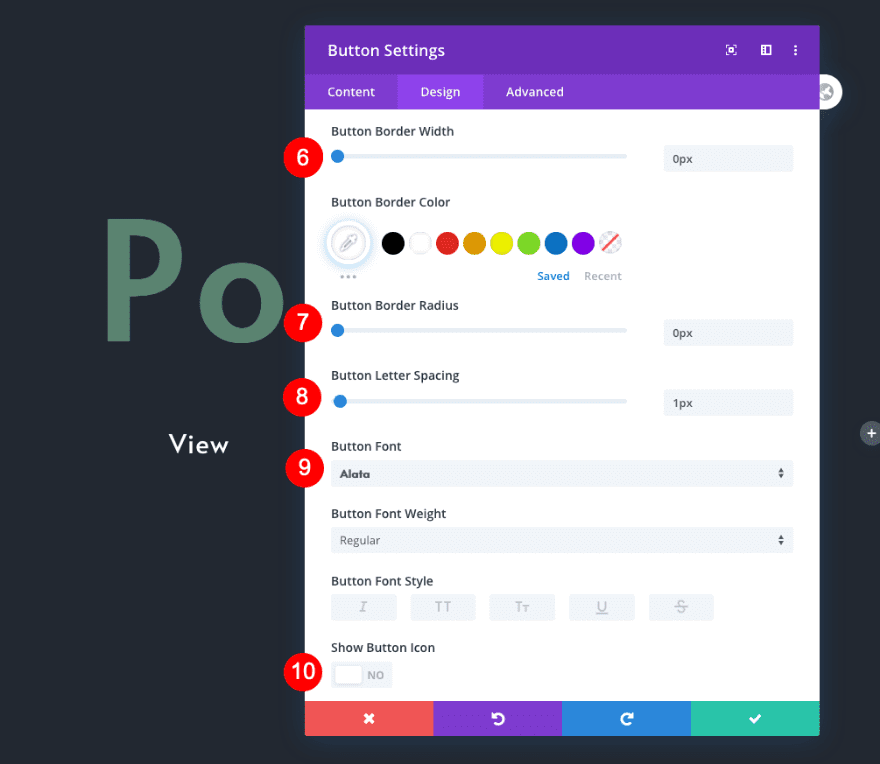
Then, style the button accordingly:
- Custom Styles For Button: Yes
- Text Size
- Desktop: 30px
- Tablet: 25px
- Phone: 20px
- Color: White #ffffff
- Background: Dark Grey #222831
- Border Width: 0px
- Border Radius: 0px
- Letter Spacing: 1px
- Font: Alata
- Show Button Icon: No
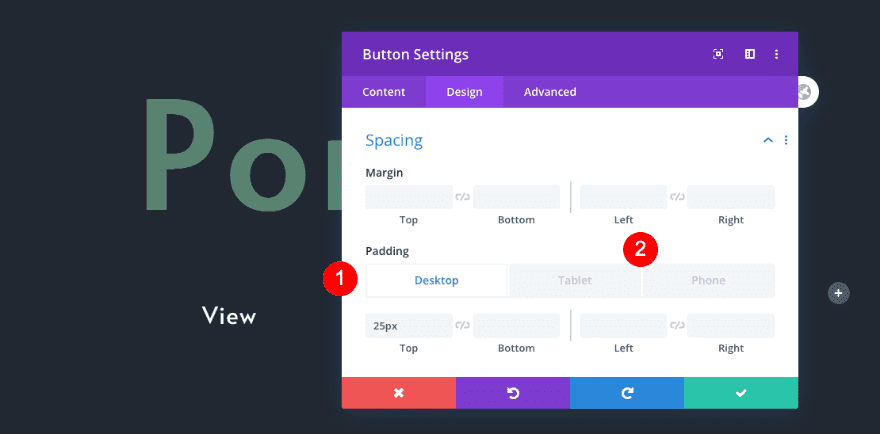
Spacing
Make changes to the spacing settings too.
- Top Padding
- Desktop: 25px
- Tablet: 15px
- Phone: 5px
Scroll Effects
And add a fading in and out scroll effect.
- Enable Effect: Fading In and Out
- Viewport Bottom
- Position: 40%
- Starting Opacity:0%
- Mid Opacity
- Bottom: 45%
- Mid: 100%
- Top: 55%
- Viewport Top
- Position: 60%
- Ending Opacity: 0%

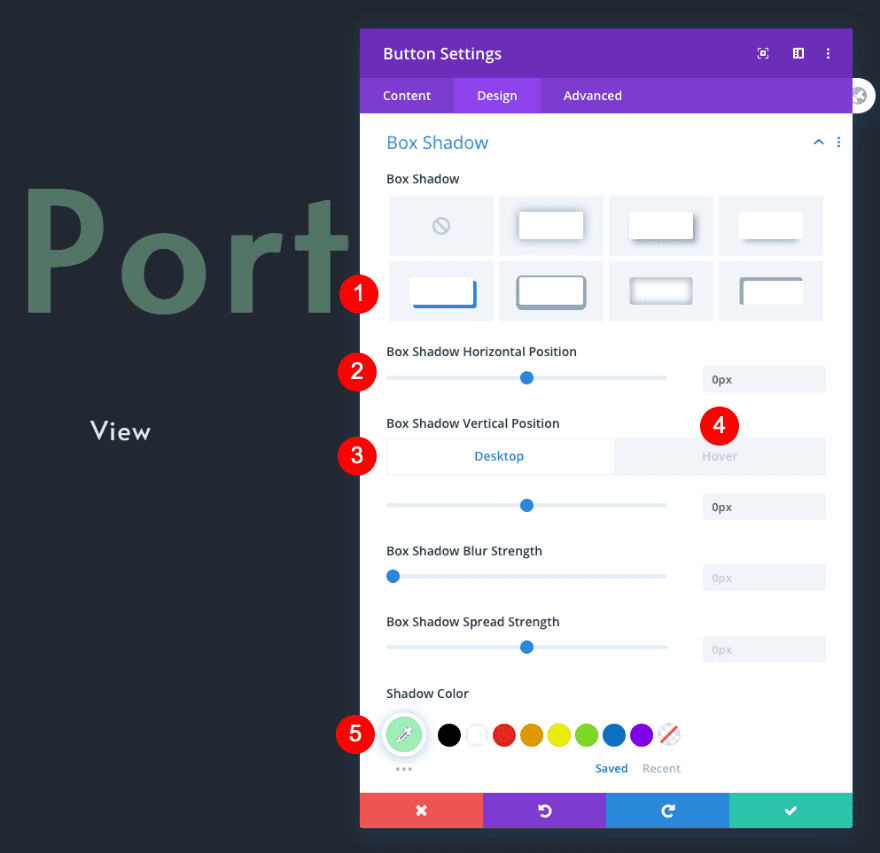
Box Shadow
Before moving on to the next module, add a box shadow to the button’s hover settings.
- Box Shadow: 4th Option
- Horizontal Position: 0px
- Vertical Position
- Hover: 5px
- Blur Strength: 0px
- Spread Strength: 0px
- Shadow Color: Aqua Green #a3f7bf
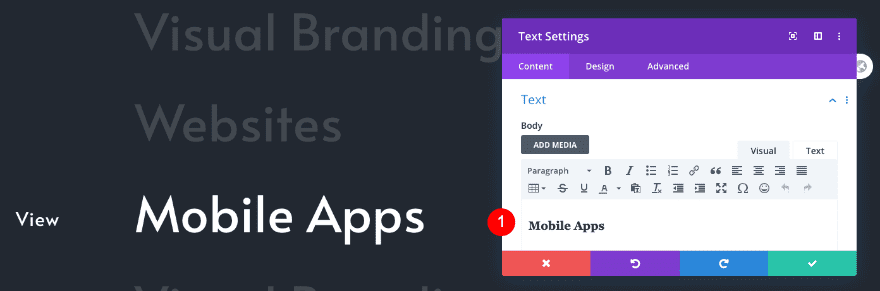
Add Text Module to Column 2
Content
Continue by adding a text module to column 2 with some H3 content of your choice.
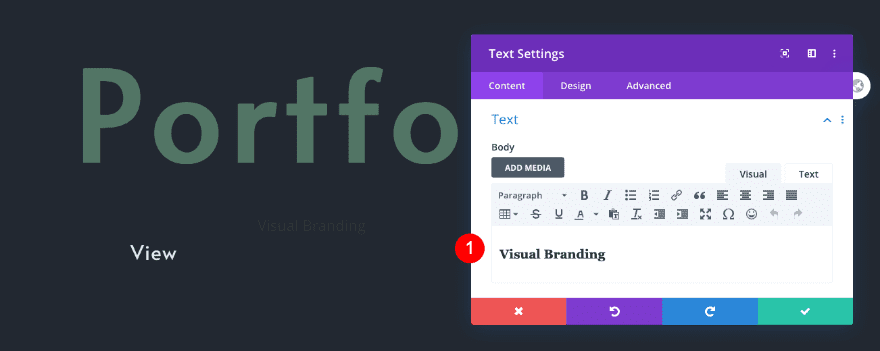
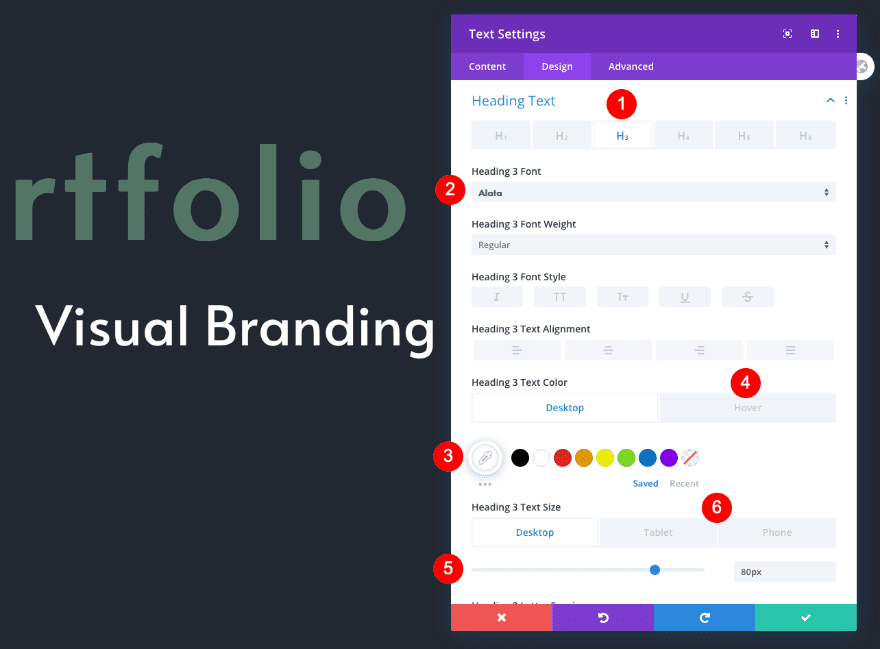
Heading Text
Move on to the design tab and style the title text as follows:
- Heading Level: H3
- Font: Alata
- Color
- Desktop: White #ffffff
- Hover: Aqua Green #a3f7bf
- Text Size
- Desktop: 80px
- Tablet: 65px
- Phone: 38px
Scroll Effects
And complete the module settings by adding a fading in and out scroll effect in the advanced tab.
- Enable Effect: Fading In and Out
- Viewport Bottom
- Position: 40%
- Starting Opacity: 15%
- Mid Opacity
- Bottom: 45%
- Mid: 100%
- Top: 55%
- Viewport Top
- Position: 60%
- Ending Opacity: 15%

Duplicate Row 2
To complete the navigation list, duplicate this row three times. The new rows will be renumbered; 2, 3, and 4.
Adjust Row 3
Row Admin Label
Change the row’s admin label from 2 to 3.
- Admin Label: Row 3
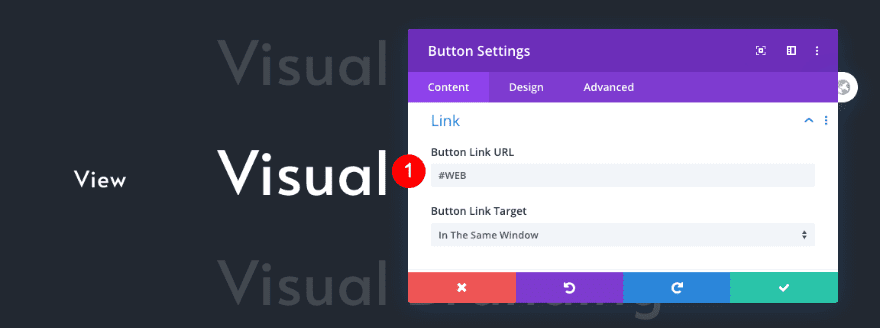
Button Module
Change the anchor link from #VB to #WEB.
- Button Link URL: #WEB
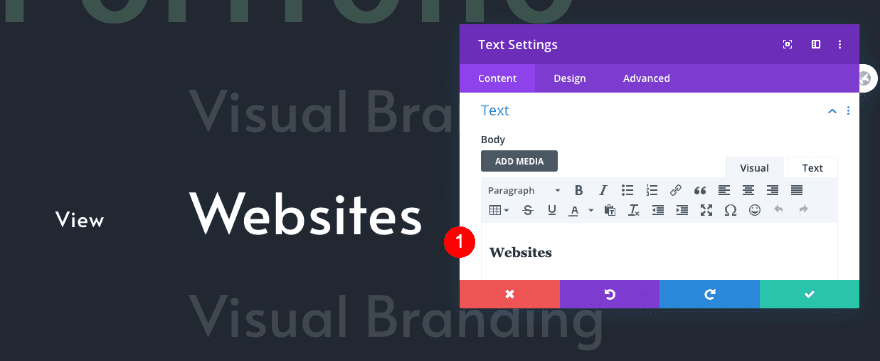
Text Module
Change the H3 content in the text module too.
- Body Text: Websites
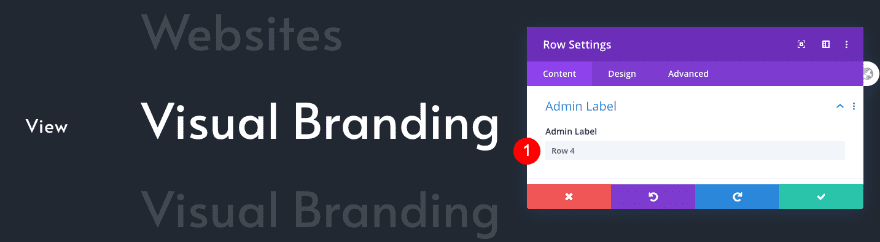
Adjust Row 4
Row Admin Label
Change the row’s admin label from 2 to 4.
- Admin Label: Row 4
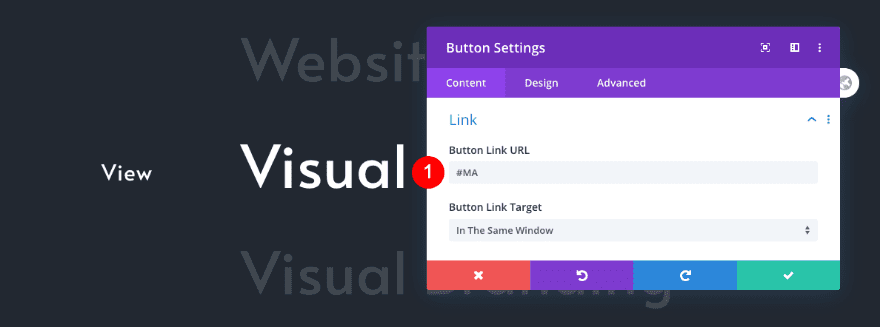
Button Module
Change the anchor link from #VB to #MA.
- Button Link URL: #MA
Text Module
Change the H3 content too.
- Body Text: Mobile Apps
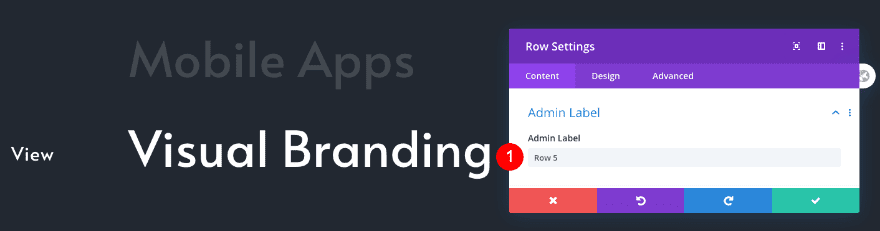
Adjust Row 5
Row Admin Label
Change the row’s admin label from 2 to 5.
- Admin Label: Row 5
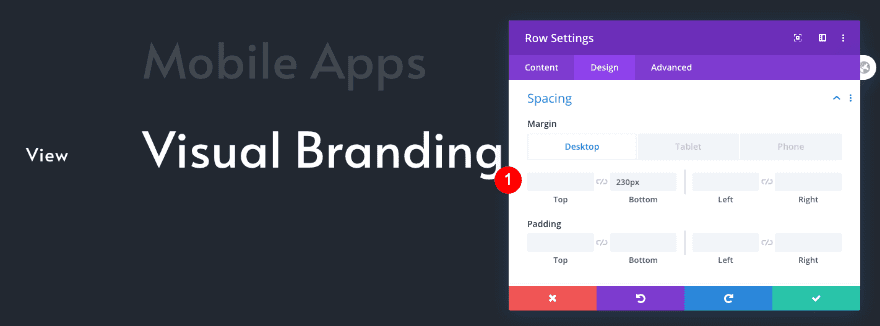
Row Spacing
Add some bottom margin.
- Bottom Margin
- Desktop 230px
- Tablet: 100px
- Phone: 60px
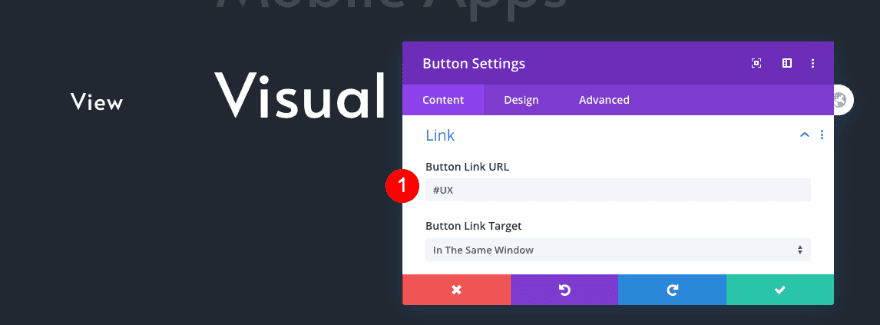
Button Module
Change the anchor link from #VB to #UX.
- Button Link URL: #UX
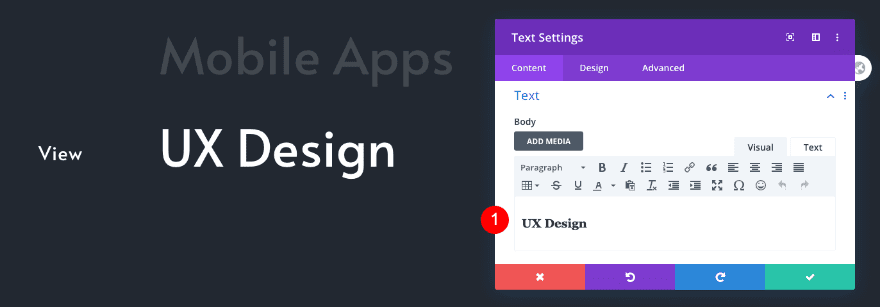
Text Module
And change the H3 content here too.
- Body Text: UX Design
3. Create Portfolio Items
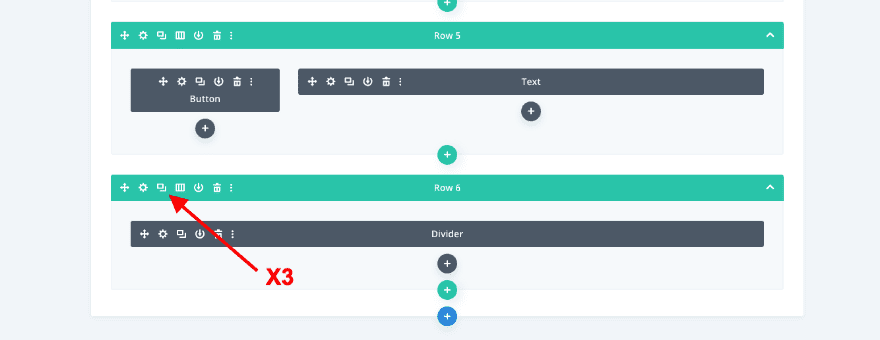
Add Row 6
Column Structure
The scrollable portfolio navigation list links to portfolio items. Each item is made up of two rows. One row with an invisible divider and another with a call to action module. The CSS IDs are added to the row with the divider. This way, the anchor navigation won’t stop at the top of the portfolio item but in the middle instead.
Let’s create the items now. Add a row with one column.

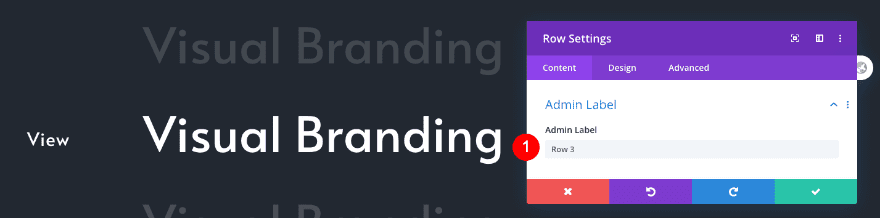
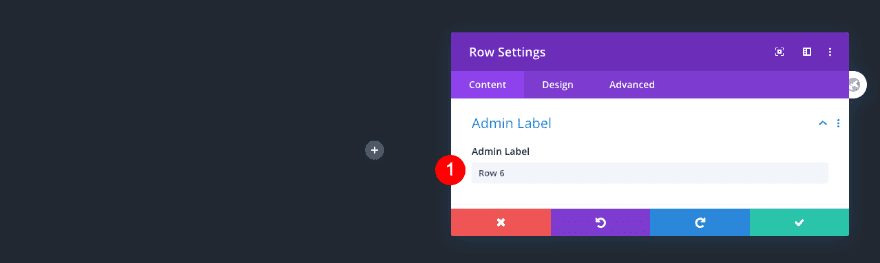
Admin Label
Don’t forget to label the new row.
- Admin Label: Row 6
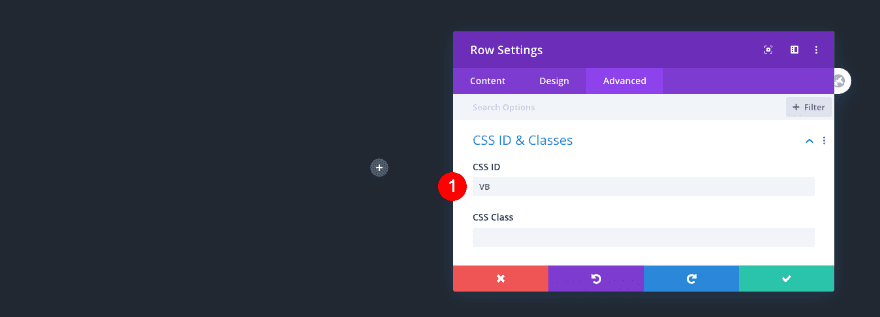
CSS ID & Classes
Insert a matching CSS ID in the advanced tab.
- CSS ID: VB
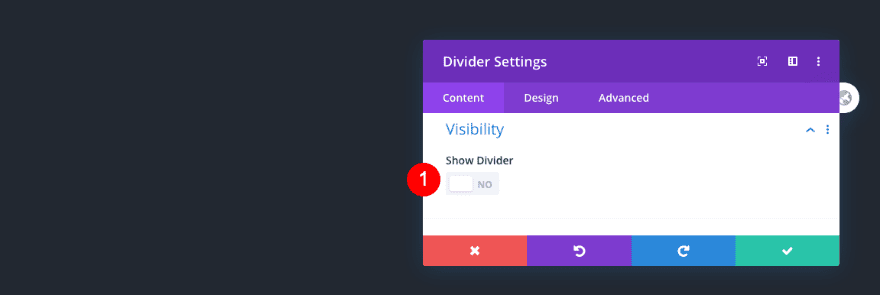
Add Divider Module to Row 6
Visibility
Add an invisible divider to the row’s column.
- Show Divider: No
Duplicate Row 6
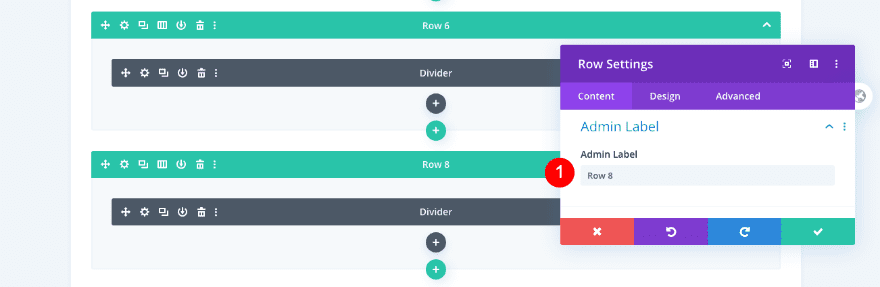
Duplicate this row three times. The new rows will be renumbered; 8, 10, and 12.
Adjust Row 8
Admin Label
Change the admin label from 6 to 8.
- Admin Label: Row 8
CSS ID & Classes
Change the CSS ID from VB to WEB.
- CSS ID: WEB
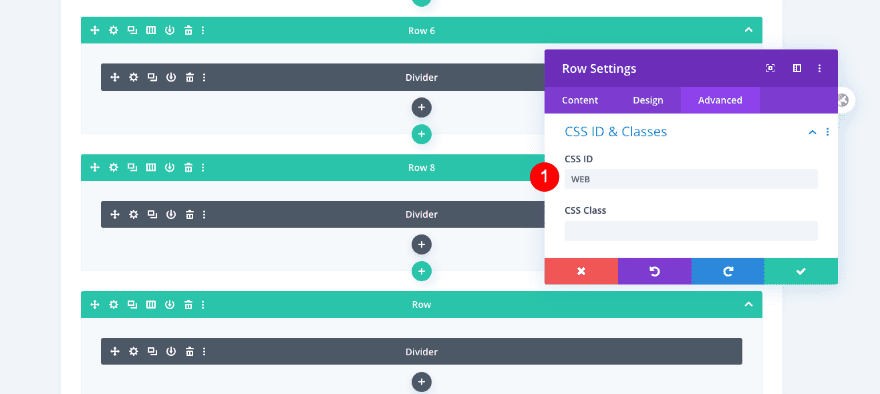
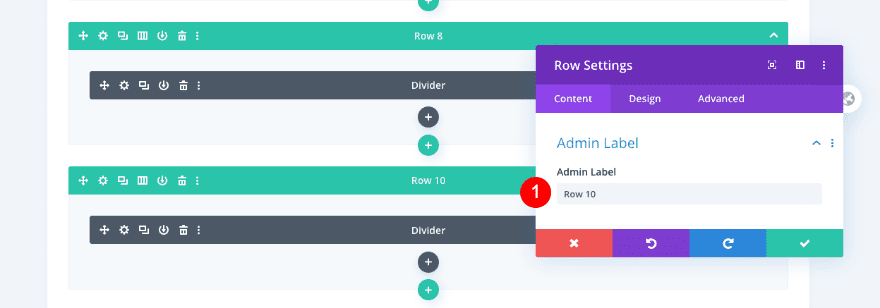
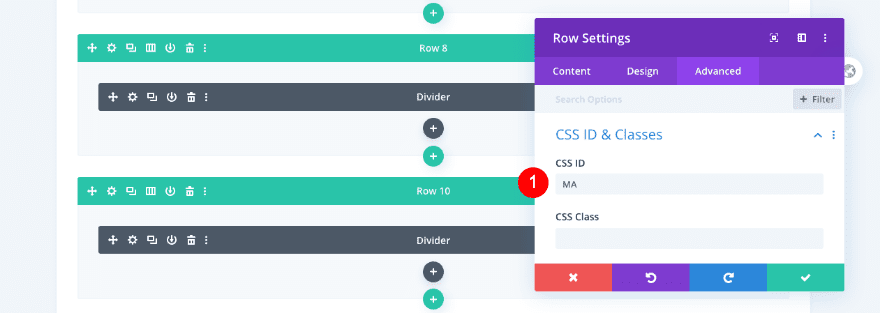
Adjust Row 10
Admin Label
Change the admin label from 6 to 10.
- Admin Label: Row 10
CSS ID & Classes
Change the CSS ID from VB to MA.
- CSS ID: MA
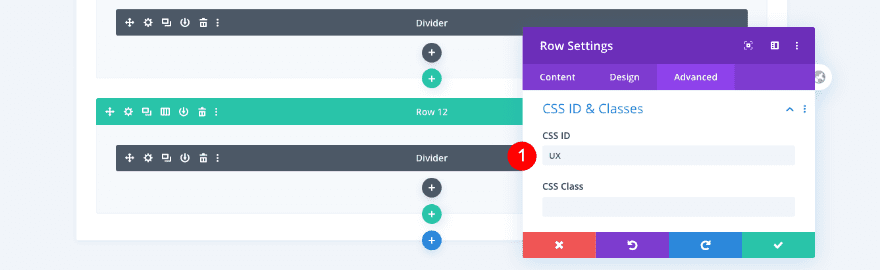
Adjust Row 12
Admin Label
Change the admin label from 6 to 12.
- Admin Label: Row 12

CSS ID & Classes
Admin Label
Change the CSS ID from VB to UX.
- CSS ID: UX
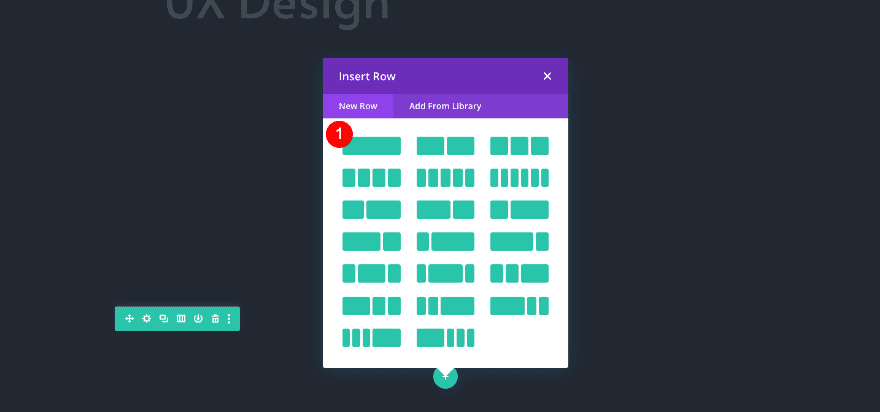
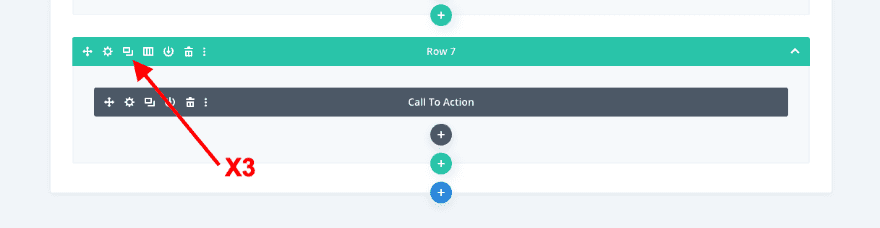
Add Row 7
Column Structure
Leave the four rows with dividers where they are for now. Add a new row with one column.
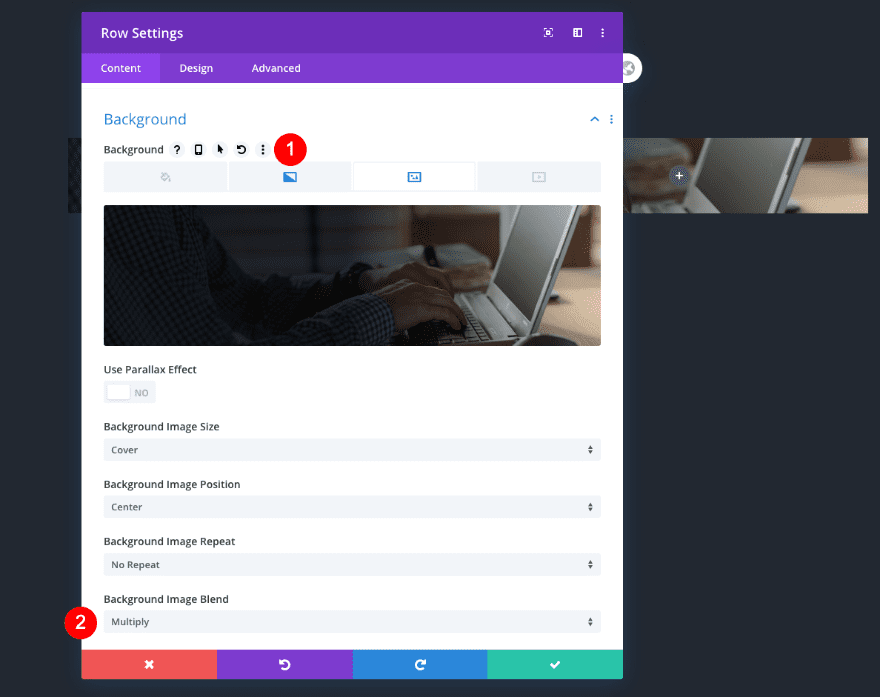
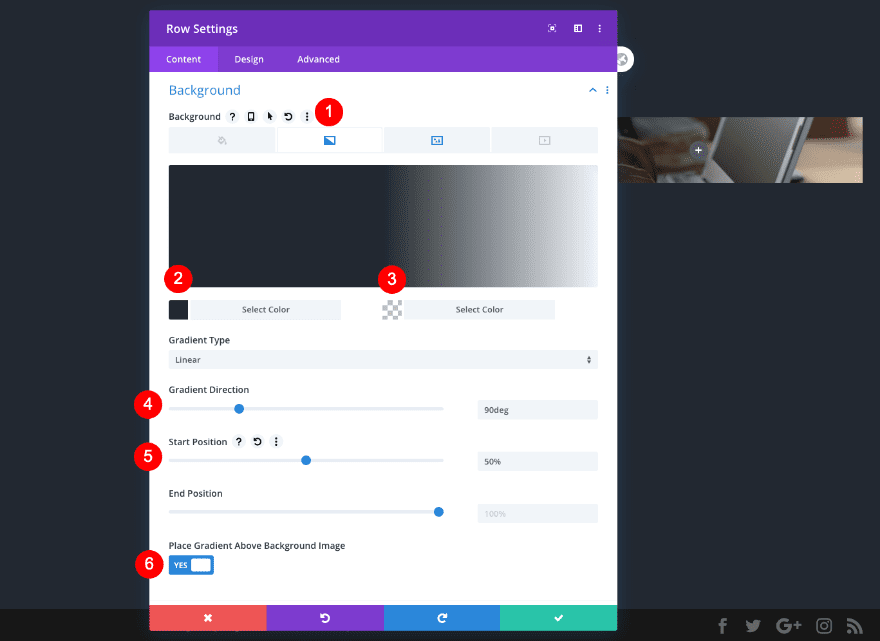
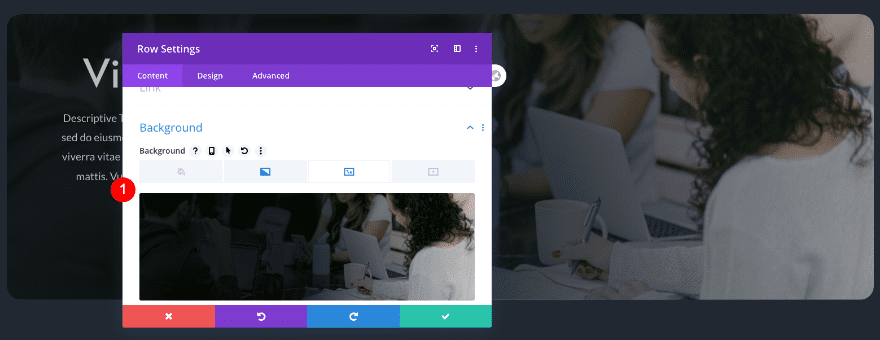
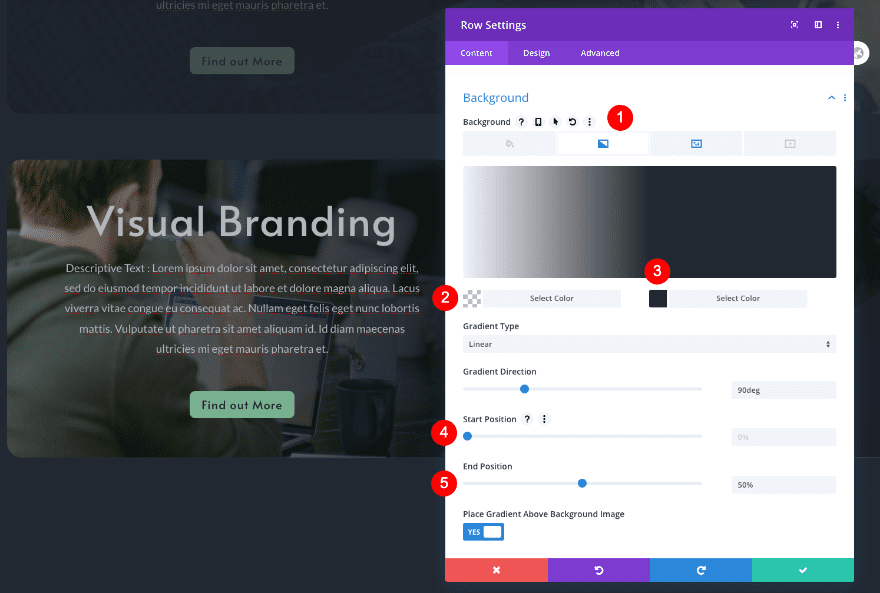
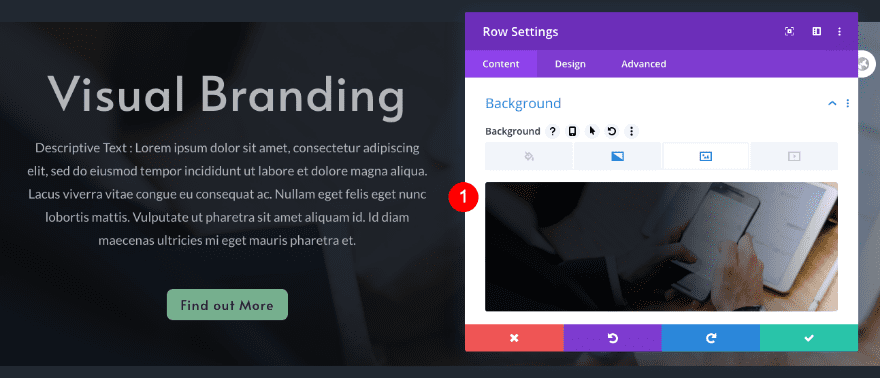
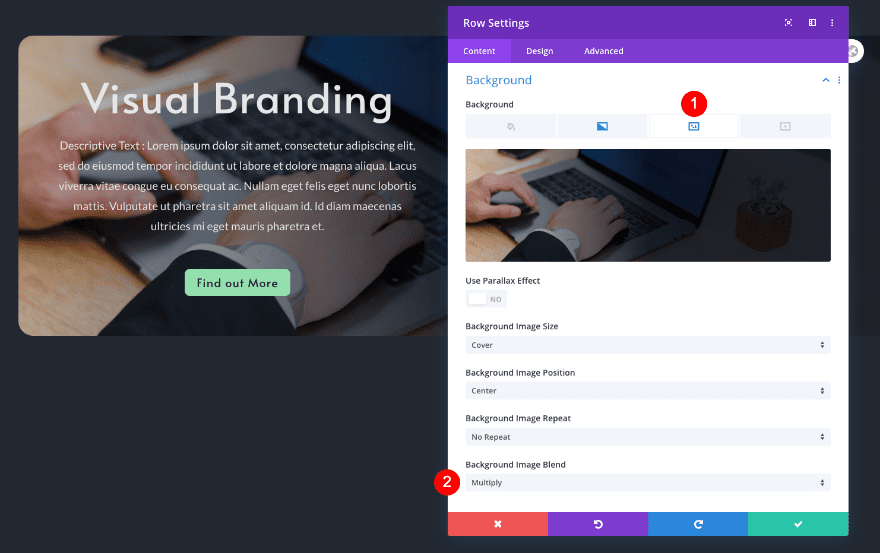
Background
Without adding a module yet, open the row settings and style the background as follows:
- Background Image: Photo
- Image Blend: Multiply
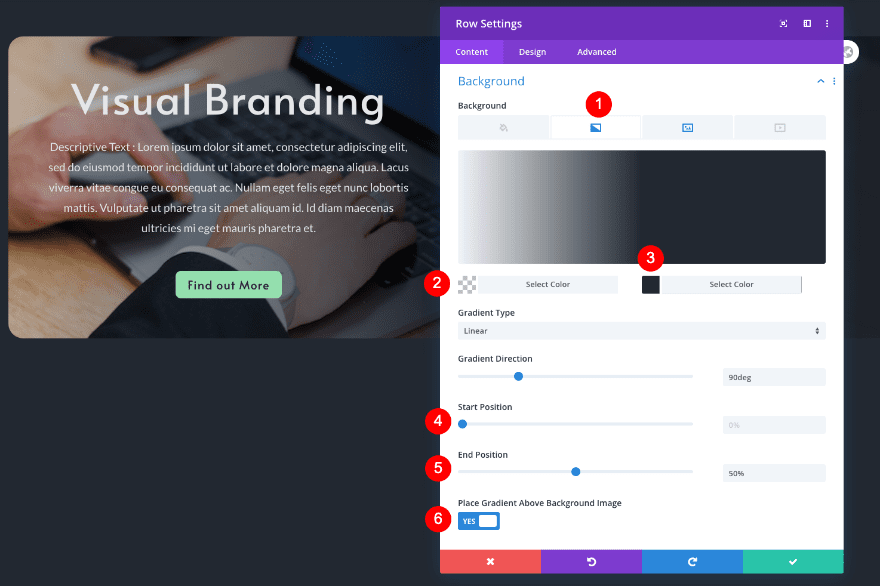
- Background Gradient
- Color 1: Dark Grey #222831
- Color 2: Transparent
- Type: Linear
- Direction: 90deg
- Start Position: 50%
- End Position: 100%
- Place Gradient Above Background Image: Yes
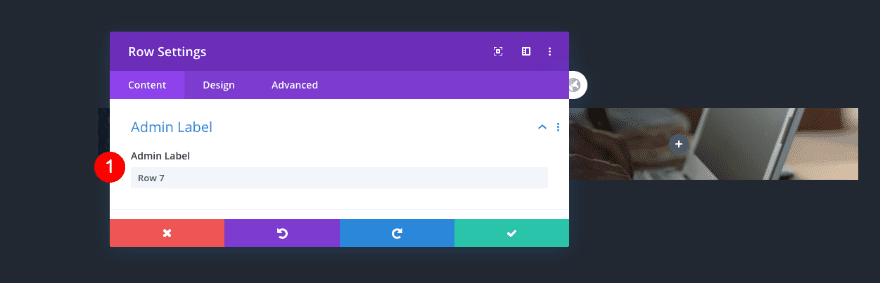
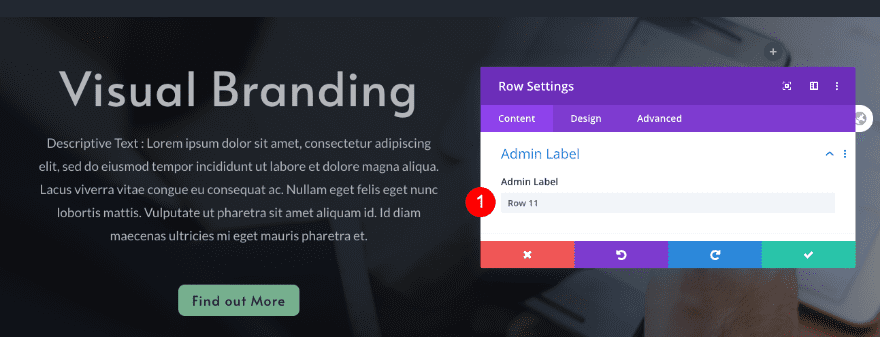
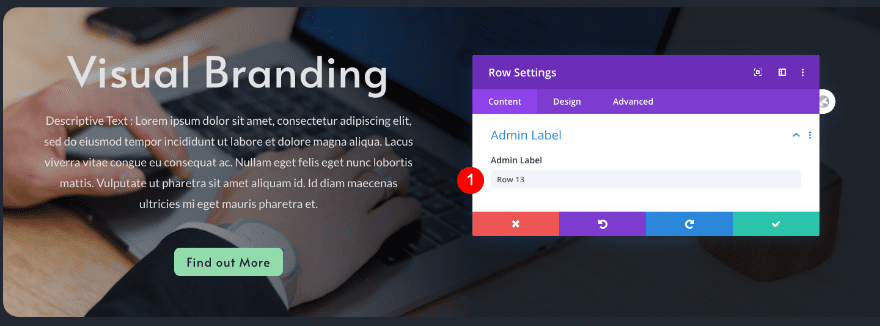
Admin Label
Label the row.
- Admin Label: row 7
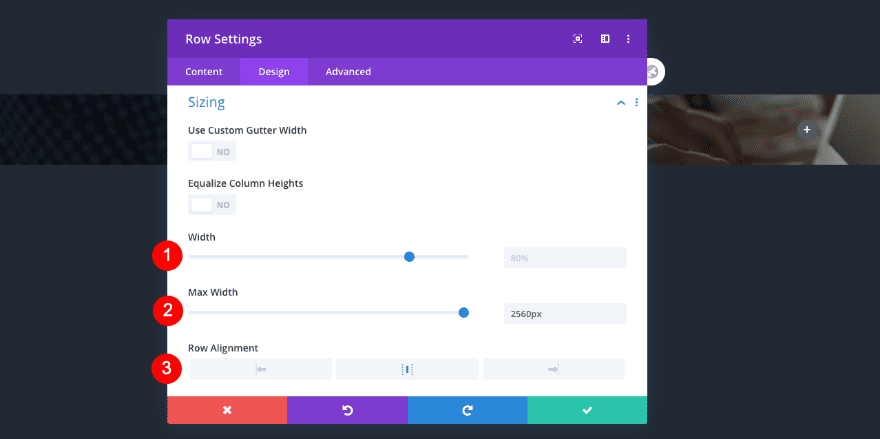
Sizing
Adjust the sizing settings of the row next.
- Width: 80%
- Max Width: 2560px
- Alignment: Center
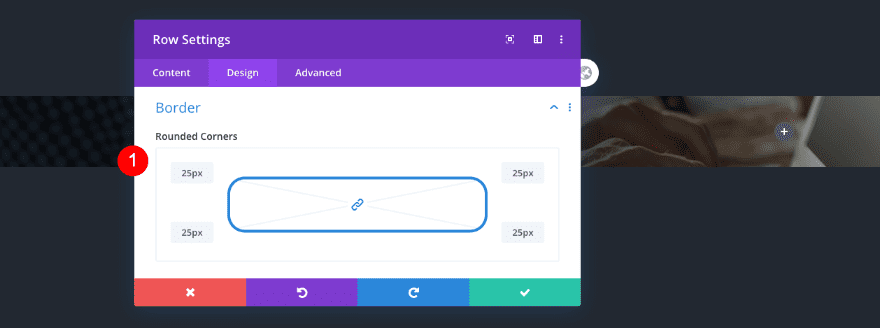
Border
Add some rounded corners too.
- Rounded Corners: 25px
Scroll Effects
And enable a fading in and out scrolling effect.
- Enable Effects: Fading In and Out
- Starting Opacity: 0%
- Mid Opacity: 100%
- Position: 80%
- Ending Opacity: 20%
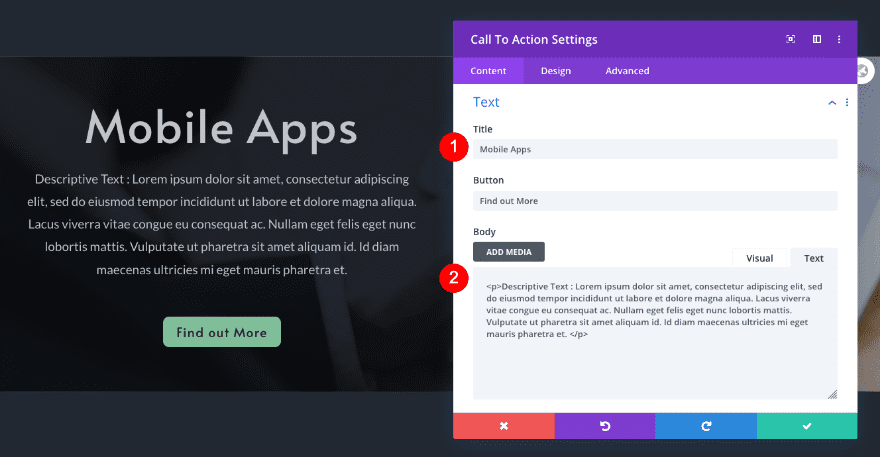
Add Call to Action Module to Row 7
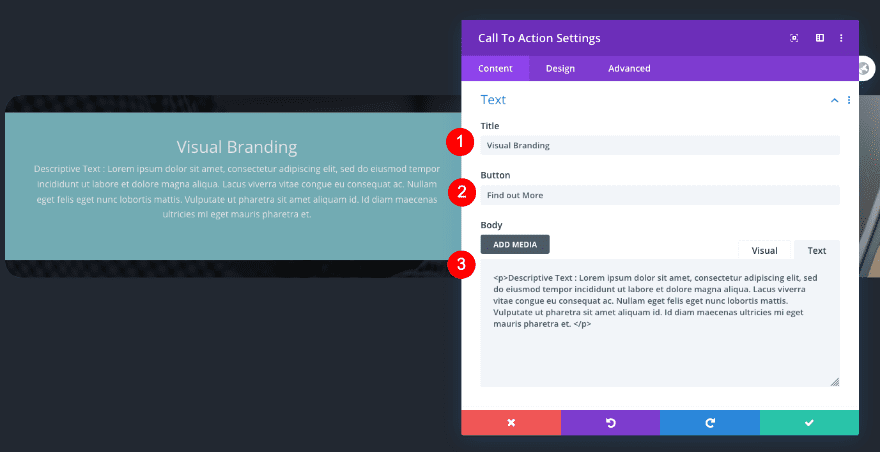
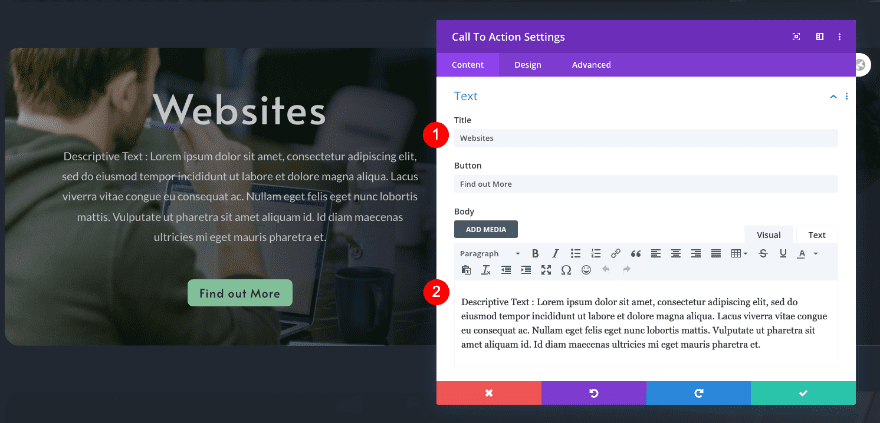
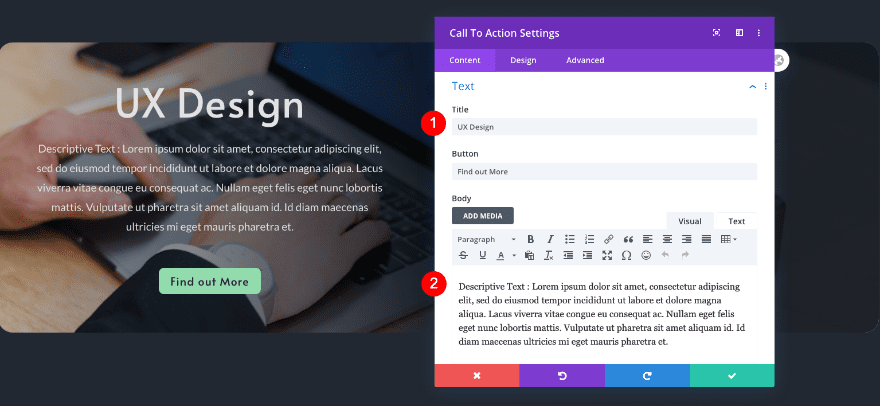
Content
Now add a call to action module to the row.
- Title: Visual Branding
- Button: Find out More
- Body: Descriptive Text
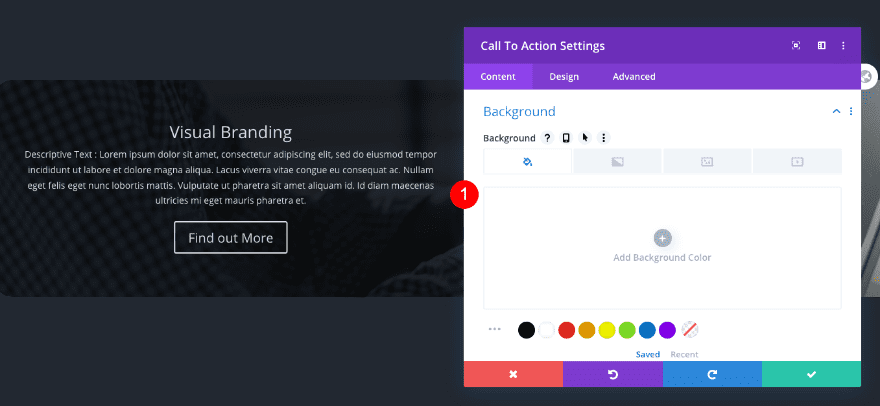
Background
Remove the default background color.
- Background: None
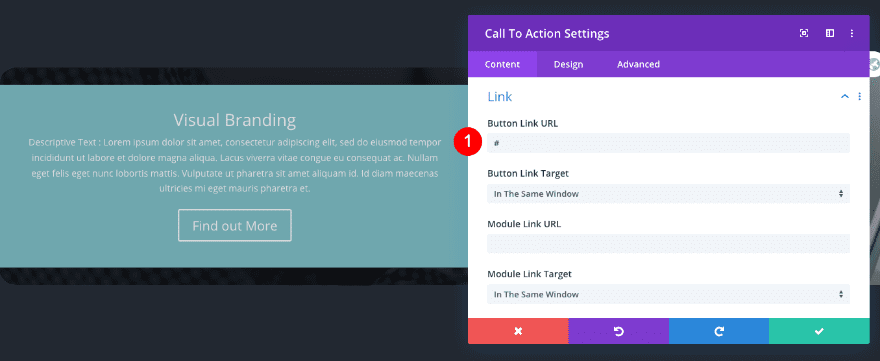
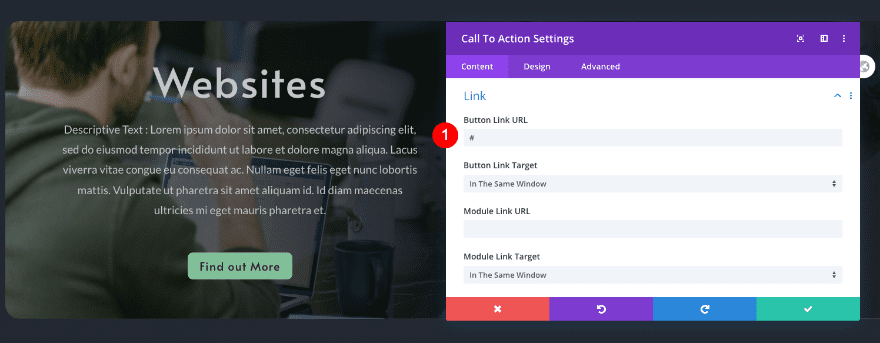
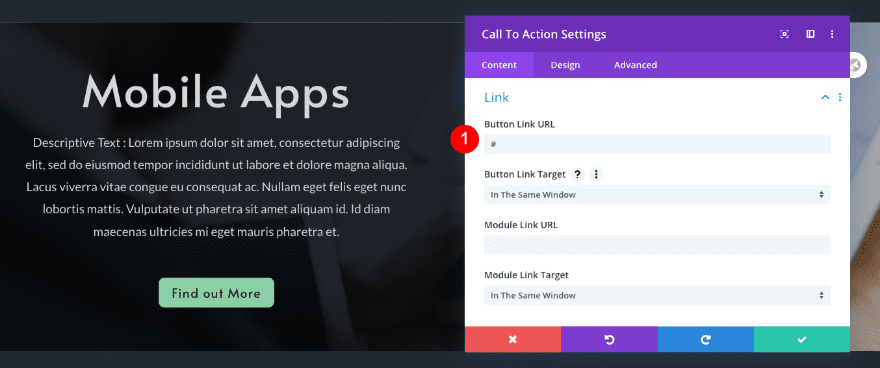
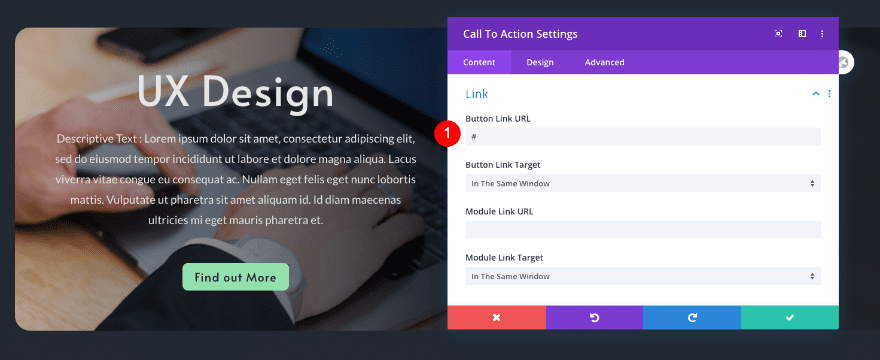
Link
Add a link to the corresponding page. We’ll insert a # for now.
- Link: #
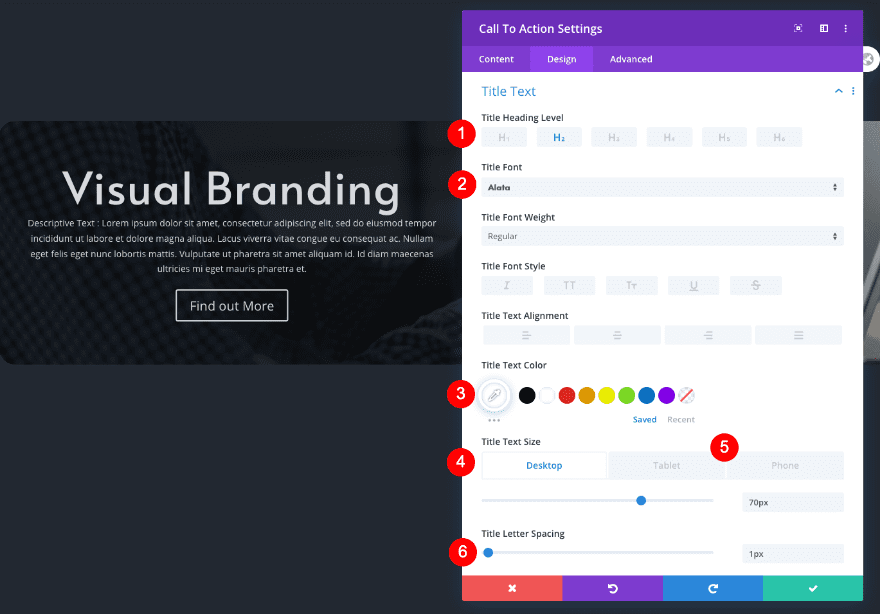
Title Text
Style the title text next.
- Heading Level: H2
- Font: Alata
- Color: White #ffffff
- Size
- Desktop: 70px
- Tablet: 60px
- Phone: 48px
- Letter Spacing: 1px
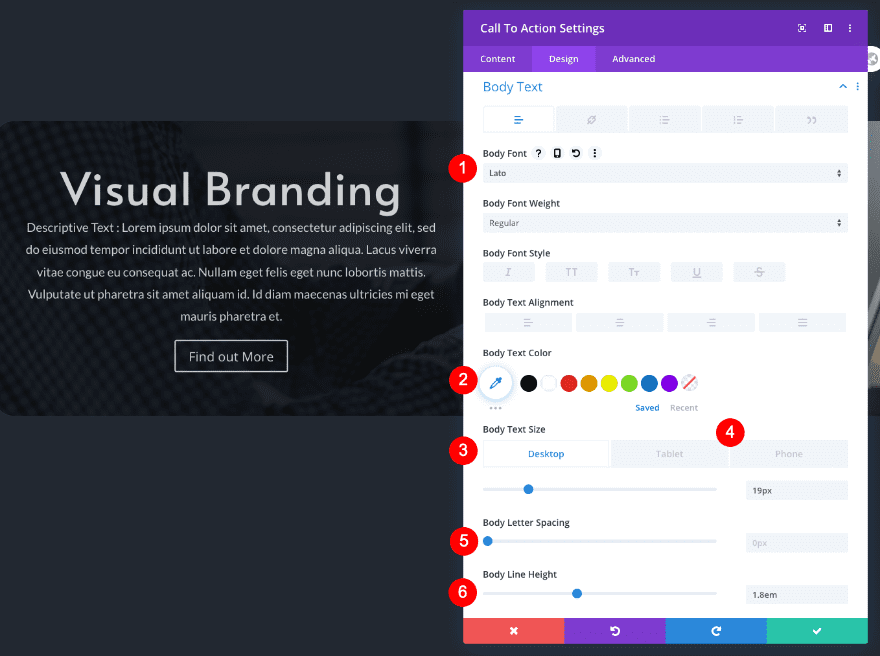
Body Text
Style the body text as well.
- Font: Lato
- Color: White #ffffff
- Size
- Desktop: 19px
- Tablet: 20px
- Phone: 18px
- Line Height: 1.8em
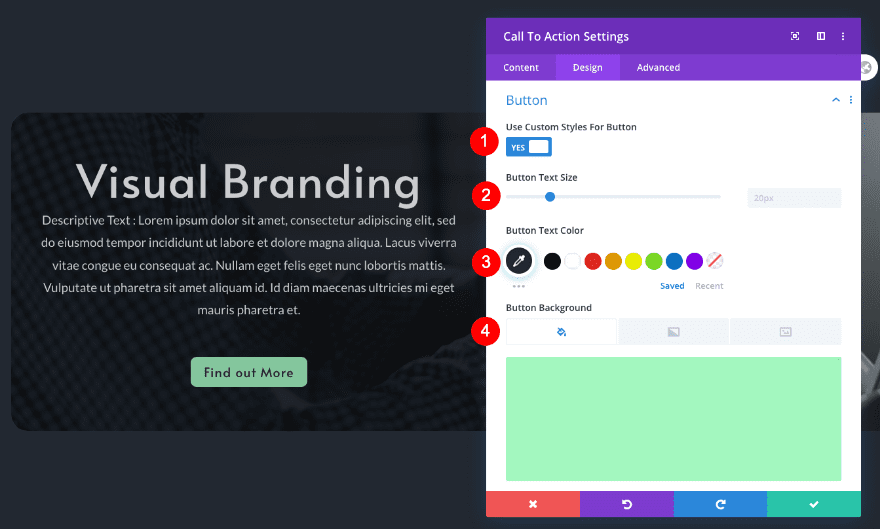
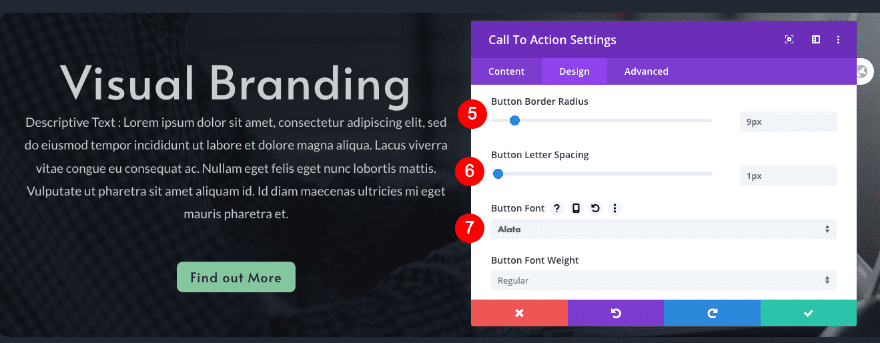
Button
Move on to the button settings and apply the following changes:
- Custom Styles: Yes
- Text Size: 20px
- Text Color: Dark Grey #222831
- Background: Aqua Green #a3f7bf
- Border Radius: 9px
- Letter Spacing: 1px
- Button Font: Alata
- Top Margin: 35px
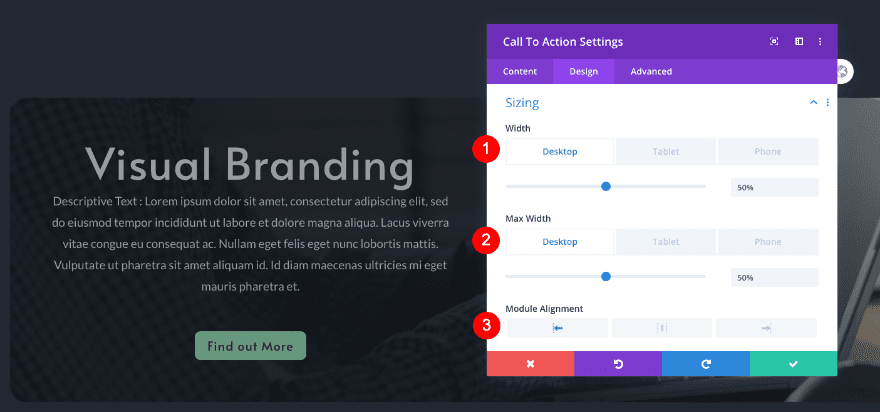
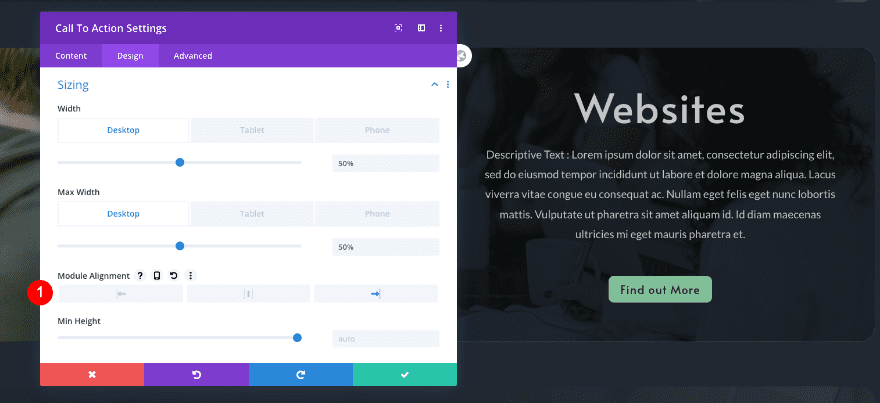
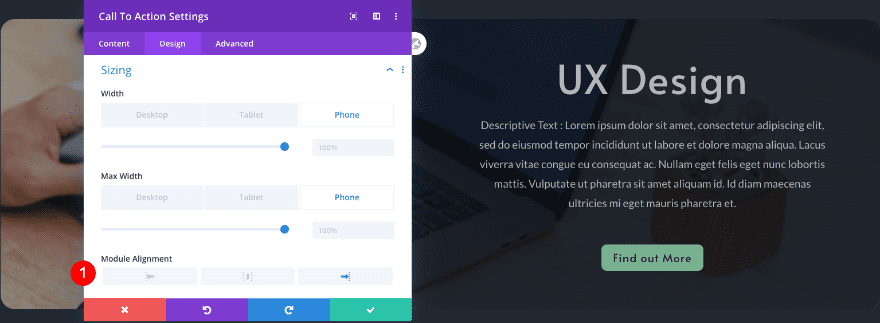
Sizing
Adjust the sizing of the module too.
- Width: 50%
- Max Width
- Desktop: 50%
- Tablet and Phone: 100%
- Alignment: Left
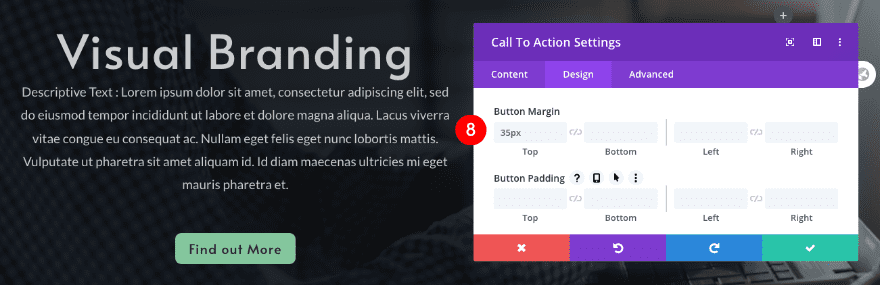
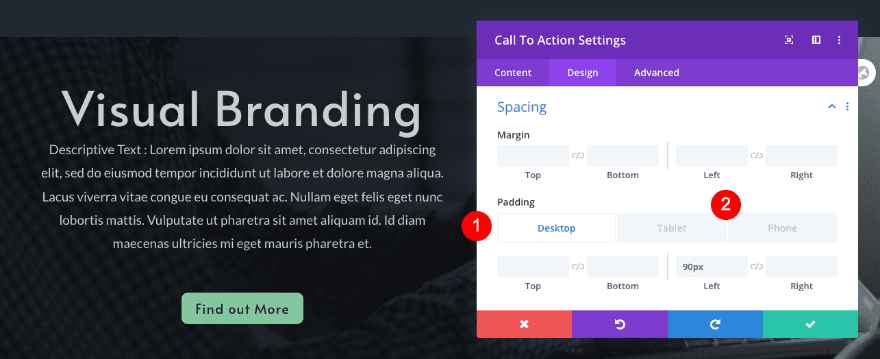
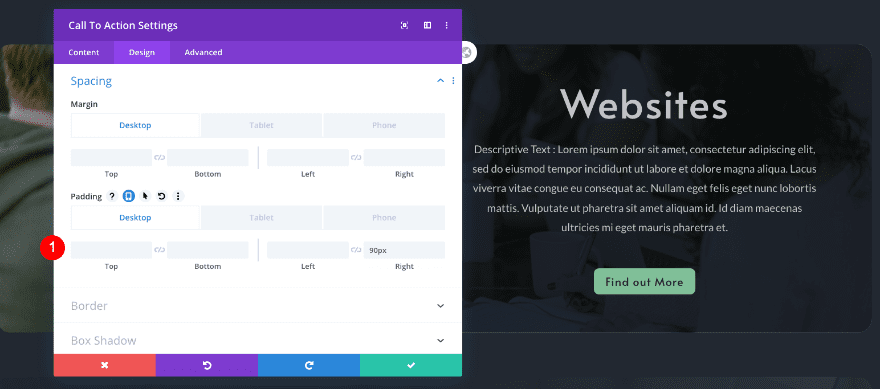
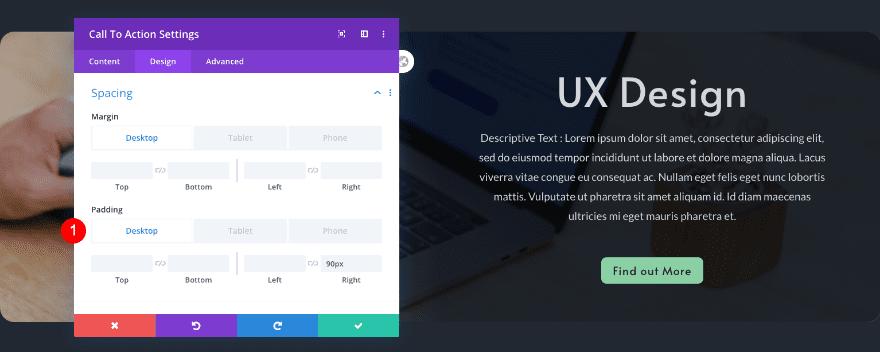
Spacing
Add some padding to the module as well.
- Left Padding:
- Desktop: 90px
- Left and Right Padding:
- Tablet: 50px
- Phone: 40px
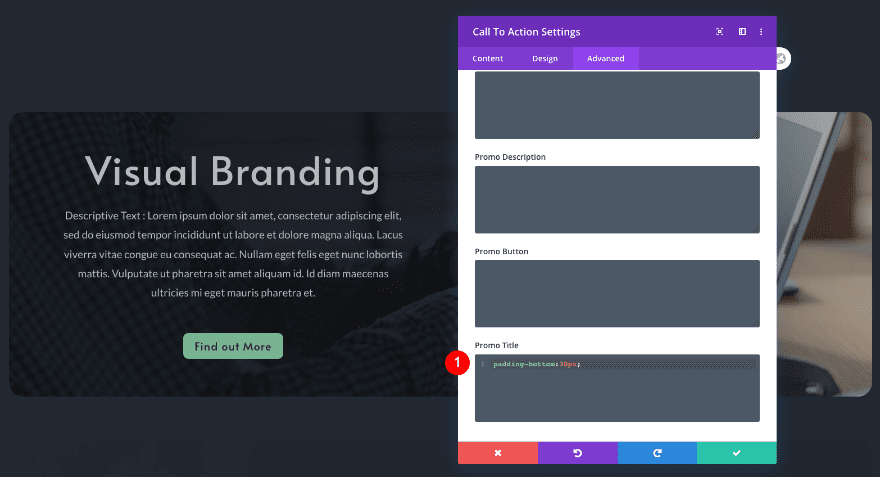
Custom CSS
Last but not least, add one line of CSS code to the promo title in the advanced tab.
- Promo Title: padding-bottom: 30px;
padding-bottom: 30px; }
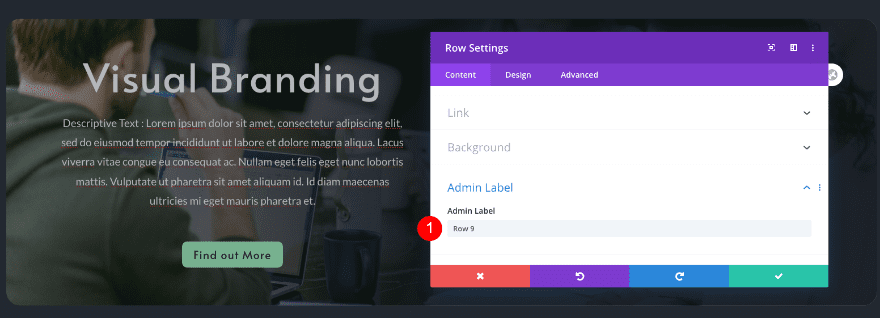
Duplicate Row 7
Duplicate row 7 three times. The new rows will be renumbered; 9, 11, and 13.
Adjust Row 9
Background
Change the background image and switch the direction of the gradient.
- Background Image: New photo
- Background Gradient
- Color 1: Transparent
- Color 2: Dark Grey #222831
- Start Position: 0%
- End Position: 50%
Admin Label
Update the row’s admin label from 7 to 9.
- Admin Label: row 9
Adjust Call to Action Module in Row 9
Content
Update the module’s content.
- Title: Websites
- Body: New descriptive text
Link
Update the link as well.
- Link: New link
Sizing
Change the alignment of the module from left to right.
- Module Alignment: Right
Spacing
Change the desktop padding from left to right. The tablet and mobile settings need to remain the same.
- Right Padding
- Desktop: 90px
Adjust Row 11
Background
Change the background image in the new row.
- Background Image: Another Photo
Admin Label
Update the row’s admin label from 7 to 11.
- Admin Label: row 11.
Adjust Call to Action Module in Row 11
Content
Change the content inside the call to action module.
Link
Modify the link too.
- Link: New link
Adjust Row 13
Background
Change the background image and switch the direction of the gradient.
- Background Image: New photo
- Background Gradient
- Color 1: Transparent
- Color 2: Dark Grey #222831
- Start Position: 0%
- End Position: 50%
Admin Label
Open the admin label tab and update the row number to 13.
Adjust Call to Action Module in Row 13
Content
Update the module’s content.
- Title: UX Design
- Body: New descriptive text
Link
Update the link as well.
- Link: New link
Sizing
Change the alignment of the module from left to right.
- Module Alignment: Right
Spacing
Change the desktop padding from left to right. The tablet and mobile settings need to stay the same.
- Right Padding
- Desktop: 90px
Rearrange Rows
Move rows 7, 9, and 11.
Place rows in the right order, according to their admin label.

Compare Your Wireframe
Double-check the wireframe of your scrollable portfolio navigation list and items. The rows must be in order for the anchor links to work properly. Here’s another look at our wireframe view:
Preview
We’re done going through all the steps to recreate the scrollable portfolio navigation list. Let’s take another look at how the design looks on different screen sizes.
Desktop
Mobile
Final Thoughts
In this step-by-step tutorial, we recreated a scrollable portfolio navigation list with Divi’s scroll effects. Furthermore, we added portfolio items. The navigation is controlled with anchor links and CSS IDs. This is a great way to interactively display portfolio items. Leave us a comment if you liked it or have any questions!


Incredibly disappointing. Some of the images in the jump sections won’t display, it’s not mobile-friendly, and even the damn json file won’t import. Thanks for nothing. I lost three hours on this crap.
Try reuploading the image on your layout and see if the issue persists? Also, to upload the layout, you can do it by going to Divi > Divi Library > Import/Export:
https://prnt.sc/v4pjttCBaF35
https://prnt.sc/rAtmmkSYDGKS
You can then add the layout to your pages by clicking on the Plus Icon in the Divi Builder > Saved Layouts > and find the Divi Scrolling Portfolio Navigation layout you uploaded:
https://prnt.sc/-0xmL8UVq9Hw
https://prnt.sc/npYebU9Ye9J0
Impressive.
Thanks for sharing.
Nice smooth scroll effect 🙂
Looks Great! Thank you