Using Divi Animation Options
Divi’s animation options make it easy to add a wide variety of preset or custom animations to any page element.
With Divi animation options it’s easy to apply stunning animations to all sections, rows, and modules that captivate the eye. You can combine animation effects using staggard delays, varying intensities and lengths, and more. In this document, we’ll show you how to find Divi’s animation options, what each setting does, as well as tips and best practices for using them effectively.
Where to Find the Divi Animation Options
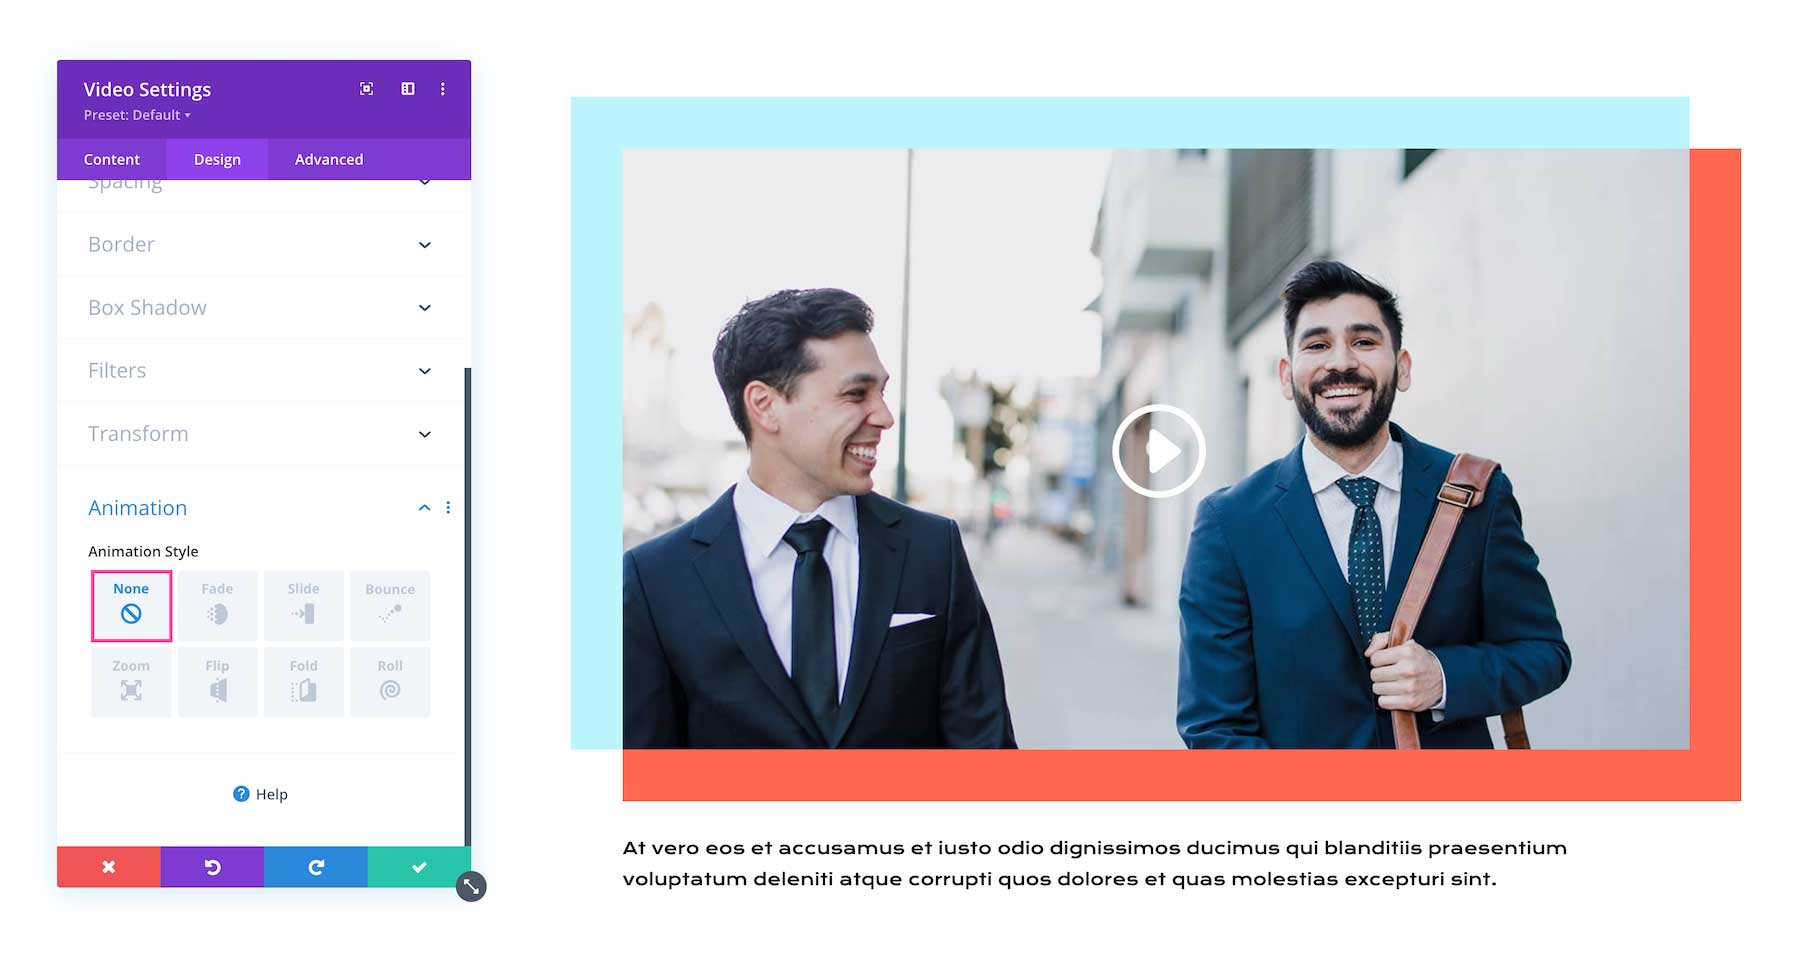
Animation options are available within all sections, rows, and modules. Simply open up the element’s settings, then navigate to Design > Animation.
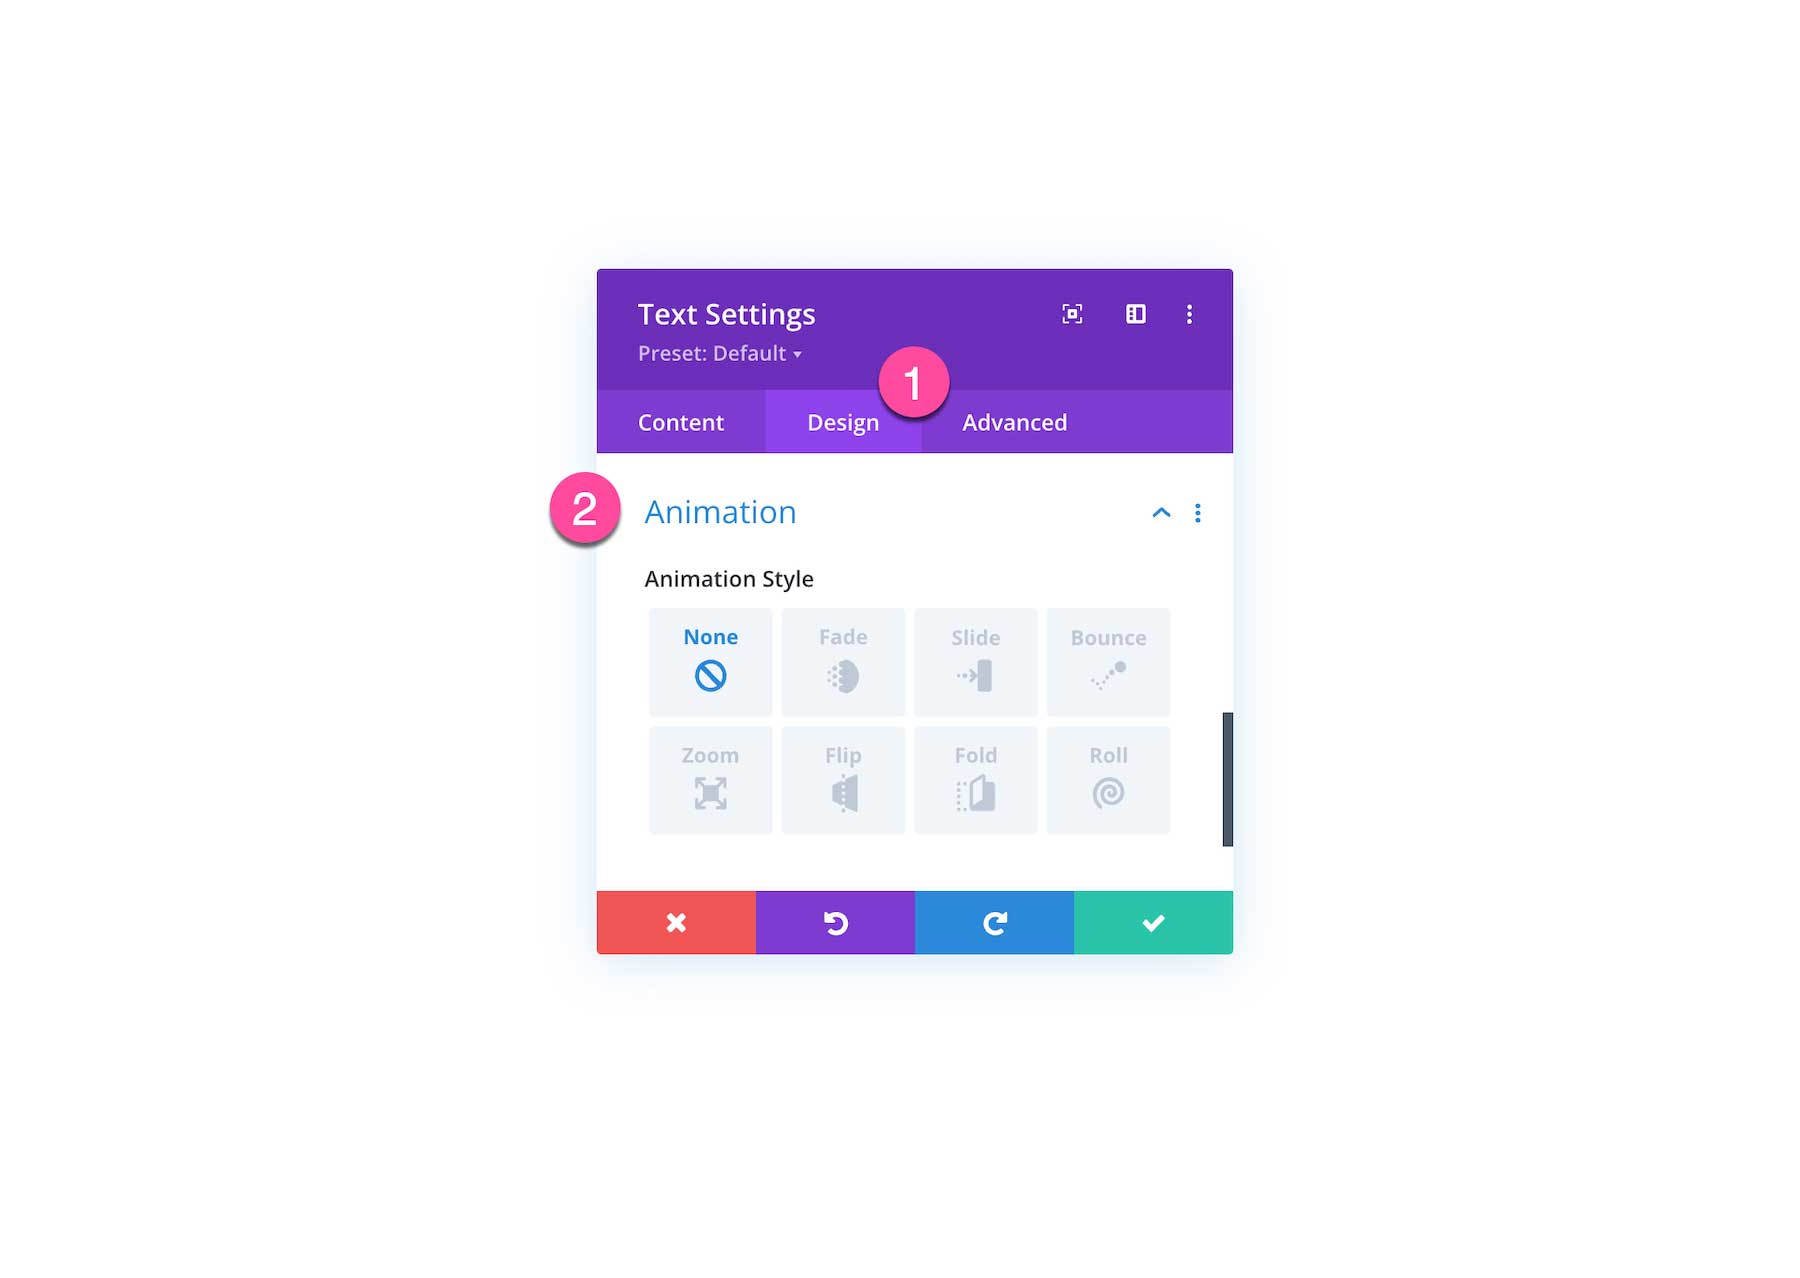
All Divi Animation Options Explained
Let’s explore all the Divi Animation Options available within Divi.
Default Setting in the Divi Animation Options: None
By default, all elements within Divi do not have any Divi Animation Options applied by default. That means there is no delay when they are loaded and appear as soon as the element is loaded to the page. The element will appear when you scroll to it and it will be in view until you scroll past it.
Fade
The fade animation gradually loads the element starting at 0% opacity and ending at 100% opacity. This is a classic animation that adds a little bit of a classy feeling to the design. You can adjust the duration and delay of the fade and more using the options below to create a truly custom fade animation.
- Animation Duration – Speed up or slow down your animation by adjusting the animation duration. Units are in milliseconds and the default animation duration is one second.
- Animation Delay – If you would like to add a delay before your animation runs you can designate that delay here in milliseconds. This can be useful when using multiple animated modules together.
- Animation Starting Opacity – By increasing the starting opacity, you can reduce or remove the fade effect that is applied.
- Animation Speed Curve – Here you can adjust the easing method of your animation. Easing your animation in and out will create a smoother effect when compared to a linear speed curve.
- Animation Repeat – By default, animations will only place once. If you would like to loop your animation continuously you can choose the Loop option here.
Slide
The slide animation means the element will slide in from the left, right, top, bottom, or center. Depending on which direction you choose, the element’s starting position will be left, right, top, bottom, or center of the screen and will slide into position once that element comes into the viewport. You can adjust the look and feel of the slide animation using the controls below.
- Animation Direction – Pick from up to five different animation directions, each of which will adjust the starting and ending position of your animated element.
- Animation Duration – Speed up or slow down your animation by adjusting the animation duration. Units are in milliseconds and the default animation duration is one second.
- Animation Delay – If you would like to add a delay before your animation runs you can designate that delay here in milliseconds. This can be useful when using multiple animated modules together.
- Animation Intensity – Intensity affects how subtle or aggressive your animation will be. Lowering the intensity will create a smoother and more subtle animation while increasing the intensity will create a snappier more aggressive animation.
- Animation Starting Opacity – By increasing the starting opacity, you can reduce or remove the fade effect that is applied.
- Animation Speed Curve – Here you can adjust the easing method of your animation. Easing your animation in and out will create a smoother effect when compared to a linear speed curve.
- Animation Repeat – By default, animations will only place once. If you would like to loop your animation continuously you can choose the Loop option here.
Bounce
When applied, the bounce effect will make an element quickly jump up and down or left and right on the screen and then land in its position once the animation is complete. This animation adds a bit of fun and whimsy to your design with it’s active animation. The controls below give you granular control over the look and feel of the bounce animation.
- Animation Direction – Pick from up to five different animation directions, each of which will adjust the starting and ending position of your animated element.
- Animation Duration – Speed up or slow down your animation by adjusting the animation duration. Units are in milliseconds and the default animation duration is one second.
- Animation Delay – If you would like to add a delay before your animation runs you can designate that delay here in milliseconds. This can be useful when using multiple animated modules together.
- Animation Starting Opacity – By increasing the starting opacity, you can reduce or remove the fade effect that is applied.
- Animation Speed Curve – Here you can adjust the easing method of your animation. Easing your animation in and out will create a smoother effect when compared to a linear speed curve.
- Animation Repeat – By default, animations will only place once. If you would like to loop your animation continuously you can choose the Loop option here.
Zoom
The Zoom animation starts the element small and grows it to 100% in size, creating a zooming-in effect. You can use the controls below to adjust the duration, delay, intensity, and more of this animation.
- Animation Direction – Pick from up to five different animation directions, each of which will adjust the starting and ending position of your animated element.
- Animation Duration – Speed up or slow down your animation by adjusting the animation duration. Units are in milliseconds and the default animation duration is one second.
- Animation Delay – If you would like to add a delay before your animation runs you can designate that delay here in milliseconds. This can be useful when using multiple animated modules together.
- Animation Intensity – Intensity affects how subtle or aggressive your animation will be. Lowering the intensity will create a smoother and more subtle animation while increasing the intensity will create a snappier more aggressive animation.
- Animation Starting Opacity – By increasing the starting opacity, you can reduce or remove the fade effect that is applied.
- Animation Speed Curve – Here you can adjust the easing method of your animation. Easing your animation in and out will create a smoother effect when compared to a linear speed curve.
- Animation Repeat – By default, animations will only place once. If you would like to loop your animation continuously you can choose the Loop option here.
Flip
The flip animation starts with an the top of an element tipped backward (creating a 3D effect) and then it tilts forward into place, completing the animation. You can control the look and feel of the flip animation using the controls below.
- Animation Direction – Pick from up to five different animation directions, each of which will adjust the starting and ending position of your animated element.
- Animation Duration – Speed up or slow down your animation by adjusting the animation duration. Units are in milliseconds and the default animation duration is one second.
- Animation Delay – If you would like to add a delay before your animation runs you can designate that delay here in milliseconds. This can be useful when using multiple animated modules together.
- Animation Intensity – Intensity affects how subtle or aggressive your animation will be. Lowering the intensity will create a smoother and more subtle animation while increasing the intensity will create a snappier more aggressive animation.
- Animation Starting Opacity – By increasing the starting opacity, you can reduce or remove the fade effect that is applied.
- Animation Speed Curve – Here you can adjust the easing method of your animation. Easing your animation in and out will create a smoother effect when compared to a linear speed curve.
- Animation Repeat – By default, animations will only place once. If you would like to loop your animation continuously you can choose the Loop option here.
Fold
The fold animation makes the element look like it’s being unfolded on the screen. Part of the element is titled back and then comes into position by the end of the animation. Use the controls below to adjust the look and feel of the fold animation.
- Animation Direction – Pick from up to five different animation directions, each of which will adjust the starting and ending position of your animated element.
- Animation Duration – Speed up or slow down your animation by adjusting the animation duration. Units are in milliseconds and the default animation duration is one second.
- Animation Delay – If you would like to add a delay before your animation runs you can designate that delay here in milliseconds. This can be useful when using multiple animated modules together.
- Animation Intensity – Intensity affects how subtle or aggressive your animation will be. Lowering the intensity will create a smoother and more subtle animation while increasing the intensity will create a snappier more aggressive animation.
- Animation Starting Opacity – By increasing the starting opacity, you can reduce or remove the fade effect that is applied.
- Animation Speed Curve – Here you can adjust the easing method of your animation. Easing your animation in and out will create a smoother effect when compared to a linear speed curve.
- Animation Repeat – By default, animations will only place once. If you would like to loop your animation continuously you can choose the Loop option here.
Roll
The roll animation makes the element look like it’s rolling onto the screen. You can choose the element to roll in from the top, right, left, bottom, or center. Use the controls below to adjust the look and feel of the roll animation.
- Animation Direction – Pick from up to five different animation directions, each of which will adjust the starting and ending position of your animated element.
- Animation Duration – Speed up or slow down your animation by adjusting the animation duration. Units are in milliseconds and the default animation duration is one second.
- Animation Delay – If you would like to add a delay before your animation runs you can designate that delay here in milliseconds. This can be useful when using multiple animated modules together.
- Animation Intensity – Intensity affects how subtle or aggressive your animation will be. Lowering the intensity will create a smoother and more subtle animation while increasing the intensity will create a snappier more aggressive animation.
- Animation Starting Opacity – By increasing the starting opacity, you can reduce or remove the fade effect that is applied.
- Animation Speed Curve – Here you can adjust the easing method of your animation. Easing your animation in and out will create a smoother effect when compared to a linear speed curve.
- Animation Repeat – By default, animations will only place once. If you would like to loop your animation continuously you can choose the Loop option here.
Tips & Best Practices for Using Divi Animation Options
Stay Subtle
Too many animations can be distracting and take your visitor’s attention away from important content. Subtle animations can enhance the user experience without confusing them or distracting them.
Pay Attention to Speed
Animations can get out of wack when it comes to speed and timing. When things animate too quickly it can be jarring and hard to understand. On the other hand, when elements animate too slowly it can be frustrating and seem like your website is loading slowly.
Don’t Animate Everything
The goal of animation is to enhance the user experience, direct attention, and highlight important elements, not to create a video game. Too many moving elements can create confusion and cognitive overload.
Synchronize Divi Animation Options
Animating several elements at once can make your design truly dynamic and engaging. Try using several different Divi Animation Options within a section to create an experience on your page that catches the eye.
Great for Drawing Attention to CTAs
Call to Actions are an important element in creating a design that gets people to take action on your page. Whether that’s signing up for a newsletter, downloading a freebie, submitting an inquiry, or booking a call. Animating your CTAs helps them stand out even more and catch the eyes of your users.
Continue Learning
- How to Add Animations to Sections/Rows
- How to Design a Hero Section with Custom Transitions and Animations in Divi
- 8 Delayed Button Animations for your Custom Divi Header CTA
- How to Create Overlapping Animations on Delay with Divi
- How to Combine Animations and Parallax in Divi for Unique Designs
- When It Makes Sense to Use Animations in Web Design