A Basic Overview Of The Bloom Plugin
Learn the basics of the plugin in this complete video overview. Newcomers, start here!
Getting Started
Bloom is an email opt-in plugin that was built to help you grow your email list. Bloom works by adding email opt-in forms to your website, each of which can connect to your email marketing or email newsletter software. When someone signs up using the Bloom opt-in form, they get added to your email list. Bloom works with tons of different email marketing software, and allowing you to create different types of opt-in forms that appear on different areas of your website and in different forms (such as pop-ups, fly-ins, or normal inline forms).
Add New Accounts
Before you can create a functioning opt-in form on your website using Bloom, you first need to connect Bloom to your email marketing software. Bloom works with several different systems, such as MailChimp, Constant Contact, MadMinim, iContact, InfusioSoft, Feedblitz, Aweber, Campaign Monitor, GetResponse, SendInBlue, MailPoet and Ontraport.
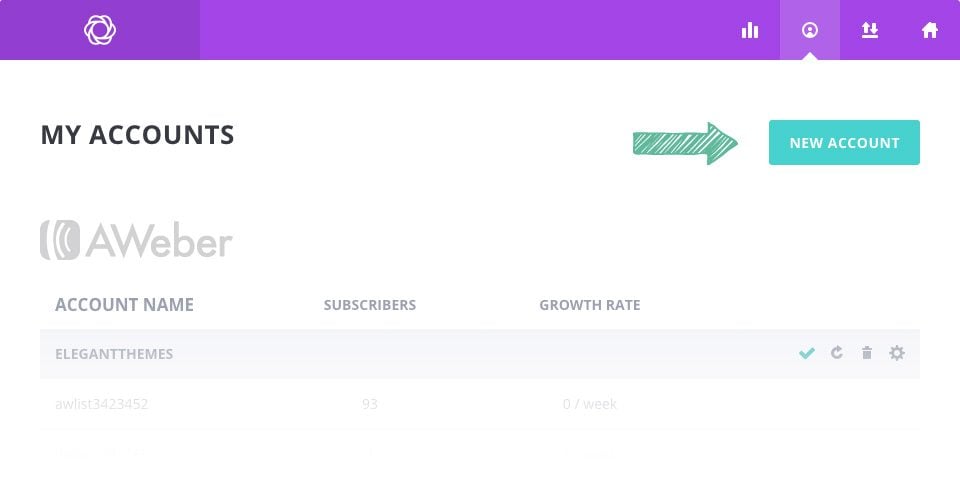
The first thing you want to do when using Bloom is connect one of these accounts. Click on the Tools > Bloom Settings link in your WordPress Dashboard to access the Bloom settings, and then click the accounts icon to open up the accounts tab. To add a new account, click the “Add Account” button. Here you can choose between the various different account types that Bloom supports. After an account is selected, you will be prompted to verify the account so that Bloom can connect with the system’s API. Each account may have a different method for verification, but in most cases you will be prompted to add your unique API key or AppID, which can be located within your email marketing software’s online account. For a complete step by step instructions on how to set up each different account type, please refer to our accounts tutorial. Our accounts tutorial explains exactly how to connect Bloom to each of the different systems that it supports.
Once you have added an account, it’s time to create your first op-tin form.
Creating An Opt-In Form
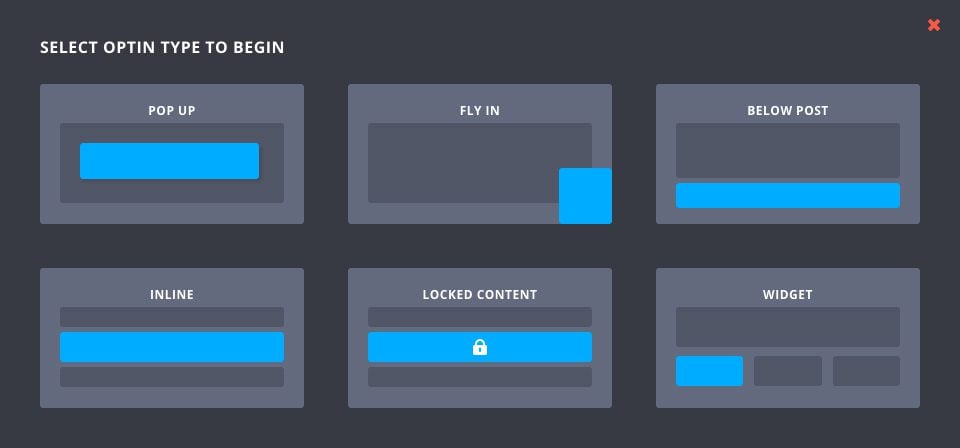
To create an opt-in form, click on the Bloom > Email Optins link in your WordPress Dashboard, or click on the “Home” icon within the Bloom settings page to open up the main settings tab. Here you can manage the opt-ins that you have created in the past, as well as create new opt-ins. To create your first opt-in form, click the “New Optin” button. This will reveal the 6 opt-in types that Bloom supports.
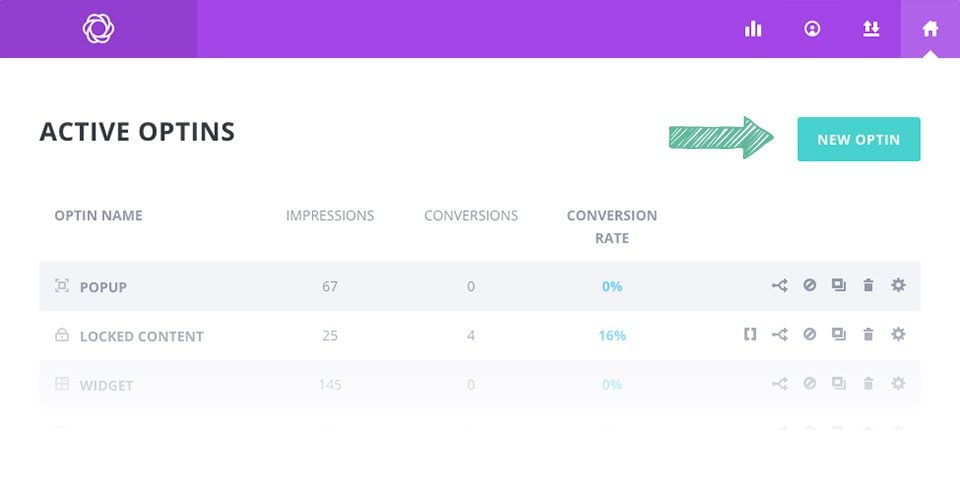
Bloom allows you to create 6 different kinds of opt-in forms. There is not limit to how many forms you can create, and these forms can be displayed on unique areas of your website.
Pop-Up
The pop-up opt-in creates a lightbox pop-up on your page that contains your opt-in form. These pop-ups can be triggered using different Bloom triggers, giving you additional control over when users are presented with the pop-up. For more information about the pop-up optin, be sure to read our in-depth pop-up tutorial.
Fly-In
The fly-in is similar to the pop-up, but is a bit smaller and more subtle. Instead of creating a full-screen lightbox pop-up, the fly-in creates a smaller form that slides up from the bottom corner of the page. Just like the pop-up, these fly-ins can be triggered based on different user interactions using the Bloom triggers. For more information about how to use triggers effectively, but sure to check out our triggers tutorial. For a complete in-depth look at the fly-in optin, be sure to read our fly-in tutorial.
Below Post
This is perhaps the most common opt-in type. This creates an opt-in form that is automatically added to the bottom of your posts or pages. When a visitor finishes reading your post, they are presented with an opt-in form that allows them to subscribe to your blog updates. For more information about the below post opt-in, be sure to read our in-depth below post tutorial.
Inline
The inline opt-in allows you to add an opt-in form anywhere inside your posts and pages. The opt-in form automatically generates a shortcode that can be pasted inside your posts and pages to display the form anywhere on your website. For more information about using this opt-in, be sure to check out our in-depth inline tutorial.
Locked Content
Locked content is a great way to build your email list by requiring visitors to sign up before they get access to content on your website. You can lock content within a post, such as a link to download free resources. Once the visitor subscribes, they are granted access to the content hidden behind the form. Locked content opt-ins automatically generated a shortcode that you can place within your posts, wrapped around the content that you would like “lock.” Fore more information about this opt-in type, be sure to check out our in-depth locked content tutorial
Widget
The widget opt-in automatically generates an opt-in in the form of a widget. Once generated, the widget will appear in your Widgets tab in the WordPress Dashboard, allowing you to add the form to any widgetzed area on your website (such as your website’s sidebar or footer). For more information about this opt-in type, be sure to read our in-depth widget tutorial.
Once you select your opt-in type, you will be taken to the opt-in creation screen where you can adjust the various opt-in settings. These settings are broken into three categories: Setup, Design and Display Settings/

Opt-In Setup
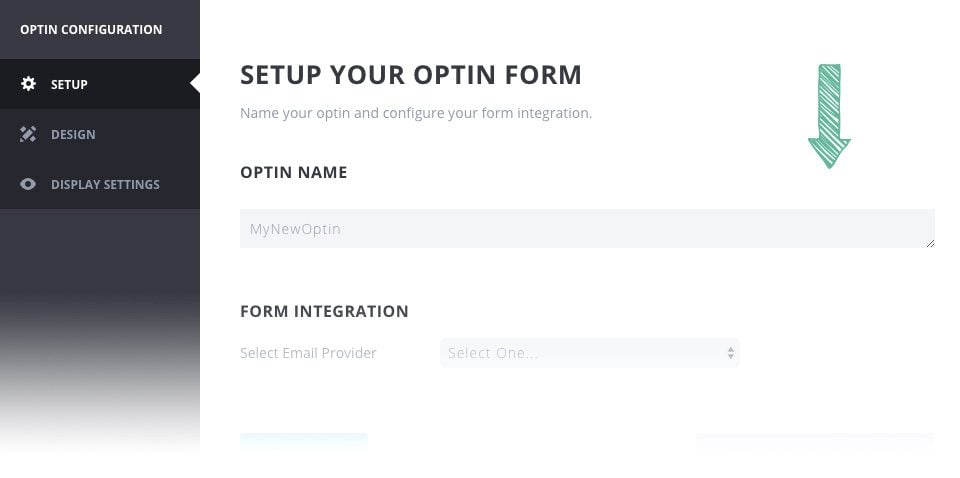
The first page of the opt-in creation form is the Setup tab. Here you can adjust the name of your opt-in form, which is simply a way for you to remember the form by. It will be reference on the homepage tab and in your stats. You can also add a new opt-in account on this page if you have not already done so via the Accounts tab. If you have already created an account, then you can select that account here. Once you have selected an account, you will be given a lists associated email lists for that account. Select the list from the dropdown menu that you would like to use, and then proceed to the next page. Once your opt-in form goes live, subscribers will be added to the list/account that you selected here.
Opt-In Design
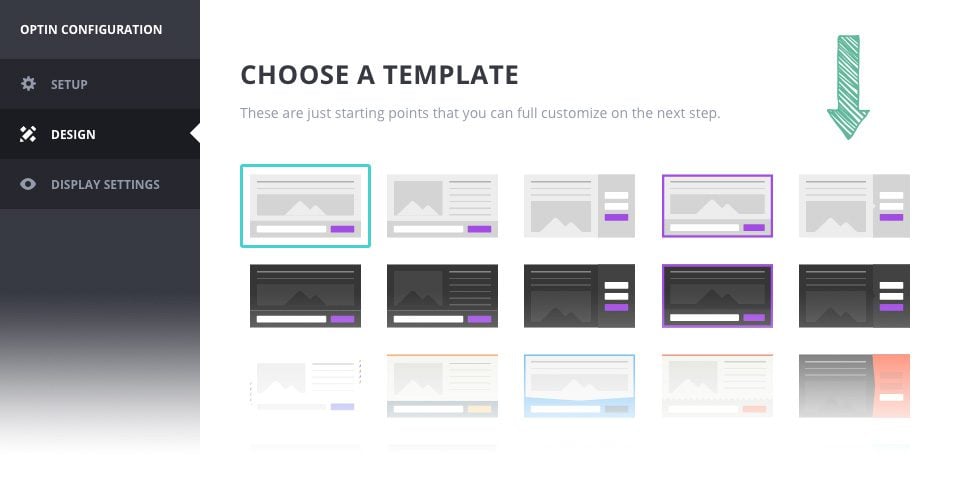
The next step is to design your opt-in form. Once you proceed to the design tab, you will first be presented with a list of pre-made templates. Think of these as starting points. We have put a lot of work into creating over 100 design variations that we think look great. Browse through the thumbnails and select a variation that looks good to you. Don’t worry, you will still get to customize everything on the next page. Once you have selected a template starting point, click the next button to bring up the design customization settings.
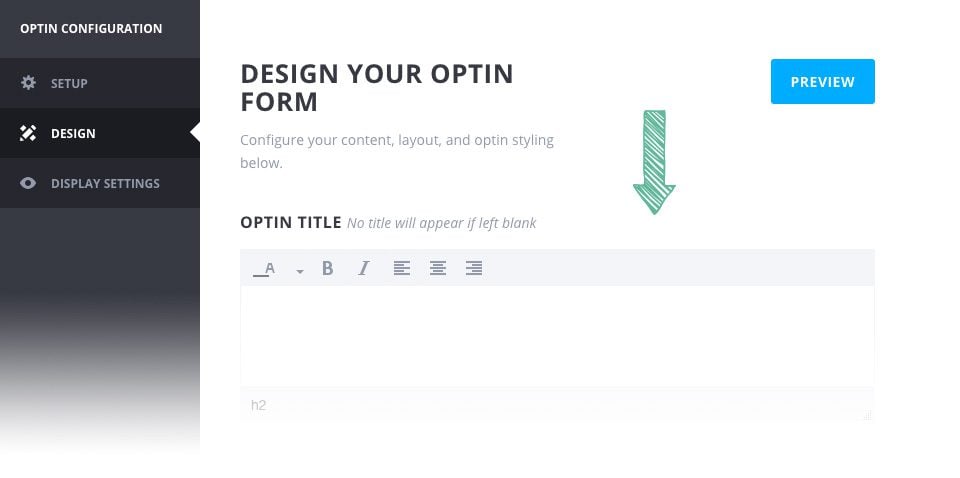
These settings allow you to adjust every aspect of your opt-in form’s appearance. You can do simple things like change the title and description and image, or more advanced things like adjust the form’s background color, text color, orientation, image, border style, edge style and more. Using these different design settings in combination, you can build just about anything. You can also preview your customized form at any time by clicking the “Preview” button on the right hand side of the page. For more information about each design setting, as well as how to use these design settings effectively, be sure to read our in-depth design settings tutorial. Once you have finished designing your opt-in, click the “Next” button to proceed to the display settings.
Opt-In Display
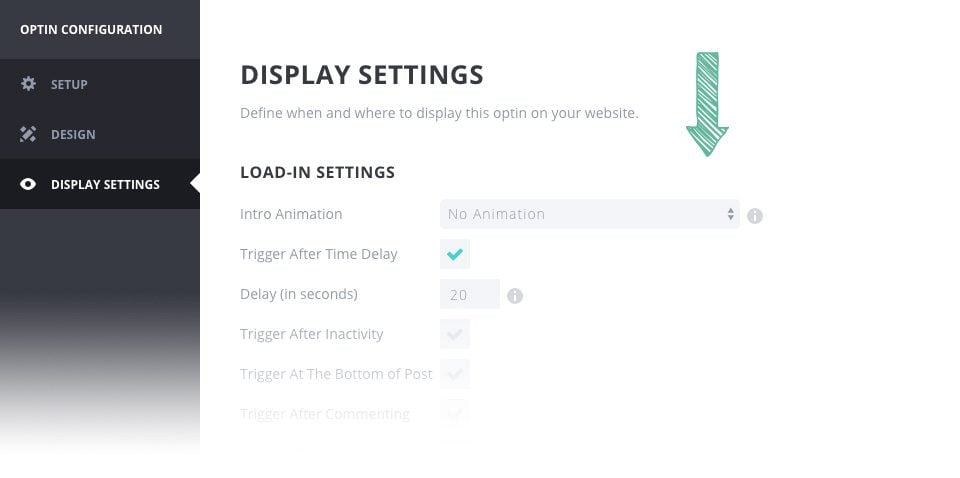
The opt-in display settings control how, where, and when your opt-in forms appear. You can choose to display your opt-in form on specific post types or categories. You can also target individual posts and pages, or exclude individual posts and pages. (Note: These settings do not exist for the Inline or Locked Content opt-in forms. These forms are displayed using shortcodes, and therefore these settings do not apply. If you are created an Inline or Locked Content form, you will be presented with a “Generate Shortcode” button. Simply copy and paste that shortcode into any post or page to display the opt-in form.)
For example, if you would like your opt-in form to to be displayed an all of your posts, but not any of your pages, you would select “Display On: Posts,” leaving the rest of the sections unchecked. If you would like your opt-in form to only appear on a single page, leave all areas under “Display On” unchecked, and then use the “Display On These Pages” section to target a specific page. If you would like you opt-in form to be displayed on your entire website, except for a single post or page, then you can select Display On: Everything,” and then exclude a single page using the “Do Not Display On These Posts” setting. Using these different settings, you can choose exactly where your opt-in form is displayed.
If you are creating a fly-in or pop-up opt-in, you will also be presented with various triggers. These triggers control not where your opt-in is displayed, but rather how and when your opt-in is displayed. For example, you can choose to trigger your opt-in form only after a visitor has finished reading your post, or only after a visitor has purchased one of your products. For more information about triggers, be sure to check out our in-depth triggers tutorial. For a complete look at all of the opt-in display settings, but sure to read our in-depth display settings tutorial.
After you have finished creating your opt-in, click the “Save and Exit” button. This will bring you back to the home page of the Bloom settings panel. You will see your newly-created opt-in has been added to the page. You can modify, delete, de-activate or create split tests for this opt-in using the various settings icons.
Managing Your Opt-Ins
Once you have created opt-in forms, you will notice that each form appears on the home page of the Bloom settings panel. Each of these opt-ins can be easily managed from this page. You can do various things with each opt-in using the setting icons that appear to the right of the opt-in name.
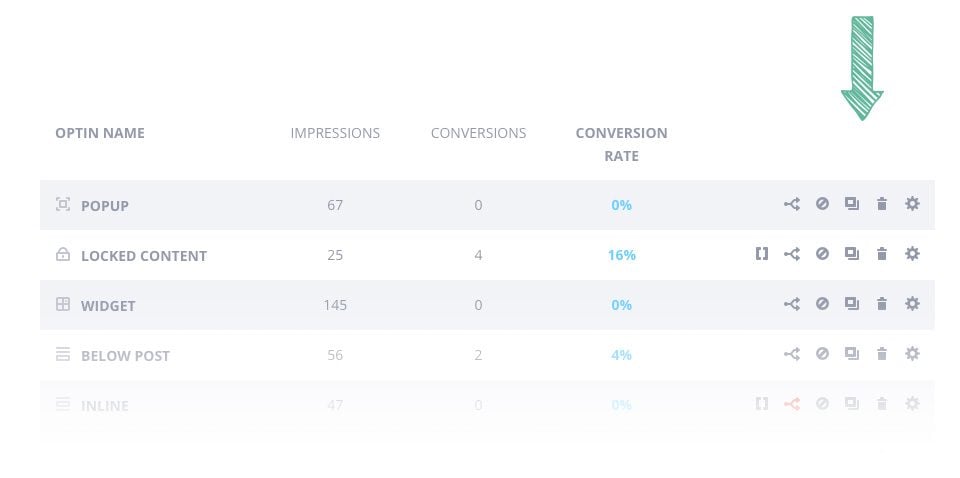
Generate Shortcode
The shortcode icons will appear for all locked content and inline opt-ins. Clicking this icon will display the shortcode needed for that specific form. Copy and past the shortcode into and post or page to display the opt-in.
Split Test – Split testing is a great way to optimize your opt-is. Initiating a split test allows you to create multiple variations of the same opt-in form, and then test those variations against each other to figure out which one has the highest conversion rate. Each variation that you create will be displayed to different visitors, and their stats will be kept separate. You can try creating different headlines, adjusting different colors, changing the images and so on to see how the changes affect user engagement. Each variation will show its conversion rate, making it easy to see which one is most effective. After you are satisfied with the results, you can end the split test and pick the most effective variation. For detained information about creating split tests, be sure to read our in-depth split testing tutorial.
Disable
You can disable an opt-in form at any time without deleting it. Once displayed the form will not be displayed on your website, and will be moved down the page into the inactive opt-ins list. You can save this form for later and re-activate it at a later time.
Duplicate
You can duplicate a form at any time. If you have spent a lot of time designing a form, and you would like to create a new variation based off that design, or if you would like to create a different opt-in type using the same design settings, you can simply duplicate the opt-in. When you first click the duplicate icon, you will be given the choice between which type of opt-in you would like to create. Even when duplicating, you can change the opt-in type while retaining your design settings.
Delete – If you no longer want to use an opt-in, it can be permanently deleted.
Modify – You can adjust the settings of an opt-in at any time. Clicking the modify icon will bring you back to the opt-in creation screen where you can adjust the opt-in settings using the Setup, Design and Display tabs.
Bloom Statistics
Once you have created your opt-ins, the next step is to understand their effectiveness. Using the Bloom stats page, you can get a great idea about how well each of your opt-in forms are performing, as well as how fast your email list is growing as a whole.
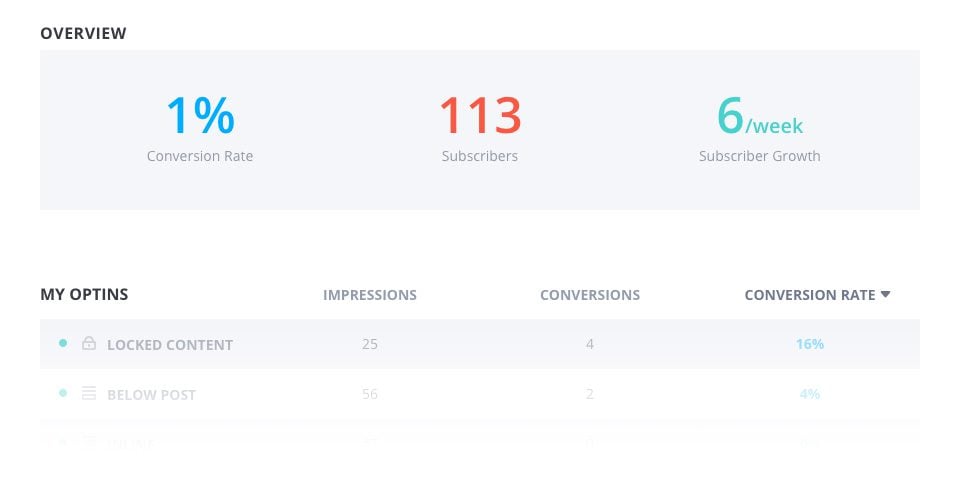
The Bloom stats page has a lot of great information, such as overall growth stats, a detailed overview of each opt-in form’s performance, a historical graph about your list growth, as well as information about your highest performing pages.
This has been a basic overview of Bloom, and we have only touched on the general concept behind creating opt-in forms. For each section above, we have deatiled tutorials that go in-depth into each setting and how they work. Be sure to browser though the rest of our tutorials found within the Bloom Documentation page.