
It’s hard to imagine the internet without opt-in forms nowadays. We use them on our website for two main reasons in particular; getting subscribers or generating leads.
Finding the right way to approach your audience with opt-in forms can be a real challenge. Some people want to play it safe and do not want to make their visitors feel like they’re ‘invading’ their internet bubble with unwanted opt-in forms. That’s usually the moment when people choose for an opt-in form that appears after clicking somewhere specific on the website, or how we call it; ‘Trigger On Click’.
In today’s tutorial, we’ll show you how exactly you can make use of these click triggers in some of the most important parts of your website. Once you’ve managed to include the click on trigger option, don’t forget to measure the results it brings you to see if it helps you make progress.

When to Use an Opt-In Form After a Click
You can basically make anything on your website trigger an opt-in form. But using it in the wrong places can quickly turn against you. People are used to randomly clicking on a website all the time; when they’re reading something, for instance. Or even just when they’re looking around, they often click somewhere on the website without a purpose.
Now imagine you’re the visitor; with every random click, you might get confronted with an unexpected opt-in form due to an action that you took without a purpose. That’s undoubtedly going to have a bad effect because, at that right moment, you’ll feel like you have no control at all when you’re visiting that website.
Placing a click trigger opt-in form on places where people voluntarily choose to click or not to click (like buttons or calls to action in general) is another story though. We’re familiar with clicking on a CTA (call to action) so it doesn’t scare us. We’re deliberately choosing to see what step is next. If we’re not curious to see what’s behind a CTA, we’ll simply not click. But if we want to, we can. This ‘choice’ visitors have, makes them feel more at easy when an opt-in form eventually pops up and increases the chances that they’ll actually sign up for your newsletter.
Subscribe To Our Youtube Channel
Create Your Opt-In Form
Getting people to click on your CTA is a form of art. Getting people to subscribe or becoming a lead through an opt-in form after clicking on your CTA is the appreciation of art. You have to experiment and find the right way to approach your target audience in order for both sides to be pleased in the end.
We’re going to show you how to make a click trigger for two different buttons on your website where you can benefit from that kind of opt-in form; the Button Module and the Fullwidth Header Button. The way of working is the same, but seeing it in different scenarios might help you understand the logic. After that, you can use it for other modules as well.
Now, before we show you how to link the opt-in forms to a CTA, we’re going to go through the settings of an opt-in form. In this post, we won’t provide you with any specific designs but rather with the logic only. There are some settings that are required to make sure the click trigger works.
Choose Type of Opt-In Form
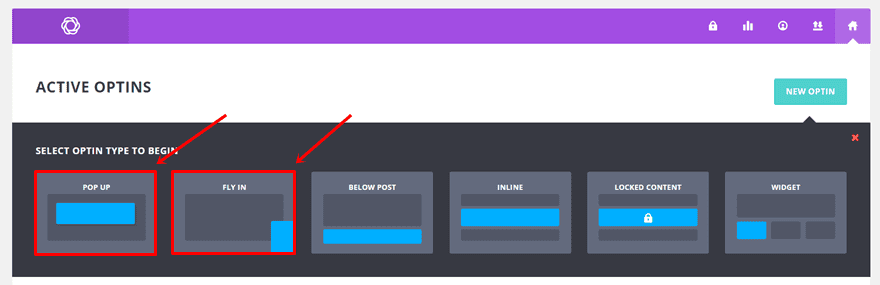
When adding a new opt-in form, the first choice you’ll be confronted with is the type of opt-in form you want to use. To create the trigger on click effect, you can use two of the types: the pop up and fly in. The one you’ll most likely choose is the pop up. But if you want to be a little bit more subtle, you can also use the fly in.
Set Up Tab
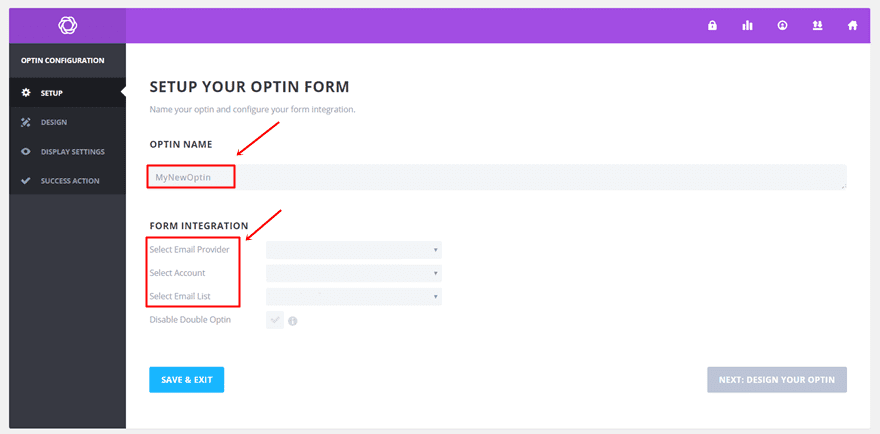
Start by naming your opt-in form in the Setup tab of the opt-in form you’re creating. Next, connect your form to an email provider. Without the email provider, account and email list, the form will be inactive.
Design Tab
Within the Design tab, you can style the form you’re going to use. In this post, we’re not going to do that. We’re going to select a standard opt-in form without modifications just to see if it works. You can, later on, always go back to the opt-in form you created to make changes.
Display Settings Tab
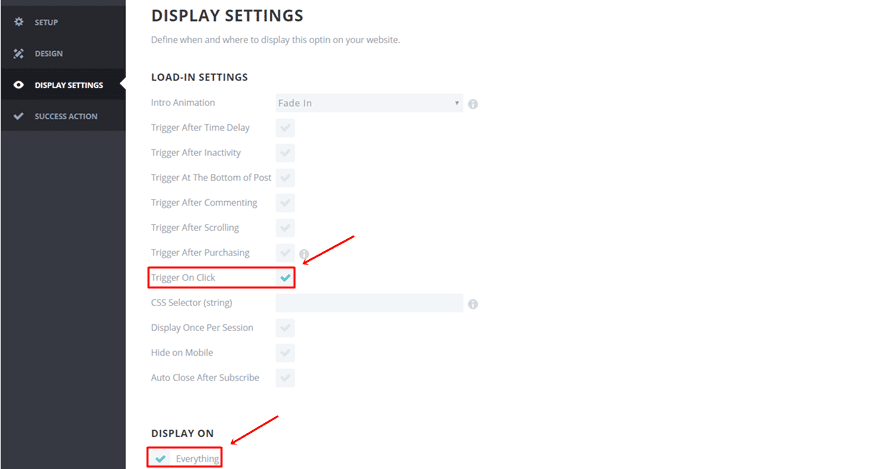
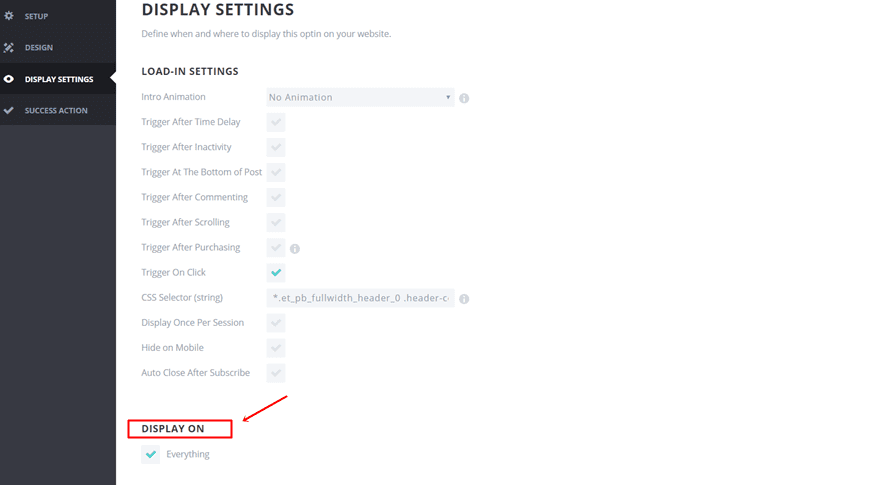
This is the tab we’ll link the opt-in form to one of the buttons. To make sure the results work, you have to make sure the opt-in form is allowed to be displayed on the page you want it to work on. If you’re going to use the same form throughout the whole website, you can easily enable the form for everything as shown in the image below.
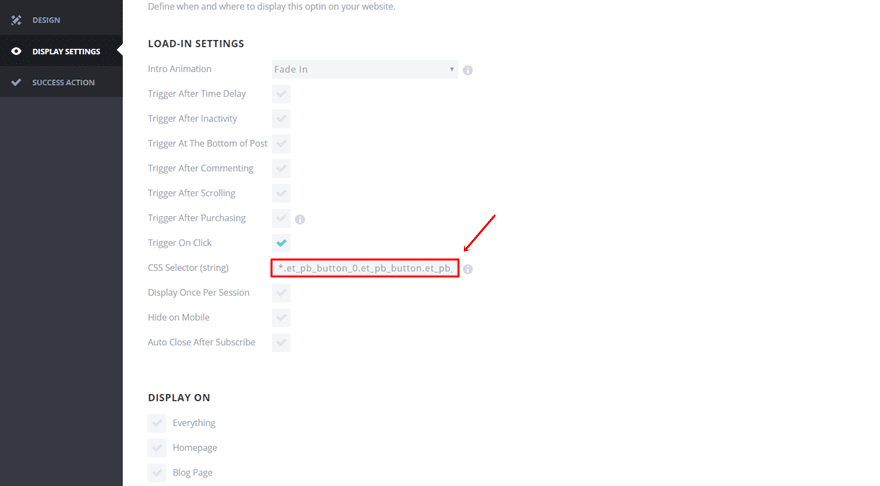
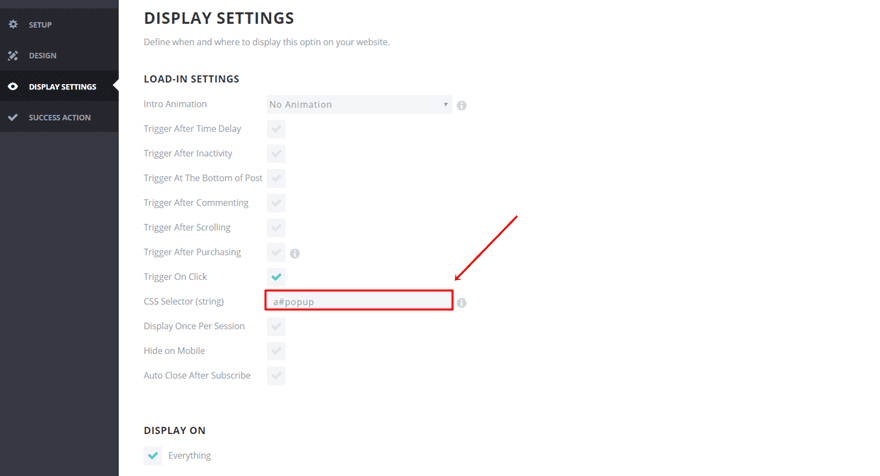
Furthermore, we want to use the opt-in form for triggers on click only. That’s why we’re going to disable all the other options and only enable the ‘Trigger on Click’ one. You’ll see that the CSS Selector field will appear immediately. Later on this post, we’re going to use this field to link our buttons to the opt-in form we’re creating. Leave this page open in your tab so you can get right away to it later on.
Let’s Get Started
Although the logic behind adding a click trigger opt-in form in different modules is the same, we’re going to explain it in two examples; the Button Module and the Fullwidth Header Button.Without understanding the logic, you can simply follow the steps in this post to make it happen.
However, if you want the click trigger to work in other places than explained below, you’ll have to make a slight modification. The only thing that’s going to change is the class we’re using since this one always differs. If you want to make this click trigger happen for any other part of your website, you just follow the same steps as we’ll show below and change the CSS class according to what you’re using.
The first example we’ll guide you through is the Button Module. The nice thing about creating a click trigger for a Button Module is that the possibilities are endless. You can make any type of section or row that contains a Button Module and get as creative as you want.
Without any further due, let’s start creating a click trigger for the button. We have two ways to do this; by using the CSS class or by creating a CSS ID assigned to the module.
By Using CSS Class
Open the page or create the page where you want the click trigger to work. Next, add a Button Module or open the Button Module settings of the button you want it to work on.
Go to the Advanced tab and scroll down. Click in the Main Element field and watch the CSS class assigned to the button appear. Copy the CSS class, we’ll need it right away.
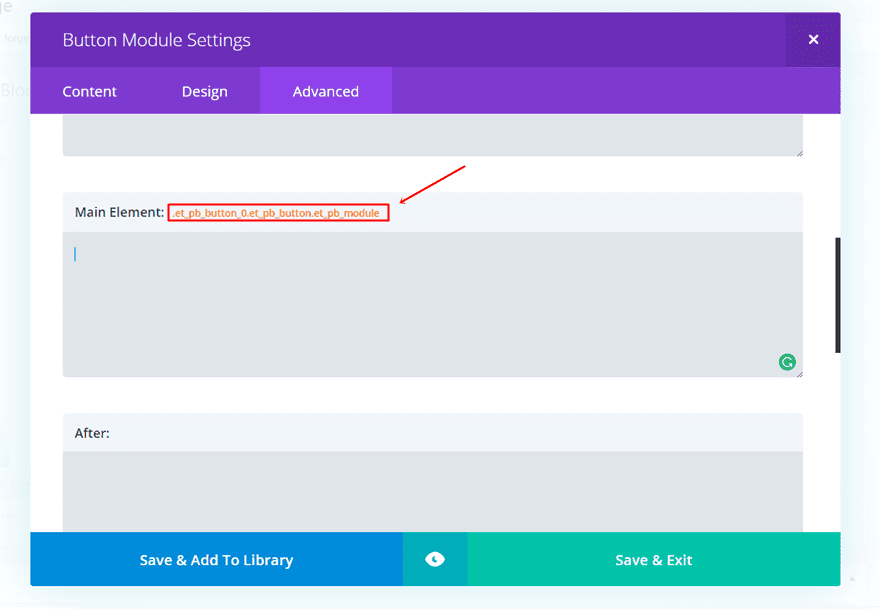
Then, go to the Display Settings tab of the opt-in form you’re creating. In the previous part, we already showed you where the magic is going to happen. We enabled ‘Trigger On Click’ and disabled all the other possibilities mentioned. Right below ‘Trick On Click’, you’ll have to paste the following line:
*.et_pb_button_0.et_pb_button.et_pb_module
As you can see, it’s simply just a ‘*’ symbol followed by the class you copied right before this step.
When using this method, there’s one thing you have to keep in mind; the button CSS Class differs for each button in the same page but as soon as you add a button to another page, it’ll start from ‘0 ‘right away. This means that every first Button Module on every page will trigger the opt-in form if your opt-in form is available for all pages and posts.
If you want to avoid this, you can use make the click trigger happen through a CSS ID. But in cases where you assign a specific CSS ID to the complete module, the easiest way to make it happen is through the CSS Class.
You can determine on what pages a certain opt-in form can show up in the Display Settings of your opt-in form. By doing so, you’ll be in control and know exactly on what pages the opt-in form will appear after clicking the button that is assigned to it.
By Using CSS ID
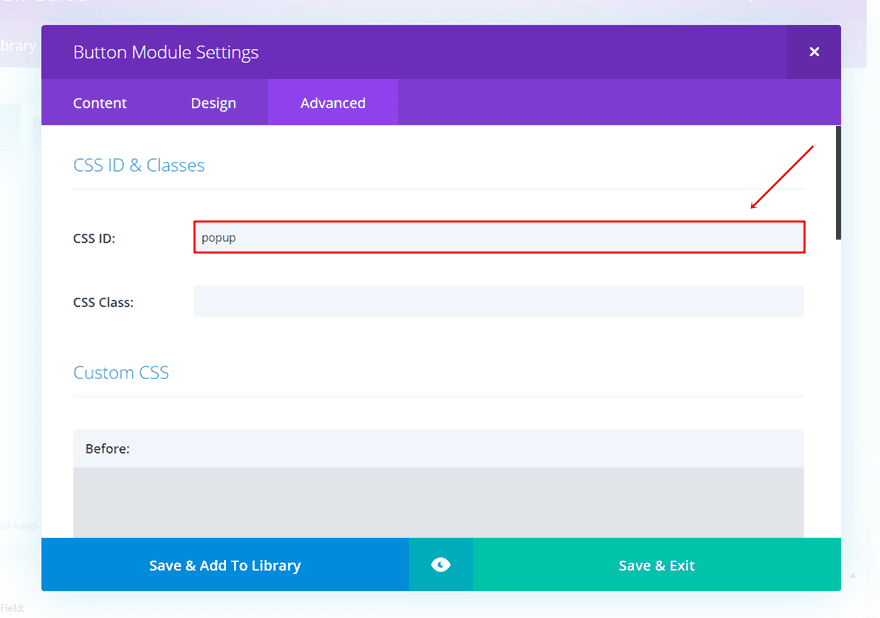
The second method is by using a CSS ID. Open the Button Module, go to the Advanced tab and give it a CSS ID. In this case, we’ll be using ‘popup’.
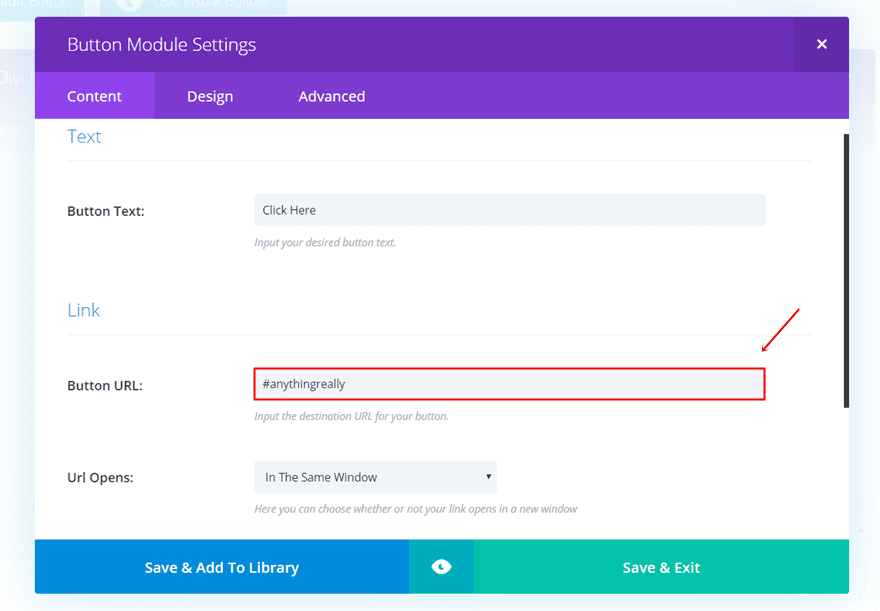
Continue by going to the Content tab of the Button Module and writing the “#” symbol followed by anything you want. By doing this, you’ll make sure the visitor remains in the same place on the page while clicking the button.
Moving on, go back to your opt-in form settings and add “a#popup” to the Trigger On Click field. You should always write “a#” followed by the CSS ID you assigned to the Button Module.
a#popup
The other example where we’ll show you how to do a Trigger On Click opt-in form is the Fullwidth Header Button. The only possibility we have here is using the button CSS class. We can’t assign a CSS ID through the Divi builder to the button in particular.
By Using CSS Class
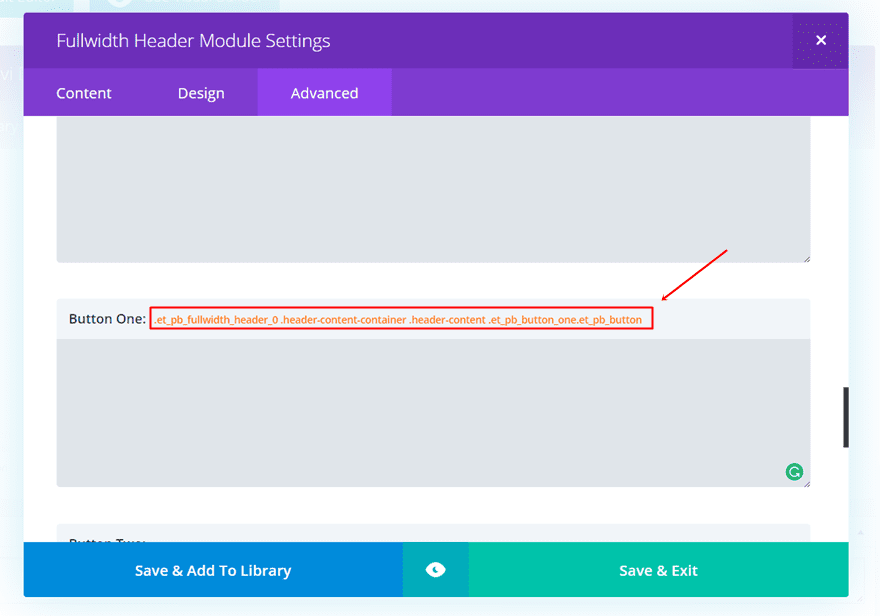
Create a fullwidth header or open the fullwidth header where you want to add the Trigger On Click opt-in form. Go to the Advanced tab of the Fullwidth header and scroll down until you come across the ‘Button One’. Click on the field and copy the CSS class assigned to the button.
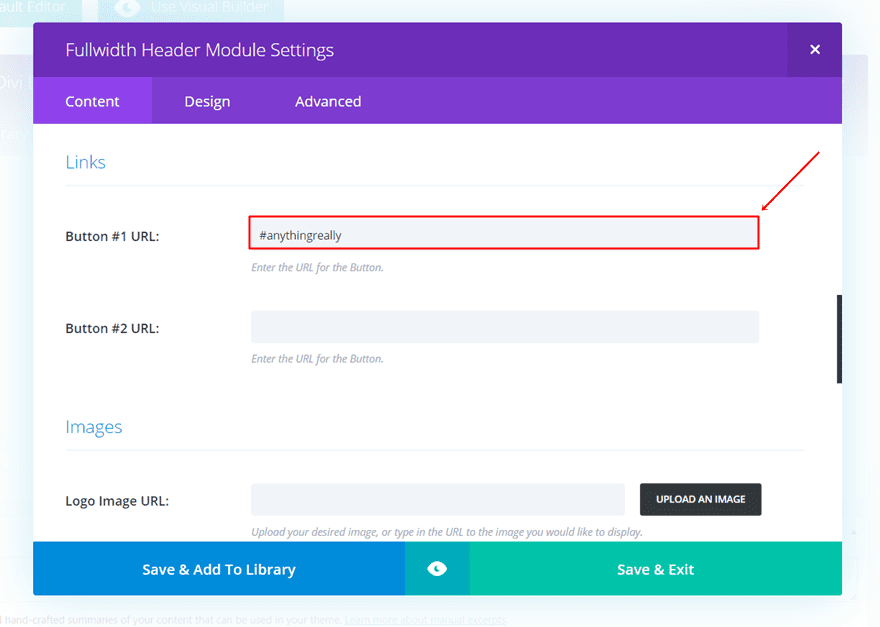
Then, go to the Content tab and type down the “#” symbol followed by anything else in the URL field of Button #1.
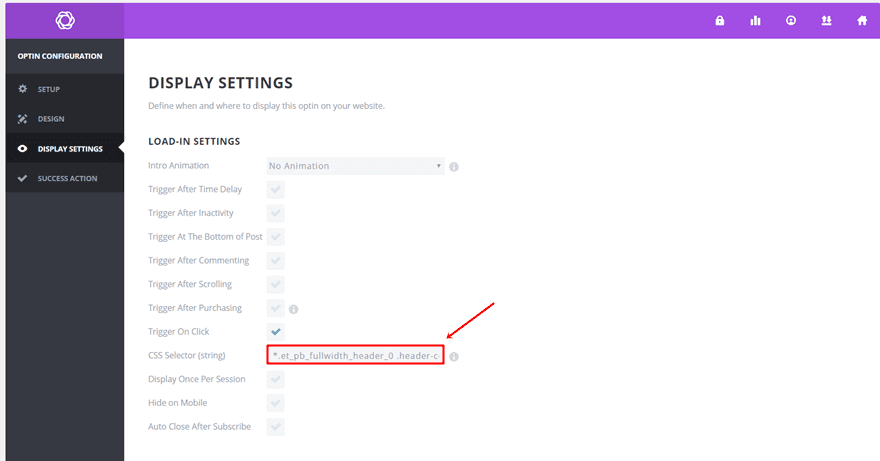
Finally, go to the Display Settings tab of your opt-in and type down the “*” symbol followed by the class you copied assigned to the button.
*.et_pb_fullwidth_header_0 .header-content-container .header-content .et_pb_button_one.et_pb_button
Final Thoughts
This tutorial should help you get started with triggers on click and the Bloom opt-in form. It might even make you reconsider the way you’re currently trying to gain subscribers or leads. If you have any questions or suggestions; feel free to leave a comment in the comment section below. And while you’re there; tell us in what cases you’d use the Trigger On Click opt-in form for.
Be sure to subscribe to our email newsletter and YouTube channel so that you never miss a big announcement, useful tip, or Divi freebie!
Featured Image by BarsRsind / shutterstock.com


“Go to the Advanced tab and scroll down. Click in the Main Element field and watch the CSS class assigned to the button appear. Copy the CSS class, we’ll need it right away.”
When I click in the main element field (in the Advanced tab, custom css) I don’t see the CSS class assigned…, nothing is shown…
You have to hover on the question mark icon to show the assigned CSS Class. Check this screenshot: https://i.imgur.com/Zoc29n9.png
Great, but how must I do if I want make the bloom opt in form popup when clicking not a simple button, but a Call to Action ?
Is possible do the same think using an image?
Do you guys have any instructions on how to do this if you’re not using Divi, just the bloom plug in?
Thank you! How would I do this if I don’t have Divi theme but have the Bloom plug-in?
Hi,
I cannot get it to work even though I have followed the instructions in the video – i think. When i click the button, it reloads the page, but no popup.
Can you guys help me out?
Many thanks
Ulrik
Thanks so much! I’m wondering, is it possible to use the same Css selector for a button module as well as a fullwidth header module? I’ve got this successfully set up on a button, but I’d like the same pop up to occur when someone clicks the button in my header module. However, I already have a css selector for the button, so I can’t paste the css selector that’s in the button for the fullwidth module. Do I need a whole separate opt in form?
Hi! I have the same issue. I set up this in a slider button but I also need the trigger in one of the sections of the header menu. I prefer to not create another opt in form, is it possible with the same opt in?
Hi, it’s great video. I’m just curious is it possible to put the divi contact form to popup as you use one of bloom default one?
I can see “Custom HTML form” in FORM INTEGRATION dropped down menu, but I’m not sure how to get HTML code from Divi contact form module, wich I already design.
Is it possible at all?
Great if the bloom plugin actually worked – see elegant themes support forums for all the unresolved problems since the last update. A post about how to fix these problems first may have been more timely.
This is awesome. I was trying to figure out how to do this a couple weeks ago, and put in on the backburner… Gonna have to go back and try again.
Brilliant! Very useful.
Very cool! Much nicer way of handling opt-in’s. I also like the idea of making it a quick pop-up contact form, especially, if we can use it as a quick quote form. Thanks for sharing!
Perfect, thank you! I´ve been waiting for this already. Is there an option also that a pop up is triggered on exit?
How about a button click triggers a contact form?
With the custom html form you can do basically anything you want.
Hope it helps
Great tip!
I was looking for this!
Thank you, very much!
Excellent article. I’ve successfully applied in the past the CSS ID method for buttons, but the CSS Class technique that you introduced in the post is also a solid way for triggering the Bloom forms in modules such as the full header.
Glad it helped, Jorge!
What’s a good way to display an email opt-in form, without scaring off readers? Is there an option to display it when the user is about to close the tab or press the back button?
Divi Overlays plugin if you want to attempt it.
Interesting. Bloom documentation says nothing about asterisk * sign and clicking trigger at all
https://www.elegantthemes.com/documentation/bloom/triggers/
Great! I’d been looking for something like this.
Glad it helped, Mikayla!
Cool!
Thanks for your comment, Helio!
Great tip! Didn’t know about that.
Thanks!
PS: Can you write an article about click on a button and open a modal window with a form? ==D
we have DIVI plugins for doing modals.
This is cool! Thanks so much. Does it work well on most browsers & browser versions?
You’re welcome! And yes, it should.