
This post is part 5 of 5 in our mini series titled 5 Fun Ways to Style Divi’s Audio Module. Thanks for following along. Stay tuned for our next miniseries full of Divi design goodness!
For those of you who are musicians, the inclusion of audio on your personal website is critical. Luckily, the Divi theme comes with an easy-to-use audio module you can add to your homepage (or any page) to share your latest tracks with visitors.
Today, we are going to be designing a Three Column “Heavy Metal” audio section that includes space for an audio player, a short bio, and a call-to-action button–in case you want to direct visitors to i-Tunes or Google Play to download your latest hits.
- 1 Today’s Before & After: The Divi Audio Module
- 2 How to Create a Themed Three Column “Heavy Metal” Audio Section with Divi’s Audio Module
- 3 The Concept & Inspiration
- 4 Preparing the Design Elements
- 5 Implementing the Design with Divi
- 6 Section Settings
- 7 Row Settings
- 8 Audio Module Settings
- 9 Text Module Settings
- 10 Call-To-Action Module Settings
- 11 Thanks For Following Along With My Audio Module Series!
Today’s Before & After: The Divi Audio Module
Because this tutorial includes multiple modules, it is important to first look at the audio module independently. This will not only familiarize you with the features and metadata included in the standard design, it will also serve as a useful standard against which to compare our jazzed-up design!
Here is the default version of the Divi audio module:

And here is the design concept we are going to be building today:
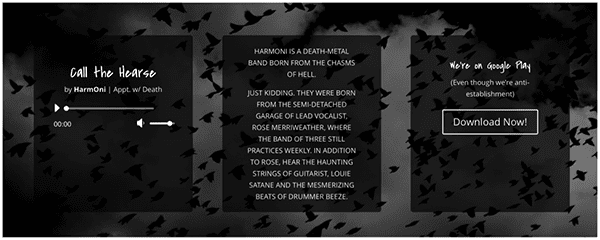
Just follow the steps I describe below to imitate this design. As always, you are free to use different image assets. In this example, I am building out my design based on the fictional heavy metal band, HarmOni.
How to Create a Themed Three Column “Heavy Metal” Audio Section with Divi’s Audio Module
Subscribe To Our Youtube Channel
The Concept & Inspiration
Don’t get me wrong. I love some saturated RBG from time-to-time, but there’s nothing like good ol’ black and white. Of course, I took that color palette to an extreme by embracing a macabre aesthetic. For your design, lighten the mood with photo assets of your choosing.
Preparing the Design Elements
Thanks to Divi’s built-in customization tools, this design only requires one image asset: the section background image. I used a photo I found on Unsplash, which you can download here. To ensure that the image still looks good on retina devices without dragging down your load times, I recommend sizing it to 1920 px by 1221 px in Photoshop or some other image-editing software.
Implementing the Design with Divi
The design we will be creating today can be tailored to any band or genre. Are you building a site for a Japanese Pop band? Consider substituting a background with cute emojis for the Hitchcock-inspired image I used here.
The design can also be used to showcase other types of audio media. If you run a podcast, for instance, upload your latest episode, write up a witty bio, and include a link to your blog in the call-to-action area. It’s ultimately a versatile concept, designed to provide users with a little context while they listen to your MP3.
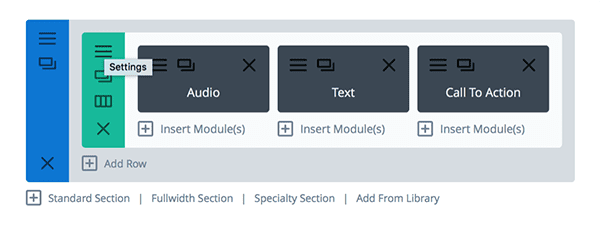
The architecture for this design is fairly straightforward. It is comprised of a single section, containing a single row. Be sure you set the row’s layout to the ⅓ – ⅓ – ⅓ selection–which is probably obvious given the title of this tutorial! Finally, each of the columns will hold one of the three modules: an audio module, a text module, and a call-to-action module. The order doesn’t matter; feel free to arrange them as you see fit.
Section Settings
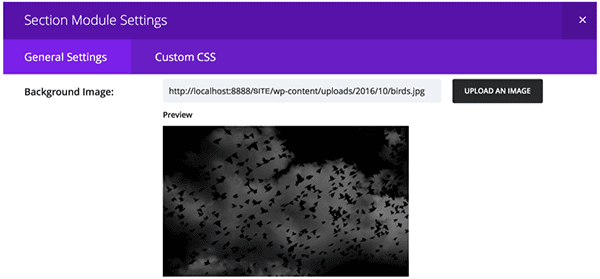
The section settings are straightforward and involve only the upload of a background image. (You can find the sinister photo I used here, but you can also browse a free stock photography site like Pexels or Unsplash to find one that better matches your own aesthetic.)
In the General Settings tab of your Section Settings, select the photo you want to use from your computer’s local Downloads folder and upload it.
Row Settings
Now that we have the section’s background set, it is time to customize the three-column row. Begin by opening the Row Settings window. Under the General Settings tab, toggle the button next to “Make This Row Fullwidth” to “Yes.” This will allow our row to extend the length of our viewport, giving us plenty of room to include three modules.
There are, however, some additional customizations we’ll need to make to the row before we can move onto the modules. Navigate to the Advanced Design Settings tab and, leaving the row’s background blank, scroll down to “Equalize Column Heights” and toggle the button to “Yes.”
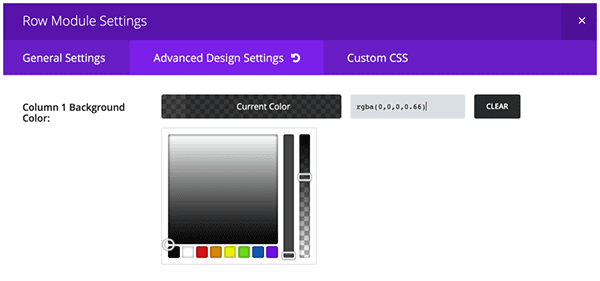
Remember that we decided to leave the row’s background color blank? That’s because we are going to be giving each of the columns its own background color. Within the Advanced Design Settings tab, scroll down until you come to Column 1, 2, and 3’s respective background color settings. As you can see, I used the rgba values of (0,0,0,.66)–intentionally setting my alpha value to reflect the demonic nature of my fictional band. This is another case in which you may want to select a different color palette (using the hue and opacity sliders) based on the brand or aesthetic you are trying to cultivate.
The final customizations we will be making to the columns are housed under the Custom CSS tab. To replicate the subtle, rounded corners of the columns, paste the following CSS in the Main Element text fields for each (Column 1 Main Element, Column 2 Main Element, and Column 3 Main Element).
border-radius: 5px;
Audio Module Settings
I chose to begin by inserting an Audio Module into the first column of my row, but you can start with whichever module you prefer. Next, bring up the Audio Module Settings window and, under the General Settings tab, upload your MP3 file and input the relevant data, like song title, artist name, and album name.
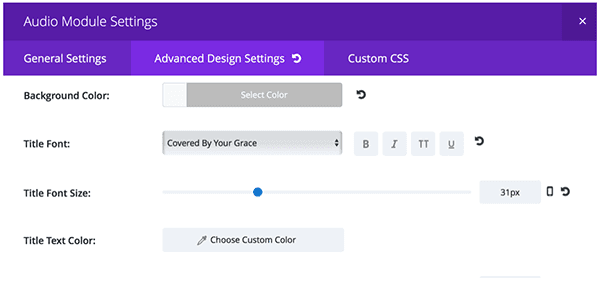
Next, we want to add some styling by navigating to the Advanced Design Settings tab. Remember, we already accomplished some styling under Row Settings–like selecting a background color and rounding the borders of the containing column. Here, either avoid setting a background color or ensure the opacity is at 0. (We don’t want anything interfering with the column’s background color.)
As you can see, I decided to adjust my typography to increase the “creep factor” of my design. I chose the macabre Covered by your Grace font, sized at 31px, but you can browse the library to find one that better fits your design.
Finally, remaining within the Advanced Design Settings tab, scroll down to the section labeled “Custom Margins.” Set the top margin to 30px. This pushes your audio player towards the middle of the column.
Text Module Settings
In the center column, insert a Text Module. I chose to use this text field for a short biography about HarmOni, but you can include any content relevant to your design. If you’re showcasing a podcast episode, for instance, you may want to type up a brief summary.
After inserting the module, open up the Text Module Settings window and, under the General Settings tab, type–or paste–the text you want to display. Above the text input box, you have the option to change the justification of your text; I centered it.
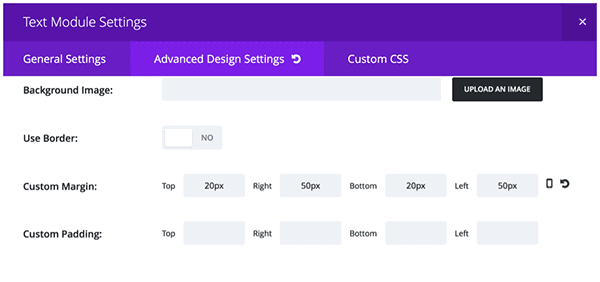
You’ll notice that, by default, your text is pushed to the very edges of the column’s boundaries. To adjust this, navigate to the Advanced Design Settings tab and scroll down to the section titled “Custom Margins.” I used 20px for my top and bottom margins and 50px for my left and right margins.
You’ll also notice that I chose to style my text, using all caps, because it seemed like the shouting-at-you kind of design choice that a heavy metal band would make.
Call-To-Action Module Settings
Lastly, we need to insert a call-to-action module into the last column of our row to encourage visitors to download your music or episode. In the General Settings window, input the headline you want to use; I chose “We’re on GooglePlay.” However, because I also wanted to add a sarcastic addendum (“even though we’re anti-establishment,”) I scrolled down a little farther to the text input field, where I typed out my message.
While you’re in the General Settings tab, don’t forget to add the URL to which your button will link, in addition to the text that will appear on the button itself. Without this information, no button will display on your page.
As previously, I also ensured that the option to include a background color was deselected.
There are also a few adjustments to the call-to-action module design that we will need to make under the Advanced Design Settings tab. First, I chose to have the Header Font mimic the one I used for the song title. Next, as with the audio module, I added a Custom Margin: 10px to the top.
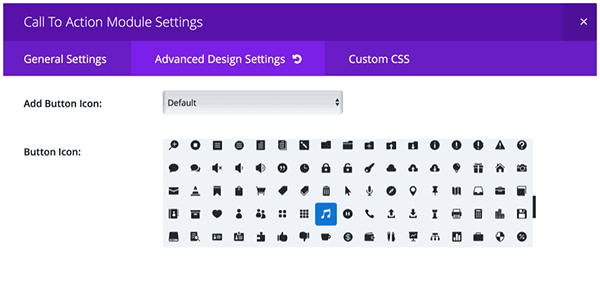
Lastly, just after the field for customizing the margins, look for the section titled “Use Custom Styles for Button.” When you toggle the option to “Yes,” additional customization options appear. You are welcome to style the CTA button however you like, but I decided to adhere to the ghostly-white default–with one exception. I selected a custom icon–a music note–to appear on hover.
When you’re finished, hit “Save and Exit” to view your masterpiece.
Now that you’re finished, scroll up and compare your tri-part audio player design with the default audio module, and appreciate the level of customization that’s possible with only a few tweaks and a touch of CSS!
Thanks For Following Along With My Audio Module Series!
It’s been a blast sharing a few tutorials with you all and I hope to share more in the future. Stay tuned for our next Divi miniseries, starting Monday. It’s by another new contributor to the Elegant Themes blog, John Donnellon, on the Divi Post Slider module. In it he will be taking five post slider designs popular blogs around the web and show you how to re-create them with Divi!
Be sure to subscribe to our email newsletter and YouTube channel so that you never miss a big announcement, useful tip, or Divi freebie!


we have to try some of the things i got here
Can the audio player have more than one track at a time, or can it be done?
these tutorials are awesome, but they lack the demo pages, people want to see the live demos, the final results before even try to do them by themselves, so please every post should come along with the live demo!
Never a better time to add a “Heavy Metal” audio section now that the new Metallica album is out:)
Post images broken on this post too
Images look good to me.
Thanks for the blog-post – I’ve got a client who’s going to want to post audio on their site, and this should be a good layout (minus the macabre-ness).
Thanks this helped a lot !